wiper fluid MERCEDES-BENZ E-CLASS ESTATE 2015 Owners Manual
[x] Cancel search | Manufacturer: MERCEDES-BENZ, Model Year: 2015, Model line: E-CLASS ESTATE, Model: MERCEDES-BENZ E-CLASS ESTATE 2015Pages: 497, PDF Size: 16.23 MB
Page 26 of 497

Vehicl
eidentificatio nnumber
see VIN
Vehicl eidentificatio nplate .............. 472
Vehicl elevel
AIRMATI C...................................... 231
Vehicl elevel (display message) ....... 315
Vehicl emaintenance
see ASSYST PLUS
Vehicl etoolkit.................................. 395
Vehicl eweigh ts................................. 481
Video
Operating the DVD ......................... 284
VIN
Sea t............................................... 472
Type plate ...................................... 472 W
Warning and indicator lamps ABS ................................................ 332
Brakes ........................................... 330
Distance warning signa l................. 338
ESP ®
.............................................. 333
ESP ®
OFF ....................................... 334
Fue ltank ........................................ 336
Genera lnotes ................................ 329
LIM (cruis econtrol) ........................ 212
LIM (DISTRONIC PLUS) .................. 219
LIM (variabl eSPEEDTRONIC )......... 215
Overview .......................................... 35
PASSENGER AIR BAG OFF ............... 45
Reserve fue l................................... 336
Sea tbelt. ....................................... 329
Tyre pressure monitor ................... 339
Warning triangle ................................ 394
Washer fluid
Displa ymessage ............................ 328
Wheel and tyre combinations
see Tyres
Wheel bolt tightenin gtorque ........... 430
Wheel chock ...................................... 427
Wheels
Changing awheel .......................... 426
Changing/replacing ....................... 426
Checking ........................................ 417
Cleaning ......................................... 388
Emergency spare whee l................. 465
Fitting anew whee l........................ 430 Fitting
awheel ............................... 426
Genera lnotes ................................ 431
Important safety notes .................. 416
Information on driving .................... 416
Removing awheel .......................... 429
Storing ........................................... 426
Tightening torque ........................... 430
Wheel size/tyre size ...................... 431
Windowbag
Operation ......................................... 52
Windows
Cleaning ......................................... 388
see Sid ewindows
Windscreen
Demisting ...................................... 164
Windscree nwasher fluid
see Windscree nwashe rs ystem
Windscree nwasher system
Important safety notes .................. 480
Topping up ..................................... 383
Windscree nwipers
Problem (malfunction) ................... 154
Rear window wipe r........................ 152
Replacing the wipe rblade s............ 152
Switching on/of f........................... 151
Winter operation
Important safety notes .................. 418
Radiato rcove r............................... 380
Slippery roa dsurfaces ................... 211
Snow chains .................................. 419
Winter tyres
Limiting the speed (on-board com-
puter) ............................................. 292
M+S tyre s...................................... 418
Wipe rblades
Cleaning ......................................... 389
Important safety notes .................. 152
Replacing (o nthe rea rwindow )..... 153
Replacing (windscreen) .................. 152
Wooden trim (cleaning instruc-
tions) .................................................. 392
Workshop
see Qualifie dspecialist workshop Z
ZONE function Switching on/of f........................... 164 Index
23
Page 154 of 497

X
Insert bulbh older;into the lamp and turn
it clockwise.
X Align housing cover :and turn it clock-
wise until it engages.
Turn signal lamps (static LED head-
lamps) X
Switch off the lights.
X Open the bonnet.
X Turn housing cover :anti-clockwise and
pullito ut.
X Turn bulbh older;anti-clockwise and pull
it out.
X Take the bulbo ut of bulbholder;.
X Insert the new bulbi nto bulbholder;.
X Insert bulbh older;into the lamp and turn
it clockwise.
X Align housing cover :and turn it clock-
wise until it engages. Windscreen wipers
Switching the windscreen wipers on/
off
! Do not operate the windscree
nwipers
when the windscree nisdry, as this could
damage the wiper blades. Moreover, dust
that has collected on the windscree ncan
scratch the glass if wiping takes place when the windscree nisdry.
If it is necessary to switch on the wind-
screen wipers in dry weather conditions,
alwayso perate them using washer fluid. !
If the windscree
nwipers leave smears on
the windscree nafter the vehicle has been
washed in an automatic car wash, this may
be due to wax or other residue. Clean the
windscree nwith washer fluida fter an auto-
matic car wash.
! Intermittent wiping with rain sensor: due
to optical influences and the windscreen
becoming dirty in dry weather conditions,
the windscree nwipers may be activated
inadvertently .This could damage the wind-
screen wiper blades or scratch the wind-
screen.
For this reason, you shoulda lwaysswitch
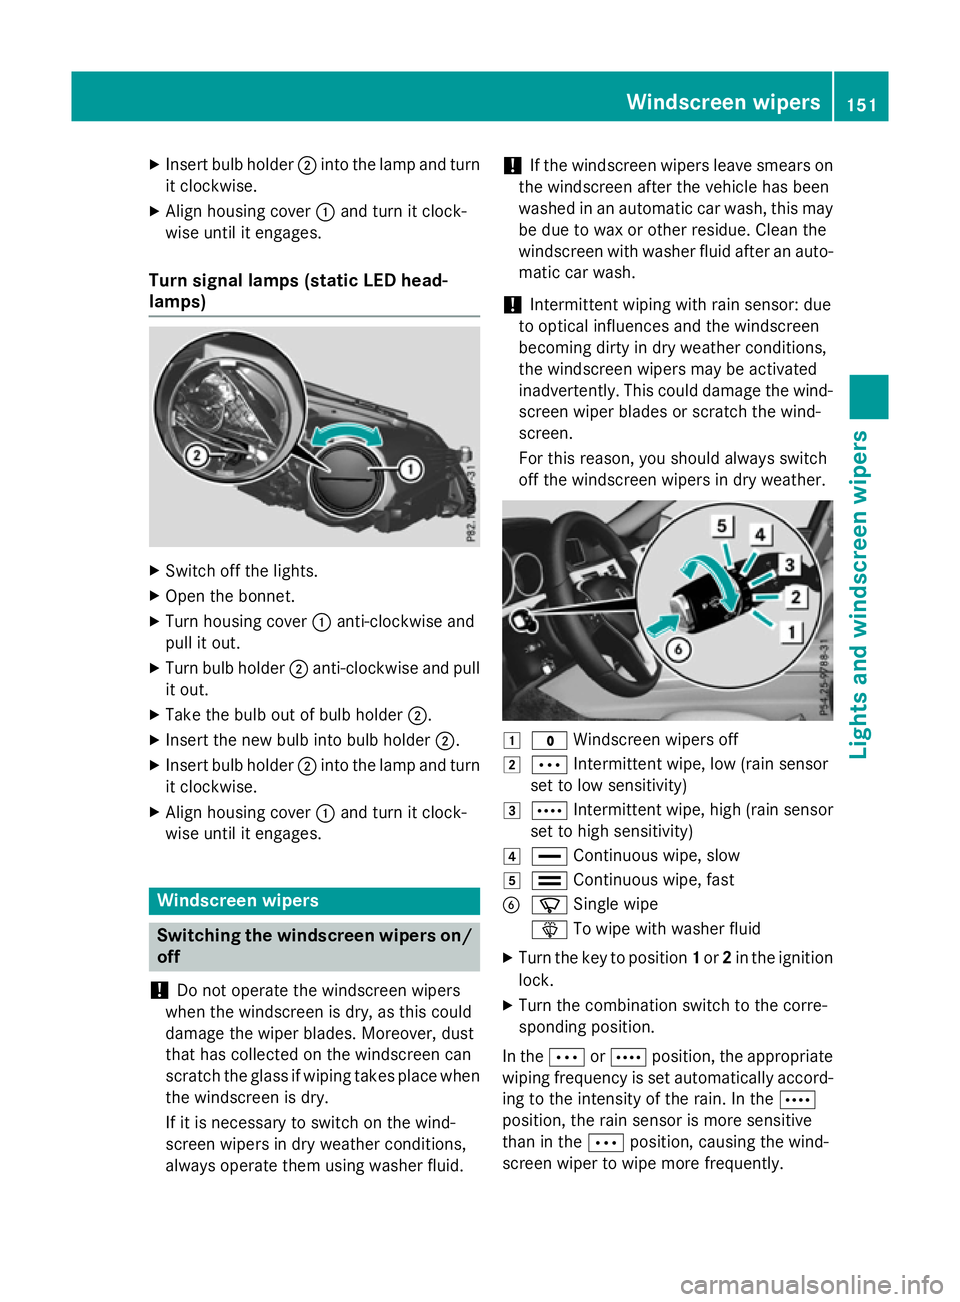
off the windscree nwipers in dry weather. 1
$ Windscreen wipers off
2 Ä Intermittent wipe, low (rains ensor
set to low sensitivity)
3 Å Intermittent wipe, high (rains ensor
set to high sensitivity)
4 ° Continuou swipe, slow
5 ¯ Continuou swipe, fast
B í Single wipe
î To wipew ith washer fluid
X Turn the key to position 1or 2in the ignition
lock.
X Turn the combination switch to the corre-
sponding position.
In the ÄorÅ position, the appropriate
wiping frequency is set automaticall yaccord-
ing to the intensity of the rain. In the Å
position, the rain sensor is more sensitive
than in the Äposition, causing the wind-
screen wiper to wipem ore frequently. Windscreen wipers
151Lights and windscreenw ipers Z
Page 155 of 497

If the wiper blades are worn, the windscreen
willnol onger be wiped properly. This could
prevent you from observing the traffic condi-
tions. Switching the rear window wipero
n/
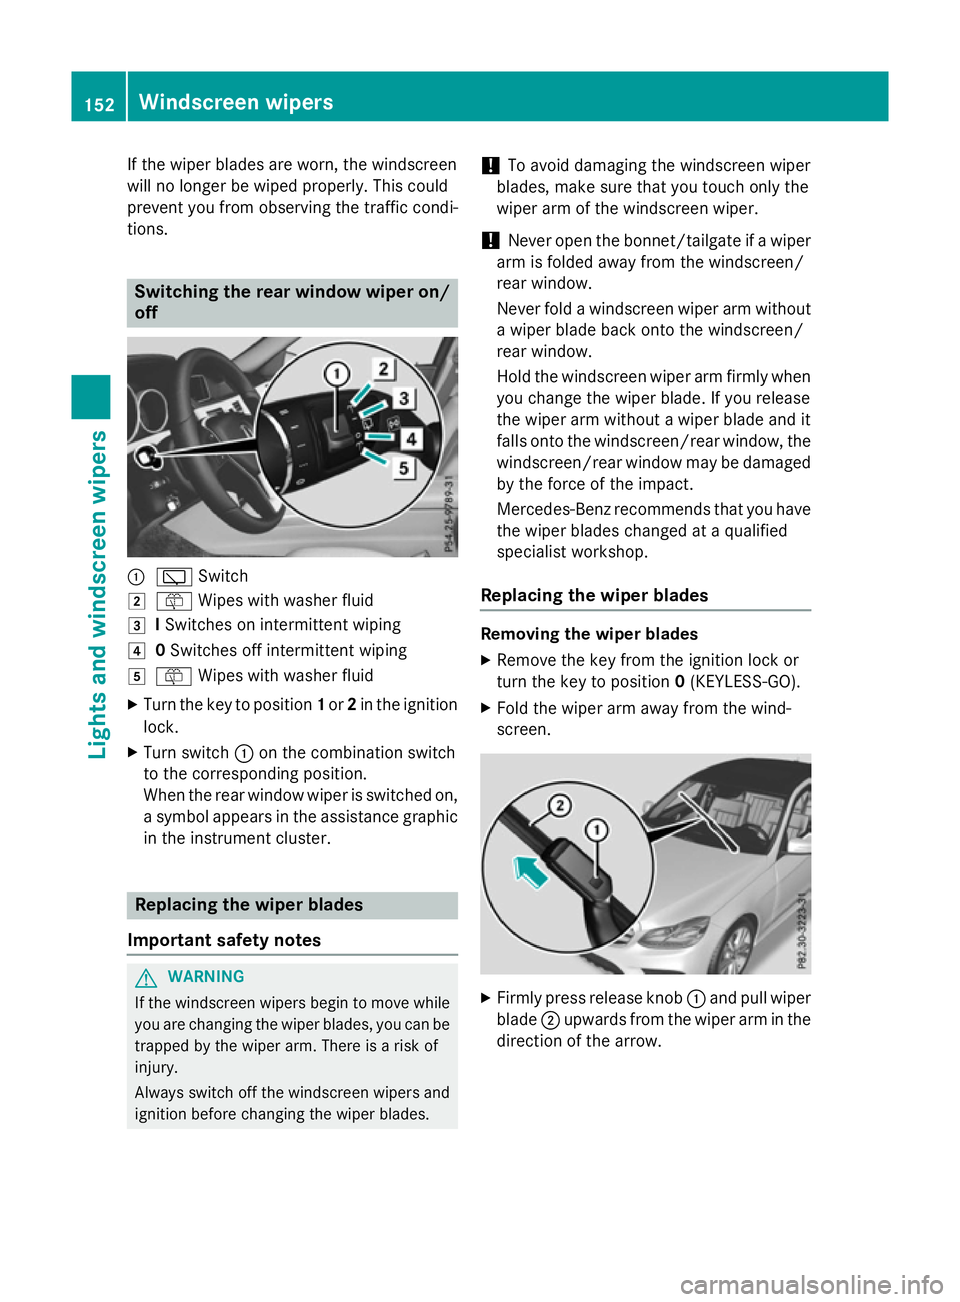
off :
è Switch
2 ô Wipesw ith washer fluid
3 ISwitches on intermittent wiping
4 0Switches off intermittent wiping
5 ô Wipesw ith washer fluid
X Turn the key to position 1or 2in the ignition
lock.
X Turn switch :on the combination switch
to the corresponding position.
When the rear window wiper is switched on,
as ymbola ppears in the assistance graphic
in the instrument cluster. Replacing the wiperb
lades
Important safety notes G
WARNING
If the windscree nwipers begintom ove while
you are changing the wiper blades, you can be trapped by the wiper arm. There is arisk of
injury.
Alwayss witch off the windscree nwipers and
ignition before changing the wiper blades. !
To avoid damaging the windscree
nwiper
blades, make sure that you touch only the
wiper arm of the windscree nwiper.
! Never open the bonnet/tailgate if
awiper
arm is folded awayf rom the windscreen/
rear window.
Never fold awindscree nwiper arm without
aw iper blade back onto the windscreen/
rear window.
Hold the windscree nwiper arm firmly when
you change the wiper blade. If you release
the wiper arm withou tawiper blade and it
fallso nto the windscreen/rear window ,the
windscreen/rear window may be damaged
by the force of the impact.
Mercedes-Benz recommends that you have
the wiper blades changed at aqualified
specialist workshop.
Replacing the wiperb lades Removing the wiperb
lades
X Remove the key from the ignition lock or
turn the key to position 0(KEYLESS-GO).
X Fold the wiper arm awayf rom the wind-
screen. X
Firmly press release knob :and pullw iper
blade ;upwards from the wiper arm in the
direction of the arrow. 152
Windscreen wipersLights and windscreenw
ipers
Page 391 of 497

Scratches, corrosiv
edeposits, areas affected
by corrosio nand damag ecaused by inade-
quate care canno talway sbec ompletely
repaired .Insuchc ases, visit aquali fied spe-
cialist workshop.
X Remove impuritie simmediately, where
possible ,whilst avoiding rubbing too hard.
X Soa kinsect remains with insect remover
and rins eoff the treated areas afterwards.
X Soa kbirdd ropping swithw ater and rinse
off the treated areas afterwards.
X Remove coolant, brake fluid ,tree resin,
oils, fuels and greases by rubbing gently
with acloth soaked in petroleu metheror
lighte rfluid.
X Use tar remover to remove tar stains.
X Use silicone remover to remove wax.
Care and treatment of matt paintwork !
Neve
rpolish the vehicl eorthe light alloy
wheels. Polishing make sthe paintwork
shiny.
! The following may cause the paint to
become shiny and thu sreduce the matt
effect:
R Vigorous rubbing with unsuitable mate-
rials.
R Frequent us eofcar washes.
R Washing the vehicl eindirect sunlight.
! Neve
ruse paint cleaner, buffing or pol-
ishing products, or gloss preserver, e.g.
wax. These products are onl ysuitabl efor
high-gloss surfaces. Their us eonvehicles
with matt finish lead stoconsiderable sur-
face damag e(shiny ,spotted areas).
Alway shavep aintwork repairs carrie dout
at aq uali fied specialist workshop.
! Do not us
ewashp rograms with ahot wax
treatment under any circumstances.
Observe thes enotes if your vehicl ehas a
clear matt finish. Thi swillh elpy ou to avoid
damag etothe paintwork du etoincorrect
treatment. These notes also appl
ytolight-alloy wheels
with aclear matt finish.
i The vehicl
eshoul dpreferabl ybewashed
by hand using asoft sponge, car shampoo
and plenty of water.
i Use onl
yinsect remover and car shampoo
from the rang eofrecommended and
approved Mercedes-Benz care products. Cleanin
gvehicle parts
Cleanin gthe wheels G
WARNING
The water jet of circular-jet nozzle s(dirt grind-
ers )can cause damag enot visible from the
outsid etotyresorc hassi scomponents .Com-
ponents damaged in this wa ycan unexpect-
edly fail. There is ariskofana ccident.
Do not us ehigh-pressure cleaners with circu-
lar-jet nozzle stoclean the vehicle. Hav edam-
aged tyre sorchassiscomponents replaced
immediately.
! Do not us
eacidi cwheel cleaning products
to remove brake dust. Thi scould damage
wheel bolts and brake components.
! Do not park up the vehicl
efor an extended
perio dstraight afte rcleaning it, particularly
afte rhaving cleane dthe wheel swithw heel
cleaner. Wheel cleaners could cause
increased corrosio nofthe brake discs and
brake pads/linings. For this reason, you
shoul ddrive for afew minutes afte rclean-
ing .Braking heats the brake discs and the
brake pads/linings, thu sdrying them. The
vehicl ecan then be parked up.
Cleanin gthe windows G
WARNING
If the windscreen wipers are set in motion
when cleaning the windscreen or wiper
blades, yo ucould become trapped. There is a
danger of injury. 388
CareMaintenanc
eand care