lights MERCEDES-BENZ E-CLASS ESTATE 2015 Owner's Manual
[x] Cancel search | Manufacturer: MERCEDES-BENZ, Model Year: 2015, Model line: E-CLASS ESTATE, Model: MERCEDES-BENZ E-CLASS ESTATE 2015Pages: 497, PDF Size: 16.23 MB
Page 99 of 497
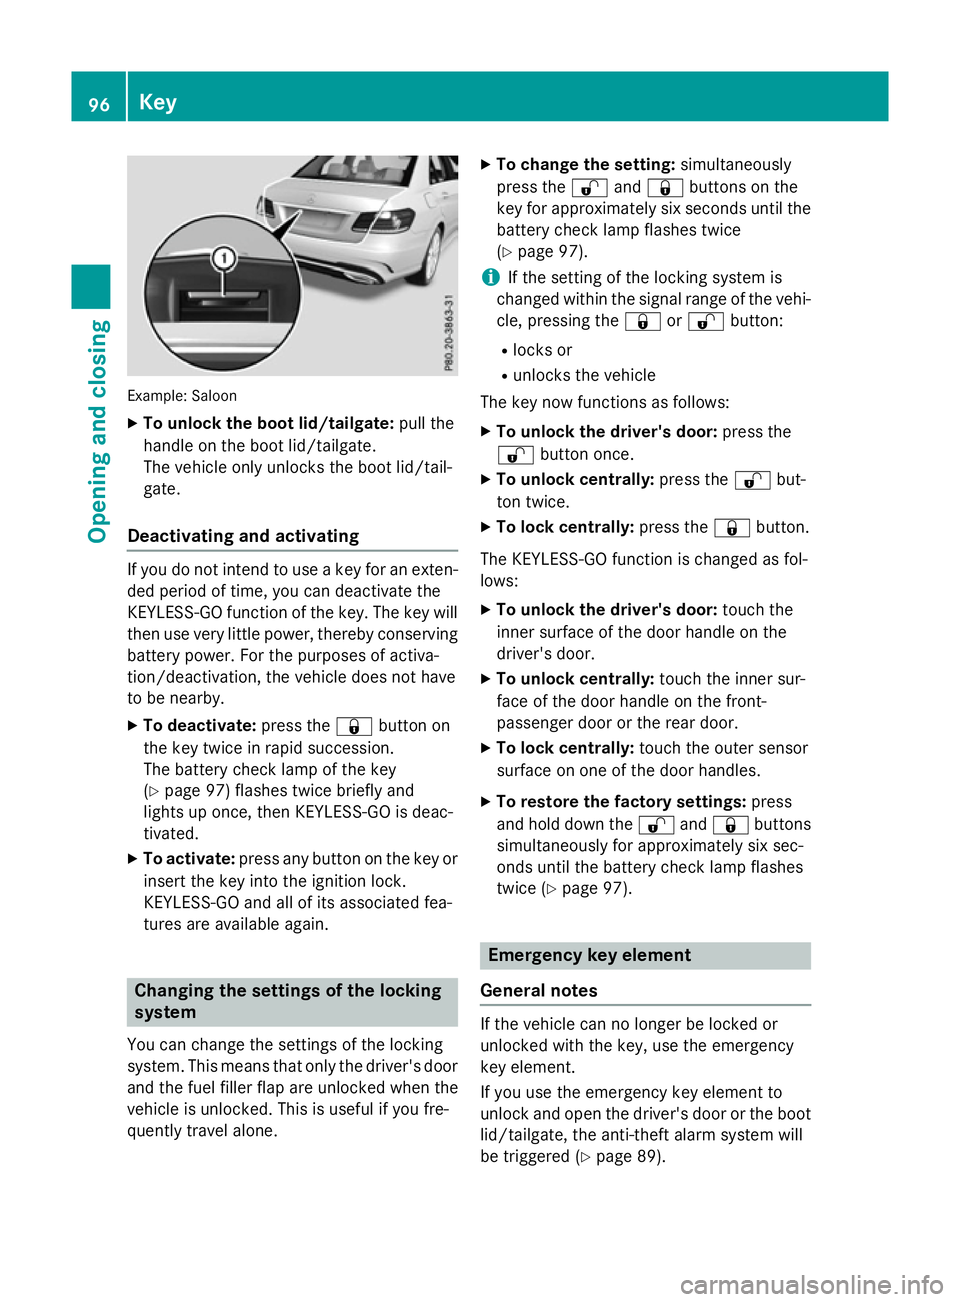
Example: Saloon
X To unloc kthe boot lid/tailgate: pull the
handl eont he boot lid/tailgate.
The vehicl eonlyu nlocks the boot lid/tail-
gate.
Deactivatin gand activating If yo
udon ot intend to us eakey for an exten-
de dp eriodoft ime,you can deactivate the
KEYLESS-GO functio nofthe key .The key will
then us everyl ittle power, thereb yconserving
battery power. For the purposes of activa-
tion/deactivation, the vehicl edoesn ot have
to be nearby.
X To deactivate: press the&button on
the key twice in rapi dsuccession.
The battery check lamp of the key
(Y page 97 )flashe stwice briefl yand
lights up once ,then KEYLESS-GO is deac-
tivated.
X To activate: press any button on the key or
insert the key into the ignition lock.
KEYLESS-GO and al lofits associate dfea-
tures ar eavailable again. Changin
gthe settings of the locking
system
Yo uc an change the settings of the locking
system .Thism eans tha tonlyt he driver's door
and the fuel fille rflapa reunlocke dwhent he
vehicl eisunlocked. Thi sisusefulify oufre-
quentl ytravel alone. X
To chang ethe setting: simultaneously
press the %and& buttons on the
key for approximatel ysixsecond suntilthe
battery check lamp flashe stwice
(Y page 97).
i If the setting of the locking system is
change dwithi nt he signa lran ge of the vehi-
cle ,pressing the &or% button:
R locks or
R unlocks the vehicle
The key now functions as follows:
X To unloc kthe driver' sdoor: press the
% button once.
X To unloc kcentrally: press the %but-
ton twice.
X To lock centrally: press the&button.
The KEYLESS-GO functio nisc hange dasfol-
lows:
X To unloc kthe driver' sdoor: touch the
inne rsurface of the door handl eonthe
driver's door.
X To unloc kcentrally: touch the inne rsur-
face of the door handl eonthe front-
passenge rdoorort he rea rdoor.
X To lock centrally: touch the outer sensor
surface on one of the door handles.
X To restore the factory settings: press
and hol ddownthe % and& buttons
simultaneously for approximatel ysixsec-
ond suntilthe battery check lamp flashes
twice (Y page 97). Emergenc
ykeyelement
General notes If the vehicl
ecan no longe rbelocked or
unlocke dwitht he key ,use the emergency
key element.
If yo uusethe emergency key element to
unlock and open the driver's door or the boot
lid/tailgate, the anti-thef talarm system will
be triggered (Y page 89).96
KeyOpening and closing
Page 100 of 497
There are several ways to deactivate the
alarm:
X To deactivat ethe alarmw ith the key:
press the %or& button on the key.
or
X Insert the key into the ignition lock.
or X To deactivat ethe alarmw ith KEYLESS-
GO: press the Start/Stop button in the igni-
tion lock. The key must be in the vehicle.
or
X Lock or unlock the vehicle using KEYLESS-
GO. The key must be outside the vehicle.
If you unlock the vehicle using the emergency
key element, the fuel filler flap will not be
unlocked automatically.
X To unlock the fuel filler flap: insert the
key into the ignition lock.
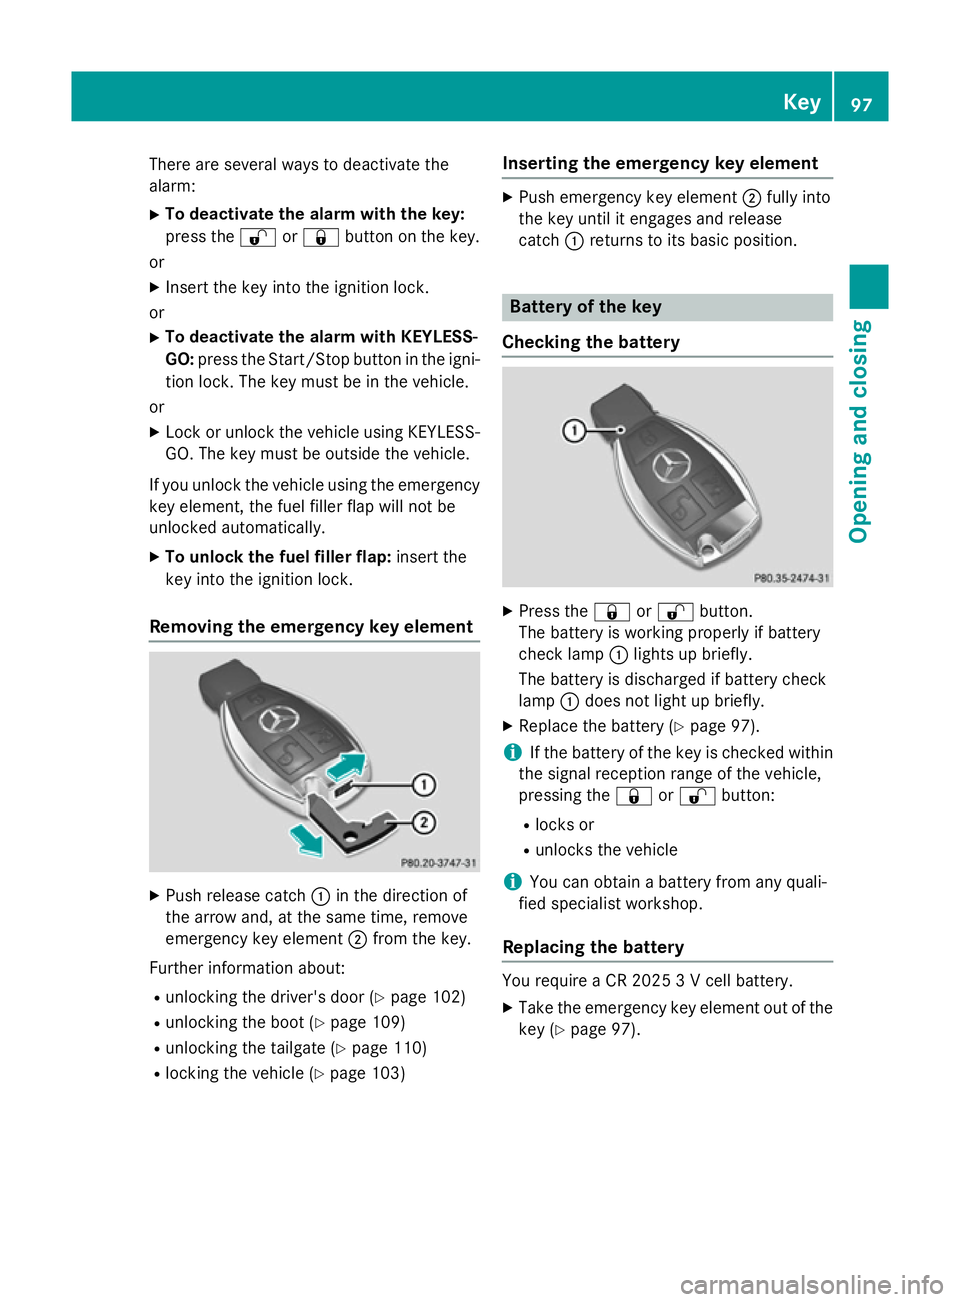
Removing the emergency key element X
Push release catch :in the direction of
the arrow and, at the same time, remove
emergenc ykey element ;from the key.
Further information about: R unlockin gthe driver's door (Y page 102)
R unlockin gthe boot (Y page 109)
R unlockin gthe tailgate (Y page 110)
R lockin gthe vehicle (Y page 103) Inserting the emergency key element X
Push emergenc ykey element ;fully into
the key until it engages and release
catch :return stoits basic position. Battery of the key
Checking the battery X
Press the &or% button.
The battery is working properly if battery
check lamp :lights up briefly.
The battery is discharged if battery check
lamp :does not light up briefly.
X Replace the battery (Y page 97).
i If the battery of the key is checked within
the signal reception range of the vehicle,
pressing the &or% button:
R locks or
R unlocks the vehicle
i You can obtain
abattery from any quali-
fied specialist workshop.
Replacing the battery You require
aCR20253Vc ell battery.
X Take the emergenc ykey element out of the
key (Y page 97). Key
97Opening and closing Z
Page 137 of 497
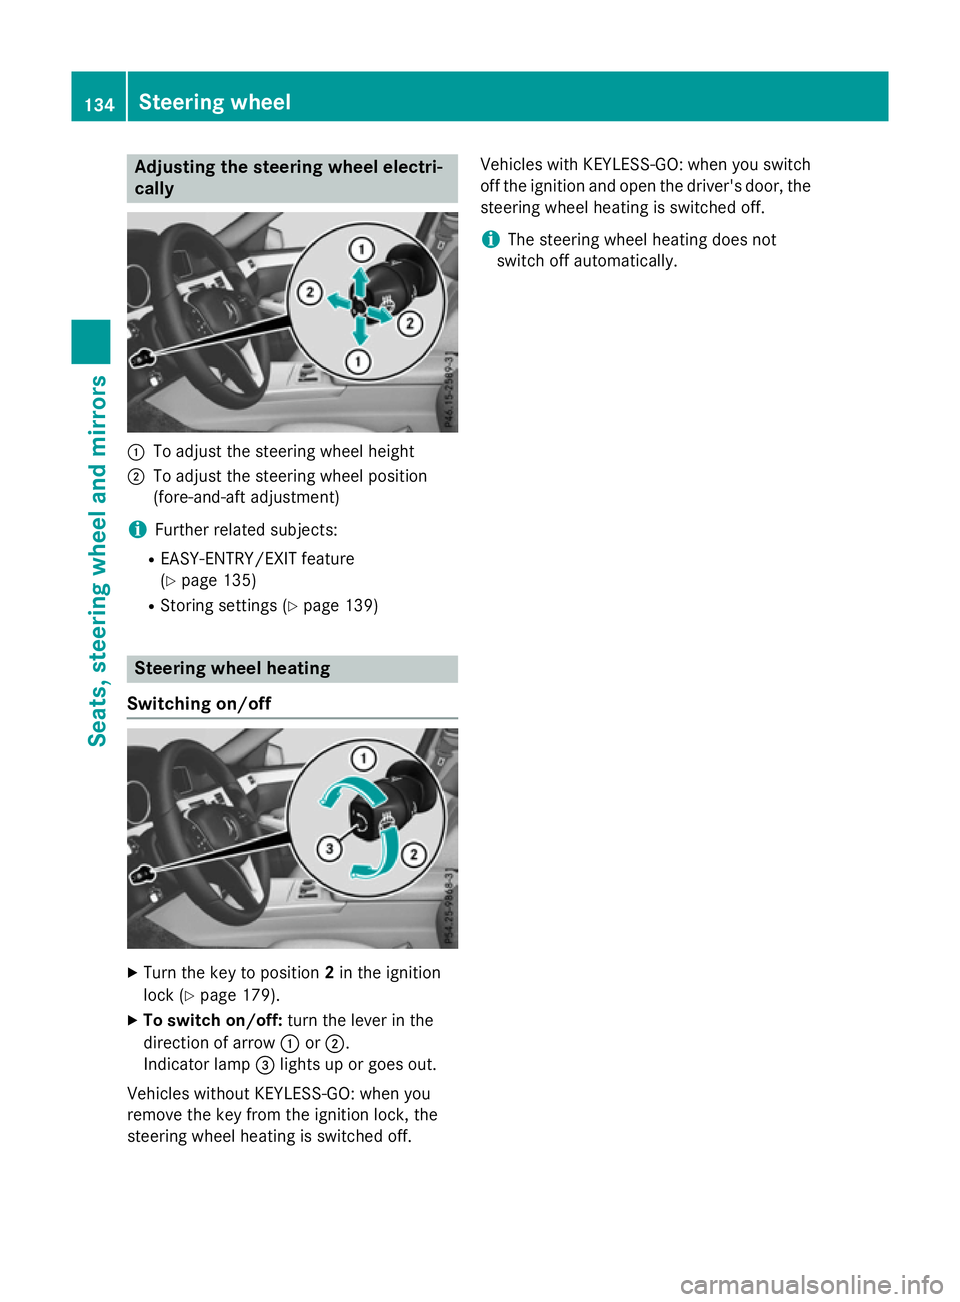
Adjusting th
esteering wheel electri-
cally :
To adjust th esteering whee lheight
; To adjust th esteering whee lposition
(fore-and-af tadjustment)
i Further relate dsubjects:
R EASY-ENTRY/EXIT feature
(Y page 135)
R Storing setting s(Ypage 139) Steering wheel heating
Switchin gon/off X
Turn th ekeyto position 2in th eignition
loc k(Ypage 179).
X To switch on/off: turnthe lever in the
direction of arrow :or;.
Indicato rlamp =lights up or goes out.
Vehicles without KEYLESS-GO :when you
remove th ekeyfrom th eignition lock, the
steering whee lheating is switched off. Vehicles wit
hKEYLESS-GO :when you switch
off th eignition and open th edriver' sdoor ,the
steering whee lheating is switched off.
i The steering whee
lheating does not
switch off automatically. 134
Steering wheelSeats
,steering wheel and mirrors
Page 139 of 497
If you close the driver's door with the key
inserted in the ignition lock, the steering
wheelisa utomaticall ymoved to the previ-
ouslys et position.
The last positio nofthe steering wheelis
stored when you switch off the ignition or
when you store the setting with the memory
function (Y page 139).
Crash-responsive EASY-EXIT feature If the crash-responsive EASY-EXIT feature is
triggered in an accident, the steering column
willm ove upwards when the driver's door is
opened. This occurs irrespective of the posi-
tion of the key in the ignition lock. This makes it easier to exit the vehicle and rescue the
occupants.
The crash-responsive EASY-EXIT feature is
only operational if the EASY-EXIT/ENTRY fea-
ture is activated in the on-board computer
(Y page 294). Mirrors
Rear-view mirror
X
Anti-dazzle mode: pivot anti-dazzle
switch :forward sorback. Exterio
rmirrors
Adjusting the exterio rmirrors G
WARNING
You could lose control of the vehicle while
driving if you:
R adjust the driver's seat, steering wheelor
mirrors
R fasten the seat belt
There is arisk of an accident.
Adjust the driver's seat, head restraint, steer-
ing wheela nd mirrors and fasten yours eat
belt before starting the engine. G
WARNING
The exterior mirrors reduce the size of the
image.O bjects visible in the mirrors are
closer than they appear. You could misjudge
the distance from road users driving behind
you when changing lanes, for instance. There is ar isk of an accident.
You shouldt herefore always look over your
shoulder to determine the actual distance
from road users driving behind you. X
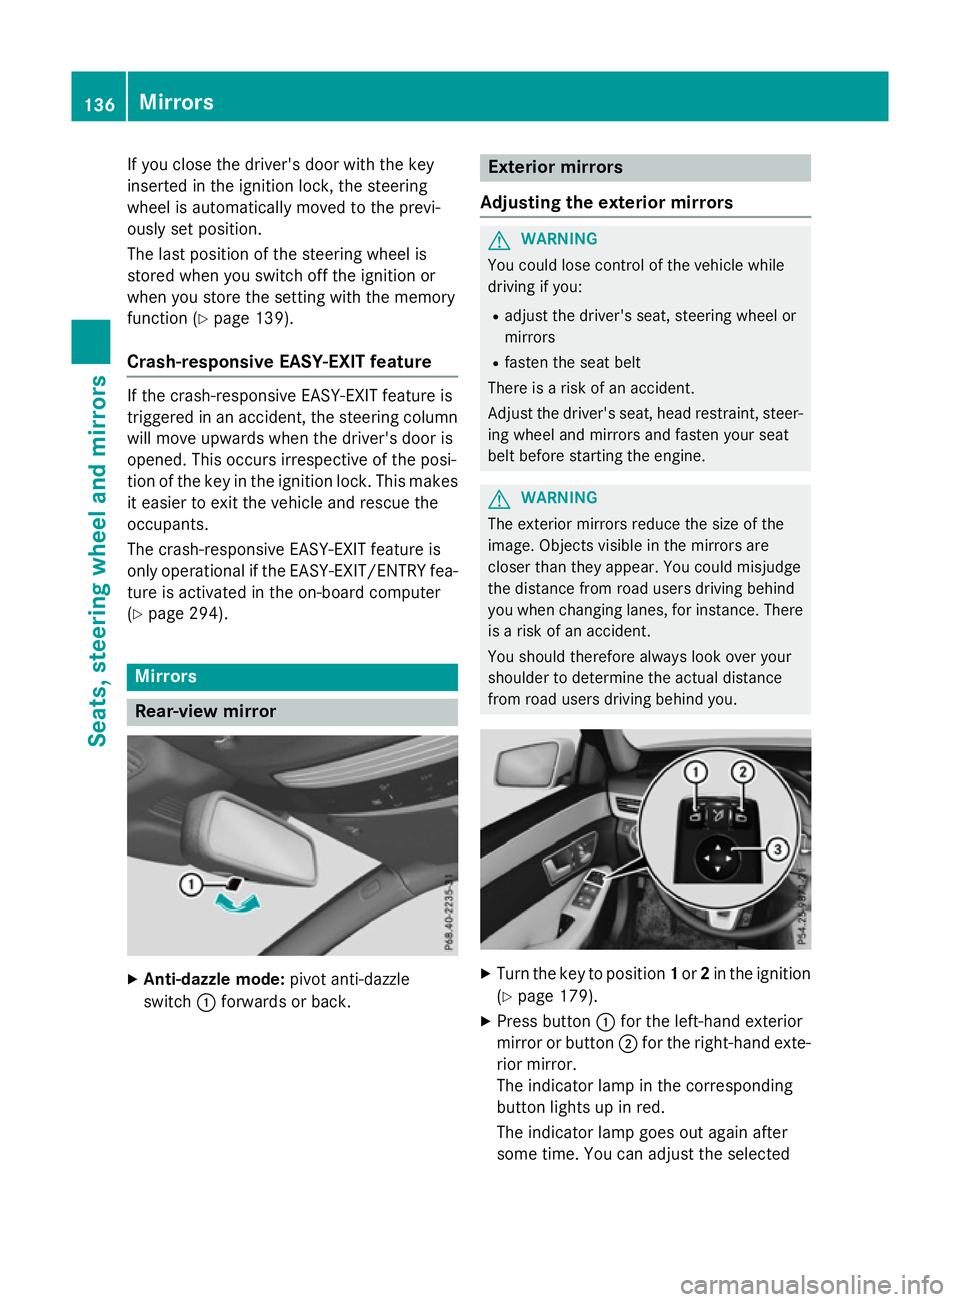
Turn the key to position 1or 2in the ignition
(Y page 179).
X Press button :for the left-hand exterior
mirror or button ;for the right-hand exte-
rior mirror.
The indicator lamp in the corresponding
button lights up in red.
The indicator lamp goes out again after
some time. You can adjustt he selected136
MirrorsSeats, steeringw
heel and mirrors
Page 144 of 497
Useful information
............................142
Exterior lighting ................................ 142
Interior lighting ................................. 148
Replacing bulbs ................................. 149
Windscreen wipers ...........................151 141Lights and windscreen wipers
Page 145 of 497
Useful information
i This Owner's Manual describes all mod-
els, series and optional equipment for your
vehicle that were available at the time of
going to press. National variation sare pos-
sible. Not ethat your vehicle may not be
equipped with all of the function sdescri-
bed. This is also the case for system sand
function srelevan ttosafety.
i Read the information on qualified special-
ist workshops: (Y page 27). Exterior lighting
Genera
lnotes
For reason sofsafety, Mercedes-Benz recom-
mends that you drive with the lights switched
on even during the daytime. Therefore, your
vehicle is equipped with special daytime driv- ing lamps. In some countries, operation of the
headlamps varies due to legal requirements
and self-imposed obligations. Driving abroad
Genera lnotes If your journey takes you to countries where
vehicles are driven on the opposite side of the
road to the country in which the vehicle is
registered, your headlamps must be switched to symmetrical dipped beam as soon as pos-sible after crossing the border (exception:
vehicles with static LED headlamps). This pre-
vent soncoming traffic from being dazzled.
Symmetrical lights do not illuminate as large
an area of the edge of the carriageway.
Vehicles with static LED headlamps It is not necessary to switc
hyour headlamps
to symmetrical dipped beam when drivin gin
countries where vehicles are driven on the
opposite side of the road to the country in
which the vehicle is registered. Legal require- ment
sare fulfilled without switching the
headlamps to symmetrical dipped beam.
Vehicles with Intelligent Light System X
Before crossing the border, set the head-
lamps to symmetrical dipped beam and
after returnin gback to asymmetrical
dipped beam via the "Dipped-beam head-
lamps for drivin gonthe right/left "function
in the on-board computer (Y page 291).
If the headlamps are converted to symmetri-
cal dipped beam, the "motorway mode" and
"extended range foglamps" function sare not
available. Setting the exterior lighting
Setting options Exterior lightin
gcan be set by:
R using the light switch
R using the combination switch
(Y page 144)
R using the on-board computer
(Y page 290)
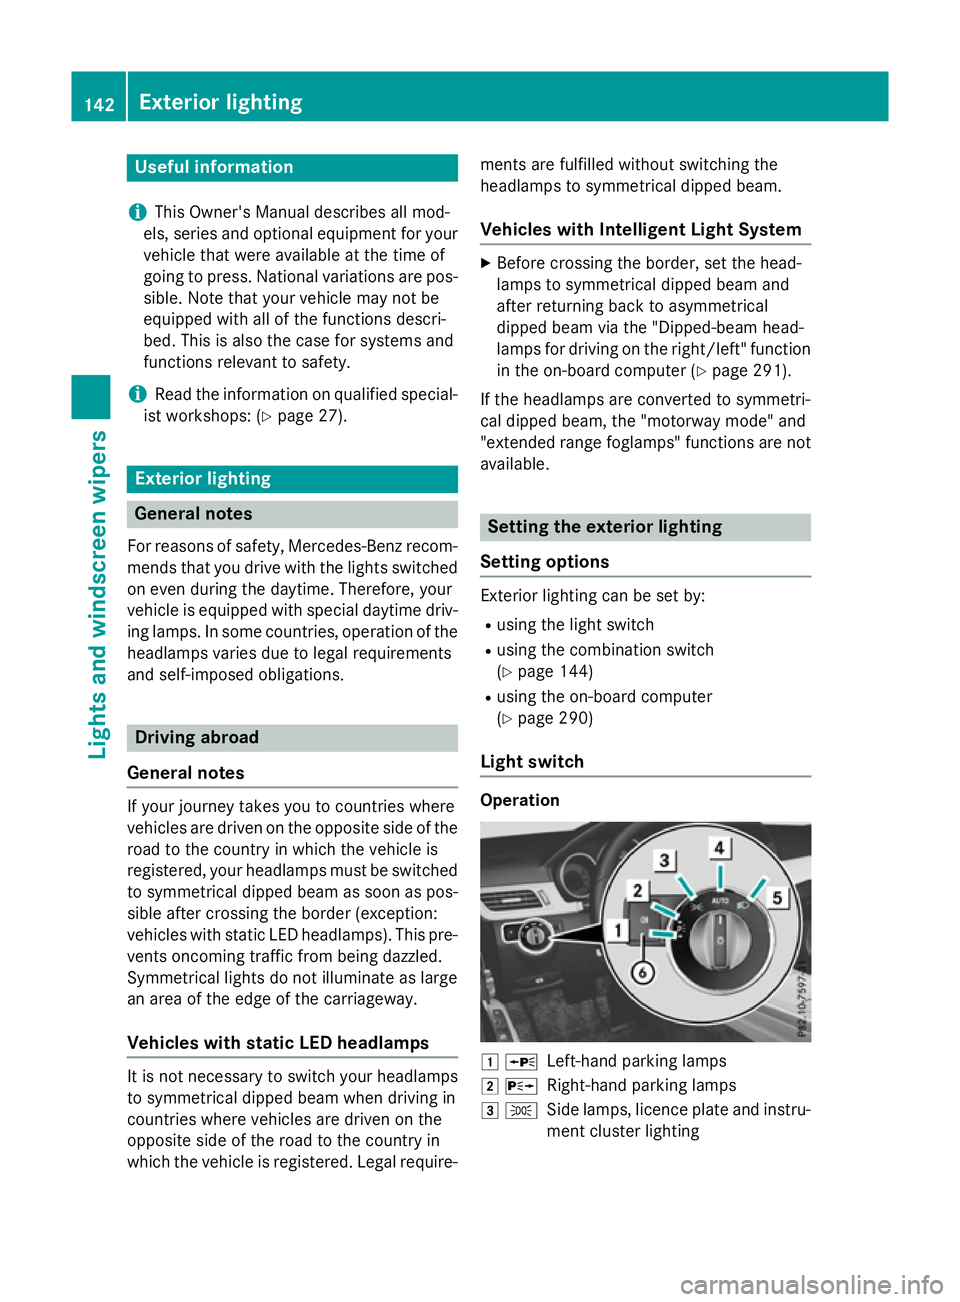
Light switch Operation
1
W
Left-han dparkin glamps
2 X
Right-hand parkin glamps
3 T
Side lamps, licenc eplate and instru-
ment cluster lighting 142
Exterior lightingLights and windscreen wipers
Page 146 of 497
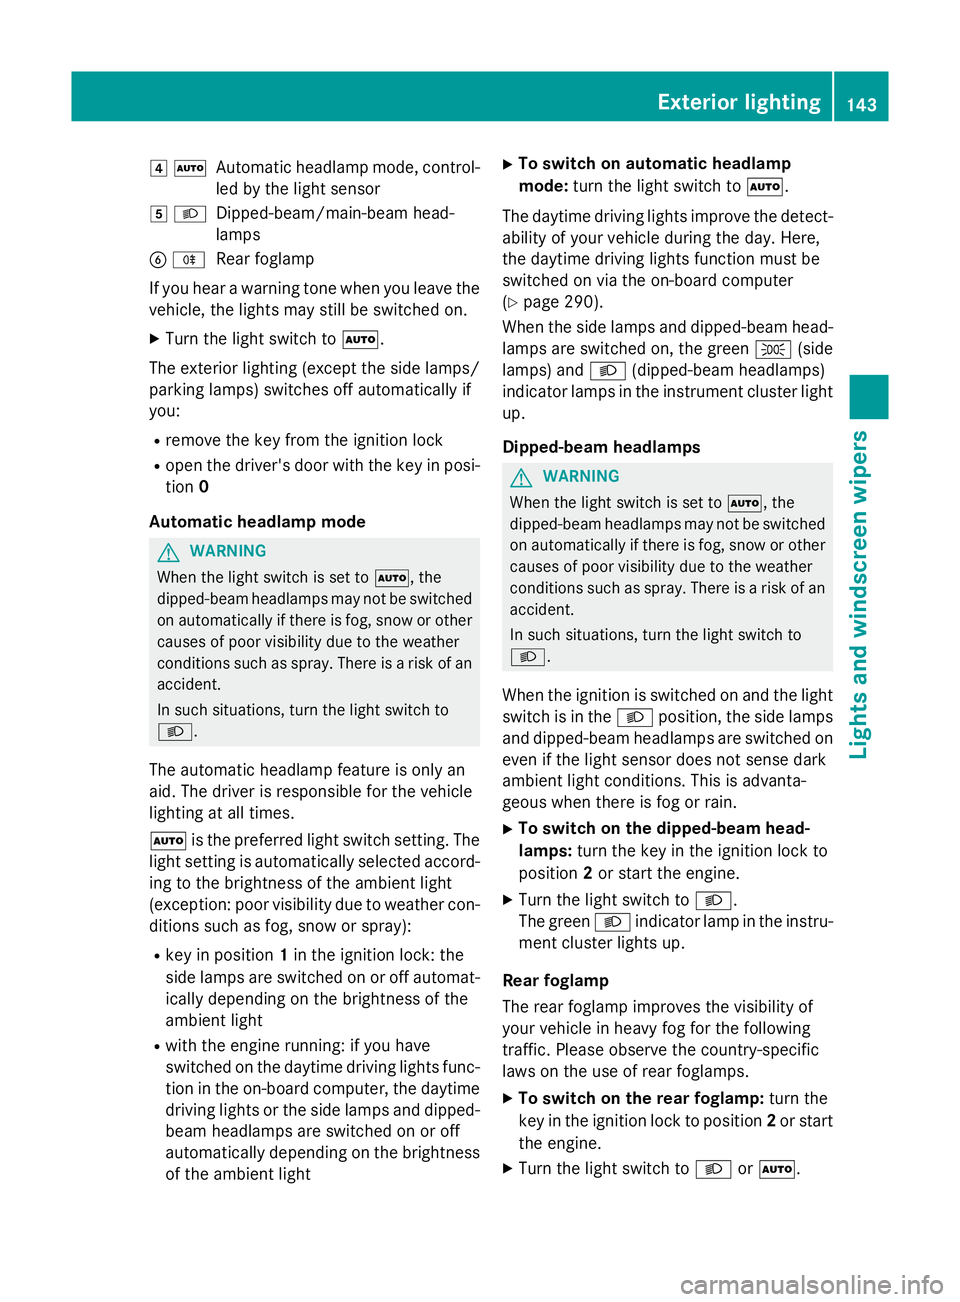
4
Ã
Automatic headlamp mode, control-
le dbyt he light sensor
5 L
Dipped-beam/main-bea mhead-
lamps
B R
Rear foglamp
If yo uhearaw arning tone when yo uleave the
vehicle, the lights ma ystill be switched on.
X Turn the light switch to Ã.
The exterio rlighting (excep tthe side lamps/
parking lamps )switches off automaticall yif
you:
R remove the key fro mthe ignition lock
R open the driver's door with the key in posi-
tion 0
Automati cheadlamp mode G
WARNING
Whe nthe light switch is set to Ã,the
dipped-beam headlamps ma ynot be switched
on automaticall yifthereisf og,snow or other
causes of poor visibility du etothe weather
conditions such as spray .There is ariskofan
accident.
In such situations, tur nthe light switch to
L.
The automatic headlamp featur eisonlyan
aid. The driver is responsibl efor the vehicle
lighting at al ltimes.
à is the preferred light switch setting. The
light setting is automaticall yselecte daccord-
ing to the brightness of the ambient light
(exception: poor visibility du etoweather con-
ditions such as fog ,snow or spray):
R key in position 1in the ignition lock: the
side lamps ar eswitched on or off automat-
icall ydepen ding on the brightness of the
ambient light
R with the engine running :ifyouhave
switched on the daytime driving lights func-
tio nint he on-board computer, the daytime
driving lights or the side lamps and dipped-
beam headlamps ar eswitched on or off
automaticall ydepen ding on the brightness
of the ambient light X
To switc honautomatic headlamp
mode: turnthe light switch to Ã.
The daytime driving lights improv ethe detect-
ability of your vehicl eduring the day. Here,
the daytime driving lights functio nmustbe
switched on via the on-board computer
(Y page 290).
When the side lamps and dipped-beam head- lamps ar eswitched on, the green T(side
lamps )and L (dipped-bea mheadlam ps)
indicator lamps in the instrument cluster light
up.
Dipped-beam headlamps G
WARNING
Whe nthe light switch is set to Ã,the
dipped-beam headlamps ma ynot be switched
on automaticall yifthereisf og,snow or other
causes of poor visibility du etothe weather
conditions such as spray .There is ariskofan
accident.
In such situations, tur nthe light switch to
L.
When the ignition is switched on and the light
switch is in the Lposition, the side lamps
and dipped-beam headlamps ar eswitched on
eve nift he light sensor does not sens edark
ambient light conditions. Thi sisadvanta-
geou swhent her eisf og or rain.
X To switc honthe dipped-beam head-
lamps: turnthe key in the ignition lock to
position 2or start the engine.
X Turn the light switch to L.
The green Lindicator lamp in the instru-
ment cluster lights up.
Rea rfoglamp
The rea rfoglamp improves the visibility of
your vehicl einheavyfog for the following
traffic. Please observe the country-specific
laws on the us eofrearfoglamps.
X To switc honthe rear foglamp: turnthe
key in the ignition lock to position 2or start
the engine.
X Turn the light switch to LorÃ. Exterior lighting
143Lights andwindscreen wipers Z
Page 147 of 497
X
Press the Rbutton.
The yellow Rindicator lamp in the
instrument cluster lights up.
X To switch off the rear foglamp: press the
R button.
The yellow Rindicator lamp in the
instrument cluster goes out.
Side lamps ! If the batter
yhas been excessively dis-
charged, the side lamps or parking lamps
are automatically switched off to enable
the next engine start .Always park your
vehicle safely and sufficiently lit according
to legal standards. Avoid the continuous
use of the Tside lamps for several
hours. If possible, switch on the Xright
or the Wleft parking lamp.
X To switch on: turn the light switch to T.
The green Tindicator lamp in the instru-
ment cluster lights up.
Parking lamps
Switching on the parking lamps ensures that
the corresponding side of the vehicle is illu-
minated.
X To switch on the parking lamps: the key
is not in the ignition lock or it is in posi-
tion 0.
X Turn the light switch to W(left-hand side
of the vehicle) or X(right-hand side of
the vehicle). Combination switch
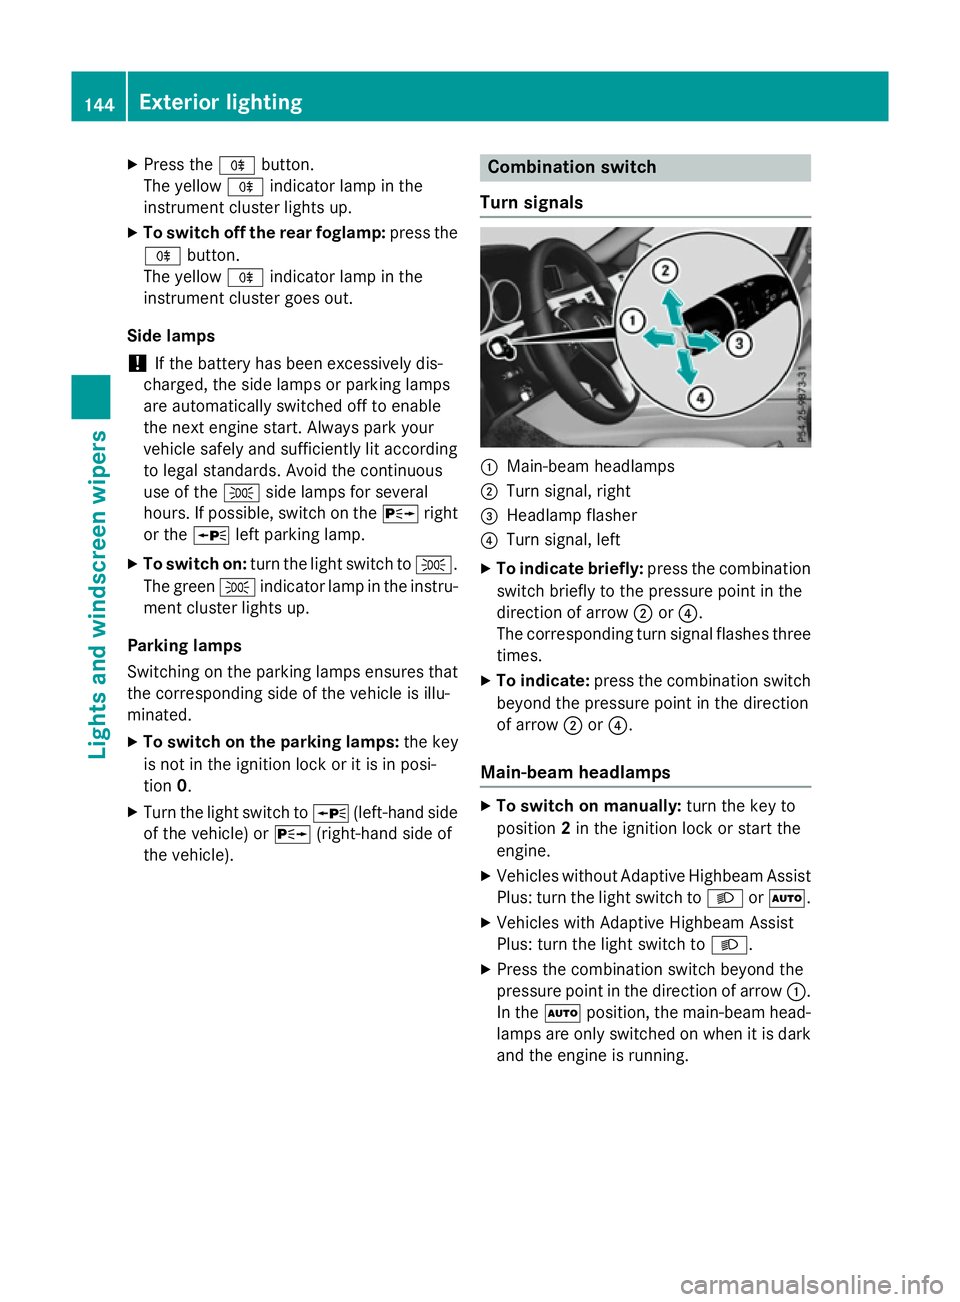
Turns ignals :
Main-beam headlamps
; Turn signal, right
= Headlamp flasher
? Turn signal, left
X To indicate briefly: press the combination
switch briefly to the pressure point in the
direction of arrow ;or?.
The corresponding turn signal flashes three
times.
X To indicate: press the combination switch
beyond the pressure point in the direction
of arrow ;or?.
Main-beam headlamps X
To switch on manually: turn the key to
position 2in the ignition lock or start the
engine.
X Vehicles without Adaptive Highbeam Assist
Plus: turn the light switch to LorÃ.
X Vehicles with Adaptive Highbeam Assist
Plus: turn the light switch to L.
X Press the combination switch beyond the
pressure point in the direction of arrow :.
In the Ãposition, the main-beam head-
lamps are only switched on when it is dark
and the engine is running. 144
Exterior lightingLights and windscreen wipers
Page 148 of 497
The blue
Kindicator lamp in the instru-
ment cluster lights up when the main-beam headlamps are switched on.
X To deactivate: move the combination
switch back to its normal position.
The blue Kindicator lamp in the instru-
ment cluster goes out.
Vehicles with Adaptive Highbeam Assist
Plus: when Adaptive Highbeam Assist Plus is
activated, it automatically controls activation
and deactivation of the main-beam head-
lamps (Y page 147).
Headlam pflasher X
To switch on: turn the key in the ignition
lock to position 1or 2,ors tart the engine.
X Pull the combination switch in the direction
of arrow =. Hazard warning lamps
X
To switch on the hazard warning lamps:
press button :.
All turn signals flash. If you now switch on a turn signal using the combination switch,
only the turn signal lamp on the corre-
sponding side of the vehicle will flash.
X To switch off the hazard warning lamps:
press button :. The hazard warning lamps switch on auto-
matically if:
R an airbag is deployed or
R the vehicle decelerates rapidly from a
speed of above 70 km/ha nd comes to a
standstill
The hazard warning lamps switch off auto-
matically if the vehicle reaches aspeed of
above 10 km/ha gain afterafull brake appli-
cation.
i The hazard warning lamps continue to
operate even if the ignition is switched off. Intelligent Light System
General notes The Intelligent Light System is
asystem that
adjusts the headlamps automatically to suit
the prevailing driving and weather conditions.
It offers advanced functions for improved illu-
mination of the road surface, e.g. depending
on the vehicle speed or weather conditions.
The system includes the active light function, cornering light function, motorway mode and
extended range foglamps. The system is only active when it is dark.
You can activate or deactivate the "IntelligentLight System" function using the on-board
computer (Y page 290).
Active light function The active light function is
asystem that
moves the headlamps according to the steer-
ing movements of the front wheels. In this Exterior lighting
145Lights and windscreen wipers Z
Page 149 of 497
way, relevant areas remain illuminated while
you are driving .This allows you to recognise
pedestrians ,cyclist sand animals.
Active: when thelight sare switche don.
Cornering light function The cornering light function improves th
eillu-
minatio noftheroad over awide angle in the
directio nyou are turning, enabling better vis-
ibilit yint ight bends, for example. It can only
be activated when th edipped-beam head-
lamps are switche don.
Active:
R if you are driving at speed sbelow 40 km/h
and switch on th eturns ignal or tur nthe
steerin gwheel.
R if you are driving at speed sbetween
40 km/h and 70 km/h and tur nthe steer-
ing wheel.
The cornering light function may remain lit for as hor ttime, but is automatically switche doff
after no mor ethant hree minutes.
Motorwa ymode Active:
if you are driving at aspeed above
11 0k m/ hand do not mak eany large steering
movements for at least 1,000 morify ou are
driving at aspee dabove 130 km/h
Not active: if you are driving at speeds below
80 km/h following activation.
Extended range foglamps The extended range foglamps reduce the
glare experienced by the drive
rand improve
the illumination of the edge of the carriage-
way.
Active: if you are driving at speeds below
70 km/h and you switch on the rear foglamp.
Not active: if, following activation, you are
driving at speeds above 100 km/h or if you
switch off the rear foglamp. 146
Exterio
rlightingLights and windscreen wipers