MERCEDES-BENZ E-CLASS ESTATE 2015 Owners Manual
Manufacturer: MERCEDES-BENZ, Model Year: 2015, Model line: E-CLASS ESTATE, Model: MERCEDES-BENZ E-CLASS ESTATE 2015Pages: 497, PDF Size: 16.23 MB
Page 371 of 497
More information on suitable mobile phones,
mobile phone brackets and on connecting
Bluetooth ®
-capable mobile phones to
COMAND Online/Audio 20 can be obtained:
R at your Mercedes-Ben zService Centre
R on the Internet at http://www.mercedes-
benz.com/connect
The functions and services available when
you use the phone depend on your mobile
phone model and service provider.
Using amobile phone To connect
amobile phone to the exterior
aerial and charge it, insert it into the mobile
phone bracket.
X Open the telephone compartment
(Y page 344).
X Place the mobile phone bracket into the
pre-installed fitting; see the separate instal-
lation instructions for the mobile phone fit-
ting.
X Insert the mobile phone into the mobile
phone bracket; see the separate installa-
tion instructions for the mobile phone fit-
ting.
i The mobile phone can also be operated
without being in the bracket. However, the charging function and aerial function are
not available.
In order to use Bluetooth ®
(SAP profile) on
your telephone module, you must first insert
the telephone module into the pre-installed
fitting. This connects it to the exterior aerial.
If you wish to charge the mobile phone, then
you must connect it to aUSB port.
Further information on the telephone module
with Bluetooth ®
(SAP profile) can be found in
the Digital Owner's Manual.
Operating the mobile phone You can operate the telephone using the
6 and~ buttons on the multifunction
steering wheel. You can operate other mobile phone functions via the on-board computer
(Y page 284).
When you remove the key from the ignition
lock, the mobile phone is disconnected from
the hands-free system. Active calls will first
be transferred to the mobile phone directly.
Mobile phone bracket in the stowage
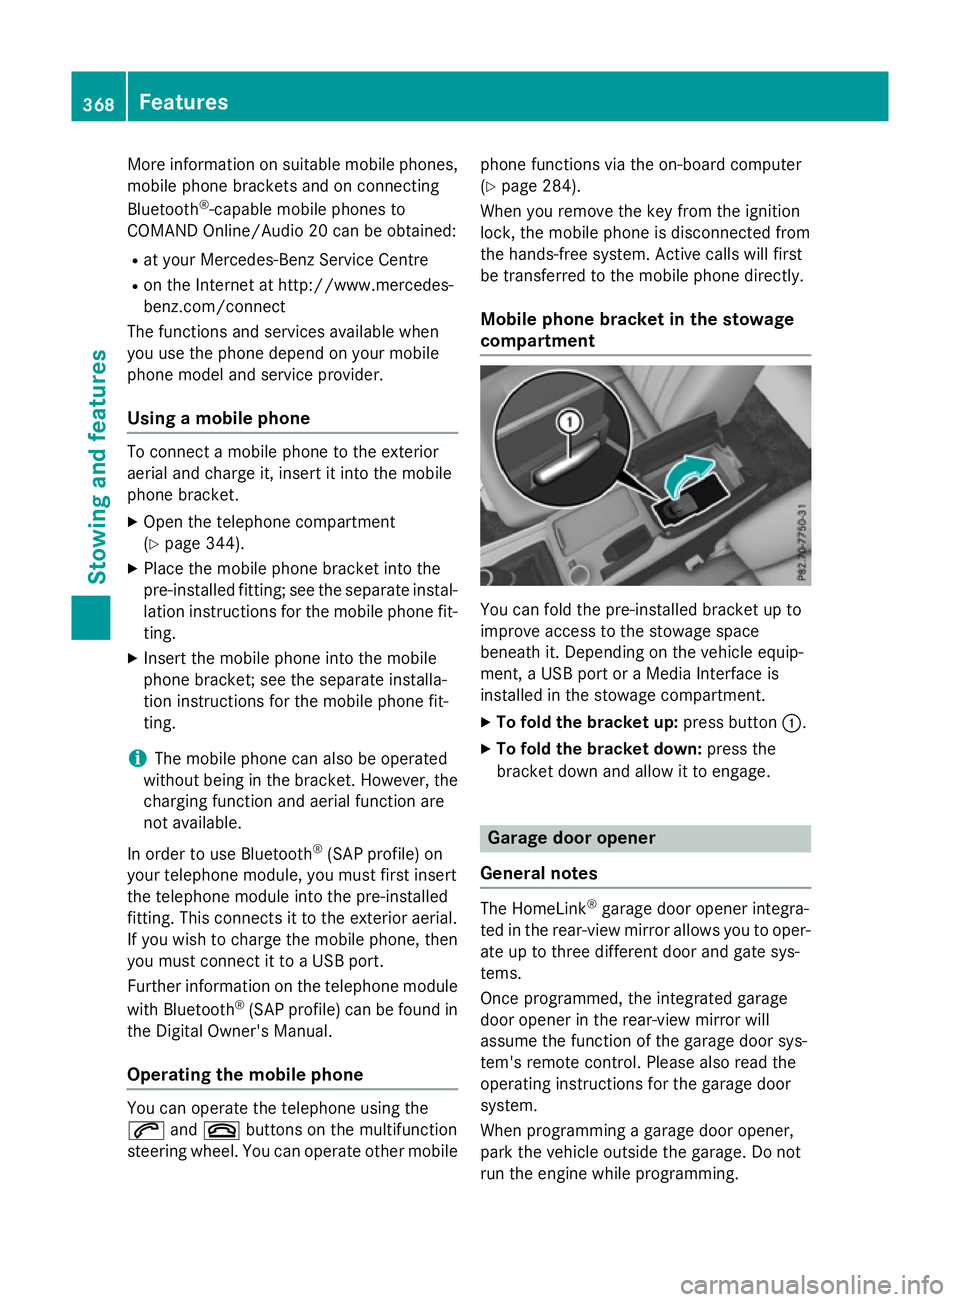
compartment You can fold the pre-installed bracket up to
improve access to the stowage space
beneath it. Depending on the vehicle equip-
ment,aU
SB port or aMedia Interface is
installed in the stowage compartment.
X To fold the bracket up: press button:.
X To fold the bracket down: press the
bracket down and allow it to engage. Garage door opener
General notes The HomeLink
®
garage door opener integra-
ted in the rear-view mirror allowsy ou to oper-
ate up to three different door and gate sys-
tems.
Once programmed, the integrated garage
door opener in the rear-view mirror will
assume the function of the garage door sys-
tem's remote control. Please also read the
operating instructions for the garage door
system.
When programming agarage door opener,
park the vehicle outside the garage. Do not
run the engine while programming. 368
FeaturesStowing and features
Page 372 of 497
The garage door opener is only available for
certain countries. Observe the legal require-
mentsf or each individual country.
The HomeLink ®
garage door opener is com-
patible with most European garage and gate
opener drives. More information on Home-
Link ®
and/or compatible products is availa-
ble:
R at aq ualified specialist workshop
R via the HomeLink ®
Hotline
(0) 080004 66 354 65 or alternatively
+49 (0) 6838 907-277
R on the Internet at http://
www.homelink.com
Important safety notes G
WARNING
When you operate or program the garage door with the integrated garage door opener, per-
sons in the range of movemen tofthe garage
door can become trapped or struck by the
garage door. There is arisk of injury.
When using the integrated garage door
opener, alway smake sure that nobody is
within the range of movemen tofthe garage
door. G
WARNING
Combustion engines emit poisonous exhaust
gases such as carbon monoxide. Inhaling
these exhaust gases leads to poisoning. There is ar isk of fatal injury. Therefore never leave
the engine runnin ginenclosed spaces with-
out sufficient ventilation.
Programming Programming buttons
Pay attention to the "Importan
tsafety notes"
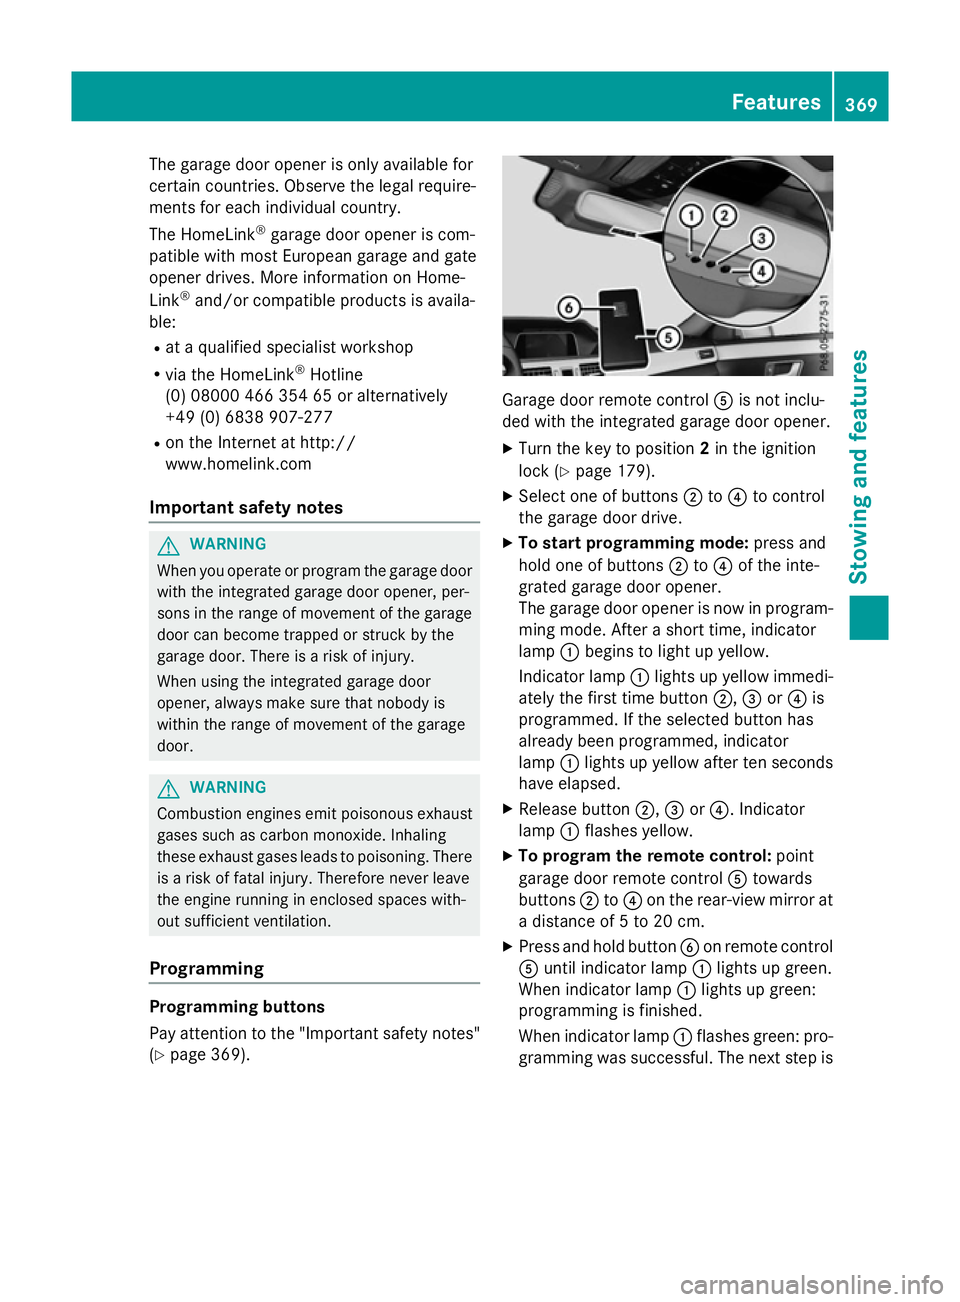
(Y page 369). Garage door remot
econtrol Ais not inclu-
ded with the integrated garage door opener.
X Turn the key to position 2in the ignition
lock (Y page 179).
X Select one of buttons ;to? to control
the garage door drive.
X To startp rogramming mode: press and
hold one of buttons ;to? of the inte-
grated garage door opener.
The garage door opener is now in program- ming mode. After ashort time, indicator
lamp :begins to light up yellow.
Indicator lamp :lights up yellow immedi-
ately the first time button ;,=or? is
programmed. If the selected button has
already been programmed, indicator
lamp :lights up yellow after ten seconds
have elapsed.
X Release button ;,=or?.I ndicator
lamp :flashes yellow.
X To program the remot econtrol: point
garage door remot econtrol Atowards
buttons ;to? on the rear-view mirror at
ad istanc eof5to20c m.
X Press and hold button Bon remot econtrol
A until indicator lamp :lights up green.
When indicator lamp :lights up green:
programming is finished.
When indicator lamp :flashes green: pro-
gramming was successful. The next step is Features
369Stowing and features Z
Page 373 of 497
to synchronise the rolling code
(Y
page 370).
X Releas ebutton Bof remote control Aof
the garage door drive.
If indicator lamp :lights up red :repea tthe
programming proces sfor the correspond-
ing button on the rear-view mirror. When
doing so ,varyt he distance between remote
control Aand the rear-view mirror.
Th er equired distance between remote
control Aand the integrated garage door
opene rdepen ds on the garage door drive
system. Severa lattempts ma yberequired.
Yo us houl dteste very positio nfor at least
25 second sbefore trying another position.
Synchronising the rolling code
Observe the "Important safety notes"
(Y page 369).
If the garage door system uses arolling code,
you will also have to synchronise the garage
door system with the integrated garage door
opener in the rear-view mirror .Todothis you
will need to use the programming button on
the door drive control panel. The program-
ming button may be placed at differen tloca-
tion sdepending on the manufacturer. It is
usually located on the door drive unit on the
garage ceiling.
Familiarise yourself with the garage door
drive operatin ginstructions, e.g. under "Pro-
grammin gofadditional remot econtrols",
before carrying out the following steps.
Your vehicle must be within range of the
garage door or gate opener drive. Make sure
that neither your vehicle nor any persons/
objects are present within the sweep of the
door or gate.
X Turn the key to position 2in the ignition
lock (Y page 179).
X Get out of the vehicle.
X Press the programming button on the door
drive unit.
Usually, you now have 30 seconds to ini-
tiate the nexts tep. X
Get intot he vehicle.
X Press previously programmed button ;,
= or? of the integrated garage door
opener until the door closes.
The rolling code synchronisation is then
complete.
Problems when programming
If you have problems when programming the
integrated garage door opener, please note
the following: R Check the transmitter frequenc yused by
garage door drive remot econtrol Aand
whether it is supported. The transmitter
frequenc ycan usually be found on the back
of the garage door drive remot econtrol.
R Replace the batteries in garage door
remot econtrol A.This increases the like-
lihood that garage door remot econtrol A
will transmit astrong and precise signal to
the integrated garage door opener in the
rear-view mirror.
R When programming, hold remot econtrol
A at varying distances and angles from the
button which you are programming. Try var- ious angles at adistanc ebetween 5and
30 cm or at the same angle but at varying
distances.
R If ther eisanother remot econtrol for the
same garage door drive, perform the pro-
grammin gsteps again using this remote
control. Befor eperforming these steps,
make sure that new batteries have been
fitted in garage door drive remot econtrol
A.
R Note that some remot econtrols transmit
only for alimited period (the indicator lamp
on the remot econtrol goes out). Press but-
ton Bon remot econtrol Aagain before
transmission ends.
R Align the aerial cable of the garage door
opener unit. This can improve signal recep-
tion/transmission. 370
FeaturesStowing and features
Page 374 of 497
Opening or closing the garage door
Oncep
rogrammed, the integrated garage
door opener will assume the function of the
garage door system's remot econtrol. Please
also read the operatin ginstructions for the
garage door system.
X Turn the key to position 2in the ignition
lock (Y page 179).
X Press button ;,=or? which you have
programmed to operate the garage door.
Garage door system with afixed code: indi-
cator lamp :lights up green.
Garage door system with arolling code:
indicator lamp :flashes green.
The transmitter will transmit asignal for as
long as the button is pressed. The trans-
mission is halted after amaximum of ten
seconds and indicator lamp :lights up
yellow.
X Press button ;,=or? again if neces-
sary.
Clearing the memory Make sure that you clear the memory of the
integrated garage door opener before selling
the vehicle.
X Turn the key to position 2in the ignition
lock (Y page 179).
X Press and hold buttons ;and ?.
The indicator lamp initially lights up yellow
and then green.
X Release buttons ;and ?.
The memory of the integrated garage door
opener in the rear-view mirror is cleared. Frequencies Europe
Country Radio typea
pproval num-
ber
Frequency range (MHz) AD (Andorra) 20 July 2005
MHz:2
7, 30, 40, 433,8 68 AT (Austria) Article
6ofDirective
1999/5/ECR &TTE 18 May
05
MHz:2 7, 40, 433,8 68 BE (Belgium) Article
6ofDirective
1999/5/ECR &TTE 18 May
05
MHz:2 7, 40, 433,8 68 BG (Bulga-
ria) Article
6ofDirective
1999/5/ECR &TTE 12 April
07
MHz:2 7, 40, 433,8 68 CH (Switzer-
land) Article
6ofDirective
1999/5/ECR &TTE 14357
27 May 05
MHz:2 7, 40, 433,8 68 CY (Cyprus) Article
6ofDirective
1999/5/ECR &TTE5May
05
MHz:2 7, 40, 433,8 68 CZ (Czech
Republic) General Licence GL-30/R/
2000R
eg No. 844 13 May
05
MHz:2 7, 40, 433 DK (Den-
mark) Article
6ofDirective
1999/5/ECR &TTE 20 April
05
MHz:2 7, 40, 433,8 68 DE (Ger-
many) Article
6ofDirective
1999/5/ECR &TTE
751930129A pril 05
MHz:2 7, 40, 433,8 68 Features
371Stowing and features Z
Page 375 of 497
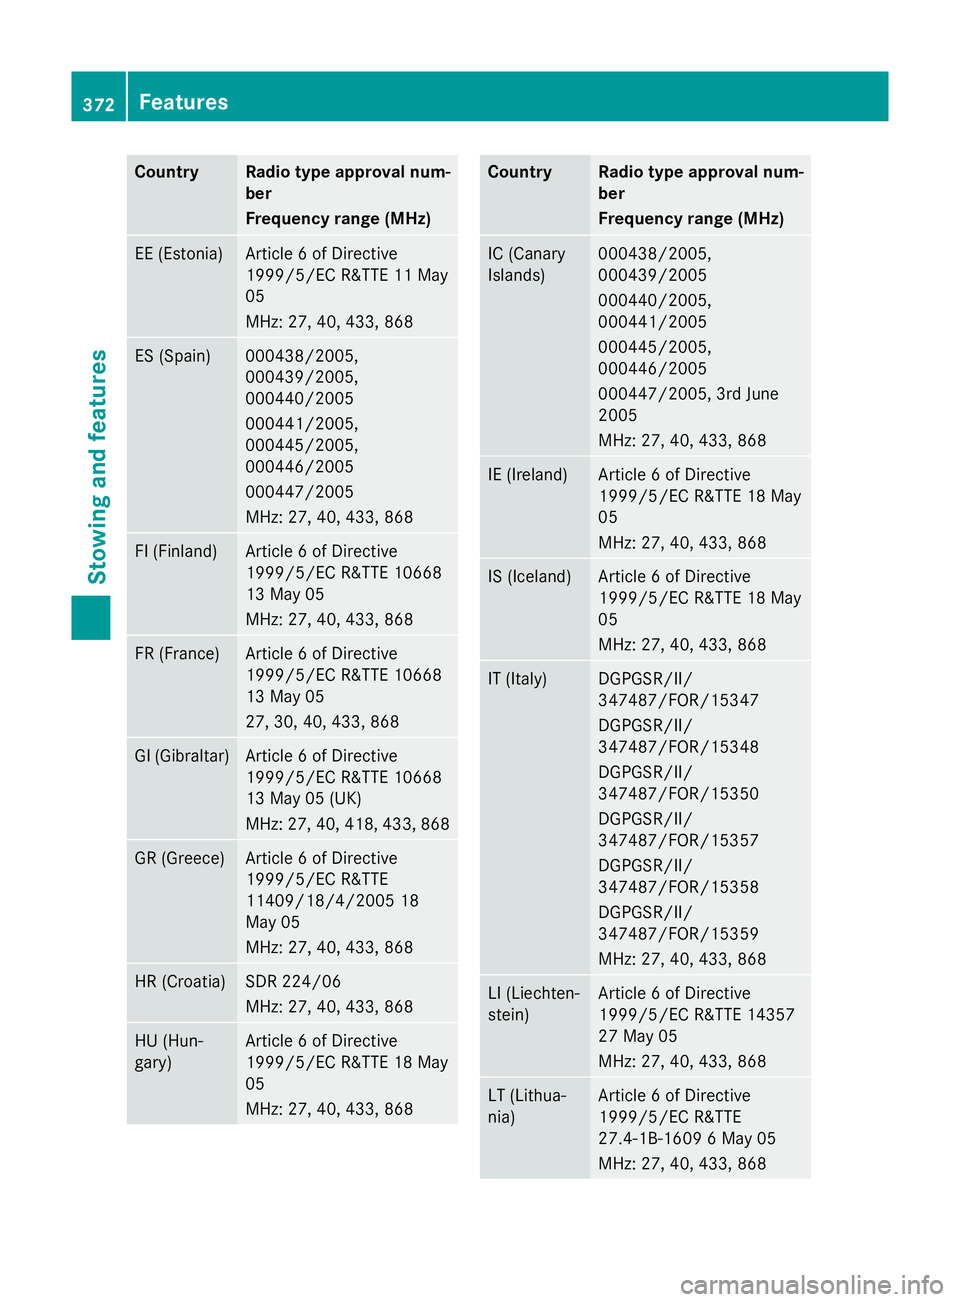
Country Radio type approval num-
ber
Frequency range (MHz)
EE (Estonia) Article
6ofDirective
1999/5/E CR&TT E11M ay
05
MHz :27,40 ,433 ,868 ES (Spain) 000438/2005,
000439/2005,
000440/2005
000441/2005,
000445/2005,
000446/2005
000447/2005
MHz :27,40 ,433 ,868 FI (Finland) Article
6ofDirective
1999/5/E CR&TT E10668
13 May 05
MHz :27,40 ,433 ,868 FR (France) Article
6ofDirective
1999/5/E CR&TT E10668
13 May 05
27 ,30,40 ,433 ,868 GI (Gibraltar) Article
6ofDirective
1999/5/E CR&TT E10668
13 May 05 (UK)
MHz :27,40 ,418 ,433 ,868 GR (Greece) Article
6ofDirective
1999/5/E CR&TTE
11409/18/4/200 518
May 05
MHz :27,40 ,433 ,868 HR (Croatia) SD
R2 24/06
MHz :27,40 ,433 ,868 HU (Hun-
gary) Article
6ofDirective
1999/5/E CR&TT E18M ay
05
MHz :27,40 ,433 ,868 Country Radio type approval num-
ber
Frequency range (MHz)
IC (Canary
Islands) 000438/2005,
000439/2005
000440/2005,
000441/2005
000445/2005,
000446/2005
000447/2005, 3r
dJune
2005
MHz :27,40 ,433 ,868 IE (Ireland) Article
6ofDirective
1999/5/E CR&TT E18M ay
05
MHz :27,40 ,433 ,868 IS (Iceland) Article
6ofDirective
1999/5/E CR&TT E18M ay
05
MHz :27,40 ,433 ,868 IT (Italy) DGPGSR/II/
347487/FOR/15347
DGPGSR/II/
347487/FOR/15348
DGPGSR/II/
347487/FOR/15350
DGPGSR/II/
347487/FOR/15357
DGPGSR/II/
347487/FOR/15358
DGPGSR/II/
347487/FOR/15359
MHz :27,40 ,433 ,868 LI (Liechten-
stein) Article
6ofDirective
1999/5/E CR&TT E14357
27 May 05
MHz :27,40 ,433 ,868 LT (Lithua-
nia) Article
6ofDirective
1999/5/E CR&TTE
27.4-1B-1609 6May 05
MHz :27,40 ,433 ,868 372
FeaturesStowing and features
Page 376 of 497
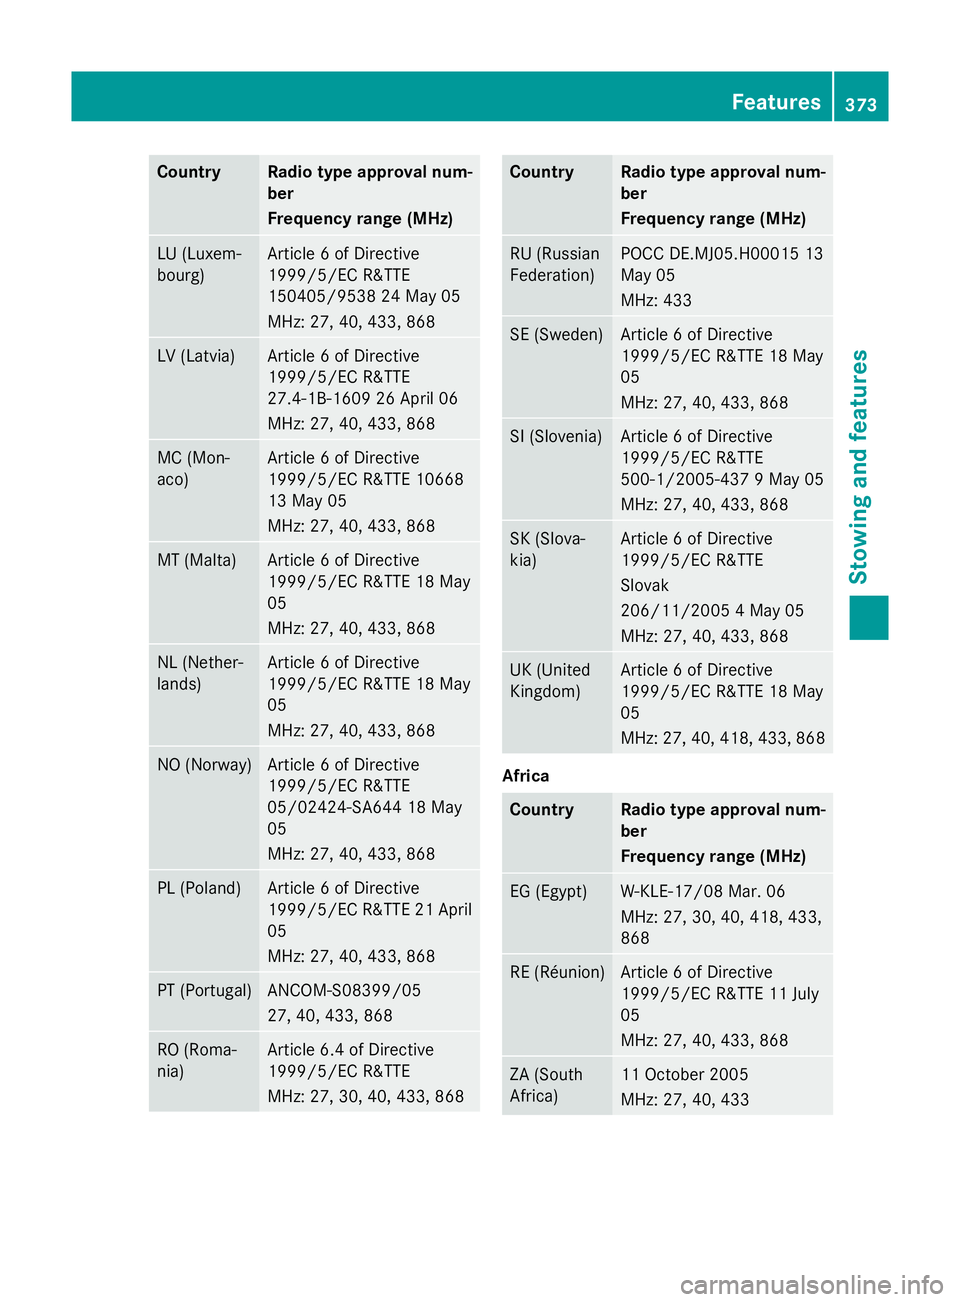
Country Radio type approval num-
ber
Frequency range (MHz)
LU (Luxem-
bourg) Article
6ofDirective
1999/5/E CR&TTE
150405/953 824May 05
MHz :27,40 ,433 ,868 LV (Latvia) Article
6ofDirective
1999/5/E CR&TTE
27.4-1B-1609 26 April 06
MHz :27,40 ,433 ,868 MC (Mon-
aco) Article
6ofDirective
1999/5/E CR&TT E10668
13 May 05
MHz :27,40 ,433 ,868 MT (Malta) Article
6ofDirective
1999/5/E CR&TT E18M ay
05
MHz :27,40 ,433 ,868 NL (Nether-
lands) Article
6ofDirective
1999/5/E CR&TT E18M ay
05
MHz :27,40 ,433 ,868 NO (Norway) Article
6ofDirective
1999/5/E CR&TTE
05/02424-SA644 18 May
05
MHz :27,40 ,433 ,868 PL (Poland) Article
6ofDirective
1999/5/E CR&TT E21A pril
05
MHz :27,40 ,433 ,868 PT (Portugal) ANCOM-S08399/05
27
,40,433, 868 RO (Roma-
nia) Article 6.
4ofDirective
1999/5/E CR&TTE
MHz :27,30 ,40,433, 868 Country Radio type approval num-
ber
Frequency range (MHz)
RU (Russian
Federation) POCC DE.MJ05.H0001
513
May 05
MHz :433 SE (Sweden) Article
6ofDirective
1999/5/E CR&TT E18M ay
05
MHz :27,40 ,433 ,868 SI (Slovenia) Article
6ofDirective
1999/5/E CR&TTE
500-1/2005-437 9May 05
MHz :27,40 ,433 ,868 SK (Slova-
kia) Article
6ofDirective
1999/5/E CR&TTE
Slovak
206/11/200 54May 05
MHz :27,40 ,433 ,868 UK (United
Kingdom) Article
6ofDirective
1999/5/E CR&TT E18M ay
05
MHz :27,40 ,418 ,433 ,868 Africa
Country Radio type approval num-
ber
Frequency range (MHz)
EG (Egypt) W-KLE-17/08 Mar. 06
MHz
:27,30 ,40,418, 433,
868 RE (Réunion) Article
6ofDirective
1999/5/E CR&TT E11J uly
05
MHz :27,40 ,433 ,868 ZA (South
Africa) 11 October 2005
MHz
:27,40 ,433 Features
373Stowing and features Z
Page 377 of 497
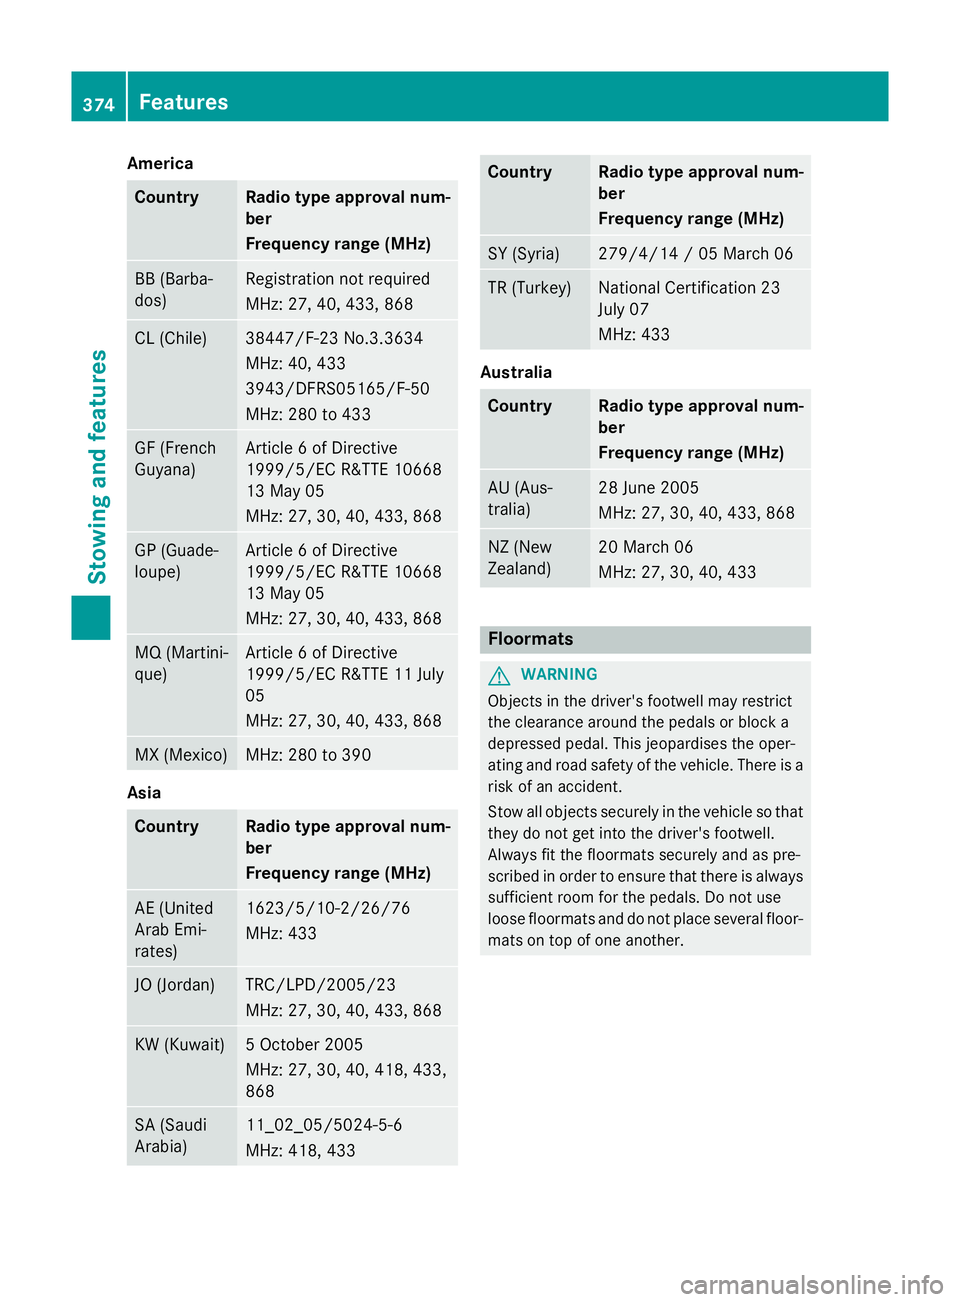
America
Country Radio type approva
lnum-
ber
Frequency range (MHz) BB (Barba-
dos) Registration no
trequired
MHz: 27 ,40,433, 868 CL (Chile) 38447/F-23 No.3.3634
MHz: 40
,433
3943/DFRS05165/F-50
MHz: 28 0to433 GF (French
Guyana) Article
6ofDirective
1999/5/E CR&TT E10668
13 May 05
MHz: 27 ,30,40 ,433 ,868 GP (Guade-
loupe) Article
6ofDirective
1999/5/E CR&TT E10668
13 May 05
MHz: 27 ,30,40 ,433 ,868 MQ (Martini-
que) Article
6ofDirective
1999/5/E CR&TT E11J uly
05
MHz: 27 ,30,40 ,433 ,868 MX (Mexico) MHz: 28
0to390 Asia
Country Radio type approva
lnum-
ber
Frequency range (MHz) AE (United
Arab Emi-
rates) 1623/5/10-2/26/76
MHz: 433
JO (Jordan) TRC/LPD/2005/23
MHz: 27 ,30,40 ,433 ,868 KW (Kuwait) 5O
ctob er 2005
MHz: 27 ,30,40 ,418 ,433,
868 SA (Saudi
Arabia) 11_02_05/5024-5-6
MHz: 418, 433 Country Radio type approva
lnum-
ber
Frequency range (MHz) SY (Syria) 279/4/14
/05March06 TR (Turkey) National Certification 23
July 07
MHz: 433
Australia
Country Radio type approva
lnum-
ber
Frequency range (MHz) AU (Aus-
tralia) 28 June 2005
MHz: 27
,30,40 ,433 ,868 NZ (New
Zealand) 20 Marc
h06
MHz: 27 ,30,40 ,433 Floormats
G
WARNING
Object sinthedriver' sfootwell may restrict
th ec learance aroun dthe pedals or bloc ka
depressed pedal. This jeopardise sthe oper-
ating and road safet yofthevehicle. Ther eisa
ris kofana ccident.
Stow all object ssecurely in th evehicl esot hat
they do no tget int othe driver' sfootwell.
Always fit th efloormats securely and as pre-
scribe dinorder to ensure that there is always
sufficien troo mf or th epedals .Don otuse
loos efloormats and do no tplac eseveral floor-
mat sont opof on eanother. 374
FeaturesStowing and featu
res
Page 378 of 497
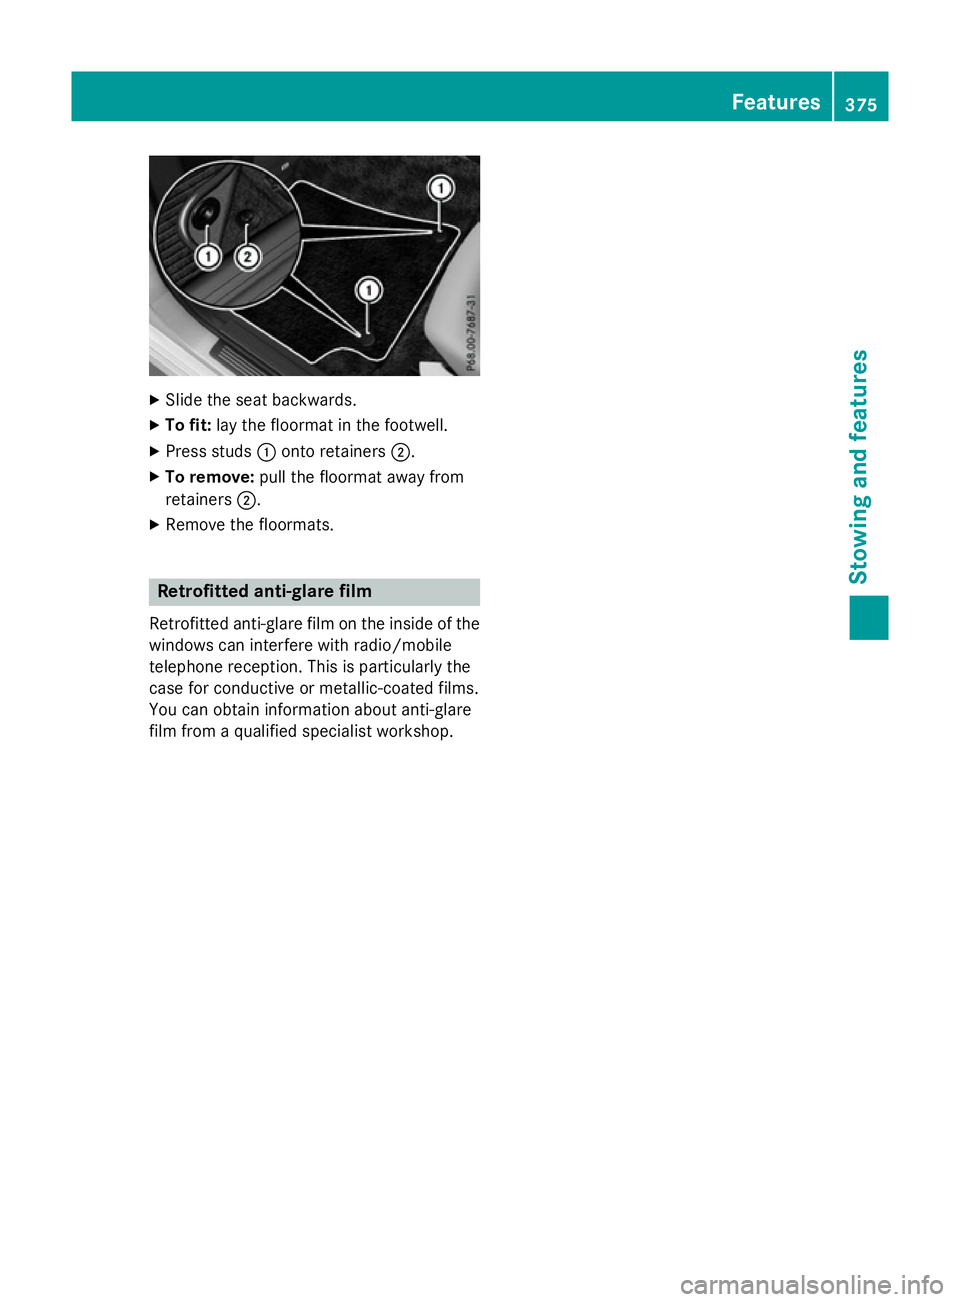
X
Slide the sea tbackwards.
X To fit: layt he floorma tinthe footwell.
X Press studs :onto retainers ;.
X To remove: pull the floorma tawa yfrom
retainers ;.
X Remove the floormats. Retrofitte
danti-glare film
Retrofitted anti-glare fil monthe inside of the
window scan interfere with radio/mobile
telephone reception. Thi sisparticularly the
cas efor conductive or metallic-coate dfilms.
Yo uc an obtain information abou tanti-glare
fil mf rom aquali fied specialist workshop. Features
375Stowing and features Z
Page 379 of 497

376
Page 380 of 497
Useful information
............................378
Engine compartment ........................378
Service ............................................... 384
Care .................................................... 385 377Maintenance and care