MERCEDES-BENZ E-CLASS ESTATE 2015 Owners Manual
Manufacturer: MERCEDES-BENZ, Model Year: 2015, Model line: E-CLASS ESTATE, Model: MERCEDES-BENZ E-CLASS ESTATE 2015Pages: 497, PDF Size: 16.23 MB
Page 351 of 497
X
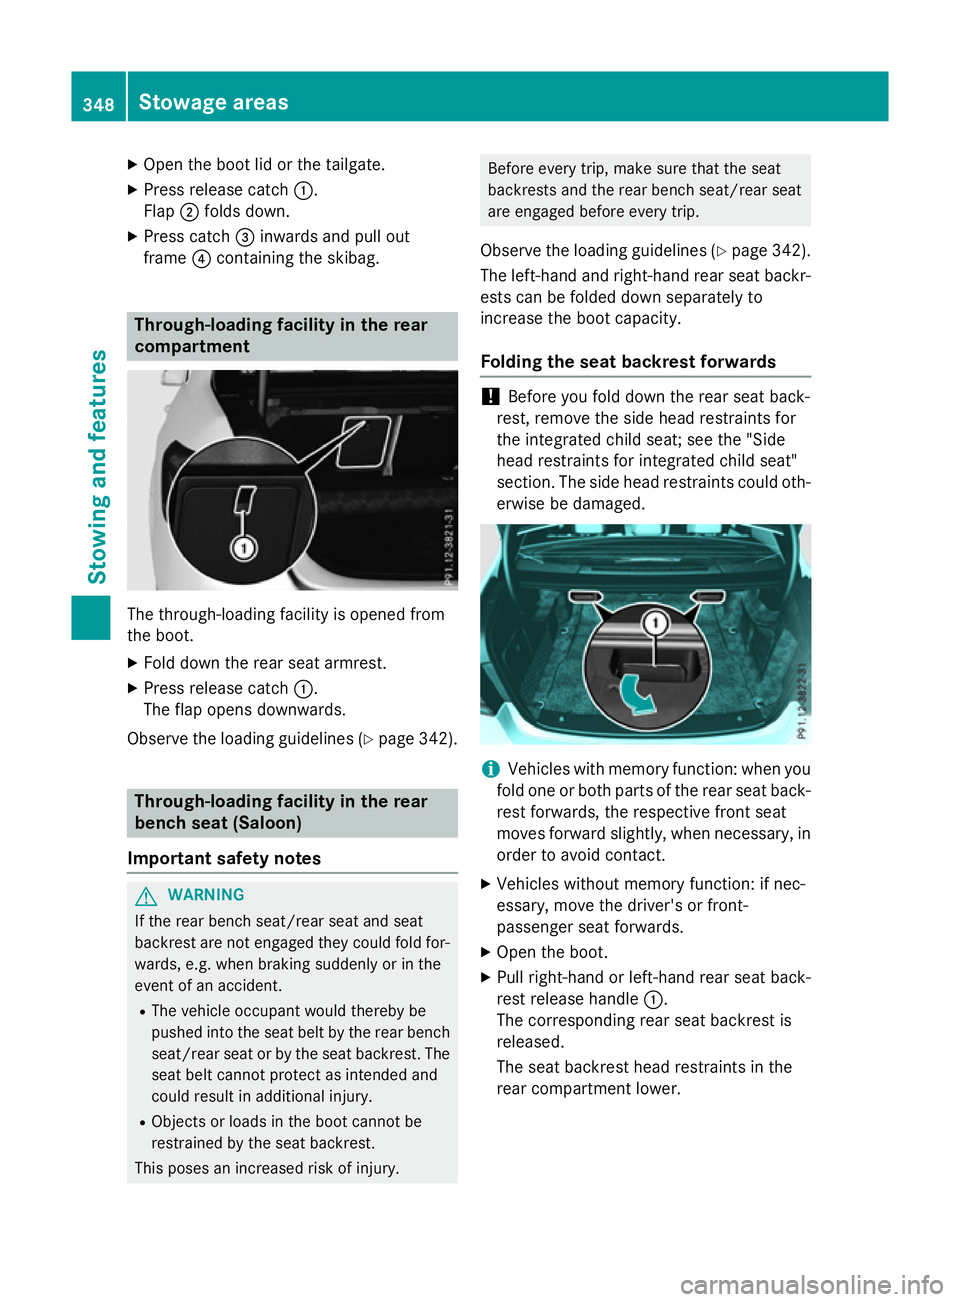
Open the boot lid or the tailgate.
X Press release catch :.
Flap ;folds down.
X Press catch =inwards and pull out
frame ?containing the skibag. Through-loading facility in the rear
compartment The through-loading facility is opened from
the boot.
X Fold down the rear seat armrest.
X Press release catch :.
The flap opens downwards.
Observe the loading guidelines (Y page 342).Through-loading facility in the rear
benchs eat (Saloon)
Important safety notes G
WARNING
If the rear bench seat/rear seat and seat
backrest are not engaged they could fold for- wards, e.g. when braking suddenly or in the
event of an accident.
R The vehicle occupant wouldt hereby be
pushed into the seat belt by the rear bench
seat/rear seat or by the seat backrest. The
seat belt cannot protect as intended and
could result in additional injury.
R Objects or loads in the boot cannot be
restrained by the seat backrest.
This poses an increased risk of injury. Before every trip, make sure that the seat
backrests and the rear bench seat/rear seat
are engaged before every trip.
Observe the loading guidelines (Y page 342).
The left-hand and right-hand rear seat backr- ests can be folded down separately to
increase the boot capacity.
Folding the seat backrest forwards !
Before you fold down the rear seat back-
rest, remove the side head restraints for
the integrated child seat; see the "Side
head restraints for integrated child seat"
section. The side head restraints could oth-
erwise be damaged. i
Vehicles with memory function: when you
fold one or both parts of the rear seat back- rest forwards, the respective front seat
moves forward slightly, when necessary, inorder to avoid contact.
X Vehicles without memory function: if nec-
essary, move the driver's or front-
passenger seat forwards.
X Open the boot.
X Pull right-hand or left-hand rear seat back-
rest release handle :.
The corresponding rear seat backrest is
released.
The seat backrest head restraints in the
rear compartment lower. 348
Stowage areasStowinga
nd features
Page 352 of 497
X
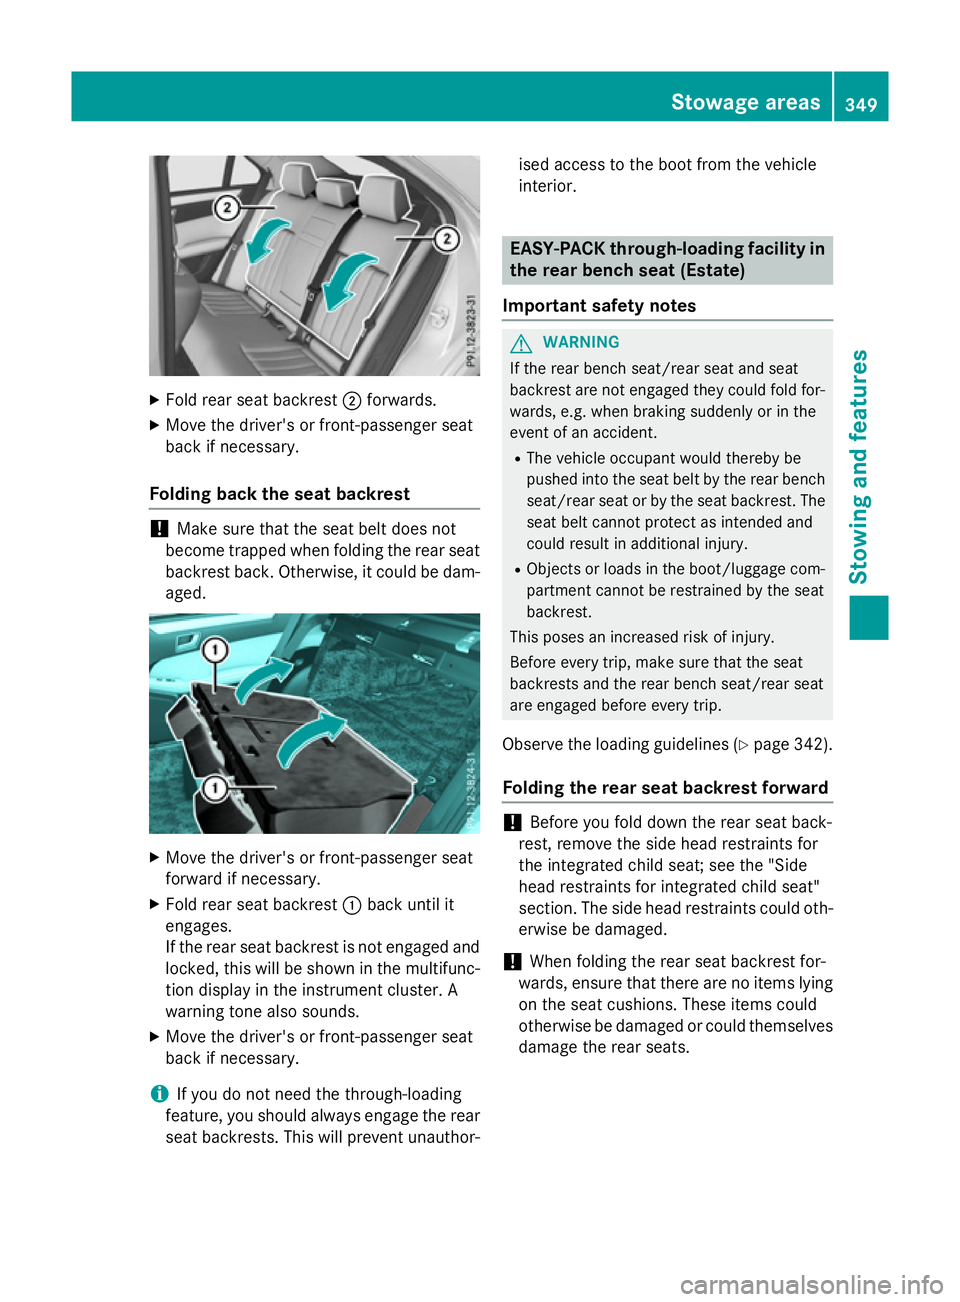
Fold rea rseatb ackrest ;forwards.
X Move the driver' sorfront-passenger seat
back if necessary.
Folding bac kthe seat backrest !
Make sure that the sea
tbeltd oesn ot
become trapped whe nfolding the rea rseat
backrest back. Otherwise, it could be dam- aged. X
Move the driver' sorfront-passenger seat
forward if necessary.
X Fold rea rseatb ackrest :back unti lit
engages.
If the rea rsea tb ackrest is not engaged and
locked, this will be shown in the multifunc-
tion display in the instrument cluster. A
warning tone also sounds.
X Move the driver' sorfront-passenger seat
back if necessary.
i If yo
udon ot need the through-loading
feature ,you shoul dalway sengage the rear
sea tbackrests. Thi swillp revent unauthor- ise
da ccess to the boo tfrom the vehicle
interior. EASY-PACK through-loadin
gfacility in
the rear benc hseat(Es tate)
Important safety notes G
WARNING
If the rea rbench seat/rea rseata nd seat
backrest are not engaged they could fol dfor-
wards, e.g. whe nbraking suddenl yorinthe
event of an accident.
R The vehicle occupant would thereby be
pushe dinto the sea tbeltb ythe rea rbench
seat/rea rseatorb ythe sea tbackrest. The
sea tbeltc annot protect as intended and
could result in additiona linjury.
R Objects or loads in the boot/luggage com-
partment cannot be restrained by the seat
backrest.
Thi sp oses an increase driskofi njury.
Befor eevery trip ,make sur ethat the seat
backrests and the rea rbench seat/rea rseat
are engaged before every trip.
Observe the loading guidelines (Y page 342).
Folding the rear seat backres tforward !
Befor
eyou foldd ownthe rea rseatb ack-
rest, remove the sid eheadr estraints for
the integrate dchilds eat; see the "Side
hea drestraints for integrate dchilds eat"
section. The sid eheadr estraints could oth-
erwise be damaged.
! Whe
nfolding the rea rseatb ackrest for-
wards, ensure that there are no item slying
on the sea tcushions .These item scould
otherwise be damaged or could themselves
damag ethe rea rseats. Stowage areas
349Stowingand features Z
Page 353 of 497
The left-hand and right-hand rear seat backr-
ests can be folded forwards separately to
increase the luggage compartment capacity.
The combined luggage cover and net can
remain installed.
i When you fold one or both parts of the
rear seat backrest sforwards, the headr-
ests are also lowered if necessary. In the
case of vehicles with memory function, the respective fronts eat is moved forwards
slightly to avoid contact with the seat
behind it.
X Vehicles without memory function: if nec-
essary, move the driver's or front-
passenger seat forwards.
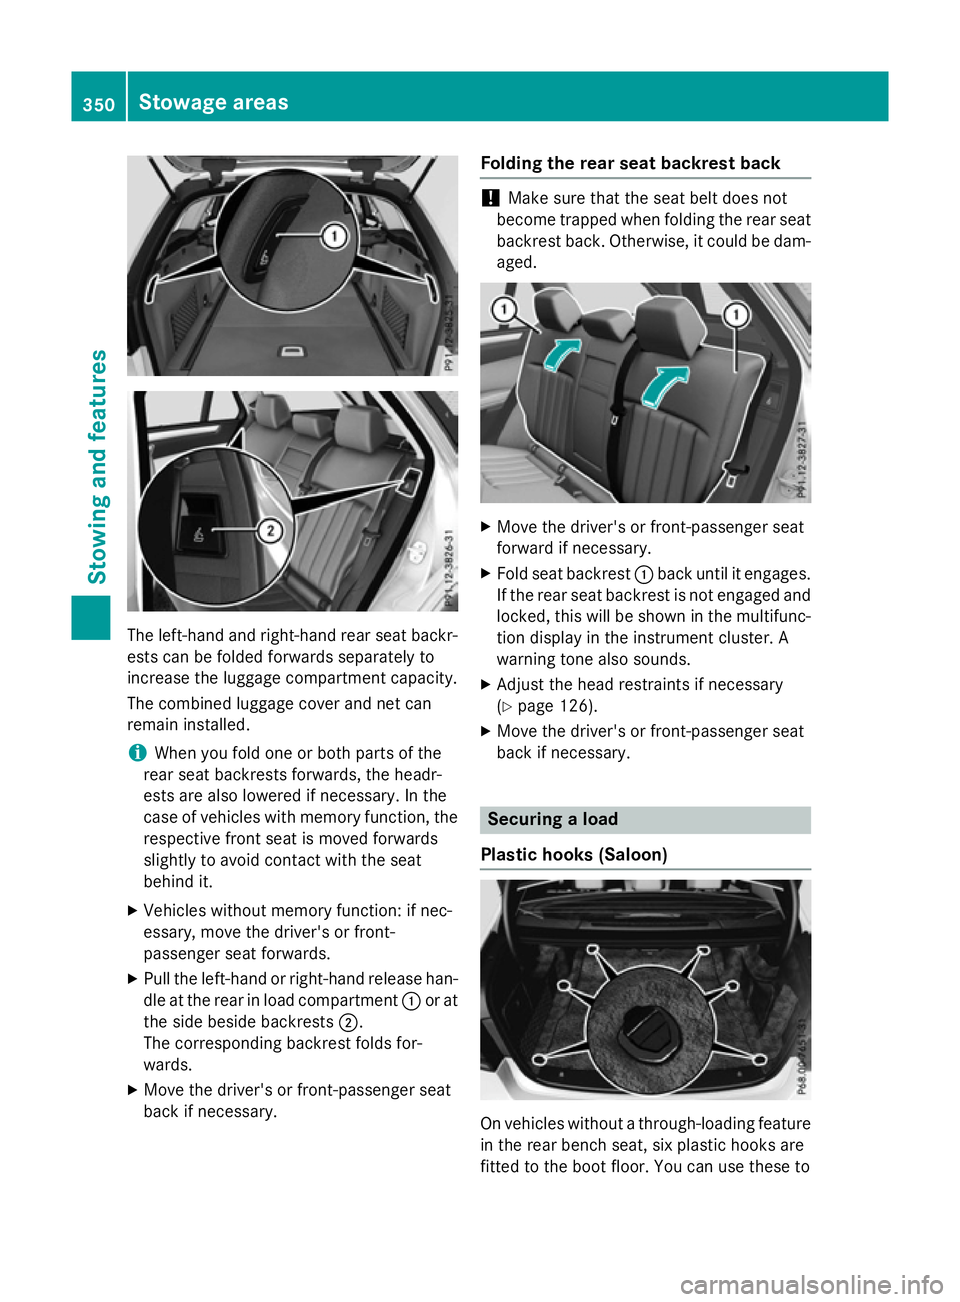
X Pull the left-hand or right-hand release han-
dle at the rear in load compartment :or at
the side beside backrests ;.
The corresponding backrest folds for-
wards.
X Move the driver's or front-passenger seat
back if necessary. Folding the rear seat backrest back !
Make sure that the seat belt does not
become trapped when folding the rear seat backrest back. Otherwise, it could be dam- aged. X
Move the driver's or front-passenger seat
forward if necessary.
X Fold seat backrest :back until it engages.
If the rear seat backrest is not engaged and locked, this will be shown in the multifunc-
tion display in the instrument cluster. A
warning tonea lso sounds.
X Adjust the head restraints if necessary
(Y page 126).
X Move the driver's or front-passenger seat
back if necessary. Securing
aload
Plastic hooks (Saloon) On vehicles without
athrough-loading feature
in the rear bench seat, six plastic hooks are
fitted to the boot floor. You can use these to 350
Stowage areasStowing and features
Page 354 of 497
attach th
eluggag esecurin gfixture, whic his
availabl easana ccessory.
Lashing eyelets General notes
Observ
ethe followin gnotes on securing
loads:
R observ ethe loadin gguidelines
(Y page 342).
R secure th eload usin gthe lashin geyelets.
R distribut ethe load on th elashin geyelets
evenly.
R do no tuse elastic straps or nets to secure a
load. Thes eare only intended as an anti-slip
protection for light loads.
R do no trout elashin gmaterials across sharp
edge sorc orners.
R pad shar pedge sfor protection.
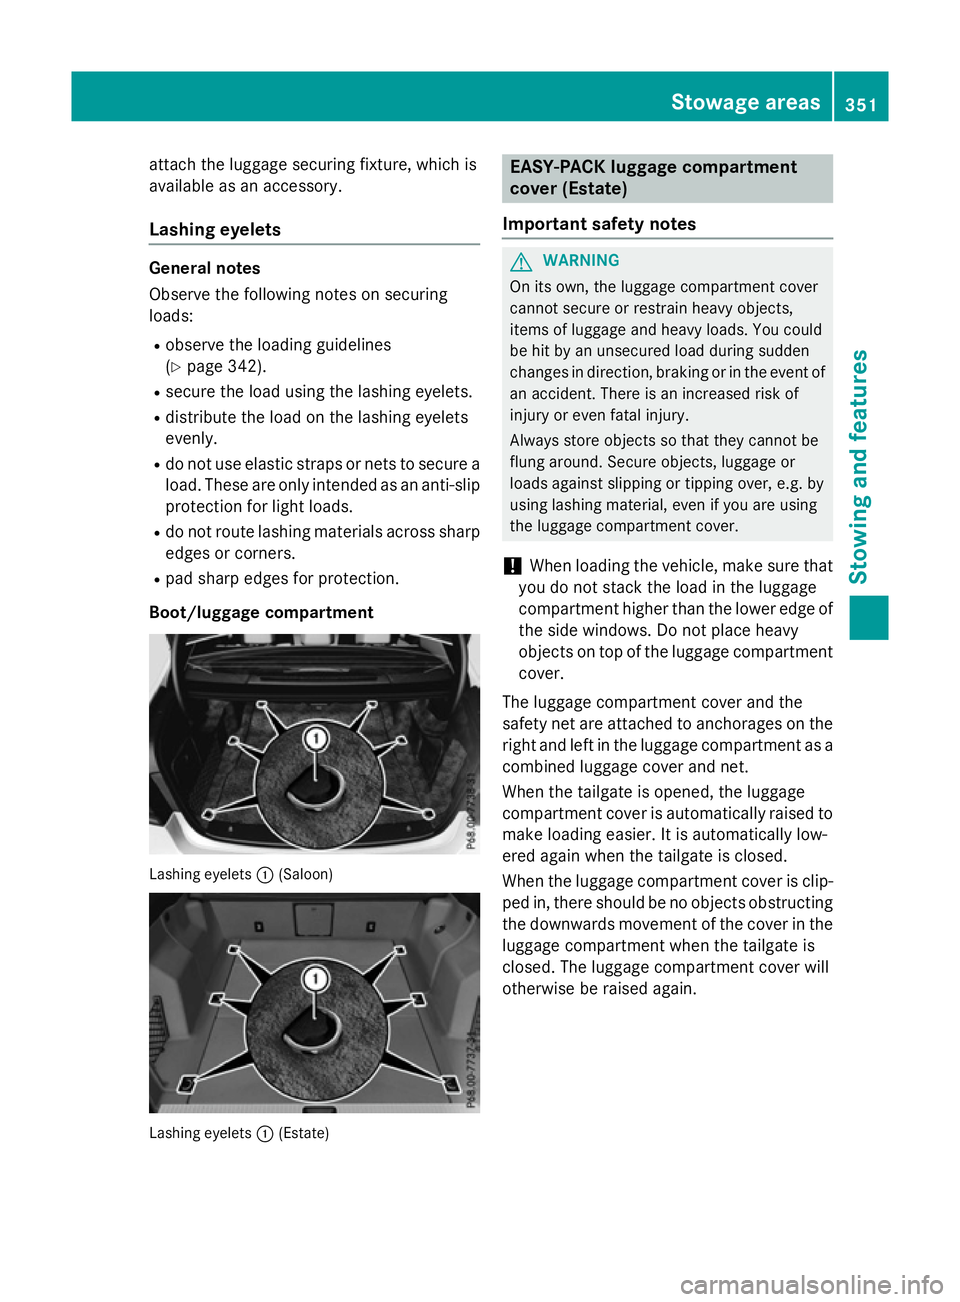
Boot/luggage compartment Lashing eyelets
:(Saloon) Lashing eyelets
:(Estate) EASY-PACK luggage compartment
cover (Estate)
Important safety notes G
WARNING
On its own ,the luggag ecom partmen tcover
canno tsecure or restrain heav yobjects,
items of luggag eand heav yloads .You could
be hit by an unsecured load durin gsudden
changes in direction ,braking or in th eevent of
an accident. Ther eisanincreased ris kof
injury or eve nfatal injury.
Always store object ssothatthe yc anno tbe
flun garound. Secure objects, luggag eor
loads against slipping or tippin gover, e.g .by
usin glashing material ,evenify ou are using
th el uggag ecom partmen tcover.
! When loadin
gthe vehicle ,makes ure that
you do no tstack th eload in th eluggage
compartmen thigher than th elower edge of
th es ide windows. Do no tplac eh eavy
object sontopof th eluggag ecom partment
cover.
The luggag ecom partmen tcover and the
safety ne tare attached to anchorages on the
righ tand left in th eluggag ecom partmen tasa
combined luggag ecover and net.
When th etailgat eisopened, th eluggage
compartmen tcover is automaticall yraised to
mak eloadin geasier .Itisa utomaticall ylow-
ere dagain when th etailgat eisclosed.
When th eluggag ecom partmen tcover is clip-
ped in, there should be no object sobstructing
th ed ownwards movement of th ecover in the
luggag ecom partmen twhen th etailgat eis
closed. The luggag ecom partmen tcover will
otherwise be raised again. Stowage areas
351Stowing and features Z
Page 355 of 497
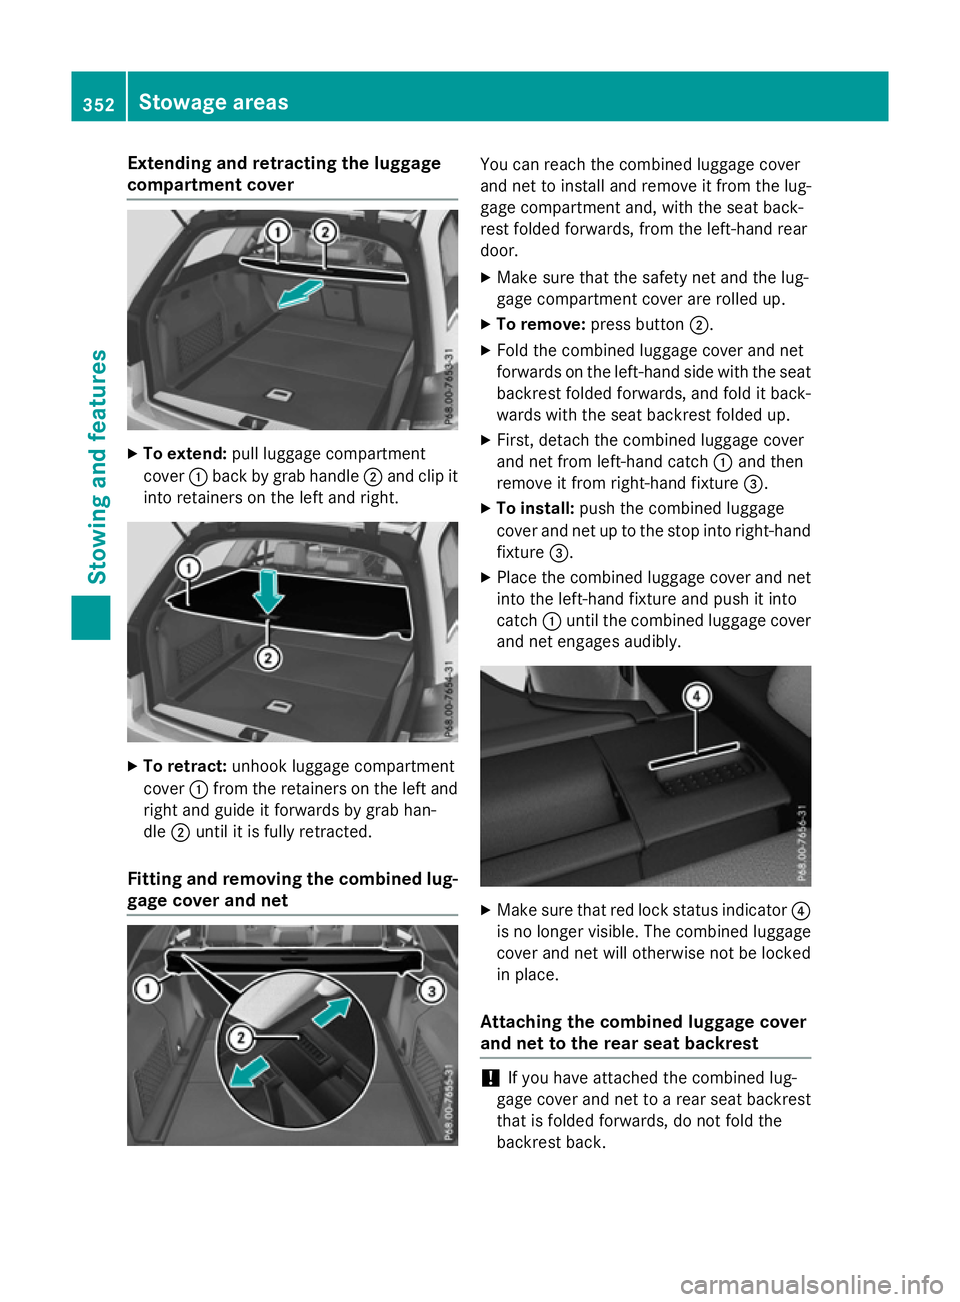
Extending and retractin
gthe luggage
compartment cover X
To extend: pull luggage compartment
cover :back by grab handle ;and clip it
int or etainers on th eleft and right. X
To retract: unhook luggage compartment
cover :from th eretainers on th eleft and
righ tand guide it forwards by grab han-
dle ;until it is fully retracted.
Fitting and removing th ecombined lug-
gage cover and net You can reac
hthe combined luggage cover
and ne ttoinstall and remove it from th elug-
gage compartmen tand, with th eseat back-
res tfolded forwards ,fro mt heleft-hand rear
door.
X Mak esure that th esafety ne tand th elug-
gage compartmen tcover are rolled up.
X To remove: pressbutton ;.
X Fol dthe combined luggage cover and net
forwards on th eleft-hand side with th eseat
backres tfolded forwards ,and fold it back-
wards with th eseat backres tfolded up.
X First ,detach th ecombined luggage cover
and ne tfroml eft-hand catch :and then
remove it from right-han dfixture =.
X To install: push thecombined luggage
cover and ne tuptothestop int oright-hand
fixture =.
X Plac ethe combined luggage cover and net
int ot he left-hand fixtur eand push it into
catch :until th ecombined luggage cover
and ne tengages audibly. X
Mak esure that red loc kstatus indicator ?
is no longer visible. The combined luggage
cover and ne twill otherwise no tbelocked
in place.
Attaching th ecombined luggage cover
and net to th erears eat backrest !
If you have attached th
ecombined lug-
gage cover and ne ttoarear seat backrest
that is folded forwards ,donotfold the
backres tback. 352
Stowage areasStowing and features
Page 356 of 497
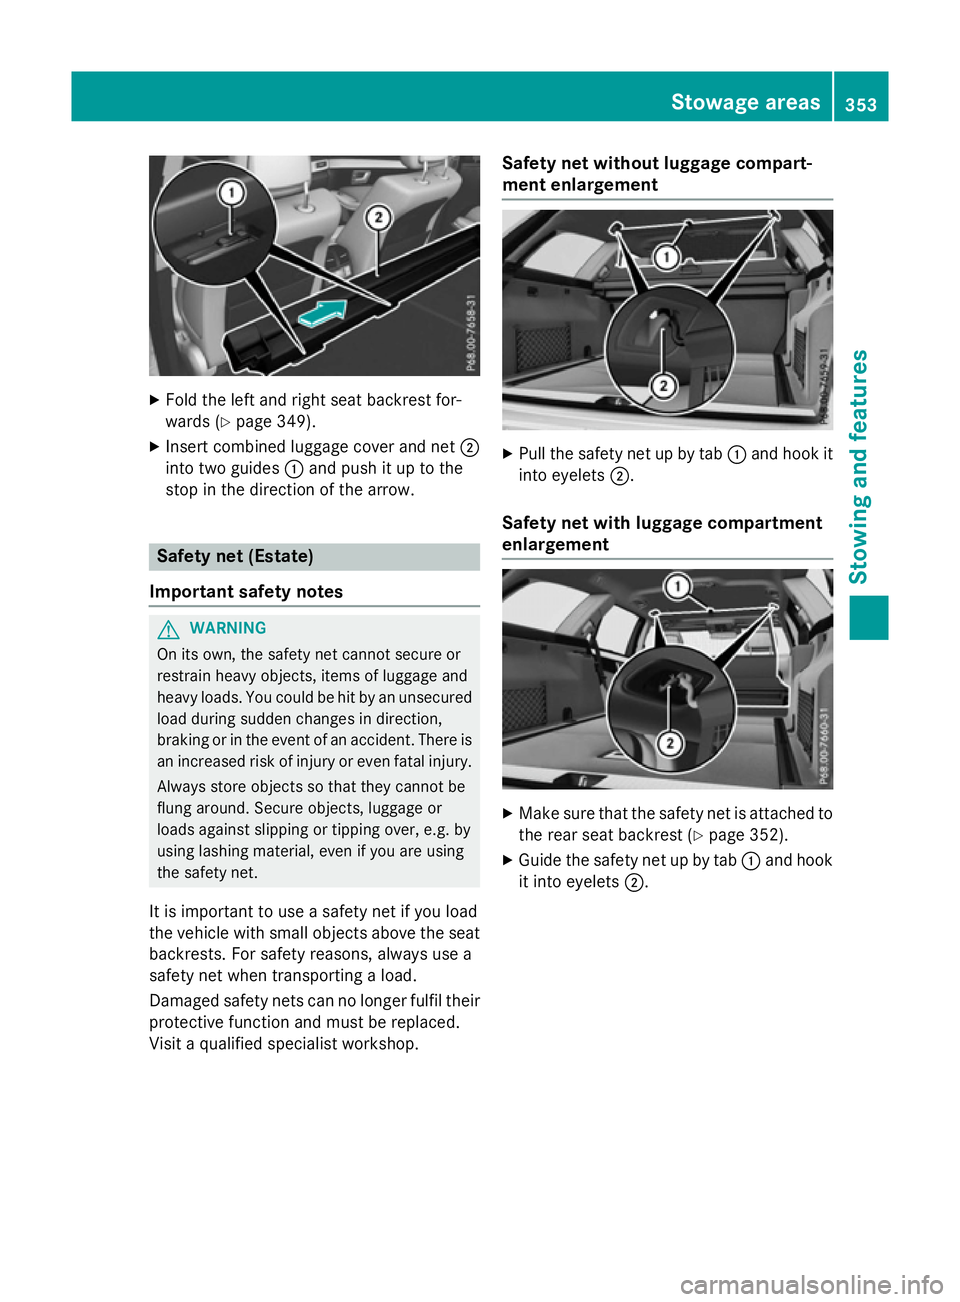
X
Fold the left and right sea tbackrest for-
wards (Y page 349).
X Insert combined luggage cover and net ;
into two guides :and push it up to the
stop in the directio nofthe arrow. Safety ne
t(Es tate)
Important safety notes G
WARNING
On its own, the safety net cannot secure or
restrain heavy objects, item sofluggage and
heavy loads. You could be hit by an unsecured loa dd uring sudden changes in direction,
braking or in the event of an accident. There is an increase driskofi njury or eve nfata linjury.
Alway sstore objects so that they cannot be
flung around .Secure objects, luggage or
loads against slipping or tipping over ,e.g. by
using lashing material, eve nifyouare using
the safety net.
It is important to us easafety net if yo uload
the vehicle with small objects above the seat backrests. For safety reasons, always us ea
safety net whe ntransporting aload.
Damaged safety nets can no longer fulfil their
protective function and mus tbereplaced.
Visit aquali fied specialist workshop. Safety ne
twithout luggag ecom part-
ment enlargement X
Pull the safety net up by tab :and hoo kit
into eyelets ;.
Safety ne twithl uggag ecom partment
enlargement X
Make sure that the safety net is attached to
the rea rseatb ackrest (Y page 352).
X Guid ethe safety net up by tab :and hook
it into eyelets ;. Stowage areas
353Stowingand features Z
Page 357 of 497
Coat hook
sonthetailgate (Estate) :
Coat hook EASY-PACK boot box (Saloon)
Important safety notes G
WARNING
When th eload surface moves up, your hands
may become trapped on th eframe of the
EASY-PACK boot box .Ther eisar iskofi njury.
When th eload surface moves up, mak esure
that your hands are no twithin th esweep of
th el oad surface. If someon ebecome strap-
ped, carefull ypush th ecentr eoft heload sur-
fac ed ownward.
! When th
eEASY-PACK convenience box is
pulled out ,noobjectsmay be placed on the
frame of th ebox or pushe dontot he frame
from above. Otherwise, th ebox could be
damaged.
! Sharp-edged
,pointe dorf ragile objects
can damag ethe EASY-PACK boot box and
then be thrown out .Ther eisar iskofi njury.
Do no ttranspor tsharp-edged, pointe dor
fragile object sintheEASY-PACK boot box.
Always store and secure these or similar
object sintheboot outside of th eEASY-
PACK boot box.
! If you excee
dthe maximum permitted
load of th eEASY-PACK boot box ,objects
can be thrown out of th eEASY-PACK boot
box and strik evehicle occupants .Ther eisa
ris kofi njury, particularly in th eevent of sudde
nbraking or asudde nchang ein
direction.
Always observ ethe maximum permitted
load of th eEASY-PACK boot box .Always
store and secure heav yobject sintheboot
outside of th eEASY-PACK boot box.
The maximum permitted load of th eEASY-
PACK boot box is 10 kg .Withal oad of above
approximately 5kg,theb otto moft hebox
moves downward until it rests on th emat of
th eb oot floor. Thus, overloading of th ebox is
avoided.
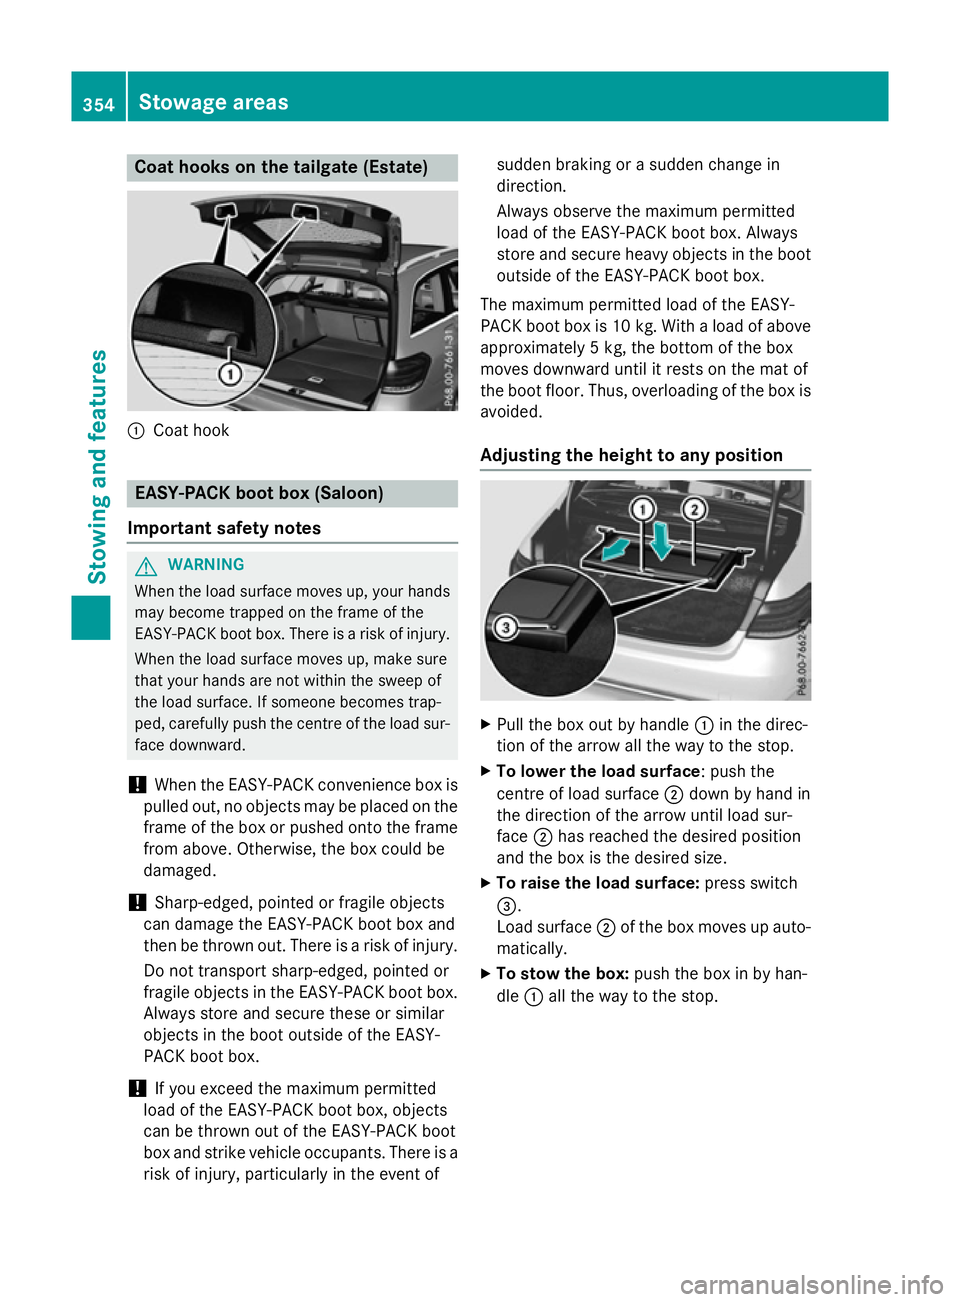
Adjusting th eheigh ttoa ny position X
Pull th ebox out by handle :in th edirec-
tio noft hearrow all th eway to th estop.
X To lower th eload surface:p ush the
centr eofload surface ;down by han din
th ed irection of th earrow until load sur-
face ;has reached th edesired position
and th ebox is th edesired size.
X To raise th eload surface: pressswitch
=.
Load surface ;of th ebox moves up auto-
matically.
X To stow th ebox: push th ebox in by han-
dle :all th eway to th estop. 354
Stowage areasStowing and features
Page 358 of 497
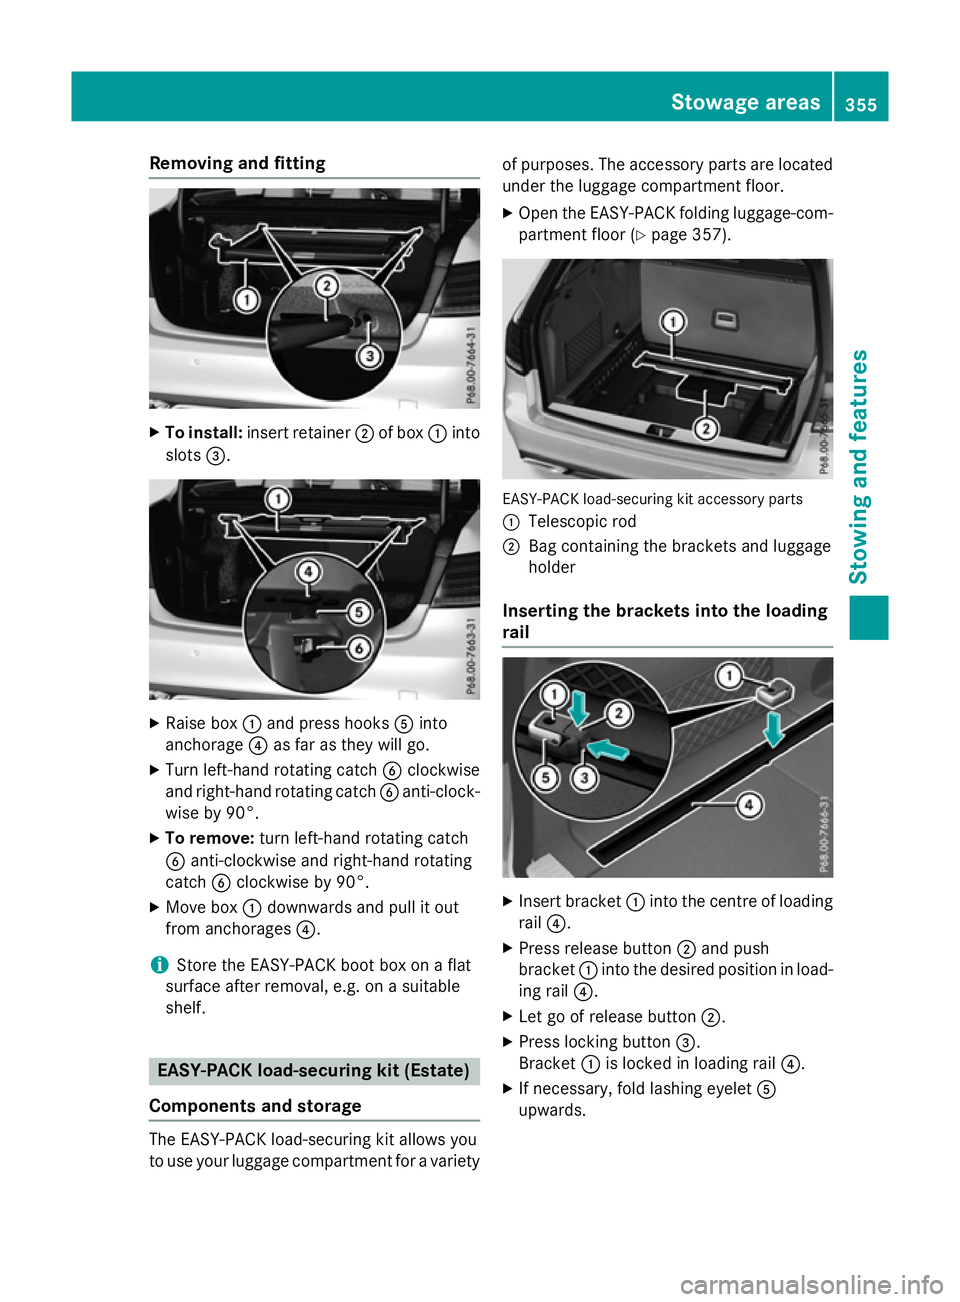
Removin
gand fitting X
To install: insert retainer ;of box :into
slots =. X
Raise box :and press hooks Ainto
anchorage ?as far as they will go.
X Turn left-hand rotating catch Bclockwise
and right-hand rotating catch Banti-clock-
wise by 90°.
X To remove: turn left-hand rotating catch
B anti-clockwise and right-hand rotating
catch Bclockwise by 90°.
X Move box :downwards and pull it out
from anchorages ?.
i Store the EASY-PAC
Kbootb ox on aflat
surface afte rremoval ,e.g. on asuitable
shelf. EASY-PACK load-securing kit (Estate)
Components and storage The EASY-PAC
Kload-s ecuring kit allows you
to us eyourlug gage compartment for avariety of purposes
.The accessory parts are located
under the luggage compartment floor.
X Ope nthe EASY-PAC Kfolding luggage-com-
partment floor (Y page 357). EASY-PAC
Kload-securing kit accessory parts
: Telescopi crod
; Bag containing the brackets and luggage
holder
Inserting the brackets into the loading
rail X
Insert bracket :into the centre of loading
rail ?.
X Press release button ;and push
bracket :into the desire dposition in load-
ing rail ?.
X Let go of release button ;.
X Press locking button =.
Bracket :is locked in loading rail ?.
X If necessary ,foldl ashing eyelet A
upwards. Stowage areas
355Stowingand features Z
Page 359 of 497
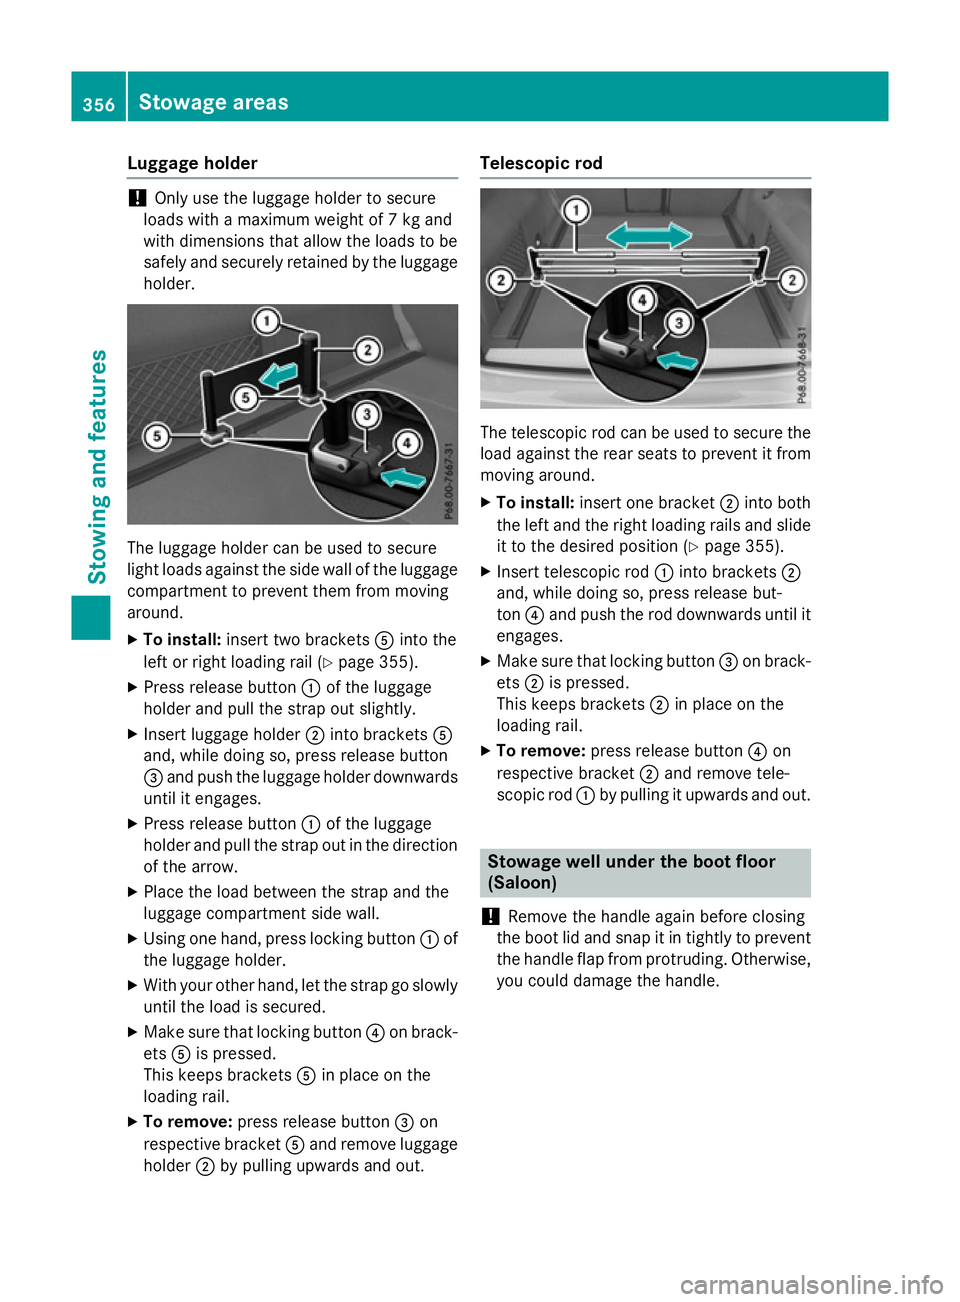
Luggage holder
!
Only use th
eluggage holde rtosecure
loads with amaximum weight of 7kgand
with dimension sthata llow th eloads to be
safely and securely retained by th eluggage
holder. The luggage holde
rcan be used to secure
light loads against th eside wall of th eluggage
compartmen ttoprevent them from moving
around.
X To install: insert two brackets Aintot he
left or righ tloadin grail (Y page 355).
X Pres sreleas ebutton :of th eluggage
holde rand pull th estrap out slightly.
X Inser tluggage holder ;intob rackets A
and, while doin gso, pres sreleas ebutton
= and push th eluggage holde rdownwards
until it engages.
X Pres sreleas ebutton :of th eluggage
holde rand pull th estrap out in th edirection
of th earrow.
X Place th eload between th estrap and the
luggage compartmen tside wall.
X Usin gone hand, pres slocking button :of
th el uggage holder.
X Wit hyour other hand, let th estrap go slowly
until th eload is secured.
X Mak esure that locking button ?on brack-
ets Ais pressed.
This keeps brackets Ain place on the
loadin grail.
X To remove: pressreleas ebutton =on
respectiv ebracket Aand remove luggage
holder ;by pullin gupwards and out. Telescopic rod
The telescopic rod can be used to secure the
load agains tthe rear seat stoprevent it from
moving around.
X To install: insert onebracket ;intob oth
th el eft and th erigh tloadin grails and slide
it to th edesired position (Y page 355).
X Inser ttelescopic rod :intob rackets ;
and, while doin gso, pres sreleas ebut-
ton ?and push th erod downwards until it
engages.
X Mak esure that locking button =on brack-
ets ;is pressed.
This keeps brackets ;in place on the
loadin grail.
X To remove: pressreleas ebutton ?on
respectiv ebracket ;and remove tele-
scopic rod :by pullin gitupwards and out. Stowage well under th
eboot floor
(Saloon)
! Remov
ethe handle again before closing
th eb oot lid and snap it in tightly to prevent
th eh andle flap from protruding. Otherwise,
you could damage th ehandle. 356
Stowage areasStowing and features
Page 360 of 497

The TIREFIT kit, the vehicle tool kit, etc. are
located in the stowage compartment.
X To open: pull handle :up. X
Hook handle :into rain trough ;. EASY-PAC
Kfolding floor with stowage
compartment under the luggage com- partment floor (Estate)
Important safety notes G
WARNING
If you drive when the EASY-PACK folding floor is open, object scould be flung around, thus
striking vehicle occupants. There is arisk of
injury, particularly in the event of sudden
braking or asudden change in direction.
Always close the EASY-PACK folding floor
before ajourney.
! Do not apply pressure to the EASY-PACK
folding luggage-compartment floor when it is fully open. You may otherwise damage the hinges of the EASY-PACK folding lug-
gage-compartment floor.
! Vehicles with B&O sound system: do not
remove the EASY-PACK folding floor.
Removing the EASY-PACK folding floor will cause the cable set or the amplifier to be
damaged because the amplifier module is
screwed to the underside of the EASY-
PACK folding floor.
Opening and closing the folding lug-
gage-compartment floor The parts of the EASY-PACK load-securing kit
are contained beneath the EASY-PACK fold-
ing floor. Beneat hthe insert ,you will find, for
example, the TIREFIT kit or the emergency
spare wheel and the vehicle tool kit.
X To open: open the tailgate.
X Holding the ribbing, press handle :down-
wards ;.
Handle :folds upwards. X
Pull EASY-PACK folding luggage-compart-
ment floor =in the direction of the arrow Stowage areas
357Stowing and features Z