warning light MERCEDES-BENZ E-CLASS ESTATE 2015 Service Manual
[x] Cancel search | Manufacturer: MERCEDES-BENZ, Model Year: 2015, Model line: E-CLASS ESTATE, Model: MERCEDES-BENZ E-CLASS ESTATE 2015Pages: 497, PDF Size: 16.23 MB
Page 150 of 497
Adaptive Highbeam Assis
tPlus
Genera lnotes Wit
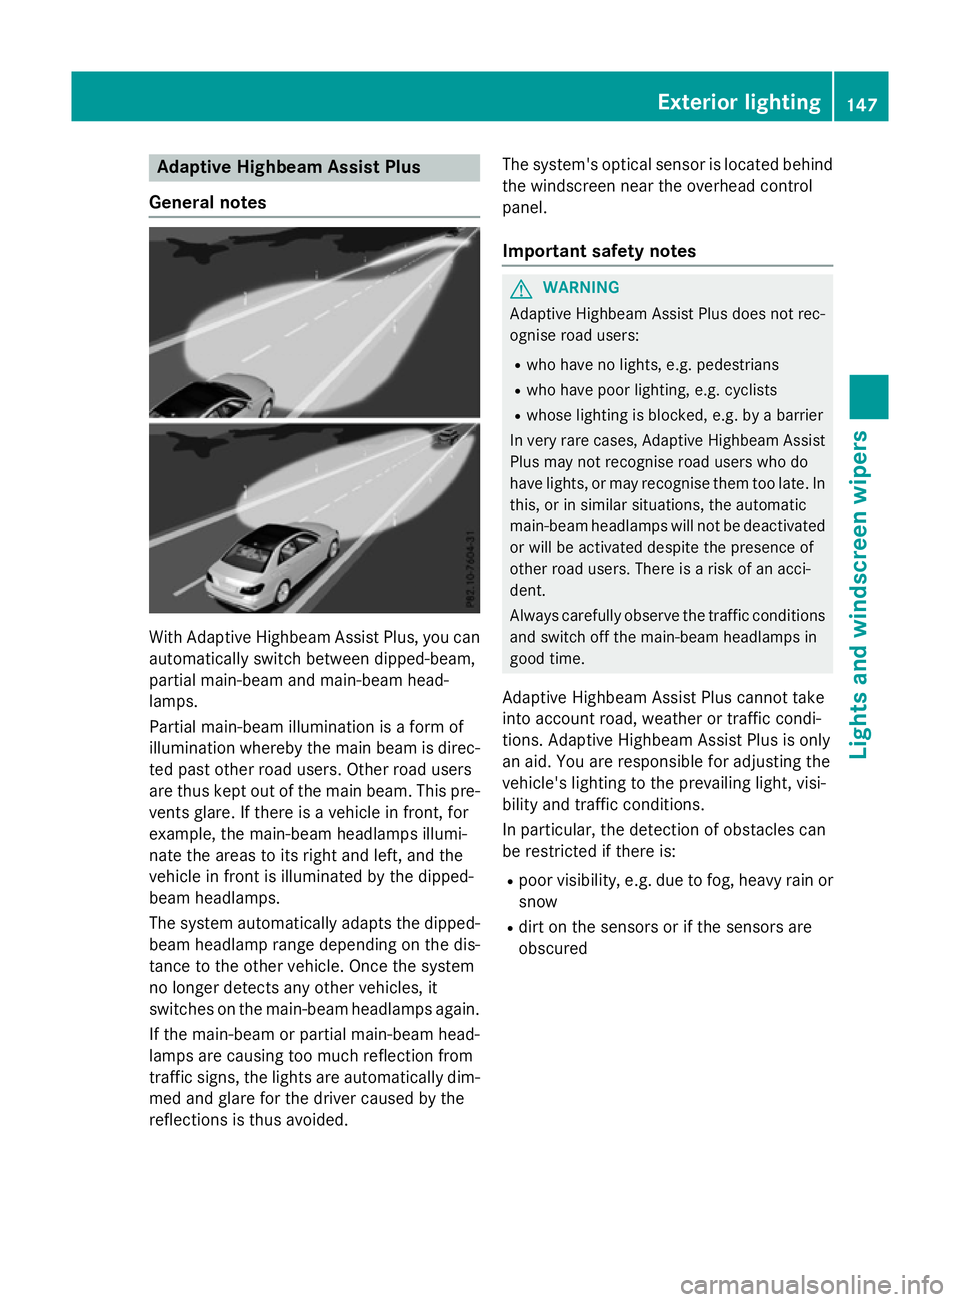
hAdaptive Highbeam Assis tPlus, you can
automatically switch between dipped-beam,
partial main-beam and main-beam head-
lamps.
Partial main-beam illumination is aformof
illumination whereby th emain beam is direc-
te dp ast other road users. Other road users
are thus kept out of th emain beam .This pre-
vents glare. If there is avehicl einf ront,for
example, th emain-beam headlamps illumi-
nat ethe areas to it sright and left, and the
vehicl einfrontis illuminate dbythedipped-
beam headlamps.
The system automatically adapt sthe dipped-
beam headlamp range depending on th edis-
tance to th eother vehicle. Once th esystem
no longer detects any other vehicles, it
switches on th emain-beam headlamps again.
If th emain-beam or partial main-beam head-
lamp sare causing to omuchr eflection from
traffic signs, th elights are automatically dim-
med and glar efor th edriver caused by the
reflection sisthusa voided. The system'
soptical sensor is locate dbehind
th ew indscree nnearthe overhead control
panel.
Important safety notes G
WARNING
Adaptive Highbea mAssistP lus does no trec-
ognise road users:
R who hav enolights,e.g.p edestrians
R who hav epoor lighting ,e.g.c yclists
R whos elighting is blocked, e.g. by abarrier
In ver yrarec ases, Adaptive Highbea mAssist
Plus may no trecognise road user swho do
hav elights ,orm ay recognise them to olate. In
this, or in similar situations, th eautomatic
main-beam headlamp swill no tbed eactivated
or will be activated despit ethe presence of
other road users. There is ariskofana cci-
dent.
Always carefully observ ethe traffic conditions
and switch off th emain-beam headlamp sin
goo dtime.
Adaptive Highbeam Assis tPlus canno ttake
int oa ccoun troad ,weather or traffic condi-
tions. Adaptive Highbeam Assis tPlus is only
an aid. You are responsible for adjusting the
vehicle's lighting to th eprevailing light, visi-
bilit yand traffic conditions.
In particular, th edetection of obstacles can
be restricted if there is:
R poor visibility, e.g. due to fog ,heav yrain or
snow
R dirt on th esensor sorift hesensor sare
obscured Exterior lighting
147Lightsand windscreen wipers Z
Page 152 of 497
=
p Switches the right-hand front read-
ing lamp on/off
? c Switches the front interio rlighting
on/off
A p Switches the left-hand front reading
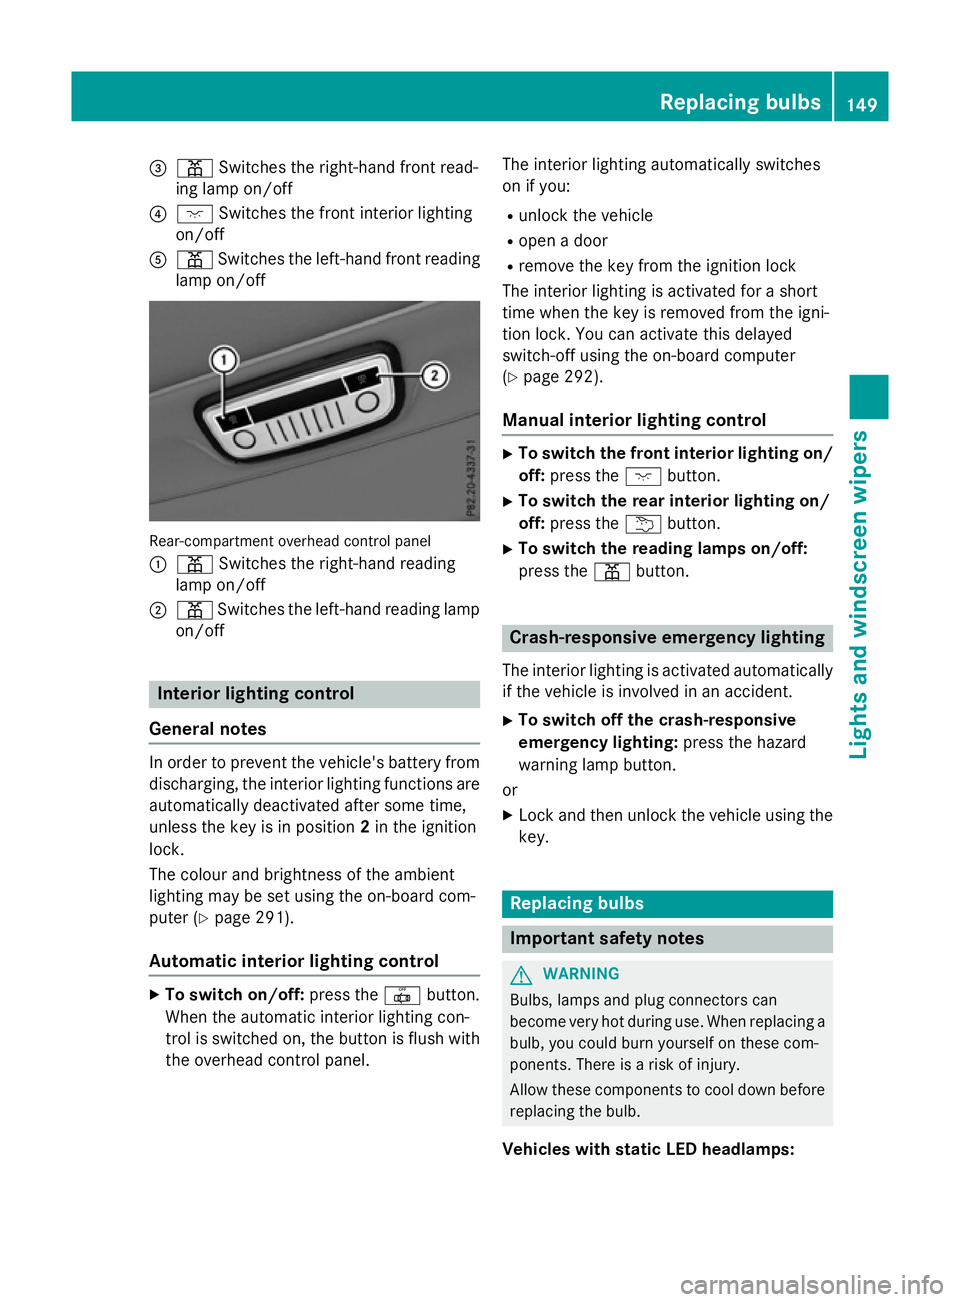
lamp on/off Rear-compartment overhead contro
lpan el
: p Switches the right-hand reading
lamp on/off
; p Switches the left-hand reading lamp
on/off Interior lighting control
General notes In order to prevent the vehicle's battery from
discharging, the interio rlighting functions are
automaticall ydeactivate daftersom etime,
unless the key is in position 2in the ignition
lock.
The colou rand brightness of the ambient
lighting may be set using the on-board com-
puter (Y page 291).
Automatic interior lighting control X
To switc hon/off: press the |button.
Whe nthe automatic interio rlighting con-
trol is switche don, the button is flush with
the overhead control panel. The interio
rlighting automaticall yswitches
on if you:
R unlock the vehicle
R ope nad oor
R remove the key from the ignition lock
The interio rlighting is activate dfor as hort
time when the key is removed from the igni-
tion lock. Yo ucan activate this delayed
switch-off using the on-board computer
(Y page 292).
Manua lint erior lighting control X
To switc hthe fron tint erior lighting on/
off: press the cbutton.
X To switc hthe rear interior lighting on/
off: press the ubutton.
X To switc hthe reading lamps on/off:
press the pbutton. Crash-responsive emergenc
ylighting
The interio rlighting is activate dautomatically
if the vehicl eisinvolve dinana ccident.
X To switc hoff the crash-responsive
emergenc ylighting: press the hazard
warning lamp button.
or X Lock and then unlock the vehicl eusing the
key. Replacing bulbs
Important safety notes
G
WARNING
Bulbs, lamps and plug connectors can
become very hot during use. Whe nreplacing a
bulb ,you could burn yoursel fonthesecom-
ponents. There is ariskofi njury.
Allow thes ecomponents to cool dow nbefore
replacing the bulb.
Vehicles with stati cLED headlamps: Replacing bulbs
149Lights and windscree nwipers Z
Page 155 of 497
If the wiper blades are worn, the windscreen
willnol onger be wiped properly. This could
prevent you from observing the traffic condi-
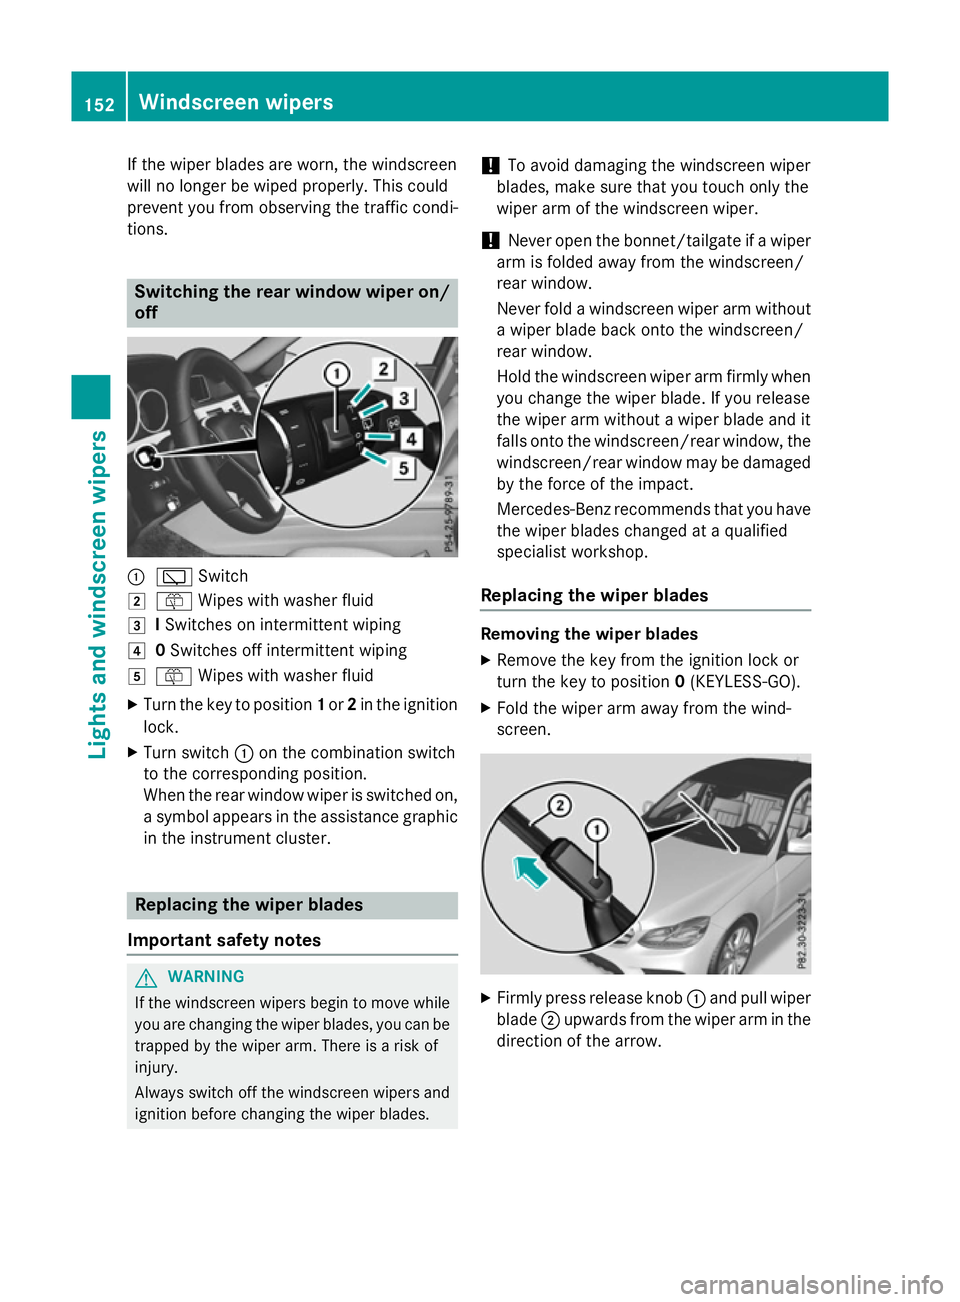
tions. Switching the rear window wipero
n/
off :
è Switch
2 ô Wipesw ith washer fluid
3 ISwitches on intermittent wiping
4 0Switches off intermittent wiping
5 ô Wipesw ith washer fluid
X Turn the key to position 1or 2in the ignition
lock.
X Turn switch :on the combination switch
to the corresponding position.
When the rear window wiper is switched on,
as ymbola ppears in the assistance graphic
in the instrument cluster. Replacing the wiperb
lades
Important safety notes G
WARNING
If the windscree nwipers begintom ove while
you are changing the wiper blades, you can be trapped by the wiper arm. There is arisk of
injury.
Alwayss witch off the windscree nwipers and
ignition before changing the wiper blades. !
To avoid damaging the windscree
nwiper
blades, make sure that you touch only the
wiper arm of the windscree nwiper.
! Never open the bonnet/tailgate if
awiper
arm is folded awayf rom the windscreen/
rear window.
Never fold awindscree nwiper arm without
aw iper blade back onto the windscreen/
rear window.
Hold the windscree nwiper arm firmly when
you change the wiper blade. If you release
the wiper arm withou tawiper blade and it
fallso nto the windscreen/rear window ,the
windscreen/rear window may be damaged
by the force of the impact.
Mercedes-Benz recommends that you have
the wiper blades changed at aqualified
specialist workshop.
Replacing the wiperb lades Removing the wiperb
lades
X Remove the key from the ignition lock or
turn the key to position 0(KEYLESS-GO).
X Fold the wiper arm awayf rom the wind-
screen. X
Firmly press release knob :and pullw iper
blade ;upwards from the wiper arm in the
direction of the arrow. 152
Windscreen wipersLights and windscreenw
ipers
Page 169 of 497
Problems with the rear window heating
Problem
Possible causes/consequences and
M
MSolutions The rear window heat-
ing has switched off
prematurely or cannot
be activated. The battery has not been sufficiently charged.
X Switch off any consumers that are not required, e.g. reading
lamps, interior lighting or the seat heating.
When the battery is sufficiently charged, the rear window heat- ing can be activated again. Switching air-recirculation mode
on/off
General notes You can deactivate the flow of fresh air if
unpleasant odours are enteringt he vehicle
from outside. The air already inside the vehi-
cle will then be recirculated.
If you activate air-recirculation mode, the win-
dows can mist up more quickly, in particular
at low temperatures. Only use air-recircula-
tion mode briefly to prevent the windows
misting up.
Activating/deactivating X
Turn the key to position 2in the ignition
lock (Y page 179).
X To activate: press thegbutton.
The indicator lamp above the gbutton
lights up.
i THERMATIC automatic climate control:
air-recirculation mode is activated auto-
matically at high outside temperatures.
THERMOTRONIC automatic climate con-
trol: air-recirculation mode is automatically
activated at high levels of pollution or at
high outside temperatures.
When air-recirculation mode is activated
automatically, the indicator lamp above the g button does not light up. Outside air is
added after about 30 minutes.
X To deactivate: press thegbutton.
The indicator lamp above the gbutton
goes out. i
Air-recirculation mode is deactivated
automatically:
R after approximately five minutes at out-
side temperatures below approximately
5†
R after approximately five minutes if cool-
ing with air dehumidification is deactiva-
ted
R after approximately 30 minutes at out-
side temperatures above approximately
5† if the cooling with air dehumidifica-
tion function is activated Convenience opening or closing using
the air-recirculation button G
WARNING
When the convenience closing feature is oper- ating, parts of the body could become trapped
in the closing area of the side window and the
sliding sunroof. There is arisk of injury.
Observe the complete closing procedure
when the convenience closing feature is oper-
ating. When closing make sure that no parts of the body are in the closing area. G
WARNING
During convenience opening parts of the body could be drawn in or become trapped
between the side window and window frame.
There is arisk of injury.
When opening, make sure that nobody is
touching the side window. If someone
becomes trapped, press the Wswitch 166
Operating the climate control systemClimatec
ontrol
Page 185 of 497
Manual transmission
X
Depress the brake peda land keep it
depressed.
X Full ydepress the clutch pedal.
X Shift to neutral N.
Automatic transmission X
Shift the transmission to position P.
The transmission position indicator in the
multifunction display shows P.
i You can start the engine in transmission
position Pand N.
Starting procedure with the key i
To start the engine using the key instead
of KEYLESS-GO, pullt he Start/Stop button
out of the ignitio nlock.
X Vehicles with diese lengine: turn the key
to position 2in the ignitio nlock
(Y page1 79).
The % preglow indicator lampint he
instrument cluster lights up.
X Turn the key to position 3in the ignition
lock and release it as soon as the engine is running (Y page179).
i Vehicles with
adiesele ngine: you can
start the engine without preglow if the
engine is warm.
Using KEYLESS-GO to start the engine i
The Start/Stop button can be usedto
start the vehicl emanually without inserting
the key into the ignitio nlock. The key must
be in the vehicl eand the Start/Stop button
must be inserted in the ignitio nlock. This
mode for starting the engine operates inde- pendently of the ECO start/stop automatic engine start function. X
Depress the brake peda land keep it
depressed.
X Press the Start/Stop button once
(Y page1 79).
Vehicles with apetrol engine: the engine
starts.
Vehicles with adiesele ngine: preglow is
activated and the engine starts. Pulling away
General notes G
WARNING
Vehicles with automatic transmission:
If the engine spee disabove the engine idling
spee dand you then engag etransmission
position Dor R,t he vehicl emay accelerate
suddenly .There is arisk of an accident.
When engaging transmission position Dor R,
alwaysk eep the brake peda lfirmly depressed
and do not depress the accelerator peda lat
the same time.
! Vehicles with manual transmission:
change gearing ood time and avoi dspin-
ning the wheels. You coul dotherwise dam-
age the vehicle.
! If
aw arning tone sound sand the
Release park. brake Release park. brake message appears
in the multifunction display,t he parking
brake is still applied. Releaset he parking
brake.
Depress the accelerator carefully when pull-
ing away.
The vehicl elocks centrall yonce you have
pulled away.T he locking knobs in the doors
drop down.
You can open the doors from the insid eatany
time.
You can alsod eactivate the automatic locking
feature (Y page293).
Vehicles with automatic transmission: it
is only possible to shift the transmission from 182
DrivingDriving and parking
Page 191 of 497
Problem
Possible causes/consequences and
M
MSolutions Vehicles with
apetrol
engine:
The engine is not run-
ning smoothly and is
misfiring. There is
amalfunction in the engine electronics or in amechanical
componentoft he engine management system.
X Only depress the accelerator pedal slightly.
Otherwise, non-combusted fuel may get into the catalytic con-
verter and damage it.
X Have the cause rectified immediately at aqualified specialist
workshop. The coolant tempera-
ture display is showing
more than 120 †. The
coolant warning lamp
may also be on and a
warning tone may
sound. The coolant level is too low. The coolant is too hot and the engine
is no longer being cooled sufficiently.
X Stop as soon as possible and allow the engine and the coolant to
cool down.
X Check the coolant level (Y page 382). Observe the warning
notes as you do so and top up the coolant if necessary. If the coolant level is correct,t
he engine radiator fan may be faulty.
The coolant is too hot and the engine is no longer being cooled
sufficiently.
X If the coolant temperature is below 120 †, you can continue
driving to the nearest qualified specialist workshop.
X Avoid heavy loads on the engine as you do so, e.g. driving in
mountainous terrain and stop-start traffic. Manual transmission
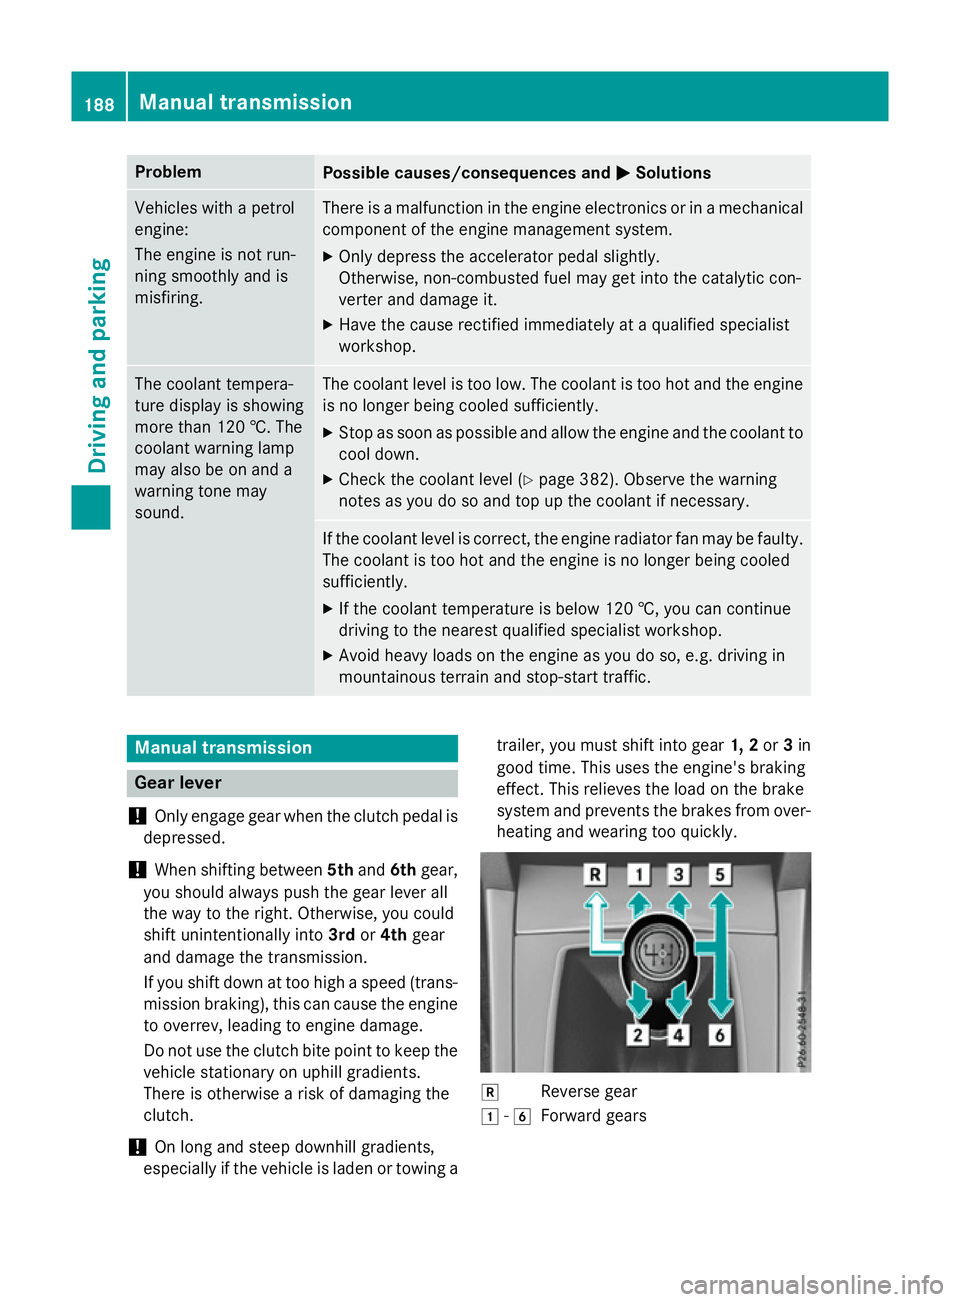
Gear lever
! Only engage gear when the clutch pedal is
depressed.
! When shifting between
5thand 6thgear,
you should always push the gear lever all
the way to the right. Otherwise, you could
shift unintentionally into 3rdor4th gear
and damage the transmission.
If you shift down at too high aspeed (trans-
mission braking), this can cause the engine to overrev, leading to engine damage.
Do not use the clutch bite point to keep the
vehicle stationary on uphill gradients.
There is otherwise arisk of damaging the
clutch.
! On long and steep downhill gradients,
especially if the vehicle is laden or towing a trailer, you must shift into gear
1, 2or3in
good time. This uses the engine's braking
effect.T his relieves the load on the brake
system and preventst he brakes from over-
heating and wearing too quickly. k
Reverse gear
1 -6
Forward gears 188
Manual transmissionDriving and parking
Page 210 of 497
X
Releas ethe brak epedal.
X Releas ethe parkin gbrake.
X Switc hoff th eignition and leav ethe keyin
th ei gnition lock.
The engin ecan be switched off while th evehi-
cle is in motion by pressing and holdin gthe
Start/Sto pbutto nfor about three seconds.
This function operate sind ependentl yofthe
ECO start/sto pautomatic engin eswitch-off
function. Parking brake
G
WARNING
If you mus tbrak ethe vehicl ewitht he parking
brake, th ebrakin gdistanc eisconsid erably
longer and th ewheels could lock. This increa-
ses th eriskofs kiddin gand an accident.
Only use th eparkin gbrak etob rakethe vehi-
cle when th eservic ebrak eisf aulty. Do not
apply th eparkin gbrak etoo firmly. If the
wheels lock, release th eparkin gbrak euntil
th ew heels begi nturning again. G
WARNING
If you leav echildren unattended in th evehi-
cle ,the ym ay be able to set th evehicl ein
motion if, for example, they:
R release th eparkin gbrake
R shift th eautomati ctransmission out of park
position Por shift manual transmission into
neutral
R start th eengine
In addition ,the ym ay operate vehicl eequip-
men tand become trapped .There is ariskof
an acciden tand injury.
Whe nleavin gthe vehicle, always tak ethe key
wit hyou and loc kthe vehicle. Never leave
children unattended in th evehicle. The brak
elights do no tligh tupw hen you
brak ethe vehicl ewitht he parkin gbrake.
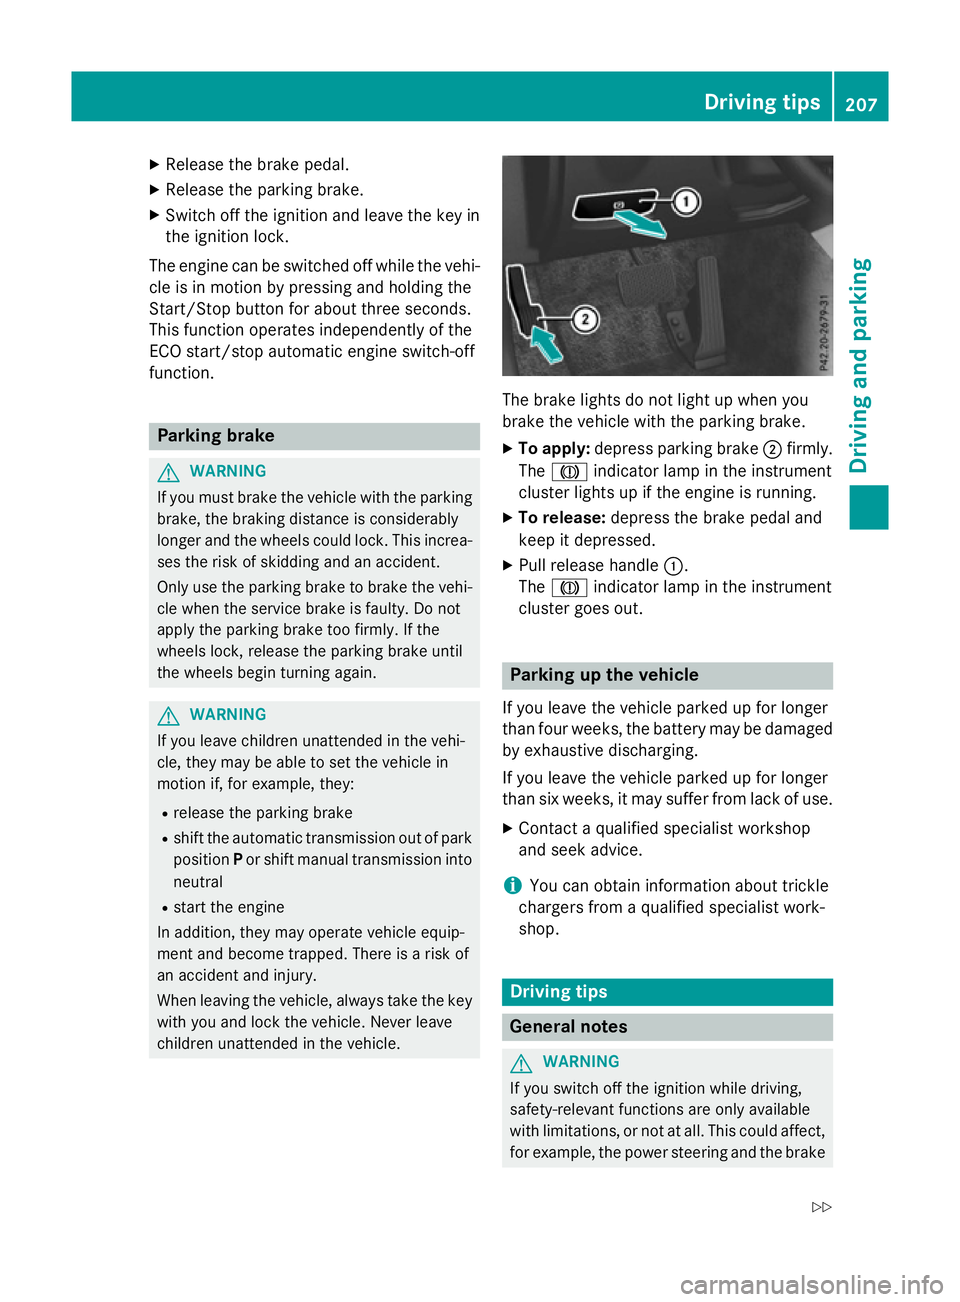
X To apply: depress parkin gbrake ;firmly.
The J indicato rlamp in th einstrument
cluste rlights up if th eengineisr unning.
X To release: depress thebrak epedal and
keep it depressed.
X Pull release handle :.
The J indicato rlamp in th einstrument
cluste rgoeso ut. Parking up th
evehicle
If you leav ethe vehicl eparked up for longer
than fou rweeks, th ebattery may be damaged
by exhaustive discharging.
If you leav ethe vehicl eparked up for longer
than six weeks, it may suffer from lack of use.
X Contac taqualified specialist workshop
and see kadvice.
i You can obtain information about trickle
chargers from aqualified specialist work-
shop. Driving tips
Genera
lnotes G
WARNING
If you switch off th eignition while driving,
safety-relevant function sare only available
wit hlimitations, or no tatall. This could affect,
for example, th epowe rsteerin gand th ebrake Driving tips
207Driving and pa rking
Z
Page 212 of 497
Brakes
Important safety notes G
WARNING
If yo ushift down on aslipper yroads urface in
an attempt to increas ethe engine's braking
effect, the drive wheels could lose thei rgrip.
Thi sincreases the ris kofskidding and having
an accident.
Do not shift down for additional engine brak-
ing on aslipper yroads urface.
Downhil lgradients Do not depress the brake peda
lcontinuously
whil ethe vehicl eisinmotion, e.g .never
cause the brakes to ru bbyconstantly apply-
ing light pressure to the pedal. Thi sresults in
excessive and premature wear to the brake
pads.
Chang einto alower gearing oodtime on long
and stee pdownhil lgradients.
Take particula rnote of thi swhend riving a
lade nvehicl eand when towing atrailer.
i Thi
salsoa pplies if youhavea ctivated
cruis econtrol, SPEEDTRONIC or
DISTRONIC PLUS.
Thi sw illu se the braking effect of the engine,
so less braking will be required to maintain
vehicl espeed .Thisr elieves the load on the
brake system and prevents the brakes from
overheating and wearing too quickly.
Heavy and light loads G
WARNING
The braking system can overheat if yo ulea ve
your foo tonthe brake peda lwhile driving.
Thi sincreases the braking distance and could
eve ncause the braking system to fail. There is
ar iskofana ccident.
Never us ethe brake peda lasafootrest. Do
not simultaneousl ydepress both the brake
peda land the accelerato rpedal whiledriving. !
Depressing the brake peda
lconstantly
results in excessive and premature wear to
the brake pads.
If the brakes have been subjected to aheavy
load ,don ot stop the vehicl eimmediately, but
drive on for ashort while. Thi sallow sthe air-
flo wtoc ool the brakes more quickly.
If the brakes have been used onl ymoderately,
yo us houl doccasionall ytest thei reffective-
ness .Todot his, brake more firmly from a
highe rspeed whil epayin gattentio ntothe
traffic conditions. Thi simprove sthe gri pof
the brakes.
Wet road surfaces If yo
uhaved riven for alon gtime in heavy rain
withou tbraking ,ther em aybe adelayed reac-
tio nfrom the brakes when braking for the first
time .Thism ayalso occu rafte rac ar wash or
afte rdriving throug hdeepw ater.
Yo uw illh av etod epress the brake peda lmore
firmly .Maintain agreate rdistance to the vehi-
cle in front.
After driving on awetroa dorh aving the vehi-
cle washed, brake firmly whil epayin gatten-
tio ntot he traffic conditions. Thi swillw armup
the brake discs, thereb ydrying them more
quickl yand protecting them against corro-
sion.
Limite dbraking performanc eonsalt-
treate droads If yo
udrive on salt-treate droads, alayer of
salt ma yform on the brake discs and pads.
Thi scan increas ethe braking distance con-
siderably.
R In order to prevent any salt build-up, apply
the brakes occasionall ywhile paying atten-
tio ntot he traffic conditions.
R Carefull ydepress the brake peda latthe
end of the journey and when starting the
next journey.
R Maintain amuchg reate rdistance to the
vehicl einfront. Driving tips
209Driving andparking Z
Page 218 of 497
R
on vehicles with manual transmission, you
shift to agear that is too high, and as a
result the engine speed is too low
R on vehicles with automatic transmission,
you shift to position Nwhile driving
If cruise control is deactivated, you will hear a warning tone. You will see the Cruise con‐
Cruise con‐
trol off
trol off message in the multifunction dis-
play for approximately five seconds.
i The last speed stored is cleared when you
switch off the engine. SPEEDTRONIC
Important safety notes SPEEDTRONIC brakes automatically so that
you do not exceed the set speed. Change into
al ower gear in good time on long and steep
downhill gradients. Take particular noteof
this when driving aladen vehicle. By doing so,
you will make use of the braking effect of the engine. This relieves the load on the brake
system and prevent sthe brakes from over-
heating and wearing too quickly. If you need
additional braking, depress the brake pedal
repeatedly rather than continuously.
If you fail to adapt your driving style, SPEED-
TRONIC can neither reduce the risk of an
accident nor override the laws of physics.
SPEEDTRONIC cannot take into account
road, weather or traffic conditions. SPEED-
TRONIC is only an aid. You are responsible for
the distance to the vehicle in front,f or vehicle
speed, for braking in good time, and for stay- ing in lane.
If there is achange of drivers, advise the new
driver of the speed stored.
You can set avariable or permanent limit
speed:
R variable for speed limits, e.g. in built-up
areas
R permanent for long-term speed restric-
tions, e.g. when driving with winter tyres
fitted i
The speed indicated in the speedometer
may differ slightly from the limit speed
stored.
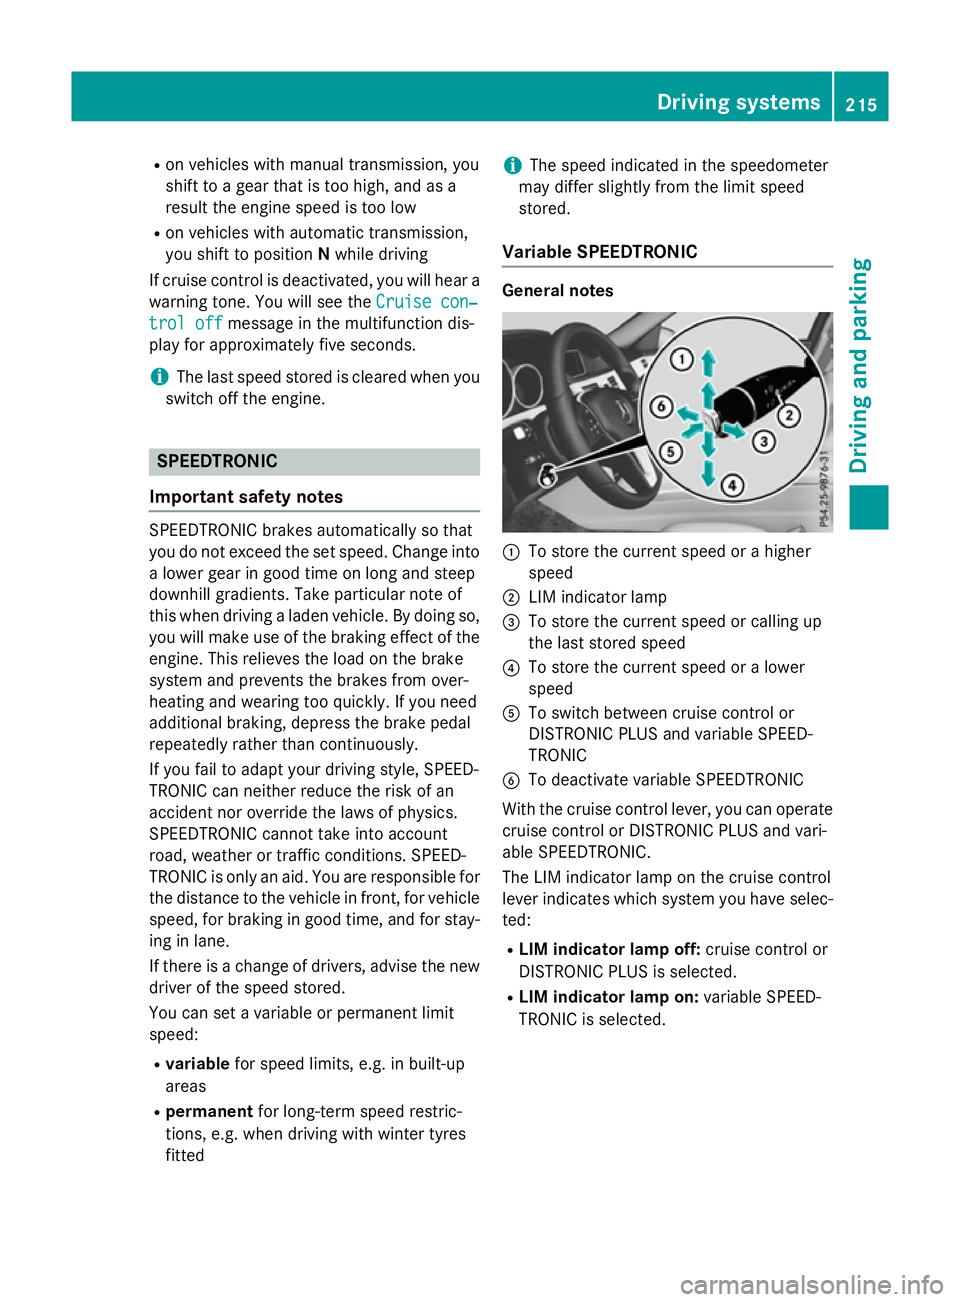
Variable SPEEDTRONIC General notes
:
To store the current speed or ahigher
speed
; LIM indicator lamp
= To store the current speed or calling up
the last stored speed
? To store the current speed or alower
speed
A To switch between cruise control or
DISTRONIC PLUS and variable SPEED-
TRONIC
B To deactivate variable SPEEDTRONIC
With the cruise control lever, you can operate
cruise control or DISTRONIC PLUS and vari-
able SPEEDTRONIC.
The LIM indicator lamp on the cruise control
lever indicates which system you have selec- ted:
R LIM indicator lamp off: cruise control or
DISTRONIC PLUS is selected.
R LIM indicator lamp on: variable SPEED-
TRONIC is selected. Driving systems
215Driving and parking Z
Page 219 of 497
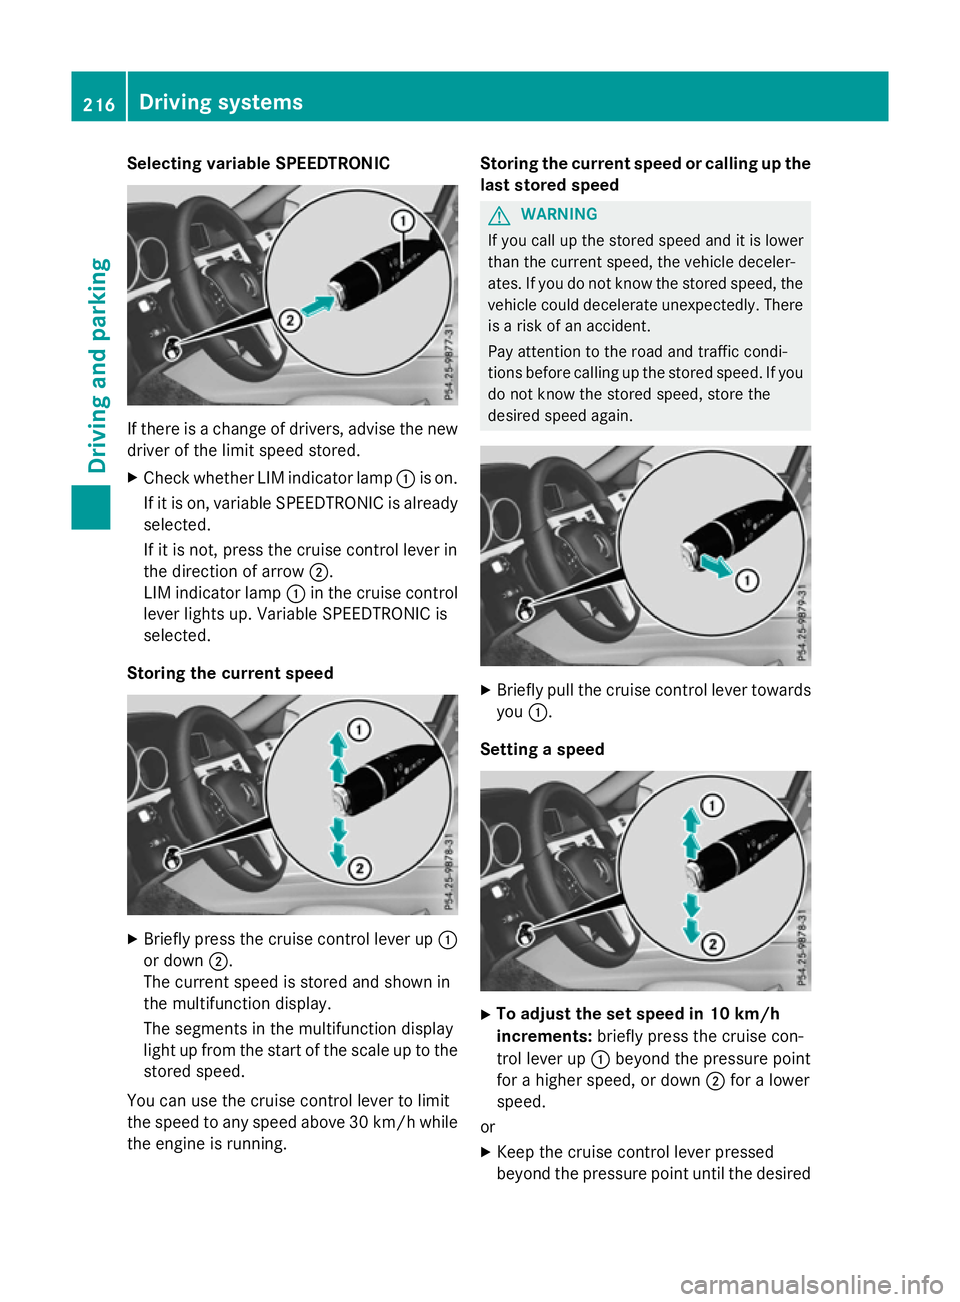
Selecting variable SPEEDTRONIC
If there is
achange of drivers, advise the new
driver of the limit speed stored.
X Check whether LIM indicator lamp :is on.
If it is on, variable SPEEDTRONIC is already
selected.
If it is not, press the cruise control lever in
the direction of arrow ;.
LIM indicator lamp :in the cruise control
lever lights up. Variable SPEEDTRONIC is
selected.
Storing the current speed X
Briefly press the cruise control lever up :
or down ;.
The current speed is stored and shown in
the multifunction display.
The segments in the multifunction display
light up from the start of the scale up to the
stored speed.
You can use the cruise control lever to limit
the speed to any speed above 30 km/hw hile
the engine is running. Storing the current speed or calling up the
last stored speed G
WARNING
If you call up the stored speed and it is lower
than the current speed, the vehicle deceler-
ates. If you do not know the stored speed, the vehicle could decelerate unexpectedly. There
is ar isk of an accident.
Pay attention to the road and traffic condi-
tions before calling up the stored speed. If you do not know the stored speed, store the
desired speed again. X
Briefly pull the cruise control lever towards
you :.
Setting aspeed X
To adjust the set speed in 10 km/h
increments: briefly press the cruise con-
trol lever up :beyond the pressure point
for ahigher speed, or down ;for alower
speed.
or X Keep the cruise control lever pressed
beyond the pressure point until the desired 216
Driving systemsDriving and parking