warning light MERCEDES-BENZ E-CLASS ESTATE 2015 Owner's Guide
[x] Cancel search | Manufacturer: MERCEDES-BENZ, Model Year: 2015, Model line: E-CLASS ESTATE, Model: MERCEDES-BENZ E-CLASS ESTATE 2015Pages: 497, PDF Size: 16.23 MB
Page 120 of 497
Rain-closin
gfeature Whe
nthe key is in position 0in the ignition
lock or is removed ,the panorama sliding sun-
roo fcloses automatically:
R if it starts to rain.
R at extrem eoutsid etemperatures.
R afte rsix hours.
R if there is amalfunction in the voltag esup-
ply
The panorama sliding sunroof remains raised
at the rea rinorder to allo wventilation of the
vehicl einterior.
i If the panorama sliding sunroof is obstruc-
ted when being closed by the rain-closing
feature ,itopens agai nslightly. The rain-
closing feature is then deactivated.
The panorama sliding sunroof doe snot close
if:
R it is raised at the rear.
R it is blocked.
R no rai nisfalling on the are aofthe wind-
screen being monitored by the rai nsensor,
e.g. because the vehicl eisunderabridge. Operating the rolle
rsunblin dfor the
panorama sliding sunroof
Important safety notes G
WARNING
Parts of the bod ycould become trapped
between the rolle rsun blind and frame or slid-
ing sunroof during automatic opening or clos-
ing. There is ariskofi njury.
Whe nopening or closing ,make sure that no
bod yparts are in the sweep of the rolle rsun-
blind.
If someone is trapped:
R release the switch immediately or
R press the switch in any direction during the
automatic opening/closing process The opening/closing process is briefl
ystop-
ped .The rolle rsun blind then returns to its ini-
tia lposition.
The rolle rsun blind shields the vehicl einterior
from sunlight. The two rolle rsunblind scan
only be opened and closed together when the panorama sliding sunroof is closed.
Rolle rsunblin dreversin gfeature The rolle
rsunblind is equipped with an auto-
mati creversing feature .Ifanobject blocks or
restricts the rolle rsun blind during the closing
process ,the rolle rsun blind opens agai nauto-
matically .The automatic reversing feature is,
however, only an ai dand is no substitute for
your attention when closing the rolle rsun-
blind. G
WARNING
The reversing function doe snot react in par-
ticula rtosoft, light and thin objects, e.g. small
fingers .Thism eans that the reversing feature
canno tprevent someone being trapped in
thes esituations. There is ariskofi njury.
Whe nclosing the rolle rsunblind ,make sure
that no bod yparts are in the sweep.
If someone is trapped:
R release the switch immediately or
R press the switch in any direction during the
automatic closing process
The closing process is briefl ystopped .The
rolle rsunblind then returns to its initia lposi-
tion. Sliding sunroof
117Opening and closing Z
Page 122 of 497
Problems with the sliding sunroof
Your vehicle may be fitted with asliding sunroof or apanorama sliding sunroof. In this section,
the term "sliding sunroof" refers to both types of sliding sunroof. G
WARNING
If you close the sliding sunroof again immediately after it has been blocked or reset, the sliding
sunroof closes with increased or maximum force. The reversing feature is then not active. Parts of the body could be trapped in the closing area in the process. This poses an increased risk of
injury or even fatal injury.
Make sure that no parts of the body are in the closing area.
If someone is trapped:
R release the switch immediately or
R press the switch in any direction during the automatic closing process
The closing process is stopped. Problem
Possible causes/consequences and
M MSolutions The sliding sunroof can-
not be closed and you
cannot see the cause. If the sliding sunroof is obstructed during closing and reopens
again slightly:
X Immediately after the sliding sunroof blocks, pull the 3
switch in the overhead control panel down to the point of resist-
ance and hold it until the sliding sunroof is closed.
The sliding sunroof is closed with increased force.
If the sliding sunroof is obstructed again during closing and
reopens again slightly:
X Immediately after the sliding sunroof blocks, pull the 3
switch in the overhead control panel down to the point of resist-
ance and hold it until the sliding sunroof is closed.
The sliding sunroof is closed without the anti-entrapment fea-
ture. Sliding sunroof
119Opening and closing Z
Page 125 of 497
Useful information
i This Owner's Manual describes all mod-
els, series and optional equipment for your
vehicle that were available at the time of
going to press. National variation sare pos-
sible. Not ethat your vehicle may not be
equipped with all of the function sdescri-
bed. This is also the case for system sand
function srelevan ttosafety.
i Read the information on qualified special-
ist workshops: (Y page 27). Correct driver's seat position
G
WARNING
You could lose contro lofthe vehicle while
drivin gifyou:
R adjust the driver' sseat, steering wheel or
mirrors
R faste nthe seat belt
There is arisk of an accident.
Adjust the driver' sseat, head restraint ,steer-
ing wheel and mirrors and faste nyour seat
belt before starting the engine. X
Observ ethe safet yguidelines on seat
adjustment (Y page 123).
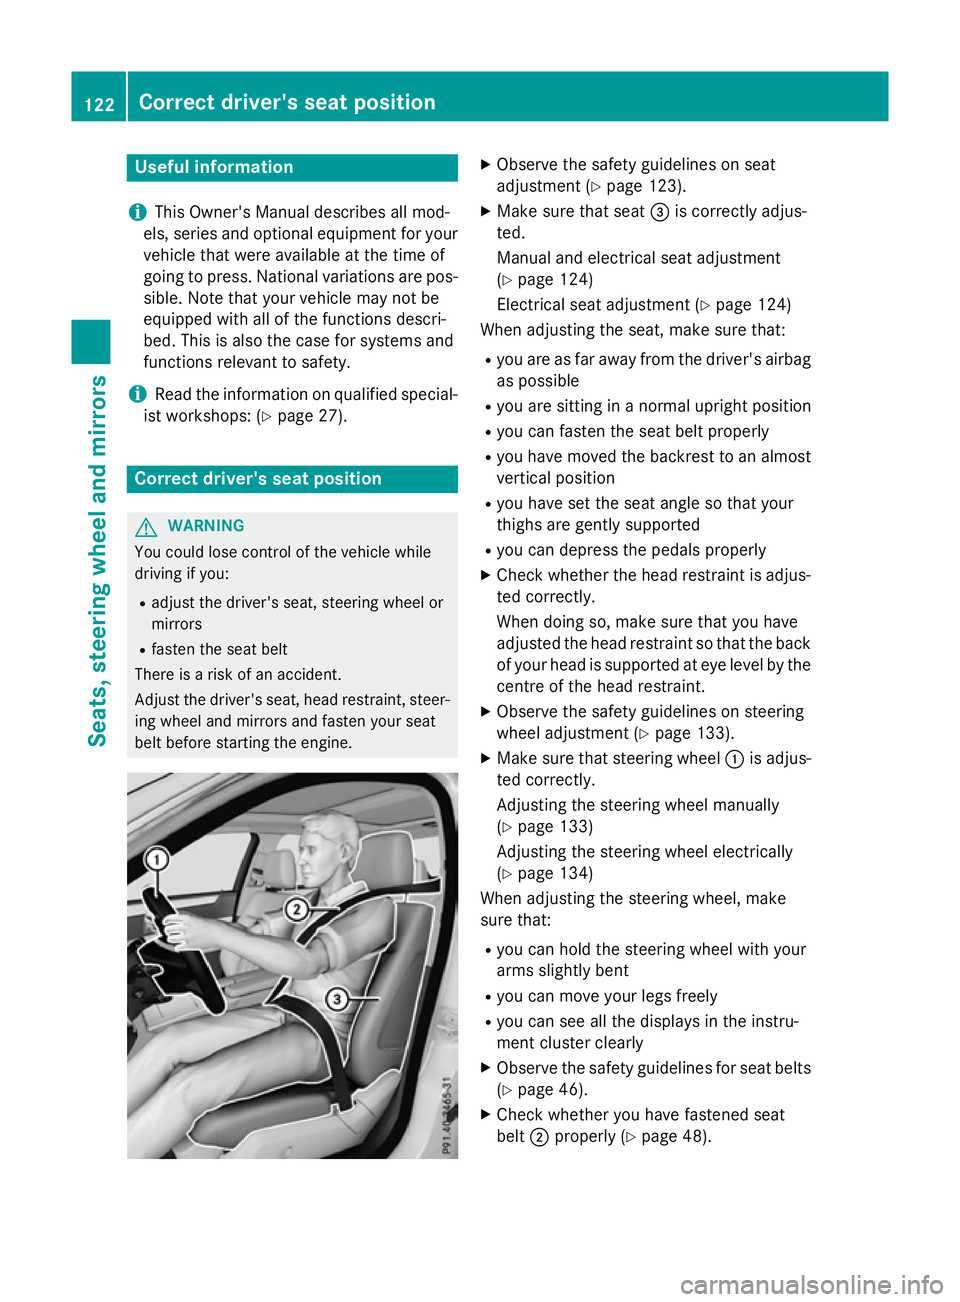
X Make sure that seat =is correctly adjus-
ted.
Manual and electrical seat adjustment
(Y page 124)
Electrical seat adjustment (Y page 124)
When adjusting the seat, make sure that:
R you are as far away from the driver' sairbag
as possible
R you are sitting in anormal upright position
R you can faste nthe seat belt properly
R you have moved the backrest to an almost
vertical position
R you have set the seat angle so that your
thighs are gently supported
R you can depress the pedals properly
X Check whether the head restraint is adjus-
ted correctly.
When doing so, make sure that you have
adjusted the head restraint so that the back
of your head is supported at eye level by the centre of the head restraint.
X Observ ethe safet yguidelines on steering
wheel adjustment (Y page 133).
X Make sure that steering wheel :is adjus-
ted correctly.
Adjustin gthe steering wheel manually
(Y page 133)
Adjustin gthe steering wheel electrically
(Y page 134)
When adjusting the steering wheel, make
sure that:
R you can hold the steering wheel with your
arms slightly bent
R you can move your legs freely
R you can see all the displays in the instru-
ment cluster clearly
X Observ ethe safet yguidelines for seat belts
(Y page 46).
X Check whether you have fastened seat
belt ;properly (Y page 48).122
Correct driver's seat positionSeats, steering wheel and mirrors
Page 128 of 497
?
Sea tfore-and-aft adjustment
A Backrest angle
i Vehicles with memory function: if PRE-
SAFE ®
is activate dand the front-passenger
sea tisinanu nfavourable position, it is
move dtoab etter position.
i Yo
uc an store the sea tsettings using the
memory function (Y page 139).
i Vehicles with the through-loading feature
and memory function: if yo ufoldd owna
rea rseatb ackrest, the respective front
sea tism ovedforward sslightl yifneces-
sary.
i Vehicles with memory function: when the
sea tism ovedforward sorbackwards ,the
headrest is move dupordowna utomati-
cally. Adjustin
gthe hea drestraints
Important safety notes G
WARNING
Yo uc ould lose contro lofthe vehicl ewhile
driving if you:
R adjus tthe driver' sseat, steering wheel or
mirrors
R fasten the sea tbelt
There is ariskofana ccident.
Adjust the driver' sseat, hea drestraint, steer-
ing wheel and mirrors and fasten your seat
belt before starting the engine. G
WARNING
The hea drestraints canno tprovid ethe inten-
de dp rotectio nunless they are fitte dand
adjusted correctly .There is an increased risk
of injury to the hea dand neck in the event of
an accident or sudden braking, for example.
Alway sdrive with the hea drestraints fitted.
Ensur ethatthe centre of the hea drestraints
support the back of each vehicl eoccupant's
hea date yelevel before driving off. Do not interchange the hea
drestraints of the
front and rea rseats. Otherwise, yo uwilln ot
be able to adjus tthe height and angle of the
hea drestraints to the correct position.
Adjust the hea drestraint fore-and-aft posi-
tion so tha titisasc lose as possible to the
back of your head.
Observe the important safety notes regarding the seats (Y page 123).
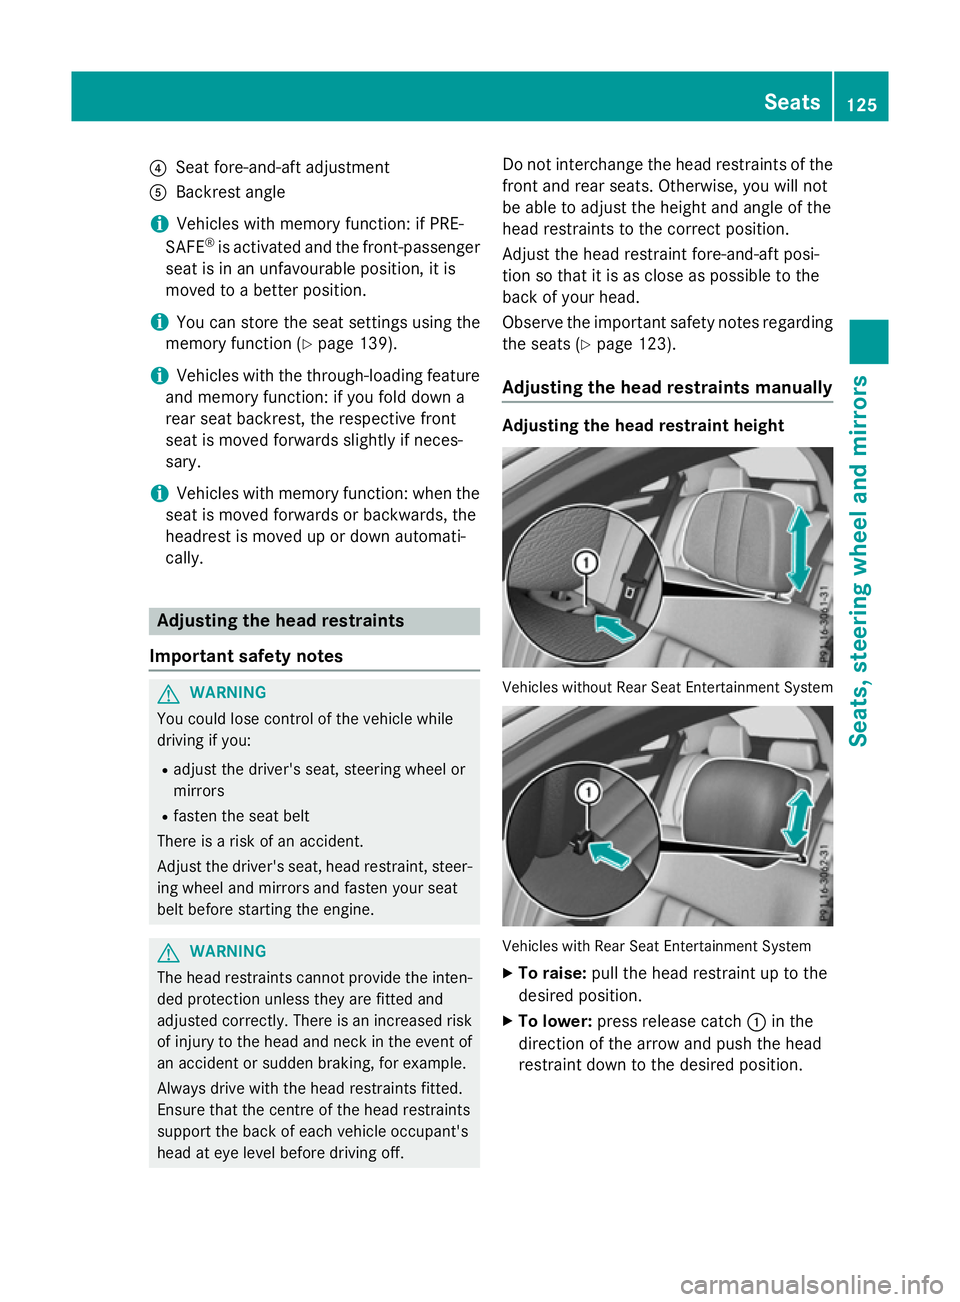
Adjustin gthe hea drestraints manually Adjustin
gthe hea drestrain theight Vehicles withou
tRearS eatE ntertainment System Vehicles with Rear Sea
tEntertainment System
X To raise: pull the hea drestraint up to the
desired position.
X To lower: press release catch :in the
direction of the arrow and push the head
restraint dow ntothe desired position. Seats
125Seats, steering whee land mirrors Z
Page 130 of 497
X
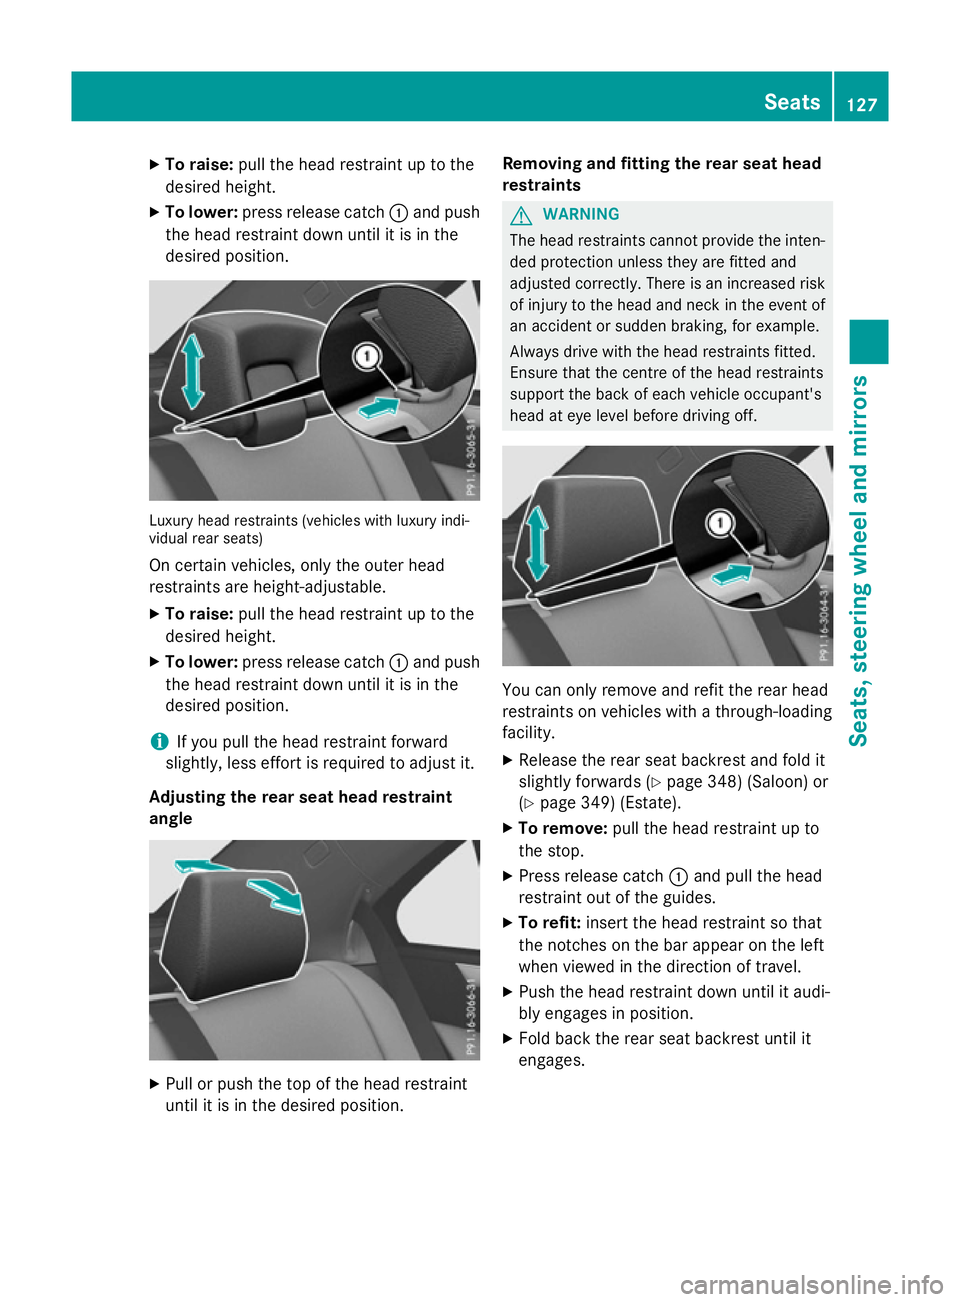
To raise: pull the hea drestraint up to the
desired height.
X To lower: press release catch :and push
the hea drestraint down unti litisinthe
desired position. Luxur
yheadr estraints (vehicle swithl uxuryi ndi-
vidua lrea rs eats)
On certain vehicles, onl ythe outer head
restraints ar eheight-adjustable.
X To raise: pull the hea drestraint up to the
desired height.
X To lower: press release catch :and push
the hea drestraint down unti litisinthe
desired position.
i If yo
upullt he hea drestraint forward
slightly, less effort is required to adjus tit.
Adjusting the rear seat hea drestraint
angle X
Pull or push the top of the hea drestraint
unti litisint he desired position. Removing and fitting the rear seat head
restraints G
WARNING
The hea drestraints canno tprovid ethe inten-
de dp rotection unless they ar efitte dand
adjusted correctly. There is an increased risk of injury to the hea dand neck in the event of
an accident or sudden braking ,for example.
Alway sdrive with the hea drestraints fitted.
Ensure tha tthe centre of the hea drestraints
support the back of each vehicl eoccupant's
hea date yelevel before driving off. Yo
uc an onl yremove and refit the rea rhead
restraints on vehicles with athrough-loading
facility.
X Releas ethe rea rseatb ackres tand fol dit
slightl yforwards (Y page 348)(Saloon) or
(Y page 349 )(Estate).
X To remove: pull the headrestraint up to
the stop.
X Press release catch :and pull the head
restraint ou tofthe guides.
X To refit: insert the hea drestraint so that
the notche sonthe barappea ront he left
when viewe dinthe direction of travel.
X Push the hea drestraint down unti litaudi-
bl ye ngages in position.
X Fol db ackt he rea rseatb ackres tuntilit
engages. Seats
127Seats, steering wheel andmirrors Z
Page 136 of 497
Problems with the seat ventilation
Problem
Possible causes/consequences and
M
MSolutions The seat ventilation has
switched off prema-
turely or cannot be
switched on. The on-board voltage is too low because too many electrical con-
sumers are switched on.
X Switch off electrical consumers that you do not need, such as
the rear window heating or interior lighting.
Once the battery is sufficiently charged, the seat ventilation will
switch back on automatically. Steering wheel
Important safety notes
G
WARNING
You could lose control of the vehicle while
driving if you:
R adjust the driver's seat, steering wheel or
mirrors
R fasten the seat belt
There is arisk of an accident.
Adjust the driver's seat, head restraint ,steer-
ing wheel and mirrors and fasten your seat
belt before startingt he engine. G
WARNING
Children could become trapped by the steer-
ing wheel if they adjust it. There is arisk of
injury.
When leaving the vehicle, always take the key with you and lock the vehicle. Never leave
children unattended in the vehicle.
The electrically adjustable steering wheel can
still be adjusted when there is no key in the
ignition lock. Adjusting the steering wheel man-
ually
G
WARNING
The steering wheel may move unexpectedly if you adjust it while driving. This could cause you to lose control of the vehicle. There is a
risk of an accident.
Make sure that the steering wheel is locked
before driving off. Never unlock the steering
wheel when the vehicle is in motion.
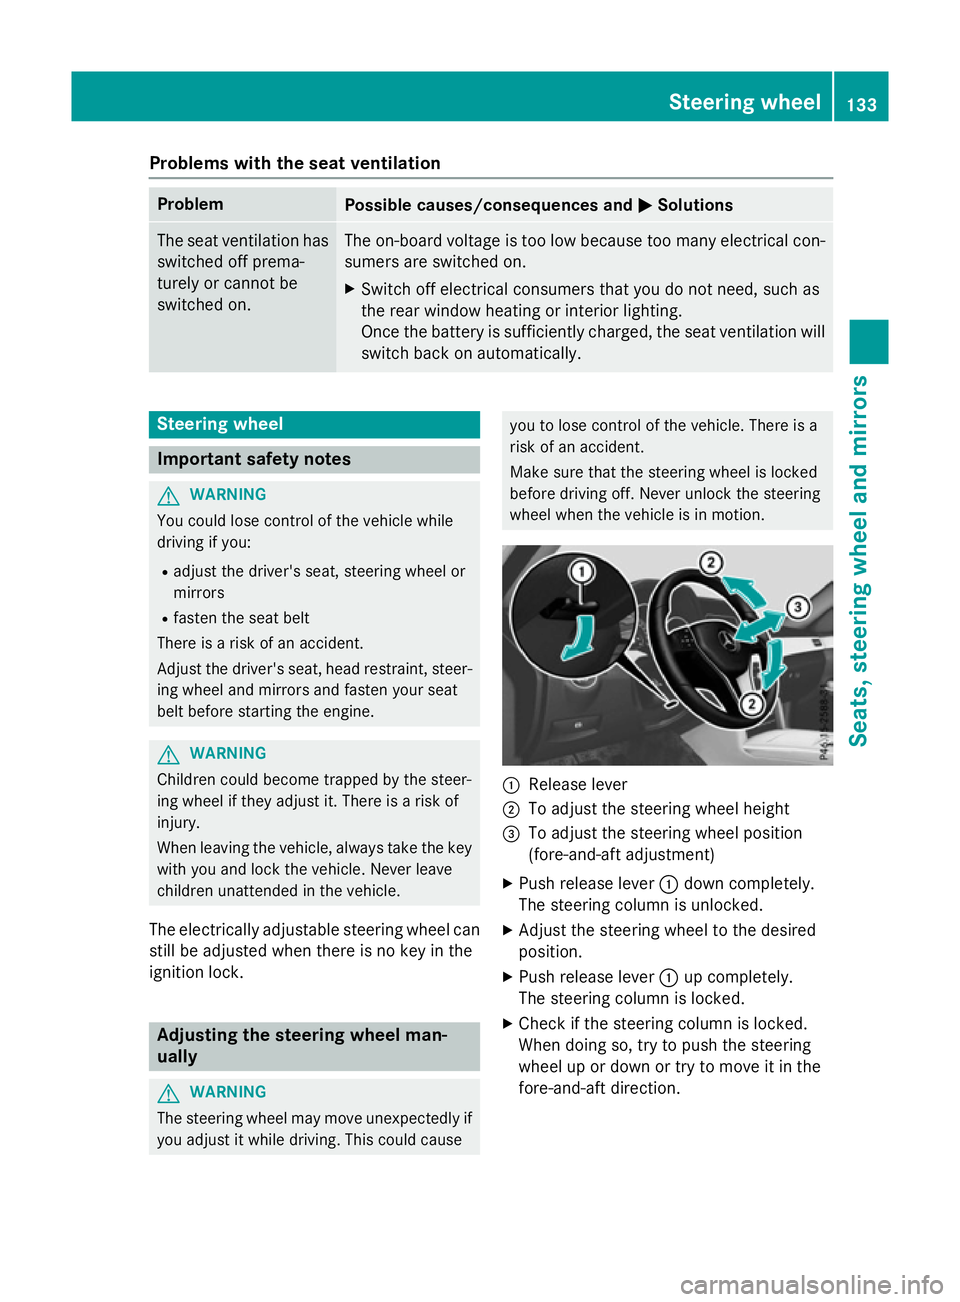
:
Release lever
; To adjust the steering wheel height
= To adjust the steering wheel position
(fore-and-aft adjustment)
X Push release lever :down completely.
The steering column is unlocked.
X Adjust the steering wheel to the desired
position.
X Push release lever :up completely.
The steering column is locked.
X Check if the steering column is locked.
When doing so, try to push the steering
wheel up or down or try to move it in the
fore-and-aft direction. Steering wheel
133Seats, steering wheela nd mirrors Z
Page 138 of 497
Problems with the steering wheel heating
Problem
Possible causes/consequences and
M
MSolutions The steering wheel
heating has switched
itself off prematurely or
cannot be switched on. The on-board voltage is too low because too many electrical con-
sumers are switched on.
X Switch off electrical consumers that you do not need, such as
the rear window heating or interior lighting.
Once the battery is sufficiently charged, the steering wheel
heating will switch back on automatically. EASY-ENTRY/EXIT feature
Important safety notes G
WARNING
When the EASY-ENTRY/EXIT feature adjusts
the steering wheel, you and other vehicle
occupants –particularly children –could
become trapped. There is arisk of injury.
While the EASY-ENTRY/EXIT feature is mak-
ing adjustments, make sure that no one has
any body parts in the sweep of the steering
wheel.
Move the steering wheel adjustment lever if
there is arisk of entrapment by the steering
wheel. The adjustment process is stopped.
Vehicles with amemory function: if there is a
risk of becoming trapped by the steering
wheel, you can also press one of the memory
function position buttons.T he adjustment
process is stopped. G
WARNING
If children activate the EASY-ENTRY/EXIT fea- ture, they can become trapped, particularly
when unattended. There is arisk of injury.
When leaving the vehicle, always take the key with you and lock the vehicle. Never leave
children unattended in the vehicle. G
WARNING
If you drive off while the EASY-ENTRY/EXIT
feature is making adjustments, you could lose
control of the vehicle. There is arisk of an
accident. Always wait until the adjustment process is
complete before driving off.
The EASY-ENTRY/EXIT feature makes getting in and out of your vehicle easier.
You can activate and deactivate the EASY-
ENTRY/EXI Tfeature in the on-board com-
puter (Y page 294).
Position of the steering wheel when the
EASY-ENTRY/EXIT featureisa ctive The steering wheel tilts upwards if you:
R remove the key from the ignition lock
R with KEYLESS-GO: open the driver's door;
KEYLESS-GO must be in position 1
R with the key: open the driver's door; the
key must be in position 0or 1in the ignition
lock (Y page 179)
i The steering wheel only moves upwards if
it has not already reached the upper stop.
Position of the steering wheel for driv-
ing The steering wheel is moved to the previously
set position if:
R the driver's door is closed and
R with KEYLESS-GO: you press the Start/
Stop button once
or
R with the key: you insert the key into the
ignition lock Steering wheel
135Seats, steering wheela nd mirrors Z
Page 139 of 497
If you close the driver's door with the key
inserted in the ignition lock, the steering
wheelisa utomaticall ymoved to the previ-
ouslys et position.
The last positio nofthe steering wheelis
stored when you switch off the ignition or
when you store the setting with the memory
function (Y page 139).
Crash-responsive EASY-EXIT feature If the crash-responsive EASY-EXIT feature is
triggered in an accident, the steering column
willm ove upwards when the driver's door is
opened. This occurs irrespective of the posi-
tion of the key in the ignition lock. This makes it easier to exit the vehicle and rescue the
occupants.
The crash-responsive EASY-EXIT feature is
only operational if the EASY-EXIT/ENTRY fea-
ture is activated in the on-board computer
(Y page 294). Mirrors
Rear-view mirror
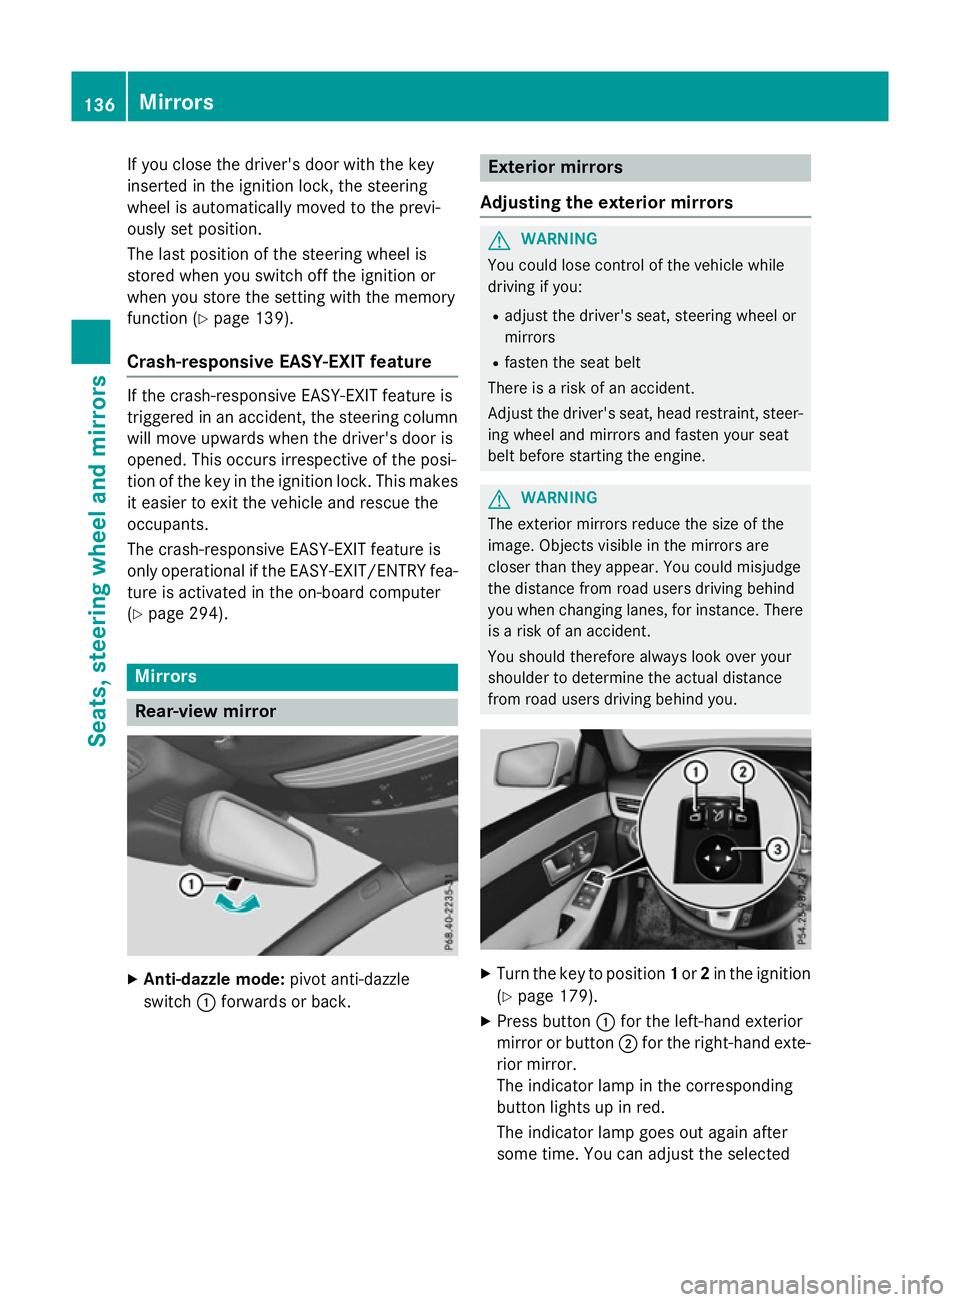
X
Anti-dazzle mode: pivot anti-dazzle
switch :forward sorback. Exterio
rmirrors
Adjusting the exterio rmirrors G
WARNING
You could lose control of the vehicle while
driving if you:
R adjust the driver's seat, steering wheelor
mirrors
R fasten the seat belt
There is arisk of an accident.
Adjust the driver's seat, head restraint, steer-
ing wheela nd mirrors and fasten yours eat
belt before starting the engine. G
WARNING
The exterior mirrors reduce the size of the
image.O bjects visible in the mirrors are
closer than they appear. You could misjudge
the distance from road users driving behind
you when changing lanes, for instance. There is ar isk of an accident.
You shouldt herefore always look over your
shoulder to determine the actual distance
from road users driving behind you. X
Turn the key to position 1or 2in the ignition
(Y page 179).
X Press button :for the left-hand exterior
mirror or button ;for the right-hand exte-
rior mirror.
The indicator lamp in the corresponding
button lights up in red.
The indicator lamp goes out again after
some time. You can adjustt he selected136
MirrorsSeats, steeringw
heel and mirrors
Page 146 of 497
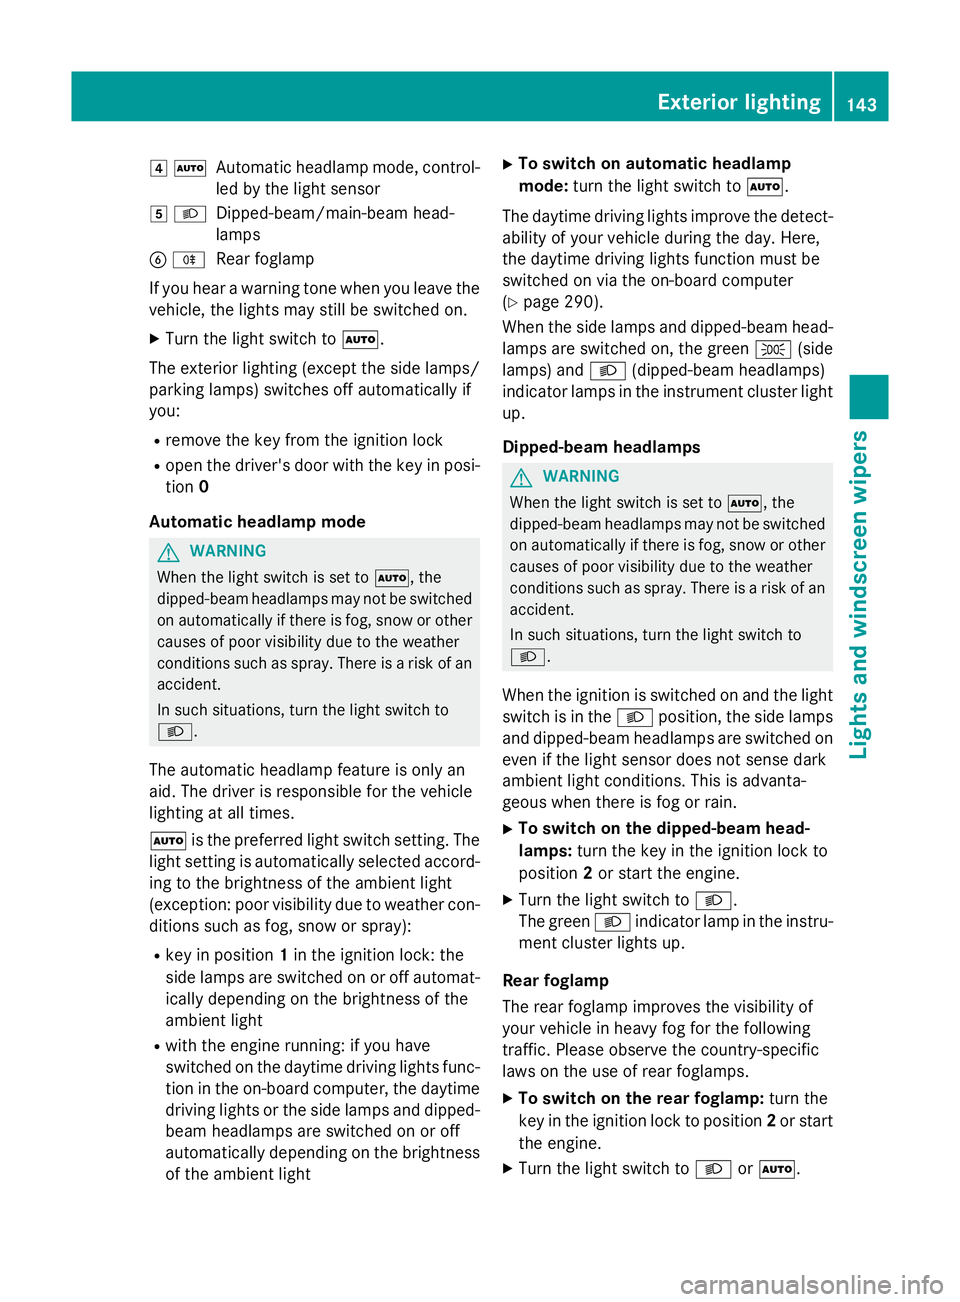
4
Ã
Automatic headlamp mode, control-
le dbyt he light sensor
5 L
Dipped-beam/main-bea mhead-
lamps
B R
Rear foglamp
If yo uhearaw arning tone when yo uleave the
vehicle, the lights ma ystill be switched on.
X Turn the light switch to Ã.
The exterio rlighting (excep tthe side lamps/
parking lamps )switches off automaticall yif
you:
R remove the key fro mthe ignition lock
R open the driver's door with the key in posi-
tion 0
Automati cheadlamp mode G
WARNING
Whe nthe light switch is set to Ã,the
dipped-beam headlamps ma ynot be switched
on automaticall yifthereisf og,snow or other
causes of poor visibility du etothe weather
conditions such as spray .There is ariskofan
accident.
In such situations, tur nthe light switch to
L.
The automatic headlamp featur eisonlyan
aid. The driver is responsibl efor the vehicle
lighting at al ltimes.
à is the preferred light switch setting. The
light setting is automaticall yselecte daccord-
ing to the brightness of the ambient light
(exception: poor visibility du etoweather con-
ditions such as fog ,snow or spray):
R key in position 1in the ignition lock: the
side lamps ar eswitched on or off automat-
icall ydepen ding on the brightness of the
ambient light
R with the engine running :ifyouhave
switched on the daytime driving lights func-
tio nint he on-board computer, the daytime
driving lights or the side lamps and dipped-
beam headlamps ar eswitched on or off
automaticall ydepen ding on the brightness
of the ambient light X
To switc honautomatic headlamp
mode: turnthe light switch to Ã.
The daytime driving lights improv ethe detect-
ability of your vehicl eduring the day. Here,
the daytime driving lights functio nmustbe
switched on via the on-board computer
(Y page 290).
When the side lamps and dipped-beam head- lamps ar eswitched on, the green T(side
lamps )and L (dipped-bea mheadlam ps)
indicator lamps in the instrument cluster light
up.
Dipped-beam headlamps G
WARNING
Whe nthe light switch is set to Ã,the
dipped-beam headlamps ma ynot be switched
on automaticall yifthereisf og,snow or other
causes of poor visibility du etothe weather
conditions such as spray .There is ariskofan
accident.
In such situations, tur nthe light switch to
L.
When the ignition is switched on and the light
switch is in the Lposition, the side lamps
and dipped-beam headlamps ar eswitched on
eve nift he light sensor does not sens edark
ambient light conditions. Thi sisadvanta-
geou swhent her eisf og or rain.
X To switc honthe dipped-beam head-
lamps: turnthe key in the ignition lock to
position 2or start the engine.
X Turn the light switch to L.
The green Lindicator lamp in the instru-
ment cluster lights up.
Rea rfoglamp
The rea rfoglamp improves the visibility of
your vehicl einheavyfog for the following
traffic. Please observe the country-specific
laws on the us eofrearfoglamps.
X To switc honthe rear foglamp: turnthe
key in the ignition lock to position 2or start
the engine.
X Turn the light switch to LorÃ. Exterior lighting
143Lights andwindscreen wipers Z
Page 148 of 497
The blue
Kindicator lamp in the instru-
ment cluster lights up when the main-beam headlamps are switched on.
X To deactivate: move the combination
switch back to its normal position.
The blue Kindicator lamp in the instru-
ment cluster goes out.
Vehicles with Adaptive Highbeam Assist
Plus: when Adaptive Highbeam Assist Plus is
activated, it automatically controls activation
and deactivation of the main-beam head-
lamps (Y page 147).
Headlam pflasher X
To switch on: turn the key in the ignition
lock to position 1or 2,ors tart the engine.
X Pull the combination switch in the direction
of arrow =. Hazard warning lamps
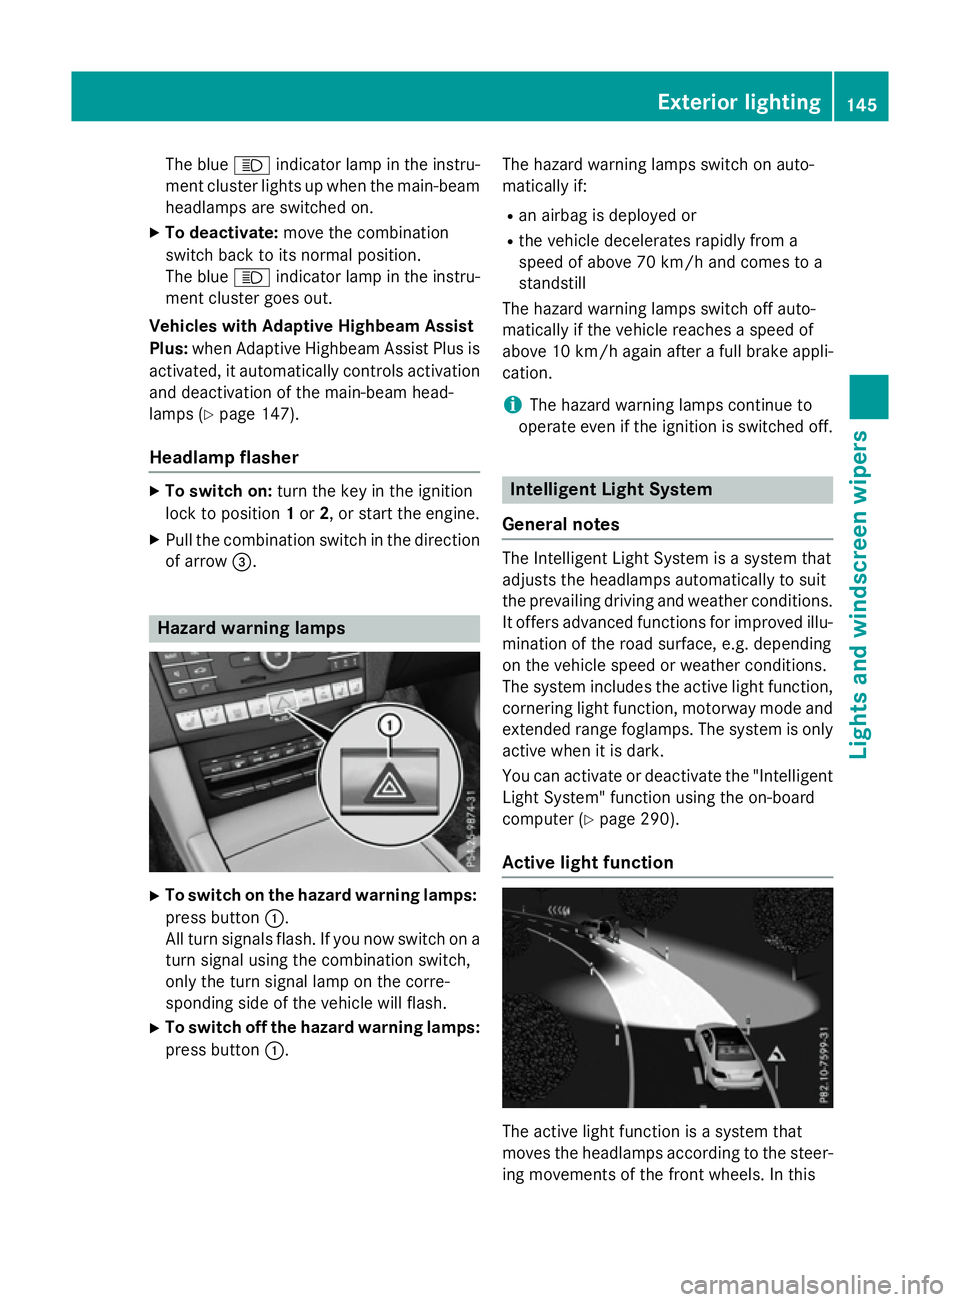
X
To switch on the hazard warning lamps:
press button :.
All turn signals flash. If you now switch on a turn signal using the combination switch,
only the turn signal lamp on the corre-
sponding side of the vehicle will flash.
X To switch off the hazard warning lamps:
press button :. The hazard warning lamps switch on auto-
matically if:
R an airbag is deployed or
R the vehicle decelerates rapidly from a
speed of above 70 km/ha nd comes to a
standstill
The hazard warning lamps switch off auto-
matically if the vehicle reaches aspeed of
above 10 km/ha gain afterafull brake appli-
cation.
i The hazard warning lamps continue to
operate even if the ignition is switched off. Intelligent Light System
General notes The Intelligent Light System is
asystem that
adjusts the headlamps automatically to suit
the prevailing driving and weather conditions.
It offers advanced functions for improved illu-
mination of the road surface, e.g. depending
on the vehicle speed or weather conditions.
The system includes the active light function, cornering light function, motorway mode and
extended range foglamps. The system is only active when it is dark.
You can activate or deactivate the "IntelligentLight System" function using the on-board
computer (Y page 290).
Active light function The active light function is
asystem that
moves the headlamps according to the steer-
ing movements of the front wheels. In this Exterior lighting
145Lights and windscreen wipers Z