boot MERCEDES-BENZ E-CLASS ESTATE 2016 Owners Manual
[x] Cancel search | Manufacturer: MERCEDES-BENZ, Model Year: 2016, Model line: E-CLASS ESTATE, Model: MERCEDES-BENZ E-CLASS ESTATE 2016Pages: 565, PDF Size: 11.34 MB
Page 114 of 565
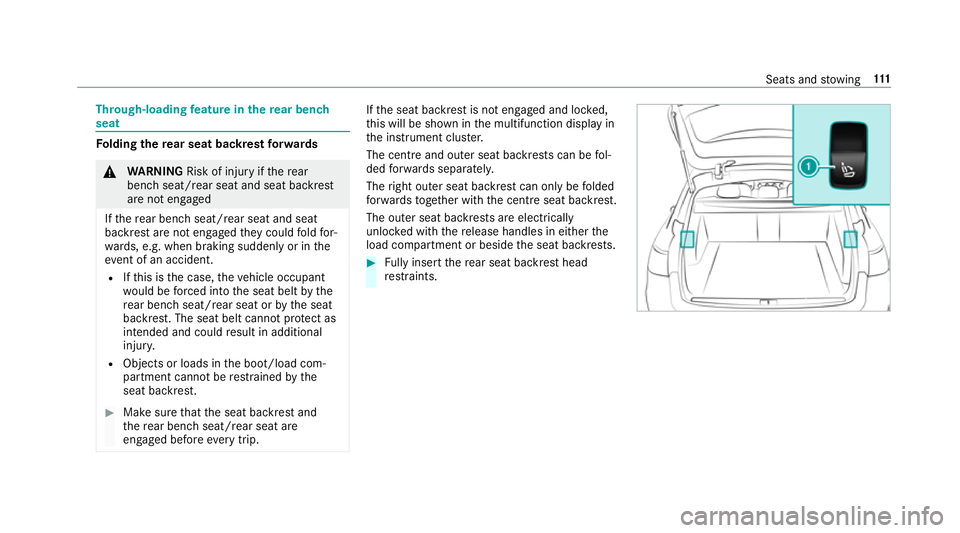
Through-loading
feature in there ar ben ch
seat Fo
lding there ar seat backrest forw ards &
WARNING Risk of inju ryifth ere ar
ben chseat/rear seat and seat backrest
are not engaged
If th ere ar ben chseat/rear seat and seat
backrest are not engaged they could fold for‐
wa rds, e.g. when braking suddenly or in the
ev ent of an accident.
R Ifth is is the case, theve hicle occupant
wo uld be forc ed into the seat belt bythe
re ar ben chseat/rear seat or bythe seat
backrest. The seat belt cann otprotect as
intended and could result in additional
injur y.
R Objects or loads in the boot/load com‐
partment cann otbe restra ined bythe
seat backrest. #
Make sure that the seat backrest and
th ere ar ben chseat/rear seat are
engaged before everytrip. If
th e seat backrest is not engaged and loc ked,
th is will be shown in the multifunction display in
th e instrument clus ter.
The centre and outer seat backrests can be fol‐
ded forw ards separatel y.
The right outer seat backrest can only be folded
fo rw ards toget her with the cent reseat backrest.
The outer seat backrests are electrically
unloc ked with there lease handles in either the
load compartment or beside the seat backrests. #
Fully inse rtthere ar seat backrest head
re stra ints. Seats and
stowing 111
Page 132 of 565
#
Close the loc kable stow age spaces
before starting a journe y. #
Alw aysstow and secure heavy, hard,
poin ted, sharp-edged, fragile or bulky
objects in the boot/load compartment. Obser
vethe no tes on loading theve hicle. &
WARNING Risk offire from placing
objects in the mobile phone stowage
compartment
If yo u place objects in the mobile phone
stow age compartment, they may heat up
exc essively and even catch fire. #
Do not place additional objects, espe‐
cially those mode of me tal, in the
mobile phone stowage compartment. *
NO
TEDama getoobjects caused by
placing them in the mobile phone stow‐
age compartment If
yo u place objects in the mobile phone
stow age compartment, these may be dam‐
aged byelectromagnetic fields. #
Do not place credit cards, storage
media or other objects sensitive to
electromagnetic fields in the mobile
phone stowage compartment. *
NO
TEDama getothe mobile phone
stow age compartment caused byliquids If liquid is spilled in
the mobile phone stow‐
age compartment, the mobile phone stowage
compartment may be damaged. #
Do not spill liquids into the mobile
phone stowage compartment. R
Depending on theve hicle equipment, the
mobile phone is connected totheve hicle's
ex terior aerial via thech arging module. R
The charging function and wireless connec‐
tion of the mobile phone totheve hicle's
ex terior aerial are only available if the ignition
is switched on.
R Small mobile phones may not be able tobe
ch arge d in everyposition of the mobile
phone stowage compartment.
R Largemobile phones which do not rest flat in
th e mobile phone stowage compartment may
not be able tobe charge d or connec ted with
th eve hicle's exterior aerial.
R The mobile phone may heat up during the
ch arging process. The mobile phone can be
cooled in the mobile phone stowage com‐
partment when the air conditioning sy stem is
switched on. The cooling output in the
mobile phone stowage compartment is high‐
est when the controller in theglove box is
closed. Wire
lesscharging of the mobile phone Re
quirements:
R Your mobile phone must be suitable for wire‐
less charging (Qi-compatible mobile phone). Seats and
stowing 12 9
Page 189 of 565
The electric parking brake is
released when the
fo llowing conditions are fulfilled:
R The driver's door is closed.
R The engine is running.
R Age ar has been selec ted, youre lease the
clutch pedal and dep ress the accelera tor
pedal.
R When there ve rsege ar k is selec ted, the
boot lid must be closed.
If th e electric parking brake is released,
th e! indicator lamp in the instrument clus‐
te r goes out.
Ve hicles with automatic transmission:
The electric parking brake is released when the
fo llowing conditions are fulfilled:
R The engine is running.
R The seat belt tongue is inser ted into the seat
belt buckle of the driver's seat.
R The transmission is in position hork and
yo u depress the accelera tor pedal or you
shift from transmission position jtoh or
k. R
Ifth e transmission is in position k,the boot
lid must be closed.
If th e seat belt tongue is not inser ted into the
seat belt buckle of the driver's seat, thefo llow‐
ing conditions must be fulfilled:
R The driver's door is closed.
R You mo vethe transmission out of transmis‐
sion position joryou ha veprev iously
driven faster than 3 km/h.
R Ifth e transmission is in position k,the boot
lid must be closed.
If th e electric parking brake is released,
th e! indicator lamp in the instrument clus‐
te r goes out. Applying or
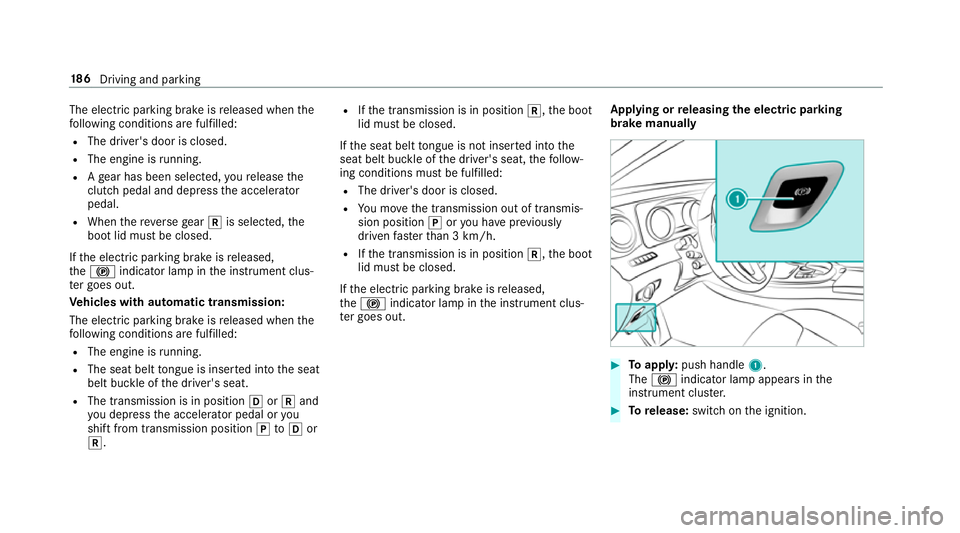
releasing the electric pa rking
brake manually #
Toappl y:push handle 1.
The ! indicator lamp appears in the
instrument clus ter. #
Torelease: switch on the ignition. 18 6
Driving and pa rking
Page 224 of 565
Ac
tivating/deactivating audio fadeout
Yo u can specify whe ther thevo lume of a media
source in the multimedia sy stem is tobe
re duced when Parking Assist PARKTRONIC gives
an audible warning. #
Select Audio fadeout during warning tones .#
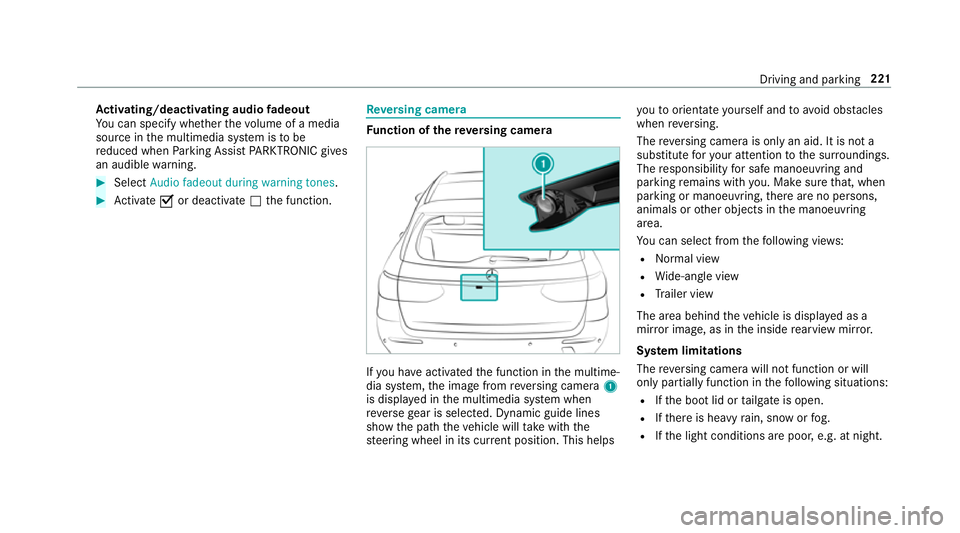
Activate Oor deacti vate ª the function. Re
versing camera Fu
nction of there ve rsing camera If
yo u ha veactivated the function in the multime‐
dia sy stem, the image from reve rsing camera 1
is displa yed in the multimedia sy stem when
re ve rsege ar is selec ted. Dynamic guide lines
show the path theve hicle will take with the
st eering wheel in its cur rent position. This helps yo
uto orientate yourself and toavo id obs tacles
when reve rsing.
The reve rsing camera is only an aid. It is not a
substitute foryo ur attention tothe sur roundings.
The responsibility for safe manoeuvring and
parking remains with you. Make sure that, when
parking or manoeuv ring, there are no persons,
animals or other objects in the manoeuvring
area.
Yo u can select from thefo llowing vie ws:
R Normal view
R Wide-angle view
R Trailer view
The area behind theve hicle is displa yed as a
mir ror image, as in the inside rearview mir ror.
Sy stem limitations
The reve rsing camera will not function or will
only partially function in thefo llowing situations:
R Ifth e boot lid or tailgate is open.
R Ifth ere is heavy rain, snow or fog.
R Ifth e light conditions are poor, e.g. at night. Driving and parking
221
Page 229 of 565
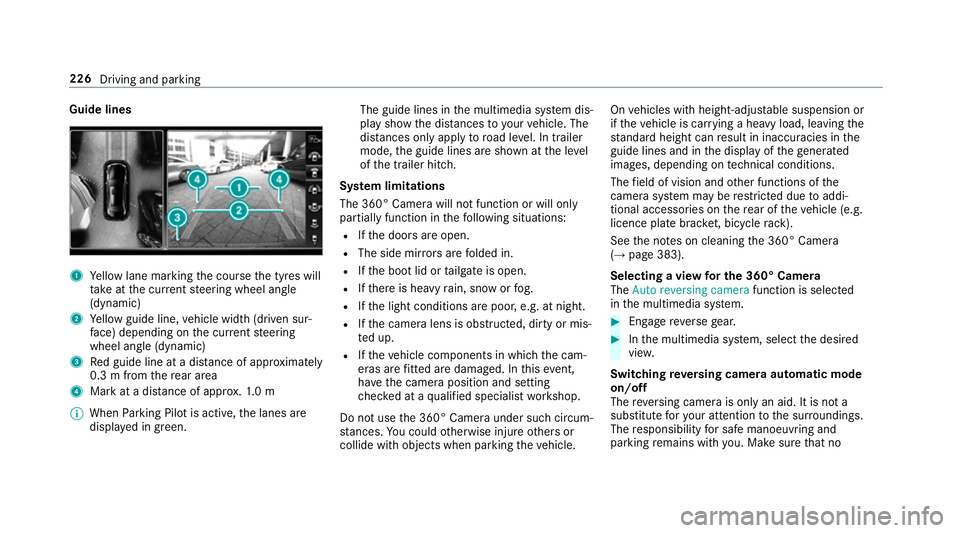
Guide lines
1
Yellow lane marking the course the tyres will
ta ke atthe cur rent steering wheel angle
(dynamic)
2 Yellow guide line, vehicle width (driven sur‐
fa ce) depending on the cur rent steering
wheel angle (dynamic)
3 Red guide line at a dis tance of appr oximately
0.3 m from there ar area
4 Mark at a distance of appr ox.1. 0 m
% When Parking Pilot is active, the lanes are
displa yed in green. The guide lines in
the multimedia sy stem dis‐
play show the dis tances toyour vehicle. The
dis tances only apply toroad le vel. In trailer
mode, the guide lines are shown at the le vel
of the trailer hitch.
Sy stem limitations
The 360° Camera will not function or will only
partially function in thefo llowing situations:
R Ifth e doors are open.
R The side mir rors are folded in.
R Ifth e boot lid or tailgate is open.
R Ifth ere is heavy rain, snow or fog.
R Ifth e light conditions are poor, e.g. at night.
R Ifth e camera lens is obstructed, dirty or mis‐
te d up.
R Ifth eve hicle components in which the cam‐
eras are fitted are dama ged. In this event,
ha ve the camera position and setting
ch ecked at a qualified specialist workshop.
Do not use the 360° Camera under such circum‐
st ances. You could otherwise injure others or
collide with objects when parking theve hicle. On
vehicles with height-adjus table suspension or
if th eve hicle is car rying a heavy load, leaving the
st andard height can result in inaccuracies in the
guide lines and in the display of thege nerated
ima ges, depending on tech nical conditions.
The field of vision and other functions of the
came rasystem may be restricted due toaddi‐
tional accesso ries on there ar of theve hicle (e.g.
licence plate brac ket, bicycle rack ).
See the no tes on cleaning the 360° Camera
(→ page 383).
Selecting a view for the 360° Camera
The Auto reversing camera function is selected
in the multimedia sy stem. #
Enga gereve rsege ar. #
Inthe multimedia sy stem, select the desired
vie w.
Switching reve rsing camera automatic mode
on/off
The reve rsing camera is only an aid. It is not a
substitute foryo ur attention tothe sur roundings.
The responsibility for safe manoeuvring and
parking remains with you. Make sure that no 226
Driving and parking
Page 238 of 565
%
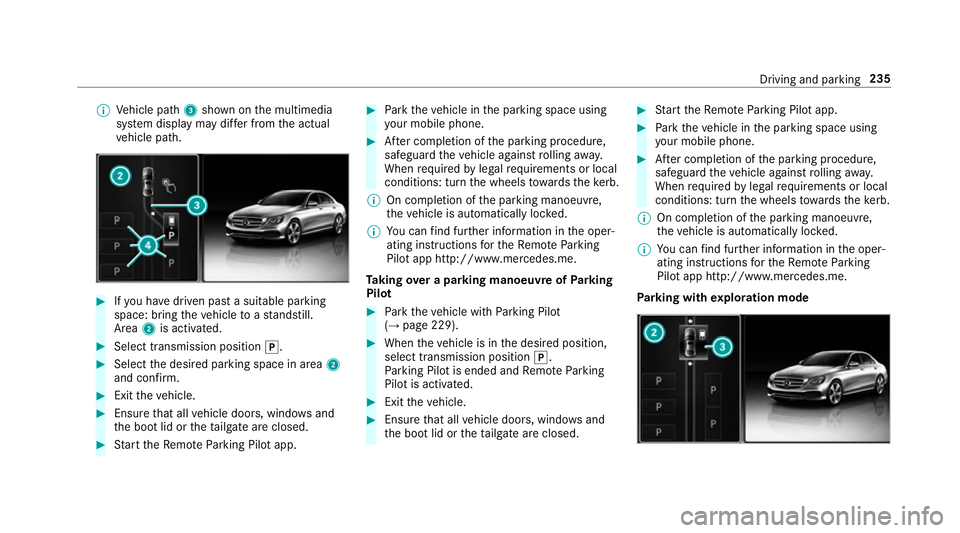
Vehicle path 3shown on the multimedia
sy stem display may dif fer from the actual
ve hicle path. #
Ifyo u ha vedriven past a suitable parking
space: bring theve hicle toast andstill.
Area 2is activated. #
Select transmission position j.#
Select the desired parking space in area 2
and confi rm. #
Exit theve hicle. #
Ensure that all vehicle doors, windo wsand
th e boot lid or theta ilgate are closed. #
Start theRe mo teParking Pilot app. #
Park theve hicle in the parking space using
yo ur mobile phone. #
After completion of the parking procedure,
safeguard theve hicle against rolling away.
When requ ired bylegal requirements or local
conditions: turn the wheels towa rdsth eke rb.
% On completion of the parking manoeuvre,
th eve hicle is automatically loc ked.
% You can find fur ther information in the oper‐
ating instructions forth eRe mo teParking
Pilot app http://www.me rcedes.me.
Ta king over a parking manoeuv reofParking
Pilot #
Park theve hicle with Parking Pilot
(→ page 229). #
When theve hicle is in the desired position,
select transmission position j.
Pa rking Pilot is ended and Remo teParking
Pilot is activated. #
Exit theve hicle. #
Ensure that all vehicle doors, windo wsand
th e boot lid or theta ilgate are closed. #
Start theRe mo teParking Pilot app. #
Park theve hicle in the parking space using
yo ur mobile phone. #
After completion of the parking procedure,
safeguard theve hicle against rolling away.
When requ ired bylegal requirements or local
conditions: turn the wheels towa rdsth eke rb.
% On completion of the parking manoeuvre,
th eve hicle is automatically loc ked.
% You can find fur ther information in the oper‐
ating instructions forth eRe mo teParking
Pilot app http://www.me rcedes.me.
Pa rking with explo ration mode Driving and pa
rking 235
Page 239 of 565
#
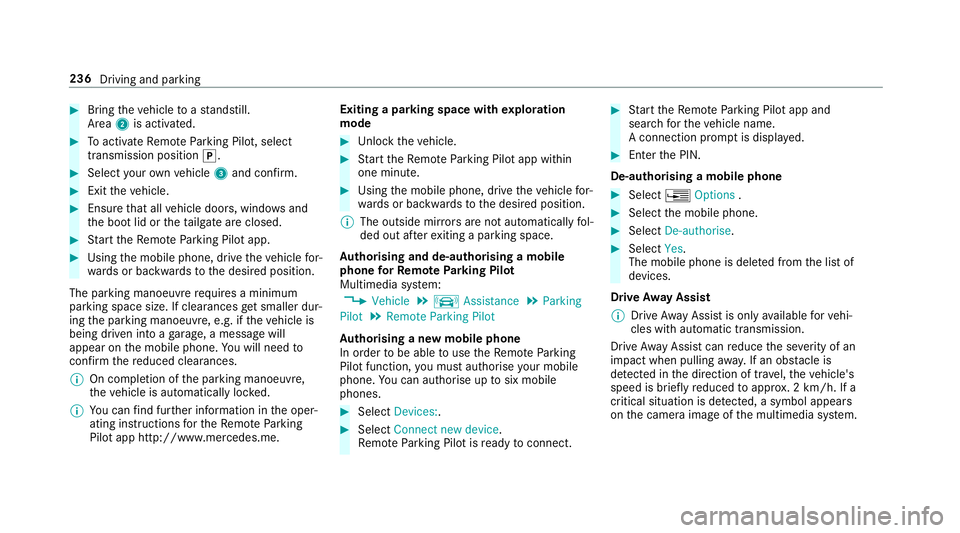
Bring theve hicle toast andstill.
Area 2is activated. #
Toactivate Remo teParking Pilot, select
transmission position j.#
Select your ow nve hicle 3and confirm. #
Exit theve hicle. #
Ensure that all vehicle doors, windo wsand
th e boot lid or theta ilgate are closed. #
Start theRe mo teParking Pilot app. #
Using the mobile phone, drive theve hicle for‐
wa rds or backwards tothe desired position.
The parking manoeuvre requires a minimum
parking space size. If clearances get smaller dur‐
ing the parking manoeuvre, e.g. if theve hicle is
being driven into a garage , a message will
appear on the mobile phone. You will need to
confirm there duced clearances.
% On completion of the parking manoeuvre,
th eve hicle is automatically loc ked.
% You can find fur ther information in the oper‐
ating instructions forth eRe mo teParking
Pilot app http://www.me rcedes.me. Exiting a parking space with
explo ration
mode #
Unlock theve hicle. #
Start theRe mo teParking Pilot app within
one minute. #
Using the mobile phone, drive theve hicle for‐
wa rds or backwards tothe desired position.
% The outside mir rors are not automatically fol‐
ded out af terex iting a parking space.
Au thorising and de-authorising a mobile
phone forRe mo teParking Pilot
Multimedia sy stem:
, Vehicle .
k Assistance .
Parking
Pilot .
Remote Parking Pilot
Au thorising a new mobile phone
In order tobe able touse theRe mo teParking
Pilot function, you must authorise your mobile
phone. You can authorise up tosix mobile
phones. #
Select Devices:. #
Select Connect new device .
Re mo teParking Pilot is ready toconnect. #
Start theRe mo teParking Pilot app and
sear chforth eve hicle name.
A connection prom ptis displa yed. #
Ente rth e PIN.
De-authorising a mobile phone #
Select ¥Options . #
Select the mobile phone. #
Select De-authorise. #
Select Yes.
The mobile phone is dele ted from the list of
devices.
Drive Away Assist
% Drive AwayAssi stis only available forve hi‐
cles with automatic transmission.
Drive AwayAssi stcan reduce the se verity of an
impact when pulling away. If an obs tacle is
de tected in the direction of tr avel, theve hicle's
speed is brief lyreduced toappr ox. 2 km/h. If a
critical situation is de tected, a symbol appea rs
on the camera image of the multimedia sy stem. 236
Driving and parking
Page 366 of 565
In some countries,
thest andards may not be
av ailable, or may not be available in all areas.
A CA module (Conditional Access Module),
whi chis not included in the scope of deliver y,is
used todecrypt HD programmes according to
th e CI+ standard. In some countries, an addi‐
tional smart card is requ ired, which is inse rted
into theCA module (see the manufacturer's
operating manual).
The TVtuner is in the boot in there ar bag on the
ri ght-hand side. The CAmodule is inser ted into
th eTV tune r.
* NO
TEDama getotheCA module and
Smart Card The
CAmodule is designed for use in the
home. When used on the mo ve,th eCA mod‐
ule may overheat in consis tently high outside
te mp eratures and may be damaged. #
Make sure that theCA module is not
subject tohigh temp eratures forex ten‐
ded pe riods of time.
If th eCA module is dama ged, no
enc rypte dch annels can be recei ved. The
TVtuner can recei veprogrammes in Dolby
Digital Plus. Produced under licence
byDol byLaboratories.
Dolby and the double-D symbol are trademar ks
of Dolby Laboratories.
The TVtuner au tomatically sets theTV standard.
TV reception is dependent on thefo llowing fac‐
to rs:
R speed
R characteristics of the selected TVchannel TV
reception may be impaired due tothefo llow‐
ing factors:
R electronic devices being transpor ted in the
ve hicle
R changing reception conditions while theve hi‐
cle is in motion
Po or reception conditions can ha vethefo llowing
ef fect:
R theTV tuner switches toan alternative chan‐
nel with better reception whi chis digitally
broadcasting the same programme conte nt
R theTV tuner mu testh e sound, freezes the
screen or hides it. The tsymbol appears
in the displa y. Switching
toTV mode Multimedia sy
stem:
, Media .
à Devices #
Select TV.
The TVpicture appears. If available, the
ch annel and prog ramme information is dis‐
pla yed. Multimedia sy
stem 363
Page 372 of 565
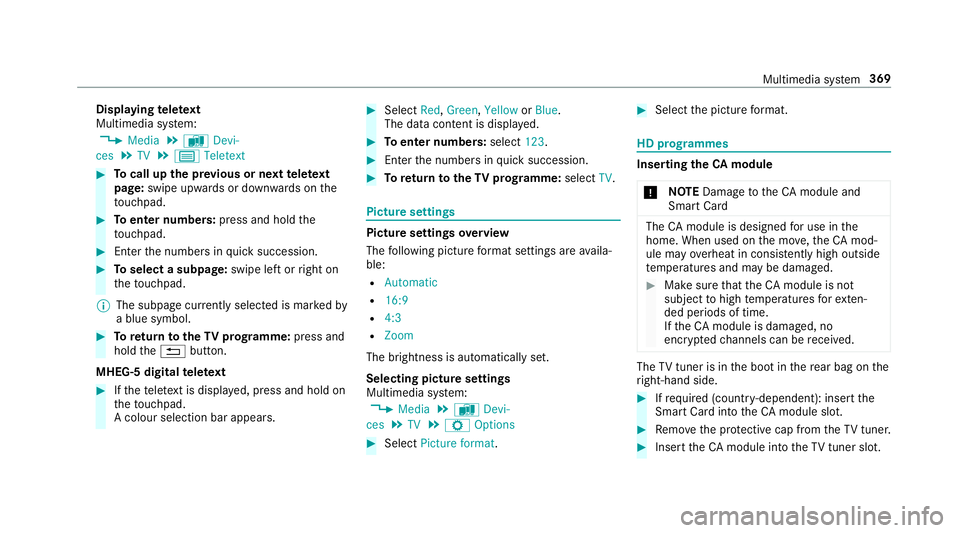
Displaying
telete xt
Multimedia sy stem:
, Media .
à Devi-
ces .
TV .
p Teletext #
Tocall up the pr evious or next telete xt
page: swipe upwards or down wards on the
to uchpad. #
Toenter numbers: press and holdthe
to uchpad. #
Enterth e numbers in quick succession. #
Toselect a subpage: swipe left orright on
th eto uchpad.
% The subpage cur rently selected is ma rked by
a blue symbol. #
Toreturn totheTV prog ramme: press and
hold the% button.
MHEG-5 digital telete xt #
Ifth ete lete xt is displ ayed, press and hold on
th eto uchpad.
A colour selection bar appears. #
Select Red,Green, YelloworBlue .
The data content is displ ayed. #
Toenter numbers: select123. #
Enterth e numbers in quick succession. #
Toreturn totheTV prog ramme: selectTV. Pictu
resettings Picture settings
overview
The following picture form at settings are availa‐
ble:
R Automatic
R 16:9
R 4:3
R Zoom
The brightness is automatically set.
Selecting picture settings
Multimedia sy stem:
, Media .
à Devi-
ces .
TV .
Z Options #
Select Picture format. #
Select the picture form at. HD prog
rammes Inse
rting theCA module
* NO
TEDama getotheCA module and
Smart Card The
CAmodule is designed for use in the
home. When used on the mo ve,th eCA mod‐
ule may overheat in consis tently high outside
te mp eratures and may be damaged. #
Make sure that theCA module is not
subject tohigh temp eratures forex ten‐
ded pe riods of time.
If th eCA module is dama ged, no
enc rypte dch annels can be recei ved. The
TVtuner is in the boot in there ar bag on the
ri ght-hand side. #
Ifre qu ired (countr y-dependent): insert the
Smart Ca rdinto theCA module slot. #
Remo vethe pr otective cap from theTV tune r. #
Insert theCA module into theTV tuner sl ot. Multimedia sy
stem 369
Page 524 of 565
Selecting pa
rkposition ........................ 172
Shifting toneutral ................................ 172
St eering wheel gearshift paddles ........ .173
Tr ansmission position display .............. 171
Tr ansmission positions ........................ 171
Au tomatic transmission
see Selector le ver
Axle load Perm issible .......................................... 431
Tr ailer operation .................................. 443B
Bag hook ................................................... 11 8
Ball ne ck
Extending/r etra cting ........................... 24 8
BA S (Brake Assist Sy stem) .................... .189
Battery Key ........................................................ 66
Re mo tecontrol (s tationary heater) ...... 157
Battery (vehicle) Charging .............................................. 398
Notes .................................................. 396
St arting assis tance .............................. 398 Battery (vehicle)
see Vehicle battery
Belt .............................................................32
Bic ycle rack
Tr ailer operation .................................. 251
Blind Spot Assist .................................... .242
Ac tivating/deactivating ...................... .244
Fu nction/no tes ................................... 24 2
Sy stem limits ....................................... 24 2
Blind Spot Assi st
see Active Blind Spot Assi st
Blo wer
see Climate control
BlueTEC see AdBlue ®
Blue tooth ®
Ac tivating/deactivating ...................... .288
Setting up an Internet connection ....... 340
Settings ............................................... 287
Switching profile (DUN/PAN) .............. 342
Blue tooth ®
Au dio
Ac tivating ............................................ 359 De-authorising (de-regis
tering) the
device .................................................. 359
Information .......................................... 356
Overview .............................................3 57
Sea rching for and auth orisingthe
device .................................................. 358
Switching device via NFC .................... 359
Boot lid see Tailgate
Boot load .................................................. 442
Brake Assi stSystem
see BAS (Brake Assi stSystem)
Brake fluid Notes .................................................. 439
Brake forc e distribution
EBD (Elect ronic Brake forc e Distribu‐
tion) ..................................................... 19 3
Brakes ABS (Anti-lo ckBraking Sy stem) ........... 189
Ad aptive brake lights .......................... .199
BA S (Brake Assi stSystem) .................. 189
Driving tips .......................................... 16 4
EBD (Electronic Brake forc e Distribu‐
tion) ..................................................... 19 3 Index
521