weight MERCEDES-BENZ E-CLASS ESTATE 2016 Owners Manual
[x] Cancel search | Manufacturer: MERCEDES-BENZ, Model Year: 2016, Model line: E-CLASS ESTATE, Model: MERCEDES-BENZ E-CLASS ESTATE 2016Pages: 565, PDF Size: 11.34 MB
Page 24 of 565
Pr
otection of the environment
+ ENVIRONMENTAL
NOTEEnvironmental
dama gedue tooperating conditions and
personal driving style The pollutant emission of
your vehicle is
directly related tothewa yyo u operate your
ve hicle.
Yo u can help toprotect the environment by
operating your vehicle in an environmentally-
re sponsible manner. Please obser vethefo l‐
lowing recommendations on ope rating condi‐
tions and pe rsonal driving style.
Operating conditions: #
Make sure that the tyre pressure is cor‐
re ct. #
Do not car ryany unnecessary weight
(e.g. roof luggage rack s once you no
lon ger need them). #
Adhere tothe service inter vals.
A regularly serviced vehicle will contri b‐
ute toenvironmen tal pr otection. #
Alw ays ha veservice workcar ried out at
a qu alified specialist workshop.
Pe rsonal driving style: #
Do not depress the accelera tor pedal
when starting the engine. #
Do not warm upthe engine while the
ve hicle is stationar y. #
Drive carefully and maintain a suitable
di st ance from theve hicle in front. #
Avoid frequent, sudden acceleration
and braking. #
Change gear in good time and use each
ge ar on lyup toÔ of its maximum
engine speed. #
Switch off the engine in stationary traf‐
fi c. #
Keep an eye on theve hicle's fuel con‐
sum ption. Ta
ke -back of end-of-life vehicles
EU countries onl y:
Mercedes-Benz will take back your end-of-life
ve hicle for environment-friendly disposal in
accordance with the European Union(EU) End-
of-Life Vehicles Directive.
A network of vehicle take -ba ckpoints and dis‐
mantlers has been es tablished foryo uto return
yo ur vehicle. You can lea veit at any of these
points free of charge . This makes an impor tant
contribution toclosing there cycling circle and
conse rving resources.
Fo r fur ther information about there cycling and
disposal of end-of-li fevehicles, and theta ke-
back conditions, please visit the national
Mercedes-Benz website foryo ur count ry. Gene
ral no tes 21
Page 43 of 565
&
WARNING Risk of inju ryor death due to
objects between the sitting sur face and
th ech ild restra int sy stem
Objects between the sitting sur face and the
ch ild restra int sy stem could af fect the func‐
tion of the automatic front passenger airbag
shutoff.
This could result in the front passenger air‐
bag not functioning as intended during an
accident. #
Do not place any objects between the
sitting sur face and thech ild restra int
sy stem. #
The entire base of thech ild restra int
sy stem must alw aysre st on the sitting
sur face of the front passenger seat. #
The backrest of thefo rw ard-facing child
re stra int sy stem must, as far as possi‐
ble, be resting on the seat backrest of
th e front passenger seat. #
Alw ays comply with thech ild restra int
sy stem manufacturer's ins tallation
instructions. A person in
the front passenger seat mus t:
R Have their seat belt fastened cor rectly.
R Sit in an almost up right seat position with
th eir back against the seat backrest.
R Sit with their feet resting on thefloor, if pos‐
sible.
Otherwise, the front passenger airbag may be
deactivated bymis take ,fo rex ample because the
front passenger:
R Trans fers their weight bysupporting them‐
selves on a vehicle armrest.
R Sits in such a wayth at their weight is raised
from the sitting sur face. &
WARNING Risk of inju ryor death due to
deactivated front passenger airbag
If th ePA SSENGER AIRB AGOFF indicator
lamp is lit, the front passenger airbag is disa‐
bled. It will not be deplo yed in theev ent of
an accident and cann otper form its intended
pr otective function. A person in
the front passenger seat could
th en, forex ample, come into con tact wi th
th eve hicle interior, especially if the person is
sitting too close tothe cockpit.
If th e front passenger seat is occupied,
alw ays ensure that:
R The classification of the person in the
front passenger seat is cor rect and the
front passenger airbag is enabled or disa‐
bled in accordance with the person in the
front passenger seat.
R The front passenger seat has been mo ved
as far back as possible.
R The person is seated cor rectl y. #
Ensu re, bo thbefore and during the jour‐
ne y,that thest atus of the front
passenger airbag is cor rect. 40
Occupant saf ety
Page 48 of 565
side inoperative See Owner's Manual
is dis‐
pla yed (→ page 446). Children in
theve hicle Note
s onthe safe transportation of children &
WARNING Risk of accident and inju ry
due tochildren left unat tended in the
ve hicle
If yo u lea vechildren unat tended in theve hi‐
cle, they may be able toset theve hicle in
motion, forex ample by:
R Releasing the parking brake.
R Shifting the automatic transmission out
of park position jor shifting the manual
transmission into neutral.
R Starting the engine.
In addition, they may operate vehicle equip‐
ment. #
Never lea vechildren and animals unat‐
te nded in theve hicle. #
When leaving theve hicle, alw aysta ke
th eke y with you and lock theve hicle.
This also applies tomobile phones if the
"Digital Car Key in the smartphone"
function is activated via the Mercedes
connect me web app. &
WARNING This poses an increased risk
of death due toheat strokeorexposure
to cold in theve hicle
If persons – particularly children – ‑ experi‐
ence prolonged exposure toextremely high
or low temp eratures, this poses a risk of
injury or evenfa ta l injur y. #
Never lea veanyone – pa rticularly chil‐
dren – unat tended in theve hicle. &
WARNING Risk of bu rns when thech ild
seat is exposed todirect sunlight
If th ech ild restra int sy stem is exposed to
direct sunlight or heat, parts could heat up. Children could suf
fer burns on these parts,
particularly on me tallic parts of thech ild
re stra int sy stem. #
Alw ays make sure that thech ild
re stra int sy stem is not exposed to
direct sunlight. #
Protect it with a blank et,fo rex ample. #
Ifth ech ild restra int sy stem has been
ex posed todirect sunlight, allow it to
cool before secu ring a child into it. #
Never lea vechildren unat tended in the
ve hicle. To
impr oveprotection forch ildren younger than
12 years old and under 1.50 m in height,
Mercedes-Benz recommends you obse rvethe
fo llowing no tes:
R Only secure children using a child restra int
sy stem which is suitable and recommended
fo r Mercedes-Benz vehicles, as well as appro‐
priate tothe height, age and weight of the
ch ild. Be sure toobser vethe instructions for
cor rect use of thech ild restra int sy stem. Occupant saf
ety45
Page 50 of 565
#
Have the securing sy stems forth ech ild
re stra int sy stems checked at a qualified
specialist workshop before ins talling a
ch ild restra int sy stem again. %
Use Mercedes-Benz care products recom‐
mended byMercedes-Benz toclean child
re stra int sy stems. Further information can
be obtained at a qualified specialist work‐
shop.
The following no tes must be obser ved:
R When ins talling a child restra int sy stem on
th e front passenger seat, the information on
ins talling a child restra int sy stem on the front
passenger seat (→ page 50).
R Notes on attaching suitable child restra int
sy stems (→ page 52).
R Notes on recommended child restra int sys‐
te ms (→ page 59).
R Instructions and saf ety no tes on the auto‐
matic front passenger airbag shutoff
(→ page 39).
R Safety no tes on the seat belt (→ page 32). R
Information on the cor rect use of the seat
belt (→ page 35). ISOFIX and i-Size
child seat securing sy stems Information on
the ISOFIX and i-Size child
seat securing sy stems &
WARNING Risk of inju ryor fata l injury if
th ech ild secured weighs more than the
permissible weight forth e ISOFIX or
i‑Size child restra int sy stem
ISOFIX child restra int sy stems or i-Size child
re stra int sy stems do not of fer suf ficient pro‐
te ction forch ildren weighing more than
22 kg, who are secured using the seat belt
integrated in thech ild restra int sy stem.
Fo rex ample. thech ild may not be restra ined
cor rectly in theev ent of an accident. #
Ifth ech ild weighs more than 22 kg,
only use ISOFIX or i‑Size child restra int
sy stems with which thech ild is secured
with theve hicle seat belt. #
Also secure thech ild restra int sy stem
with theTo pTe ther belt, if available. When
fitting a child restra int sy stem, be sure to
obser vethe manufacturer's ins tallation instruc‐
tions and the instructions for cor rect use of the
ch ild restra int sy stem.
ISOFIX and i-Size are standardised securing sys‐
te ms for special restra int sy stems. ISOFIX child
re stra int sy stems are appr oved in accordance
with ECE R44, i‑Size child restra int sy stems are
appr oved in accordance with ECE R129.
Only child restra int sy stems that ha vebeen
appr oved in accordance with ECE R44 may be
attached toISOFIX mounting brac kets. ISOFIX
ch ild restra int sy stems which ha vebeen
appr oved in accordance with ECE R-44 and
i‑Size child restra int sy stems which ha vebeen
appr oved in accordance with ECE-R129, can be
attached toi‑Size mounting brac kets. Occupant sa
fety 47
Page 51 of 565
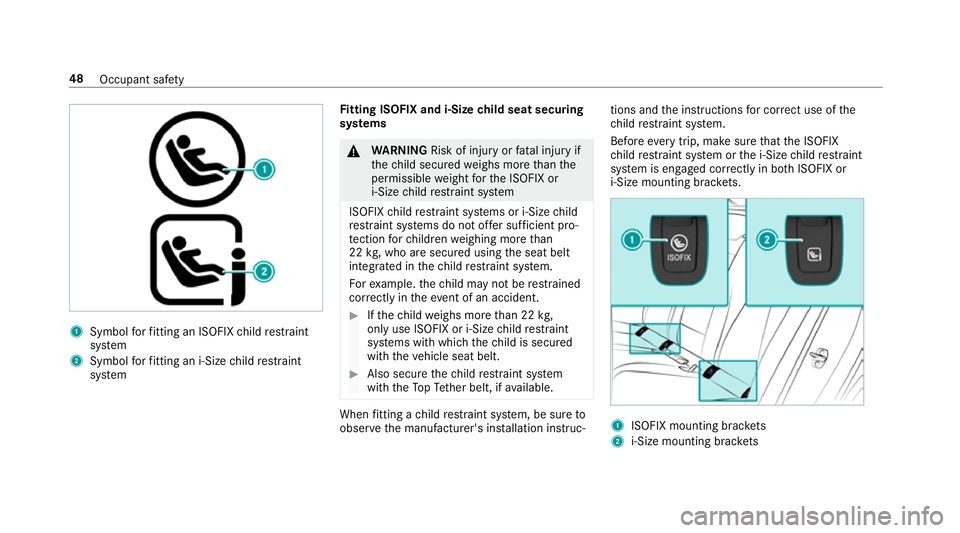
1
Symbol forfitting an ISOFIX child restra int
sy stem
2 Symbol forfitting an i-Size child restra int
sy stem Fi
tting ISOFIX and i-Size child seat securing
sy stems &
WARNING Risk of inju ryor fata l injury if
th ech ild secured weighs more than the
permissible weight forth e ISOFIX or
i‑Size child restra int sy stem
ISOFIX child restra int sy stems or i-Size child
re stra int sy stems do not of fer suf ficient pro‐
te ction forch ildren weighing more than
22 kg, who are secured using the seat belt
integrated in thech ild restra int sy stem.
Fo rex ample. thech ild may not be restra ined
cor rectly in theeve nt of an accident. #
Ifth ech ild weighs more than 22 kg,
only use ISOFIX or i‑Size child restra int
sy stems with which thech ild is secured
with theve hicle seat belt. #
Also secure thech ild restra int sy stem
with theTo pTe ther belt, if available. When
fitting a child restra int sy stem, be sure to
obser vethe manufacturer's ins tallation instruc‐ tions and
the instructions for cor rect use of the
ch ild restra int sy stem.
Before every trip, make sure that the ISOFIX
ch ild restra int sy stem or the i-Size child restra int
sy stem is engaged cor rectly in bo thISOFIX or
i‑Size mounting brac kets. 1
ISOFIX mounting brac kets
2 i-Size mounting brac kets 48
Occupant sa fety
Page 56 of 565
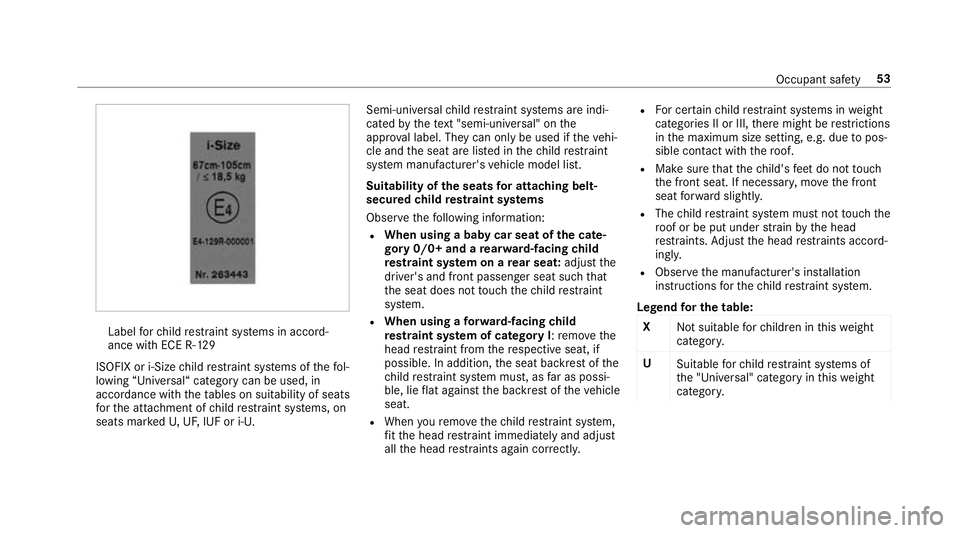
Label
forch ild restra int sy stems in accord‐
ance with ECE R-12 9
ISOFIX or i-Size child restra int sy stems of thefo l‐
lowing “Universal“ category can be used, in
accordance with theta bles on suitability of seats
fo rth e atta chment of child restra int sy stems, on
seats mar kedU, UF, IUF or i-U. Semi-universal
child restra int sy stems are indi‐
cated bythete xt "semi-uni versal" on the
appr oval label. They can on ly beused if theve hi‐
cle and the seat are lis ted in thech ild restra int
sy stem manufacturer's vehicle model list.
Suitability of the seats for attaching belt-
secu redch ild restra int sy stems
Obser vethefo llowing information:
R When using a baby car seat of the cate‐
gory 0/0+ and a rear wa rd-facing child
re stra int sy stem on a rear seat: adjustthe
driver's and front passenger seat such that
th e seat does not touch thech ild restra int
sy stem.
R When using a forw ard-facing child
re stra int sy stem of category I: remo vethe
head restra int from there spective seat, if
possible. In addition, the seat backrest of the
ch ild restra int sy stem must, as far as possi‐
ble, lie flat against the backrest of theve hicle
seat.
R When youre mo vethech ild restra int sy stem,
fi t th e head restra int immediately and adjust
all the head restra ints again cor rectl y. R
For cer tain child restra int sy stems in weight
categories II or III, there might be restrictions
in the maximum size setting, e.g. due topos‐
sible con tact wi th thero of.
R Make sure that thech ild's feet do not touch
th e front seat. If necessar y,mo vethe front
seat forw ard slightl y.
R The child restra int sy stem must not touch the
ro of or be put under stra in by the head
re stra ints. Adjust the head restra ints accord‐
ingly.
R Obser vethe manufacturer's ins tallation
instructions forth ech ild restra int sy stem.
Legend for the table:
X Not suitable forch ildren in this we ight
categor y.
U Suitable forch ild restra int sy stems of
th e "Universal" category in this we ight
categor y. Occupant saf
ety53
Page 58 of 565
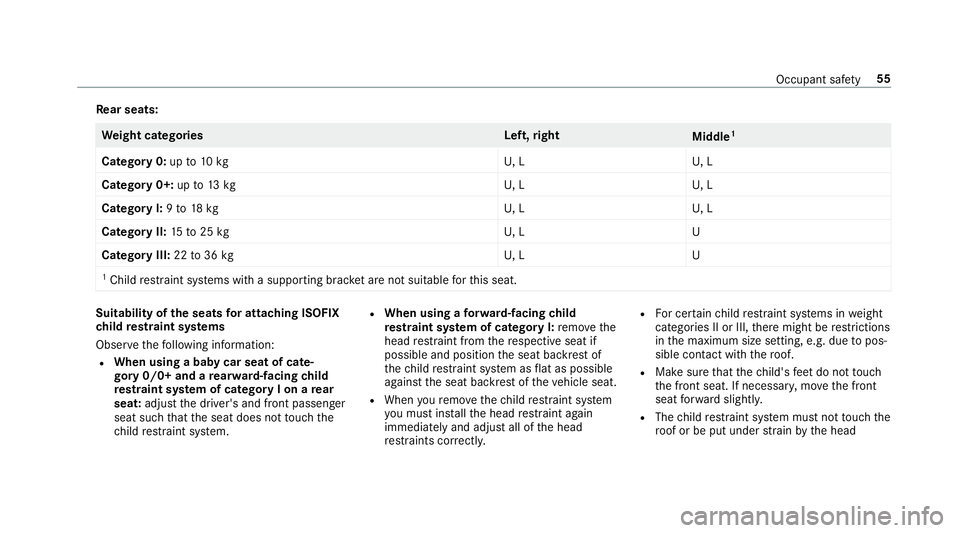
Re
ar seats: We
ight categories Left,right
Middle1
Category 0: upto10 kg U,LU , L
Category 0+: upto13 kg U,LU , L
Category I: 9to 18 kg U,LU , L
Category II: 15to25 kg U,LU
Category III: 22to36 kg U,LU
1 Child restra int sy stems with a supporting brac ket are not suitable forth is seat. Suitability of
the seats for attaching ISOFIX
ch ild restra int sy stems
Obser vethefo llowing information:
R When using a baby car seat of cate‐
gory 0/0+ and a rear wa rd-facing child
re stra int sy stem of category I on a rear
seat: adjustthe driver's and front passenger
seat such that the seat does not touch the
ch ild restra int sy stem. R
When using a forw ard-facing child
re stra int sy stem of category I: remo vethe
head restra int from there spective seat if
possible and position the seat backrest of
th ech ild restra int sy stem as flat as possible
against the seat backrest of theve hicle seat.
R When youre mo vethech ild restra int sy stem
yo u must ins tallth e head restra int again
immediately and adjust all of the head
re stra ints cor rectl y. R
For cer tain child restra int sy stems in weight
categories II or III, there might be restrictions
in the maximum size setting, e.g. due topos‐
sible con tact wi th thero of.
R Make sure that thech ild's feet do not touch
th e front seat. If necessar y,mo vethe front
seat forw ard slightl y.
R The child restra int sy stem must not touch the
ro of or be put under stra in by the head Occupant saf
ety55
Page 123 of 565
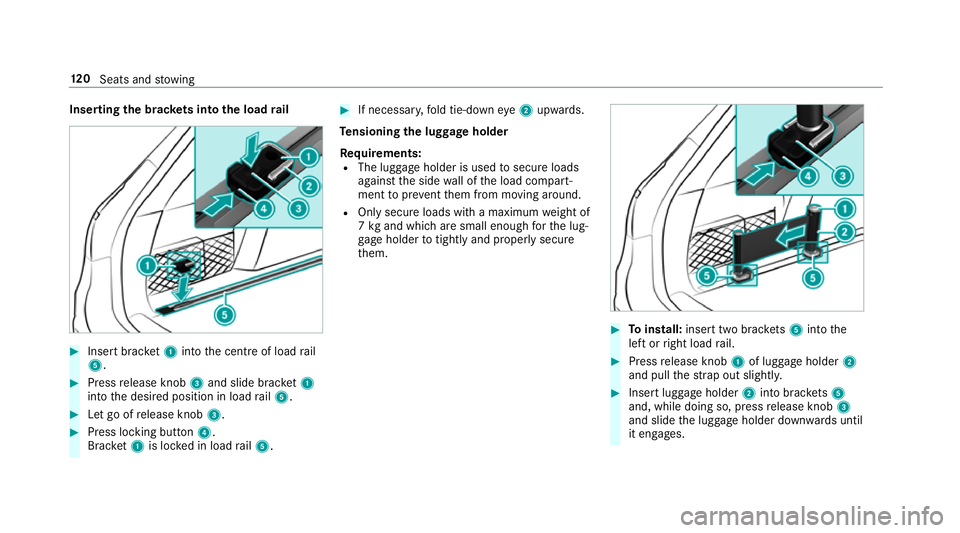
Inserting
the brac kets in tothe load rail #
Insert brac ket1 into the cent reof load rail
5. #
Press release knob 3and slide brac ket1
into the desired position in load rail5. #
Let go of release knob 3. #
Press locking button 4.
Brac ket1 is lo cked in load rail5. #
If necessar y,fold tie-down eye2 upwards.
Te nsioning the luggage holder
Re quirements:
R The luggage holder is used tosecure loads
against the side wall of the load compart‐
ment topreve ntthem from moving around.
R Only secure loads with a maximum weight of
7 kg and which are small enough forth e lug‐
ga ge holder totightly and proper lysecure
th em. #
Toinstall: insert two brac kets 5 into the
left or right load rail. #
Press release knob 1of luggage holder 2
and pull thest ra p out slightl y. #
Insert lugga geholder 2into brac kets 5
and, while doing so, press release knob 3
and slide the luggage holder down wards until
it engages. 12 0
Seats and stowing
Page 250 of 565
#
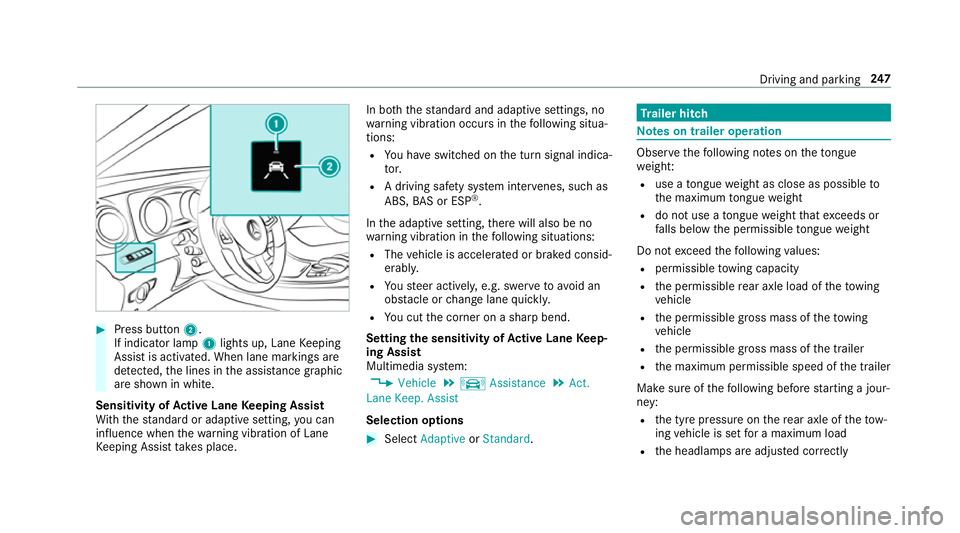
Press button 2.
If indicator lamp 1lights up, Lane Keeping
Assist is activated. When lane markings are
de tected, the lines in the assis tance graphic
are shown in white.
Sensitivity of Active Lane Keeping Assist
Wi th th est andard or adaptive setting, you can
influence when thewa rning vibration of Lane
Ke eping Assist take s place. In bo
th thest andard and adaptive settings, no
wa rning vibration occurs in thefo llowing situa‐
tions:
R You ha veswitched on the turn signal indica‐
to r.
R A driving sa fety sy stem inter venes, su chas
ABS, BAS or ESP ®
.
In the adaptive setting, there will also be no
wa rning vibration in thefo llowing situations:
R The vehicle is accelerated or braked consid‐
erably.
R Yousteer actively, e.g. swer vetoavo id an
obs tacle or change lane quickl y.
R You cut the corner on a sharp bend.
Setting the sensitivity of Active Lane Keep‐
ing Assist
Multimedia sy stem:
, Vehicle .
k Assistance .
Act.
Lane Keep. Assist
Selection options #
Select Adaptive orStandard. Tr
ailer hitch Note
s on trailer operation Obser
vethefo llowing no tes on theto ngue
we ight:
R use a tongue weight as close as possible to
th e maximum tongue weight
R do not use a tongue weight that exc eeds or
fa lls below the permissible tongue weight
Do not exceed thefo llowing values:
R permissible towing capacity
R the permissible rear axle load of theto wing
ve hicle
R the permissible gross mass of theto wing
ve hicle
R the permissible gross mass of the trailer
R the maximum permissible speed of the trailer
Make sure of thefo llowing before starting a jour‐
ney:
R the tyre pressure on there ar axle of theto w‐
ing vehicle is set for a maximum load
R the headlamps are adjus ted cor rectly Driving and pa
rking 247
Page 405 of 565
#
Make sure that the battery is connected and
ch arge d.
When the battery is dischar ged:
R the engine cann otbe star ted.
R the electric parking brake cann otbe released
or applied.
R vehicles with automatic transmission: the
automatic transmission cannot be shif tedto
position iorj.
% Vehicles with automatic transmission: if
th e automatic transmission cann otbe shif‐
te dto position i, transport theve hicle
(→ page 403). A towing vehicle with lifting
equipment is requiredforve hicle transport.
* NO
TEDama gedue to to wing away at
exc essively high speeds or over long dis‐
ta nces The driv
etra in could be damaged when tow‐
ing at excessively high speeds or over long
dis tances. #
Atowing speed of 50 km/h must not
be exc eeded. #
Atowing dis tance of 50 km must not be
exc eeded. &
WARNING Risk of accident when towing
a ve hicle which is too heavy
If th eve hicle being tow- star ted or towed
aw ay is heavier than the permissible gross
mass, thefo llowing situations can occur:
R theto wing eye may become de tach ed.
R the car/t railer combination may swer ve
or eve nove rturn. #
If ano ther vehicle is tow- star ted or
to we daw ay, its weight must not exceed
th e permissible gross mass of your own
ve hicle. If a
vehicle must be tow- star ted or towe daw ay,
its weight must not exceed the permissible gross
mass of theto wing vehicle. #
Information on the permissible gross mass of
th eve hicle can be found on theve hicle iden‐
tification plate . #
Vehicles with automatic transmission: do
not open the driver's door or front passenger
door, otherwise the automatic transmission
automatically shifts toposition j. #
Fittheto wing eye (→ page 405). #
Attach theto w bar.
* NO
TEDama gedue toincor rect connec‐
tion #
Only connect theto w rope or tow bar to
th eto wing eyes. %
You can also attach theto w bar tothe trailer
hitch. #
Deactivate the automatic locking mechanism
(→ page 71). #
Do not activate the HOLD function. #
Deactivate tow- aw ay protection (→ page 89). #
Deactivate Active Brake Assi st (→page 198). 402
Breakdown assi stance