buttons MERCEDES-BENZ E-CLASS SALOON 2008 Owners Manual
[x] Cancel search | Manufacturer: MERCEDES-BENZ, Model Year: 2008, Model line: E-CLASS SALOON, Model: MERCEDES-BENZ E-CLASS SALOON 2008Pages: 401, PDF Size: 6.89 MB
Page 16 of 401
13
Shift ranges
Automatic transmission . . . . . . . . .116
Display in the speedometer . . . . . .115
Sidebags . . . . . . . . . . . . . . . . . . . . . . . .45
Side window Fault . . . . . . . . . . . . . . . . . . . . . . . .300
Opening/closing . . . . . . . . . . . . . .107
Resetting . . . . . . . . . . . . . . . . . . . .108
Side windows
Cleaning . . . . . . . . . . . . . . . . . . . . .246
Skibag . . . . . . . . . . . . . . . . . . . . . . . . .188
Sliding/tilting sunroof . . . . . . . . . ..180
Rain closing feature . . . . . . . . . . . .182
Resetting . . . . . . . . . . . . . . . . . . . .182
Sliding sunroof
see Panorama sliding/tilting sunroof
see Sliding/tilting sunroof
Snow chains . . . . . . . . . . . . . . . . . . . .235
Socket Cockpit . . . . . . . . . . . . . . . . . . . . . .210
Rear compartment . . . . . . . . . . . . .210
Spare wheel
Fitting . . . . . . . . . . . . . . . . . . . . . . .323
Storage location . . . . . . . . . . . . . . .254
Technical data . . . . . . . . . . . . . . . .365
Spectacles compartment . . . . . . . ..206
Speed Technical data . . . . . . . . . . . . . . . .352
Speed limiter
Speedtronic . . . . . . . . . . . . . . . . . .152 Speedometer
Digital speedometer (on-board
computer) . . . . . . . . . . . . . . . . . . .126
Segments . . . . . . . . . . . . . . . . . . . .121
Setting the unit (on-board com-
puter) . . . . . . . . . . . . . . . . . . . . . . .133
Speedtronic . . . . . . . . . . . . . . . . . . . .152
Display message . . . . . . . . . . . . . .265
Permanent . . . . . . . . . . . . . . . . . . .154
Variabl e.. . . . . . . . . . . . . . . . . . . .152
SRS (Supplemental Restraint Sys-
tem) . . . . . . . . . . . . . . . . . . . . . . . . . . . .41
Warning lamp . . . . . . . . . . . . . . . . . .41
Standard display (on-board com-
puter) . . . . . . . . . . . . . . . . . . . . . . . . .125
Selecting the displa y.. . . . . . . . ..134
Station
see Radio
Status line (on-board computer) . ..1 23
Selecting the displa y.. . . . . . . . ..134
Steering wheel
Adjusting . . . . . . . . . . . . . . . . . . . . .89
Buttons (on-board computer) . . . . .122
Storing settings . . . . . . . . . . . . . . . .93
Steering wheel gearshift paddles ..1 18
Steering wheel heating . . . . . . . . . . ..90
Malfunction indicator lamp . . . . . .283
Stowage compartment . . . . . . . . . ..205
Armrest (in front) . . . . . . . . . . . . . .206
Armrest (under) . . . . . . . . . . . . . . .206 Centre console . . . . . . . . . . . . . . .
.206
Centre console (rear) . . . . . . . . . . .207
Glove compartment . . . . . . . . . . . .205
Rear seat armrest . . . . . . . . . . . . .207
Stowage compartments
Overview . . . . . . . . . . . . . . . . . . . . .36
Stowage space
Cup holder . . . . . . . . . . . . . . . . . . .186
Stowage well
Boot floor (underneath) . . . . . . . . .192
underneath luggage compart-
ment floo r.. . . . . . . . . . . . . . . . . .192
Submenu (on-board computer) . . ..1 32
Convenience . . . . . . . . . . . . . . . . .133
Dynamic driving sea t.. . . . . . . . ..139
Heating . . . . . . . . . . . . . . . . . . . . .133
Instrument cluster . . . . . . . . . . . . .132
Lighting . . . . . . . . . . . . . . . . . . . . .133
Time/date . . . . . . . . . . . . . . . . . . .132
Vehicle . . . . . . . . . . . . . . . . . . . . . .133
Summer opening . . . . . . . . . . . . . . . .109
Sun visor . . . . . . . . . . . . . . . . . . . . . . .207
Supplemental Restraint System see SRS
Supplemental Restraint System (SRS)
Display message . . . . . . . . . . . . . .265
Warning lamp . . . . . . . . . . . . . . . . .289
Surround lighting
Switching on/off (on-board com-
puter) . . . . . . . . . . . . . . . . . . . . . . .135 Index
211_AKB; 2; 5, en-GB
mkalafa,
Version: 2.9.4
2008-02-29T16:57:07+01:00 - Seite 13 Dateiname: 6515_3416_02_buchblock.pdf; preflight
Page 37 of 401
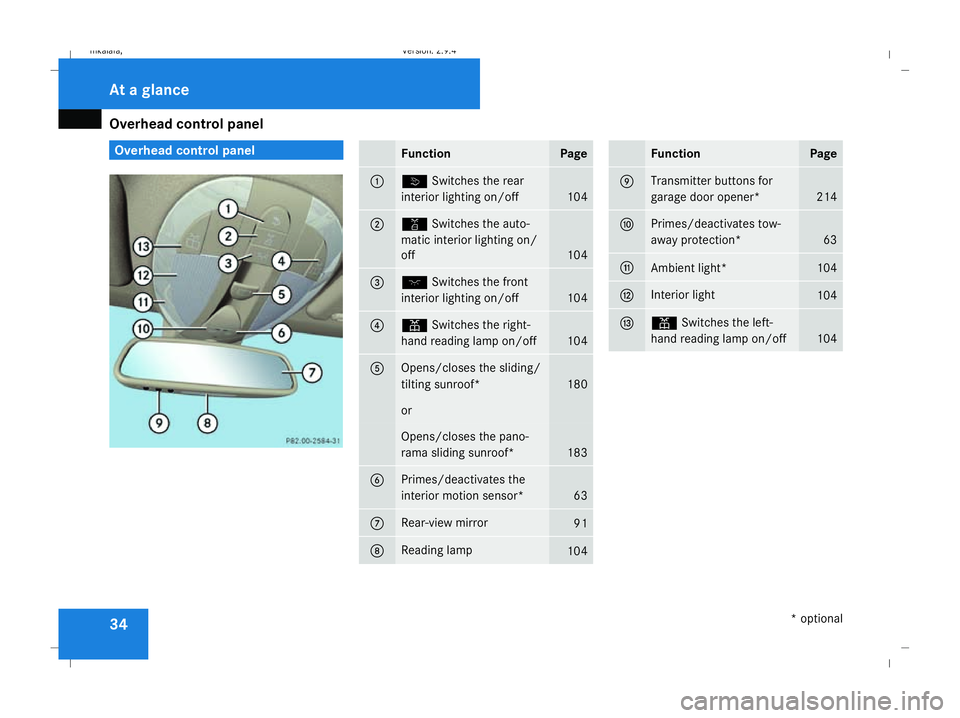
Overhead control panel
34 Overhead control panel
Function Page
1 ò
Switches the rear
interior lighting on/off 104
2 ¡
Switches the auto-
matic interior lighting on/
off 104
3 ð
Switches the front
interior lighting on/off 104
4 X
Switches the right-
hand reading lamp on/off 104
5 Opens/closes the sliding/
tilting sunroof*
180
or
Opens/closes the pano-
rama sliding sunroof*
183
6 Primes/deactivates the
interior motion sensor*
63
7 Rear-view mirror
91
8 Reading lamp
104 Function Page
9 Transmitter buttons for
garage door opener*
214
a Primes/deactivates tow-
away protection*
63
b
Ambient light* 104
c Interior light
104
d X
Switches the left-
hand reading lamp on/off 104At a glance
* optional
211_AKB; 2; 5, en-GB
mkalafa,
Version: 2.9.4 2008-02-29T16:57:07+01:00 - Seite 34Dateiname: 6515_3416_02_buchblock.pdf; preflight
Page 66 of 401
Anti-theft syste
ms 63Tow-away protection*
An audible and visual alarm is triggered if your
vehicle's angle of inclination is altered while
tow-away protection is primed. This happens
if the vehicle is jacked up on one side, for
example.
Priming tow-away protection X
Lock the vehicle using the key. On vehicles
with KEYLESS GO*, the locking button on
the door handle/boot lid/tailgate can also
be used.
Tow-away protection is primed after
approximately 30 seconds.
To deactivate tow-away protection When you unlock your vehicle using the key
or KEYLESS GO
*,tow-away protection is
automatically deactivated.
Deactivate tow-away protection manually to
prevent a false alarm if your vehicle:
R is being transported
R is being loaded, e.g. onto a ferry or car
transporter
R is being parked on a movable surface, e.g.
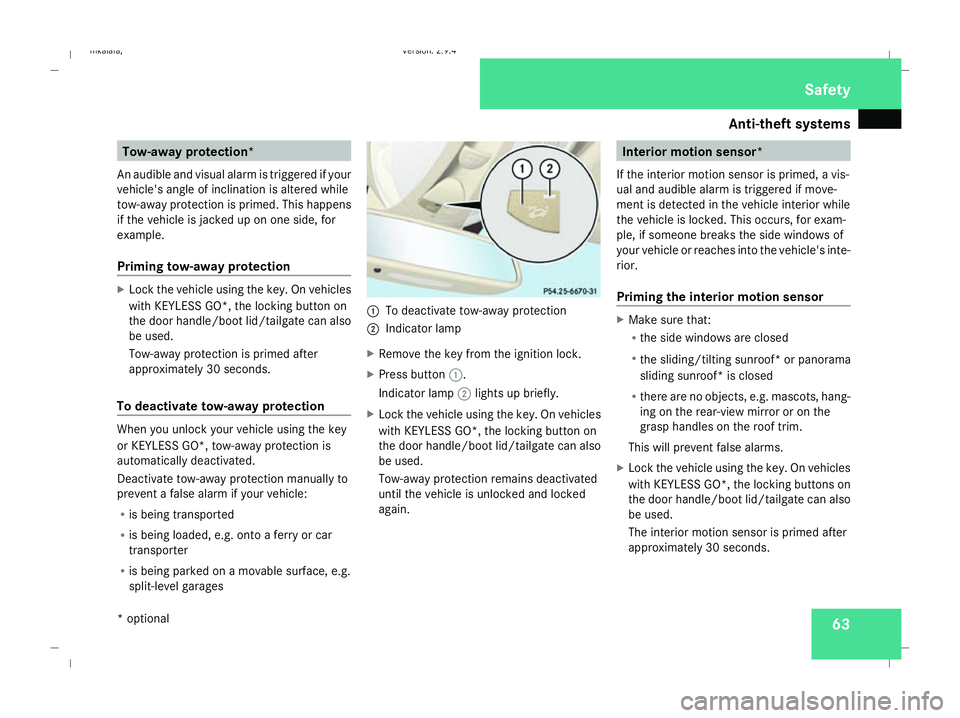
split-level garages 1
To deactivate tow-away protection
2 Indicator lamp
X Remove the key from the ignition lock.
X Press button 1.
Indicator lamp 2lights up briefly.
X Lock the vehicle using the key. On vehicles
with KEYLESS GO*, the locking button on
the door handle/boot lid/tailgate can also
be used.
Tow-away protection remains deactivated
until the vehicle is unlocked and locked
again. Interior motion sensor*
If the interior motion sensor is primed, a vis-
ual and audible alarm is triggered if move-
ment is detected in the vehicle interior while
the vehicle is locked. This occurs, for exam-
ple, if someone breaks the side windows of
your vehicle or reaches into the vehicle's inte-
rior.
Priming the interior motion sensor X
Make sure that:
R
the side windows are closed
R the sliding/tilting sunroof* or panorama
sliding sunroof* is closed
R there are no objects, e.g. mascots, hang-
ing on the rear-view mirror or on the
grasp handles on the roof trim.
This will prevent false alarms.
X Lock the vehicle using the key. On vehicles
with KEYLESS GO*, the locking buttons on
the door handle/boot lid/tailgate can also
be used.
The interior motion sensor is primed after
approximately 30 seconds. Safety
* optional
211_AKB; 2; 5, en-GB
mkalafa
,V ersion: 2.9.4
2008-02-29T16:57:07+01:00 - Seite 63 ZDateiname: 6515_3416_02_buchblock.pdf; preflight
Page 70 of 401

Opening and closing
67
X
To change the setting: press thek
and j buttons simultaneously for
approximately six seconds until the battery
check lamp flashes twice.
The key now functions as follows:
X To unlock the driver's door: press the
k button once.
X To unlock centrally: press thekbut-
ton twice.
X To lock centrally: press thejbutton.
Restoring the factory settings X
Press the kandj buttons simulta-
neously for approximately six seconds until
the battery check lamp flashes twice. KEYLESS GO key*
The optional equipment supplied with your
vehicle includes two KEYLESS GO keys. KEY-
LESS GO allows you to lock/unlock and start
the vehicle simply by carrying the KEYLESS
GO key with you. When you touch the surface
of the sensors on the vehicle's door handles,
KEYLESS GO establishes a radio connection
between the vehicle and the key.
When you touch the inner surface of the door
handle or press the button on the tailgate
handle (Estate), your vehicle unlocks cen-
trally if the factory settings have not been
changed:
R the doors
R the boot lid/tailgate
R the fuel filler flap
When starting the engine and whilst driving,
KEYLESS GO also checks whether a valid
KEYLESS GO key is in the vehicle by periodi-
cally establishing radio contact. G
Risk of accident
If children are left unsupervised in the vehi-
cle, they could open a door from the inside,
even if it has been locked. Or they could
start the vehicle if a valid KEYLESS GO key is in the vehicle and they press the KEY-
LESS GO button on the gear selector lever.
They could endanger themselves and oth-
ers. Never leave children unsupervised in
the vehicle. Switch off the engine and take
the KEYLESS GO key with you, even if you
are only leaving the vehicle for a short time. 1
j To lock the vehicle
2 i To unlock the boot lid/tailgate*
3 k To unlock the vehicle
4 Battery check lamp
i You can also use the KEYLESS GO key to
open and close the side windows and the
sliding/tilting sunroof* or the panorama
sliding sunroof *.You can open them using
the summer opening feature Controls
* optional
211_AKB; 2; 5, en-GB
mkalafa,
Version: 2.9.4
2008-02-29T16:57:07+01:00 - Seite 67 ZDateiname: 6515_3416_02_buchblock.pdf; preflight
Page 72 of 401
Opening and closing
69
X
To change the setting: press thek
and j buttons simultaneously for
approximately six seconds until the battery
check lamp flashes twice.
The KEYLESS GO key will now function as fol-
lows:
X To unlock the driver's door: pull the door
handle on the driver's door.
X To unlock centrally: pull the door handle
on the front-passenger door or on the rear
doors.
X To lock centrally (Saloon): press locking
button 1on the door handle, without
touching the inside of the handle.
X To lock centrally (Estate): press the lock-
ing button on the door handle or the tail-
gate.
Restoring the factory settings X
Press the kandj buttons simulta-
neously for approximately six seconds until
the battery check lamp flashes twice. Locking centrally from the luggage
compartment* (Estate) i
If the vehicle is locked centrally while the
tailgate is open, the tailgate will be locked
automatically when it is closed.
i If you leave the KEYLESS GO key in the
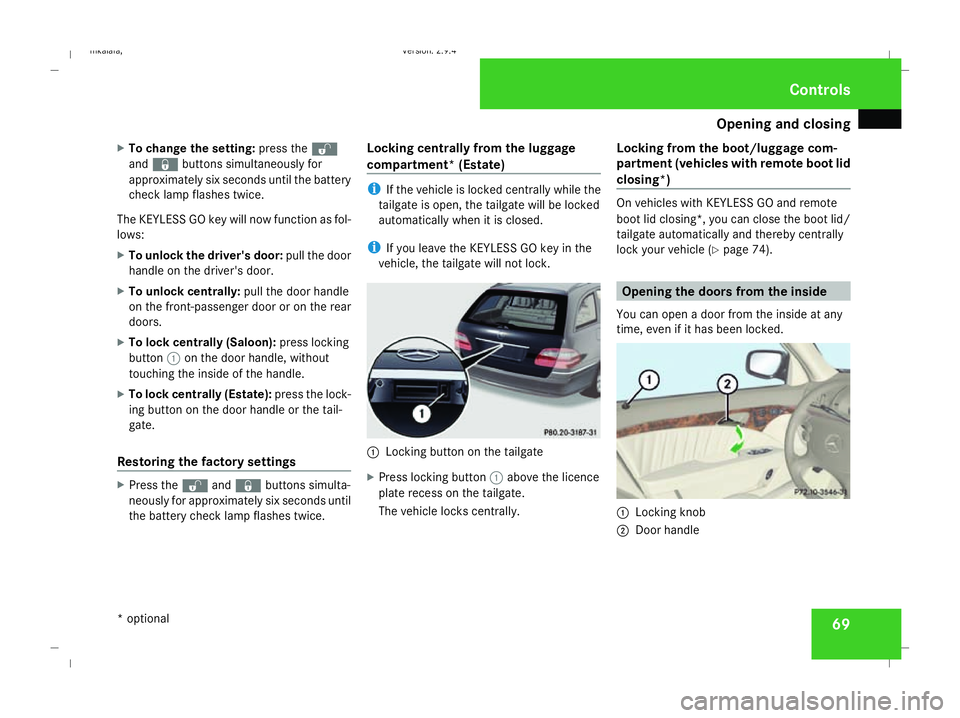
vehicle, the tailgate will not lock. 1
Locking button on the tailgate
X Press locking button 1above the licence
plate recess on the tailgate.
The vehicle locks centrally. Locking from the boot/luggage com-
partment (vehicles with remote boot lid
closing*) On vehicles with KEYLESS GO and remote
boot lid closing*, you can close the boot lid/
tailgate automatically and thereby centrally
lock your vehicle (
Ypage 74). Opening the doors from the inside
You can open a door from the inside at any
time, even if it has been locked. 1
Locking knob
2 Door handle Controls
* optional
211_AKB; 2; 5, en-GB
mkalafa,
Version: 2.9.4 2008-02-29T16:57:07+01:00 - Seite 69 ZDateiname: 6515_3416_02_buchblock.pdf; preflight
Page 93 of 401
Steering wheel
90
R
Easy-entry/exit feature (Y page 90)
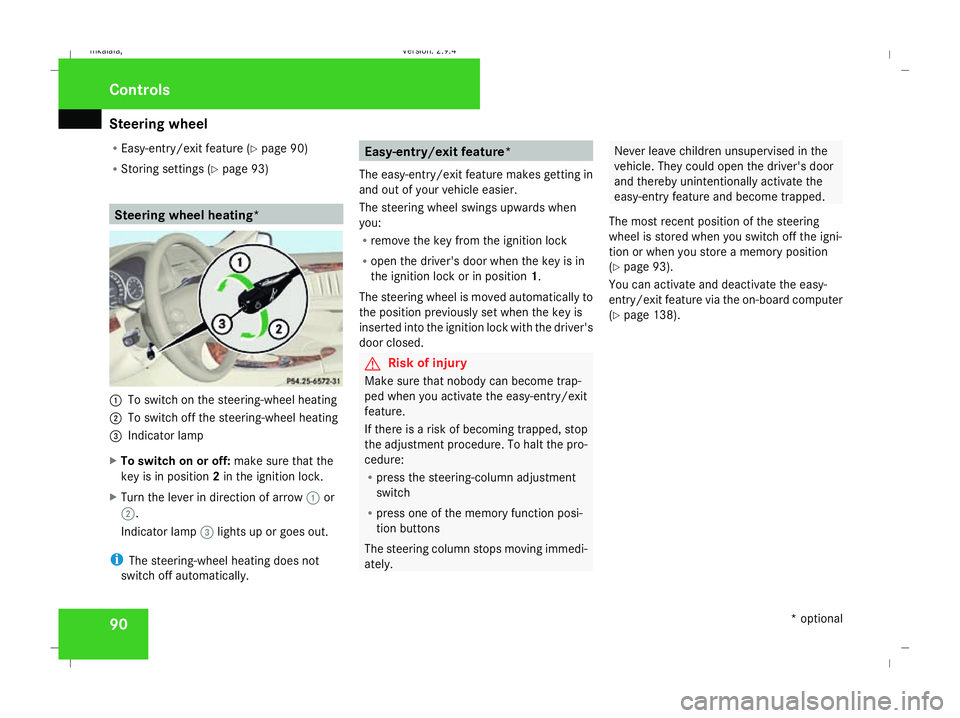
R Storing settings (Y page 93) Steering wheel heating*
1
To switch on the steering-wheel heating
2 To switch off the steering-wheel heating
3 Indicator lamp
X To switch on or off: make sure that the
key is in position 2in the ignition lock.
X Turn the lever in direction of arrow 1or
2.
Indicator lamp 3lights up or goes out.
i The steering-wheel heating does not
switch off automatically. Easy-entry/exit feature*
The easy-entry/exit feature makes getting in
and out of your vehicle easier.
The steering wheel swings upwards when
you:
R remove the key from the ignition lock
R open the driver's door when the key is in
the ignition lock or in position 1.
The steering wheel is moved automatically to
the position previously set when the key is
inserted into the ignition lock with the driver's
door closed. G
Risk of injury
Make sure that nobody can become trap-
ped when you activate the easy-entry/exit
feature.
If there is a risk of becoming trapped, stop
the adjustment procedure. To halt the pro-
cedure:
R press the steering-column adjustment
switch
R press one of the memory function posi-
tion buttons
The steering column stops moving immedi-
ately. Never leave children unsupervised in the
vehicle. They could open the driver's door
and thereby unintentionally activate the
easy-entry feature and become trapped.
The most recent position of the steering
wheel is stored when you switch off the igni-
tion or when you store a memory position
(Y page 93).
You can activate and deactivate the easy-
entry/exit feature via the on-board computer
(Y page 138). Controls
* optional
211_AKB; 2; 5, en-GB
mkalafa,
Version: 2.9.4 2008-02-29T16:57:07+01:00 - Seite 90Dateiname: 6515_3416_02_buchblock.pdf; preflight
Page 125 of 401
On-board computer
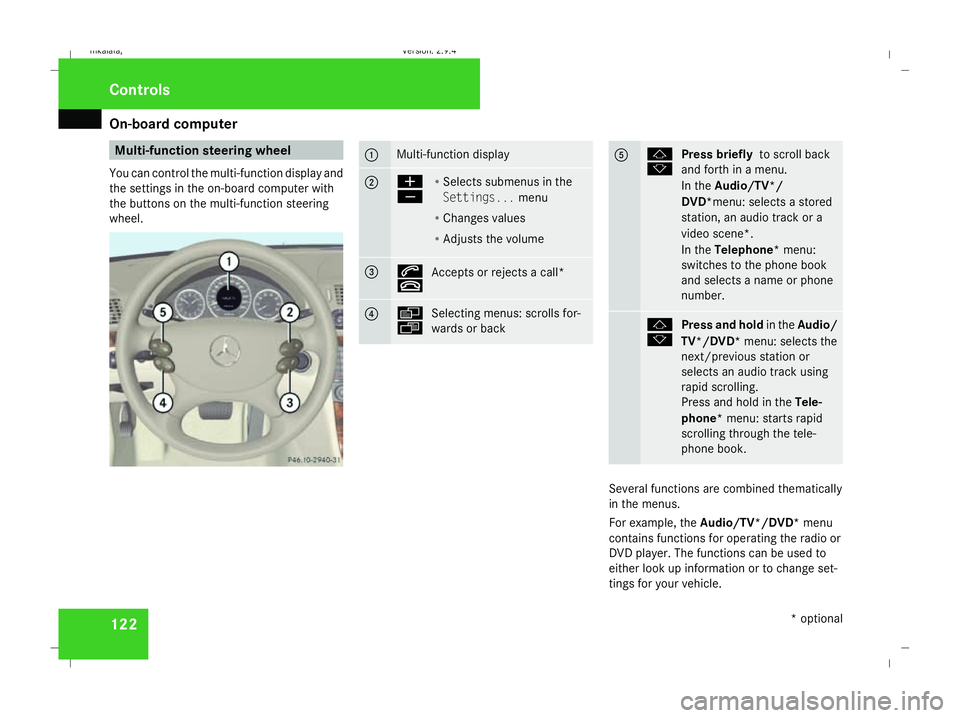
122 Multi-function steering wheel
You can control the multi-function display and
the settings in the on-board computer with
the buttons on the multi-function steering
wheel. 1 Multi-function display
2 æ
ç
R
Selects submenus in the
Settings... menu
R Changes values
R Adjusts the volume 3 s
t
Accepts or rejects a call* 4 è
ÿ
Selecting menus: scrolls for-
wards or back 5 j
k
Press briefly
to scroll back
and forth in a menu.
In the Audio/TV*/
DVD*menu: selects a stored
station, an audio track or a
video scene*.
In the Telephone* menu:
switches to the phone book
and selects a name or phone
number. j
k
Press and hold
in theAudio/
TV*/DVD* menu: selects the
next/previous station or
selects an audio track using
rapid scrolling.
Press and hold in the Tele-
phone* menu: starts rapid
scrolling through the tele-
phone book. Several functions are combined thematically
in the menus.
For example, the Audio/TV*/DVD* menu
contains functions for operating the radio or
DVD player. The functions can be used to
either look up information or to change set-
tings for your vehicle. Controls
* optional
211_AKB; 2; 5, en-GB
mkalafa,
Version: 2.9.4 2008-02-29T16:57:07+01:00 - Seite 122Dateiname: 6515_3416_02_buchblock.pdf; preflight
Page 128 of 401
On-board computer
125Function
1 Basic display
menu (Ypage 125)
R Digital speedometer 17
(Y page 126)
R Outside tempera-
ture 17
(Y page 126)
R ASSYST PLUS service display
(Y page 243)
R Engine oil level* (Y page 223)
R Tyre pressure loss warning system
(Y page 230) or tyre pressure mon-
itor* (Y page 232) 2
AMG* menu (Y
page 126) 3
Audio/TV*/DVD*
(Ypage 129)
menu
R Radio station ( Ypage 129)
R Audio drive or media (Y page 129)
R TV* (Y page 130)
R DVD video* (Y page 130) Function
4
Navigation* menu (Y
page 130) 5
Distronic
* menu (distance display)
(Y page 145) 6
Message memory
menu18
(fault and
warning messages) (Y page 131) 7 Settings
menu (Ypage 131)
R Resetting to factory settings
(Y page 132)
R Selecting a submenu (Y page 132) 8 Trip computer
menu
R Consumption statistics
(Y page 140)
R Range (Y page 140) 9
Telephone*
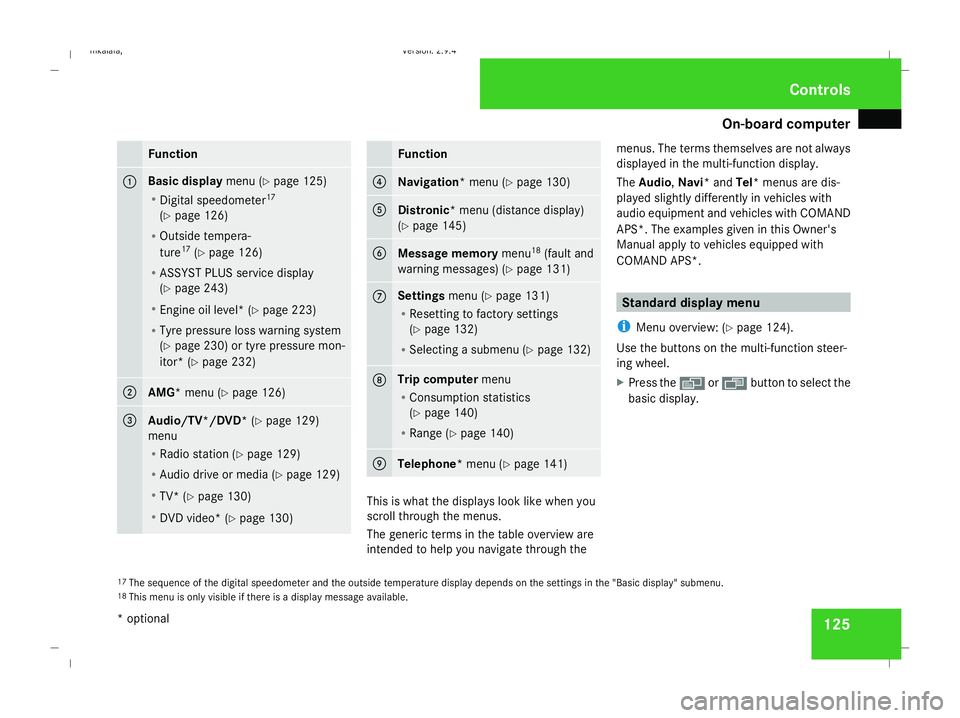
menu (Ypage 141) This is what the displays look like when you
scroll through the menus.
The generic terms in the table overview are
intended to help you navigate through themenus. The terms themselves are not always
displayed in the multi-function display.
The Audio, Navi* and Tel* menus are dis-
played slightly differently in vehicles with
audio equipment and vehicles with COMAND
APS*. The examples given in this Owner's
Manual apply to vehicles equipped with
COMAND APS*. Standard display menu
i Menu overview: (Y page 124).
Use the buttons on the multi-function steer-
ing wheel.
X Press the èor· button to select the
basic display.
17 The sequence of the digital speedometer and the outside temperature display depends on the settings in the "Basic display" submenu.
18 This menu is only visible if there is a display message available. Controls
* optional
211_AKB; 2; 5, en-GB
mkalafa,
Version: 2.9.4
2008-02-29T16:57:07+01:00 - Seite 125 ZDateiname: 6515_3416_02_buchblock.pdf; preflight
Page 129 of 401
On-board computer
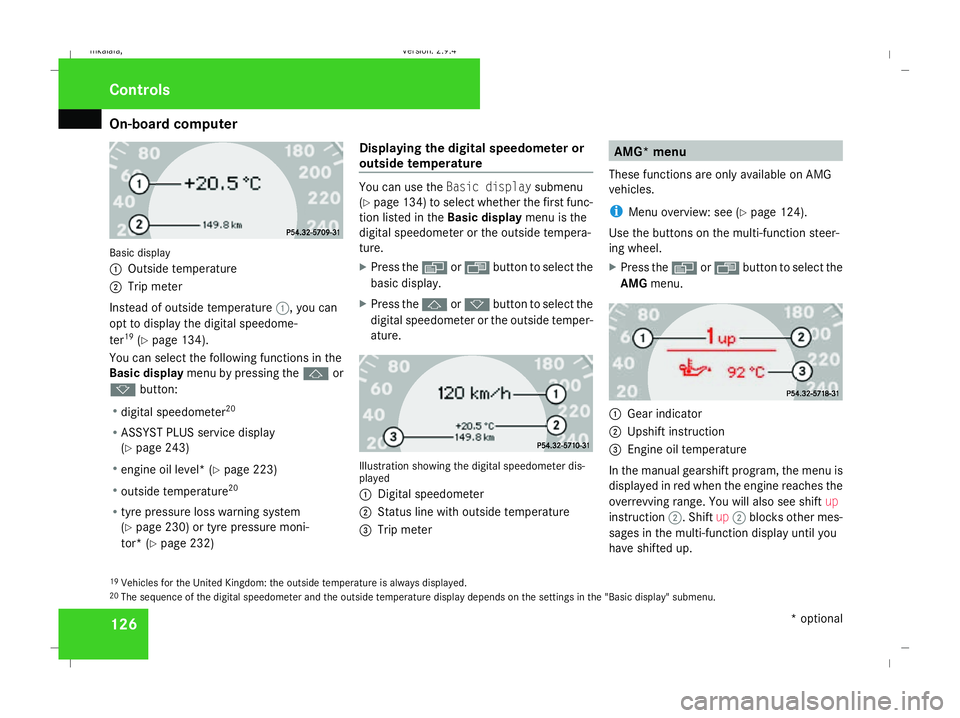
126Basic display
1
Outside temperature
2 Trip meter
Instead of outside temperature 1, you can
opt to display the digital speedome-
ter 19
(Y page 134).
You can select the following functions in the
Basic display menu by pressing the jor
k button:
R digital speedometer 20
R ASSYST PLUS service display
(Y page 243)
R engine oil level* (Y page 223)
R outside temperature 20
R tyre pressure loss warning system
(Y page 230) or tyre pressure moni-
tor* (Y page 232) Displaying the digital speedometer or
outside temperature You can use the
Basic display submenu
(Y page 134) to select whether the first func-
tion listed in the Basic displaymenu is the
digital speedometer or the outside tempera-
ture.
X Press the èor· button to select the
basic display.
X Press the jork button to select the
digital speedometer or the outside temper-
ature. Illustration showing the digital speedometer dis-
played
1
Digital speedometer
2 Status line with outside temperature
3 Trip meter AMG* menu
These functions are only available on AMG
vehicles.
i Menu overview: see (Y page 124).
Use the buttons on the multi-function steer-
ing wheel.
X Press the èor· button to select the
AMG menu. 1
Gear indicator
2 Upshift instruction
3 Engine oil temperature
In the manual gearshift program, the menu is
displayed in red when the engine reaches the
overrevving range. You will also see shift up
instruction 2. Shiftup2 blocks other mes-
sages in the multi-function display until you
have shifted up.
19 Vehicles for the United Kingdom: the outside temperature is always displayed.
20 The sequence of the digital speedometer and the outside temperature display depends on the settings in the "Basic display" submenu. Controls
* optional
211_AKB; 2; 5, en-GB
mkalafa,
Version: 2.9.4 2008-02-29T16:57:07+01:00 - Seite 126Dateiname: 6515_3416_02_buchblock.pdf; preflight
Page 130 of 401
On-board computer
127
The engine oil temperature gauge flashes if
the engine oil temperature has not reached
80 †. Avoid driving at full engine output dur-
ing this time.
Displaying the on-board voltage X
Press the èor· button to select the
AMG menu.
X Press the jbutton repeatedly until the
on-board voltage appears. 1
Gear indicator
2 On-board voltage
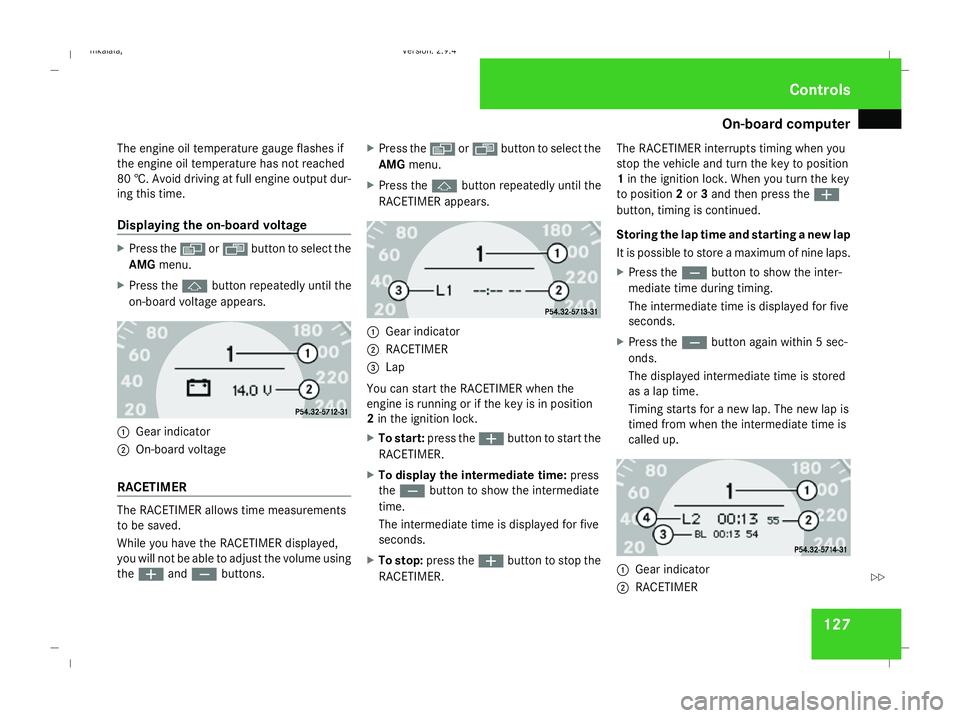
RACETIMER The RACETIMER allows time measurements
to be saved.
While you have the RACETIMER displayed,
you will not be able to adjust the volume using
the æ andç buttons. X
Press the èor· button to select the
AMG menu.
X Press the jbutton repeatedly until the
RACETIMER appears. 1
Gear indicator
2 RACETIMER
3 Lap
You can start the RACETIMER when the
engine is running or if the key is in position
2 in the ignition lock.
X To start: press the æbutton to start the
RACETIMER.
X To display the intermediate time: press
the ç button to show the intermediate
time.
The intermediate time is displayed for five
seconds.
X To stop: press the æbutton to stop the
RACETIMER. The RACETIMER interrupts timing when you
stop the vehicle and turn the key to position
1
in the ignition lock. When you turn the key
to position 2or 3and then press the æ
button, timing is continued.
Storing the lap time and starting a new lap
It is possible to store a maximum of nine laps.
X Press the çbutton to show the inter-
mediate time during timing.
The intermediate time is displayed for five
seconds.
X Press the çbutton again within 5 sec-
onds.
The displayed intermediate time is stored
as a lap time.
Timing starts for a new lap. The new lap is
timed from when the intermediate time is
called up. 1
Gear indicator
2 RACETIMER Controls
211_AKB; 2; 5, en-GB
mkalafa,
Version: 2.9.4
2008-02-29T16:57:07+01:00 - Seite 127 ZDateiname: 6515_3416_02_buchblock.pdf; preflight