MERCEDES-BENZ E-CLASS SALOON 2009 Owners Manual
Manufacturer: MERCEDES-BENZ, Model Year: 2009, Model line: E-CLASS SALOON, Model: MERCEDES-BENZ E-CLASS SALOON 2009Pages: 373, PDF Size: 12.37 MB
Page 161 of 373
Front sensors
Centre Approximately 100 cm
Corners Approximately 60 cm
Rear sensors
Centre Approximately 120 cm
Corners Approximately 80 cm
!
When parking, pay particular attention to
objects above or below the sensors, such
as flower pots or trailer towbars. PARK-
TRONIC does not detect such objects when
they are in the immediate vicinity of the
vehicle. You could damage the vehicle or
the objects.
Ultrasonic sources such as an automatic
car wash, a lorry's compressed-air brakes
or a pneumatic drill could cause PARK-
TRONIC to malfunction.
Minimum distance Centre Approximately 20 cm
Corners Approximately 15 cm
If there is an obstacle within this range, all
warning displays light up and a tone sounds.
If the distance falls below the minimum clear-
ance, it may no longer be shown.
Warning displays
The warning displays show the distance
between the sensors and the obstacle. The
warning display for the front area is located
on the dashboard above the centre air vents.
The warning display for the rear area is loca-
ted on the roof lining in the rear compart-
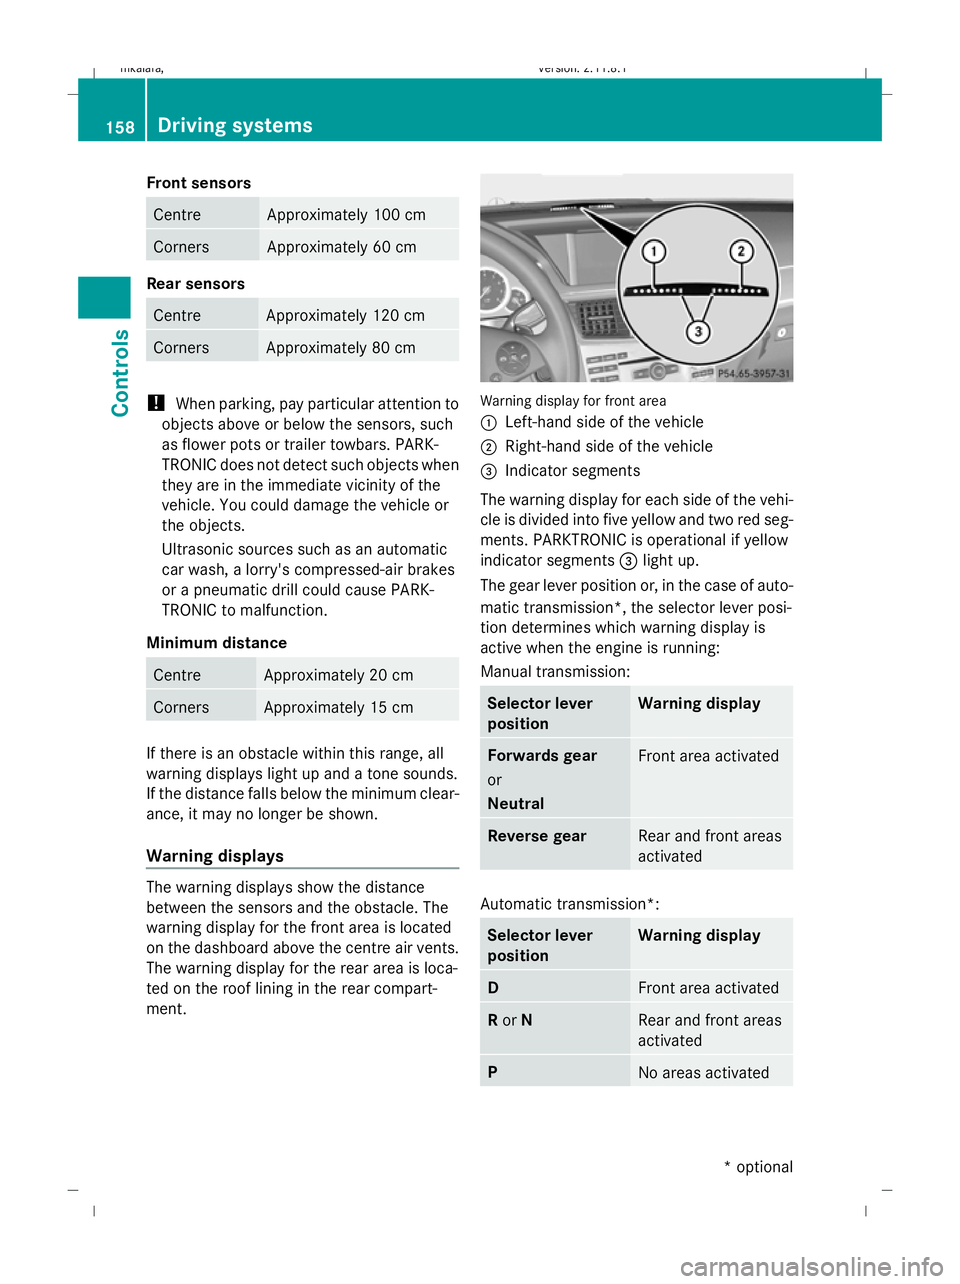
ment. Warning display for front area
:
Left-hand side of the vehicle
; Right-hand side of the vehicle
= Indicator segments
The warning display for each side of the vehi-
cle is divided into five yellow and two red seg-
ments. PARKTRONIC is operational if yellow
indicator segments =light up.
The gear lever position or, in the case of auto-
matic transmission*, the selector lever posi-
tion determines which warning display is
active when the engine is running:
Manual transmission: Selector lever
position Warning display
Forwards gear
or
Neutral
Front area activated
Reverse gear
Rear and front areas
activated
Automatic transmission*:
Selector lever
position Warning display
D
Front area activated
R
or N Rear and front areas
activated
P
No areas activated158
Driving systemsControls
* optional
212_AKB; 2; 4, en-GB
mkalafa
,V ersion: 2.11.8.1
2009-05-05T14:17:16+02:00 - Seite 158
Dateiname: 6515346702_buchblock.pdf; erzeugt am 07. May 2009 14:16:23; WK
Page 162 of 373
One or more segments light up as the vehicle
approaches an obstacle, depending on the
vehicle's distance to the obstacle.
From the:
R
sixth segment onwards, you will hear an
intermittent warning tone for approx-
imately two seconds.
R seventh segment onwards, you will hear a
warning tone for approximately two sec-
onds. You have reached the minimum dis-
tance.
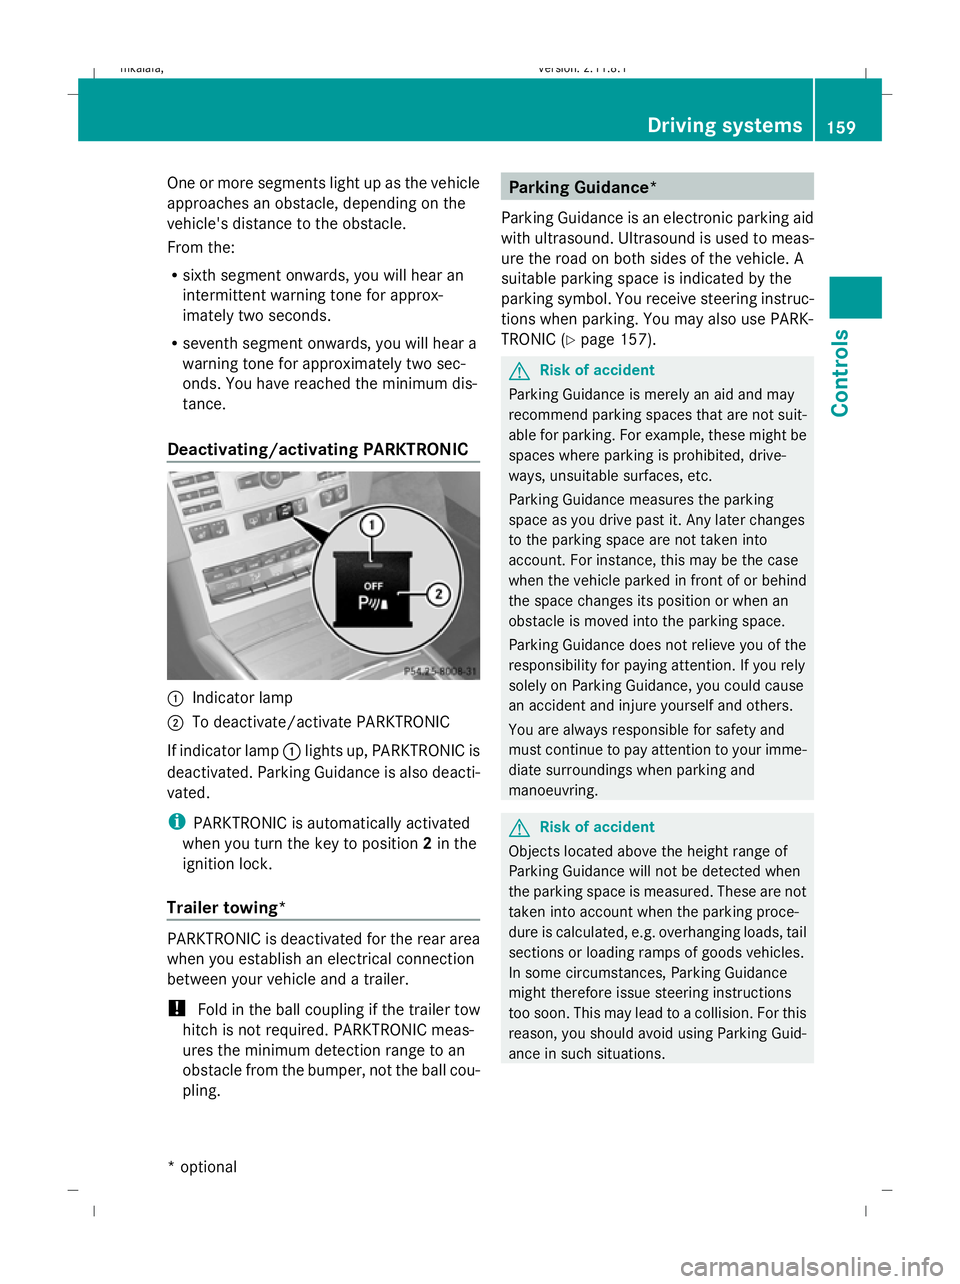
Deactivating/activating PARKTRONIC :
Indicator lamp
; To deactivate/activate PARKTRONIC
If indicator lamp :lights up, PARKTRONIC is
deactivated. Parking Guidance is also deacti-
vated.
i PARKTRONIC is automatically activated
when you turn the key to position 2in the
ignition lock.
Trailer towing* PARKTRONIC is deactivated for the rear area
when you establish an electrical connection
between your vehicle and a trailer.
!
Fold in the ball coupling if the trailer tow
hitch is not required. PARKTRONIC meas-
ures the minimum detection range to an
obstacle from the bumper, not the ball cou-
pling. Parking Guidance*
Parking Guidance is an electronic parking aid
with ultrasound. Ultrasound is used to meas-
ure the road on both sides of the vehicle. A
suitable parking space is indicated by the
parking symbol. You receive steering instruc-
tions when parking. You may also use PARK-
TRONIC (Y page 157). G
Risk of accident
Parking Guidance is merely an aid and may
recommend parking spaces that are not suit-
able for parking. For example, these might be
spaces where parking is prohibited, drive-
ways, unsuitable surfaces, etc.
Parking Guidance measures the parking
space as you drive past it. Any later changes
to the parking space are not taken into
account. For instance, this may be the case
when the vehicle parked in front of or behind
the space changes its position or when an
obstacle is moved into the parking space.
Parking Guidance does not relieve you of the
responsibility for paying attention. If you rely
solely on Parking Guidance, you could cause
an accident and injure yourself and others.
You are always responsible for safety and
must continue to pay attention to your imme-
diate surroundings when parking and
manoeuvring. G
Risk of accident
Objects located above the height range of
Parking Guidance will not be detected when
the parking space is measured. These are not
taken into account when the parking proce-
dure is calculated, e.g. overhanging loads, tail
sections or loading ramps of goods vehicles.
In some circumstances, Parking Guidance
might therefore issue steering instructions
too soon. This may lead to a collision. For this
reason, you should avoid using Parking Guid-
ance in such situations. Driving systems
159Controls
* optional
212_AKB; 2; 4, en-GB
mkalafa,
Version: 2.11.8.1 2009-05-05T14:17:16+02:00 - Seite 159 Z
Dateiname: 6515346702_buchblock.pdf; erzeugt am 07. May 2009 14:16:23; WK
Page 163 of 373
G
Risk of injury
Make sure that no persons or animals are in
the manoeuvring range. Otherwise, they
could be injured.
When PARKTRONIC is deactivated, Parking
Guidance is also unavailable.
Use Parking Guidance for parking spaces:
R that are parallel to the direction of travel
R that are on straight roads, not bends
R that are on the same level as the road, i.e.
not on the pavement
Parking tips:
R On narrow roads, drive as close to the park-
ing space as possible.
R Parking spaces which are littered, over-
grown or partially occupied by trailer draw-
bars might be identified incorrectly or not
at all.
R Snowfall or heavy rain may lead to a parking
space being measured inaccurately.
R Pay attention to the PARKTRONIC warning
messages during the parking procedure
(Y page 157).
R When transporting a load which protrudes
from your vehicle, you must not use Parking
Guidance.
R Never use Parking Guidance with snow
chains or an emergency spare wheel* fit-
ted.
R The way your vehicle is positioned in the
parking space after parking is dependent
on various factors. These include the posi-
tion and shape of the vehicles parked in
front and behind it and the conditions of the
location. In some cases, Parking Guidance
may guide you too far or not far enough into
a parking space. In some cases, it may also
lead you across or onto the kerb. If neces-
sary, cancel the parking procedure with
Parking Guidance. !
If unavoidable, you should drive over
obstacles such as kerbs slowly and not at
a sharp angle. Otherwise, you may damage
the wheels or tyres.
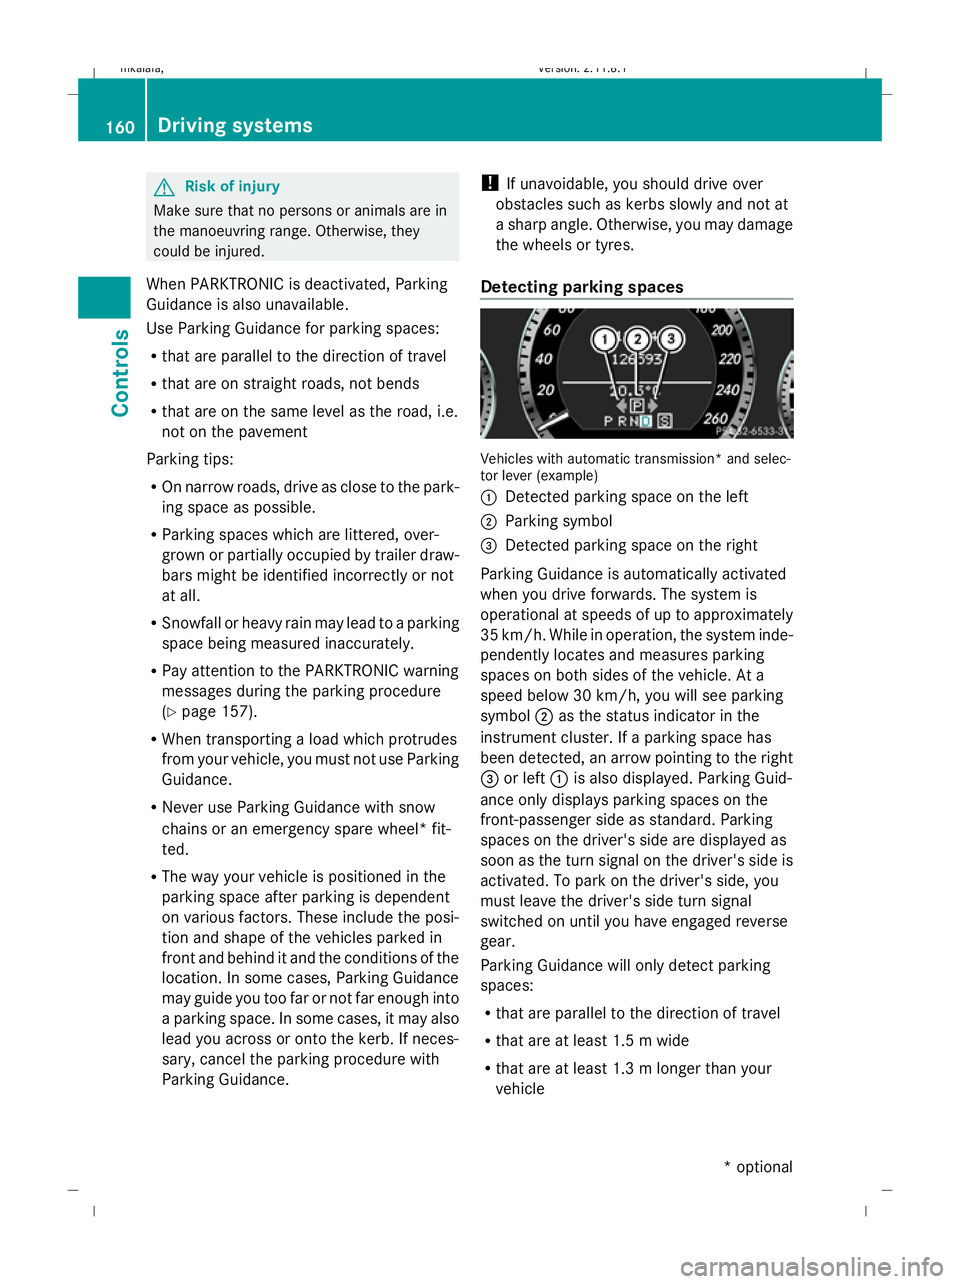
Detecting parking spaces Vehicles with automatic transmission* and selec-
tor lever (example)
:
Detected parking space on the left
; Parking symbol
= Detected parking space on the right
Parking Guidance is automatically activated
when you drive forwards. The system is
operational at speeds of up to approximately
35 km/h. While in operation, the system inde-
pendently locates and measures parking
spaces on both sides of the vehicle. At a
speed below 30 km/h, you will see parking
symbol ;as the status indicator in the
instrument cluster. If a parking space has
been detected, an arrow pointing to the right
= or left :is also displayed. Parking Guid-
ance only displays parking spaces on the
front-passenger side as standard. Parking
spaces on the driver's side are displayed as
soon as the turn signal on the driver's side is
activated. To park on the driver's side, you
must leave the driver's side turn signal
switched on until you have engaged reverse
gear.
Parking Guidance will only detect parking
spaces:
R that are parallel to the direction of travel
R that are at least 1.5 m wide
R that are at least 1.3 m longer than your
vehicle 160
Driving systemsControls
* optional
212_AKB; 2; 4, en-GB
mkalafa
,V ersion: 2.11.8.1
2009-05-05T14:17:16+02:00 - Seite 160
Dateiname: 6515346702_buchblock.pdf; erzeugt am 07. May 2009 14:16:24; WK
Page 164 of 373
A parking space is displayed while you are
driving past it, and until you are approx-
imately 15 m away from it.
Parking G
Risk of accident
PARKTRONIC and Parking Guidance are
merely parking aids and may not detect all
obstacles. They do not relieve you of the
responsibility of paying attention.
You are always responsible for safety and
must continue to pay attention to your imme-
diate surroundings when parking and
manoeuvring. You could otherwise endanger
yourself and others.
X Stop the vehicle when the parking space
symbol shows the desired parking space in
the instrument cluster.
X Vehicles with manual transmission: shift to
reverse gear.
Vehicles with automatic transmission*:
move the selector lever to R.
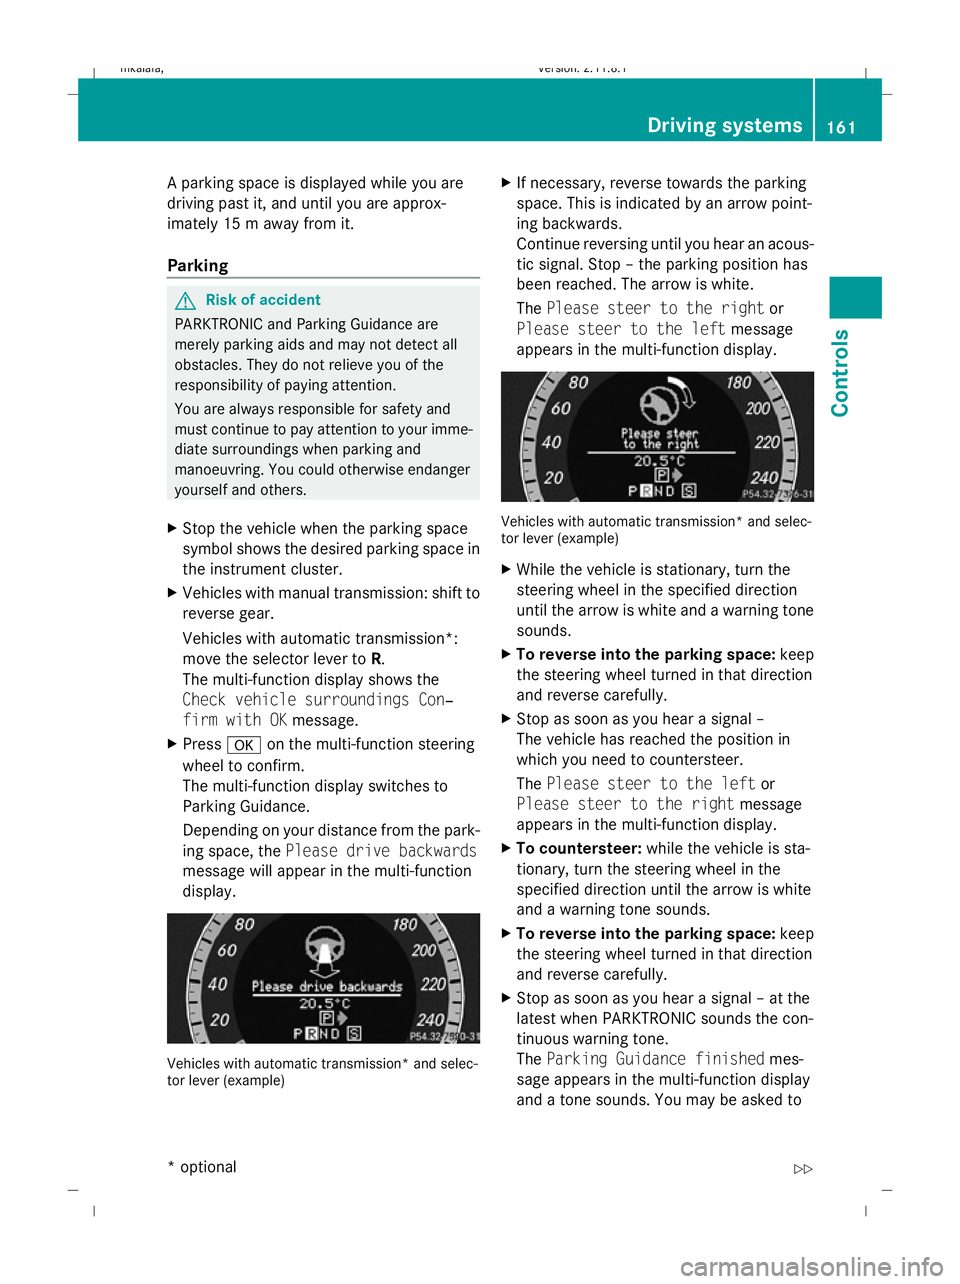
The multi-function display shows the
Check vehicle surroundings Con‐
firm with OK message.
X Press aon the multi-function steering
wheel to confirm.
The multi-function display switches to
Parking Guidance.
Depending on your distance from the park-
ing space, the Please drive backwards
message will appear in the multi-function
display. Vehicles with automatic transmission* and selec-
tor lever (example) X
If necessary, reverse towards the parking
space. This is indicated by an arrow point-
ing backwards.
Continue reversing until you hear an acous-
tic signal. Stop – the parking position has
been reached. The arrow is white.
The Please steer to the right or
Please steer to the left message
appears in the multi-function display. Vehicles with automatic transmission* and selec-
tor lever (example)
X
While the vehicle is stationary, turn the
steering wheel in the specified direction
until the arrow is white and a warning tone
sounds.
X To reverse into the parking space: keep
the steering wheel turned in that direction
and reverse carefully.
X Stop as soon as you hear a signal –
The vehicle has reached the position in
which you need to countersteer.
The Please steer to the left or
Please steer to the right message
appears in the multi-function display.
X To countersteer: while the vehicle is sta-
tionary, turn the steering wheel in the
specified direction until the arrow is white
and a warning tone sounds.
X To reverse into the parking space: keep
the steering wheel turned in that direction
and reverse carefully.
X Stop as soon as you hear a signal – at the
latest when PARKTRONIC sounds the con-
tinuous warning tone.
The Parking Guidance finished mes-
sage appears in the multi-function display
and a tone sounds. You may be asked to Driving systems
161Controls
* optional
212_AKB; 2; 4, en-GB
mkalafa,
Version: 2.11.8.1 2009-05-05T14:17:16+02:00 - Seite 161 Z
Dateiname: 6515346702_buchblock.pdf; erzeugt am 07. May 2009 14:16:24; WK
Page 165 of 373
steer in a different direction and then
change gear. In this case, further displays
in the multi-function display will direct you
to the final position.
X Manoeuvre, if necessary.
X Always observe the warning messages dis-
played by PARKTRONIC (Y page 157).
Cancelling Parking Guidance X
Press the PARKTRONIC button on the
centre console (Y page 157).
Parking Guidance is cancelled immediately
and PARKTRONIC is deactivated.
Parking Guidance is cancelled automatically
if it is no longer possible to guide you into the
parking space, or if a malfunction occurs.
The parking space symbol disappears and the
Parking Guidance cancelled message
appears in the multi-function display.
Trailer towing* For vehicles with a trailer coupling, the mini-
mum length for parking spaces is slightly
increased.
If you have attached a trailer to your vehicle,
you should not use Parking Guidance. When
the electrical connection is established
between your vehicle and the trailer, Parking
Guidance ceases to be available. PARK-
TRONIC is deactivated for the rear area. Reversing camera*
The reversing camera is an optical aid. It
shows the area behind your vehicle in the
COMAND APS display. G
Risk of injury
Make sure that no persons or animals are in
the manoeuvring range. Otherwise, they
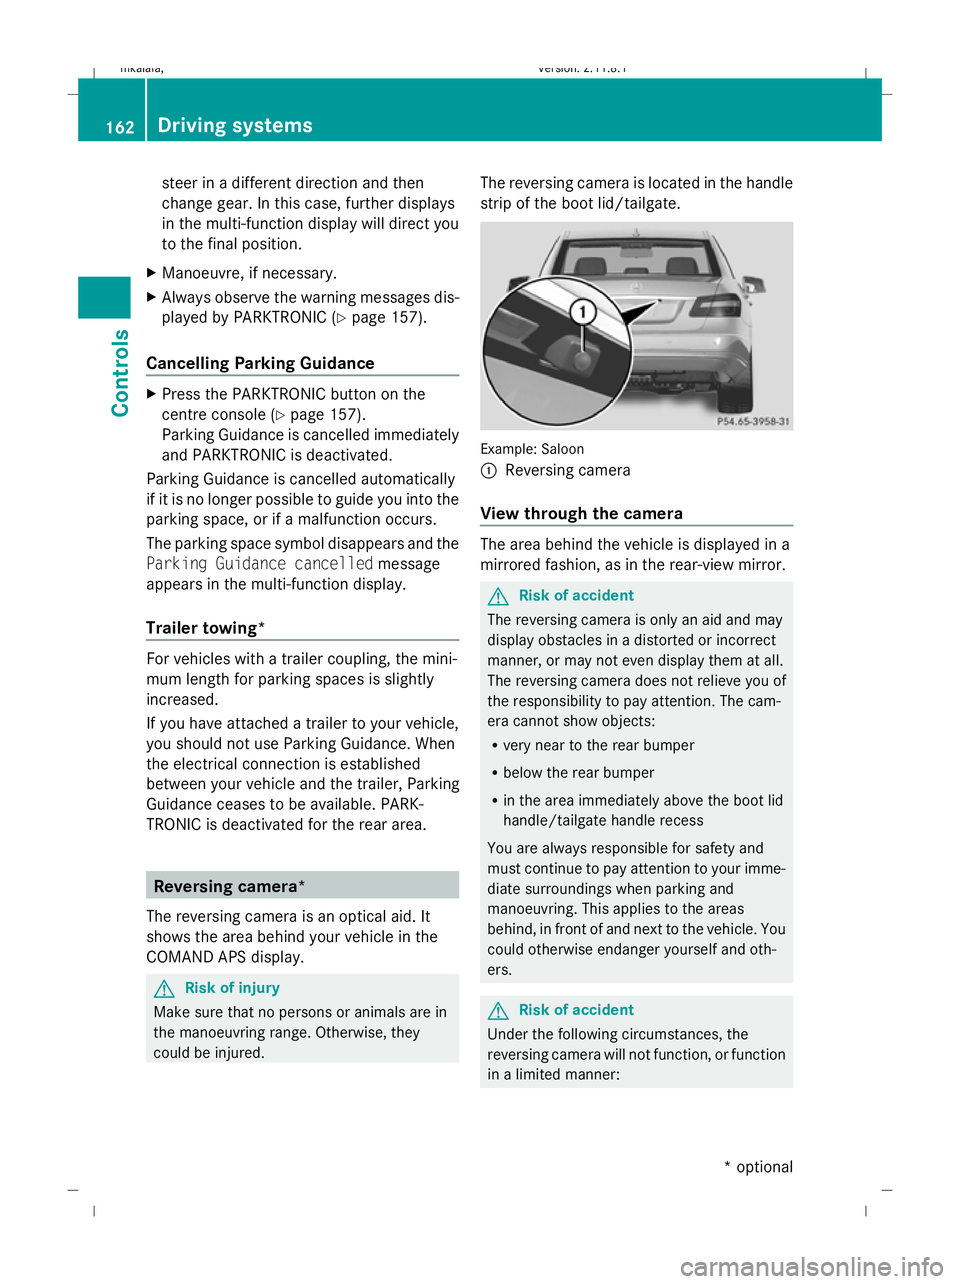
could be injured. The reversing camera is located in the handle
strip of the boot lid/tailgate.
Example: Saloon
:
Reversing camera
View through the camera The area behind the vehicle is displayed in a
mirrored fashion, as in the rear-view mirror.
G
Risk of accident
The reversing camera is only an aid and may
display obstacles in a distorted or incorrect
manner, or may not even display them at all.
The reversing camera does not relieve you of
the responsibility to pay attention. The cam-
era cannot show objects:
R very near to the rear bumper
R below the rear bumper
R in the area immediately above the boot lid
handle/tailgate handle recess
You are always responsible for safety and
must continue to pay attention to your imme-
diate surroundings when parking and
manoeuvring. This applies to the areas
behind, in front of and next to the vehicle. You
could otherwise endanger yourself and oth-
ers. G
Risk of accident
Under the following circumstances, the
reversing camera will not function, or function
in a limited manner: 162
Driving systemsControls
* optional
212_AKB; 2; 4, en-GB
mkalafa,
Version: 2.11.8.1 2009-05-05T14:17:16+02:00 - Seite 162
Dateiname: 6515346702_buchblock.pdf; erzeugt am 07. May 2009 14:16:24; WK
Page 166 of 373
R
the boot lid/tail gate is open
R in heavy rain, snow or fog
R at night or in very dark places
R if the camera is exposed to very bright light
R if the area is lit by fluorescent light (the dis-
play may flicker)
R if there is a sudden change in temperature,
e.g. when driving into a heated garage in
winter
R if the camera lens is dirty or obstructed
R if the rear of your vehicle is damaged. In this
event have the camera position and setting
checked at a qualified specialist workshop.
Mercedes-Benz recommends that you use
a Mercedes-Benz Service Centre for this
purpose.
Do not use the reversing camera in these
types of situation. You could, otherwise,
injure others or damage objects and your
vehicle while you are parking.
Activating the reversing camera X
Make sure that the key is in position 2in
the ignition lock.
X Make sure that the "Reversing camera"
function is selected in COMAND APS (see
the separate operating instructions for
COMAND APS).
X Engage reverse gear.
The area behind the vehicle is shown in the
COMAND APS display.
You can select not to show the area behind
the vehicle in the COMAND APS display (see
the separate operating instructions for
COMAND APS). ATTENTION ASSIST
ATTENTION ASSIST helps you on long, monot-
onous journeys such as on motorways and
trunk roads. It is active at speeds between 80
and 180 km/h. If ATTENTION ASSIST detects tiredness or increasing lapses in concentra-
tion on the part of the driver, it suggests a
break. G
Risk of accident
ATTENTION ASSIST is only an aid and may
detect your tiredness or lapses in concentra-
tion too late or not at all. It is not a substitute
for a well rested and attentive driver.
Fatigue may cause you to recognise hazard-
ous situations too late, misjudge a situation
or react slower. For this reason, make sure
you feel rested before you begin driving and
during your journey. Always take breaks in
good time and regularly, especially during
long journeys. Otherwise, you may fail to rec-
ognise dangers in time, cause an accident and
injure yourself and others.
ATTENTION ASSIST assesses your level of
fatigue or increasing inattentiveness taking
into consideration the following criteria:
R personal driving style, e.g. steering charac-
teristics
R driving conditions, e. g. time, driving time
ATTENTION ASSIST's functionality is restric-
ted and warnings are delayed or do not
appear at all:
R if the road condition is poor, e.g. large
bumps or potholes
R there is a strong side wind
R you have adopted a very sporty driving style
with high cornering speeds or driving with
a high rate of acceleration
R if you are predominantly driving slower
than 80 km/h or faster than 180 km/h
R if you are currently operating or making a
call using COMAND APS*
R in active driving situations, for example, if
you are changing lanes or changing the
vehicle speed Driving systems
163Controls
* optional
212_AKB; 2; 4, en-GB
mkalafa
,V ersion: 2.11.8.1
2009-05-05T14:17:16+02:00 - Seite 163 Z
Dateiname: 6515346702_buchblock.pdf; erzeugt am 07. May 2009 14:16:24; WK
Page 167 of 373
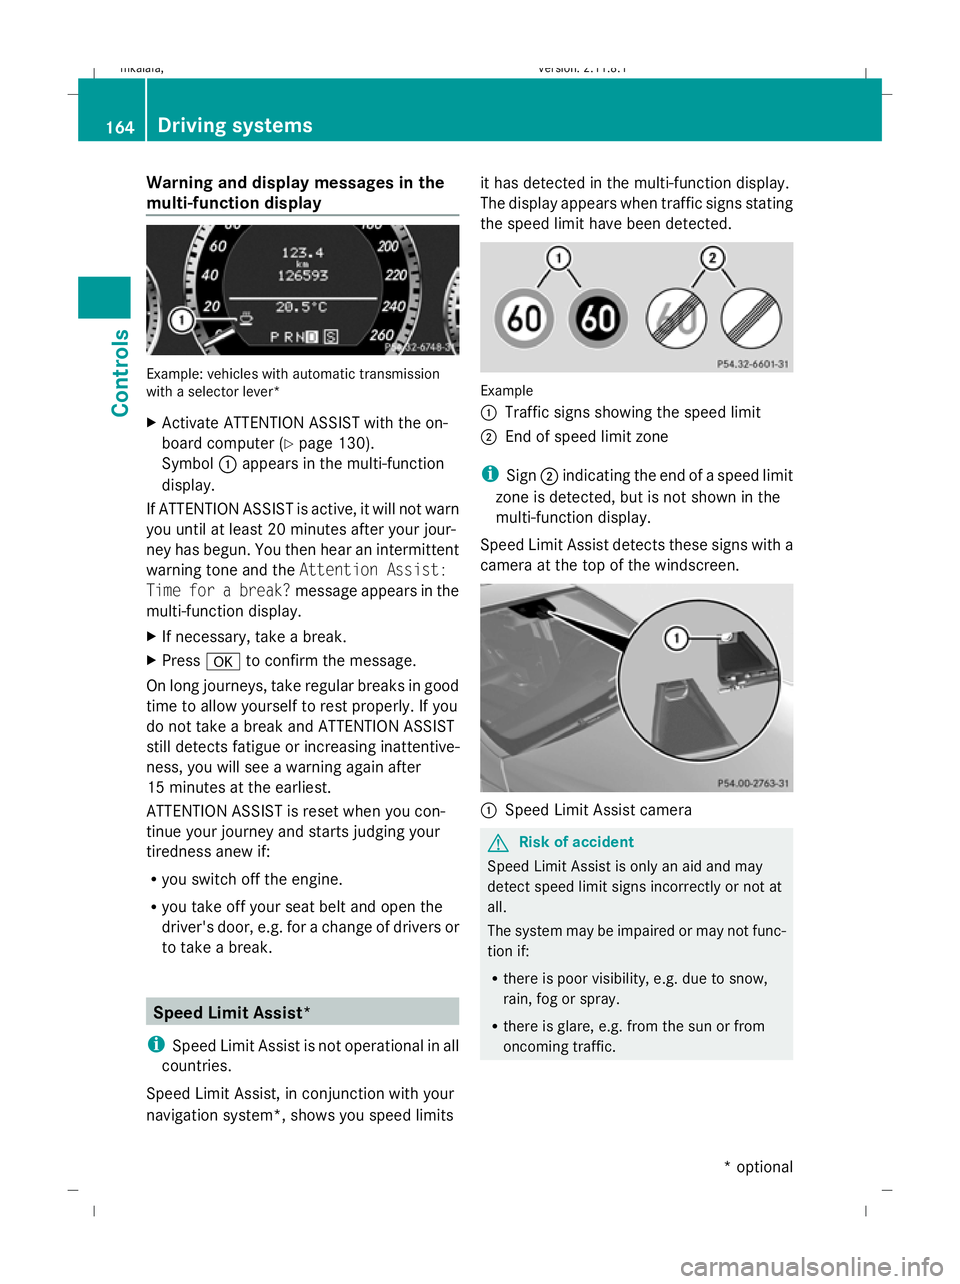
Warning and display messages in the
multi-function display Example: vehicles with automatic transmission
with a selector lever*
X Activate ATTENTION ASSIST with the on-
board computer (Y page 130).
Symbol :appears in the multi-function
display.
If ATTENTION ASSIST is active, it will not warn
you until at least 20 minutes after your jour-
ney has begun. You then hear an intermittent
warning tone and the Attention Assist:
Time for a break? message appears in the
multi-function display.
X If necessary, take a break.
X Press ato confirm the message.
On long journeys, take regular breaks in good
time to allow yourself to rest properly. If you
do not take a break and ATTENTION ASSIST
still detects fatigue or increasing inattentive-
ness, you will see a warning again after
15 minutes at the earliest.
ATTENTION ASSIST is reset when you con-
tinue your journey and starts judging your
tiredness anew if:
R you switch off the engine.
R you take off your seat belt and open the
driver's door, e.g. for a change of drivers or
to take a break. Speed Limit Assist*
i Speed Limit Assist is not operational in all
countries.
Speed Limit Assist, in conjunction with your
navigation system*, shows you speed limits it has detected in the multi-function display.
The display appears when traffic signs stating
the speed limit have been detected.
Example
:
Traffic signs showing the speed limit
; End of speed limit zone
i Sign ;indicating the end of a speed limit
zone is detected, but is not shown in the
multi-function display.
Speed Limit Assist detects these signs with a
camera at the top of the windscreen. :
Speed Limit Assist camera G
Risk of accident
Speed Limit Assist is only an aid and may
detect speed limit signs incorrectly or not at
all.
The system may be impaired or may not func-
tion if:
R there is poor visibility, e.g. due to snow,
rain, fog or spray.
R there is glare, e.g. from the sun or from
oncoming traffic. 164
Driving systemsControls
* optional
212_AKB; 2; 4, en-GB
mkalafa,
Version: 2.11.8.1 2009-05-05T14:17:16+02:00 - Seite 164
Dateiname: 6515346702_buchblock.pdf; erzeugt am 07. May 2009 14:16:25; WK
Page 168 of 373
R
the windscreen is dirty, misted up or cov-
ered, for instance by a sticker, in the vicinity
of the camera.
R the traffic signs are covered, for instance
by dirt, snow or trees.
R the traffic signs are poorly illuminated.
R there are ambiguous traffic signs, for
instance near roadworks or on multi-lane
roads.
Traffic signs always have priority over the
Speed Limit Assist display. Speed Limit Assist
cannot detect road and traffic conditions. It is
not a substitute for attentive driving.
Always pay attention to traffic conditions and
your surroundings. Otherwise, you may fail to
recognise dangers in time, cause an accident
and injure yourself and others.
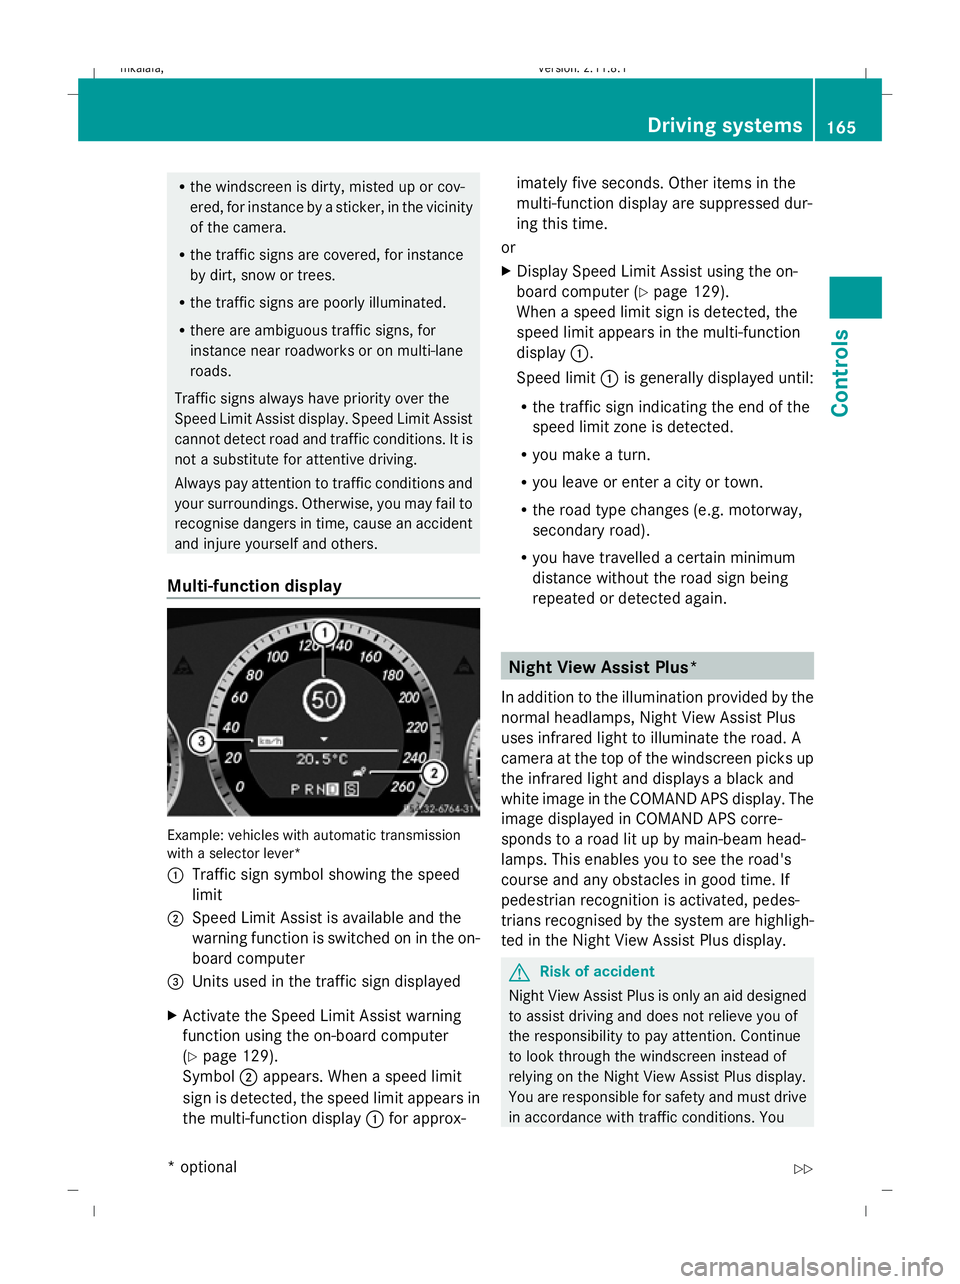
Multi-function display Example: vehicles with automatic transmission
with a selector lever*
:
Traffic sign symbol showing the speed
limit
; Speed Limit Assist is available and the
warning function is switched on in the on-
board computer
= Units used in the traffic sign displayed
X Activate the Speed Limit Assist warning
function using the on-board computer
(Y page 129).
Symbol ;appears. When a speed limit
sign is detected, the speed limit appears in
the multi-function display :for approx- imately five seconds. Other items in the
multi-function display are suppressed dur-
ing this time.
or
X Display Speed Limit Assist using the on-
board computer (Y page 129).
When a speed limit sign is detected, the
speed limit appears in the multi-function
display :.
Speed limit :is generally displayed until:
R the traffic sign indicating the end of the
speed limit zone is detected.
R you make a turn.
R you leave or enter a city or town.
R the road type changes (e.g. motorway,
secondary road).
R you have travelled a certain minimum
distance without the road sign being
repeated or detected again. Night View Assist Plus*
In addition to the illumination provided by the
normal headlamps, Night View Assist Plus
uses infrared light to illuminate the road. A
camera at the top of the windscreen picks up
the infrared light and displays a black and
white image in the COMAND APS display. The
image displayed in COMAND APS corre-
sponds to a road lit up by main-beam head-
lamps. This enables you to see the road's
course and any obstacles in good time. If
pedestrian recognition is activated, pedes-
trians recognised by the system are highligh-
ted in the Night View Assist Plus display. G
Risk of accident
Night View Assist Plus is only an aid designed
to assist driving and does not relieve you of
the responsibility to pay attention. Continue
to look through the windscreen instead of
relying on the Night View Assist Plus display.
You are responsible for safety and must drive
in accordance with traffic conditions. You Driving systems
165Controls
* optional
212_AKB; 2; 4, en-GB
mkalafa
,V ersion: 2.11.8.1
2009-05-05T14:17:16+02:00 - Seite 165 Z
Dateiname: 6515346702_buchblock.pdf; erzeugt am 07. May 2009 14:16:25; WK
Page 169 of 373
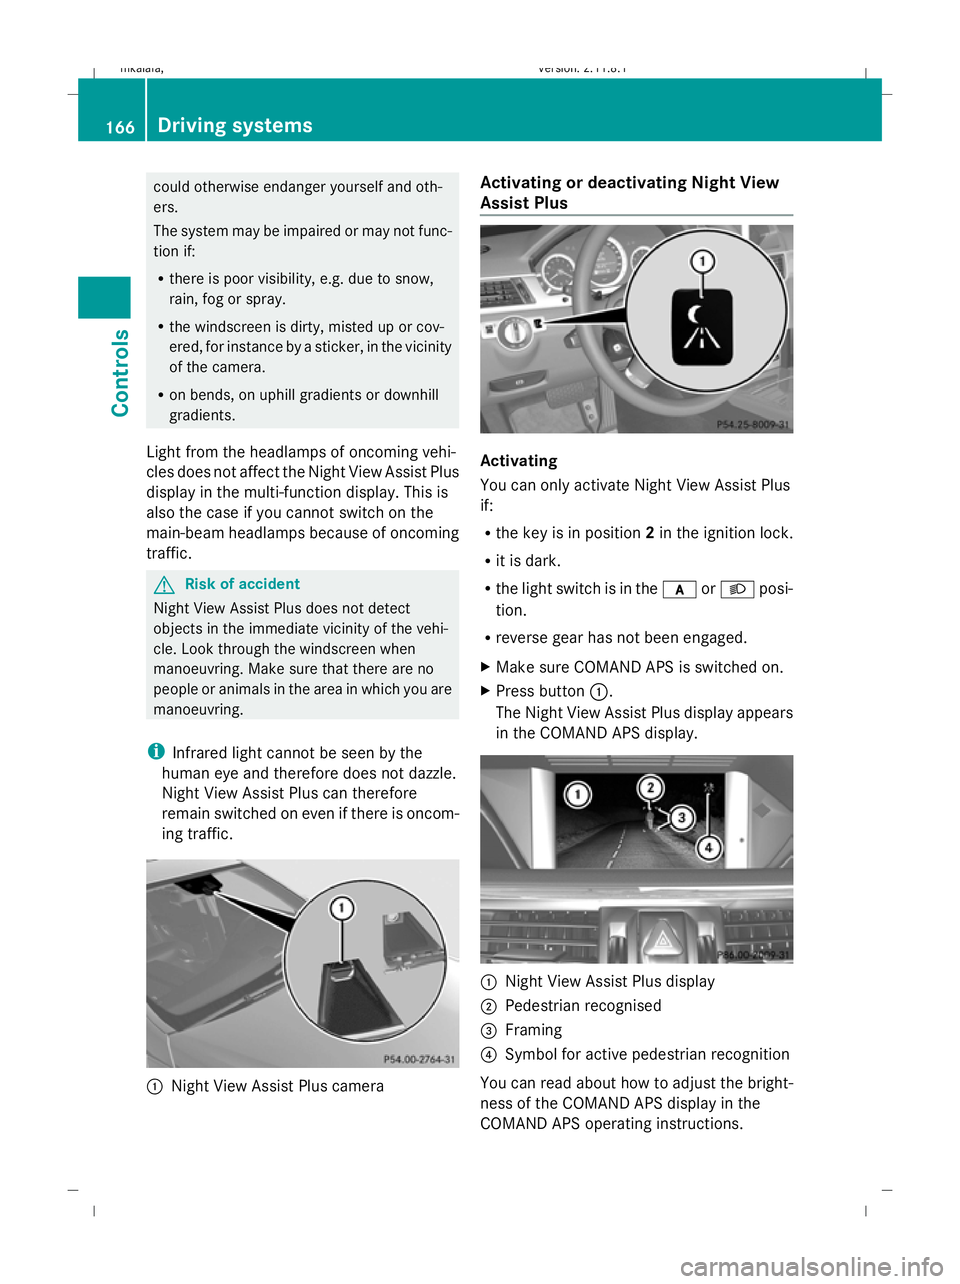
could otherwise endanger yourself and oth-
ers.
The system may be impaired or may not func-
tion if:
R there is poor visibility, e.g. due to snow,
rain, fog or spray.
R the windscreen is dirty, misted up or cov-
ered, for instance by a sticker, in the vicinity
of the camera.
R on bends, on uphill gradients or downhill
gradients.
Light from the headlamps of oncoming vehi-
cles does not affect the Night View Assist Plus
display in the multi-function display. This is
also the case if you cannot switch on the
main-beam headlamps because of oncoming
traffic. G
Risk of accident
Night View Assist Plus does not detect
objects in the immediate vicinity of the vehi-
cle. Look through the windscreen when
manoeuvring. Make sure that there are no
people or animals in the area in which you are
manoeuvring.
i Infrared light cannot be seen by the
human eye and therefore does not dazzle.
Night View Assist Plus can therefore
remain switched on even if there is oncom-
ing traffic. :
Night View Assist Plus camera Activating or deactivating Night View
Assist Plus
Activating
You can only activate Night View Assist Plus
if:
R
the key is in position 2in the ignition lock.
R it is dark.
R the light switch is in the corL posi-
tion.
R reverse gear has not been engaged.
X Make sure COMAND APS is switched on.
X Press button :.
The Night View Assist Plus display appears
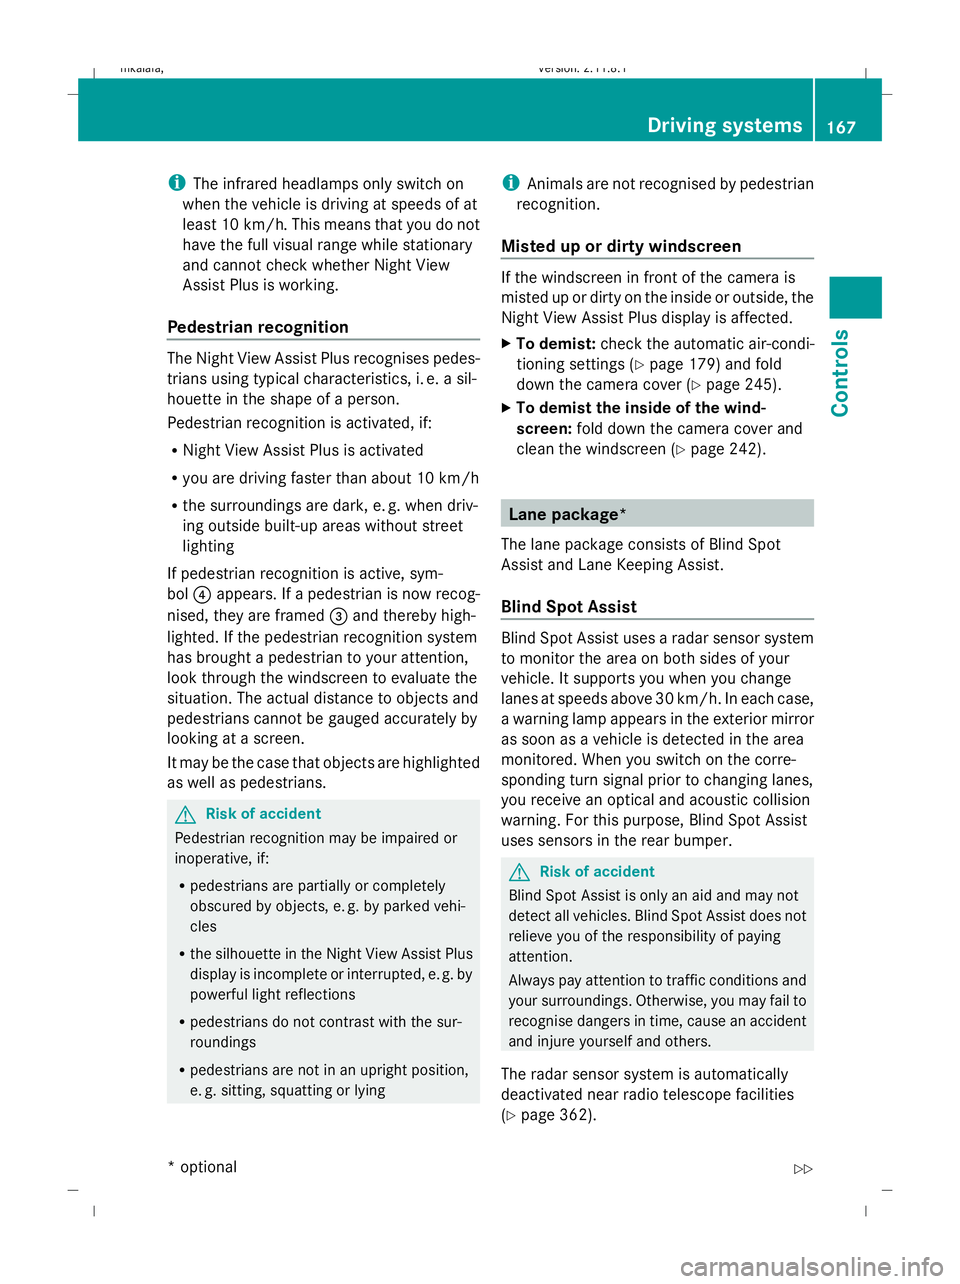
in the COMAND APS display. :
Night View Assist Plus display
; Pedestrian recognised
= Framing
? Symbol for active pedestrian recognition
You can read about how to adjust the bright-
ness of the COMAND APS display in the
COMAND APS operating instructions. 166
Driving systemsControls
212_AKB; 2; 4, en-GB
mkalafa
,V ersion: 2.11.8.1
2009-05-05T14:17:16+02:00 - Seite 166
Dateiname: 6515346702_buchblock.pdf; erzeugt am 07. May 2009 14:16:26; WK
Page 170 of 373
i
The infrared headlamps only switch on
when the vehicle is driving at speeds of at
least 10 km/h. This means that you do not
have the full visual range while stationary
and cannot check whether Night View
Assist Plus is working.
Pedestrian recognition The Night View Assist Plus recognises pedes-
trians using typical characteristics, i. e. a sil-
houette in the shape of a person.
Pedestrian recognition is activated, if:
R Night View Assist Plus is activated
R you are driving faster than about 10 km/h
R the surroundings are dark, e. g. when driv-
ing outside built-up areas without street
lighting
If pedestrian recognition is active, sym-
bol ?appears. If a pedestrian is now recog-
nised, they are framed =and thereby high-
lighted. If the pedestrian recognition system
has brought a pedestrian to your attention,
look through the windscreen to evaluate the
situation. The actual distance to objects and
pedestrians cannot be gauged accurately by
looking at a screen.
It may be the case that objects are highlighted
as well as pedestrians. G
Risk of accident
Pedestrian recognition may be impaired or
inoperative, if:
R pedestrians are partially or completely
obscured by objects, e. g. by parked vehi-
cles
R the silhouette in the Night View Assist Plus
display is incomplete or interrupted, e. g. by
powerful light reflections
R pedestrians do not contrast with the sur-
roundings
R pedestrians are not in an upright position,
e. g. sitting, squatting or lying i
Animals are not recognised by pedestrian
recognition.
Misted up or dirty windscreen If the windscreen in front of the camera is
misted up or dirty on the inside or outside, the
Night View Assist Plus display is affected.
X To demist: check the automatic air-condi-
tioning settings (Y page 179) and fold
down the camera cover (Y page 245).
X To demist the inside of the wind-
screen: fold down the camera cover and
clean the windscreen (Y page 242). Lane package*
The lane package consists of Blind Spot
Assist and Lane Keeping Assist.
Blind Spot Assist Blind Spot Assist uses a radar sensor system
to monitor the area on both sides of your
vehicle. It supports you when you change
lanes at speeds above 30 km/h. In each case,
a warning lamp appears in the exterior mirror
as soon as a vehicle is detected in the area
monitored. When you switch on the corre-
sponding turn signal prior to changing lanes,
you receive an optical and acoustic collision
warning. For this purpose, Blind Spot Assist
uses sensors in the rear bumper.
G
Risk of accident
Blind Spot Assist is only an aid and may not
detect all vehicles. Blind Spot Assist does not
relieve you of the responsibility of paying
attention.
Always pay attention to traffic conditions and
your surroundings. Otherwise, you may fail to
recognise dangers in time, cause an accident
and injure yourself and others.
The radar sensor system is automatically
deactivated near radio telescope facilities
(Y page 362). Driving systems
167Controls
* optional
212_AKB; 2; 4, en-GB
mkalafa,
Version: 2.11.8.1 2009-05-05T14:17:16+02:00 - Seite 167 Z
Dateiname: 6515346702_buchblock.pdf; erzeugt am 07. May 2009 14:16:26; WK