MERCEDES-BENZ E-CLASS SALOON 2011 Owners Manual
Manufacturer: MERCEDES-BENZ, Model Year: 2011, Model line: E-CLASS SALOON, Model: MERCEDES-BENZ E-CLASS SALOON 2011Pages: 409, PDF Size: 10.47 MB
Page 341 of 409
i
Vehicles without a spare wheel are not
equipped with the tools needed to change
a wheel when they leave the factory, e.g. a
jack or wheel wrench. Country-specific
deviations are possible. Some tools for
changing a wheel are specific to the vehi-
cle. Tools approved for yourv ehicle are
available at a qualified specialist workshop.
X Vehicles with a TIREFIT kit: lift up the
boot floor/luggage compartment floor
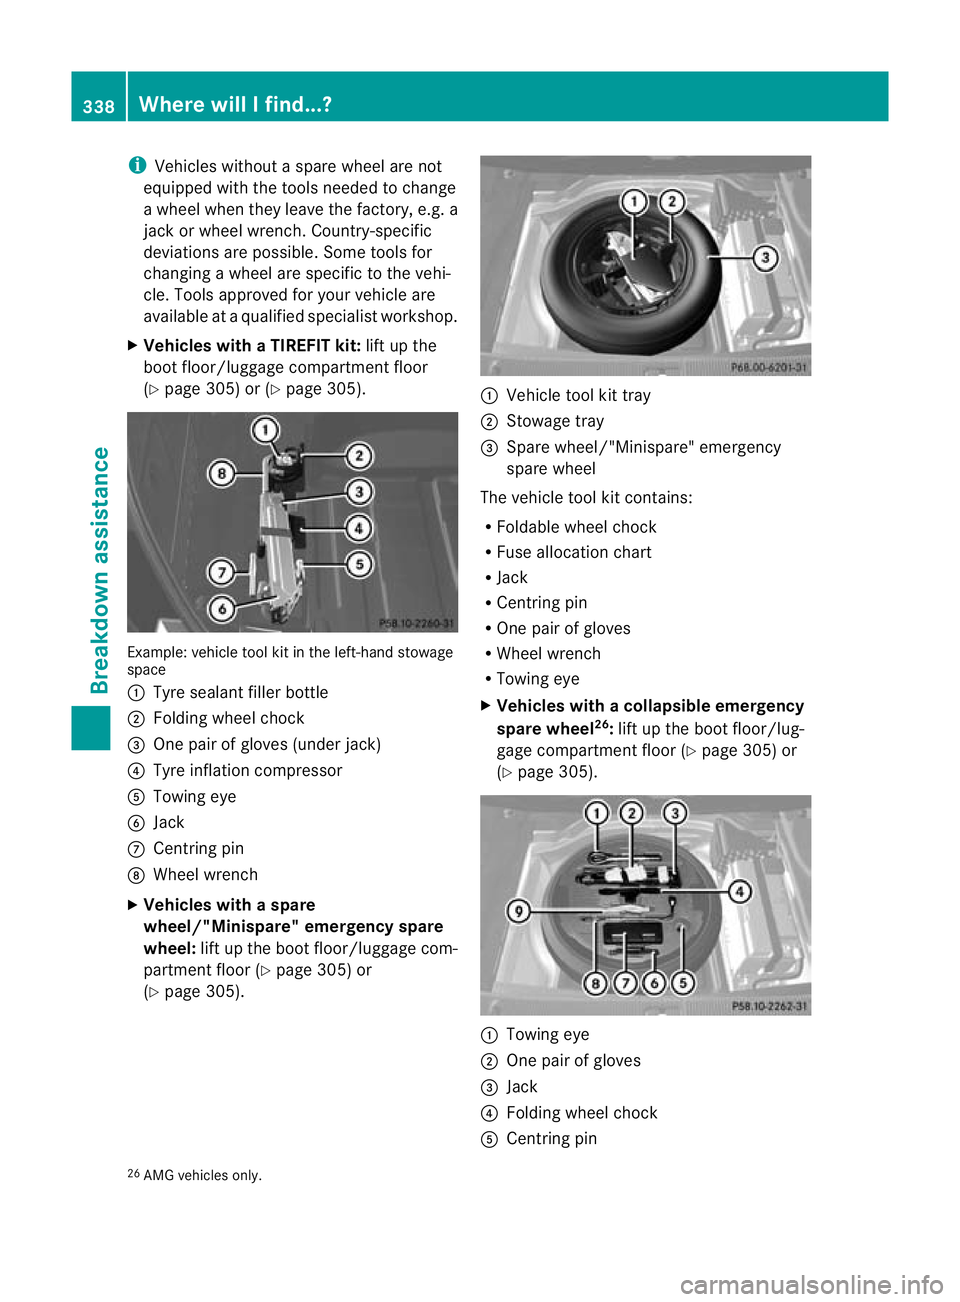
(Y page 305) or (Y page 305). Example: vehicle tool kit in the left-hand stowage
space
:
Tyre sealant filler bottle
; Folding wheel chock
= One pair of gloves (under jack)
? Tyre inflation compressor
A Towing eye
B Jack
C Centring pin
D Wheel wrench
X Vehicles with a spare
wheel/"Minispare" emergency spare
wheel: lift up the boot floor/luggage com-
partment floor (Y page 305) or
(Y page 305). :
Vehicle tool kit tray
; Stowage tray
= Spare wheel/"Minispare" emergency
spare wheel
The vehicle tool kit contains:
R Foldable wheel chock
R Fuse allocation chart
R Jack
R Centring pin
R One pair of gloves
R Wheel wrench
R Towing eye
X Vehicles with acollapsible emergency
spare wheel 26
:lift up the boot floor/lug-
gage compartment floor (Y page 305) or
(Y page 305). :
Towing eye
; One pair of gloves
= Jack
? Folding wheel chock
A Centring pin
26 AMG vehicles only. 338
Where will I find...?Breakdown assistance
Page 342 of 409
B
Shee tfor faulty wheel
C Tyre inflation compressor
D Wheel wrench
E Fuse allocation chart "Minispare" emergency spare wheel/
collapsible emergency spare wheel
Removing the "Minispare" emergency
spare wheel/collapsible emergency
spare wheel Opening the stowage well
Saloon:
the emergency spare wheel can be
found in the stowage well under the boot
floor.
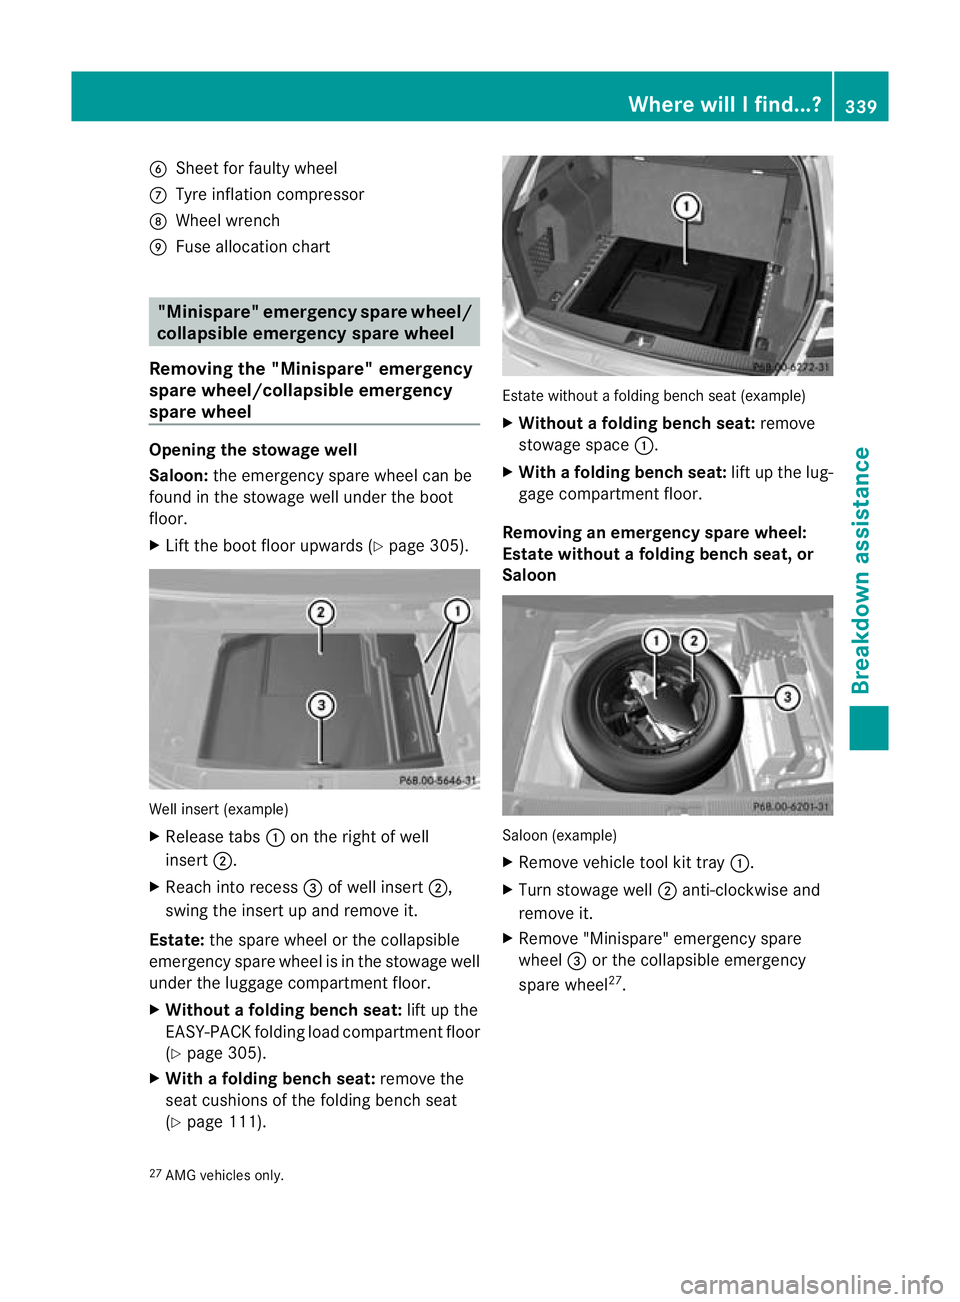
X Lift the boot floor upwards (Y page 305).Well insert (example)
X
Release tabs :on the right of well
insert ;.
X Reach into recess =of well insert ;,
swing the insert up and remove it.
Estate: the spare wheel or the collapsible
emergency spare wheel is in the stowage well
under the luggage compartment floor.
X Without a folding bench seat: lift up the
EASY-PACK folding load compartment floor
(Y page 305).
X With a folding bench seat: remove the
seat cushions of the folding bench seat
(Y page 111). Estate without a folding bench seat (example)
X
Without a folding bench seat: remove
stowage space :.
X With afolding bench seat: lift up the lug-
gage compartmen tfloor.
Removing an emergency spare wheel:
Estate without a folding bench seat, or
Saloon Saloon (example)
X
Remove vehicle tool kit tray :.
X Turn stowage well ;anti-clockwise and
remove it.
X Remove "Minispare" emergency spare
wheel =or the collapsible emergency
spare wheel 27
.
27 AMG vehicles only. Where will I find...?
339Breakdown assistance
Page 343 of 409
Removing an emergenc
yspare wheel:
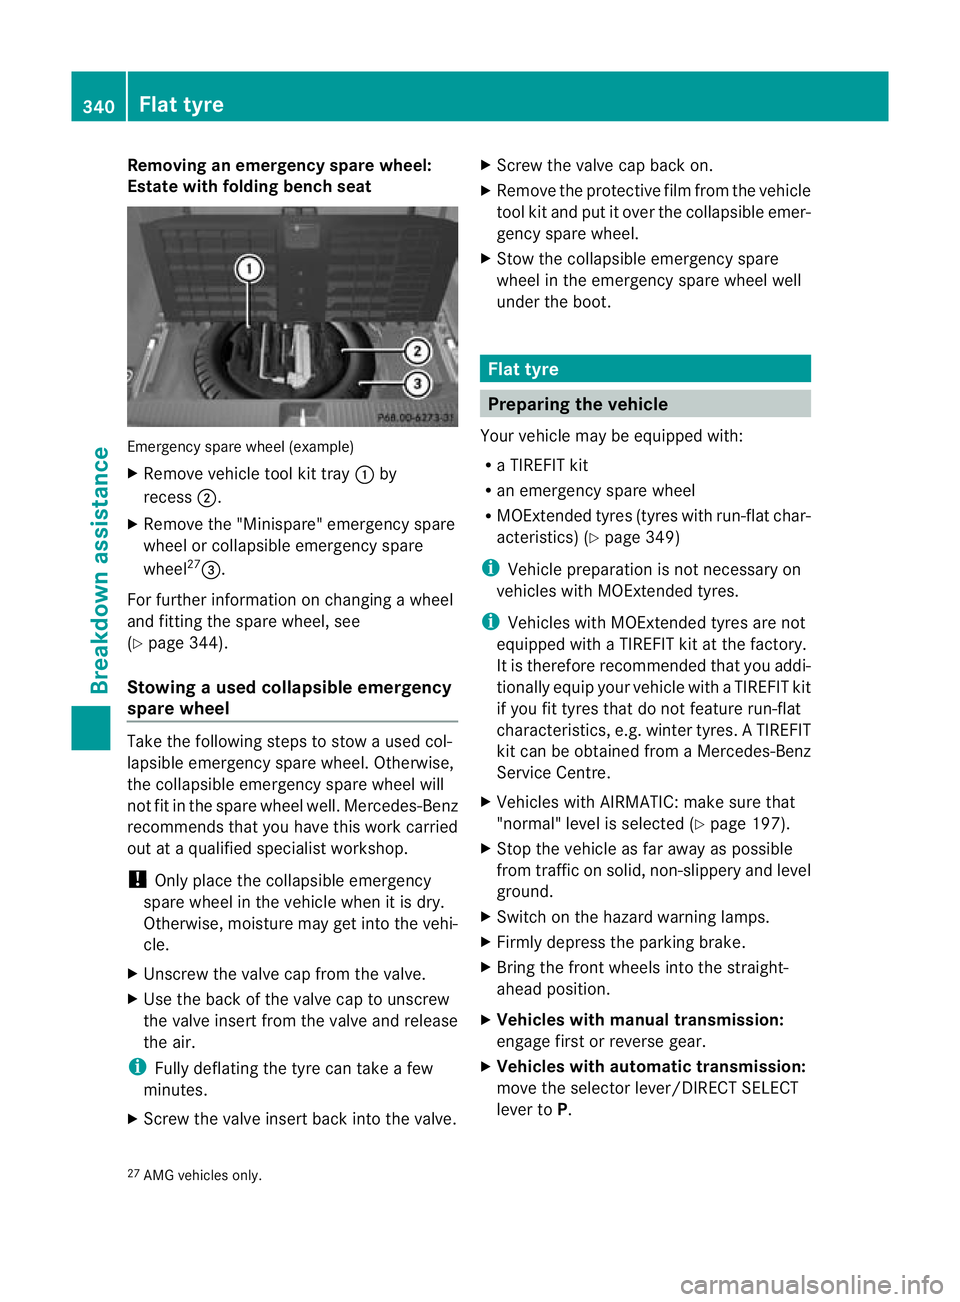
Estate with folding benc hseat Emergency spare wheel (example)
X Remove vehicle tool kit tray :by
recess ;.
X Remove the "Minispare" emergency spare
wheel or collapsible emergency spare
wheel 27
=.
For further information on changing a wheel
and fitting the spare wheel, see
(Y page 344).
Stowing aused collapsible emergency
spare wheel Take the following steps to stow a used col-
lapsible emergency spare wheel. Otherwise,
the collapsible emergency spare wheel will
not fit in the spare wheel well. Mercedes-Benz
recommends that you have this work carried
out at a qualified specialist workshop.
! Only place the collapsible emergency
spare wheel in the vehicle when it is dry.
Otherwise, moisture may get into the vehi-
cle.
X Unscrew the valve cap from the valve.
X Use the back of the valve cap to unscrew
the valve insert from the valve and release
the air.
i Fully deflating the tyre can take a few
minutes.
X Screw the valve insert back into the valve. X
Screw the valve cap back on.
X Remove the protective film from the vehicle
tool kit and put it over the collapsible emer-
gency spare wheel.
X Stow the collapsible emergency spare
wheel in the emergency spare wheel well
under the boot. Flat tyre
Preparing the vehicle
Your vehicle may be equipped with:
R a TIREFIT kit
R an emergency spare wheel
R MOExtended tyres (tyres with run-flat char-
acteristics) (Y page 349)
i Vehicle preparation is not necessary on
vehicles with MOExtended tyres.
i Vehicles with MOExtended tyres are not
equipped with a TIREFIT kit at the factory.
It is therefore recommended that you addi-
tionally equip your vehicle with a TIREFIT kit
if you fit tyres that do not feature run-flat
characteristics, e.g. winter tyres. A TIREFIT
kit can be obtained from a Mercedes-Benz
Service Centre.
X Vehicles with AIRMATIC: make sure that
"normal" level is selected (Y page 197).
X Stop the vehicle as far away as possible
from traffic on solid, non-slippery and level
ground.
X Switch on the hazard warning lamps.
X Firmly depress the parking brake.
X Bring the fron twheels into the straight-
ahead position.
X Vehicles with manual transmission:
engage first or reverse gear.
X Vehicles with automatic transmission:
move the selector lever/DIRECT SELECT
lever to P.
27 AMG vehicles only. 340
Flat tyreBreakdown assistance
Page 344 of 409
X
Switch off the engine.
X Vehicles without KEYLESS-GO: remove
the key from the ignition lock.
X Vehicles with KEYLESS-GO: openthe
driver's door.
The on-board electronics have status 0,
which is the same as the key having been
removed.
X Vehicles with KEYLESS-GO: remove the
Start/Stop button from the ignition lock
(Y page 155).
X All occupants must get out of the vehicle.
Make sure that they are not endangered as
they do so.
X Make sure that no one is near the danger
area whilst a wheel is being changed. Any-
one who is not directly assisting in the
wheel change should, for example, stand
behind the barrier.
X Get out of the vehicle. Pay attention to traf-
fic conditions when doing so.
X Close the driver's door.
X Place the warning triangle (Y page 336) a
suitable distance away.O bserve legal
requirements. TIREFIT kit
Using the TIREFIT kit TIREFIT is a tyre sealant.
You can use TIREFIT to seal punctures of up
to 4 mm, particularly those in the tyre tread.
You can use TIREFIT at outside temperatures
down to
Ò20 †. G
WARNING
In the following situations, the tyre sealant is
unable to provide sufficient breakdown assis-
tance, as it is unable to seal the tyre properly:
R there are cuts or punctures in the tyre
larger than those mentioned above.
R the wheel rim is damaged.
R you have driven at very low tyre pressures
or on a flat tyre.
There is a risk of accident.
Do not drive any further. Contact a qualified
specialist workshop.
X Do not remove any foreign objects which
have penetrated the tyre, e.g. screws or
nails.
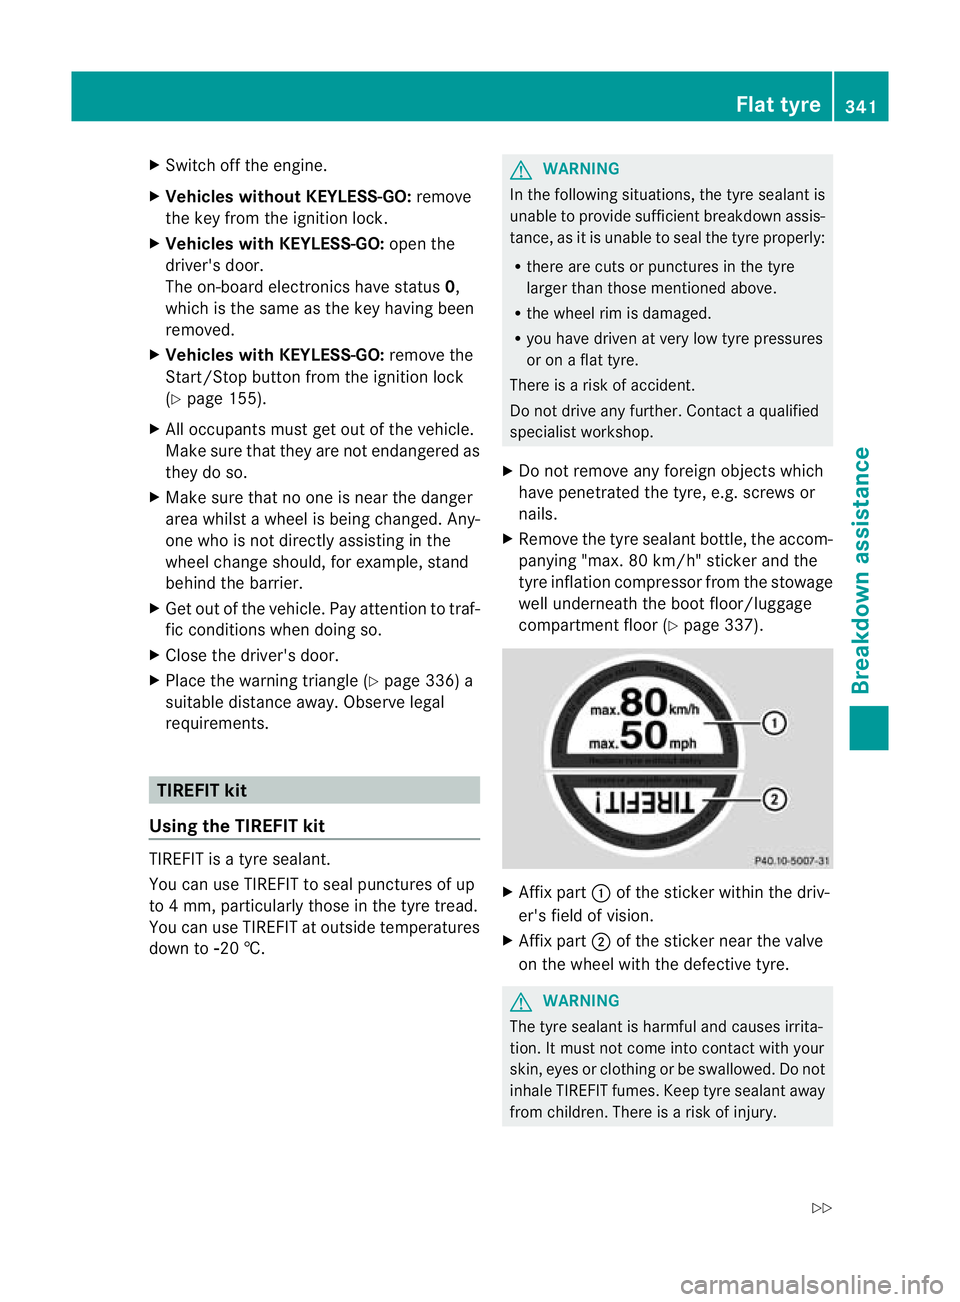
X Remove the tyre sealant bottle, the accom-
panying "max. 80 km/h" sticker and the
tyre inflation compressor from the stowage
well underneath the boot floor/luggage
compartment floor (Y page 337). X
Affix part :of the sticker within the driv-
er's field of vision.
X Affix part ;of the sticker near the valve
on the wheel with the defective tyre. G
WARNING
The tyre sealant is harmful and causes irrita-
tion. It must not come into contact with your
skin, eyes or clothing or be swallowed. Do not
inhale TIREFIT fumes. Keep tyre sealant away
from children. There is a risk of injury. Flat tyre
341Breakdown assistance
Z
Page 345 of 409
If you come into contact with the tyre sealant,
observe the following:
R
Rinse off the tyre sealant from your skin
immediately with water.
R If the tyre sealant comes into contact with
youre yes, immediately rinse them thor-
oughly with clean water.
R If tyre sealant is swallowed, immediately
rinse your mouth out thoroughly and drink
plenty of water. Do not induce vomiting,
and see kmedical attention immediately.
R Immediately change out of clothing which
has come into contact with tyre sealant.
R If an allergic reaction occurs, seek medical
attention immediately.
i If tyre sealant leaks out, allow it to dry. It
can then be removed like a layer of film.
If you get tyre sealant on your clothing,
have it cleaned as soon as possible with
perchloroethylene. X
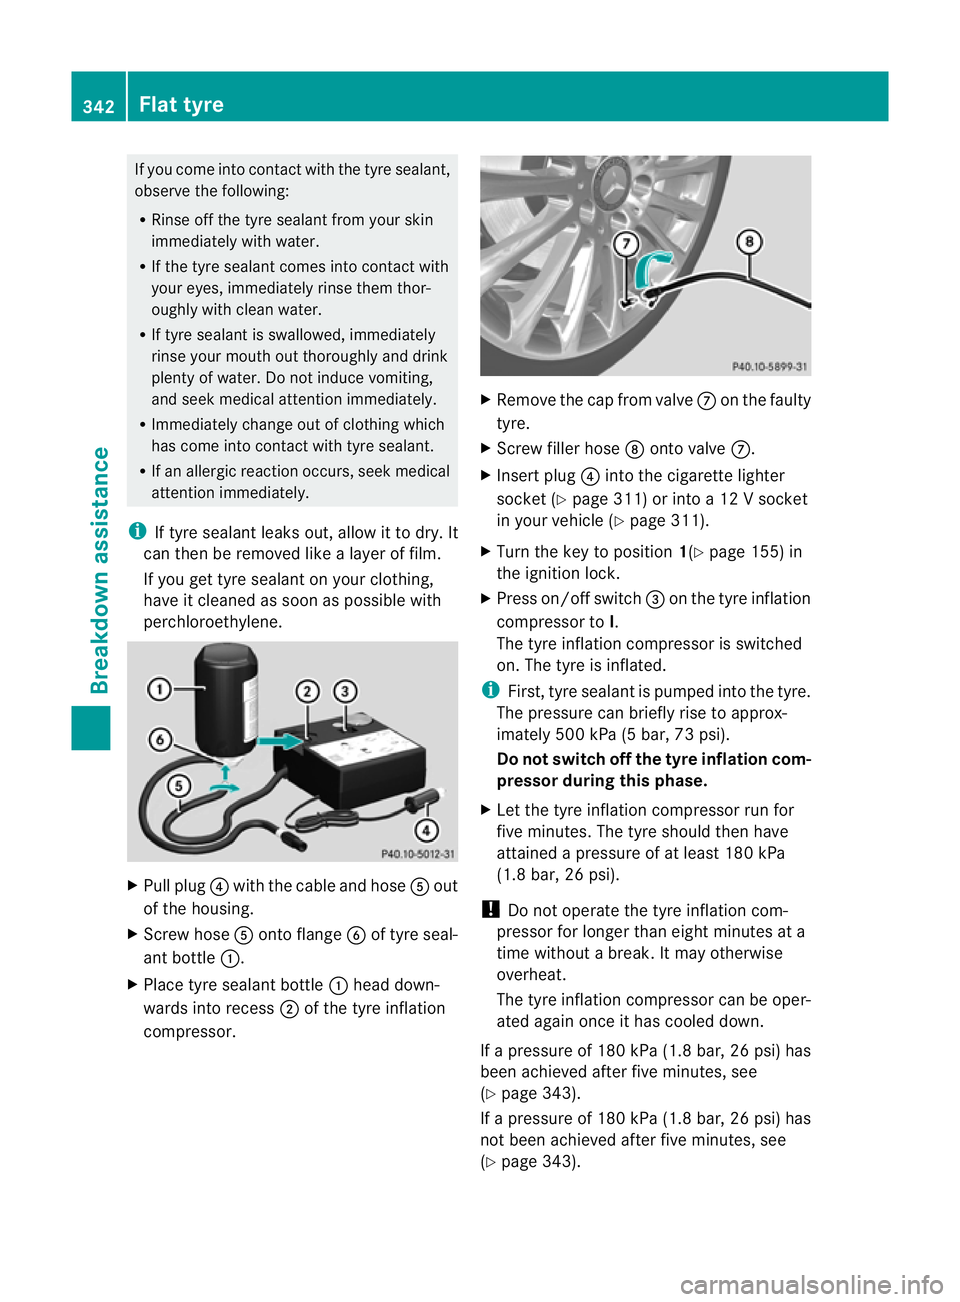
Pull plug ?with the cable and hose Aout
of the housing.
X Screw hose Aonto flange Bof tyre seal-
ant bottle :.
X Place tyre sealant bottle :head down-
wards into recess ;of the tyre inflation
compressor. X
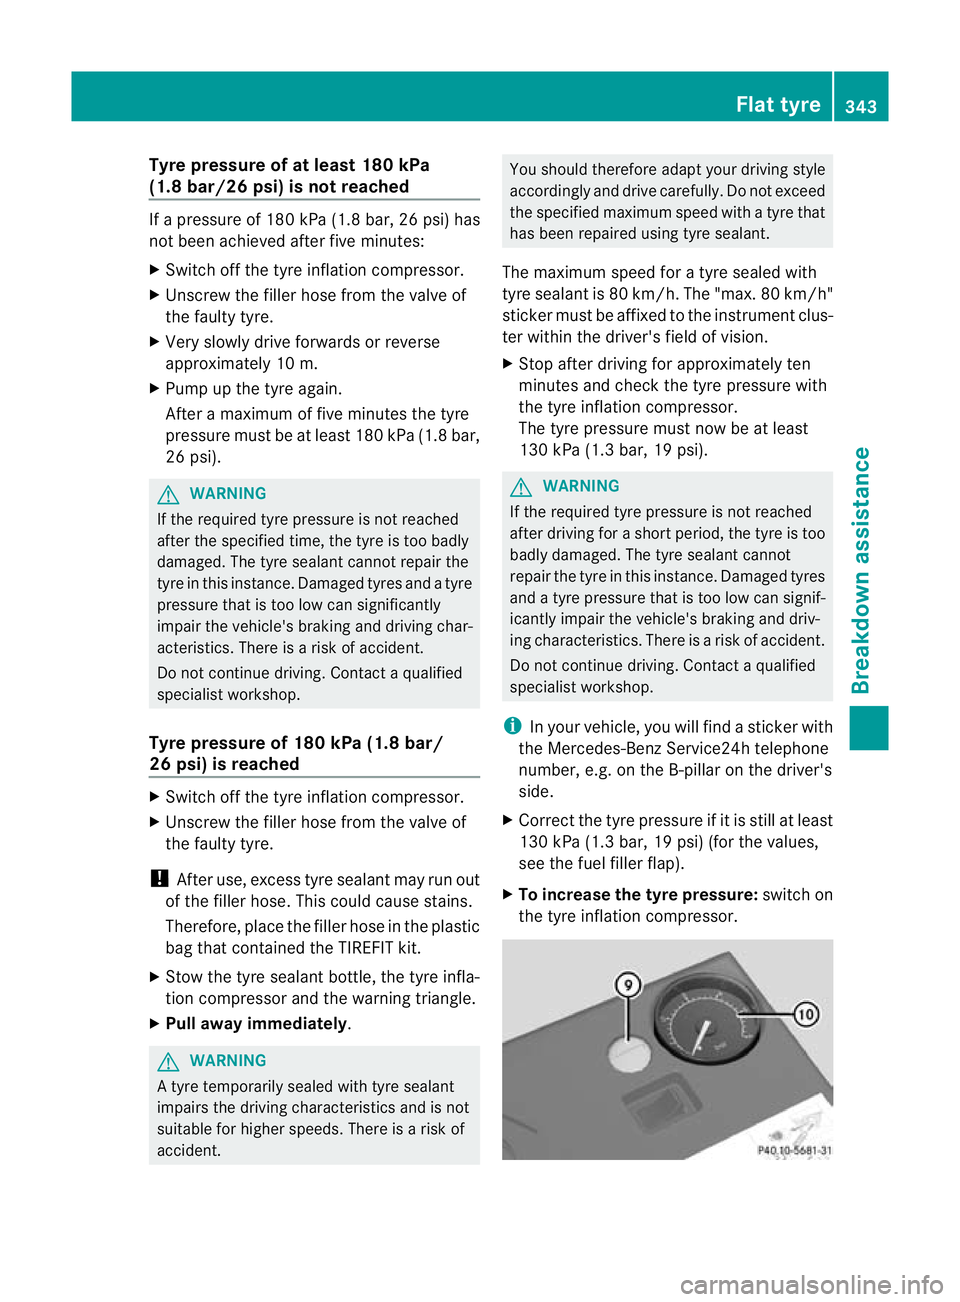
Remove the cap from valve Con the faulty
tyre.
X Screw filler hose Donto valve C.
X Inser tplug ?into the cigarette lighter
socket (Y page 311) or into a 12 V socket
in your vehicle (Y page 311).
X Turn the key to position 1(Ypage 155) in
the ignition lock.
X Press on/off switch =on the tyre inflation
compressor to I.
The tyre inflation compressor is switched
on. The tyre is inflated.
i First, tyre sealant is pumped into the tyre.
The pressure can briefly rise to approx-
imately 500 kPa (5 bar, 73 psi).
Do not switch off the tyre inflation com-
pressor during this phase.
X Let the tyre inflation compressor run for
five minutes .The tyre should then have
attained a pressure of at least 180 kPa
(1.8 bar, 26 psi).
! Do not operate the tyre inflation com-
pressor for longer than eight minutes at a
time without a break. It may otherwise
overheat.
The tyre inflation compressor can be oper-
ated again once it has cooled down.
If a pressure of 180 kPa (1.8 ba r,26 psi) has
bee nachieved afte rfive minutes, see
(Y page 343).
If a pressure of 180 kPa (1.8 ba r,26 psi) has
not bee nachieved afte rfive minutes, see
(Y page 343). 342
Flat tyreBreakdown assistance
Page 346 of 409
Tyre pressure of at least 180 kPa
(1.8 bar/26 psi) is no treached If a pressure of 180 kP
a(1 .8 ba r,26 psi) has
not bee nachieved afte rfive minutes:
X Switch off the tyre inflation compressor.
X Unscrew the filler hose fro mthe valve of
the faulty tyre.
X Very slowly drive forwards or reverse
approximately 10 m.
X Pump up the tyre again.
After a maximum of five minutes the tyre
pressure must be at least 180 kPa (1.8 bar,
26 psi). G
WARNING
If the required tyre pressure is not reached
after the specified time, the tyre is too badly
damaged. The tyre sealant cannot repair the
tyre in this instance. Damaged tyres and a tyre
pressure that is too low can significantly
impair the vehicle's braking and driving char-
acteristics. There is a risk of accident.
Do not continue driving. Contact a qualified
specialist workshop.
Tyre pressure of 180 kPa (1.8 bar/
26 psi) is reached X
Switch off the tyre inflation compressor.
X Unscrew the filler hose from the valve of
the faulty tyre.
! After use, excess tyre sealant may run out
of the filler hose. This could cause stains.
Therefore, place the filler hose in the plastic
bag that contained the TIREFIT kit.
X Stow the tyre sealant bottle, the tyre infla-
tion compressor and the warning triangle.
X Pull away immediately. G
WARNING
At yre temporarily sealed with tyre sealant
impairs the driving characteristics and is not
suitable for higher speeds .There is a risk of
accident. You should therefore adapt your driving style
accordingly and drive carefully. Do not exceed
the specified maximum speed with a tyre that
has been repaired using tyre sealant.
The maximum speed for a tyre sealed with
tyre sealant is 80 km/h. The "max. 80 km/h"
sticker must be affixed to the instrumentc lus-
ter within the driver's field of vision.
X Stop after driving for approximately ten
minutes and chec kthe tyre pressure with
the tyre inflation compressor.
The tyre pressure must now be at least
130 kPa (1.3 bar, 19 psi). G
WARNING
If the required tyre pressure is not reached
after driving for a short period, the tyre is too
badly damaged. The tyre sealant cannot
repair the tyre in this instance. Damaged tyres
and a tyre pressure that is too low can signif-
icantly impair the vehicle's braking and driv-
ing characteristics. There is a risk of accident.
Do not continue driving. Contact a qualified
specialist workshop.
i In your vehicle, you will find a sticker with
the Mercedes-Ben zService24h telephone
number, e.g. on the B-pillar on the driver's
side.
X Correct the tyre pressure if it is still at least
130 kPa (1.3 bar, 19 psi) (for the values,
see the fuel filler flap).
X To increase the tyre pressure: switch on
the tyre inflation compressor. Flat tyre
343Breakdown assistance Z
Page 347 of 409
X
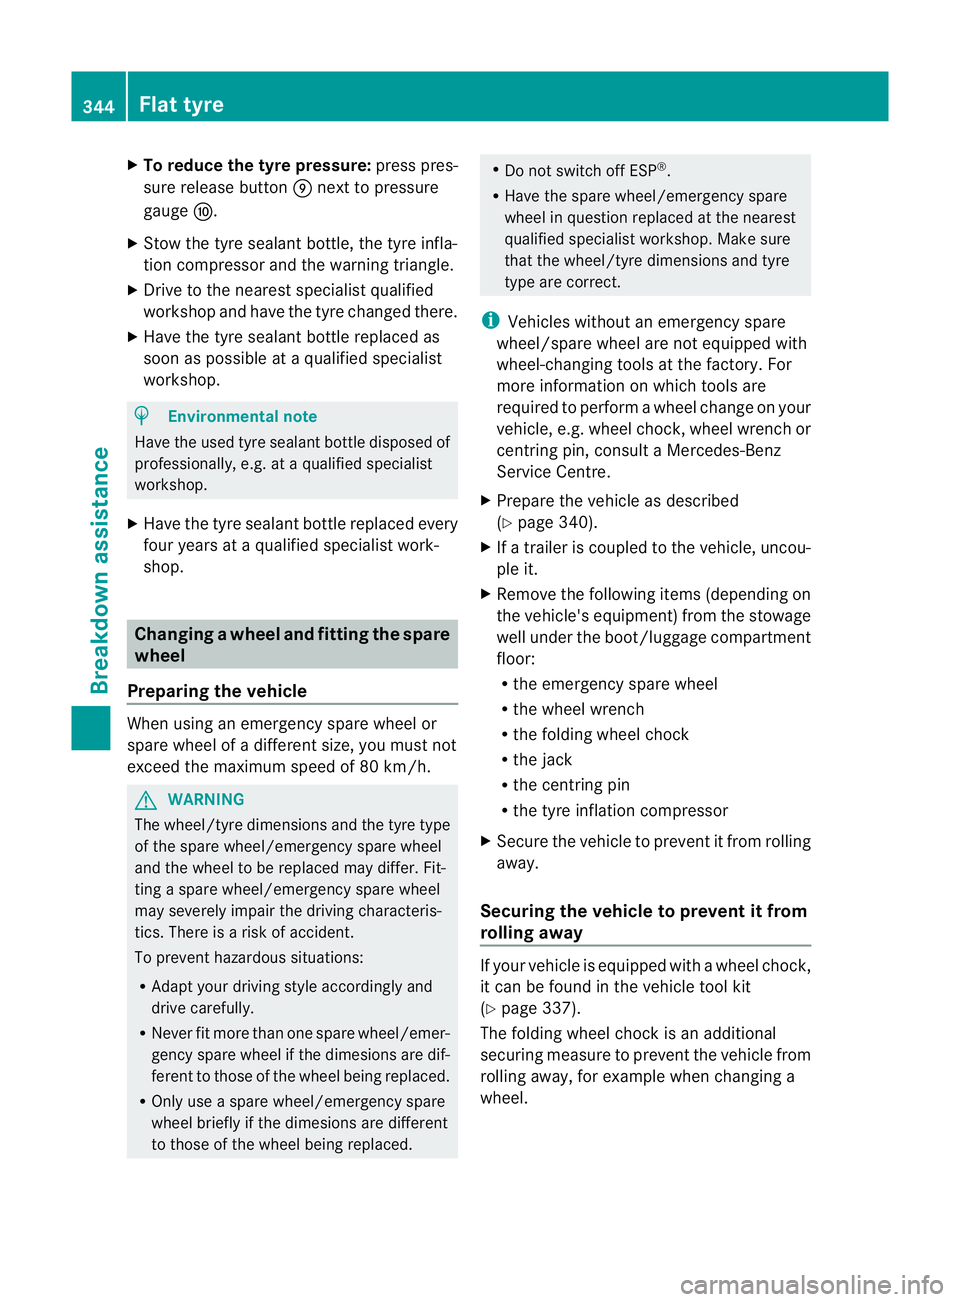
To reduce the tyre pressure: press pres-
sure release button Enext to pressure
gauge F.
X Stow the tyre sealant bottle, the tyre infla-
tio nc ompressor and the warning triangle.
X Drive to the nearest specialist qualified
workshop and have the tyre changed there.
X Have the tyre sealant bottle replaced as
soon as possible at a qualified specialist
workshop. H
Environmental note
Have the used tyre sealant bottle disposed of
professionally, e.g. at aqualified specialist
workshop.
X Have the tyre sealan tbottle replaced every
four years at a qualified specialist work-
shop. Changing
awheel and fitting the spare
wheel
Preparing the vehicle When using an emergency spare wheel or
spare wheel of a different size, you must not
exceed the maximum speed of 80 km/h.
G
WARNING
The wheel/tyre dimensions and the tyre type
of the spare wheel/emergency spare wheel
and the wheel to be replaced may differ. Fit-
ting a spare wheel/emergency spare wheel
may severely impair the driving characteris-
tics. There is a risk of accident.
To prevent hazardous situations:
R Adap tyour driving style accordingly and
drive carefully.
R Never fit more than one spare wheel/emer-
gency spare wheel if the dimesions are dif-
ferent to those of the wheel being replaced.
R Only use a spare wheel/emergency spare
wheel briefly if the dimesions are different
to those of the wheel being replaced. R
Do not switch off ESP ®
.
R Have the spare wheel/emergency spare
wheel in question replaced at the nearest
qualified specialist workshop. Make sure
that the wheel/tyre dimensions and tyre
type are correct.
i Vehicles without an emergency spare
wheel/spare wheel are not equipped with
wheel-changing tools at the factory. For
more information on which tools are
required to perform a wheel change on your
vehicle, e.g. wheel chock, wheel wrench or
centring pin, consult a Mercedes-Benz
Service Centre.
X Prepare the vehicle as described
(Y page 340).
X If a trailer is coupled to the vehicle, uncou-
ple it.
X Remove the following items (depending on
the vehicle's equipment) from the stowage
well under the boot/luggage compartment
floor:
R
the emergency spare wheel
R the wheel wrench
R the folding wheel chock
R the jack
R the centring pin
R the tyre inflation compressor
X Secure the vehicle to prevent it from rolling
away.
Securing the vehicle to prevent it from
rolling away If your vehicle is equipped with a wheel chock,
it can be found in the vehicle tool kit
(Y
page 337).
The folding wheel chock is an additional
securing measure to prevent the vehicle from
rolling away, for example when changing a
wheel. 344
Flat tyreBreakdown assistance
Page 348 of 409
X
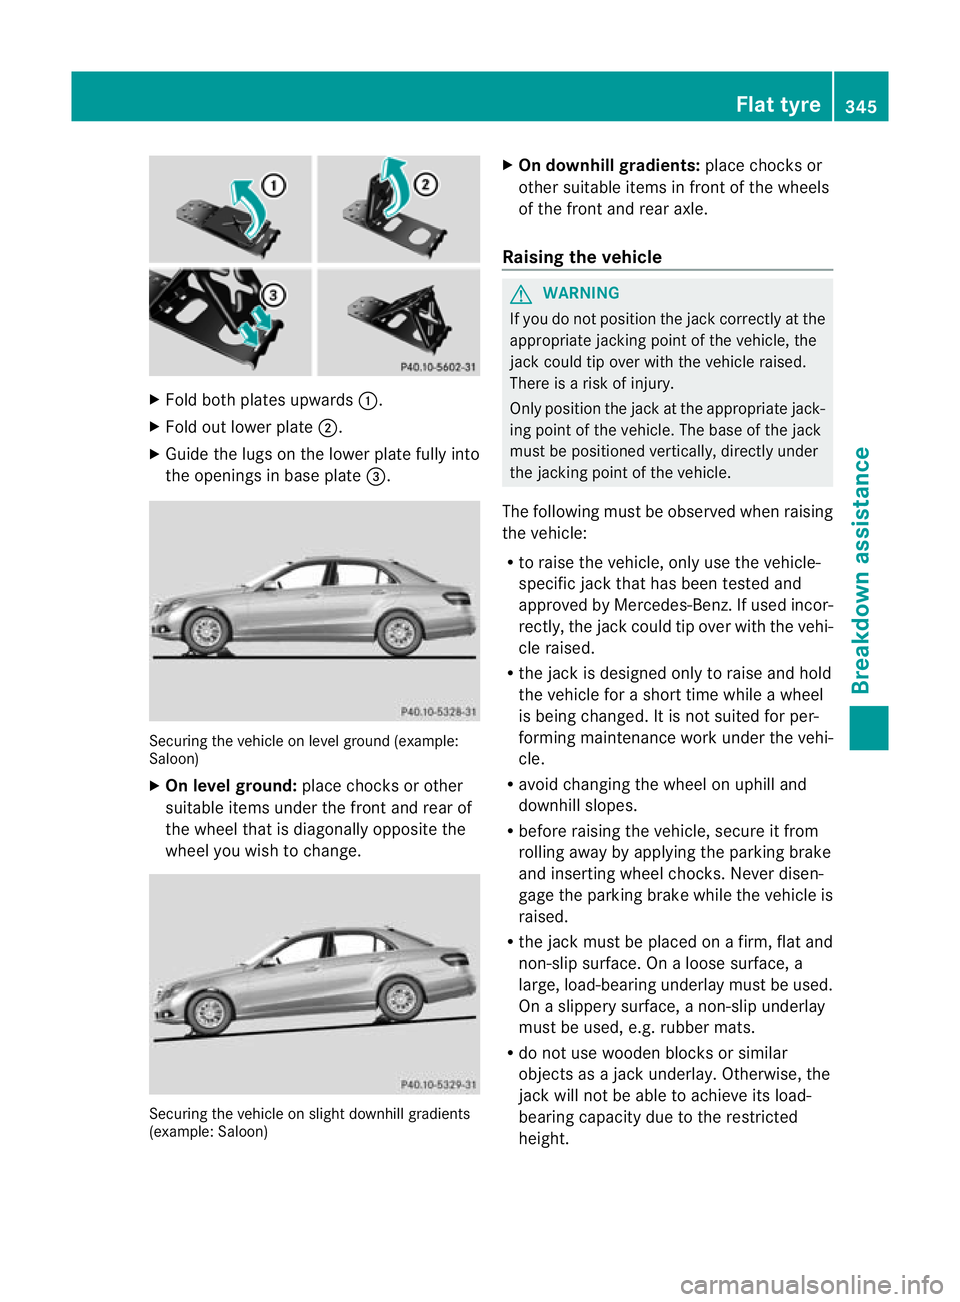
Fold both plates upwards :.
X Fold ou tlower plate ;.
X Guide the lugs on the lower plate fully into
the openings in base plate =.Securing the vehicle on level ground (example:
Saloon)
X
On level ground: place chocks or other
suitable items under the front and rear of
the wheel that is diagonally opposite the
wheel you wish to change. Securing the vehicle on slight downhill gradients
(example: Saloon) X
On downhill gradients: place chocks or
other suitable items in front of the wheels
of the front and rear axle.
Raising the vehicle G
WARNING
If you do not position the jack correctly at the
appropriate jacking point of the vehicle, the
jack could tip over with the vehicle raised.
There is a risk of injury.
Only position the jack at the appropriate jack-
ing point of the vehicle. The base of the jack
must be positioned vertically, directly under
the jacking point of the vehicle.
The following must be observed when raising
the vehicle:
R to raise the vehicle, only use the vehicle-
specific jack that has been tested and
approved by Mercedes-Benz. If used incor-
rectly, the jack could tip over with the vehi-
cle raised.
R the jack is designed only to raise and hold
the vehicle for a short time while a wheel
is being changed. It is not suited for per-
forming maintenance work under the vehi-
cle.
R avoid changing the wheel on uphill and
downhill slopes.
R before raising the vehicle, secure it from
rolling away by applying the parking brake
and inserting wheel chocks. Never disen-
gage the parking brake while the vehicle is
raised.
R the jack must be placed on a firm, flat and
non-slip surface. On a loose surface, a
large, load-bearing underlay must be used.
On a slippery surface, a non-slip underlay
must be used, e.g. rubber mats.
R do not use wooden blocks or similar
objects as a jack underlay. Otherwise, the
jack will not be able to achieve its load-
bearing capacity due to the restricted
height. Flat tyre
345Breakdown assistance Z
Page 349 of 409
R
make sure that the distance between the
underside of the tyres and the ground does
not exceed 3 cm.
R never place yourh ands and feetunde rthe
raised vehicle.
R never lie under the raised vehicle.
R never start the engine when the vehicle is
raised.
R never open or close a door or the boot lid/
tailgate when the vehicle is raised.
R make sure that no persons are present in
the vehicle when the vehicle is raised. X
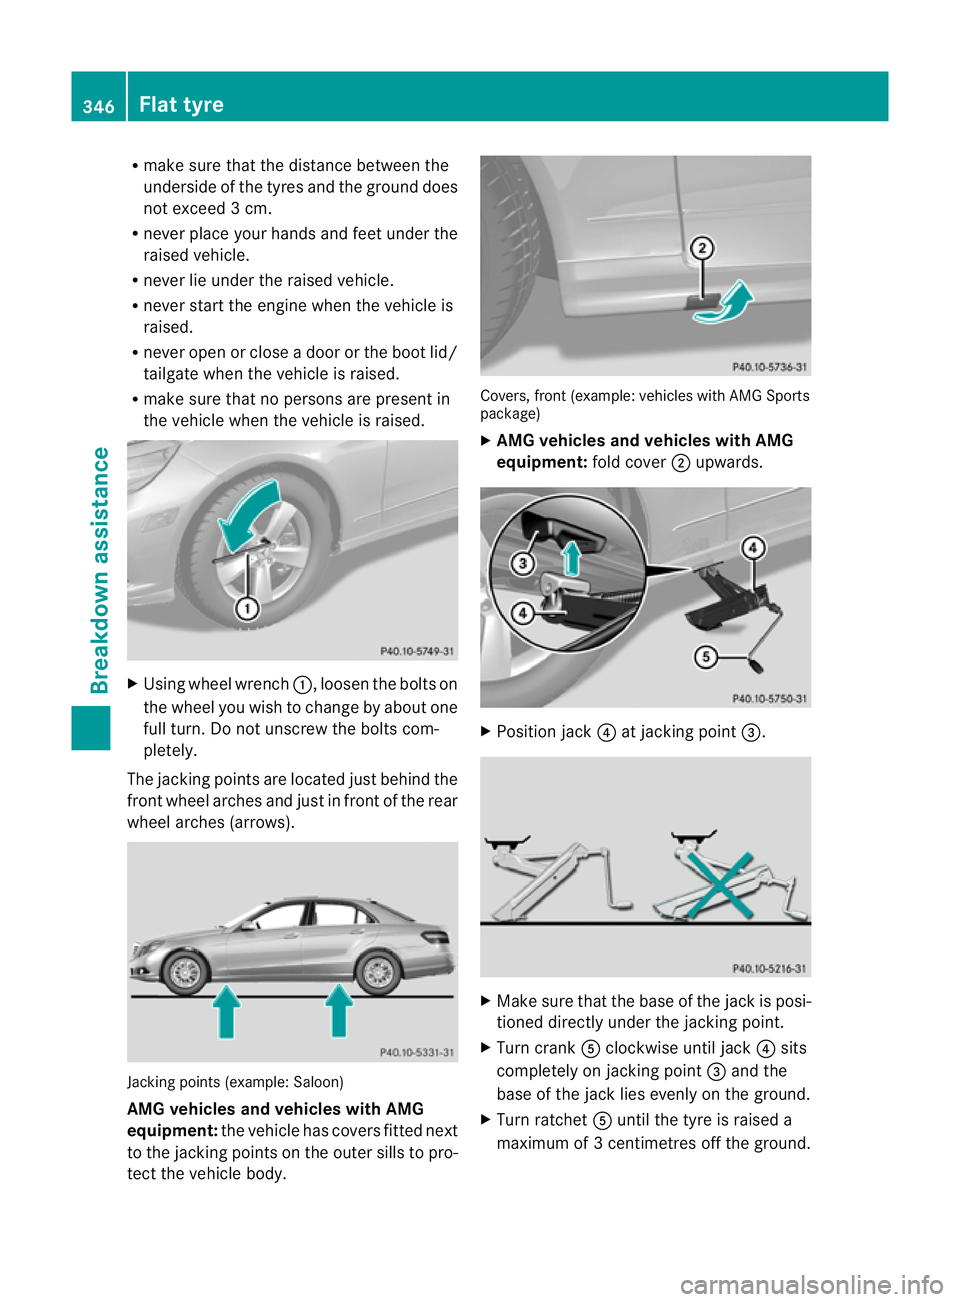
Using wheel wrench :, loosen the bolts on
the wheel you wish to change by about one
full turn. Do not unscrew the bolts com-
pletely.
The jacking points are located just behind the
front wheel arches and just in front of the rear
wheel arches (arrows). Jacking points (example: Saloon)
AMG vehicles and vehicles with AMG
equipment:
the vehicle has covers fitted next
to the jacking points on the outer sills to pro-
tect the vehicle body. Covers, front (example: vehicles with AMG Sports
package)
X
AMG vehicles and vehicles with AMG
equipment: fold cover;upwards. X
Position jack ?at jacking point =. X
Make sure that the base of the jack is posi-
tioned directly under the jacking point.
X Turn crank Aclockwise until jack ?sits
completely on jacking point =and the
base of the jack lies evenly on the ground.
X Turn ratchet Auntil the tyre is raised a
maximum of 3 centimetres off the ground. 346
Flat tyreBreakdown assistance
Page 350 of 409
Removing
awheel !
AMG vehicles: during removal and repo-
sitioning of the wheel, the wheel rim can
strike the ceramic-brake disca nd damage
it. Therefore, take precautions and ge ta
second person to assist you. Alternatively,
you can use a second centring pin. X
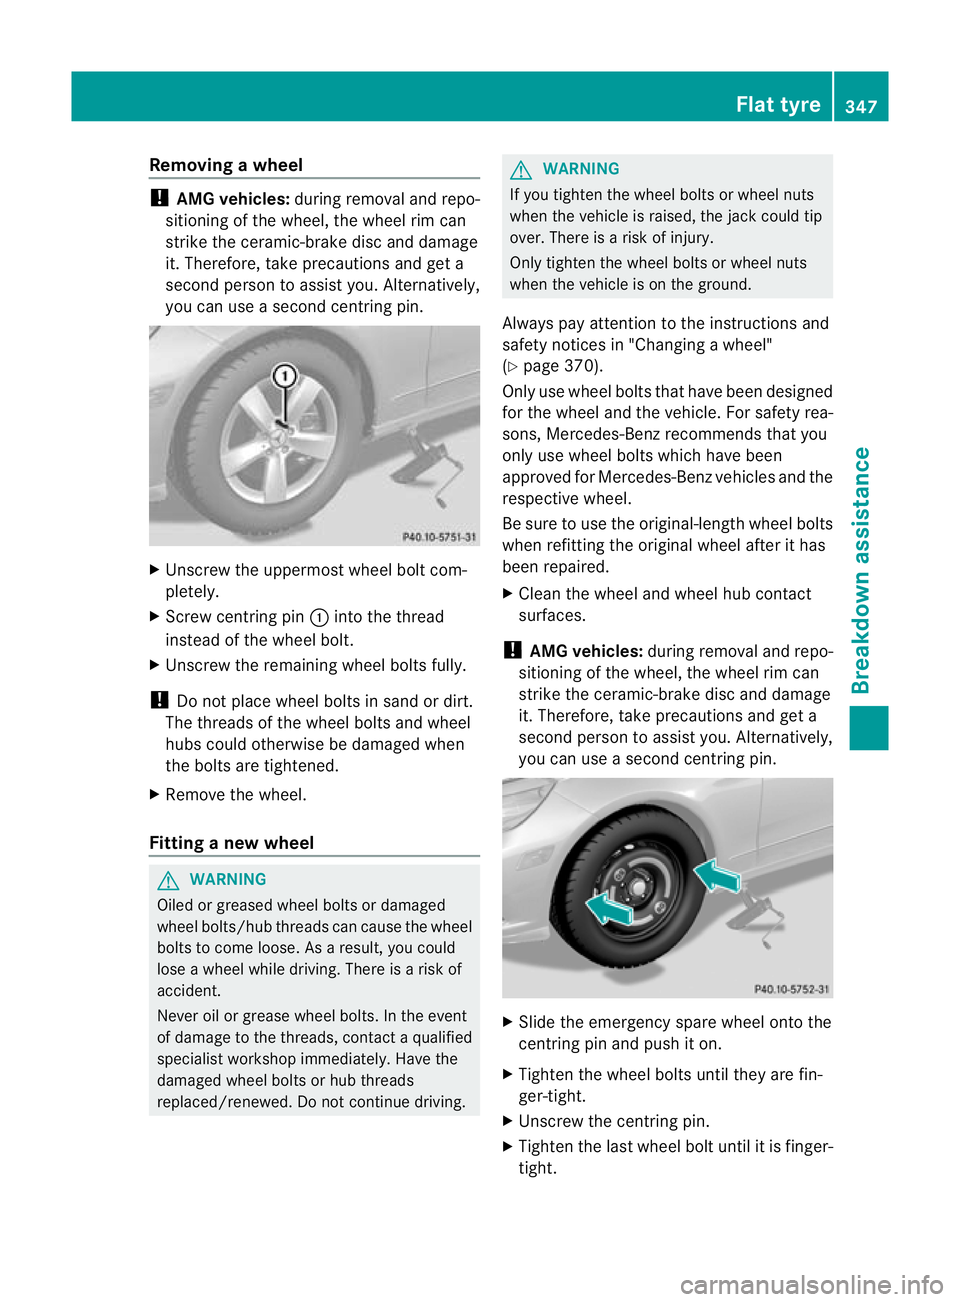
Unscrew the uppermost wheel bolt com-
pletely.
X Screw centring pin :into the thread
instead of the wheel bolt.
X Unscrew the remaining wheel bolts fully.
! Do not place wheel bolts in sand or dirt.
The threads of the wheel bolts and wheel
hubs could otherwise be damaged when
the bolts are tightened.
X Remove the wheel.
Fitting anew wheel G
WARNING
Oiled or greased wheel bolts or damaged
wheel bolts/hub threads can cause the wheel
bolts to come loose .As a result, you could
lose a wheel while driving. There is a risk of
accident.
Never oil or grease wheel bolts. In the event
of damage to the threads, contact a qualified
specialist workshop immediately.H ave the
damaged wheel bolts or hub threads
replaced/renewed. Do no tcontinue driving. G
WARNING
If you tighten the wheel bolts or wheel nuts
when the vehicle is raised, the jack could tip
over. There is a risk of injury.
Only tighten the wheel bolts or wheel nuts
when the vehicle is on the ground.
Always pay attention to the instructions and
safety notices in "Changing a wheel"
(Y page 370).
Only use wheel bolts that have been designed
for the wheel and the vehicle. For safety rea-
sons, Mercedes-Benz recommends that you
only use wheel bolts which have been
approved for Mercedes-Benz vehicles and the
respective wheel.
Be sure to use the original-length wheel bolts
when refitting the original wheel after it has
been repaired.
X Clean the wheel and wheel hub contact
surfaces.
! AMG vehicles: during removal and repo-
sitioning of the wheel, the wheel rim can
strike the ceramic-brake disc and damage
it. Therefore, take precautions and get a
second person to assist you. Alternatively,
you can use a second centring pin. X
Slide the emergency spare wheel onto the
centring pin and push it on.
X Tighten the wheel bolts until they are fin-
ger-tight.
X Unscrew the centring pin.
X Tighten the last wheel bolt until it is finger-
tight. Flat tyre
347Breakdown assistance Z