lock MERCEDES-BENZ E-CLASS SALOON 2015 Owners Manual
[x] Cancel search | Manufacturer: MERCEDES-BENZ, Model Year: 2015, Model line: E-CLASS SALOON, Model: MERCEDES-BENZ E-CLASS SALOON 2015Pages: 497, PDF Size: 16.23 MB
Page 433 of 497

X
Unscrew the remaining wheel bolts fully.
X Remove the wheel.
Fitting anew wheel G
WARNING
Oiled or greased wheel bolts or damaged
wheel bolts/hub threads can cause the wheel bolts to come loose. As aresult, you could
lose awheel while driving. There is arisk of
accident.
Never oil or grease wheel bolts. In the event of damage to the threads, contact aqualified
specialist workshop immediately.H ave the
damagedw heel bolts or hub threads
replaced/renewed. Do not continue driving. G
WARNING
If you tighten the wheel bolts or wheel nuts
when the vehicle is raised, the jack could tip
over. There is arisk of injury.
Only tighten the wheel bolts or wheel nuts
when the vehicle is on the ground.
Observe the instructions and safety notes on "Changing awheel" (Y page 426).
Only use wheel bolts that have been designed
for the wheel and the vehicle. For safety rea-
sons, Mercedes-Benz recommends that you
only use wheel bolts which have been
approved for Mercedes-Benz vehicles and the
respective wheel.
! AMG vehicles:
during removal and repo-
sitioning of the wheel, the wheel rim can
strike the ceramic-brake disc and damage
it. Therefore, take precautions and have a
second person assist you. Alternatively,
you can use asecond centring pin. X
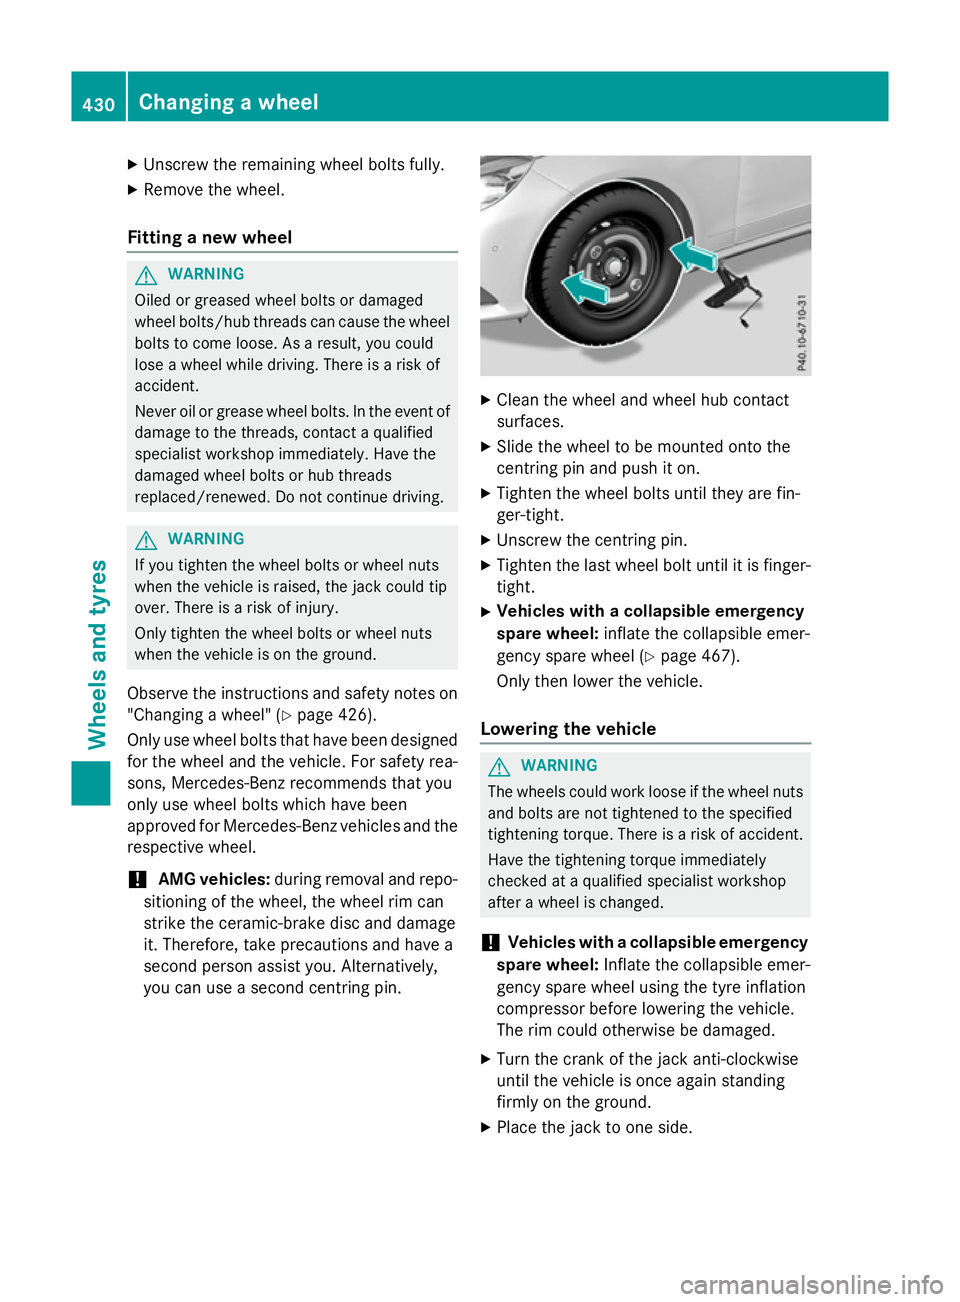
Cleant he wheel and wheel hub contact
surfaces.
X Slide the wheel to be mounted onto the
centring pin and push it on.
X Tighten the wheel bolts until they are fin-
ger-tight.
X Unscrew the centring pin.
X Tighten the last wheel bolt until it is finger-
tight.
X Vehiclesw ithacollapsible emergency
spare wheel: inflate the collapsible emer-
gency spare wheel (Y page 467).
Only then lower the vehicle.
Lowering the vehicle G
WARNING
The wheels could work loose if the wheel nuts and bolts are not tightened to the specified
tightening torque. There is arisk of accident.
Have the tightening torque immediately
checked at aqualified specialist workshop
after awheel is changed.
! Vehiclesw
ithacollapsible emergency
spare wheel: Inflate the collapsible emer-
gency spare wheel using the tyre inflation
compressor before lowering the vehicle.
The rim could otherwise be damaged.
X Turn the crank of the jack anti-clockwise
until the vehicle is once agains tanding
firmly on the ground.
X Place the jack to one side. 430
Changing
awheelWheels and tyres
Page 469 of 497

Example: Estate withou
tafolding bench seat
X Without afolding benc hseat:remove
stowag espace :.
X With afolding benc hseat:lift the luggage
compartment floor upwards.
Removing the emergenc yspare wheel
(Estate withou tafolding benc hseat, or
Saloon) (Example: equipment and country-specific varia-
tions possible)
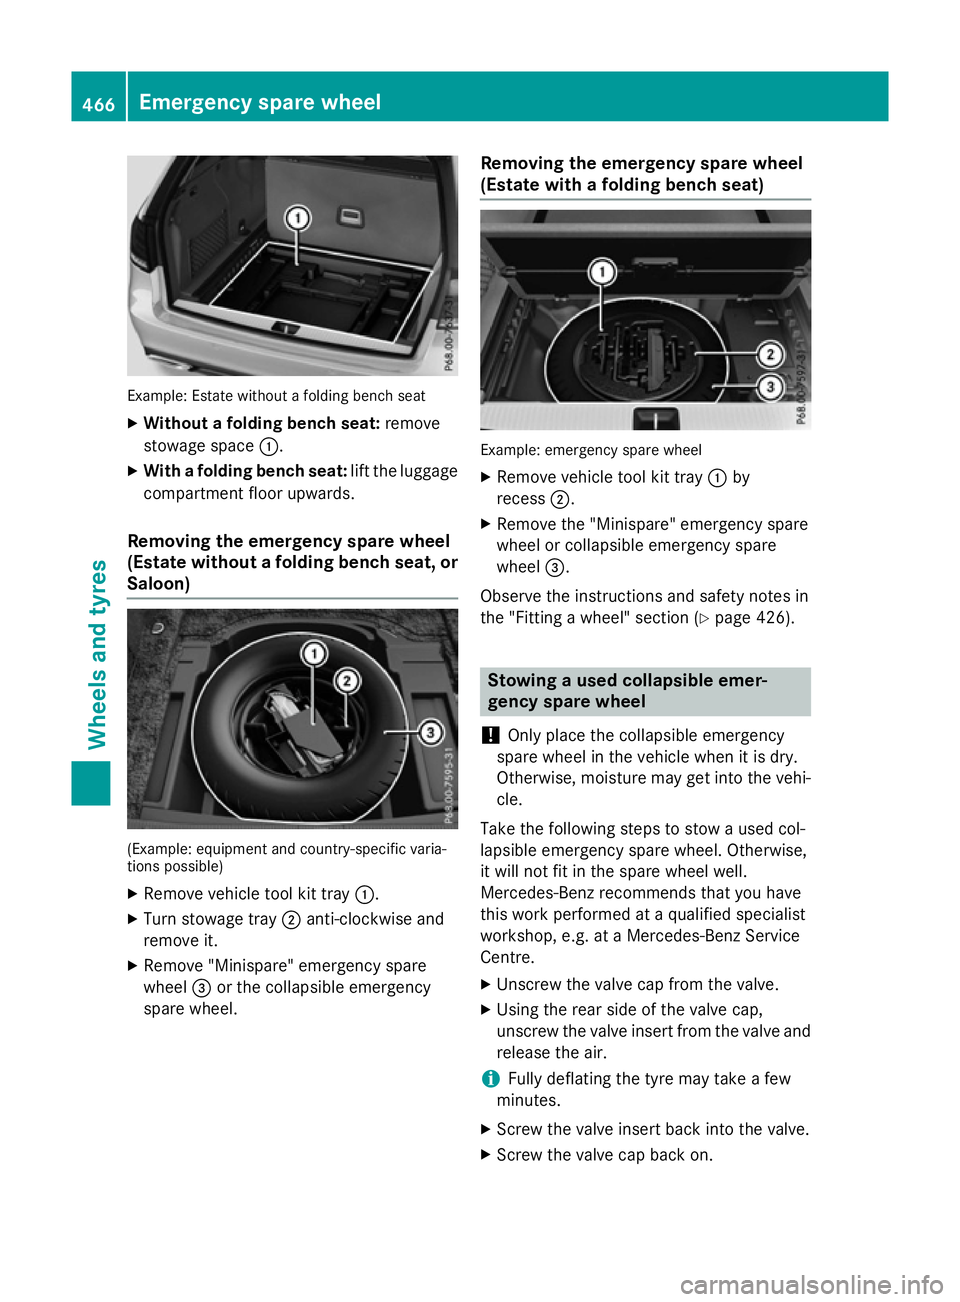
X Remov evehicl etool kit tray :.
X Turn stowag etray ;anti-clockwise and
remove it.
X Remov e"Minispare" emergency spare
wheel =or the collapsibl eemergency
spare wheel. Removing the emergenc
yspare wheel
(Estate with afolding benc hseat) Example: emergency spare wheel
X Remove vehicl etool kit tray :by
recess ;.
X Remove the "Minispare" emergency spare
whee lorcollapsibl eemergency spare
wheel =.
Observ ethe instructions and safety notes in
the "Fitting awheel "sectio n(Ypage 426). Stowing
ausedc olla psibl eemer-
genc yspare wheel
! Onl
yplace the collapsibl eemergency
spare whee linthe vehicl ewhenitisd ry.
Otherwise, moisture ma ygetinto the vehi-
cle.
Take the following step stostowausedc ol-
lapsibl eemergency spare wheel. Otherwise,
it will not fit in the spare whee lwell.
Mercedes-Benz recommends tha tyou have
thi sw orkp erformed at aquali fied specialist
workshop ,e.g.ata Mercedes-Benz Service
Centre.
X Unscrew the valve cap from the valve.
X Using the rea rsideoft he valve cap,
unscrew the valve insert from the valve and release the air.
i Fully deflating the tyr
emaytake afew
minutes.
X Screw the valve insert back into the valve.
X Screw the valve cap back on. 466
Emergenc
yspare wheelWheel sand tyres
Page 470 of 497

X
Remove th eprotective film from th evehicle
tool ki tand put it ove rthe collapsible emer-
gency spar ewheel.
X Stow th ecollapsible emergenc yspare
whee lintheemergenc yspar ew hee lwell
under th eboot/luggag ecom partment. Inflating th
ecollapsible emergency
spar ewheel
! Inflat
ethe collapsible emergenc yspare
whee lusin gthe tyreinflation compressor
before lowerin gthe vehicle. The whee lrim
could otherwise be damaged.
! Do no
toperate th etyrei nflation com-
presso rfor longer than eigh tminute sata
time without abreak. It may otherwise
overheat.
The tyr einflation compressor can be oper-
ate dagain once it has cooled down. X
Moun tthe collapsible emergenc yspare
whee lasd escribed (Y page 426).
The collapsible emergenc yspar ew heel
mus tbem ountedbefore it is inflated.
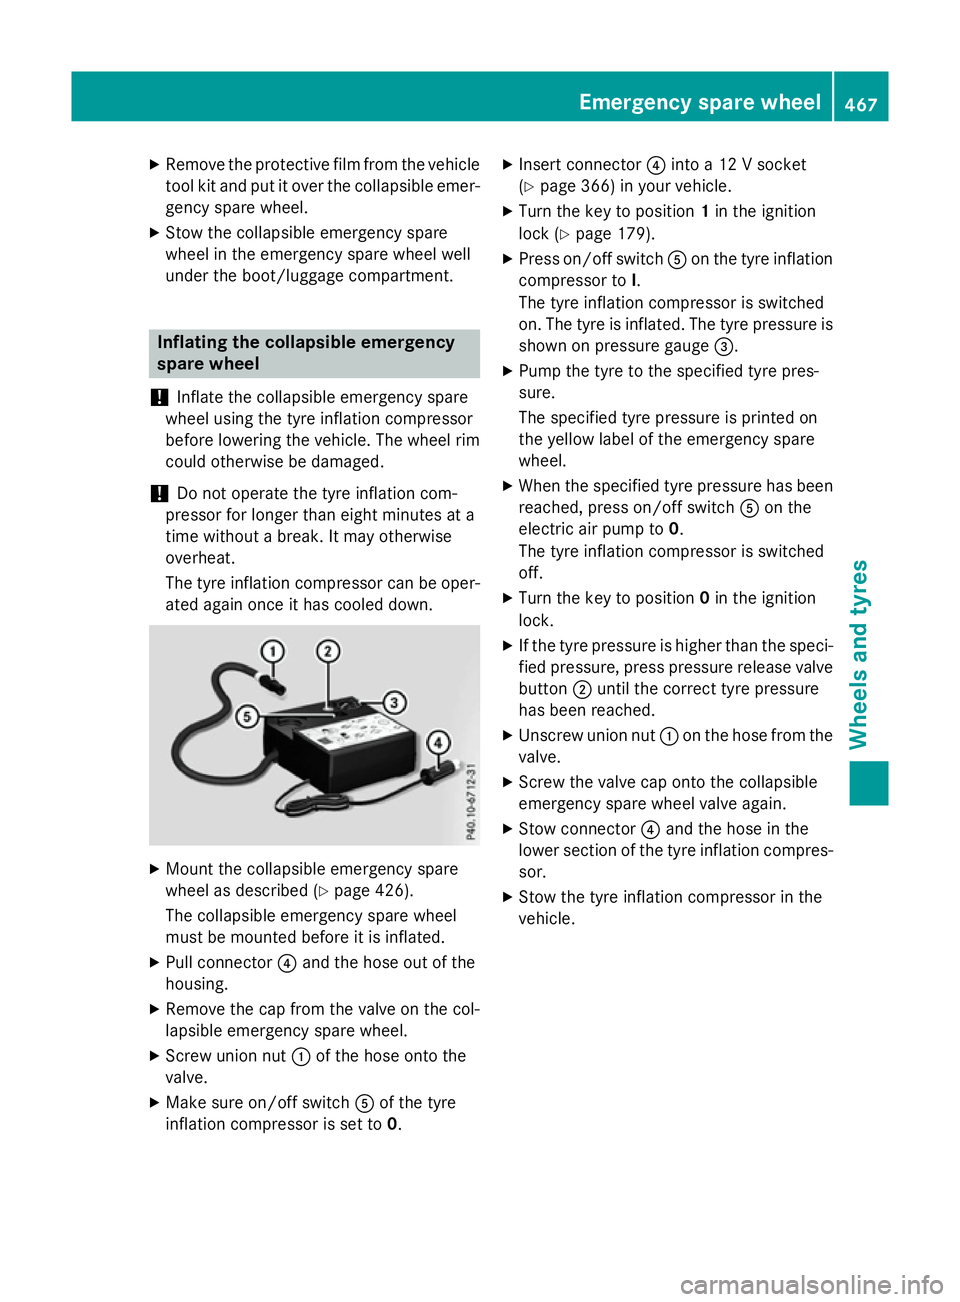
X Pull connector ?and th ehoseo ut of the
housing.
X Remove th ecap from th evalveont hecol-
lapsible emergenc yspar ew heel.
X Screw union nut :of th ehoseo ntot he
valve.
X Mak esureo n/of fswitch Aof th etyre
inflation compressor is set to 0.X
Inser tconnector ?into a12Vs ocket
(Y page 366) in your vehicle.
X Turn th ekeyto position 1in th eignition
loc k(Ypage 179).
X Press on/off switch Aon th etyrei nflation
compressor to I.
The tyr einflation compressor is switched
on .The tyr eisinflated. The tyr epressur eis
shown on pressur egauge =.
X Pump th etyretot hespecified tyr epres-
sure.
The specified tyr epressur eisprinted on
th ey ellow label of th eemergenc yspare
wheel.
X Whe nthe specified tyr epressur ehas been
reached, press on/off switch Aon the
electric air pump to 0.
The tyr einflation compressor is switched
off.
X Turn th ekeyto position 0in th eignition
lock.
X If th etyrep ressur eishigher than th especi-
fie dp ressure, press pressur erelease valve
button ;until th ecorrect tyrep ressure
has been reached.
X Unscrew union nut :on th ehosef romt he
valve.
X Screw th evalvec ap onto th ecollapsible
emergenc yspar ew hee lvalv ea gain.
X Stow connector ?and th ehoseint he
lower section of th etyrei nflation compres-
sor.
X Stow th etyrei nflation compressor in the
vehicle. Emergency spar
ewheel
467Wheels and tyres Z
Page 483 of 497

Further information on coolants can be
found in the Mercedes-Benz Specifications for Service Products, MB Specifications for Service Products 310.1, e.g. on the Inter-
net at http://bevo.mercedes-benz.com.
Or contact aquali fied specialist workshop.
! Alway
suseasuitabl ecoolant mixture,
eve ninc ountries where hig htemperatures
prevail.
Otherwise, the engine cooling system is not
sufficiently protected from corrosio nand
overheating.
i Have the coolant regularly replaced at a
qualified specialist worksho pand the
replacement confirmed in the Service
Booklet.
Compl ywitht he important safety precautions
for service products whe nhandling coolant
(Y page 473).
The coolant is amixture of water and anti-
freeze/corrosio ninhibitor. It is responsible
for the following:
R anti-corrosion protection
R antifreeze protection
R raising the boiling point
If antifreeze/corrosio ninhibitor is present in
the correct concentration, the boiling point of
the coolant during operation will be approx-
imately 130 †.
The antifreeze/corrosio ninhibitor concentra-
tion in the engine cooling system should:
R be at least 50% .Thisw illp rotect the engine
cooling system against freezing dow nto
approximately -37 †.
R not excee d55% (antifreeze protection
dow nto- 45 †). Hea twillo therwise not be
dissipated as effectively.
Mercedes-Benz recommends an antifreeze/
corrosio ninhibitor concentrate in accord-
ance with MB Specifications for Service Prod- ucts 310.1.
i Whe
nthe vehicle is firs tdelivered ,itisfil-
le dw ithac oolant mixture that ensures adequate antifreeze and corrosio
nprotec-
tion.
i The coolant is checke
datevery mainte-
nance interval at aquali fied specialist
workshop. Windscree
nwasher system
Important safety notes G
WARNING
If windscreen washe rconcentrate comes into
contact with hot components of the engine or
the exhaust system, it can ignite. There is a
ris koff ire and injury.
Make sur ethe windscreen washe rconcen-
trate doe snot come into contact with the filler
neck.
! Do not us
edistille dord e-ionised water in
the washe rfluid reservoir. Otherwise, the
level senso rmay be damaged.
! Only the washe
rfluid sSummerFit and
WinterFit can be mixed. Otherwise, the
spraying nozzles could become blocked.
Compl ywitht he important safety notes for
service products whe nhandling washe rfluid
(Y page 473).
At temperatures above freezing:
X Fil lthe washe rfluid reservoi rwitham ixture
of water and washe rfluid ,e.g. MB Sum-
merFit.
Mix 1partMBS ummerFit to 100 parts water.
At temperatures below freezing:
X Fil lthe washe rfluid reservoi rwitham ixture
of water and washe rfluid ,e.g. MB Winter-
Fit.
For the correct mixing rati orefe rtot he
information on the antifreeze reservoir.
i Add washe
rfluid concentrate, e.g. MB
SummerFit or MB WinterFit, to the washer
fluid al lyea rround. 480
Servic
eproducts and capacitiesTechnical data