lock MERCEDES-BENZ E-CLASS SALOON 2015 Repair Manual
[x] Cancel search | Manufacturer: MERCEDES-BENZ, Model Year: 2015, Model line: E-CLASS SALOON, Model: MERCEDES-BENZ E-CLASS SALOON 2015Pages: 497, PDF Size: 16.23 MB
Page 132 of 497
The combined luggage cover and net must be
fitted if you are using the folding bench seat
(Y page 352).
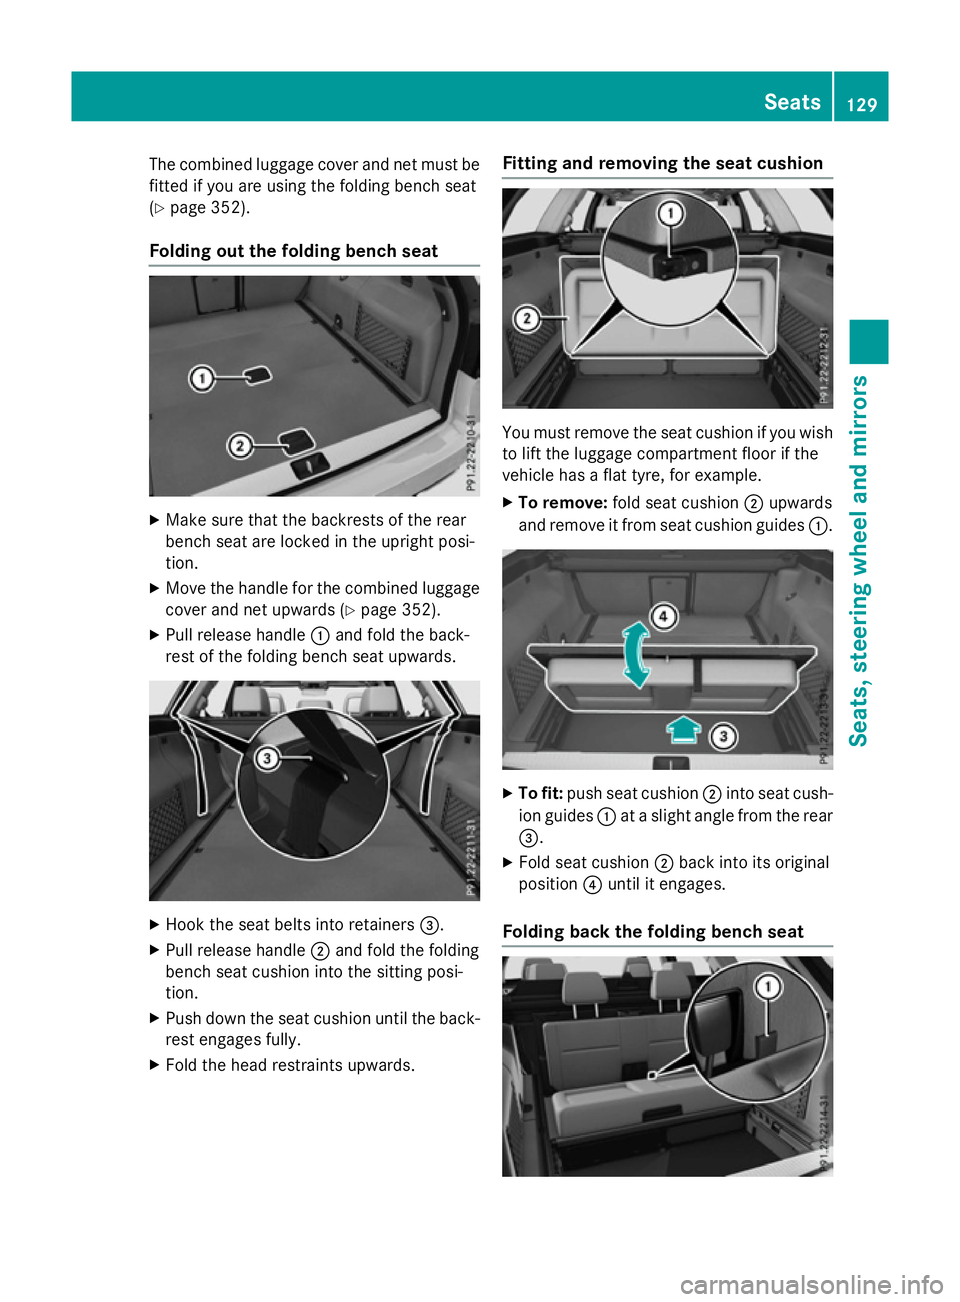
Folding out the folding bench seat X
Make sure that the backrest softhe rear
bench seat are locked in the upright posi-
tion.
X Move the handle for the combined luggage
cover and net upwards (Y page 352).
X Pull release handle :and fold the back-
rest of the folding bench seat upwards. X
Hook the seat belts into retainers =.
X Pull release handle ;and fold the folding
bench seat cushion into the sitting posi-
tion.
X Push down the seat cushion until the back-
rest engages fully.
X Fold the head restraints upwards. Fitting and removing the seat cushion
You must remove the seat cushion if you wish
to lift the luggage compartment floor if the
vehicle has aflat tyre, for example.
X To remove: fold seat cushion ;upwards
and remove it from seat cushion guides :. X
To fit: push seat cushion ;into seat cush-
ion guides :atas light angle from the rear
=.
X Fold seat cushion ;back into its original
position ?until it engages.
Folding back the folding bench seat Seats
129Seats, steering wheel and mirrors Z
Page 134 of 497
X
Turn the key to position 1or 2in the ignition
lock (Y page 179).
X To switch on: press button:repeatedly
until the desired heating level is set.
X To switch off: press button:repeatedly
until all the indicator lamps go out.
i If the battery voltage is too low, the seat
heating may switch off. Seats
131Seats, steering wheel and mirrors Z
Page 136 of 497
Problems with the seat ventilation
Problem
Possible causes/consequences and
M
MSolutions The seat ventilation has
switched off prema-
turely or cannot be
switched on. The on-board voltage is too low because too many electrical con-
sumers are switched on.
X Switch off electrical consumers that you do not need, such as
the rear window heating or interior lighting.
Once the battery is sufficiently charged, the seat ventilation will
switch back on automatically. Steering wheel
Important safety notes
G
WARNING
You could lose control of the vehicle while
driving if you:
R adjust the driver's seat, steering wheel or
mirrors
R fasten the seat belt
There is arisk of an accident.
Adjust the driver's seat, head restraint ,steer-
ing wheel and mirrors and fasten your seat
belt before startingt he engine. G
WARNING
Children could become trapped by the steer-
ing wheel if they adjust it. There is arisk of
injury.
When leaving the vehicle, always take the key with you and lock the vehicle. Never leave
children unattended in the vehicle.
The electrically adjustable steering wheel can
still be adjusted when there is no key in the
ignition lock. Adjusting the steering wheel man-
ually
G
WARNING
The steering wheel may move unexpectedly if you adjust it while driving. This could cause you to lose control of the vehicle. There is a
risk of an accident.
Make sure that the steering wheel is locked
before driving off. Never unlock the steering
wheel when the vehicle is in motion.
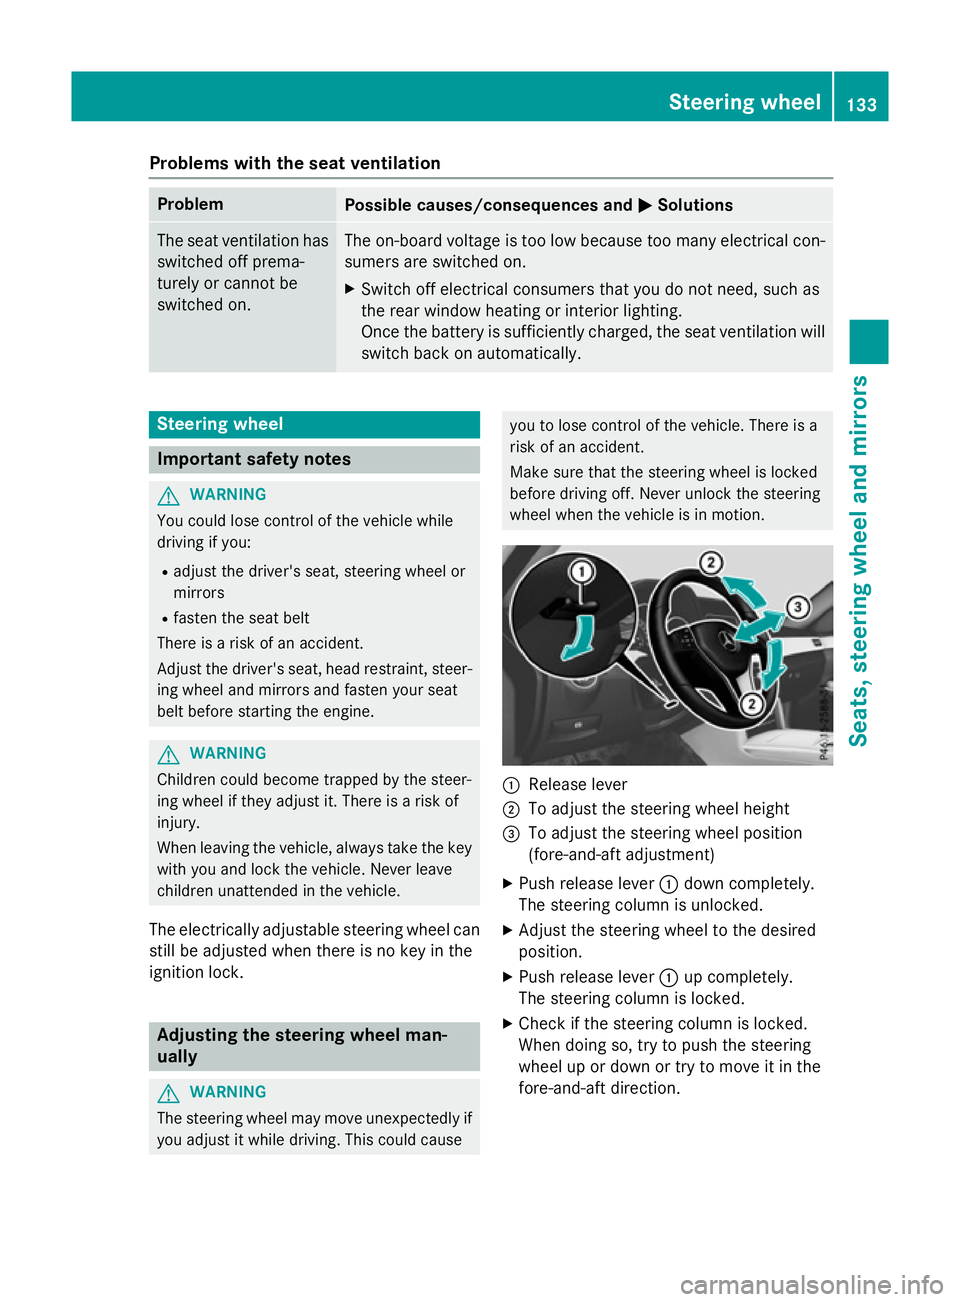
:
Release lever
; To adjust the steering wheel height
= To adjust the steering wheel position
(fore-and-aft adjustment)
X Push release lever :down completely.
The steering column is unlocked.
X Adjust the steering wheel to the desired
position.
X Push release lever :up completely.
The steering column is locked.
X Check if the steering column is locked.
When doing so, try to push the steering
wheel up or down or try to move it in the
fore-and-aft direction. Steering wheel
133Seats, steering wheela nd mirrors Z
Page 137 of 497
Adjusting th
esteering wheel electri-
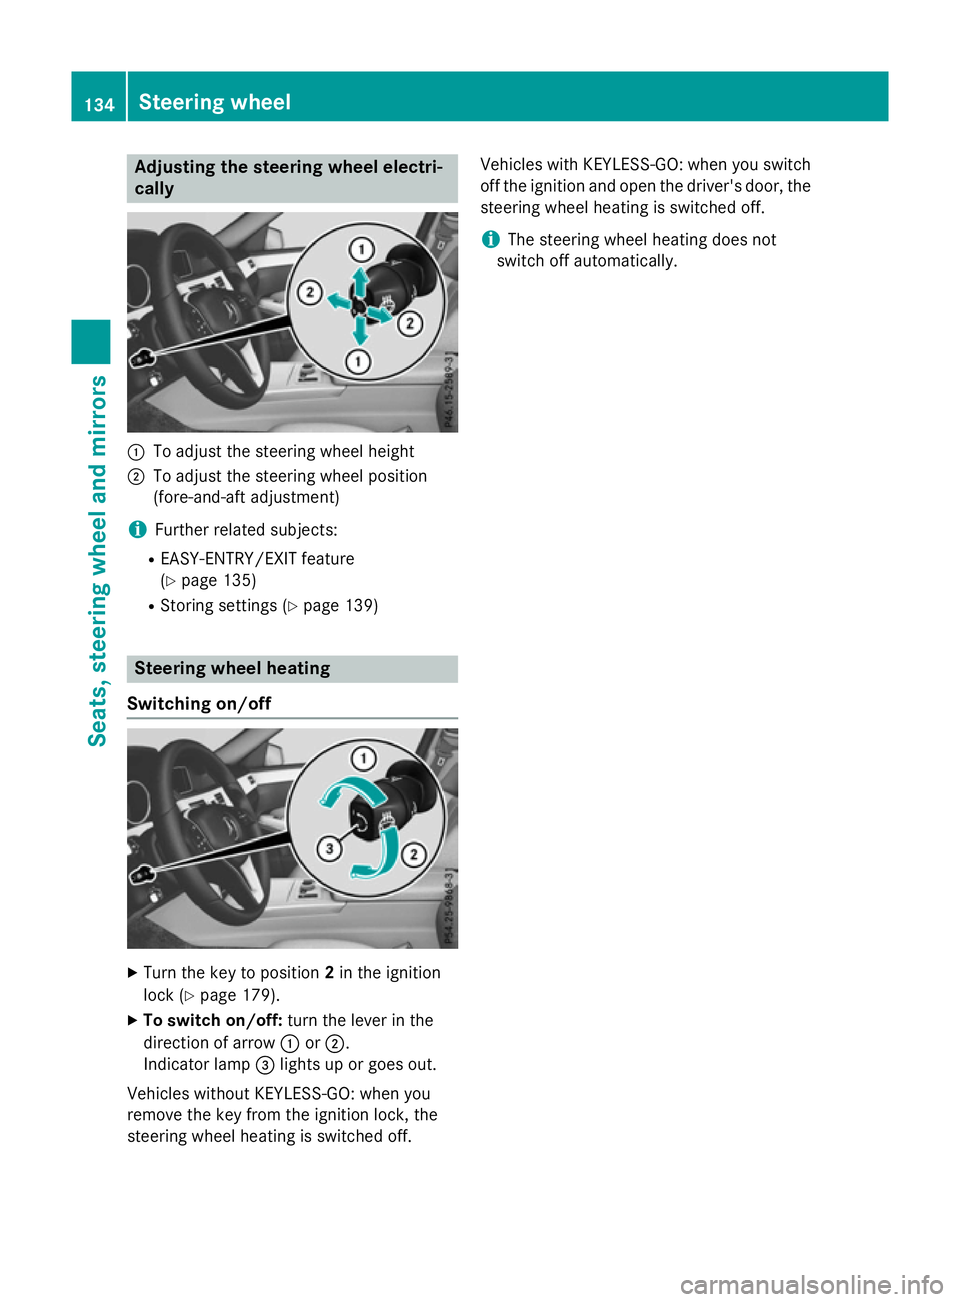
cally :
To adjust th esteering whee lheight
; To adjust th esteering whee lposition
(fore-and-af tadjustment)
i Further relate dsubjects:
R EASY-ENTRY/EXIT feature
(Y page 135)
R Storing setting s(Ypage 139) Steering wheel heating
Switchin gon/off X
Turn th ekeyto position 2in th eignition
loc k(Ypage 179).
X To switch on/off: turnthe lever in the
direction of arrow :or;.
Indicato rlamp =lights up or goes out.
Vehicles without KEYLESS-GO :when you
remove th ekeyfrom th eignition lock, the
steering whee lheating is switched off. Vehicles wit
hKEYLESS-GO :when you switch
off th eignition and open th edriver' sdoor ,the
steering whee lheating is switched off.
i The steering whee
lheating does not
switch off automatically. 134
Steering wheelSeats
,steering wheel and mirrors
Page 138 of 497
Problems with the steering wheel heating
Problem
Possible causes/consequences and
M
MSolutions The steering wheel
heating has switched
itself off prematurely or
cannot be switched on. The on-board voltage is too low because too many electrical con-
sumers are switched on.
X Switch off electrical consumers that you do not need, such as
the rear window heating or interior lighting.
Once the battery is sufficiently charged, the steering wheel
heating will switch back on automatically. EASY-ENTRY/EXIT feature
Important safety notes G
WARNING
When the EASY-ENTRY/EXIT feature adjusts
the steering wheel, you and other vehicle
occupants –particularly children –could
become trapped. There is arisk of injury.
While the EASY-ENTRY/EXIT feature is mak-
ing adjustments, make sure that no one has
any body parts in the sweep of the steering
wheel.
Move the steering wheel adjustment lever if
there is arisk of entrapment by the steering
wheel. The adjustment process is stopped.
Vehicles with amemory function: if there is a
risk of becoming trapped by the steering
wheel, you can also press one of the memory
function position buttons.T he adjustment
process is stopped. G
WARNING
If children activate the EASY-ENTRY/EXIT fea- ture, they can become trapped, particularly
when unattended. There is arisk of injury.
When leaving the vehicle, always take the key with you and lock the vehicle. Never leave
children unattended in the vehicle. G
WARNING
If you drive off while the EASY-ENTRY/EXIT
feature is making adjustments, you could lose
control of the vehicle. There is arisk of an
accident. Always wait until the adjustment process is
complete before driving off.
The EASY-ENTRY/EXIT feature makes getting in and out of your vehicle easier.
You can activate and deactivate the EASY-
ENTRY/EXI Tfeature in the on-board com-
puter (Y page 294).
Position of the steering wheel when the
EASY-ENTRY/EXIT featureisa ctive The steering wheel tilts upwards if you:
R remove the key from the ignition lock
R with KEYLESS-GO: open the driver's door;
KEYLESS-GO must be in position 1
R with the key: open the driver's door; the
key must be in position 0or 1in the ignition
lock (Y page 179)
i The steering wheel only moves upwards if
it has not already reached the upper stop.
Position of the steering wheel for driv-
ing The steering wheel is moved to the previously
set position if:
R the driver's door is closed and
R with KEYLESS-GO: you press the Start/
Stop button once
or
R with the key: you insert the key into the
ignition lock Steering wheel
135Seats, steering wheela nd mirrors Z
Page 139 of 497
If you close the driver's door with the key
inserted in the ignition lock, the steering
wheelisa utomaticall ymoved to the previ-
ouslys et position.
The last positio nofthe steering wheelis
stored when you switch off the ignition or
when you store the setting with the memory
function (Y page 139).
Crash-responsive EASY-EXIT feature If the crash-responsive EASY-EXIT feature is
triggered in an accident, the steering column
willm ove upwards when the driver's door is
opened. This occurs irrespective of the posi-
tion of the key in the ignition lock. This makes it easier to exit the vehicle and rescue the
occupants.
The crash-responsive EASY-EXIT feature is
only operational if the EASY-EXIT/ENTRY fea-
ture is activated in the on-board computer
(Y page 294). Mirrors
Rear-view mirror
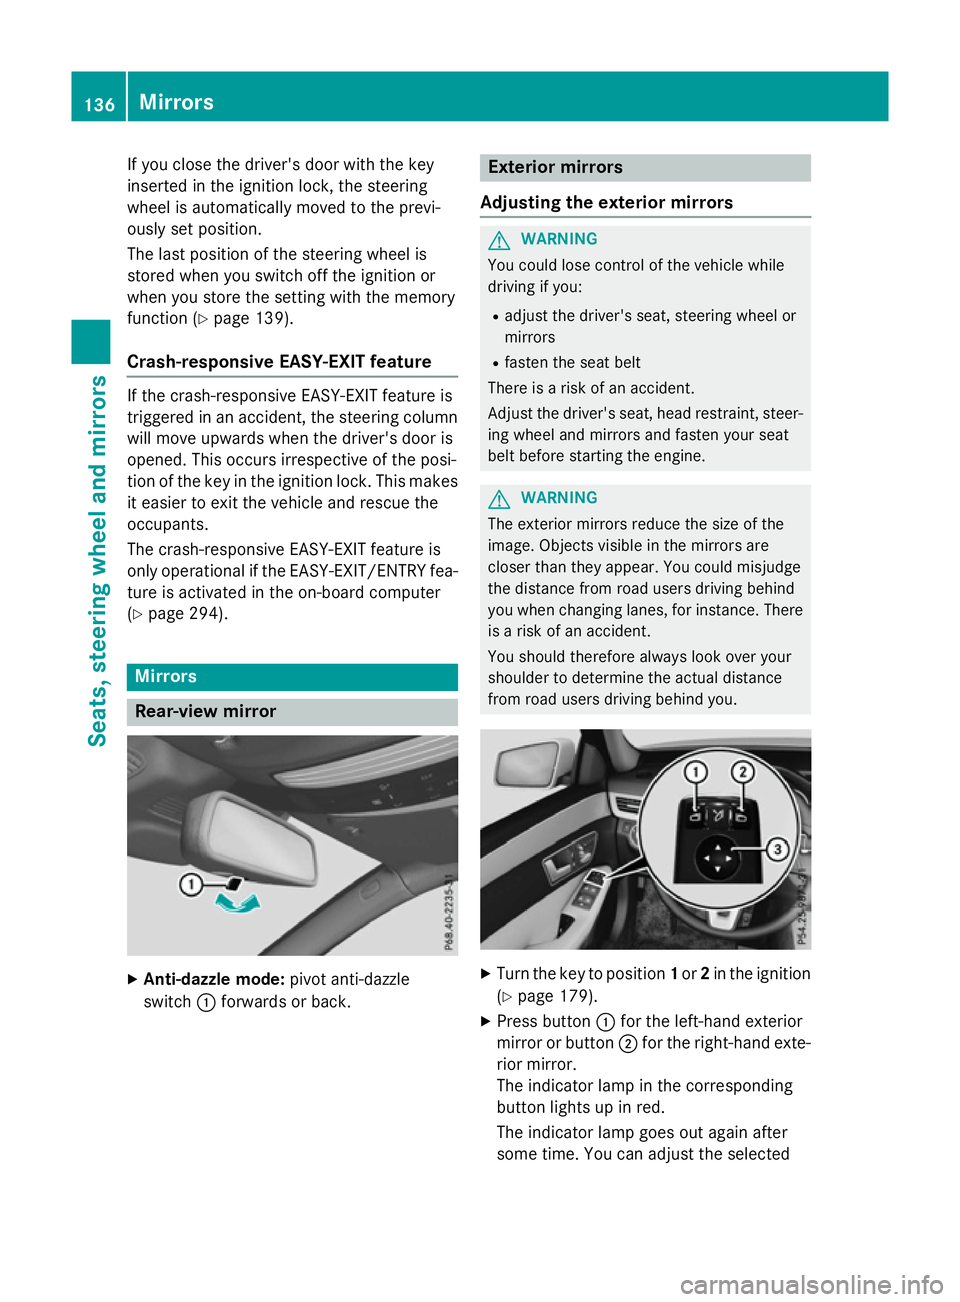
X
Anti-dazzle mode: pivot anti-dazzle
switch :forward sorback. Exterio
rmirrors
Adjusting the exterio rmirrors G
WARNING
You could lose control of the vehicle while
driving if you:
R adjust the driver's seat, steering wheelor
mirrors
R fasten the seat belt
There is arisk of an accident.
Adjust the driver's seat, head restraint, steer-
ing wheela nd mirrors and fasten yours eat
belt before starting the engine. G
WARNING
The exterior mirrors reduce the size of the
image.O bjects visible in the mirrors are
closer than they appear. You could misjudge
the distance from road users driving behind
you when changing lanes, for instance. There is ar isk of an accident.
You shouldt herefore always look over your
shoulder to determine the actual distance
from road users driving behind you. X
Turn the key to position 1or 2in the ignition
(Y page 179).
X Press button :for the left-hand exterior
mirror or button ;for the right-hand exte-
rior mirror.
The indicator lamp in the corresponding
button lights up in red.
The indicator lamp goes out again after
some time. You can adjustt he selected136
MirrorsSeats, steeringw
heel and mirrors
Page 140 of 497
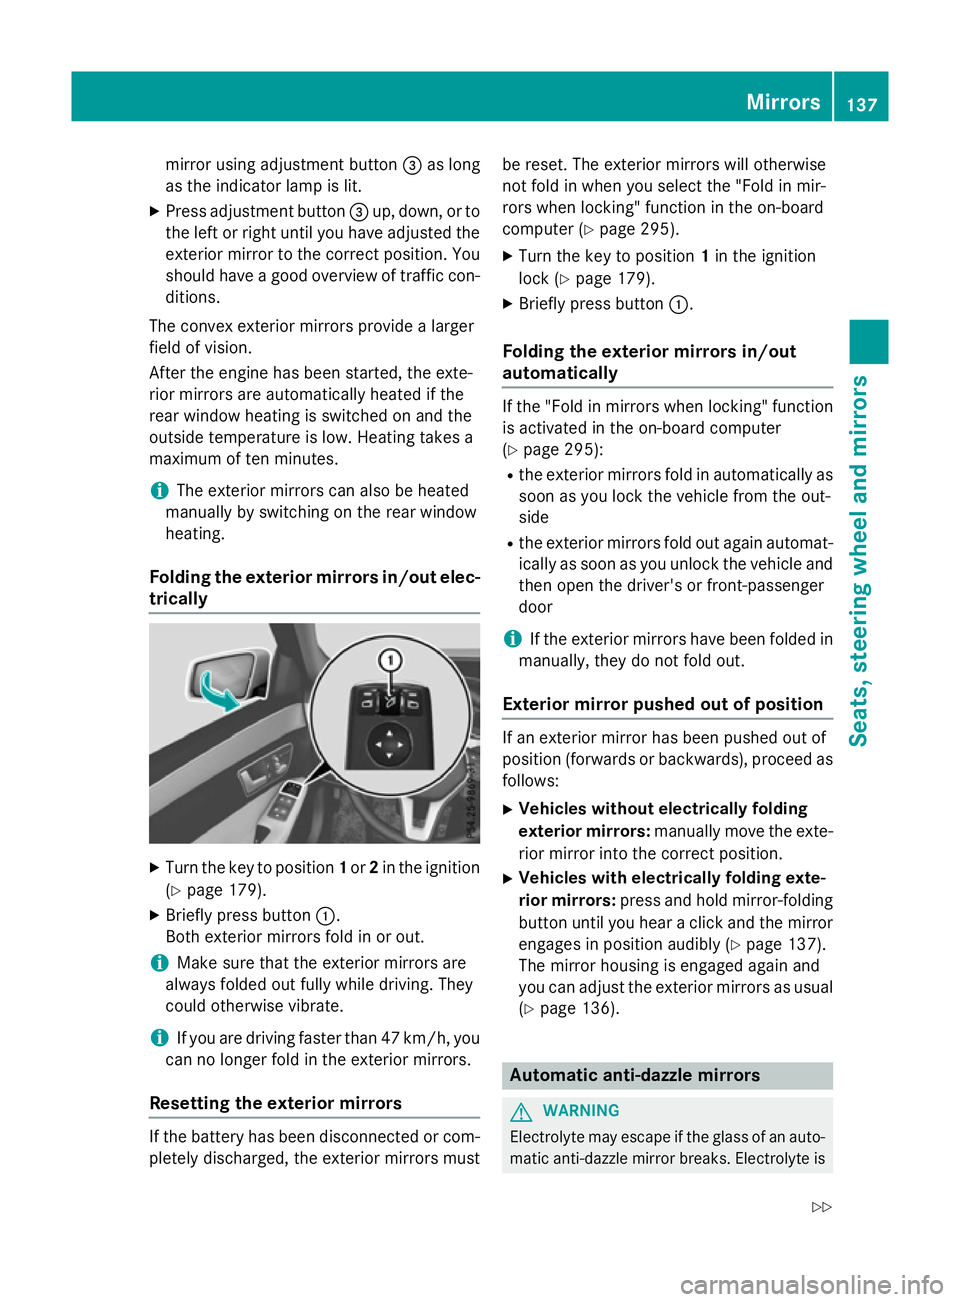
mirror using adjustment button
=as long
as the indicator lamp is lit.
X Press adjustment button =up, down, or to
the left or right until you have adjusted the
exterior mirror to the correct position. You
should have agood overvie woftraffic con-
ditions.
The convex exterior mirrors provid ealarger
fiel dofv ision.
After the engine has been started, the exte-
rior mirrors are automatically heated if the
rear windo wheating is switched on and the
outsid etemperature is low.H eating takes a
maximu moften minutes.
i The exterior mirrors can alsobeh
eated
manually by switching on the rear window
heating.
Folding the exterio rmirrors in/out elec-
trically X
Turn the key to position 1or 2in the ignition
(Y page1 79).
X Briefly press button :.
Both exterior mirrors fold in or out.
i Make sure that the exterior mirrors are
alwaysf oldedout full ywhile driving. They
could otherwise vibrate.
i If you are driving faster than 47 km/h, you
can no longer fold in the exterior mirrors.
Resetting the exterio rmirrors If the battery has been disconnected or com-
pletely discharged, the exterior mirrors must be reset. The exterior mirrors willo
therwise
not fold in when you select the "Fol dinmir-
rors when locking" function in the on-board
computer (Y page295).
X Turn the key to position 1in the ignition
lock (Y page179).
X Briefly press button :.
Folding the exterio rmirrors in/out
automatically If the "Fol
dinmirrors when locking" function
is activated in the on-board computer
(Y page2 95):
R the exterior mirrors fold in automatically as
soon as you lock the vehicl efrom the out-
side
R the exterior mirrors fold out again automat-
ically as soon as you unlock the vehicl eand
then open the driver' sorfront-passenger
door
i If the exterior mirrors have been folde
din
manually,t hey do not fold out.
Exterio rmirror pushed out of position If an exterior mirror has been pushed out of
position (forwards or backwards), proceed as
follows:
X Vehicles without electrically folding
exterio rmirrors: manually move the exte-
rior mirror into the correct position.
X Vehicles with electrically folding exte-
rior mirrors: press and hold mirror-folding
button until you hear aclick and the mirror
engage sinposition audibly (Y page137).
The mirror housing is engage dagain and
you can adjust the exterior mirrors as usual
(Y page1 36). Automatic anti-dazzle mirrors
G
WARNING
Electrolyte may escap eifthe glass of an auto-
matic anti-dazzle mirror breaks. Electrolyte is Mirrors
137Seats, steering wheel and mirrors
Z
Page 141 of 497
harmful and causes irritation. It must not
come into contact with your skin, eyes, res-
piratory organs or clothing or be swallowed.
There is arisk of injury.
If you come into contact with electrolyte,
observe the following:
R immediately rinse off electrolyte from your
skin with water.
R immediately and thoroughly rinse electro-
lyte out of eyes using clean water.
R if electrolyte is swallowed, immediately
rinse out your mouth thoroughly. Do not
induce vomiting.
R if electrolyte comes into contact with skin
or eyes or is swallowed, seek medical atten-
tion immediately.
R immediately change out of clothing that has
been in contact with electrolyte.
R if an allergic reaction occurs, seek medical
attention immediately.
The rear-view mirror and the exterior mirror
on the driver's side automatically go into anti- dazzle mode if the following conditionsa re
met simultaneously:
R the ignition is switched on and
R incident light from headlamps strikes the
sensor in the rear-view mirror
The mirrors do not dip if reverse gear is
engaged or if the interior lighting is switched
on. Parking position of the exterior mirror
on the front-passenger side
Setting and storing the parking position Using reverse gear
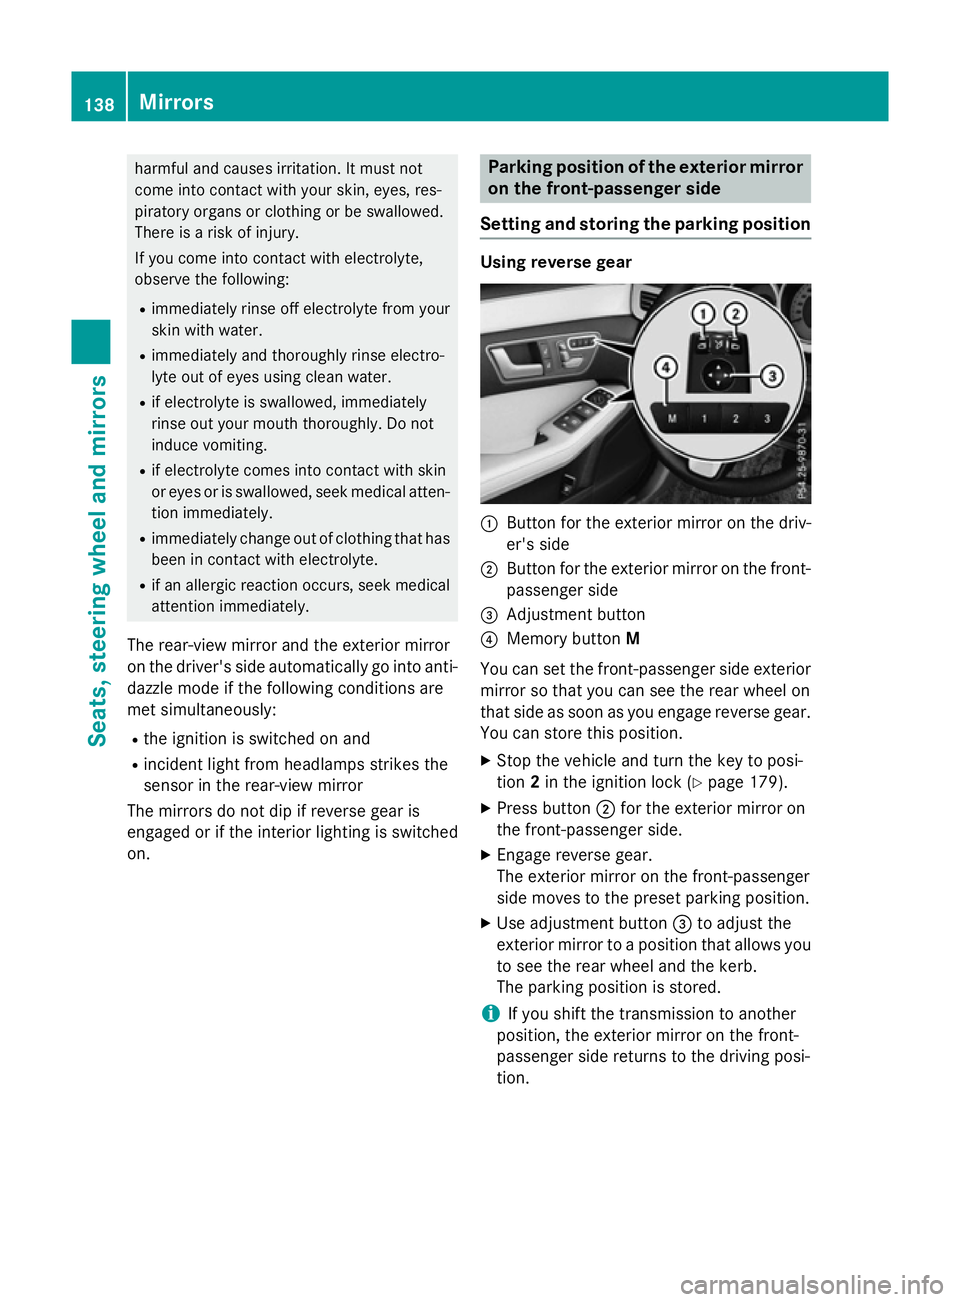
:
Button for the exterior mirror on the driv-
er's side
; Button for the exterior mirror on the front-
passenger side
= Adjustment button
? Memory button M
You can set the front-passenger side exterior
mirror so that you can see the rear wheel on
that side as soon as you engage reverse gear.
You can store this position.
X Stop the vehicle and turn the key to posi-
tion 2in the ignition lock (Y page 179).
X Press button ;for the exterior mirror on
the front-passenger side.
X Engage reverse gear.
The exterior mirror on the front-passenger
side moves to the preset parking position.
X Use adjustment button =to adjust the
exterior mirror to aposition that allowsy ou
to see the rear wheel and the kerb.
The parking position is stored.
i If you shift the transmission to another
position, the exterior mirror on the front-
passenger side returns to the driving posi-
tion. 138
MirrorsSeats, steering wheela
nd mirrors
Page 142 of 497
Using the memory button
You can set the front-passenger side exterior
mirror so that you can see the rear wheel on
that side as soon as you engage reverse gear.
This setting can be stored using memor ybut-
ton M?.
X Turn the key to position 2in the ignition
lock (Y page 179).
X With the exterior mirror on the front-
passenger side activated, use adjustment
button =to adjust the exterior mirror .The
rear wheel and the kerb should be visible in
the exterior mirror.
X Press memor ybutton M? and one of the
arrows on adjustment button =within
three seconds.
The parkin gposition is stored if the exterior
mirror does not move.
X If the exterior mirror moves out of position,
repeat the steps.
Calling up astored parking position X
Turn the key to position 2in the ignition
lock (Y page 179).
X Adjust the exterior mirror on the front-
passenger side using button ;.
X Engage reverse gear.
The exterior mirror on the front-passenger
side moves to the stored parkin gposition.
The exterior mirror on the front-passenger
side moves back to its original position:
R as soon as you exceed aspeed of
15 km/h
R if you press button :for the exterior mir-
ror on the driver' sside Memor
yfunction Storing settings
G
WARNING
If you use the memor yfunction on the driver's
side while driving, the adjustment scould cause you to lose contro
lofthe vehicle. There
is ar isk of an accident.
Only use the memor yfunction on the driver's
side while the vehicle is stationary. G
WARNING
If children activate the memor yfunction ,they
could become trapped, especially if they are
unattended. There is arisk of injury.
When leaving the vehicle, always tak ethe key
with you and lock the vehicle. Never leave
children unattended in the vehicle. G
WARNING
When the memor yfunction adjust sthe seat or
steering wheel, you and other vehicle occu-
pant s–p articularly children –could become
trapped. There is arisk of injury.
While the memor yfunction is makin gadjust-
ments, make sure that no one has any body
parts in the sweep of the seat or steering
wheel. If somebody becomes trapped, imme-
diately release the memor yfunction position
button. The adjustment proces sisstopped.
The memor yfunction can be used at any time,
e.g. even when the key isn't in the ignition
lock.
With the memor yfunction ,you can stor eup
to three different settings, e.g. for three dif-
feren tpeople.
The following settings are stored as asingle
memor ypreset:
R position of the seat, backrest and head
restraint
R activ emulticontour seat: seat contour,
dynamic function level
R driver' sside: position of the exterior mir-
rors on the driver' sand front-passenger
sides Memor
yfunction
139Seats, steering wheel and mirrors Z
Page 146 of 497
4
Ã
Automatic headlamp mode, control-
le dbyt he light sensor
5 L
Dipped-beam/main-bea mhead-
lamps
B R
Rear foglamp
If yo uhearaw arning tone when yo uleave the
vehicle, the lights ma ystill be switched on.
X Turn the light switch to Ã.
The exterio rlighting (excep tthe side lamps/
parking lamps )switches off automaticall yif
you:
R remove the key fro mthe ignition lock
R open the driver's door with the key in posi-
tion 0
Automati cheadlamp mode G
WARNING
Whe nthe light switch is set to Ã,the
dipped-beam headlamps ma ynot be switched
on automaticall yifthereisf og,snow or other
causes of poor visibility du etothe weather
conditions such as spray .There is ariskofan
accident.
In such situations, tur nthe light switch to
L.
The automatic headlamp featur eisonlyan
aid. The driver is responsibl efor the vehicle
lighting at al ltimes.
à is the preferred light switch setting. The
light setting is automaticall yselecte daccord-
ing to the brightness of the ambient light
(exception: poor visibility du etoweather con-
ditions such as fog ,snow or spray):
R key in position 1in the ignition lock: the
side lamps ar eswitched on or off automat-
icall ydepen ding on the brightness of the
ambient light
R with the engine running :ifyouhave
switched on the daytime driving lights func-
tio nint he on-board computer, the daytime
driving lights or the side lamps and dipped-
beam headlamps ar eswitched on or off
automaticall ydepen ding on the brightness
of the ambient light X
To switc honautomatic headlamp
mode: turnthe light switch to Ã.
The daytime driving lights improv ethe detect-
ability of your vehicl eduring the day. Here,
the daytime driving lights functio nmustbe
switched on via the on-board computer
(Y page 290).
When the side lamps and dipped-beam head- lamps ar eswitched on, the green T(side
lamps )and L (dipped-bea mheadlam ps)
indicator lamps in the instrument cluster light
up.
Dipped-beam headlamps G
WARNING
Whe nthe light switch is set to Ã,the
dipped-beam headlamps ma ynot be switched
on automaticall yifthereisf og,snow or other
causes of poor visibility du etothe weather
conditions such as spray .There is ariskofan
accident.
In such situations, tur nthe light switch to
L.
When the ignition is switched on and the light
switch is in the Lposition, the side lamps
and dipped-beam headlamps ar eswitched on
eve nift he light sensor does not sens edark
ambient light conditions. Thi sisadvanta-
geou swhent her eisf og or rain.
X To switc honthe dipped-beam head-
lamps: turnthe key in the ignition lock to
position 2or start the engine.
X Turn the light switch to L.
The green Lindicator lamp in the instru-
ment cluster lights up.
Rea rfoglamp
The rea rfoglamp improves the visibility of
your vehicl einheavyfog for the following
traffic. Please observe the country-specific
laws on the us eofrearfoglamps.
X To switc honthe rear foglamp: turnthe
key in the ignition lock to position 2or start
the engine.
X Turn the light switch to LorÃ. Exterior lighting
143Lights andwindscreen wipers Z