reset MERCEDES-BENZ E-Class SEDAN 2012 W212 Owner's Manual
[x] Cancel search | Manufacturer: MERCEDES-BENZ, Model Year: 2012, Model line: E-Class SEDAN, Model: MERCEDES-BENZ E-Class SEDAN 2012 W212Pages: 396, PDF Size: 17.07 MB
Page 15 of 396
Malfunction messagesee Display messages
Malfunctions relevant to safety
Reporting ......................................... 25
Massage function (PULSE) ............... 103
Matte finish (cleaning
instructions) ...................................... 316
mbrace Call priority .................................... 300
Display message ............................ 237
Downloading destinations
(COMAND) ..................................... 300
Emergency call .............................. 297
Important safety notes ..................296
Locating a stolen vehicle ...............301
MB info call button ........................299
Remote vehicle locking ..................301
Roadside Assistance button ..........298
Search & Send ............................... 300
Self-test ......................................... 296
System .......................................... 296
Vehicle remote unlocking ..............300
Mechanical key
Function/notes ................................ 77
Locking vehicle ................................ 84
Unlocking the driver's door ..............83
Memory card (audio) ......................... 222
Memory function ............................... 111
Message memory (on-board
computer) .......................................... 234
Messages see Display messages
Mirrors
see Exterior mirrors
see Rear-view mirror
see Vanity mirror
Mobile phone
Menu (on-board computer) ............222
Modifying the programming
(SmartKey) ........................................... 77
MOExtended run-flat system ........... 334
MP3 Operating ....................................... 222
see separate operating instructions
Multifunction display
Function/notes ............................. 216
Permanent display .........................226Multifunction steering wheel
Operating the on-board computer . 215
Overview .......................................... 31
N
Navigation Menu (on-board computer) ............220
On-board computer .......................220
see separate operating instructions
NECK-PRO head restraints
Operation ......................................... 50
Resetting after being triggered ........51
Night View Assist Plus
Activating/deactivating .................201
Cleaning ......................................... 318
Function/notes ............................. 200
Problem (malfunction) ...................203
Notes on breaking-in a new
vehicle ................................................ 144
O
Occupant Classification System
(OCS) Faults ............................................... 49
Operation ......................................... 44
System self-test ............................... 47
Occupant safety
Children in the vehicle .....................56
System overview .............................. 38
Octane number (fuel) ........................ 385
Odometer ........................................... 219
see Trip odometer
Oil
see Engine oil
On-board computer
AMG menu ..................................... 230
Assistance menu ........................... 224
Audio menu ................................... 221
Convenience submenu ..................229
Displaying a service message ........313
Display messages ..........................234
DISTRONIC PLUS ........................... 183
Factory settings submenu .............230
Important safety notes ..................214
Instrument cluster submenu ..........226
Lighting submenu .......................... 227
Index13
Page 16 of 396
Menu overview .............................. 218
Message memory .......................... 234
Navigation menu ............................ 220
Operating video DVD .....................222
Operation ....................................... 215
RACETIMER ................................... 231
Service menu ................................. 226
Settings menu ............................... 226
Standard display ............................ 219
Telephone menu ............................ 222
Trip menu ...................................... 219
Vehicle submenu ........................... 228
Operating system
see On-board computer
Outside temperature display ........... 215
Overhead control panel ...................... 35
Override feature Rear side windows ...........................62
P
Paint code number ............................ 381
Paintwork (cleaning instructions) ... 316
Panic alarm .......................................... 62
Panorama roof with power tilt/
sliding panel Opening/closing .............................. 94
Opening/closing the roller
sunblind ........................................... 95
Problem (malfunction) .....................96
Resetting ......................................... 95
Panorama sliding sunroof
Important safety notes ....................93
Parcel net ........................................... 277
Parking ............................................... 167
Important safety notes ..................167
Parking brake ................................ 169
Position of exterior mirror, front-
passenger side ............................... 110
Rear view camera .......................... 198
see PARKTRONIC
Parking aid
Parking Guidance ........................... 195
see Exterior mirrors
see PARKTRONIC
Parking brake
Display message ............................ 237
Notes/function .............................. 169
Parking Guidance
Display message ............................ 251
Important safety notes ..................195
Parking lamps (changing bulbs) ...... 123
PARKTRONIC Deactivating/activating .................194
Driving system ............................... 192
Function/notes ............................. 192
Problem (malfunction) ...................195
Range of the sensors .....................193
Warning display ............................. 193
PASSENGER AIRBAG OFF indicator
lamp ...................................................... 44
Pedals ................................................. 170
Permanent four-wheel drive see 4MATIC (permanent four-
wheel drive)
Plastic hooks ..................................... 281
Plastic trim (cleaning instructions) . 319
Power washers .................................. 315
Power windows see Side windows
PRE-SAFE ®
(Preventive occupant
safety system) Display message ............................ 237
Operation ......................................... 50
PRE-SAFE ®
Brake (vehicles with
DISTRONIC PLUS) Display message ............................ 238
Function/notes ................................ 69
Switching on/off ........................... 225
Warning lamp ................................. 270
Preventive occupant safety
system
see PRE-SAFE ®
(Preventive
occupant safety system)
Product information ............................ 22
Program selector button .................. 156
Pulling away Automatic transmission .................147
Q
Qualified specialist workshop ........... 25
14Index
Page 18 of 396
Seat beltsAdjusting the driver's and front-
passenger seat belt .........................54
Adjusting the height ......................... 54
Belt force limiters ............................ 56
center rear-compartment seat .........55
Cleaning ......................................... 320
Correct usage .................................. 52
Emergency Tensioning Devices ........ 56
Fastening ......................................... 53
Important safety guidelines .............51
Releasing ......................................... 55
Safety guidelines ............................. 39
Special seat belt retractor ...............59
Switching belt adjustment on/off
(on-board computer) ......................229
Warning lamp ................................. 261
Warning lamp (function) ................... 55
Seats
Active multicontour seat ................102
Adjusting (electrically) ...................100
Adjusting the 4-way lumbar
support .......................................... 103
Adjusting the head restraint ..........100
Cleaning the cover .........................320
Correct driver's seat position ........... 98
Folding the backrest (rear
compartment) forwards/back .......280
Important safety notes ....................99
Seat heating problem ....................106
Seat ventilation problem ................106
Storing settings (memory
function) ........................................ 111
Switching seat heating on/off .......105
Switching seat ventilation on/off ..106
Sensors (cleaning instructions) ....... 317
Service see ASSYST PLUS service interval
display
Service interval display
Displaying service messages .........313
Hiding service messages ...............313
Notes ............................................. 313
Service messages ..........................312
Service menu (on-board computer) . 226
Service products Brake fluid ..................................... 388
Capacities ...................................... 384Coolant (engine) ............................ 389
DEF special additives .....................387
Engine oil ....................................... 387
Fuel ................................................ 385
Important safety notes ..................382
Refrigerant (air-conditioning
system) .......................................... 388
Washer fluid ................................... 389
Settings
Factory (on-board computer) .........230
On-board computer .......................226
Setting the air distribution ............... 137
Setting the airflow ............................ 137
SETUP (on-board computer) ............. 230
Side impact air bag ............................. 42
Side marker lamp (display
message) ............................................ 244
Side windows Convenience closing feature ............91
Convenience opening feature ..........91
Important safety information ...........90
Opening/closing .............................. 90
Problem (malfunction) .....................92
Resetting ......................................... 92
Skibag ................................................ 277
Sliding sunroof Important safety notes ....................93
Opening/closing .............................. 94
Problem (malfunction) .....................96
Resetting ......................................... 94
see Panorama roof with power
tilt/sliding panel
SmartKey
Changing the battery .......................78
Changing the programming .............77
Checking the battery .......................78
Convenience closing feature ............91
Convenience opening feature ..........91
Display message ............................ 259
Door central locking/unlocking .......74
Important safety notes ....................74
Loss ................................................. 80
Mechanical key ................................ 77
Positions (ignition lock) .................145
Problem (malfunction) .....................80
Starting the engine ........................147
Snow chains .............................. 174, 34916Index
Page 21 of 396
Load index ..................................... 366
Load index (definition) ...................369
Maximum loaded vehicle weight
(definition) ..................................... 368
Maximum load on a tire
(definition) ..................................... 369
Maximum permissible tire
pressure (definition) ....................... 369
Maximum tire load .........................361
Maximum tire load (definition) .......369
Optional equipment weight
(definition) ..................................... 369
PSI (pounds per square inch)
(definition) ..................................... 369
Replacing ....................................... 370
Service life ..................................... 347
Sidewall (definition) .......................369
Speed rating (definition) ................368
Storing ........................................... 371
Structure and characteristics
(definition) ..................................... 367
Temperature .................................. 363
TIN (Tire Identification Number)
(definition) ..................................... 370
Tire bead (definition) ......................369
Tire pressure (definition) ................369
Tire pressures (recommended) ......368
Tire size (data) ............................... 371
Tire size designation, load-bearing
capacity, speed rating .................... 364
Tire tread ....................................... 347
Tire tread (definition) .....................369
Total load limit (definition) .............370
Traction ......................................... 362
Traction (definition) .......................370
Tread wear ..................................... 362
Uniform Tire Quality Grading
Standards ...................................... 362
Uniform Tire Quality Grading
Standards (definition) ....................368
Unladen weight (definition) ............369
Wear indicator (definition) .............370
Wheel rim (definition) ....................368
see Flat tire
Top Tether ............................................ 60
Towing Important safety guidelines ...........340
Installing the towing eye ................340Removing the towing eye ...............341
With the rear axle raised ................341
Towing away
With both axles on the ground .......341
Tow-starting
Emergency engine starting ............342
Important safety notes ..................340
Transmission
see Automatic transmission
Transporting the vehicle .................. 342
Trim pieces (cleaning instructions) . 319
Trip computer (on-board
computer) .......................................... 219
Trip meter see Trip odometer
Trip odometer
Calling up ....................................... 219
Resetting (on-board computer) ......220
Trunk
Emergency release ..........................89
Important safety guidelines .............84
Locking separately ...........................88
Opening/closing (automatically
from inside) ...................................... 87
Opening/closing (automatically
from outside) ................................... 86
Trunk lid
Display message ............................ 258
Opening/closing .............................. 84
Turn signals
Changing bulbs (front) ...................124
Display message ............................ 242
Switching on/off ........................... 117
Type identification plate
see Vehicle identification plate
U
Unlocking Emergency unlocking .......................83
From inside the vehicle (central
unlocking button) ............................. 82
Index19
Page 45 of 396
Improper repair work on the doors or the
modification or addition of components to the
doors create a risk of rendering the side
impact air bags inoperative or causing
unintended air bag deployment. Work on the
doors must therefore only be performed by
qualified technicians. Contact an authorized
Mercedes-Benz Center.GWARNING
Only use seat covers which have been tested
and approved by Mercedes-Benz for your
vehicle model. Using seat covers or other seat
coverings can cause a malfunction of the side
impact air bags and/or the pelvis air bags.
Contact an authorized Mercedes-Benz Center
for availability.
When deployed, the side impact air bags offer
additional protection for the thorax of the
vehicle occupants on the side of the vehicle
on which the impact occurs. However, they
do not protect the:
R head
R neck
R arms
Example: Sedan
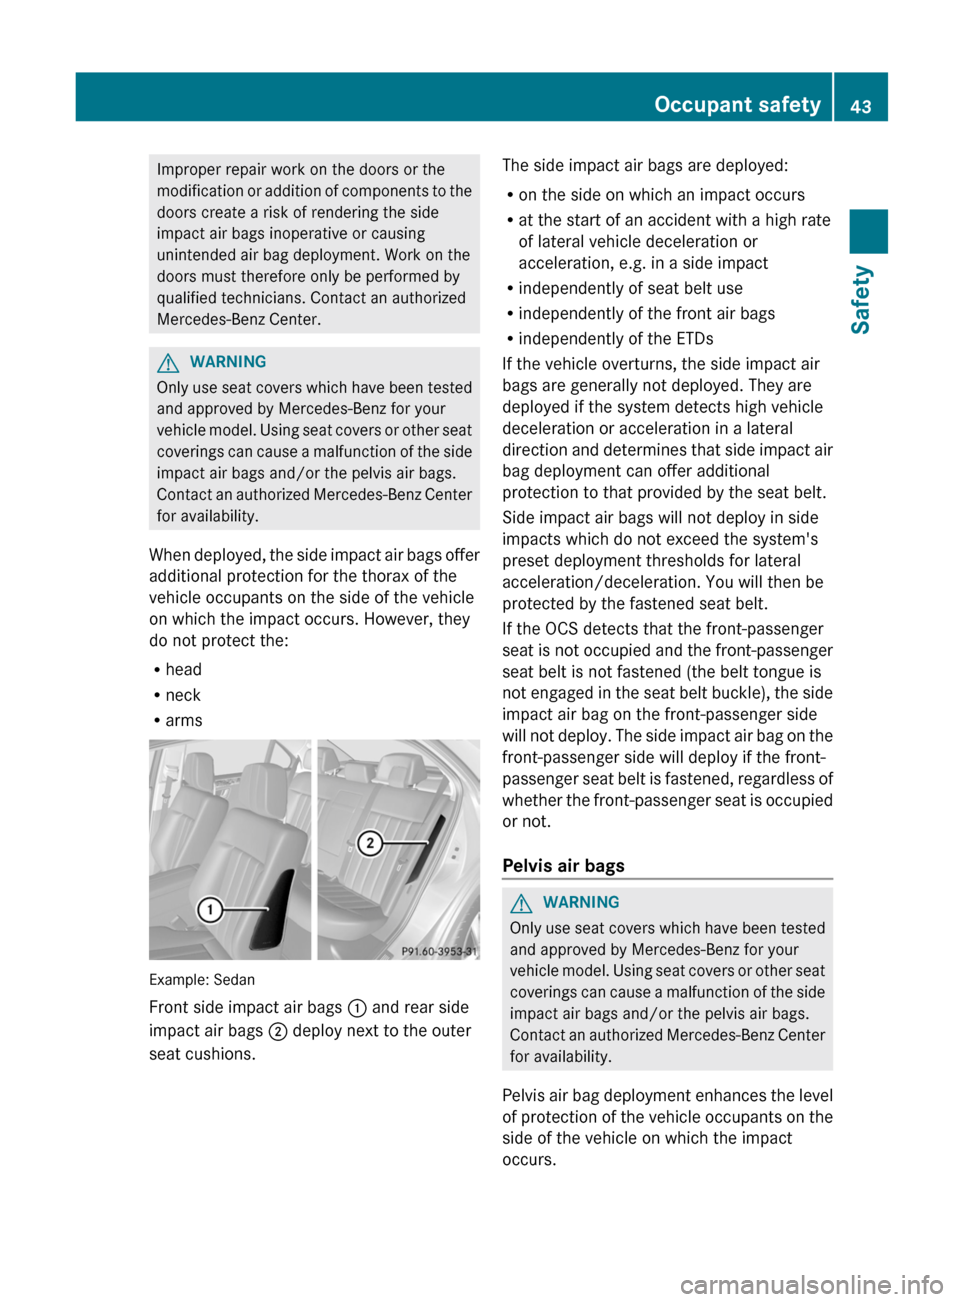
Front side impact air bags : and rear side
impact air bags ; deploy next to the outer
seat cushions.
The side impact air bags are deployed:
R on the side on which an impact occurs
R at the start of an accident with a high rate
of lateral vehicle deceleration or
acceleration, e.g. in a side impact
R independently of seat belt use
R independently of the front air bags
R independently of the ETDs
If the vehicle overturns, the side impact air
bags are generally not deployed. They are
deployed if the system detects high vehicle
deceleration or acceleration in a lateral
direction and determines that side impact air
bag deployment can offer additional
protection to that provided by the seat belt.
Side impact air bags will not deploy in side
impacts which do not exceed the system's
preset deployment thresholds for lateral
acceleration/deceleration. You will then be
protected by the fastened seat belt.
If the OCS detects that the front-passenger
seat is not occupied and the front-passenger
seat belt is not fastened (the belt tongue is
not engaged in the seat belt buckle), the side
impact air bag on the front-passenger side
will not deploy. The side impact air bag on the
front-passenger side will deploy if the front-
passenger seat belt is fastened, regardless of
whether the front-passenger seat is occupied
or not.
Pelvis air bagsGWARNING
Only use seat covers which have been tested
and approved by Mercedes-Benz for your
vehicle model. Using seat covers or other seat
coverings can cause a malfunction of the side
impact air bags and/or the pelvis air bags.
Contact an authorized Mercedes-Benz Center
for availability.
Pelvis air bag deployment enhances the level
of protection of the vehicle occupants on the
side of the vehicle on which the impact
occurs.
Occupant safety43SafetyZ
Page 46 of 396
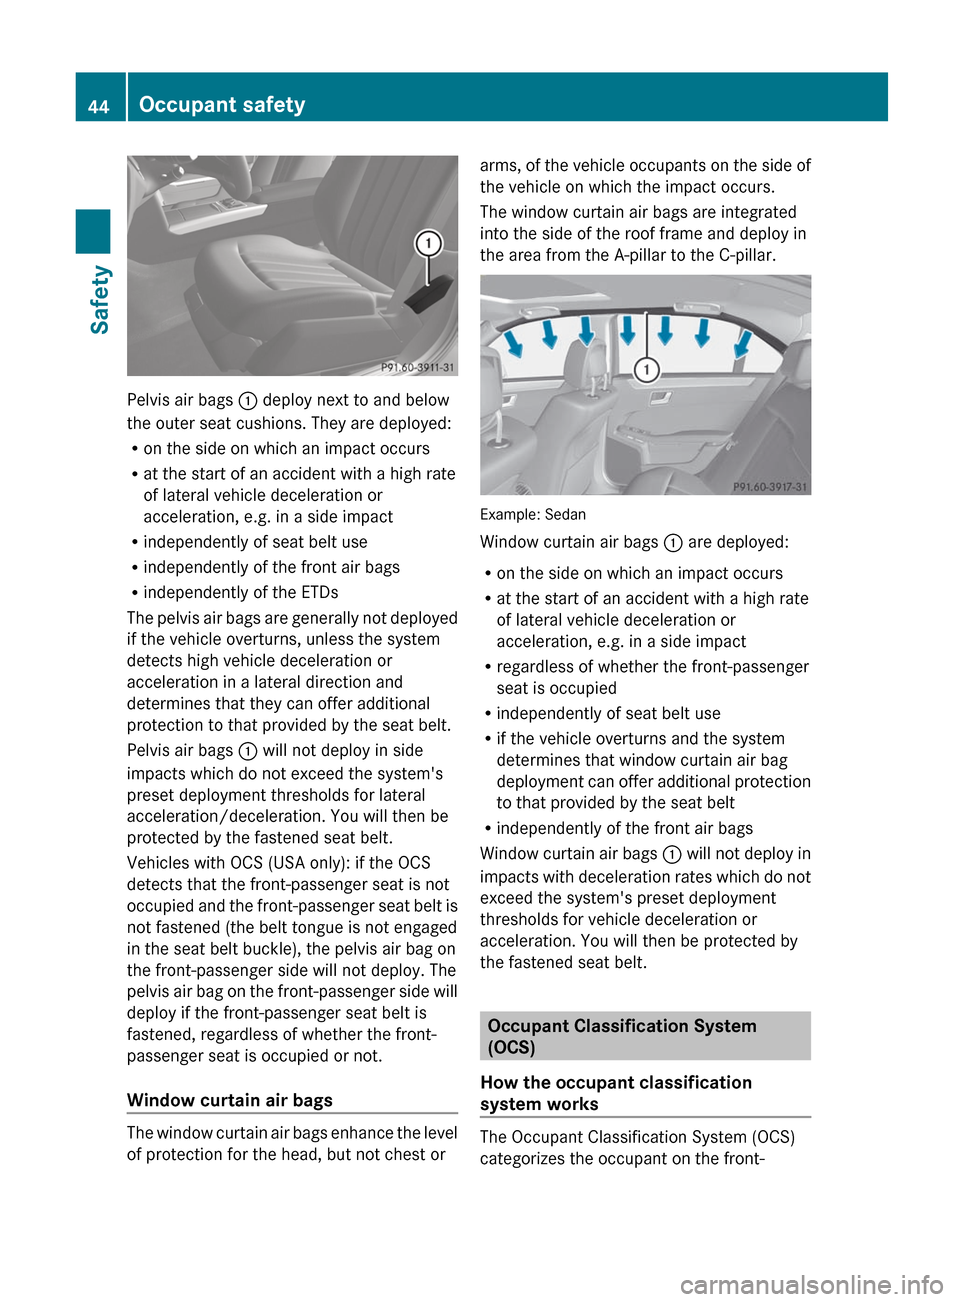
Pelvis air bags : deploy next to and below
the outer seat cushions. They are deployed:
R on the side on which an impact occurs
R at the start of an accident with a high rate
of lateral vehicle deceleration or
acceleration, e.g. in a side impact
R independently of seat belt use
R independently of the front air bags
R independently of the ETDs
The pelvis air bags are generally not deployed
if the vehicle overturns, unless the system
detects high vehicle deceleration or
acceleration in a lateral direction and
determines that they can offer additional
protection to that provided by the seat belt.
Pelvis air bags : will not deploy in side
impacts which do not exceed the system's
preset deployment thresholds for lateral
acceleration/deceleration. You will then be
protected by the fastened seat belt.
Vehicles with OCS (USA only): if the OCS
detects that the front-passenger seat is not
occupied and the front-passenger seat belt is
not fastened (the belt tongue is not engaged
in the seat belt buckle), the pelvis air bag on
the front-passenger side will not deploy. The
pelvis air bag on the front-passenger side will
deploy if the front-passenger seat belt is
fastened, regardless of whether the front-
passenger seat is occupied or not.
Window curtain air bags
The window curtain air bags enhance the level
of protection for the head, but not chest or
arms, of the vehicle occupants on the side of
the vehicle on which the impact occurs.
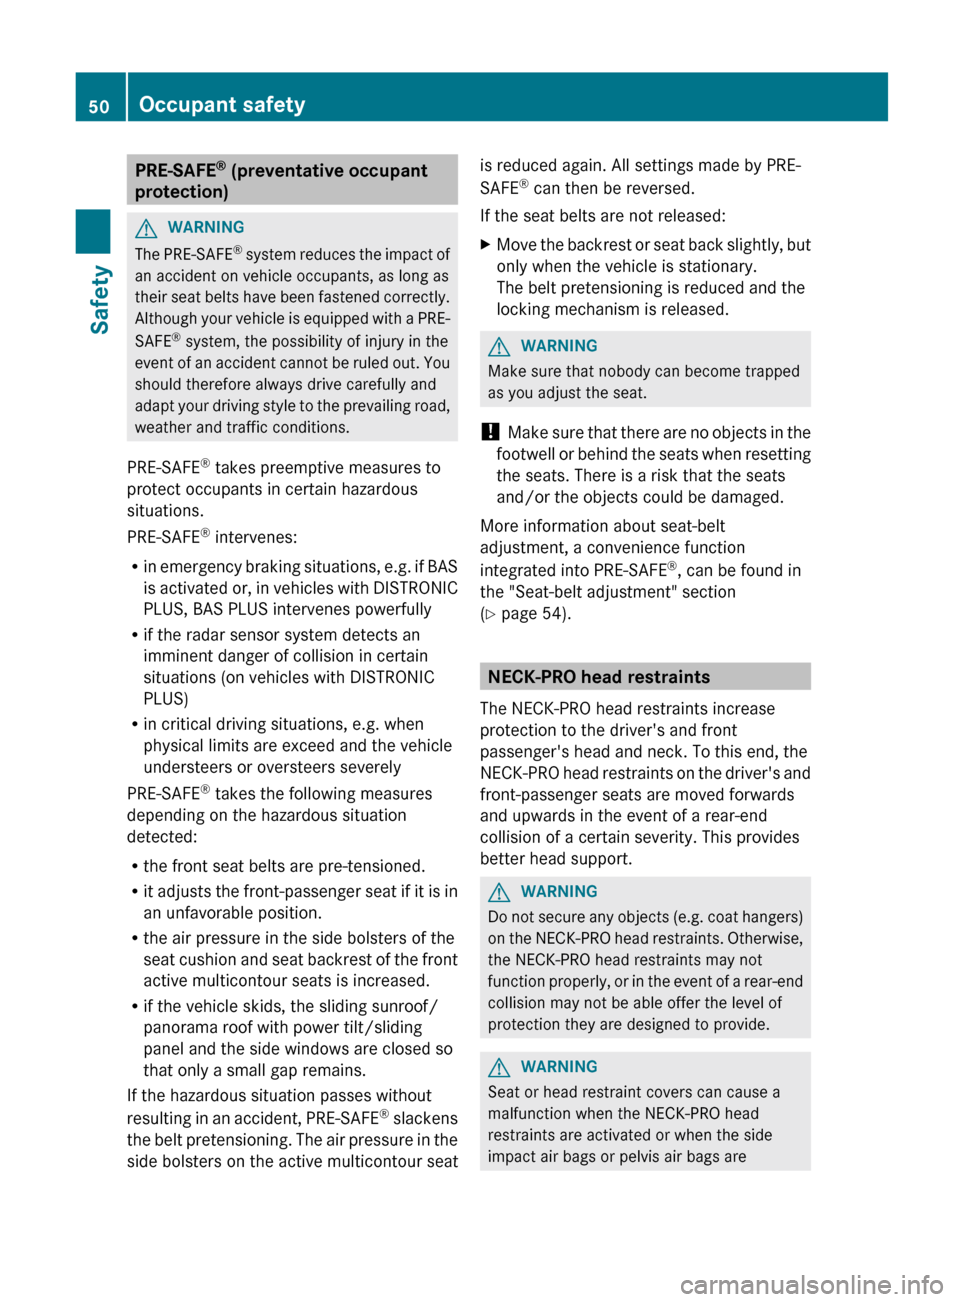
The window curtain air bags are integrated
into the side of the roof frame and deploy in
the area from the A-pillar to the C-pillar.
Example: Sedan
Window curtain air bags : are deployed:
R on the side on which an impact occurs
R at the start of an accident with a high rate
of lateral vehicle deceleration or
acceleration, e.g. in a side impact
R regardless of whether the front-passenger
seat is occupied
R independently of seat belt use
R if the vehicle overturns and the system
determines that window curtain air bag
deployment can offer additional protection
to that provided by the seat belt
R independently of the front air bags
Window curtain air bags : will not deploy in
impacts with deceleration rates which do not
exceed the system's preset deployment
thresholds for vehicle deceleration or
acceleration. You will then be protected by
the fastened seat belt.
Occupant Classification System
(OCS)
How the occupant classification
system works
The Occupant Classification System (OCS)
categorizes the occupant on the front-
44Occupant safetySafety
Page 52 of 396
PRE-SAFE®
(preventative occupant
protection)GWARNING
The PRE-SAFE ®
system reduces the impact of
an accident on vehicle occupants, as long as
their seat belts have been fastened correctly.
Although your vehicle is equipped with a PRE-
SAFE ®
system, the possibility of injury in the
event of an accident cannot be ruled out. You
should therefore always drive carefully and
adapt your driving style to the prevailing road,
weather and traffic conditions.
PRE-SAFE ®
takes preemptive measures to
protect occupants in certain hazardous
situations.
PRE-SAFE ®
intervenes:
R in emergency braking situations, e.g. if BAS
is activated or, in vehicles with DISTRONIC
PLUS, BAS PLUS intervenes powerfully
R if the radar sensor system detects an
imminent danger of collision in certain
situations (on vehicles with DISTRONIC
PLUS)
R in critical driving situations, e.g. when
physical limits are exceed and the vehicle
understeers or oversteers severely
PRE-SAFE ®
takes the following measures
depending on the hazardous situation
detected:
R the front seat belts are pre-tensioned.
R it adjusts the front-passenger seat if it is in
an unfavorable position.
R the air pressure in the side bolsters of the
seat cushion and seat backrest of the front
active multicontour seats is increased.
R if the vehicle skids, the sliding sunroof/
panorama roof with power tilt/sliding
panel and the side windows are closed so
that only a small gap remains.
If the hazardous situation passes without
resulting in an accident, PRE-SAFE ®
slackens
the belt pretensioning. The air pressure in the
side bolsters on the active multicontour seat
is reduced again. All settings made by PRE-
SAFE ®
can then be reversed.
If the seat belts are not released:XMove the backrest or seat back slightly, but
only when the vehicle is stationary.
The belt pretensioning is reduced and the
locking mechanism is released.GWARNING
Make sure that nobody can become trapped
as you adjust the seat.
! Make sure that there are no objects in the
footwell or behind the seats when resetting
the seats. There is a risk that the seats
and/or the objects could be damaged.
More information about seat-belt
adjustment, a convenience function
integrated into PRE-SAFE ®
, can be found in
the "Seat-belt adjustment" section
( Y page 54).
NECK-PRO head restraints
The NECK-PRO head restraints increase
protection to the driver's and front
passenger's head and neck. To this end, the
NECK-PRO head restraints on the driver's and
front-passenger seats are moved forwards
and upwards in the event of a rear-end
collision of a certain severity. This provides
better head support.
GWARNING
Do not secure any objects (e.g. coat hangers)
on the NECK-PRO head restraints. Otherwise,
the NECK-PRO head restraints may not
function properly, or in the event of a rear-end
collision may not be able offer the level of
protection they are designed to provide.
GWARNING
Seat or head restraint covers can cause a
malfunction when the NECK-PRO head
restraints are activated or when the side
impact air bags or pelvis air bags are
50Occupant safetySafety
Page 53 of 396

deployed, or they can prevent this completely.
The NECK-PRO head restraints or side impact
air bags/pelvis air bags can therefore not
provide the intended protection. Do not use
any seat or head restraint covers.
If the NECK-PRO head restraints have been
triggered in an accident, reset the NECK-PRO
head restraints on the driver’s and front-
passenger seat ( Y page 51). Otherwise, the
additional protection will not be available in
the event of another rear-end collision. You
can recognize when NECK-PRO head
restraints have been triggered by the fact that
they have moved forwards and can no longer
be adjusted.GWARNING
For your protection, drive only with properly
positioned head restraints.
Adjust the head restraint so that it is as close
to the head as possible and the center of the
head restraint supports the back of the head
at eye level. This will reduce the potential for
injury to the head and neck in the event of an
accident or similar situation.
Resetting triggered NECK-PRO head
restraints
GWARNING
For safety reasons, have the NECK-PRO head
restraints checked at an authorized
Mercedes-Benz Center after a rear-end
collision.
GWARNING
When pushing back the NECK-PRO head
restraint cushion, make sure your fingers do
not become caught between the head
restraint cushion and the cover. Failure to
observe this could result in injuries.
i Resetting the NECK-PRO head restraints
requires a lot of strength. If you have
difficulty resetting the NECK-PRO head
restraints, have this work carried out at a
qualified specialist workshop, e.g. an
authorized Mercedes-Benz Center.
Example: Sedan
XTilt the top of the NECK-PRO head restraint
cushion forwards in the direction of
arrow :.XPush the NECK-PRO head restraint cushion
down in the direction of arrow ; as far as
it will go.XFirmly push the NECK-PRO head restraint
cushion back in the direction of arrow =
until the cushion engages.XRepeat this procedure for the second
NECK-PRO head restraint.
Seat belts
Important safety notes
The use of seat belts and infant and child
restraint systems is required by law in all 50
states, the District of Columbia, the U.S.
territories and all Canadian provinces.
Even where this is not the case, all vehicle
occupants should have their seat belts
fastened when the vehicle is in motion.
i For further information on infants and
children traveling in the vehicle and on
infant and child restraint systems, see
"Children in the vehicle" ( Y page 56).
GWARNING
Always fasten your seat belt before driving off.
Always make sure all of your passengers are
Occupant safety51SafetyZ
Page 54 of 396

properly restrained. You and your passengers
should always wear seat belts.
Failure to wear and properly fasten and
position your seat belt greatly increases your
risk of injuries and their likely severity in an
accident.
If you are ever in an accident, your injuries can
be considerably more severe without your
seat belt properly buckled. Without your seat
belt buckled, you are much more likely to hit
the interior of the vehicle or be ejected from
it. You can be seriously injured or killed.
In the same crash, the possibility of injury or
death is lessened if you are properly wearing
your seat belt. The air bags can only protect
as intended if the occupants are properly
wearing their seat belts.GWARNING
Never ride in a moving vehicle with the seat
backrest in an excessively reclined position as
this can be dangerous. You could slide under
the seat belt in a collision. If you slide under
it, the seat belt would apply force at the
abdomen or neck. That could cause serious
or even fatal injuries. The seat backrest and
seat belt provide the best restraint when the
wearer is in a position that is as upright as
possible and the seat belt is properly
positioned on the body.
GWARNING
Never let more people ride in the vehicle than
there are seat belts available. Make sure
everyone riding in the vehicle is correctly
restrained with a separate seat belt. Never
use a seat belt for more than one person at a
time.
GWARNING
Damaged seat belts or seat belts that have
been subjected to stress in an accident must
be replaced and their anchoring points must
also be checked.
Only use seat belts which have been approved
by Mercedes-Benz.
Do not make any modifications to the seat
belts. This can lead to unintended activation
of the ETDs or to their failure to activate when
necessary.
Do not bleach or dye seat belts as this may
severely weaken them. In a crash they may
not be able to provide adequate protection.
Have all work carried out only by qualified
technicians. Contact an authorized
Mercedes-Benz Center.
Correct use of the seat beltsGWARNING
USE SEAT BELTS PROPERLY
R Seat belts can only work when used
properly. Never wear seat belts in any other
way than as described in this section, as
that could result in serious injuries in the
event of an accident.
R Each occupant should wear their seat belt
at all times, because seat belts help reduce
the likelihood of and potential severity of
injuries in accidents, including rollovers.
The integrated restraint system includes
SRS (driver front air bag, driver's side knee
bag, front-passenger front air bag, side
impact air bags, pelvis air bags, window
curtain air bags for the side windows),
Emergency Tensioning Devices, seat belt
force limiters, and front seat knee bolsters.
The system is designed to enhance the
protection offered to properly belted
occupants in certain frontal (front air bags,
driver's side knee bag and ETDs) and side
(side impact air bags, window curtain air
bags, and ETDs) impacts which exceed
preset deployment thresholds and in
certain rollovers (window curtain air bags
and ETDs).
R Never wear the shoulder belt under your
arm, across your neck or off your shoulder.
In a frontal crash, your body would move
too far forward. That would increase the
chance of head and neck injuries. The seat
belt would also apply too much force to the
52Occupant safetySafety
Page 94 of 396
Using the SmartKey
iThe SmartKey must be close to the
driver's door handle.
XPoint the tip of the SmartKey at the driver's
door handle.XPress and hold the & button until the
side windows and the sliding sunroof or the
panorama roof with power tilt/sliding
panel are fully closed.XMake sure that all the side windows and the
sliding sunroof or panorama roof with
power tilt/sliding panel are closed.
On vehicles with a panorama roof with power
tilt/sliding panel:
XPress and hold the & button again until
the roller sunblinds of the panorama roof
with power tilt/sliding panel close.XTo interrupt convenience closing:
release the & button.
Using KEYLESS-GO
The KEYLESS-GO key must be outside the
vehicle. All the doors must be closed.
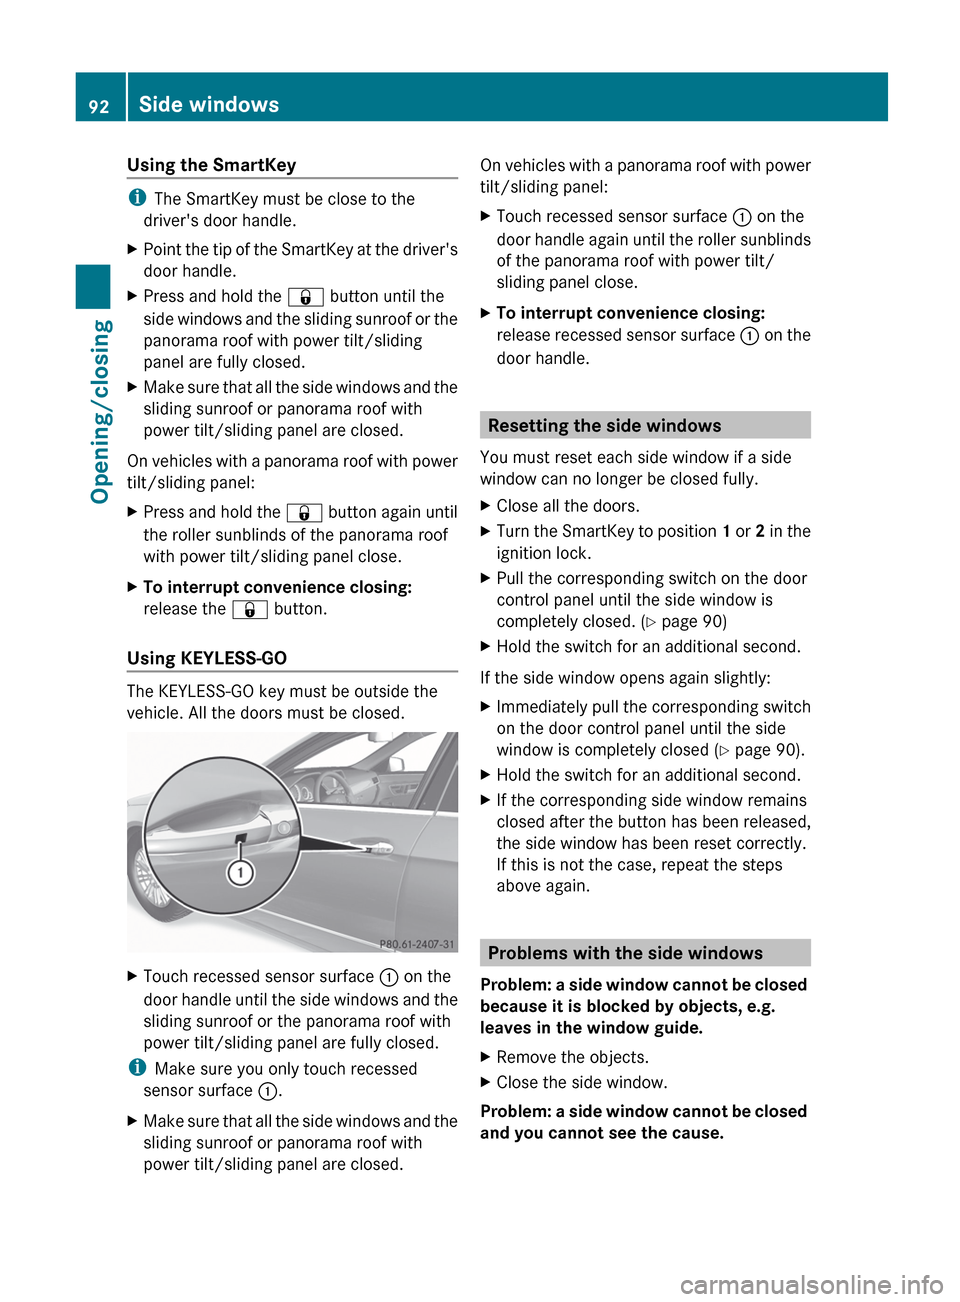
XTouch recessed sensor surface : on the
door handle until the side windows and the
sliding sunroof or the panorama roof with
power tilt/sliding panel are fully closed.
i Make sure you only touch recessed
sensor surface :.
XMake sure that all the side windows and the
sliding sunroof or panorama roof with
power tilt/sliding panel are closed.On vehicles with a panorama roof with power
tilt/sliding panel:XTouch recessed sensor surface : on the
door handle again until the roller sunblinds
of the panorama roof with power tilt/
sliding panel close.XTo interrupt convenience closing:
release recessed sensor surface : on the
door handle.
Resetting the side windows
You must reset each side window if a side
window can no longer be closed fully.
XClose all the doors.XTurn the SmartKey to position 1 or 2 in the
ignition lock.XPull the corresponding switch on the door
control panel until the side window is
completely closed. ( Y page 90)XHold the switch for an additional second.
If the side window opens again slightly:
XImmediately pull the corresponding switch
on the door control panel until the side
window is completely closed ( Y page 90).XHold the switch for an additional second.XIf the corresponding side window remains
closed after the button has been released,
the side window has been reset correctly.
If this is not the case, repeat the steps
above again.
Problems with the side windows
Problem: a side window cannot be closed
because it is blocked by objects, e.g.
leaves in the window guide.
XRemove the objects.XClose the side window.
Problem: a side window cannot be closed
and you cannot see the cause.
92Side windowsOpening/closing