ESP MERCEDES-BENZ E-Class WAGON 2011 S212 Comand Manual
[x] Cancel search | Manufacturer: MERCEDES-BENZ, Model Year: 2011, Model line: E-Class WAGON, Model: MERCEDES-BENZ E-Class WAGON 2011 S212Pages: 234, PDF Size: 8.64 MB
Page 184 of 234
If
different sortingrulesaredefined (e.g.in
iTu nes ®
), the search iscanceled without
any resul t. Playbac
koptio ns
The followi ng opti ons areavailab le:
R Nor mal TrackSeq uence Norm
altrack sequence: youh earthe
track sint heir normal order(e.g.numerical
or alpha betical).
R Random Medium All
the track sonthe medium areplay edin
random order.
R Random TrackList The
track sint he current lyactive category
or folder, including anysubfolders, are
play edinrandom order.
i For MP3 players, therandom playlists
offer amaximum of300 track schosen at
random.
X To selec taplayback option:select
Media Interface in
the basic displa yby
sliding VÆandturning cVdtheCOMAND
cont roller andpress Wtoconfirm .
The options listappea rs.The #dot
indicates theoption selected.
X Select anoption andpress Wtoconfirm . MP3
player instructions
Data forma ts MP3
andWMA aresupported asdata formats
with fixed andvariable bitrates (upto
320 kbits/s ).
Special considerationswhen using MP3
players Up
toeight directory levelswithupto1000
track sperdirectory aresupported.
Do not use USB exten sionleads oradapters.
They canimpair functionality. i
DRM (Digital RightsManagement)
protect edfiles arenot supported bythe
Media Interface. Audio
AUXmode Notes
onaudio AUXmode
If COMAND isequipped withaMedia
Interface, externalaudiosources are
located inthe stowage compartment inthe
center console.
i You willfind further information onlineat
<0012001800180019000F00320032001E001E001E00460014002900250017002A
002F00140027002900230020001B0046001F002700149.O rcall
the Merced es-BenzCustome rAssistance
Center at<0038004600440042004200460002000E00170046001400010017001C00240025
00240020V
(1-800-367-6372) (fortheUSA) or
Customer Relationsat1-800-387-0100
(for Canada). Activating
audioAUXmode
When youconnect anexternal audiosource,
audio AUXisnot selected automatically.
X Select Audio in
the main function barby
sliding ZVandturning cVdtheCOMAND
controller andpress Wtoconfirm.
If AUX mode wasthelast mode selected, it
will now beactive.
If another audiosource isswitched on,you
can now switch toaudio AUXmode inthe
audio menu.
X Select Audio using
ZVandpress Wto
confirm.
The audio menu appears. 182
Audio
AUXmodeAudioAnAUX socket isnot provided. The
You
canconn ectanextern alaudi osource
connections forthe Media Interface are
(AUX)
toCOMAND. Youwillfind the
connected usingthecorresponding cableset.
necessary
socketinthe cent erconsole
stowage compartment .
Page 185 of 234

X
Sel ect Aux us
ing cVd andpressW to
confi rm.
The audioA UX menu appe ars .The medium
in the extern alaudi osource isplay ed,ifthe
source isconn ected andplayback
selected. Please
seetherespective operating
instruct ionsforhow tooperate theextern al
audi osource.
You willfind details onvolume (Ypage 33)
and sound (Ypage 34)settin gsinthe "Ata
glance" section. G
WARNING
Ext ernal audiosources mayhave different
volumes, whichcanmean thatsystem
messages suchastraffic announcemen tsand
navigation systemannouncemen tsare much
louder. Ifnecessary, pleasedeactivate the
system messages oradjust theirvolume
manually . Increasing
thevolume usingCOMAND
In some cases, thevolume ofthe extern al
audi odevice maybequieter orlouder, orthe
usua lmaximum possible volumemaybe
lower. Onsome devices, itis possible to
adjust thevolume separately. Inthis case,
start atam edium volume andincrease it
gradua lly.This enables youtodetermine
whether thesystem isable toplay themusic
at high volume without distorting it. X
Select Volume in
the AUX displa ybyturning
cVd theCOMAND controller andpress
W toconfirm .
Am enu appears. The#dot indicat esthe
curren tsett ing. X
Select Standar d or
Boost and
press Wto
con firm.
Standar d :t
he volume ofthe extern alaudi o
source isadjusted toas tandard value.
Boost :t
he volume ofthe extern alaudi o
source israised byapproximately 10dB. Audio
AUXmode
183Audio Z
Page 192 of 234

X
Press Wthe COMAND controller toshow
the menu.
X Select DVD-Video by
turn ingcVd the
COMAND controller andpress Wto
conf irm.
X Select DVDFunctions and
press Wto
conf irm.
Am enu appears.
X Select Title Selecti on by
turn ingcVd
the COMAND controller andpress Wto
con firm. X
Select afilm/t itleand press Wtocon firm. Selecting
avideo DVD from them edia
list
X Press Wthe COMAN Dcontroller toshow
the men u.
X Selec tChan ger or
Medi a by
sliding VÆand
turn ingcVd theCOMAN Dcontroller and
press Wtocon firm .
The media listappears. The#dot
indic atesthecurr entmedium beingplayed.
Video DVDsareindic ated bythe ý icon.
X Equip pedwith aDVD changer :press W
the COMAN Dcontroller todisplay all
magazine trays.
X Select avideo DVD byturnin gcVd the
COMAND controller andpress Wto
conf irm.
COMAND loadsthevideo DVDandbegins
playi ngit. i
Ifyou select aCD,an audio DVDoran
MP3 medium, youswitch tothe respect ive
audio mode. Youcanfind further
information aboutthemedia liston
(Y page 159). DVD
menu
Calling upthe DVD menu The
DVD menu isthe menu stored onthe DVD
itself. Itis struct uredinvarious ways
according tothe individual DVDandpermits
cert ainactions andsettings.
In the case ofmulti-language DVDs,for
example, youcan change theDVD language
in the DVD menu.
X In full-screen mode,pressWthe COMAND
cont roller toshow themenu.
X Select DVD-Video in
the menu byturnin g
cVd theCOMAND controller andpress
W toconf irm.
X Select DVDFunctions and
press Wto
conf irm.
X Select Menu and
press Wtoconf irm.
The DVD menu appears.
Selecting menuitemsinthe DVD menu X
Select amenu item bysliding ZVÆor
turnin gXVY theCOMAND controller and
press Wtoconf irm.
The menu appears.
i Menu itemswhich cannotbe selected are
shown ingray. 190
Video
DVDmodeVideo
Page 193 of 234

X
To rec onfirm your selecti on:confi rm
Sel ect by
pre ssing W.
CO MAND execute sthe acti on.
Ma keaselecti onfrom thefurthe roption s,
if nec essary.
COMAND thenswitc hesback tothe DVD
menu.
i Depen dingonthe DVD ,the menu items:
Back (tomovie) ,
Play ,
Stop ,
., /orGo Up may
not
func tion ormay notfunc tion atcert ain
point sint he DVD menu. Toindicat ethis,
the Kicon appears inthe display.
Moving upone level inthe DVD menu X
Select thecorr espondin gmenu item inthe
DVD menu andpress Wthe COMAND
con troller tocon firm.
or
X Select anymenu iteminthe DVD menu and
press Wthe COMAND controller to
con firm.
X Select GoUp and
press Wtocon firm.
Back tothe film X
Press the% backbuttonrepeatedly
until youseethemovie.
or
X Select thecorr espondin gmenu item from
the DVD menu.
X Select theBack (to movie) menu
itemin
the menu andpress Wtocon firm. Sett
ingthe langua geand audio
form at
This function isnot available onallDVD s.Ifit
is available, youcan setthe DVD menu
language, theaudio language orthe audio
form at.The number ofsett ings isdeter mined
by the DVD content.Itis possible thatthe
sett ings may alsobeaccess edinthe DVD
menu (Ypage 190). X
In full-sc reenmode, pressWthe COMAND
con troller toshow themenu.
X Select DVD-Vi deo in
the menu byturn ing
cVd theCOMAND controller and press
W tocon firm.
X Select DVDFuncti ons and
press Wto
con firm.
X Select MenuLangua ge or
Audio Langua
ge and
press Wtocon firm.
In both cases, amenu appears afterafew
secon ds.The #dot infron tofane ntry
indicat esthe curren tlyselect edlanguage.
X Select asetting byturn ingcVd the
COMAND controller and press Wto
con firm. Subt
itles andcamer aangle
These functionsarenot available onallDVD s.
The number ofsubtit lelanguages andcamera
angles available dependsonthe contentof
the DVD. Itis po ssi blet hatthe settin gsmay
also beaccessed inthe DVD menu
(Y page 190).
X In full-screen mode,pressWthe COMAND
cont roller toshow themenu.
X Select DVD-Video in
the menu byturning
cVd theCOMAND controller andpress
W toconfirm .
X Select DVDFunctions and
press Wto
confirm .
X Select Subtitles or
Camera Angle and
press Wtoconfirm .
In both cases, amenu appea rs.The #dot
in front ofan entr yindicates thecurrent
settin g.
X Select asettin gbyturning cVdthe
COMAND controller andpress Wto
confirm . Video
DVDmode
191Video Z
Page 194 of 234

Int
era ctive cont ent
DV Ds can contain interac tive conten t(e.g. a
vide ogame ).In av ide og ame ,for example ,
you may beable toinfluen ceeve ntsb y
sele cting and trigge ringa ction s.The typeand
num berofact ionsdepe ndontheD VD.
X Se lec tana ction bysliding ZVÆ orXVY the
CO MAND controllera nd pre ssW to
exe cute it.
Am enu appe arsa nd the first entry ,
Sel ect ,i
sh ighl ighted .
X Pre ssW the COMAND controller. AU
Xv ideo mode Co
nnectin ge xtern alvideo source s
If yo ur veh iclei se quippe dwithaM edia
Inter face (Y pa ge 178) ,you can conne ctan
exte rnalvideo sou rce (AUXvideo).
The 1/8inch audio/vi deoj ack sareinthe
cen terc onsole stowage compartment.
i Invehicles witharear view camera, the
AUX video jackcann otbe used forexter nal
video sources. Switching
toAUX video mode
X Select Video in
the main functionbar by
sliding ZVandturnin gcVd theCOMAND
cont roller andpress Wtoconf irm.
If AUX video mode wasthelast mode
selected, itwill now beactive.
If another videosource isswitched on,you
can now switch toAUX video mode inthe
video menu.
X Select Video and
press Wtoconf irm.
X Select Aux and
press Wtoconf irm.
The AUX video menu appears. Youwillhear
and seethecont entofthe exter nalvideo
source ifit is conn ected andswitched to
playb ack. AUX
video mode
For details onhow tooperate theexter nal
video source, seetherespect ivedevice's
operating instructions. Showing/hiding
themenu
X To show: pressWthe COMAND
cont roller.
X To hide: slideZVtheCOMAND controller
and conf irmFull Screen by
pressing W. Volume
andsound settings
You willfind details onvolume (Ypage 33)
and sound (Ypage 34)settings inthe "Ata
glance" section. G
WARNIN
G
Ext ernal video sources mayhave different
volumes, whichcanmean thatsystem
messages suchastraffic announc ementsand
navigation systemannounc ementsaremuch
louder. Ifnecessary, pleasedeactivate the
system messages oradjust theirvolume
manually.
i Itmay bethe case thatadevice which is
conn ected asan exter nalvideo source
seems quieter orlouder inthe vehicle, or
that theusual maximum volumecannotbe
reached. Onsome devices, itis possible to
adjust thevolume separately. Inthis case,
start atam edium volume andincrease it
graduall y.This enables youtodetermin e 192
AUX
video modeVideo
Page 202 of 234
the
dailyf oreca stissho wn, brieflyp ress a
num berk ey, such asl.
The weather dataofthe select edarea is
shown. Weat
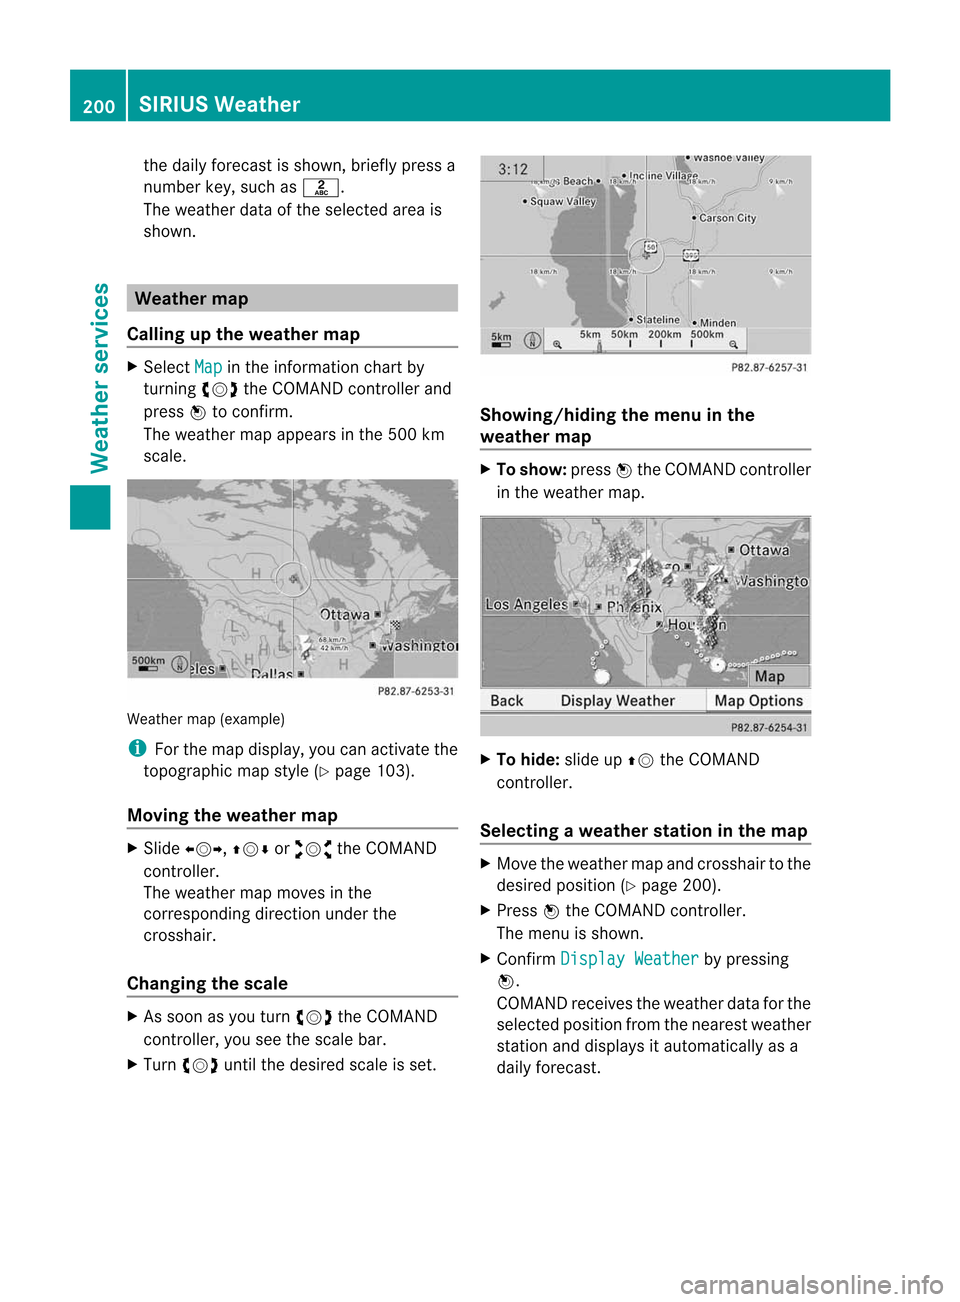
hermap
Calling upthe weather map X
Select Map in
the infor mation chartby
turn ingcVd theCOMAND controller and
press Wtocon firm.
The weather mapappears inthe 500 km
scale. Weather
map(example)
i For themap display, youcan activat ethe
topogr aphicmapstyle (Ypage 103).
Moving theweather map X
Slide XVY, ZVÆoraVb theCOMAND
con troller.
The weather mapmoves inthe
corr espondin gdirect ionunder the
cross hair.
Changing thescale X
As soon asyou turn cVd theCOMAND
con troller, youseethescale bar.
X Turn cVd untilthedesired scaleisset. Showing/hiding
themenu inthe
weather map X
To show: pressWthe COMAND controller
in the weather map. X
To hide: slideupZV theCOMAND
con troller .
Selecting aweather stationinthe map X
Move theweather mapandcross hairtothe
desired position (Y page 200).
X Press Wthe COMAND controller.
The menu isshown.
X Confirm Display Weather by
pressing
W.
COMAND receivestheweather dataforthe
select edposition fromthenearest weather
stat ionand displays itautomatic allyasa
daily forecast. 200
SIRIUS
WeatherWeat
herservices
Page 207 of 234
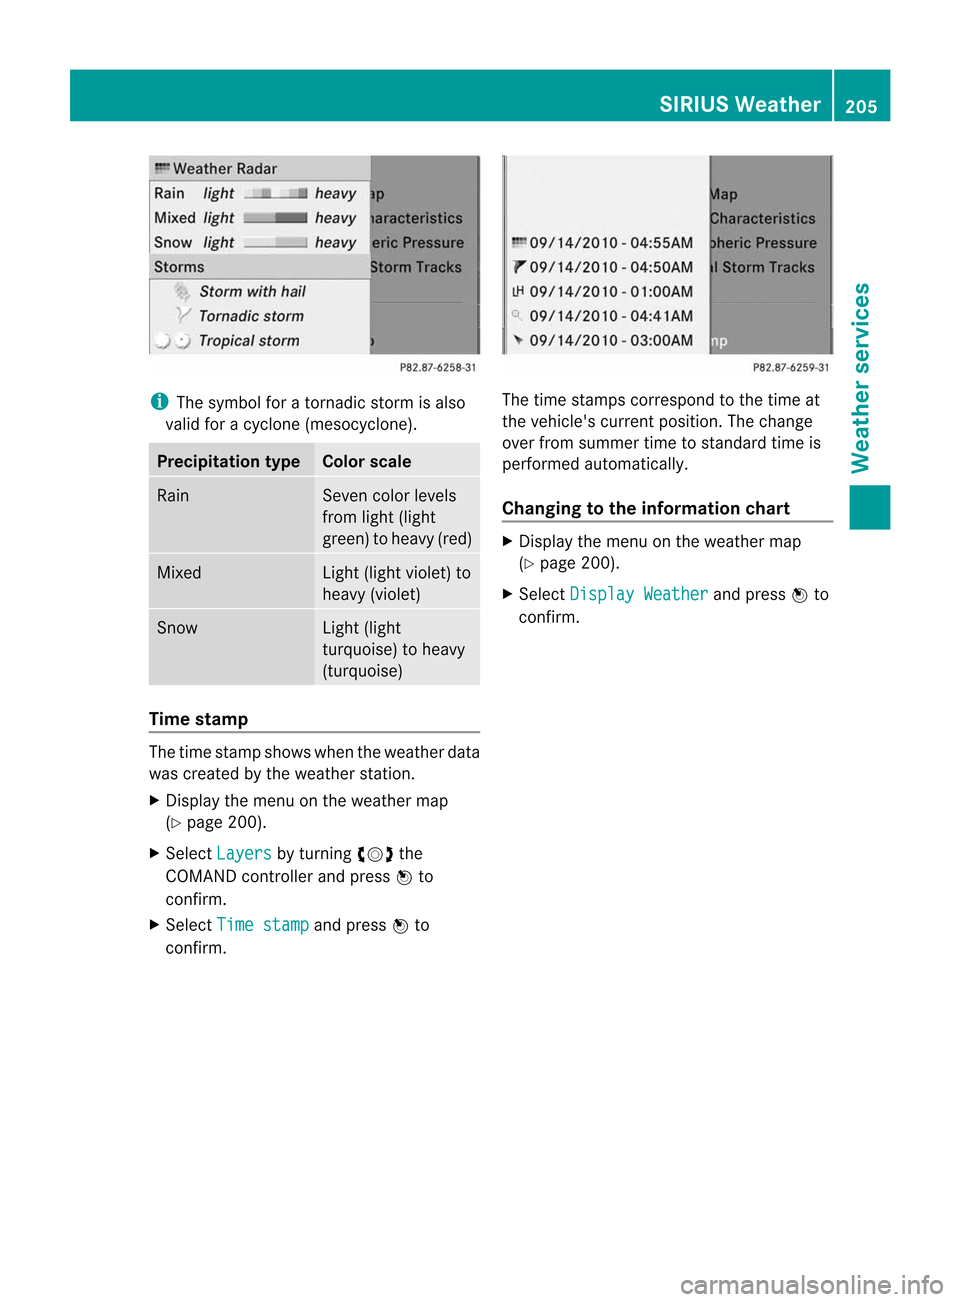
i
The symbol foratorn adic storm isalso
valid foracyclone (mesocyclone). Precipita
tiontype Color
scale Rain Seven
colorlevels
from light(light
green) toheavy (red) Mixed Light
(light violet) to
heavy (violet) Snow Light
(light
turquoise) toheavy
(turquoise) Time
stamp The
time stamp shows whentheweather data
was created bythe weather station.
X Display themenu onthe weather map
(Y page 200).
X Select Layers by
turnin gcVd the
COMAND controller andpress Wto
conf irm.
X Select Timestamp and
press Wto
conf irm. The
time stamps correspon dtothe time at
the vehicle's currentposition. Thechange
over from summer timetostandard timeis
performed automatically.
Changing tothe informa tionchart X
Display themenu onthe weather map
(Y page 200).
X Select Display Weather and
press Wto
conf irm. SIRIUS
Weather
205Weather services
Page 212 of 234
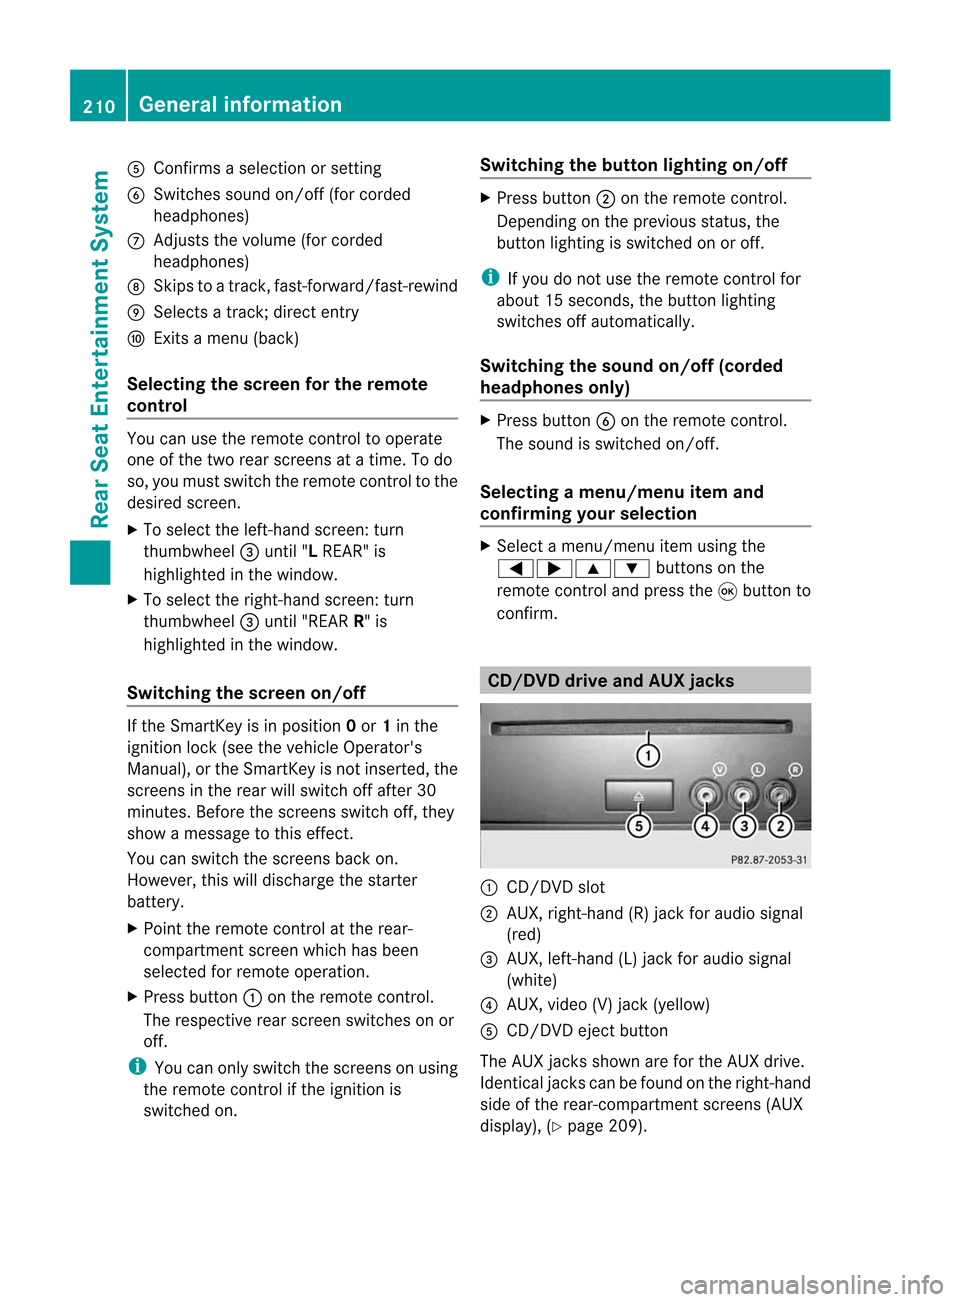
A
Con firms asele ction orset ting
B Swit ches soun don/off( forc orded
headphones)
C Adjust sthe volume (forcorded
headphones)
D Skips toatrack, fast-forwa rd/fast-rew ind
E Selects atrack; directentry
F Exits amenu (back)
Sel ecting thescre enfor the remote
co ntrol You
canusetheremote controltoopera te
one ofthe two rear screens atat ime. Todo
so, you must switch the remote controltothe
desi redscreen.
X To sele ctthe left-hand screen:turn
thumbw heel=until "LREAR" is
high lighted inthe windo w.
X To sele ctthe right-hand screen:turn
thumbw heel=until "REAR R"is
high lighted inthe windo w.
Swi tching thescre enon/ off If
the SmartKey isin posi tion 0or 1in the
ignitio nlock (see thevehicle Operator's
Manual), orthe Smart Keyisnot insert ed,the
screen sint he rear willswitch offafter 30
minutes. Beforethescreen sswitch off,they
show amessage tothis effect .
You canswitch thescreen sback on.
How ever,this will disc harg ethe start er
bat tery.
X Poin tthe rem otec ontro latthe rear -
co mpar tments cree nwhich hasbeen
selected forremote operation.
X Press button :onthe remote control.
The respective rearscreen switches onor
off.
i You canonly switch thescreens onusing
the remote controlifthe ignition is
switched on. Switching
thebutt onlighting on/off X
Press button ;onthe remote control.
Depending onthe previous status,the
button lighting isswitched onoroff.
i Ifyou donot use theremote controlfor
about 15seconds, thebutton lighting
switches offautomatically .
Switching thesound on/off(corded
headph onesonly) X
Press button Bonthe remote control.
The sound isswitched on/off.
Selec tingamenu/m enuitem and
confir mingyour select ion X
Sele ctam enu/m enuitemu singthe
=;9 :buttonso nthe
rem otec ontrol and pres sthe 9 butt onto
con firm. CD/DVD
drive and AUX jacks :
CD/ DVDs lot
; AUX,righ t-han d(R) jac kfor audio signal
(red)
= AUX, left-hand (L)jack foraudio signal
(white)
? AUX, video (V)jack (yellow )
A CD/D VDeject button
The AUX jacksshown areforthe AUX drive.
Ident icaljack scan be found onthe right- hand
side ofthe rear-com partmentscreen s(AUX
display ),(Y page 209). 210
General
informationRear
Seat
Entert ainment System
Page 214 of 234
LED
disp lay St
atus Green The
batteries arefine. Red The
batteries arealmos t
disc harge d. Lit
con tinuous
ly The
headph onesareswit ched
on and connected toas cree n. Fla
shing The
headph ones are
sea rchi ngfor the connecti on
to as cree n. No
displ ay
(d ark) The
headph ones areswitched
off orthe batterie sare
di scha rged. Co
nne cting additi onalheadpho nes You
canconnect oneadditiona lset ofcord ed
hea dph ones toeach ofthe two rearscree ns
(Y page 209). Thesocke tisd esigned for
headphones witha3.5mm stereo jackplug
and animpedance of32 ohms. Changing
batteries
Notes Batteries
arerequired forthe remote control
and forthe two sets ofcordless headphones. G
WARNING
Keep thebatteries outofthe reach of
children. Consultadoctor immediately ifa
child should swallowabattery.
Do not dismantle, short-circuitorburn a
battery. H
Environmental
note
Dispose ofdischarged batteriesinan
environment allyresponsible manner. On
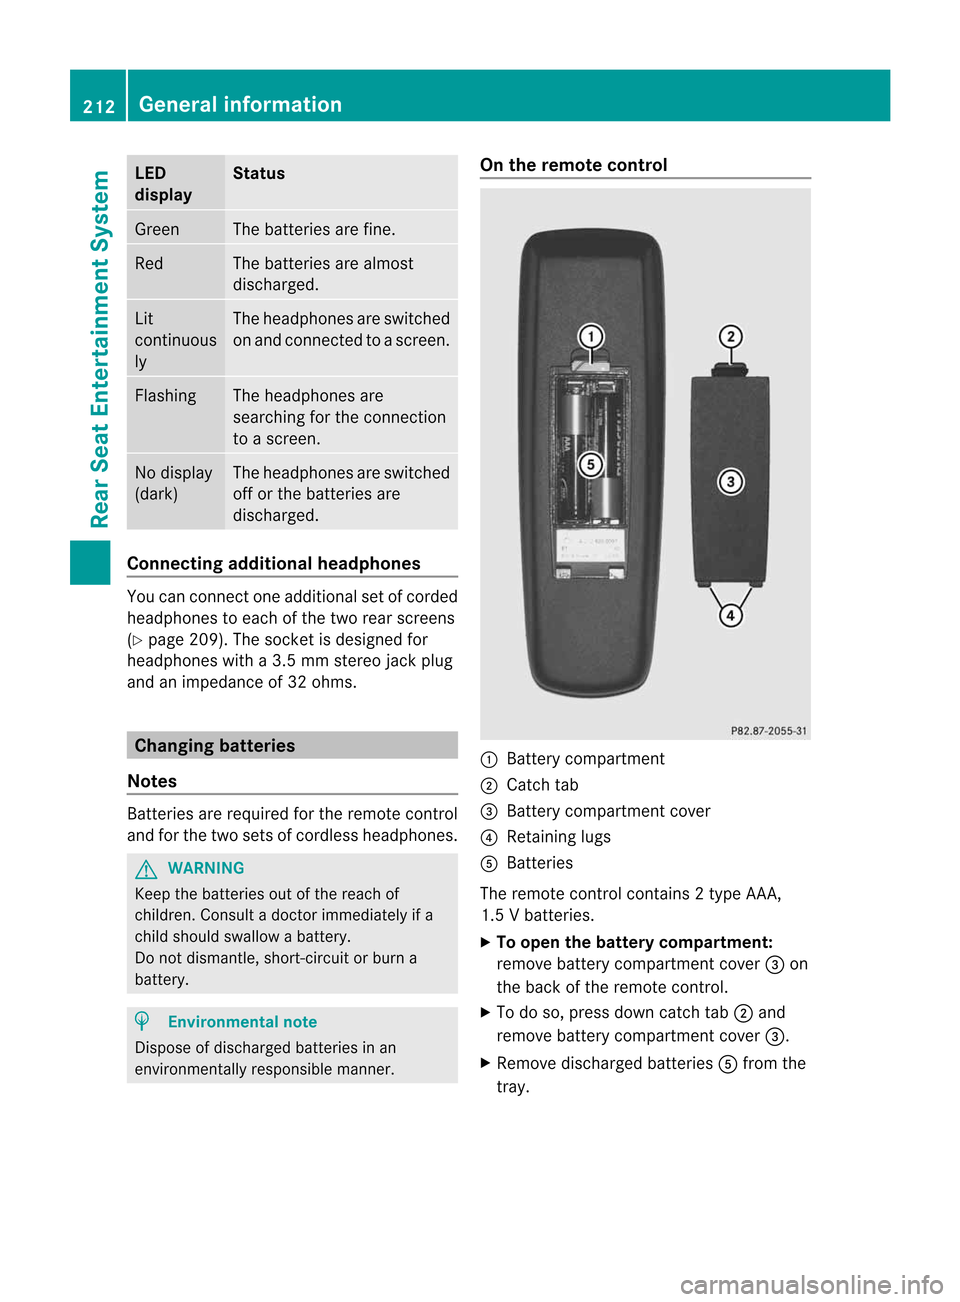
the remote control :
Battery compartment
; Catch tab
= Battery compartment cover
? Retaining lugs
A Batteries
The remote controlcont ains 2type AAA ,
1.5 Vbatteries.
X To open thebatter ycompart ment:
remove batterycompartment cover=on
the back ofthe remote control.
X To do so, press downcatch tab;and
remove batterycompartment cover=.
X Remove discharged batteriesAfrom the
tray. 212
General
informat ionRear
Seat
Entertainment System
Page 215 of 234

X
Insert thenew batteries. Observethe
pola ritymarkings onthe batteries and
battery compartment whendoing so.
Left-hand battery:thepositive pole(+)
must faceupwards.
Rig ht-hand battery: thepositive pole(+)
must facedownwa rds.
X To clo sethe battery compartment:
insert battery compartment cover=
starting withretaining lugs? into the
battery compartment andallow catch
tab ;toengage inpla ce.
On the cordle ssheadphones The
battery compartment coverislocated on
the left head phone. :
Battery compartment cover
The cordless headphones contain 2type AAA,
1. 5Vb atte rie s.
X To ope nthe bat tery com partme nt:fli p
bat tery compar tmentc over : upwar ds.
As you doso, holdthe left-han dside ofthe
head phonesa sshown topre ven tthe
batteries fromfalling out.
X Remove thedischarged batteriesfromthe
tray.
X Insert thenew batteries. Observethe
polarity markings onthe batteries and
battery compartmen twhen doing so.
Left- hand battery: thepositive pole(+)
must faceupwa rds. Right-hand
battery:thepositive pole(+)
must facedownwards.
X To close thebatt erycompart ment:
press battery compartmen tcover
downwards untilitengages intoplace.
If the batteries havebeen inserted
correct ly,the indicator lampwilllight up
green whentheheadphones areswitched
on. Basic
functions Using
headph ones
You canusethecordless headphones
suppli edand/or uptotwo sets ofcorded
headphones connected tothe corresponding
jack ofthe rear-compart mentscreens
(Y page 209).
Inform ationon:
R switching thecordless headphones on/off
R adjusting thevolume ofthe headphones
R selecting ascreen forthe headphones
can befound inthe Cordless headphones
section (Ypage 211). Using
themain loudspeakers
This funct ionisavaila bleinconj unction with
COMAND.
You canusethevehicle loudspea kersto
listen toad isc inserted inthe rear-
compartmen tdrive. Todo so, atlea stone of
the rear-compa rtmentscreens mustbeset to
disc mode.
X To set using COMA ND:press, for
exampl e,the $ function buttonto
swi tch onanaudio mode.
X Select Audio by
sliding ZVtheCOMAND
controller andpress Wtoconfirm.
The Audi omenu appears.
X Select RearAudio by
turning cVdthe
COMAND controller andpress Wto
confirm. Basic
functio ns
213Rear SeatEntertainment System Z