fuel cap MERCEDES-BENZ E350 4MATIC 2011 W212 Owner's Manual
[x] Cancel search | Manufacturer: MERCEDES-BENZ, Model Year: 2011, Model line: E350 4MATIC, Model: MERCEDES-BENZ E350 4MATIC 2011 W212Pages: 400, PDF Size: 16.3 MB
Page 11 of 400
Emergency releaseFuel filler flap ................................. 164
Trunk ......................................... 90, 91
Vehicle ....................................... 85, 86
Emergency running mode
Automatic transmission .................162
Emergency spare wheel
Storage location ............................ 325
Stowing .......................................... 326
Emergency tensioning device
Function ........................................... 57
Safety guidelines ............................. 37
Emergency unlocking
Tailgate ............................................ 91
Emissions purification
Service and warranty information ....20
Engine
Irregular running ............................ 153
Starting problems ..........................153
Starting the engine with the key ....151
Starting with KEYLESS-GO .............151
Switching off .................................. 170
Warning lamp Check Engine ..........268
Engine electronics
Malfunction .................................... 153
Engine number .................................. 386
Engine oil Adding ........................................... 310
Checking the oil level ..................... 309
Display message ............................ 248
Lubricant additives ........................391
Notes about oil grades ................... 391
Temperature (on-board computer) . 221
Viscosity ........................................ 391
ESC (Electronic Stability Control)
see ESP ®
ESP ®
(Electronic Stability
Program) Activating/deactivating (AMG
vehicles) .......................................... 70
Activating/deactivating (except
AMG vehicles) .................................. 68
Activating/deactivating (on-
board computer) ............................ 228
AMG menu (on-board computer) ...221
Display message ............................ 235
ETS/4ETS ........................................ 68Important safety information ...........67
Warning lamp ................................. 265
ETS/4ETS (Electronic Traction
System) ................................................ 68
Exhaust check ................................... 172
Exhaust tail pipe (cleaning
instructions) ...................................... 318
Exterior lighting see Lights
Exterior mirrors
Adjusting ....................................... 113
Dipping (automatic) .......................114
Out of position ............................... 114
Storing settings (memory
function) ........................................ 115
Storing the parking position ..........114
Exterior view ........................................ 26
F
First-aid kit ......................................... 323
Flat tire Changing a wheel/mounting the
spare wheel ................................... 331
MOExtended run-flat system .........337
Preparing the vehicle .....................326
Raising the vehicle .........................333
TIREFIT kit ...................................... 327
Floormat ............................................. 304
Folding bench seat (cargo
compartment) .................................... 108
Front fog lamp (display message) ... 244
Fuel Additives ........................................ 389
Notes ............................................. 388
Premium-grade unleaded gasoline . 388
Refueling ........................................ 162
Specifications ................................ 388
Troubleshooting ............................. 166
Fuel consumption
Current (on-board computer) .........220
Notes ............................................. 172
Fuel filler cap (display message) ..... 249
Fuel filler flap Emergency release ........................164
Opening/closing ............................ 164
Fuel filter (display message) ............ 249
Index9BA 212 USA, CA Edition B 2011; 1; 5, en-USdimargiVersion: 3.0.3.62010-05-20T13:33:46+02:00 - Seite 9
Page 17 of 400
Service interval display .................... 313
Displaying a service message (on-
board computer) ............................ 313
Service menu (on-board computer) . 229
Service products
AdBlue ®
special additives ..............390
Brake fluid ..................................... 392
Capacities ...................................... 387
Coolant (engine) ............................ 392
Engine oil ....................................... 391
Fuel ................................................ 388
Important safety notes ..................386
Notes ............................................. 386
Refrigerant (air-conditioning
system) .......................................... 392
Washer fluid ................................... 393
Settings
Factory (on-board computer) .........233
On-board computer .......................229
SETUP (on-board computer) ............. 221
Shift ranges ....................................... 159
Showing the distance display (on-
board computer) ............................... 227
Side impact air bag ............................. 41
Side marker lamp (display
message) ............................................ 245
Side windows Convenience closing feature ............93
Convenience opening feature ..........93
Important safety information ...........91
Opening/closing .............................. 92
Resetting ......................................... 94
Troubleshooting ............................... 94
Skibag ................................................ 276
Sliding sunroof Important safety information ...........95
Troubleshooting ............................... 99
see Panorama roof with power
tilt/sliding panel
see Tilt/sliding sunroof
SmartKey
Changing the battery .......................80
Changing the programming .............79
Checking the battery .................76, 80
Convenience closing feature ............93
Convenience opening feature ..........93
Display message ............................ 260Important safety notes ....................76
Malfunction ...................................... 82
Starting the engine ........................151
Snow chains ...................................... 176
Socket ................................................ 292
Dashboard ..................................... 293
Rear compartment .........................293
SOS
see mbrace
Spare wheel
Notes/data .................................... 380
Storage location ............................ 325
Stowing .......................................... 326
see Emergency spare wheel
Speedometer
Additional speedometer (on-
board computer) ............................ 220
Segments ...................................... 217
Setting the unit (on-board
computer) ...................................... 229
SPORT handling mode
Activating/deactivating (AMG
vehicles) .......................................... 69
Warning lamp ................................. 266
SRS (Supplemental Restraint
System) Display message ............................ 237
Introduction ..................................... 36
Warning lamp ................................. 267
Warning lamp (function) ................... 36
Standard display (on-board
computer) .......................................... 220
Starting the engine Important safety notes ..................151
Station
see Radio
Steering (display message) .............. 260
Steering wheel Adjusting (electrically) ...................111
Buttons (on-board computer) ......... 217
Cleaning ......................................... 319
Important safety notes ..................111
Memory function (storing
settings) ......................................... 111
Steering wheel heating ..................112
Storing settings (memory
function) ........................................ 115Index15BA 212 USA, CA Edition B 2011; 1; 5, en-USdimargiVersion: 3.0.3.62010-05-20T13:33:46+02:00 - Seite 15
Page 166 of 400
Refueling
Fuel filler flap
The fuel filler flap is unlocked or locked
automatically when you open or close the
vehicle with the SmartKey or using KEYLESS-
GO.
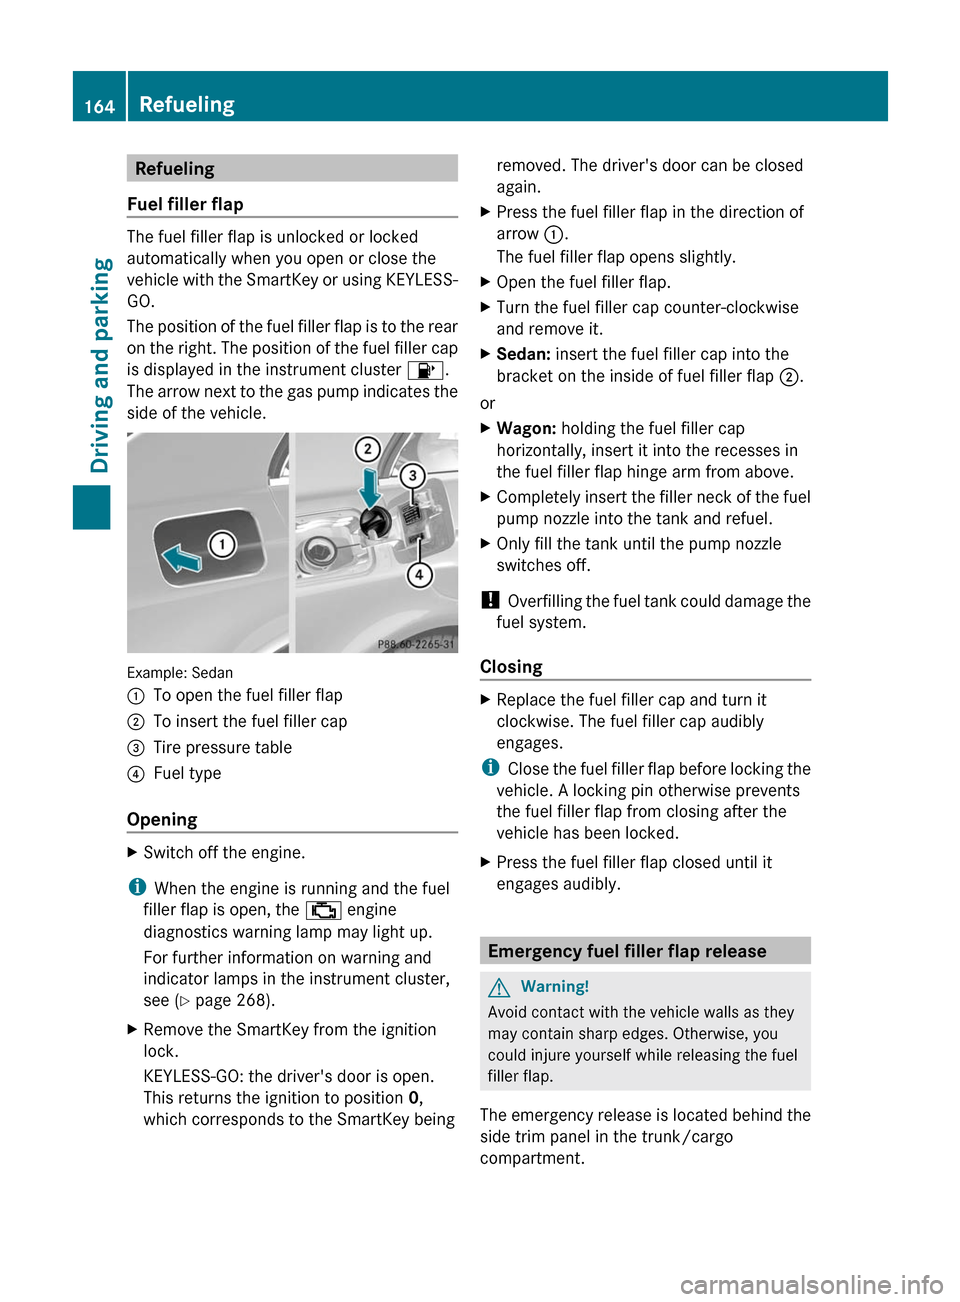
The position of the fuel filler flap is to the rear
on the right. The position of the fuel filler cap
is displayed in the instrument cluster 8.
The arrow next to the gas pump indicates the
side of the vehicle.
Example: Sedan
:To open the fuel filler flap;To insert the fuel filler cap=Tire pressure table?Fuel type
Opening
XSwitch off the engine.
iWhen the engine is running and the fuel
filler flap is open, the ; engine
diagnostics warning lamp may light up.
For further information on warning and
indicator lamps in the instrument cluster,
see (Y page 268).
XRemove the SmartKey from the ignition
lock.
KEYLESS-GO: the driver's door is open.
This returns the ignition to position 0,
which corresponds to the SmartKey being
removed. The driver's door can be closed
again.
XPress the fuel filler flap in the direction of
arrow :.
The fuel filler flap opens slightly.
XOpen the fuel filler flap.XTurn the fuel filler cap counter-clockwise
and remove it.
XSedan: insert the fuel filler cap into the
bracket on the inside of fuel filler flap ;.
or
XWagon: holding the fuel filler cap
horizontally, insert it into the recesses in
the fuel filler flap hinge arm from above.
XCompletely insert the filler neck of the fuel
pump nozzle into the tank and refuel.
XOnly fill the tank until the pump nozzle
switches off.
! Overfilling the fuel tank could damage the
fuel system.
Closing
XReplace the fuel filler cap and turn it
clockwise. The fuel filler cap audibly
engages.
iClose the fuel filler flap before locking the
vehicle. A locking pin otherwise prevents
the fuel filler flap from closing after the
vehicle has been locked.
XPress the fuel filler flap closed until it
engages audibly.
Emergency fuel filler flap release
GWarning!
Avoid contact with the vehicle walls as they
may contain sharp edges. Otherwise, you
could injure yourself while releasing the fuel
filler flap.
The emergency release is located behind the
side trim panel in the trunk/cargo
compartment.
164RefuelingDriving and parking
BA 212 USA, CA Edition B 2011; 1; 5, en-USdimargiVersion: 3.0.3.62010-05-20T13:33:46+02:00 - Seite 164
Page 170 of 400
specialist workshop, e.g. an authorized
Mercedes-Benz Center.
Use the special AdBlue ®
refill bottle when
adding between maintenance intervals. For
more information, please contact an
authorized Mercedes-Benz Center or
Roadside Assistance if applicable
( Y page 21).
Further information about BlueTEC exhaust
gas aftertreatment and AdBlue ®
is available
at any authorized Mercedes-Benz Center.
Adding AdBlue ®GWarning!
Make sure
R AdBlue ®
does not come into contact with
skin, eyes, or clothing
R to keep AdBlue ®
out of the reach of children
If you and/or others have come into contact
with AdBlue ®
:
R If AdBlue ®
has gotten into contact with
eyes, flush with plenty of water immediately
and seek medical help.
R Clean affected skin immediately with plenty
of water.
R If AdBlue ®
was swallowed, rinse mouth
immediately with plenty of water and drink
plenty of water. Consult a physician.
GWarning!
When opening the filler cap of the AdBlue ®
tank ammonia gas vapors may escape. Refill
AdBlue ®
in a well ventilated area only.
Ammonia gas vapors have a pungent odor and
are particularly irritating for your skin,
mucous membranes, and eyes. Inhaling
ammonia gas vapors will cause burning eyes,
nose, and throat, as well as coughing and
watering eyes.
! Only use AdBlue ®
that complies with
ISO 22241. Do not add any special
additives to AdBlue ®
and do not thin
AdBlue ®
with water. This could destroy the
BlueTEC exhaust gas aftertreatment.
! Rinse surfaces that have come into
contact with AdBlue ®
immediately with
water or remove AdBlue ®
using a damp
cloth and cold water. If the AdBlue ®
has
already crystallized, use a sponge and cold
water to clean it. AdBlue ®
residues
crystallize after time and contaminate the
affected surfaces.
! AdBlue ®
is not a additive and must not be
added to the diesel tank. If AdBlue ®
is
added to the diesel tank this could damage
the engine.
i If you are adding between maintenance
intervals, add approximately 1 gallon (3.8 l)
of AdBlue ®
to the AdBlue ®
tank. 1 gallon
(3.8 l) of AdBlue ®
is approximately
2 AdBlue ®
refill bottles.
Further information about
AdBlue ®
(Y page 390).
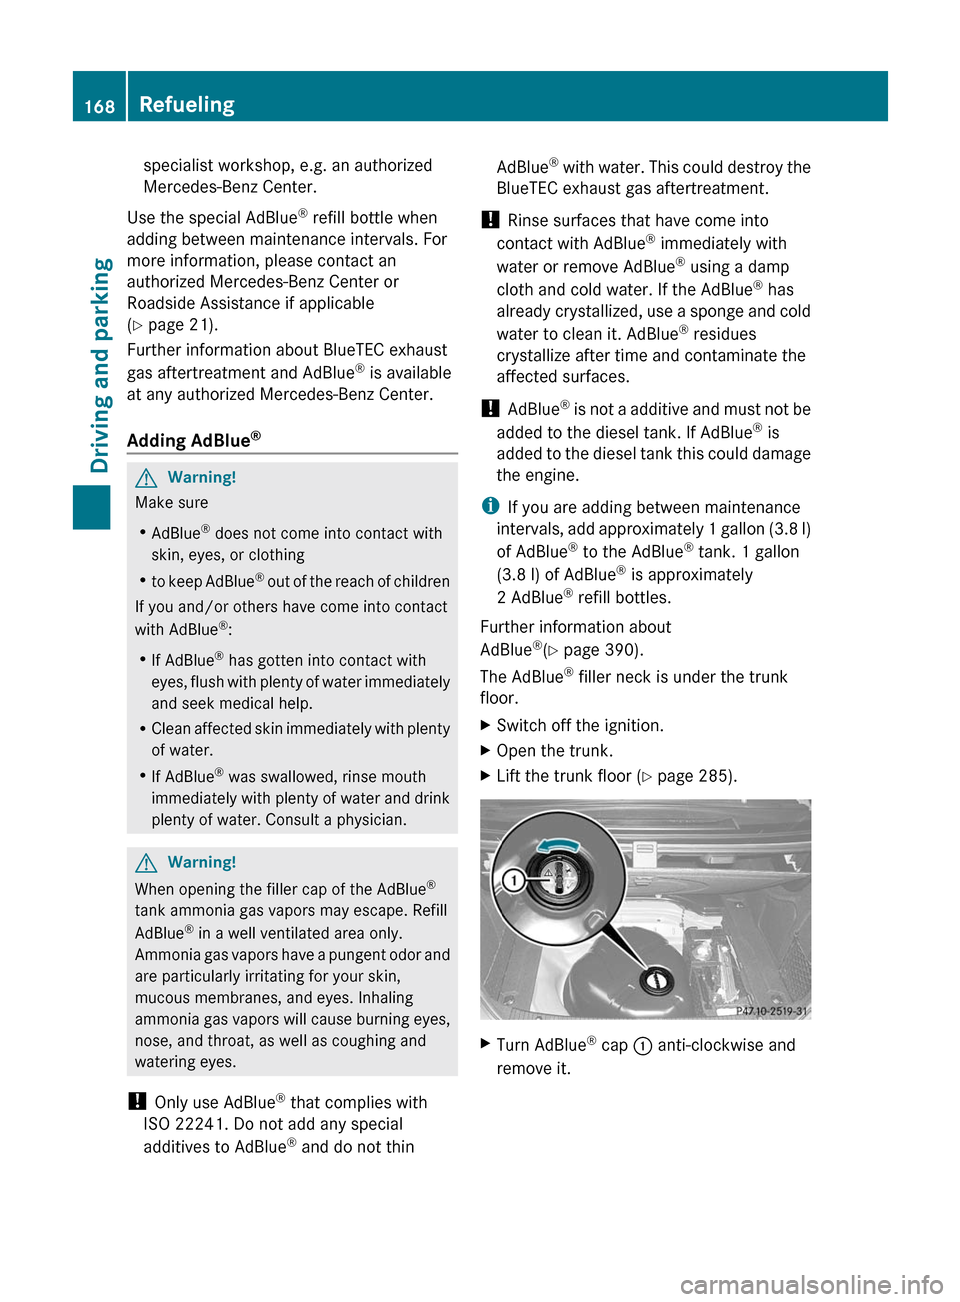
The AdBlue ®
filler neck is under the trunk
floor.XSwitch off the ignition.XOpen the trunk.XLift the trunk floor ( Y page 285).XTurn AdBlue ®
cap : anti-clockwise and
remove it.168RefuelingDriving and parking
BA 212 USA, CA Edition B 2011; 1; 5, en-USdimargiVersion: 3.0.3.62010-05-20T13:33:46+02:00 - Seite 168
Page 251 of 400
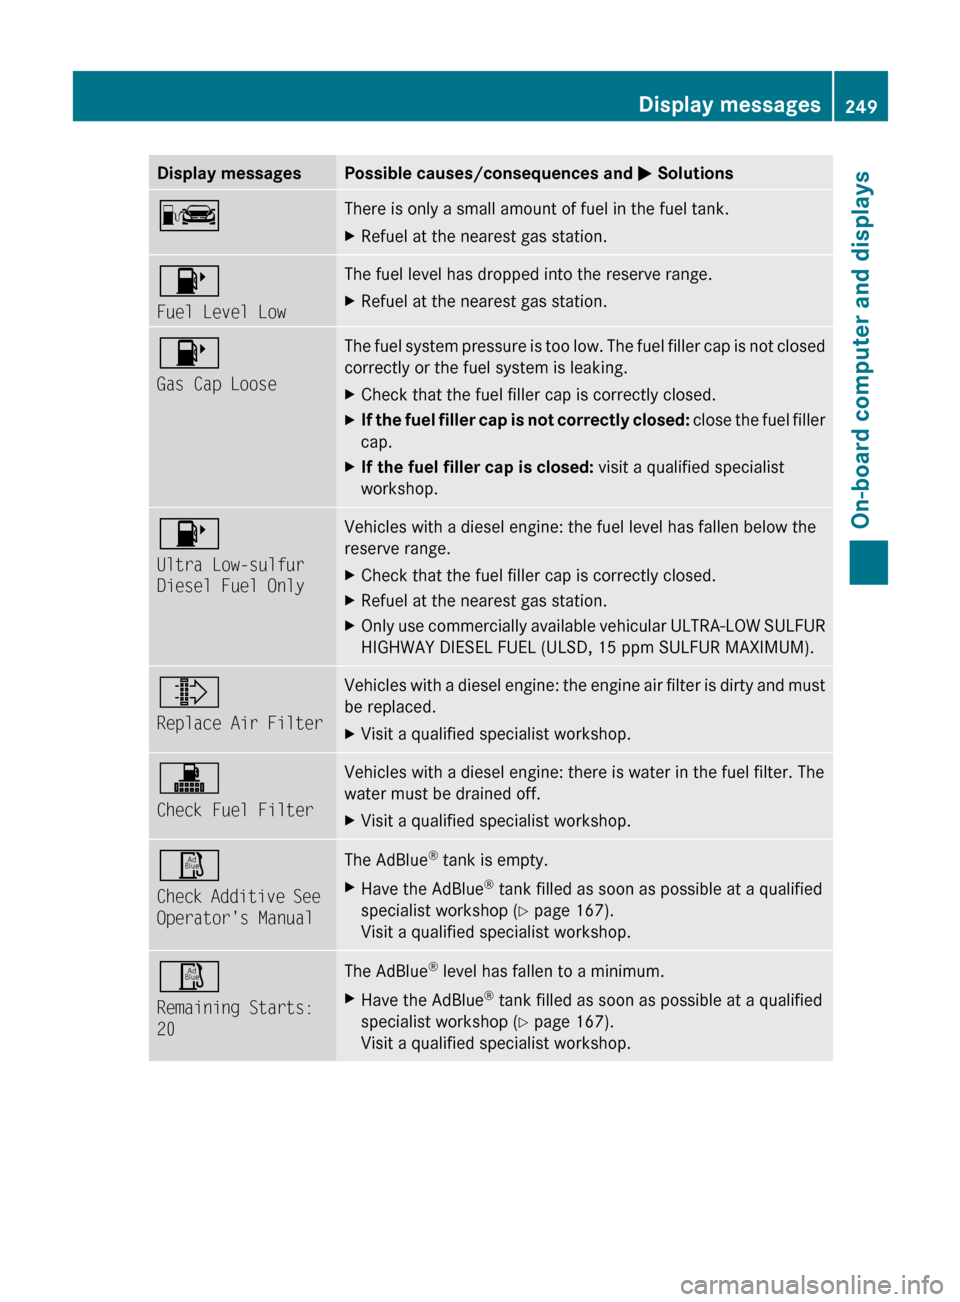
Display messagesPossible causes/consequences and M SolutionsCThere is only a small amount of fuel in the fuel tank.XRefuel at the nearest gas station.8
Fuel Level LowThe fuel level has dropped into the reserve range.XRefuel at the nearest gas station.8
Gas Cap LooseThe fuel system pressure is too low. The fuel filler cap is not closed
correctly or the fuel system is leaking.XCheck that the fuel filler cap is correctly closed.XIf the fuel filler cap is not correctly closed: close the fuel filler
cap.XIf the fuel filler cap is closed: visit a qualified specialist
workshop.8
Ultra Low-sulfur
Diesel Fuel OnlyVehicles with a diesel engine: the fuel level has fallen below the
reserve range.XCheck that the fuel filler cap is correctly closed.XRefuel at the nearest gas station.XOnly use commercially available vehicular ULTRA-LOW SULFUR
HIGHWAY DIESEL FUEL (ULSD, 15 ppm SULFUR MAXIMUM).¸
Replace Air FilterVehicles with a diesel engine: the engine air filter is dirty and must
be replaced. XVisit a qualified specialist workshop.!
Check Fuel FilterVehicles with a diesel engine: there is water in the fuel filter. The
water must be drained off. XVisit a qualified specialist workshop.Ø
Check Additive See
Operator's ManualThe AdBlue ®
tank is empty.XHave the AdBlue ®
tank filled as soon as possible at a qualified
specialist workshop ( Y page 167).
Visit a qualified specialist workshop.Ø
Remaining Starts:
20The AdBlue ®
level has fallen to a minimum.XHave the AdBlue ®
tank filled as soon as possible at a qualified
specialist workshop ( Y page 167).
Visit a qualified specialist workshop.Display messages249On-board computer and displaysBA 212 USA, CA Edition B 2011; 1; 5, en-USdimargiVersion: 3.0.3.62010-05-20T13:33:46+02:00 - Seite 249Z
Page 270 of 400
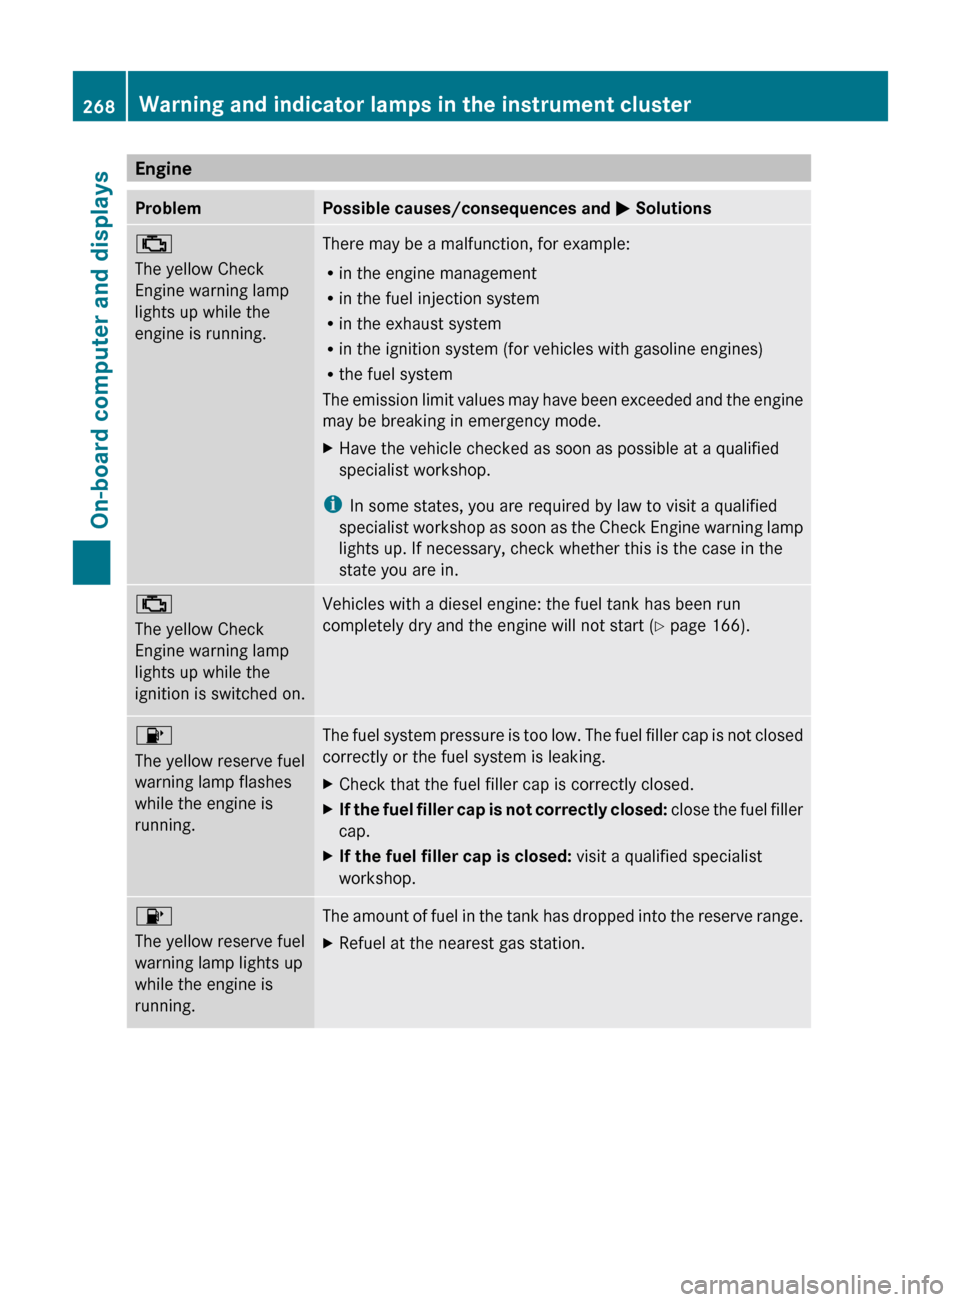
EngineProblemPossible causes/consequences and M Solutions;
The yellow Check
Engine warning lamp
lights up while the
engine is running.There may be a malfunction, for example:
R in the engine management
R in the fuel injection system
R in the exhaust system
R in the ignition system (for vehicles with gasoline engines)
R the fuel system
The emission limit values may have been exceeded and the engine
may be breaking in emergency mode.XHave the vehicle checked as soon as possible at a qualified
specialist workshop.
i In some states, you are required by law to visit a qualified
specialist workshop as soon as the Check Engine warning lamp
lights up. If necessary, check whether this is the case in the
state you are in.
;
The yellow Check
Engine warning lamp
lights up while the
ignition is switched on.Vehicles with a diesel engine: the fuel tank has been run
completely dry and the engine will not start ( Y page 166).8
The yellow reserve fuel
warning lamp flashes
while the engine is
running.The fuel system pressure is too low. The fuel filler cap is not closed
correctly or the fuel system is leaking.XCheck that the fuel filler cap is correctly closed.XIf the fuel filler cap is not correctly closed: close the fuel filler
cap.XIf the fuel filler cap is closed: visit a qualified specialist
workshop.8
The yellow reserve fuel
warning lamp lights up
while the engine is
running. The amount of fuel in the tank has dropped into the reserve range.XRefuel at the nearest gas station.268Warning and indicator lamps in the instrument clusterOn-board computer and displays
BA 212 USA, CA Edition B 2011; 1; 5, en-USdimargiVersion: 3.0.3.62010-05-20T13:33:46+02:00 - Seite 268
Page 355 of 400
Rcheck the tire for foreign bodies.
R check whether the wheel is losing air or the
valve is leaking.
R make sure that only a valve cap approved
by Mercedes-Benz is installed on the tire
valve.
Tire pressures that are too low have a
negative effect on vehicle safety, which could
lead you to cause an accident.
Only correct tire pressures when the tires are
cold. The tires are cold when the vehicle has
been parked for at least three hours or driven
for less than 1 mile (1.6 km). The tire
temperature changes depending on the
outside temperature, the vehicle speed and
the tire load. If the tire temperature changes
by 18 ‡ (10 †), the tire pressure changes by
approximately 10 kPa (0.1 bar/1.5 psi). Take
this into account when checking the pressure
of warm tires and only correct the tire
pressure if it is too low for the current
operating conditions. If you check the tire
pressure when the tires are warm, the reading
will be higher than if the tires were cold. This
is normal. Do not reduce the tire pressure to
the value specified for cold tires. The tire
pressure would otherwise be too low.
Observe the recommended tire pressure
specifications for cold tires on the Tire and
Loading Information placard on the B-pillar on
the driver's side.
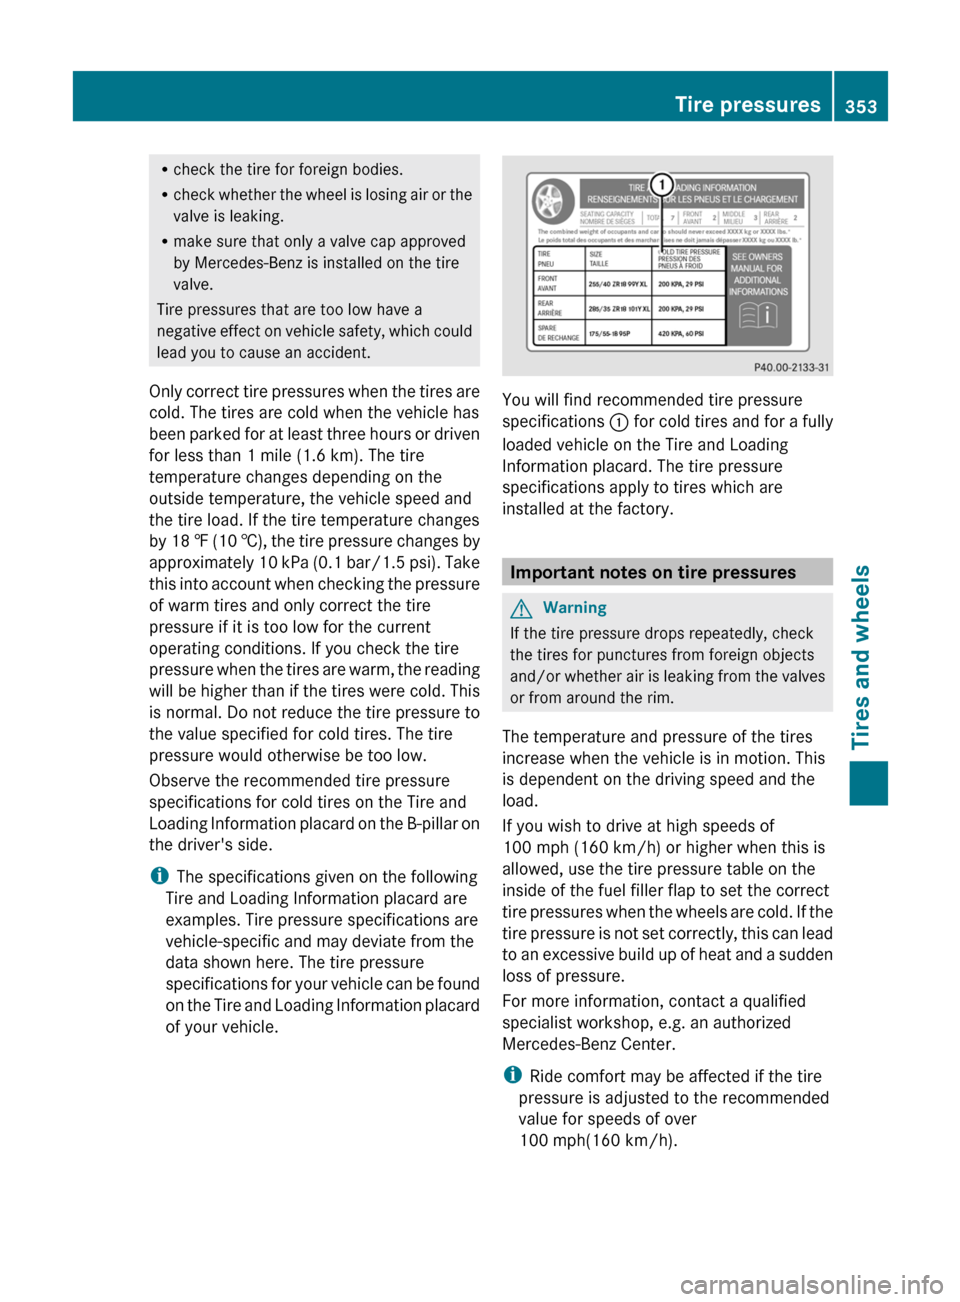
i The specifications given on the following
Tire and Loading Information placard are
examples. Tire pressure specifications are
vehicle-specific and may deviate from the
data shown here. The tire pressure
specifications for your vehicle can be found
on the Tire and Loading Information placard
of your vehicle.
You will find recommended tire pressure
specifications : for cold tires and for a fully
loaded vehicle on the Tire and Loading
Information placard. The tire pressure
specifications apply to tires which are
installed at the factory.
Important notes on tire pressures
GWarning
If the tire pressure drops repeatedly, check
the tires for punctures from foreign objects
and/or whether air is leaking from the valves
or from around the rim.
The temperature and pressure of the tires
increase when the vehicle is in motion. This
is dependent on the driving speed and the
load.
If you wish to drive at high speeds of
100 mph (160 km/h) or higher when this is
allowed, use the tire pressure table on the
inside of the fuel filler flap to set the correct
tire pressures when the wheels are cold. If the
tire pressure is not set correctly, this can lead
to an excessive build up of heat and a sudden
loss of pressure.
For more information, contact a qualified
specialist workshop, e.g. an authorized
Mercedes-Benz Center.
i Ride comfort may be affected if the tire
pressure is adjusted to the recommended
value for speeds of over
100 mph(160 km/h).
Tire pressures353Tires and wheelsBA 212 USA, CA Edition B 2011; 1; 5, en-USdimargiVersion: 3.0.3.62010-05-20T13:33:46+02:00 - Seite 353Z
Page 357 of 400
Rfail from being overheated
R adversely affect handling
Overinflated tires can:GWarning
Follow recommended tire inflation pressures.
Do not overinflate tires. Overinflated tires can
adversely affect handling and ride comfort,
wear unevenly, increase stopping distance,
and result in sudden deflation (blowout)
because they are more likely to become
punctured or damaged by road debris,
potholes etc.
Overinflated tires can:
R adversely affect handling
R wear excessively and/or unevenly
R be more likely to become damaged
R adversely affect ride comfort
R increase stopping distance
Checking tire pressures
Important safety notes
GWarning
Follow recommended tire inflation pressures.
Do not underinflate tires. Underinflated tires
wear excessively and/or unevenly, adversely
affect handling and fuel economy, and are
more likely to fail from being overheated.
Do not overinflate tires. Overinflated tires can
adversely affect handling and ride comfort,
wear unevenly, increase stopping distance,
and result in sudden deflation (blowout)
because they are more likely to become
punctured or damaged by road debris,
potholes etc.
Do not overload the tires by exceeding the
specified load limit as indicated on the Tire
and Loading Information placard on the
driver's door B-pillar. Overloading the tires
can overheat them, possibly causing a
blowout. Overloading the tires can also result
in handling or steering problems, or brake
failure.
Check the tire pressure at least once a month.
Only check and correct tire pressures when
the tires are cold ( Y page 352).
Checking the tire pressures manually
In order to determine and adjust the tire
pressures, proceed as follows:
XRemove the valve cap of the tire you wish
to check.XPress the tire pressure gauge securely onto
the valve.XRead the tire pressure and compare it with
the recommended value on the Tire and
Loading Information placard on the
B-pillar on the driver's side of your vehicle.XIf necessary, increase the tire pressure to
the recommended value ( Y page 352).XIf the tire pressure is too high, release air
by pressing down the metal pin in the valve
using the tip of a pen, for example. Then,
check the tire pressure again using the tire
pressure gauge.XScrew the valve cap onto the valve.XRepeat the steps for the other tires.
Tire pressure loss warning system
(Canada only)
Important safety notes
While the vehicle is in motion, the tire
pressure loss warning system monitors the
set tire pressure using the rotational speed of
the wheels. This enables the system to detect
significant pressure loss in a tire. If the speed
of rotation of a wheel changes as a result of
a loss of pressure, a corresponding warning
message will appear in the multifunction
display.
Tire pressures355Tires and wheelsBA 212 USA, CA Edition B 2011; 1; 5, en-USdimargiVersion: 3.0.3.62010-05-20T13:33:46+02:00 - Seite 355Z
Page 374 of 400
Increased vehicle weight due to
optional equipment
This is the combined weight of all standard
and optional equipment available for the
vehicle, regardless of whether it is actually
installed on the vehicle or not.
Wheel rim
This is the part of the wheel on which the tire
is mounted.
GAWR (Gross Axle Weight Rating)
The GAWR is the maximum gross axle weight
rating. The actual load on an axle must never
exceed the gross axle weight rating. The
gross axle weight rating can be found on the
vehicle identification plate on the B-pillar on
the driver's side.
Speed index
The speed index is part of the tire
identification. It specifies the speed range for
which the tire is approved. Specifies the
speed range for which the tire is approved.
GVW (Gross Vehicle Weight)
The gross vehicle weight includes the weight
of the vehicle including fuel, tools, the spare
wheel, accessories installed, occupants,
luggage and the drawbar noseweight if
applicable. The gross vehicle weight must not
exceed the gross vehicle weight rating GVWR
as specified on the vehicle identification plate
on the B-pillar on the driver's side.
GVWR (Gross Vehicle Weight Rating)
The GVWR is the maximum permissible gross
weight of a fully loaded vehicle (the weight of
the vehicle including all accessories,
occupants, fuel, luggage and the drawbar
noseweight if applicable). The gross vehicle
weight rating is specified on the vehicle
identification plate on the B-pillar on the
driver's side.
Maximum loaded vehicle weight
The maximum weight is the sum of the
unladen weight of the vehicle, the weight of
the accessories, the maximum load and the
weight of the optional equipment installed at
the factory.
Kilopascal (kPa)
Metric unit for tire pressure. 6.9 kPa is the
equivalent of 1 psi. Another unit for tire
pressure is bar. 100 kilopascal (kPa) is the
equivalent of 1 bar.
Load index
In addition to the load bearing index, the load
index may also be imprinted on the sidewall
of the tire. This specifies the load bearing
capacity more precisely.
Unladen weight
The weight of a vehicle with standard
equipment including the maximum capacity
of fuel, oil and coolant. It also includes the air-
conditioning system and optional equipment
if these are installed on the vehicle, but does
not include passengers or luggage.
Maximum tire load
The maximum tire load in kilograms or
pounds is the maximum weight for which a
tire is approved.
372Definitions for tires and loadingTires and wheels
BA 212 USA, CA Edition B 2011; 1; 5, en-USdimargiVersion: 3.0.3.62010-05-20T13:33:46+02:00 - Seite 372
Page 388 of 400
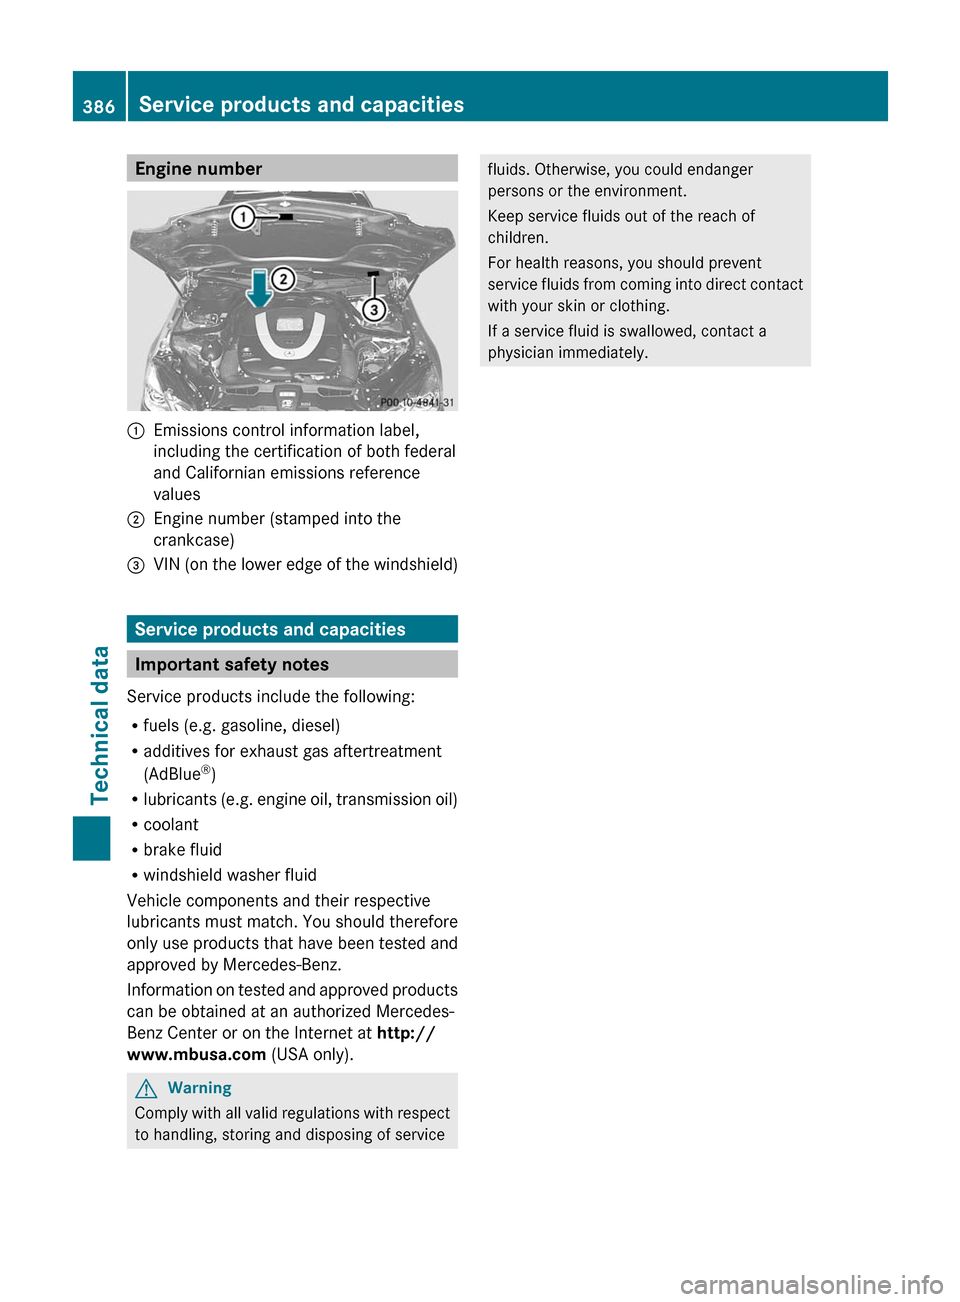
Engine number:Emissions control information label,
including the certification of both federal
and Californian emissions reference
values;Engine number (stamped into the
crankcase)=VIN (on the lower edge of the windshield)
Service products and capacities
Important safety notes
Service products include the following:
R fuels (e.g. gasoline, diesel)
R additives for exhaust gas aftertreatment
(AdBlue ®
)
R lubricants (e.g. engine oil, transmission oil)
R coolant
R brake fluid
R windshield washer fluid
Vehicle components and their respective
lubricants must match. You should therefore
only use products that have been tested and
approved by Mercedes-Benz.
Information on tested and approved products
can be obtained at an authorized Mercedes-
Benz Center or on the Internet at http://
www.mbusa.com (USA only).
GWarning
Comply with all valid regulations with respect
to handling, storing and disposing of service
fluids. Otherwise, you could endanger
persons or the environment.
Keep service fluids out of the reach of
children.
For health reasons, you should prevent
service fluids from coming into direct contact
with your skin or clothing.
If a service fluid is swallowed, contact a
physician immediately.386Service products and capacitiesTechnical data
BA 212 USA, CA Edition B 2011; 1; 5, en-USdimargiVersion: 3.0.3.62010-05-20T13:33:46+02:00 - Seite 386