MERCEDES-BENZ G-Class 2009 W463 Owner's Manual
Manufacturer: MERCEDES-BENZ, Model Year: 2009, Model line: G-Class, Model: MERCEDES-BENZ G-Class 2009 W463Pages: 264, PDF Size: 6.98 MB
Page 231 of 264
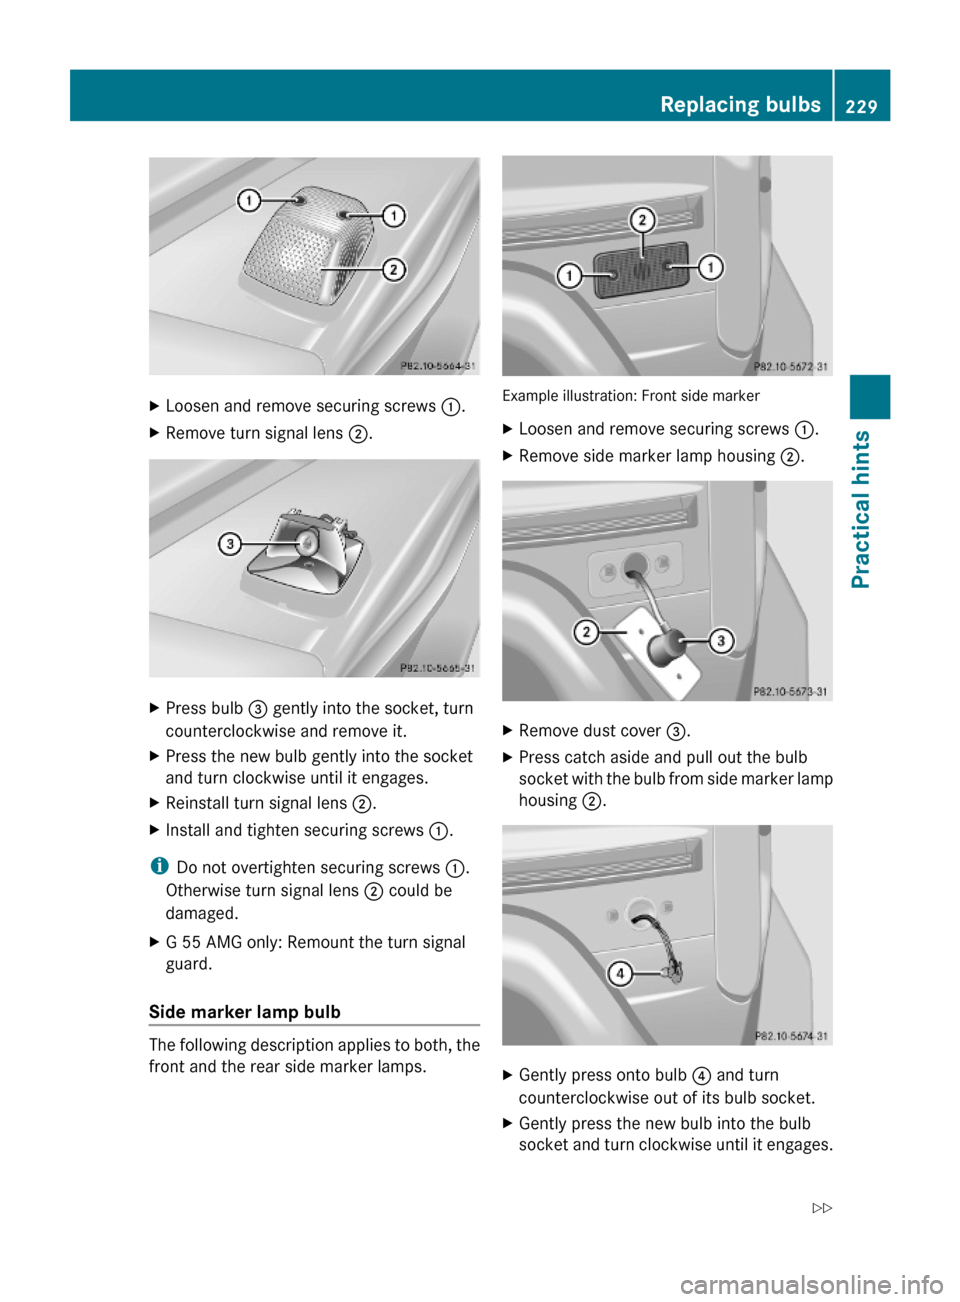
XLoosen and remove securing screws :.XRemove turn signal lens ;.XPress bulb = gently into the socket, turn
counterclockwise and remove it.
XPress the new bulb gently into the socket
and turn clockwise until it engages.
XReinstall turn signal lens ;.XInstall and tighten securing screws :.
iDo not overtighten securing screws :.
Otherwise turn signal lens ; could be
damaged.
XG 55 AMG only: Remount the turn signal
guard.
Side marker lamp bulb
The following description applies to both, the
front and the rear side marker lamps.
Example illustration: Front side marker
XLoosen and remove securing screws :.XRemove side marker lamp housing ;.XRemove dust cover =.XPress catch aside and pull out the bulb
socket with the bulb from side marker lamp
housing ;.
XGently press onto bulb ? and turn
counterclockwise out of its bulb socket.
XGently press the new bulb into the bulb
socket and turn clockwise until it engages.
Replacing bulbs229Practical hints463_AKB; 2; 52, en-USd2ureepe,Version: 2.11.7.12008-12-02T10:52:11+01:00 - Seite 229Z
Page 232 of 264
XInsert the bulb socket back into side
marker lamp housing ;.
XReinstall dust cover =.XReinstall side marker lamp housing ;.XInstall and tighten securing screws :.
iDo not overtighten securing screws :.
Otherwise side marker lamp housing ;
could be damaged.
Replacing bulbs for rear lamps
Before you start to replace a bulb for a rear
lamp, do the following:
XSwitch off the ignition.XTurn the exterior lamp switch to position
$.
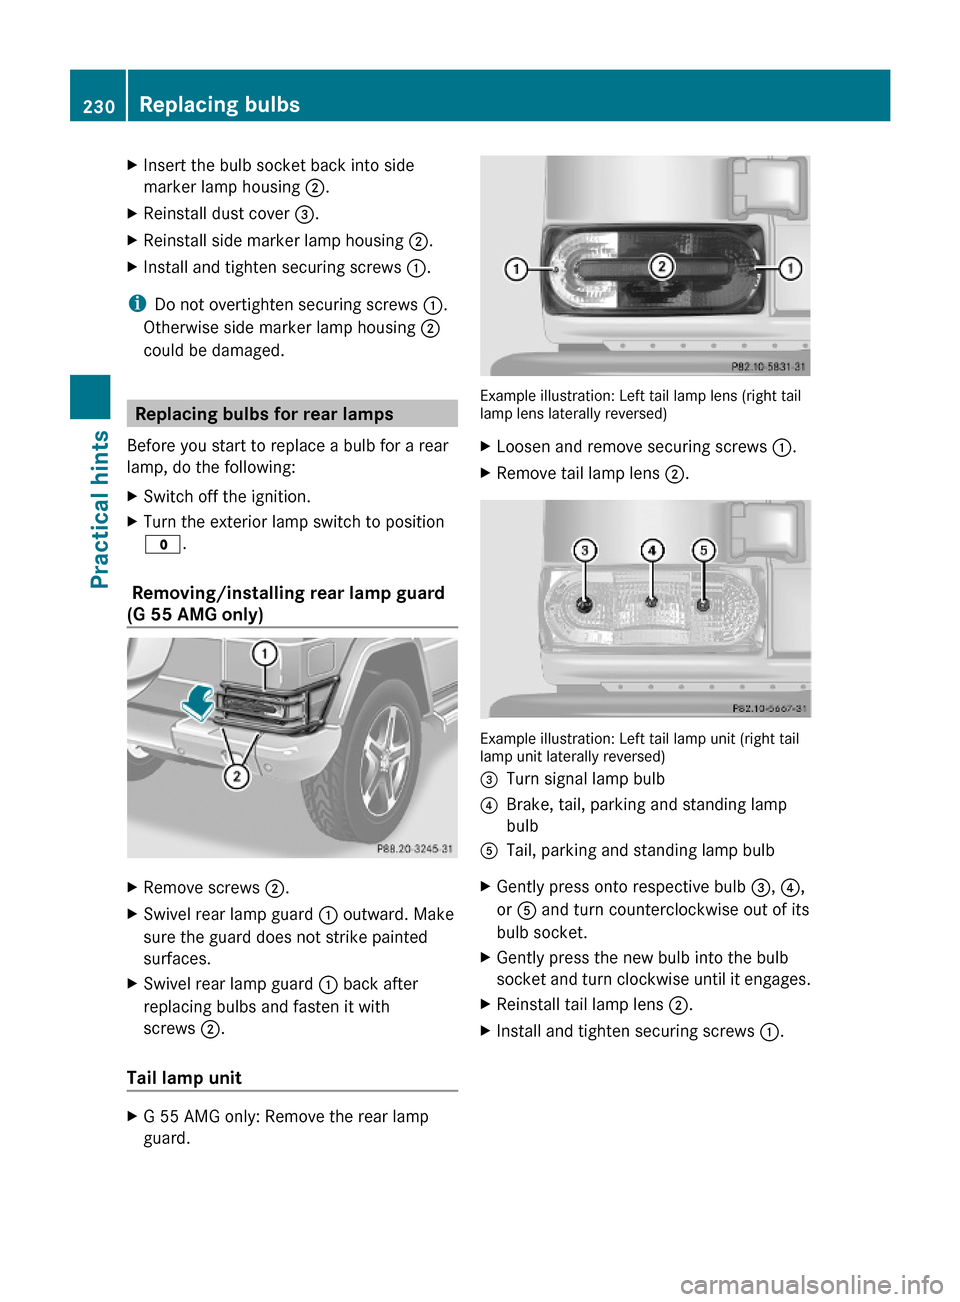
Removing/installing rear lamp guard
(G 55 AMG only)
XRemove screws ;.XSwivel rear lamp guard : outward. Make
sure the guard does not strike painted
surfaces.
XSwivel rear lamp guard : back after
replacing bulbs and fasten it with
screws ;.
Tail lamp unit
XG 55 AMG only: Remove the rear lamp
guard.
Example illustration: Left tail lamp lens (right taillamp lens laterally reversed)
XLoosen and remove securing screws :.XRemove tail lamp lens ;.
Example illustration: Left tail lamp unit (right taillamp unit laterally reversed)
=Turn signal lamp bulb?Brake, tail, parking and standing lamp
bulb
ATail, parking and standing lamp bulbXGently press onto respective bulb =, ?,
or A and turn counterclockwise out of its
bulb socket.
XGently press the new bulb into the bulb
socket and turn clockwise until it engages.
XReinstall tail lamp lens ;.XInstall and tighten securing screws :.230Replacing bulbsPractical hints
463_AKB; 2; 52, en-USd2ureepe,Version: 2.11.7.12008-12-02T10:52:11+01:00 - Seite 230
Page 233 of 264
iDo not overtighten securing screws :.
Otherwise tail lamp lens ; could be
damaged.
XG 55 AMG only: Reinstall rear lamp
guard : (Y page 230).
Rear fog lamp/Backup lamp
The following description applies to both, the
rear fog lamp and the backup lamp.
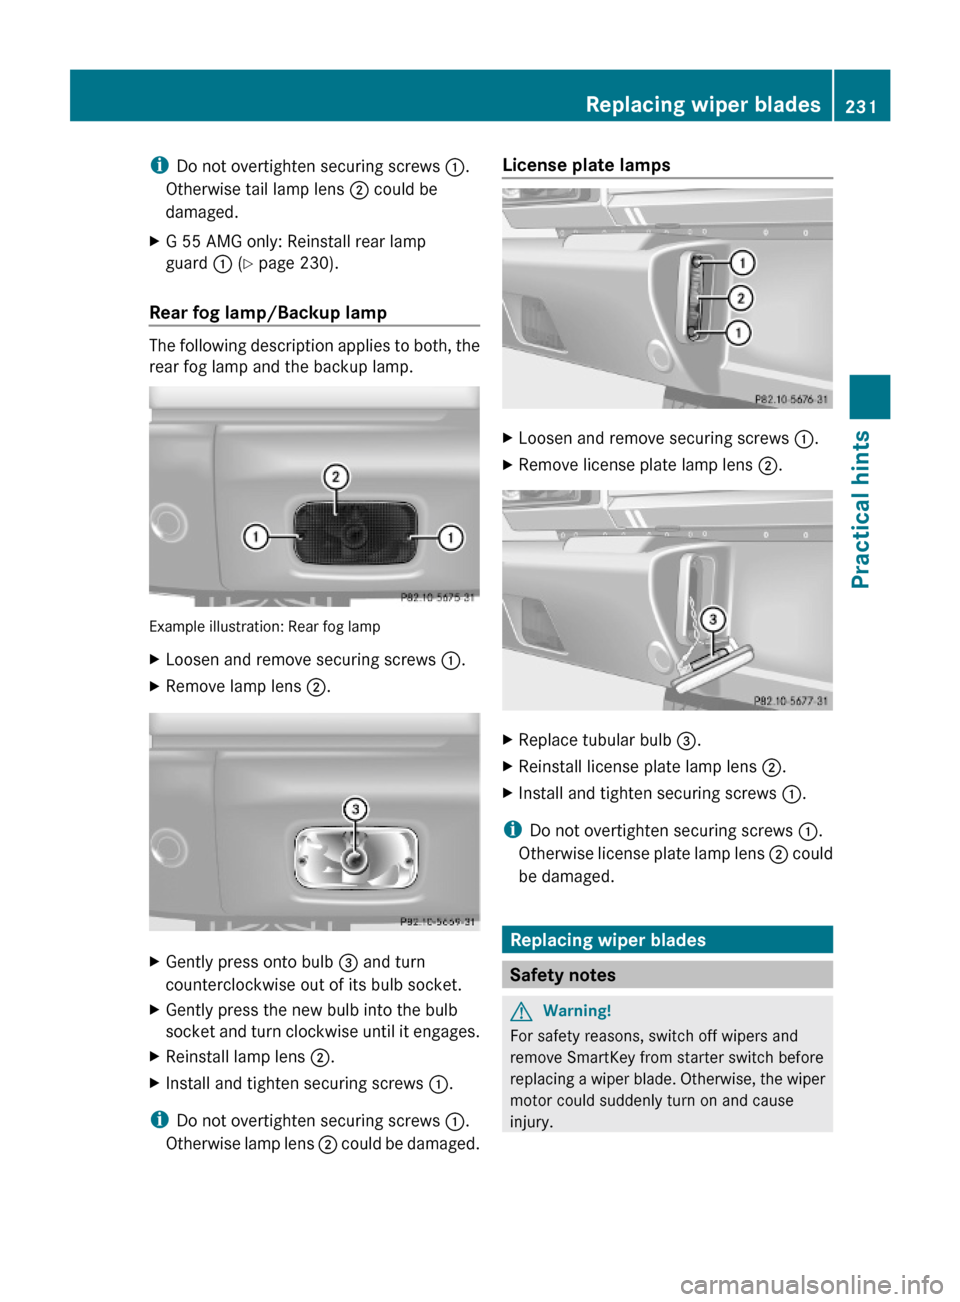
Example illustration: Rear fog lamp
XLoosen and remove securing screws :.XRemove lamp lens ;.XGently press onto bulb = and turn
counterclockwise out of its bulb socket.
XGently press the new bulb into the bulb
socket and turn clockwise until it engages.
XReinstall lamp lens ;.XInstall and tighten securing screws :.
iDo not overtighten securing screws :.
Otherwise lamp lens ; could be damaged.
License plate lampsXLoosen and remove securing screws :.XRemove license plate lamp lens ;.XReplace tubular bulb =.XReinstall license plate lamp lens ;.XInstall and tighten securing screws :.
iDo not overtighten securing screws :.
Otherwise license plate lamp lens ; could
be damaged.
Replacing wiper blades
Safety notes
GWarning!
For safety reasons, switch off wipers and
remove SmartKey from starter switch before
replacing a wiper blade. Otherwise, the wiper
motor could suddenly turn on and cause
injury.
Replacing wiper blades231Practical hints463_AKB; 2; 52, en-USd2ureepe,Version: 2.11.7.12008-12-02T10:52:11+01:00 - Seite 231Z
Page 234 of 264
GWarning!
Wiper blades are components that are subject
to wear and tear. Replace the wiper blades
twice a year, preferably in the spring and fall.
Otherwise the windows will not be properly
wiped. As a result, you may not be able to
observe surrounding traffic conditions and
could cause an accident.
! Never open the hood when a front wiper
arm is folded forward.
Hold on to the wiper when folding a wiper
arm back. If released, the force of the
impact from the tensioning spring could
crack the windshield or the rear window.
Do not allow a wiper arm to contact the
windshield glass or the rear window
without a wiper blade inserted.
Mercedes-Benz recommends that you have
this work carried out at an authorized
Mercedes-Benz Center.
XRemove the SmartKey from the starter
switch.
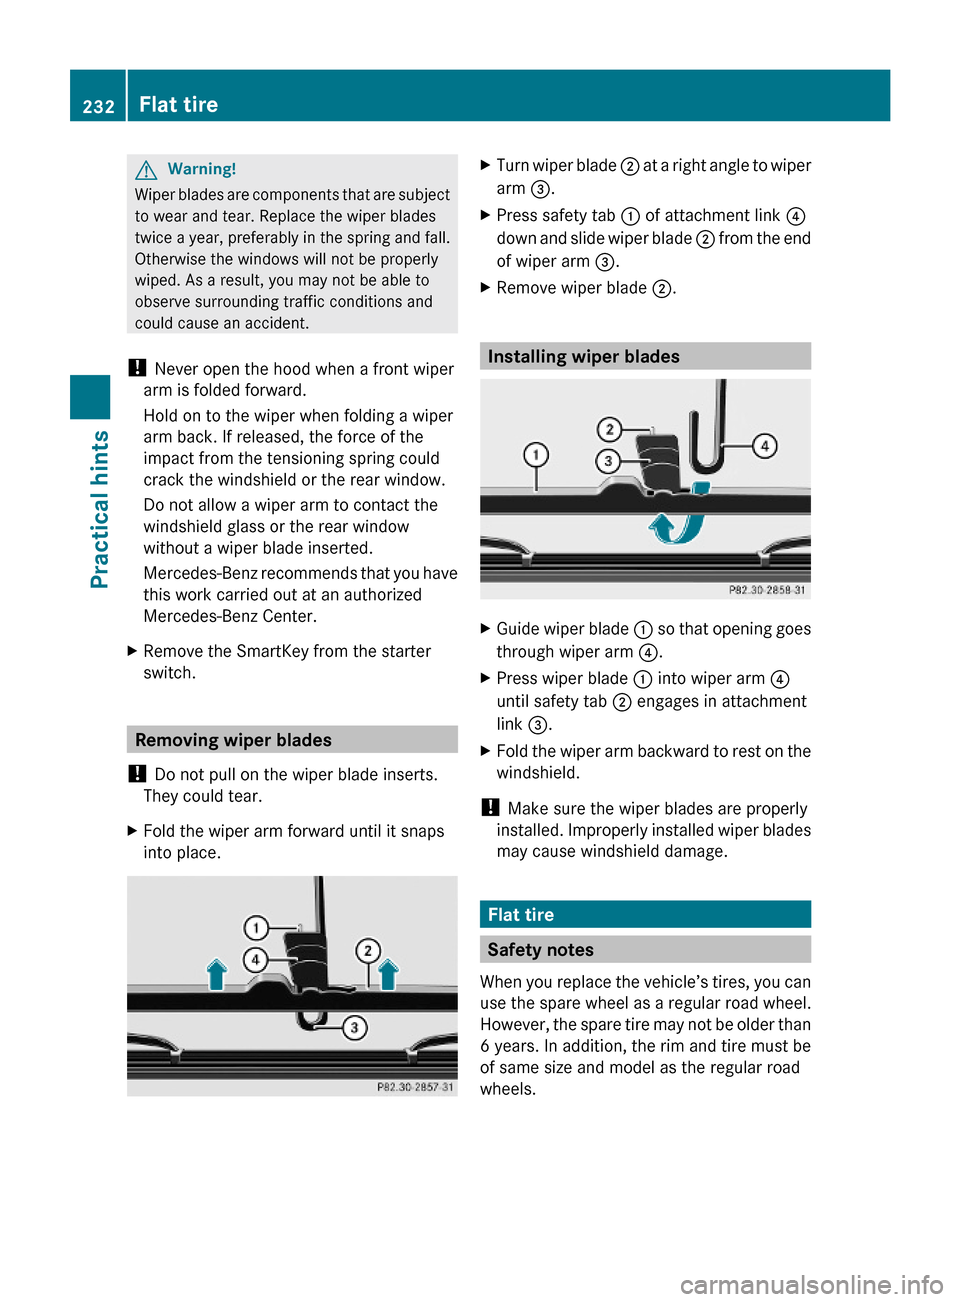
Removing wiper blades
! Do not pull on the wiper blade inserts.
They could tear.
XFold the wiper arm forward until it snaps
into place.
XTurn wiper blade ; at a right angle to wiper
arm =.
XPress safety tab : of attachment link ?
down and slide wiper blade ; from the end
of wiper arm =.
XRemove wiper blade ;.
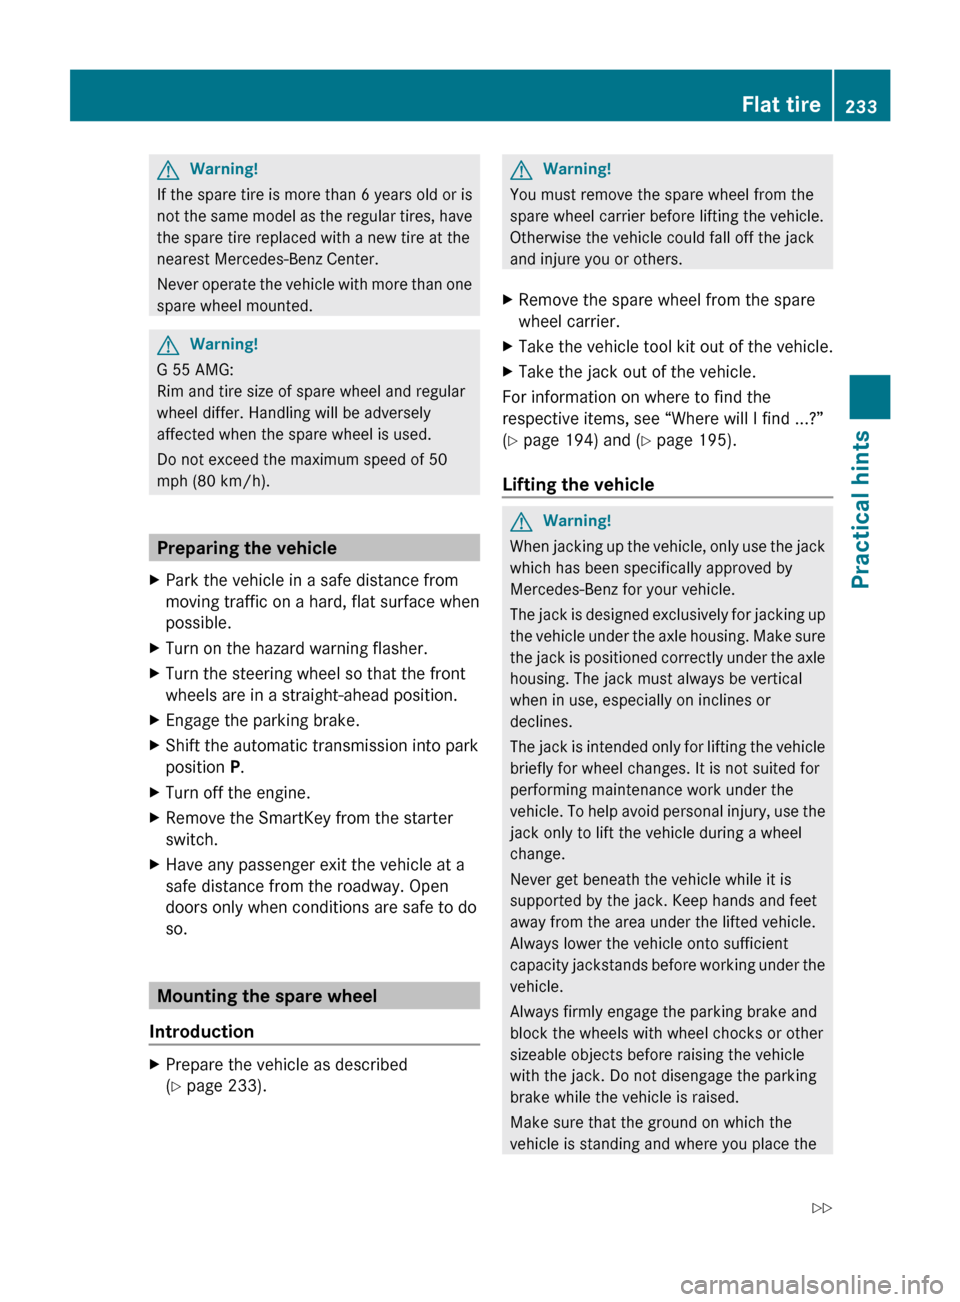
Installing wiper blades
XGuide wiper blade : so that opening goes
through wiper arm ?.
XPress wiper blade : into wiper arm ?
until safety tab ; engages in attachment
link =.
XFold the wiper arm backward to rest on the
windshield.
! Make sure the wiper blades are properly
installed. Improperly installed wiper blades
may cause windshield damage.
Flat tire
Safety notes
When you replace the vehicle’s tires, you can
use the spare wheel as a regular road wheel.
However, the spare tire may not be older than
6 years. In addition, the rim and tire must be
of same size and model as the regular road
wheels.
232Flat tirePractical hints
463_AKB; 2; 52, en-USd2ureepe,Version: 2.11.7.12008-12-02T10:52:11+01:00 - Seite 232
Page 235 of 264
Page 236 of 264
jack is solid, level and not slippery. If
necessary, use a large underlay. On slippery
surfaces, such as tiled floors, you should use
a non-slip underlay, for example a rubber mat.
Do not use wooden blocks or similar objects
to support the jack. Otherwise the jack may
not be able to achieve its load-bearing
capacity if it is not at its full height.
Never start the engine when the vehicle is
raised.
Also observe the notes on the jack.
XPrevent the vehicle from rolling away by
blocking wheels with wheel chocks (not
included) or other sizeable objects.
When changing wheel on a level surface:
XPlace one wheel chock or other sizeable
object in front of and another wheel chock
or other sizeable object behind the wheel
that is diagonally opposite to the wheel
being changed.
Always try lifting the vehicle using the jack on
a level surface. However, should
circumstances require you to do so on a hill,
place a wheel chock or other sizeable object
and the other wheel chock or sizeable object
as follows:
XPlace wheel chocks or other sizeable
objects on the downhill side blocking both
wheels of the axle not being worked on.
GWarning!
Only jack up the vehicle on level ground or on
slight inclines/declines. Otherwise, the
vehicle could fall off the jack and injure you or
others.
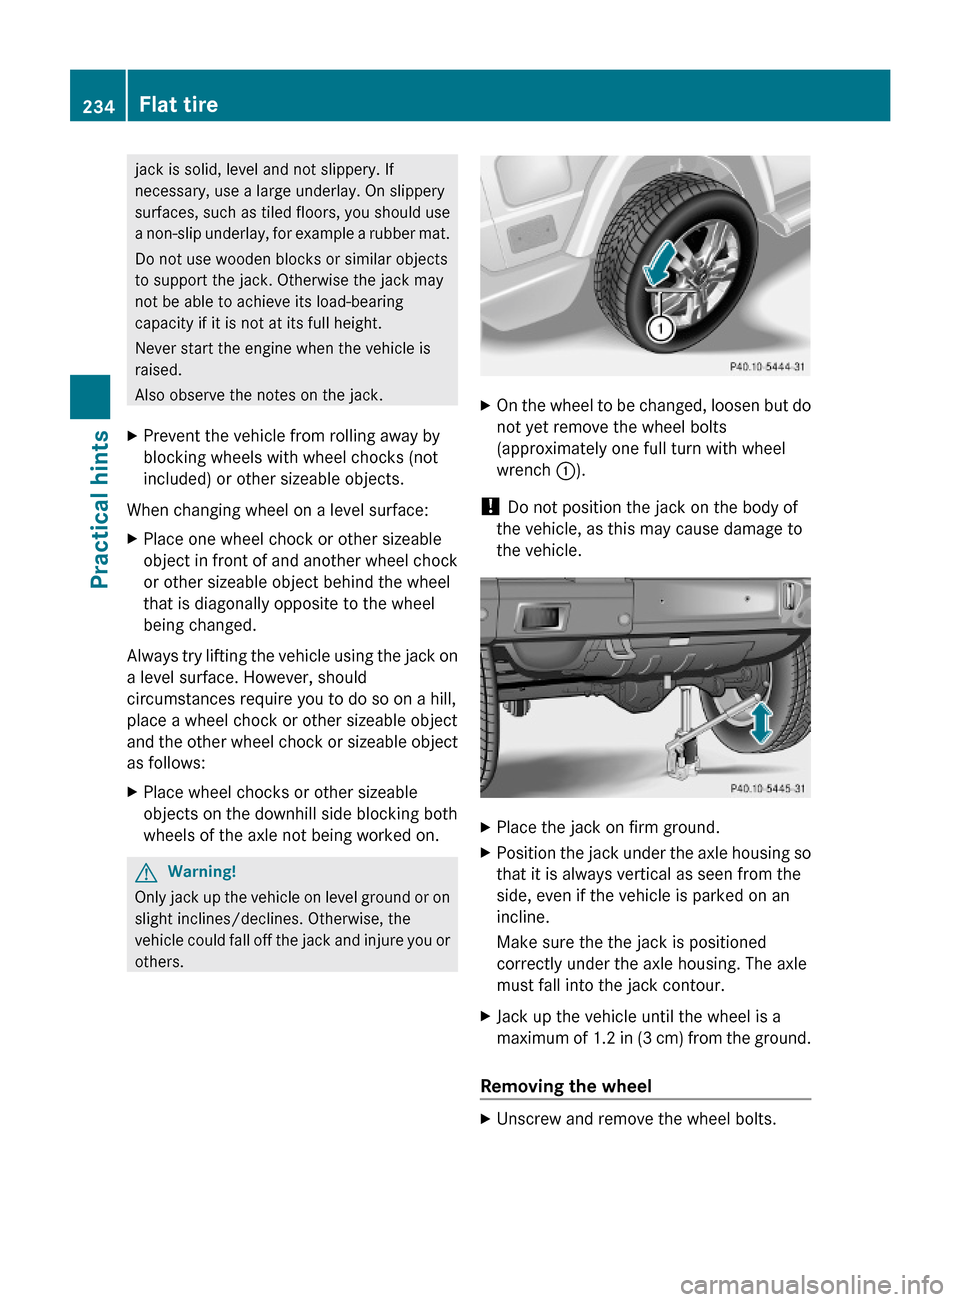
XOn the wheel to be changed, loosen but do
not yet remove the wheel bolts
(approximately one full turn with wheel
wrench :).
! Do not position the jack on the body of
the vehicle, as this may cause damage to
the vehicle.
XPlace the jack on firm ground.XPosition the jack under the axle housing so
that it is always vertical as seen from the
side, even if the vehicle is parked on an
incline.
Make sure the the jack is positioned
correctly under the axle housing. The axle
must fall into the jack contour.
XJack up the vehicle until the wheel is a
maximum of 1.2 in (3 cm) from the ground.
Removing the wheel
XUnscrew and remove the wheel bolts.234Flat tirePractical hints
463_AKB; 2; 52, en-USd2ureepe,Version: 2.11.7.12008-12-02T10:52:11+01:00 - Seite 234
Page 237 of 264
! Do not place wheel bolts in sand or dirt.
This could result in damage to the wheel
bolts and wheel hub threads.
XRemove the wheel.
Attaching the spare wheel
GWarning!
Always replace wheel bolts that are damaged
or rusted.
Never apply oil or grease to wheel bolts.
Damaged wheel hub threads should be
repaired immediately. Do not continue to
drive under these circumstances! Contact an
authorized Mercedes-Benz Center or call
Roadside Assistance.
Incorrect wheel bolts or improperly tightened
wheel bolts can cause the wheel to come off.
This could cause an accident. Be sure to use
the correct wheel bolts.
GWarning!
Only use genuine Mercedes-Benz wheel bolts.
Other wheel bolts may come loose.
Do not tighten the wheel bolts when the
vehicle is raised. Otherwise the vehicle could
fall off the jack.
XClean contact surfaces of wheel and wheel
hub.
! To avoid paint damage, place wheel flat
against hub and hold it there while
installing first wheel bolt.
XGuide the spare wheel onto the wheel hub
and push it on.
XInsert the wheel bolts and tighten them
slightly.
Lowering the vehicle
XUsing the pump handle, turn the release
bolt of the jack counterclockwise
approximately one turn.
iNever turn the release bolt of the jack
more than one or two revolutions.
Otherwise hydraulic fluid can escape.
XLower the vehicle until the vehicle is resting
fully on its own weight.
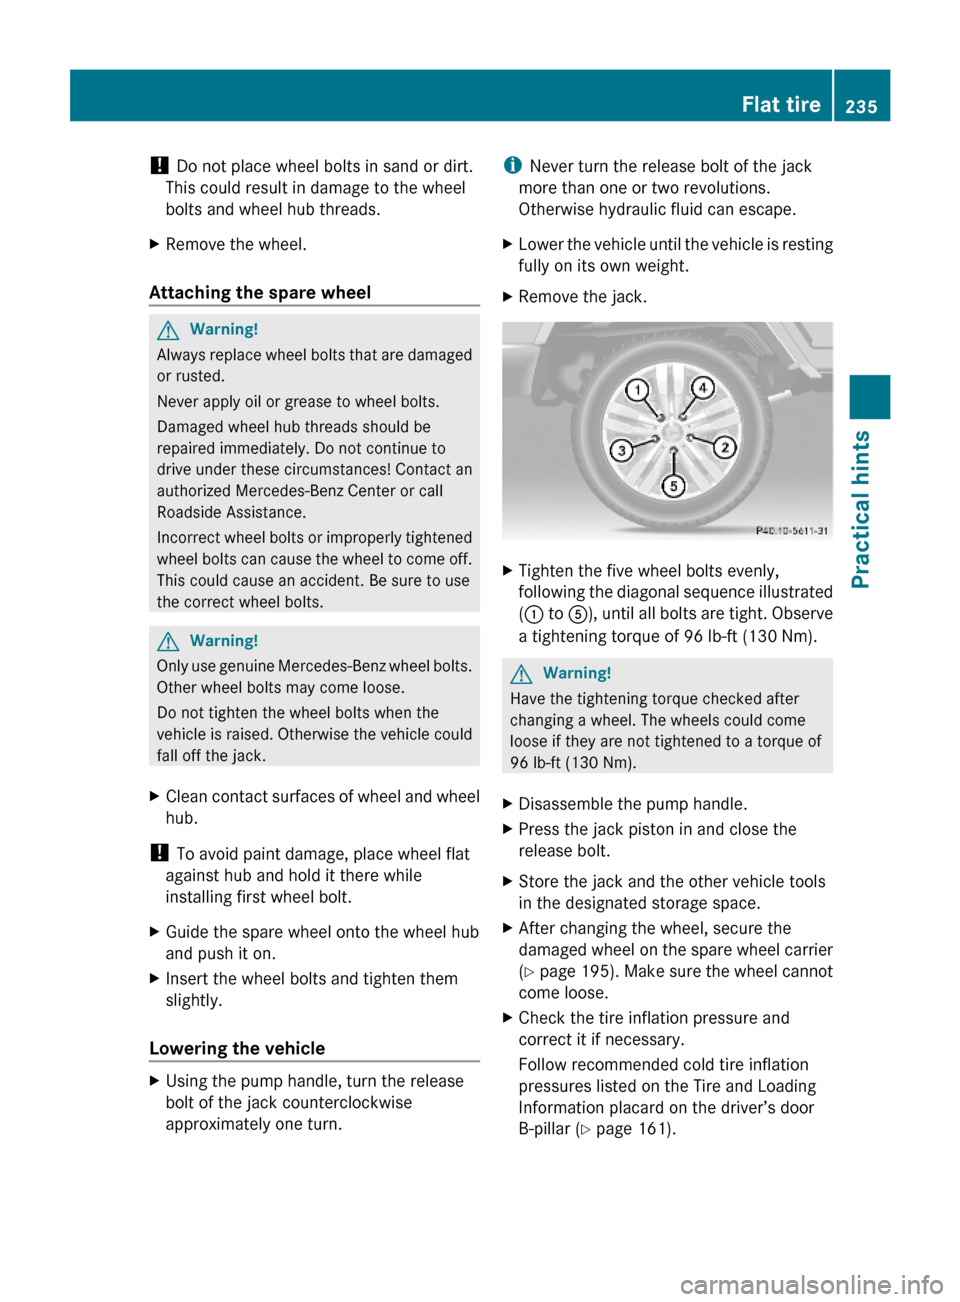
XRemove the jack.XTighten the five wheel bolts evenly,
following the diagonal sequence illustrated
(: to A), until all bolts are tight. Observe
a tightening torque of 96 lb-ft (130 Nm).
GWarning!
Have the tightening torque checked after
changing a wheel. The wheels could come
loose if they are not tightened to a torque of
96 lb-ft (130 Nm).
XDisassemble the pump handle.XPress the jack piston in and close the
release bolt.
XStore the jack and the other vehicle tools
in the designated storage space.
XAfter changing the wheel, secure the
damaged wheel on the spare wheel carrier
(Y page 195). Make sure the wheel cannot
come loose.
XCheck the tire inflation pressure and
correct it if necessary.
Follow recommended cold tire inflation
pressures listed on the Tire and Loading
Information placard on the driver’s door
B-pillar (Y page 161).
Flat tire235Practical hints463_AKB; 2; 52, en-USd2ureepe,Version: 2.11.7.12008-12-02T10:52:11+01:00 - Seite 235Z
Page 238 of 264
Battery
Safety notes
A battery should always be sufficiently
charged in order to achieve its rated service
life. Refer to Maintenance Booklet for battery
maintenance intervals.
If you use your vehicle mostly for short-
distance trips, you will need to have the
battery charge checked more frequently.
When replacing a battery, always use a
battery approved by Mercedes-Benz.
If you do not intend to operate your vehicle
for an extended period of time, contact an
authorized Mercedes-Benz Center about
steps you need to observe.
GWarning!
Observe all safety instructions and
precautions when handling automotive
batteries.
Risk of explosion.Fire, open flames and
smoking are prohibited
when handling batteries.
Avoid creating sparks.
Battery acid is caustic. Do
not allow it to come into
contact with skin, eyes or
clothing.
Wear suitable protective
clothing, especially gloves,
apron and faceguard.
Wear eye protection.
Rinse any acid spills
immediately with clear
water. Contact a physician
if necessary.
Keep children away.Follow the instructions in
this Operator’s Manual.
Batteries contain materials that can harm the
environment if disposed of improperly. Large
12-volt storage batteries contain lead.
Recycling of batteries is the preferred method
of disposal. Many states (USA only) or
provinces (Canada only) require sellers of
batteries to accept old batteries for recycling.
GWarning!
Failure to follow these instructions can result
in severe injury or death.
Never lean over batteries while connecting.
You might get injured.
Battery fluid contains sulfuric acid. Do not
allow this fluid to come in contact with eyes,
skin or clothing. In case it does, immediately
flush affected area with water and seek
medical help if necessary.
A battery will also produce hydrogen gas,
which is flammable and explosive. Keep
flames or sparks away from battery, avoid
improper connection of jumper cables,
smoking etc.
GWarning!
Do not place metal objects on the battery as
this could result in a short circuit.
Use leak-proof batteries only to avoid the risk
of acid burns in the event of an accident.
Take care that you do not become statically
charged, e.g. by wearing synthetic clothing or
rubbing against textiles. For this reason, you
also should not pull or push the battery over
carpets or other synthetic materials.
Never touch the battery first. First touch the
outside body of the vehicle in order to release
any possible electrostatic charges.
236BatteryPractical hints
463_AKB; 2; 52, en-USd2ureepe,Version: 2.11.7.12008-12-02T10:52:11+01:00 - Seite 236
Page 239 of 264
Page 240 of 264
