battery MERCEDES-BENZ G-Class 2015 W463 User Guide
[x] Cancel search | Manufacturer: MERCEDES-BENZ, Model Year: 2015, Model line: G-Class, Model: MERCEDES-BENZ G-Class 2015 W463Pages: 350, PDF Size: 6.44 MB
Page 91 of 350
Switching the seat heating on/off
General notes G
WARNING
Repeatedly switching on the seat heating can
cause the seat cushion and backrest pads to
become very hot. The health of persons with
limited temperature sensitivity or a limited
ability to react to excessively high tempera-
tures may be affected or they may even suffer burn-like injuries. There is a risk of injury.
Therefore, do not switch the seat heating on
repeatedly.
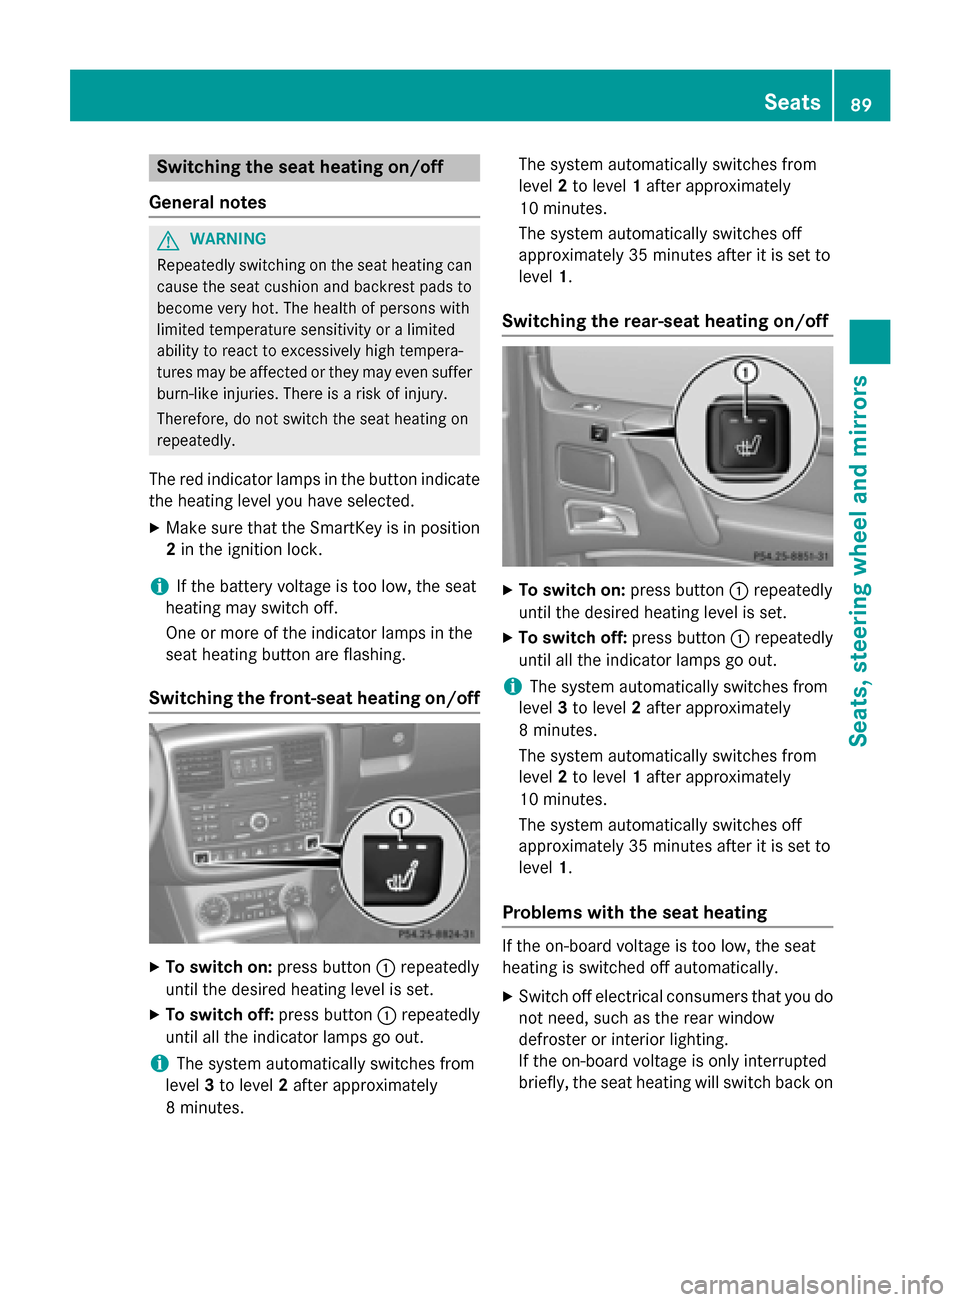
The red indicator lamps in the button indicate the heating level you have selected.
X Make sure that the SmartKey is in position
2 in the ignition lock.
i If the battery voltage is too low, the seat
heating may switch off.
One or more of the indicator lamps in the
seat heating button are flashing.
Switching the front-seat heating on/off X
To switch on: press button:repeatedly
until the desired heating level is set.
X To switch off: press button:repeatedly
until all the indicator lamps go out.
i The system automatically switches from
level 3to level 2after approximately
8 minutes. The system automatically switches from
level
2to level 1after approximately
10 minutes.
The system automatically switches off
approximately 35 minutes after it is set to
level 1.
Switching the rear-seat heating on/off X
To switch on: press button:repeatedly
until the desired heating level is set.
X To switch off: press button:repeatedly
until all the indicator lamps go out.
i The system automatically switches from
level 3to level 2after approximately
8 minutes.
The system automatically switches from
level 2to level 1after approximately
10 minutes.
The system automatically switches off
approximately 35 minutes after it is set to
level 1.
Problems with the seat heating If the on-board voltage is too low, the seat
heating is switched off automatically.
X Switch off electrical consumers that you do
not need, such as the rear window
defroster or interior lighting.
If the on-board voltage is only interrupted
briefly, the seat heating will switch back on Seats
89Seats, steering wheel and mirrors Z
Page 92 of 350
automatically. If the seat heating is not
switched on automatically:
X Switch on the seat heating manually
(Y page 89) Switching the seat ventilation on/off
Switching on/off Seat ventilation is only available for the front
seats.
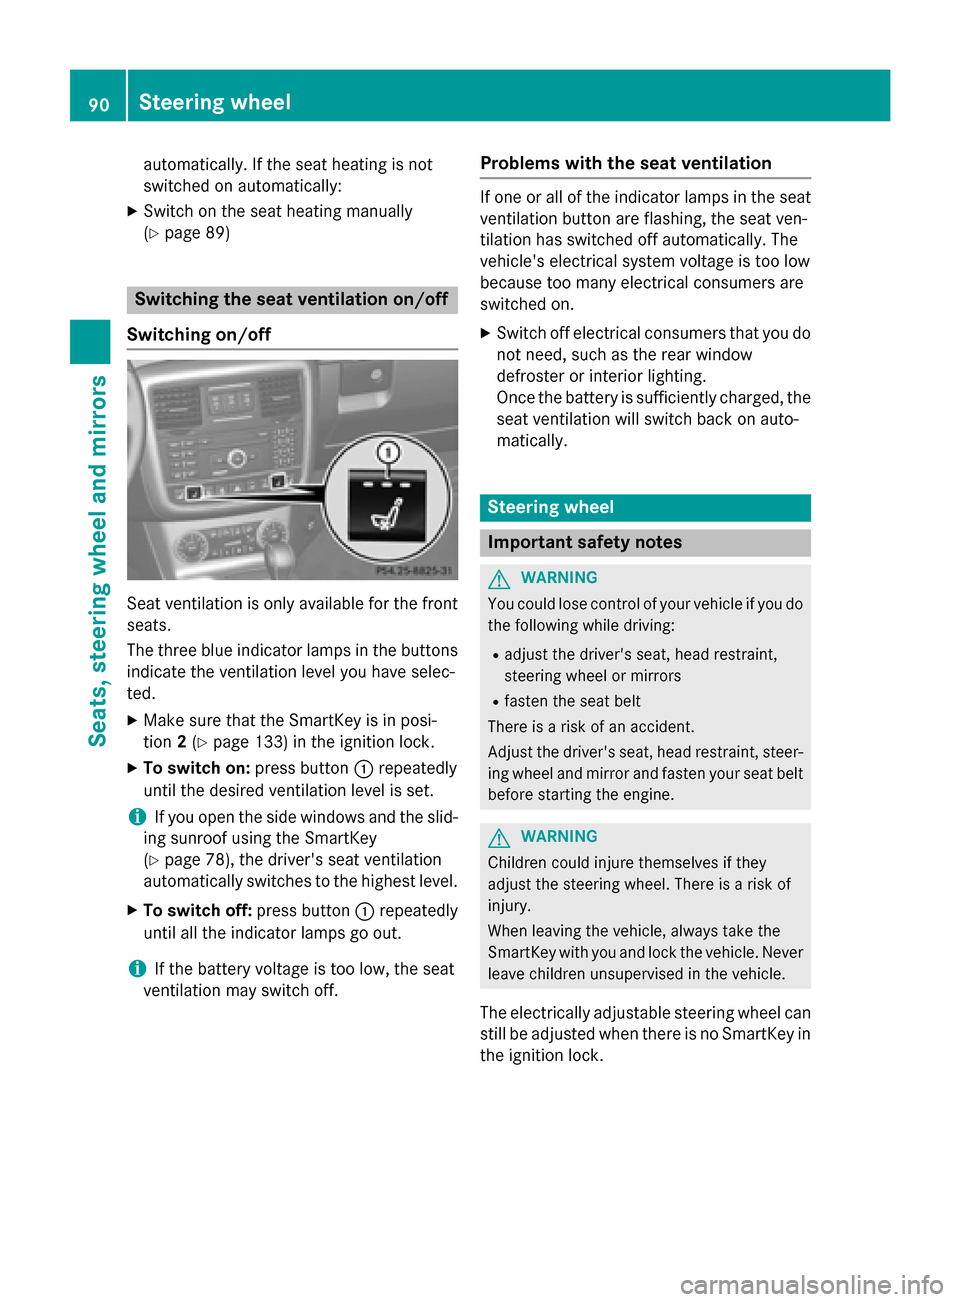
The three blue indicator lamps in the buttons
indicate the ventilation level you have selec-
ted.
X Make sure that the SmartKey is in posi-
tion 2(Y page 133) in the ignition lock.
X To switch on: press button:repeatedly
until the desired ventilation level is set.
i If you open the side windows and the slid-
ing sunroof using the SmartKey
(Y page 78), the driver's seat ventilation
automatically switches to the highest level.
X To switch off: press button:repeatedly
until all the indicator lamps go out.
i If the battery voltage is too low, the seat
ventilation may switch off. Problems with the seat ventilation If one or all of the indicator lamps in the seat
ventilation button are flashing, the seat ven-
tilation has switched off automatically. The
vehicle's electrical system voltage is too low
because too many electrical consumers are
switched on.
X Switch off electrical consumers that you do
not need, such as the rear window
defroster or interior lighting.
Once the battery is sufficiently charged, the seat ventilation will switch back on auto-
matically. Steering wheel
Important safety notes
G
WARNING
You could lose control of your vehicle if you do the following while driving:
R adjust the driver's seat, head restraint,
steering wheel or mirrors
R fasten the seat belt
There is a risk of an accident.
Adjust the driver's seat, head restraint, steer-
ing wheel and mirror and fasten your seat belt before starting the engine. G
WARNING
Children could injure themselves if they
adjust the steering wheel. There is a risk of
injury.
When leaving the vehicle, always take the
SmartKey with you and lock the vehicle. Never leave children unsupervised in the vehicle.
The electrically adjustable steering wheel can
still be adjusted when there is no SmartKey in
the ignition lock. 90
Steering wheelSeats, steering wheel and
mirrors
Page 94 of 350
If steering wheel heating indicator lamp
=is
flashing, the steering wheel heating has
switched off automatically. The vehicle's
electrical system voltage is too low because
too many electrical consumers are switched
on.
X Switch off electrical consumers that you do
not need, such as the rear window
defroster or interior lighting.
Once the battery is sufficiently charged, the steering wheel heating will switch back on
automatically. Steering wheel EASY-ENTRY/EXIT fea-
ture
Important safety notes G
WARNING
When the EASY-ENTRY/EXIT feature adjusts
the steering wheel and the driver's seat, you
and other vehicle occupants – particularly
children – could become trapped. There is a
risk of injury.
While the EASY-ENTRY/EXIT feature is mak-
ing adjustments, make sure that no one has
any body parts in the sweep of the seat and
the steering wheel.
If somebody becomes trapped:
R press one of the memory function position
buttons, or
R press one of the memory function memory
buttons, or
R move the switch for steering wheel adjust-
ment in the opposite direction to that in
which the steering wheel is moving
The adjustment process is stopped. G
WARNING
If you drive off while the EASY-ENTRY/EXIT
feature is making adjustments, you could lose
control of the vehicle. There is a risk of an
accident.
Always wait until the adjustment process is
complete before driving off. !
Do not activate the EASY-ENTRY/EXIT
feature, if the seat backrest is reclined too
far backwards. This can damage the front
or rear seats. You must first move the back- rest to a vertical position.
The EASY-ENTRY/EXIT feature makes getting
in and out of your vehicle easier.
You can activate and deactivate the EASY-
ENTRY/EXIT feature in the on-board com-
puter (Y page 208).
Position of the steering wheel when the EASY-ENTRY/EXIT feature is active The steering wheel moves upwards and
towards the dashboard if:
R you remove the SmartKey from the ignition
lock or
R you open the driver's door with the Smart-
Key in position 0or 1in the ignition lock
i The steering wheel only moves upwards
and towards the dashboard if it has not
already reached the upper steering limiter.
Position of the steering wheel for driv-
ing The steering wheel is moved to the last selec-
ted position when:
R the driver's door is closed
R you insert the SmartKey into the ignition
lock
The last position of the steering column is
stored when you switch off the ignition or
when you store the setting with the memory
function (Y page 95). Mirrors
Rear-view mirror
X Adjust the rear-view mirror by hand so you
have a good overview of the traffic condi-
tions behind you. 92
MirrorsSeats, steering wheel and mirrors
Page 95 of 350
Exterior mirrors
Adjusting the exterior mirrors G
WARNING
The exterior mirror on the front-passenger
side reduces the size of the image. Visible
objects are actually closer than they appear.
This means that you could misjudge the dis-
tance from road users traveling behind, e.g.
when changing lane. There is a risk of an acci-
dent.
For this reason, always make sure of the
actual distance from the road users traveling
behind by glancing over your shoulder. X
Make sure that the SmartKey is in position
1 or 2in the ignition lock (Y page 133).
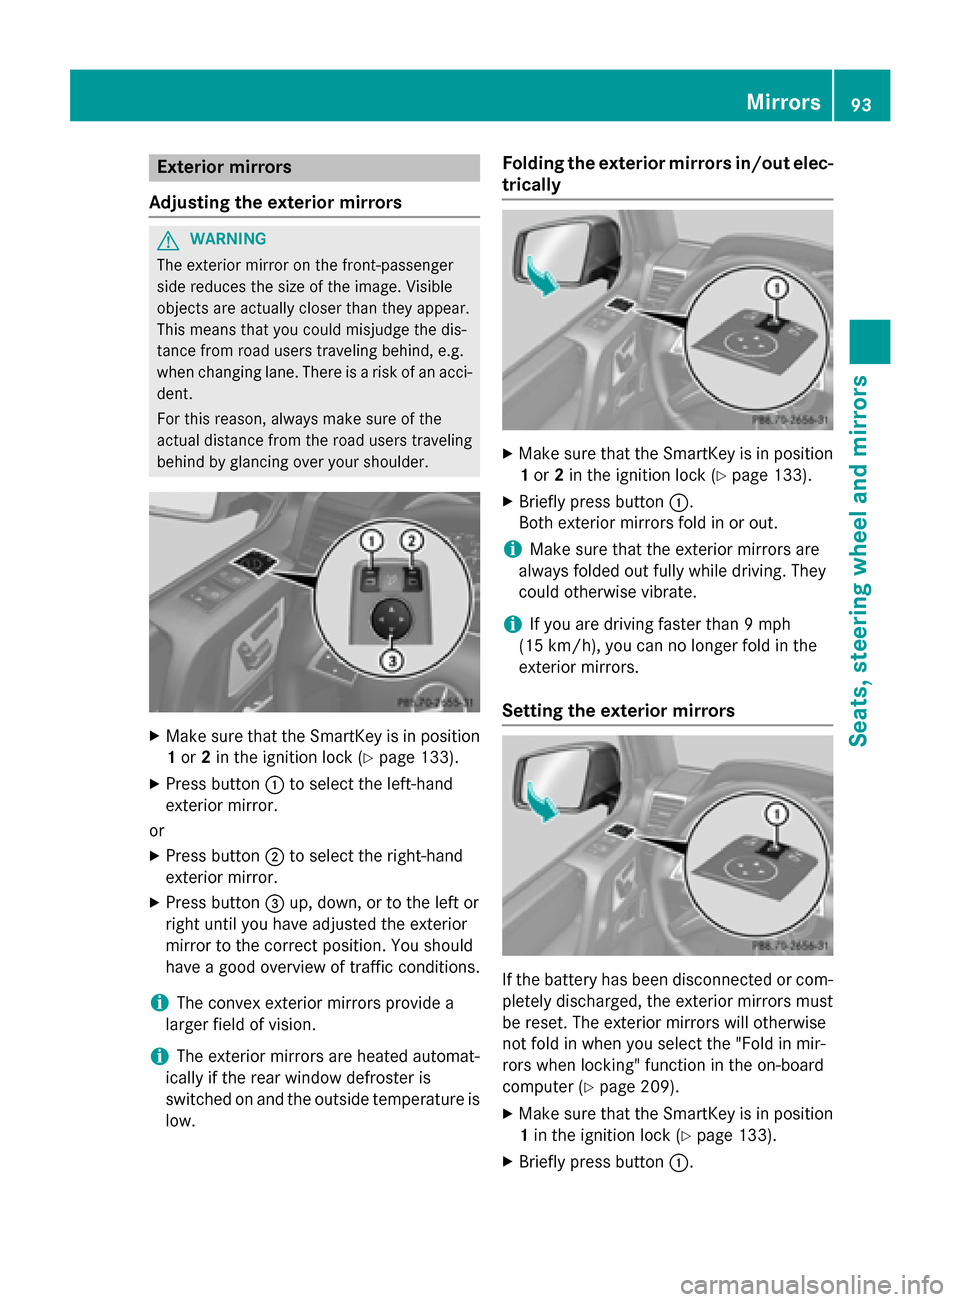
X Press button :to select the left-hand
exterior mirror.
or
X Press button ;to select the right-hand
exterior mirror.
X Press button =up, down, or to the left or
right until you have adjusted the exterior
mirror to the correct position. You should
have a good overview of traffic conditions.
i The convex exterior mirrors provide a
larger field of vision.
i The exterior mirrors are heated automat-
ically if the rear window defroster is
switched on and the outside temperature is
low. Folding the exterior mirrors in/out elec-
trically X
Make sure that the SmartKey is in position
1 or 2in the ignition lock (Y page 133).
X Briefly press button :.
Both exterior mirrors fold in or out.
i Make sure that the exterior mirrors are
always folded out fully while driving. They
could otherwise vibrate.
i If you are driving faster than 9 mph
(15 km/ h), you can no longer fold in the
exterior mirrors.
Setting the exterior mirrors If the battery has been disconnected or com-
pletely discharged, the exterior mirrors must
be reset. The exterior mirrors will otherwise
not fold in when you select the "Fold in mir-
rors when locking" function in the on-board
computer (Y page 209).
X Make sure that the SmartKey is in position
1 in the ignition lock (Y page 133).
X Briefly press button :. Mirrors
93Seats, steering wheel and mirrors Z
Page 100 of 350
Useful information
i This Operator's Manual describes all
models and all standard and optional equip- ment of your vehicle available at the time of
publication of the Operator's Manual.
Country-specific differences are possible.
Please note that your vehicle may not be
equipped with all features described. This
also applies to safety-related systems and
functions.
i Read the information on qualified special-
ist workshops: (Y page 24). Exterior lighting
Important safety notes
For reasons of safety, Mercedes-Benz recom- mends that you drive with the lights switched
on even during the daytime. In some coun-
tries, operation of the headlamps varies due
to legal requirements and self-imposed obli-
gations. Driving abroad
Conversion to symmetrical low beam Switch the headlamps to symmetrical low
beam in countries in which traffic drives on
the opposite side of the road from the country where the vehicle is registered. This prevents
glare to oncoming traffic. When using sym-
metrical lights, the edge of the road is not lit
as widely and as far ahead as normal.
Have the headlamps converted at a qualified
specialist workshop as close to the border as
possible before driving in these countries.
Conversion to asymmetrical low beam
after returning Have the headlamps converted back to asym-
metrical low-beam headlamps at a qualified
specialist workshop as soon as possible after
crossing the border again. Light switch
Operation !
Switch off the parking lamps and low-
beam headlamps when you leave the vehi-
cle. This prevents the battery from dis-
charging.
! If the battery has been excessively dis-
charged, the parking lamps or standing
lamps are automatically switched off to
enable the next engine start. Always park
your vehicle safely and sufficiently lit
according to legal standards. Avoid the
continuous use of the Tparking lamps
for several hours. If possible, switch on the
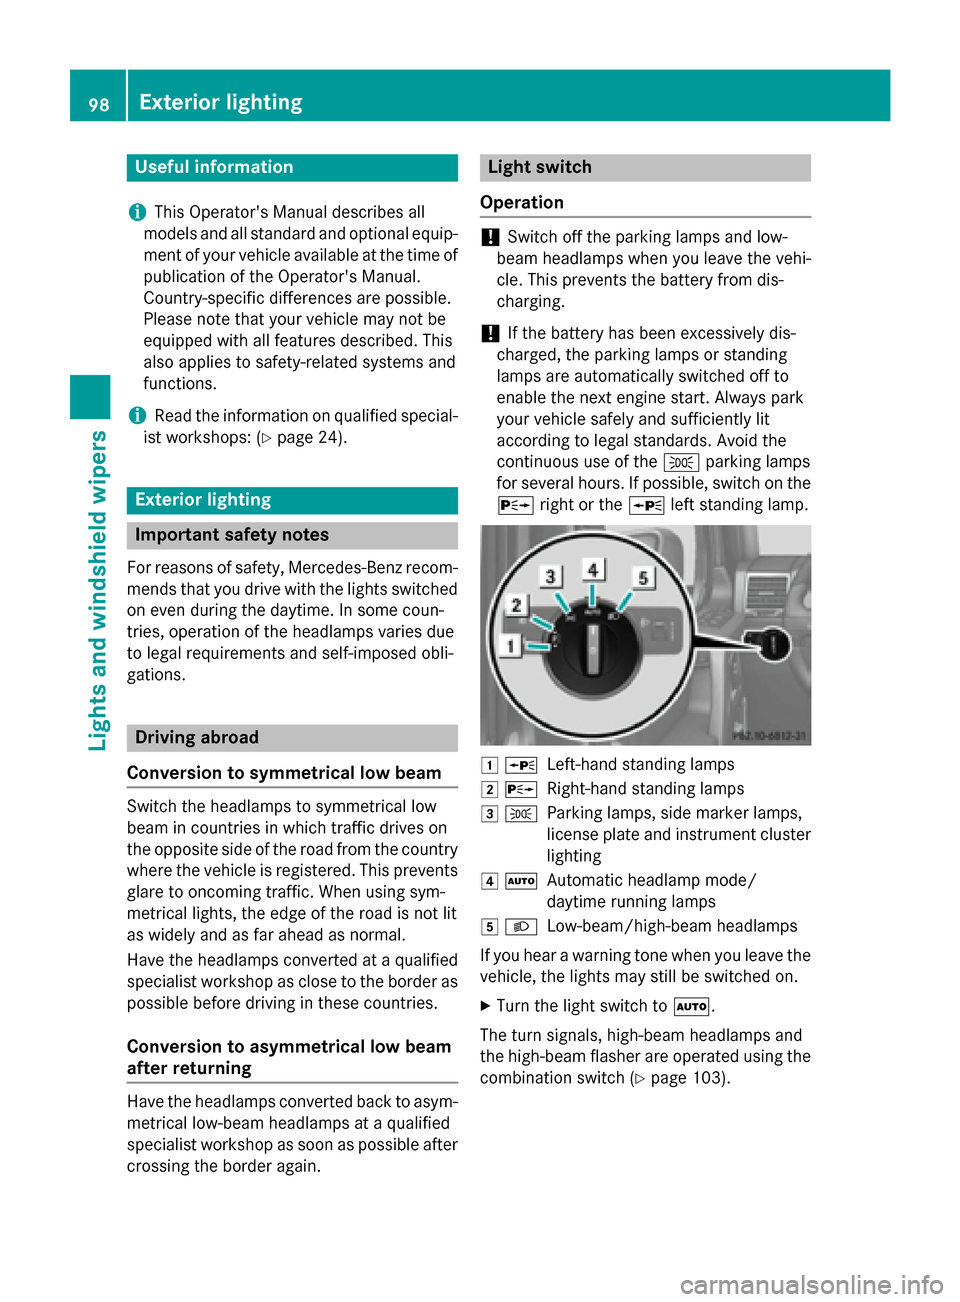
X right or the Wleft standing lamp. 1
W
Left-hand standing lamps
2 X
Right-hand standing lamps
3 T
Parking lamps, side marker lamps,
license plate and instrument cluster lighting
4 Ã
Automatic headlamp mode/
daytime running lamps
5 L
Low-beam/high-beam headlamps
If you hear a warning tone when you leave the
vehicle, the lights may still be switched on.
X Turn the light switch to Ã.
The turn signals, high-beam headlamps and
the high-beam flasher are operated using the combination switch (Y page 103).98
Exterior lightingLights and windshield wipers
Page 107 of 350
nal or turn the steering wheel to the straight-
ahead position.
The cornering lamp may remain lit for a short
time, but is automatically switched off after
no more than three minutes. Headlamps and indicator lamps fog-
ged up on the inside
The headlamps and the indicator lamps in the exterior mirrors may fog up on the inside if
there is high atmospheric humidity.
X Drive with the headlamps switched on.
The level of moisture diminishes, depend-
ing on the length of the journey and the
weather conditions (humidity and temper-
ature).
If the level of moisture does not diminish:
X Have the headlamps checked at a qualified
specialist workshop. Interior lighting
Overview of interior lighting
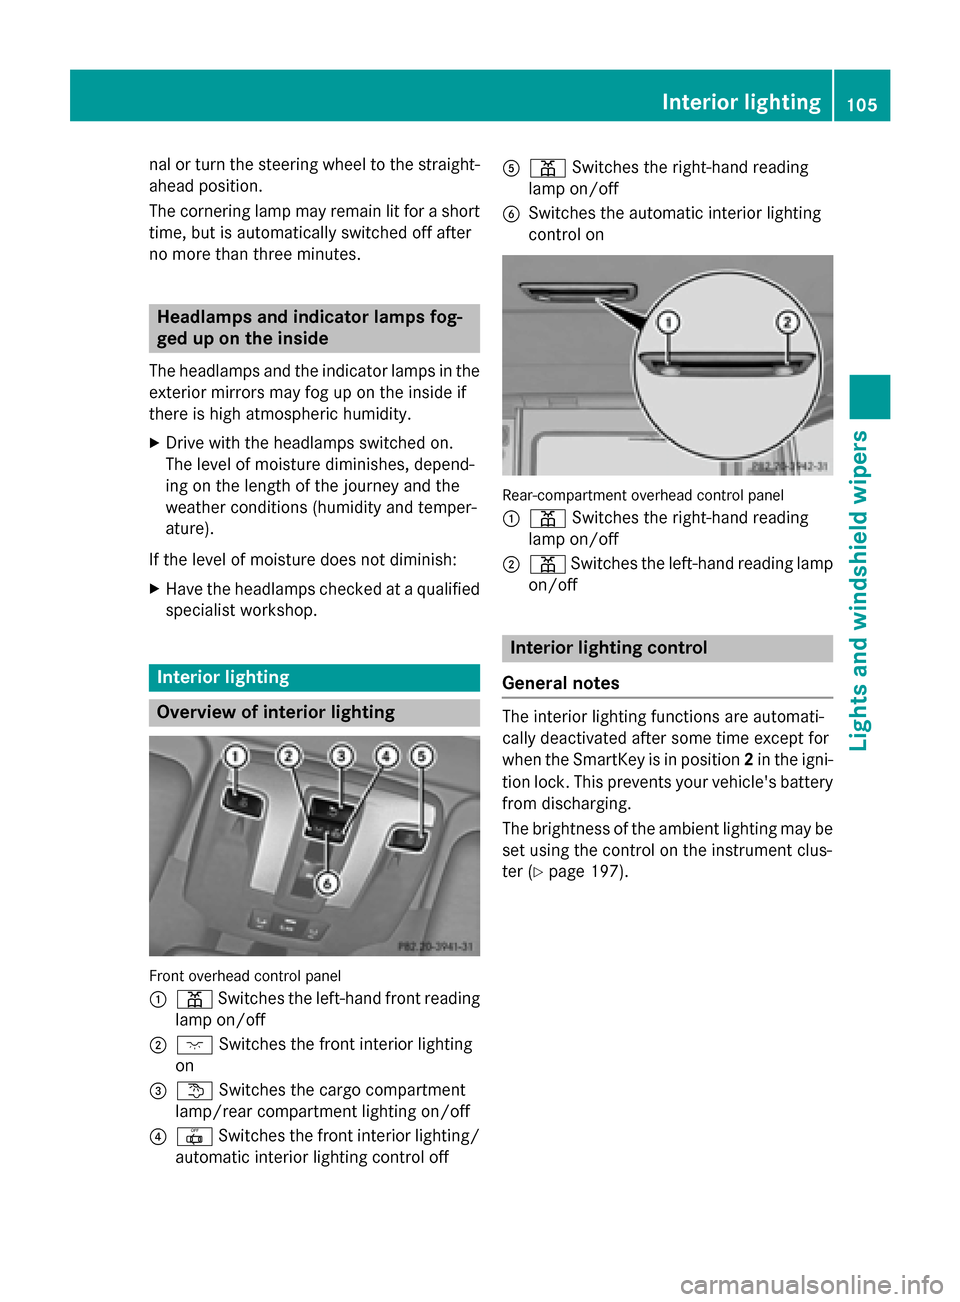
Front overhead control panel
:
p Switches the left-hand front reading
lamp on/off
; c Switches the front interior lighting
on
= t Switches the cargo compartment
lamp/rear compartment lighting on/off
? | Switches the front interior lighting/
automatic interior lighting control off A
p Switches the right-hand reading
lamp on/off
B Switches the automatic interior lighting
control on Rear-compartment overhead control panel
: p Switches the right-hand reading
lamp on/off
; p Switches the left-hand reading lamp
on/off Interior lighting control
General notes The interior lighting functions are automati-
cally deactivated after some time except for
when the SmartKey is in position 2in the igni-
tion lock. This prevents your vehicle's battery from discharging.
The brightness of the ambient lighting may beset using the control on the instrument clus-
ter (Y page 197). Interior lighting
105Lights andwindshield wipers Z
Page 108 of 350
Automatic interior lighting control
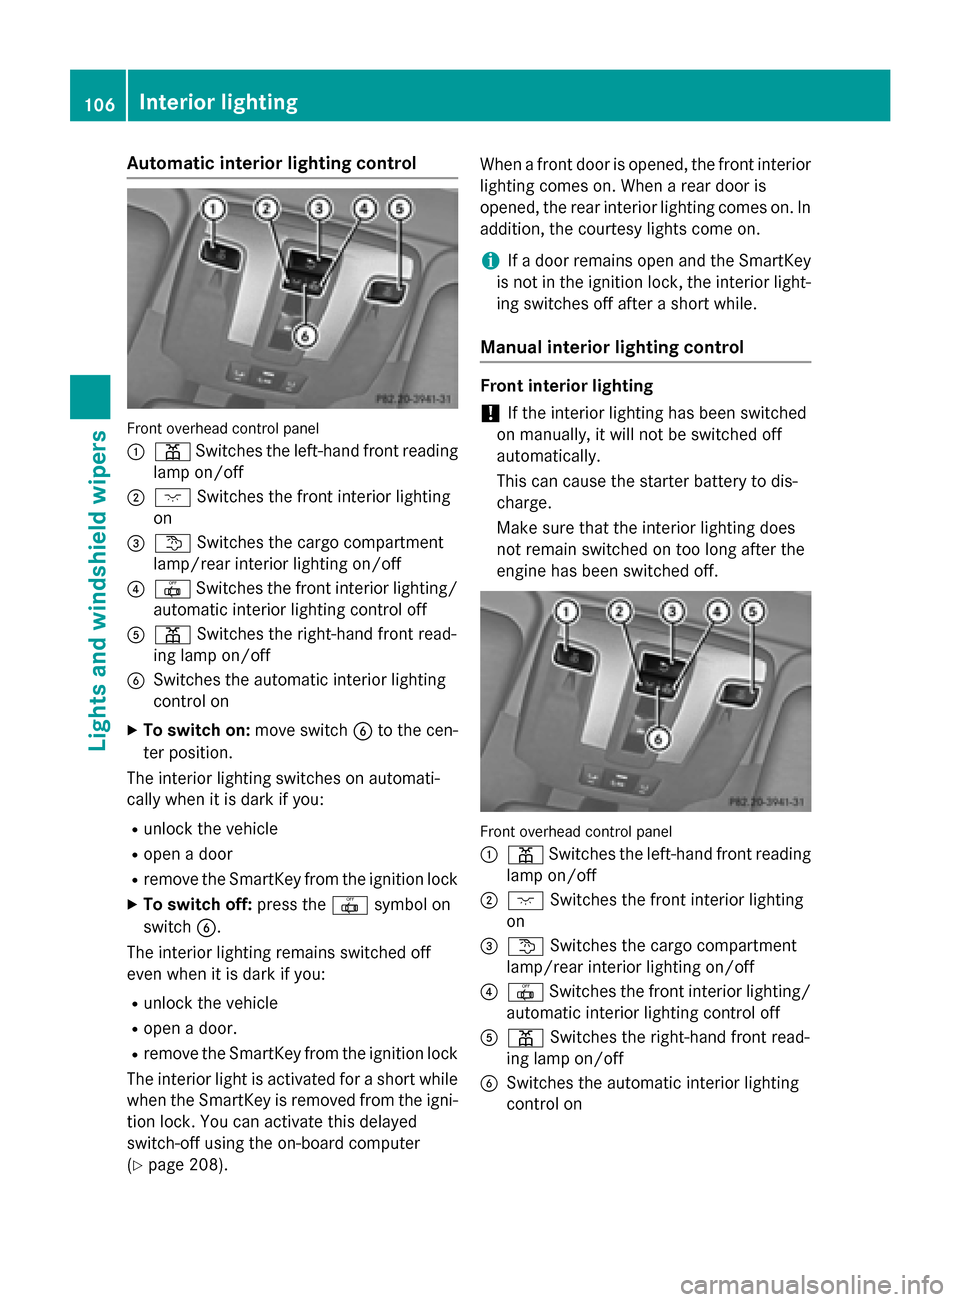
Front overhead control panel
: p Switches the left-hand front reading
lamp on/off
; c Switches the front interior lighting
on
= t Switches the cargo compartment
lamp/rear interior lighting on/off
? | Switches the front interior lighting/
automatic interior lighting control off
A p Switches the right-hand front read-
ing lamp on/off
B Switches the automatic interior lighting
control on
X To switch on: move switchBto the cen-
ter position.
The interior lighting switches on automati-
cally when it is dark if you:
R unlock the vehicle
R open a door
R remove the SmartKey from the ignition lock
X To switch off: press the|symbol on
switch B.
The interior lighting remains switched off
even when it is dark if you:
R unlock the vehicle
R open a door.
R remove the SmartKey from the ignition lock
The interior light is activated for a short while when the SmartKey is removed from the igni-
tion lock. You can activate this delayed
switch-off using the on-board computer
(Y page 208). When a front door is opened, the front interior
lighting comes on. When a rear door is
opened, the rear interior lighting comes on. In addition, the courtesy lights come on.
i If a door remains open and the SmartKey
is not in the ignition lock, the interior light- ing switches off after a short while.
Manual interior lighting control Front interior lighting
! If the interior lighting has been switched
on manually, it will not be switched off
automatically.
This can cause the starter battery to dis-
charge.
Make sure that the interior lighting does
not remain switched on too long after the
engine has been switched off. Front overhead control panel
:
p Switches the left-hand front reading
lamp on/off
; c Switches the front interior lighting
on
= t Switches the cargo compartment
lamp/rear interior lighting on/off
? | Switches the front interior lighting/
automatic interior lighting control off
A p Switches the right-hand front read-
ing lamp on/off
B Switches the automatic interior lighting
control on 106
Interior lightingLights and windshield wipers
Page 109 of 350
X
To switch on: press thecsymbol on
switch B.
X To switch off: set switchBto the center
position.
Reading lamps Front overhead control panel
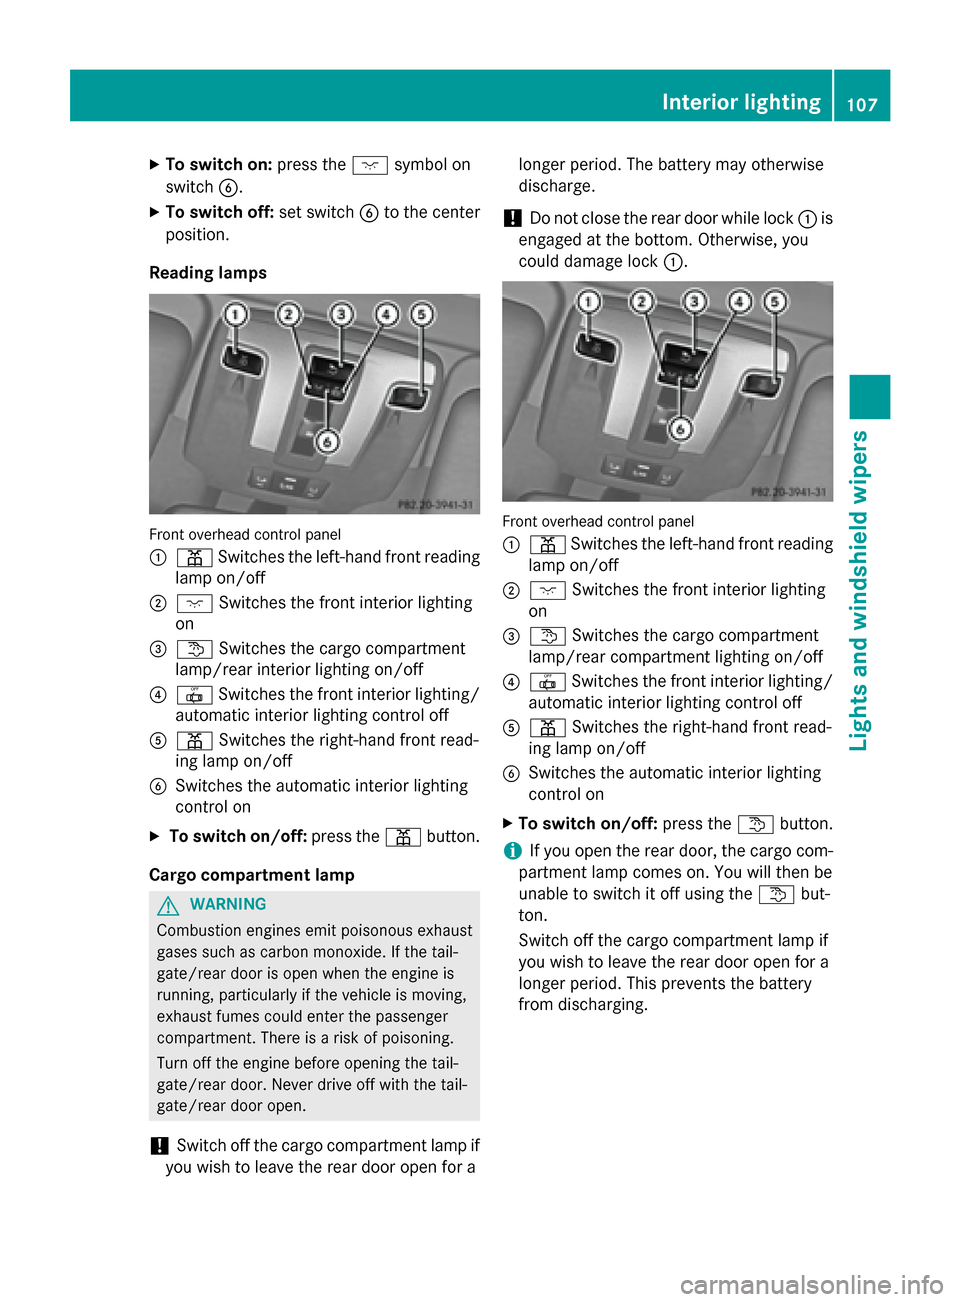
:
p Switches the left-hand front reading
lamp on/off
; c Switches the front interior lighting
on
= t Switches the cargo compartment
lamp/rear interior lighting on/off
? | Switches the front interior lighting/
automatic interior lighting control off
A p Switches the right-hand front read-
ing lamp on/off
B Switches the automatic interior lighting
control on
X To switch on/off: press thepbutton.
Cargo compartment lamp G
WARNING
Combustion engines emit poisonous exhaust
gases such as carbon monoxide. If the tail-
gate/rear door is open when the engine is
running, particularly if the vehicle is moving,
exhaust fumes could enter the passenger
compartment. There is a risk of poisoning.
Turn off the engine before opening the tail-
gate/rear door. Never drive off with the tail-
gate/rear door open.
! Switch off the cargo compartment lamp if
you wish to leave the rear door open for a longer period. The battery may otherwise
discharge.
! Do not close the rear door while lock
:is
engaged at the bottom. Otherwise, you
could damage lock :. Front overhead control panel
:
p Switches the left-hand front reading
lamp on/off
; c Switches the front interior lighting
on
= t Switches the cargo compartment
lamp/rear compartment lighting on/off
? | Switches the front interior lighting/
automatic interior lighting control off
A p Switches the right-hand front read-
ing lamp on/off
B Switches the automatic interior lighting
control on
X To switch on/off: press thetbutton.
i If you open the rear door, the cargo com-
partment lamp comes on. You will then be
unable to switch it off using the tbut-
ton.
Switch off the cargo compartment lamp if
you wish to leave the rear door open for a
longer period. This prevents the battery
from discharging. Interior lighting
107Lights andwindshield wipers Z
Page 110 of 350
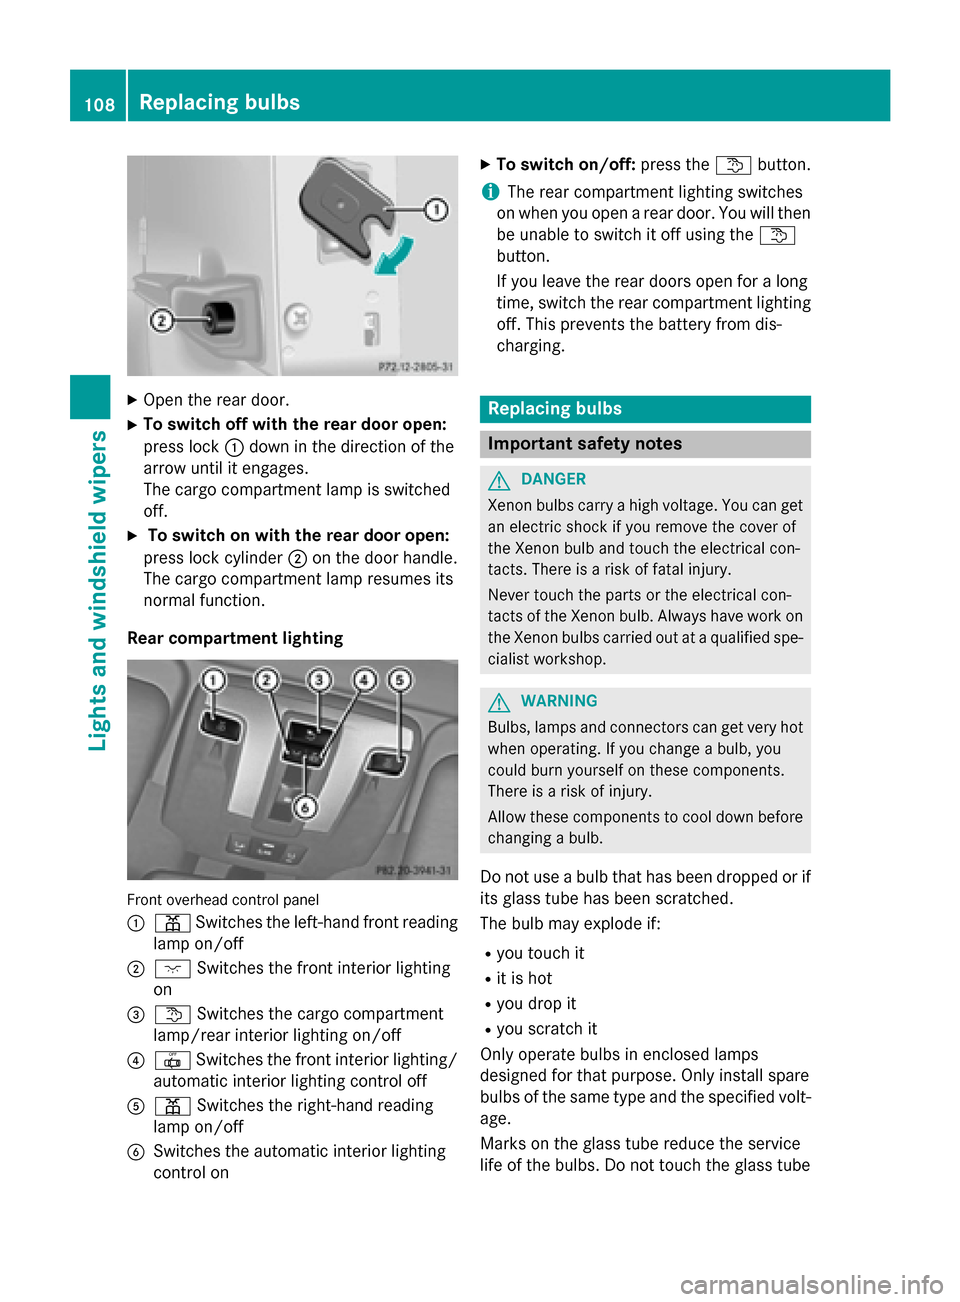
X
Open the rear door.
X To switch off with the rear door open:
press lock :down in the direction of the
arrow until it engages.
The cargo compartment lamp is switched
off.
X To switch on with the rear door open:
press lock cylinder ;on the door handle.
The cargo compartment lamp resumes its
normal function.
Rear compartment lighting Front overhead control panel
:
p Switches the left-hand front reading
lamp on/off
; c Switches the front interior lighting
on
= t Switches the cargo compartment
lamp/rear interior lighting on/off
? | Switches the front interior lighting/
automatic interior lighting control off
A p Switches the right-hand reading
lamp on/off
B Switches the automatic interior lighting
control on X
To switch on/off: press thetbutton.
i The rear compartment lighting switches
on when you open a rear door. You will then be unable to switch it off using the t
button.
If you leave the rear doors open for a long
time, switch the rear compartment lighting
off. This prevents the battery from dis-
charging. Replacing bulbs
Important safety notes
G
DANGER
Xenon bulbs carry a high voltage. You can get an electric shock if you remove the cover of
the Xenon bulb and touch the electrical con-
tacts. There is a risk of fatal injury.
Never touch the parts or the electrical con-
tacts of the Xenon bulb. Always have work on
the Xenon bulbs carried out at a qualified spe-
cialist workshop. G
WARNING
Bulbs, lamps and connectors can get very hot when operating. If you change a bulb, you
could burn yourself on these components.
There is a risk of injury.
Allow these components to cool down before changing a bulb.
Do not use a bulb that has been dropped or if
its glass tube has been scratched.
The bulb may explode if:
R you touch it
R it is hot
R you drop it
R you scratch it
Only operate bulbs in enclosed lamps
designed for that purpose. Only install spare
bulbs of the same type and the specified volt- age.
Marks on the glass tube reduce the service
life of the bulbs. Do not touch the glass tube 108
Replacing bulbsLights and windshield wipers
Page 128 of 350
Defrosting the windows
Windows fogged up on the inside X
Activate the Ácooling with air dehu-
midification function.
X Activate automatic mode Ã.
X If the windows continue to fog up, activate
the defrosting function (Y page 125).
i You should only select this setting until
the windshield is clear again.
Windows fogged up on the outside X
Switch on the windshield wipers
(Y page 114).
X Press the _button repeatedly until the
P orO symbol appears in the dis-
play.
i You should only select this setting until
the windshield is clear again. Switching the windshield defroster
on/off
G
WARNING
Any accumulation of snow and ice should be
removed from the windshield before driving.
Otherwise, your vision may be impaired,
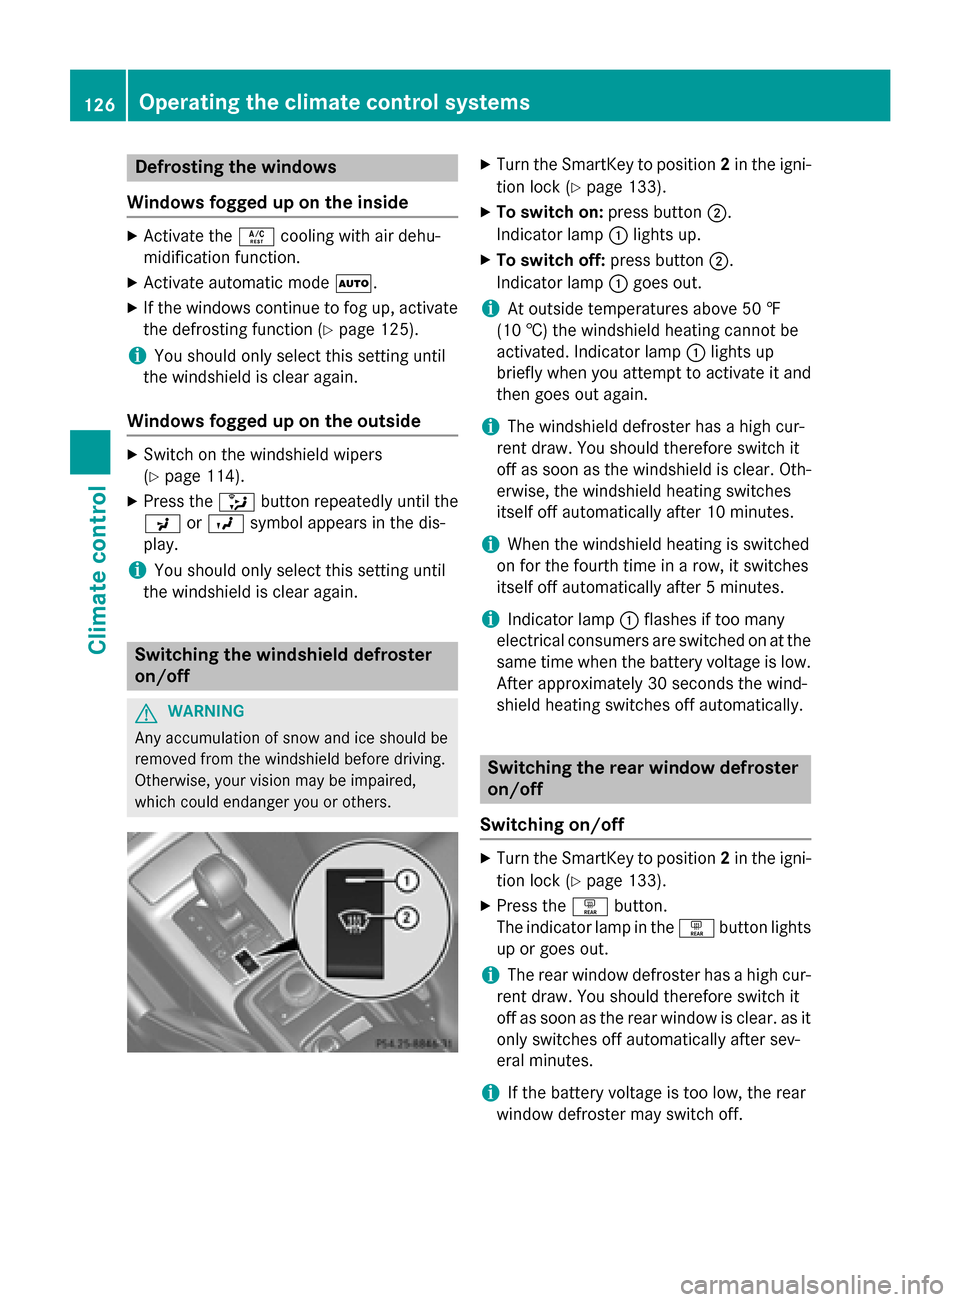
which could endanger you or others. X
Turn the SmartKey to position 2in the igni-
tion lock (Y page 133).
X To switch on: press button;.
Indicator lamp :lights up.
X To switch off: press button;.
Indicator lamp :goes out.
i At outside temperatures above 50 ‡
(10 †) the windshield heating cannot be
activated. Indicator lamp :lights up
briefly when you attempt to activate it and
then goes out again.
i The windshield defroster has a high cur-
rent draw. You should therefore switch it
off as soon as the windshield is clear. Oth-
erwise, the windshield heating switches
itself off automatically after 10 minutes.
i When the windshield heating is switched
on for the fourth time in a row, it switches
itself off automatically after 5 minutes.
i Indicator lamp
:flashes if too many
electrical consumers are switched on at the
same time when the battery voltage is low. After approximately 30 seconds the wind-
shield heating switches off automatically. Switching the rear window defroster
on/off
Switching on/off X
Turn the SmartKey to position 2in the igni-
tion lock (Y page 133).
X Press the ªbutton.
The indicator lamp in the ªbutton lights
up or goes out.
i The rear window defroster has a high cur-
rent draw. You should therefore switch it
off as soon as the rear window is clear. as it
only switches off automatically after sev-
eral minutes.
i If the battery voltage is too low, the rear
window defroster may switch off. 126
Operating the climate cont
rol systemsClimate control