check engine light MERCEDES-BENZ G-CLASS SUV 2012 User Guide
[x] Cancel search | Manufacturer: MERCEDES-BENZ, Model Year: 2012, Model line: G-CLASS SUV, Model: MERCEDES-BENZ G-CLASS SUV 2012Pages: 357, PDF Size: 8.86 MB
Page 174 of 357
Checklist after driving off-road
Driving ove
rrough terrain places greater
demands on your vehicle than driving on nor-
mal roads. After driving off-road, check the
vehicle. This allows you to detect damage
promptly and reduce the risk of an accident
to yourself and other road users.
X Shift the transfer case to HIGH
RANGE(Y page 202).
X Disengage the differential locks
(Y page 204).
X Clean the headlamps and rear lights and
check for damage.
X Clean the front and rear licence plates.
X Clean the wheels and tyres with a water jet
and remove any foreign objects.
X Clean the wheels, tyres, wheel arches and
the vehicle underside with a water jet;
check for any foreign objects and damage.
X Check whether twigs or other parts of
plants have become trapped. These
increase the risk of fire and can damage
fuel pipes, brake hoses or the rubber bel-
lows of the axle joints and propeller shafts.
X After the trip, examine without fail the
entire undercarriage, wheels, tyres, brakes,
bodywork structure, steering, chassis and
exhaust system for damage.
X After driving for extended periods across
sand, mud, gravel, water or in similarly dirty
conditions, have the brake discs, wheels,
brake pads/linings and axle joints checked
and cleaned.
X If you notice strong vibrations after off-road
driving, check for foreign objects in the
wheels and drive train and, if necessary,
remove them. Foreign objects can disturb
the balance and cause vibrations. Driving on sand Observe the following rules when driving on
sand:
R
Shift the transfer case to LOW
RANGE(Y page 202).
R Avoid high engine speeds.
R Limit the shift range of the automatic trans-
mission according to the off-road condi-
tions.
R Drive quickly to overcome the rolling resist-
ance. Otherwise, the vehicle could dig itself
into the sand.
R Drive in the tracks of other vehicles if pos-
sible. Make sure that the ruts are not too
deep, that the sand is firm enough and that
your vehicle has sufficient ground clear-
ance.
Tyre ruts and gravel roads !
Check that the ruts are not too deep and
that your vehicle has sufficient clearance.
Otherwise, your vehicle could be damaged
or bottom out and get stuck.
Observe the following rules when driving
along ruts in off-road terrain or on roads with
loose gravel:
R Shift the transfer case to LOW
RANGE(Y page 202).
R Avoid high engine speeds.
R Observe the safety notes (Y page 169) and
the general notes (Y page 169) on off-road
driving.
R Restrict the shift range of the automatic
transmission to 1(Ypage 153).
R Drive slowly.
R Where ruts are too deep, drive with the
wheels on one side on the middle section
of turf if possible.
Driving over obstacles !
Obstacles could damage the floor of the
vehicle or components of the chassis. Ask
passengers for guidance when driving over Driving tips
171Driving and parking Z
Page 176 of 357
R
Accelerate gently and make sure that the
wheels are gripping.
R Avoid high engine speeds, except when
driving on sandy and muddy routes with
high driving resistance.
R Whe ndriving downaslope, use the braking
power of the engine. Observe the engine
speed; do not overrev the engine.
R Select a shift range appropriate to the gra-
dient.
R Before tackling steep downhill gradients,
select shift range 1(Ypage 153).
R Always check the brakes after driving off-
road.
Maximum gradient-climbing capability On good road surfaces and with the
LOW
RANGE gear selected, the maximum gradi-
ent-climbing capability is 80%.
i If the load on the front axle is reduced
when pulling away on a steep uphill slope,
the front wheels have a tendency to spin.
4ETS recognises this and brakes the
wheels accordingly. The rear wheel torque
is increased and it is easier to pull away.
Hilltops When driving up an uphill gradient, slightly
reduce pressure on the accelerator immedi-
ately before reaching the brow of the hill.
Make use of the vehicle's own impetus to
travel over the brow.
This style of driving prevents:
R the vehicle from lifting off the ground on the
brow of a hill
R loss of traction
R the vehicle from travelling too quickly down
the other side.
Driving downhill R
Before tackling steep downhill gradients,
select shift range 1(Ypage 153). This way you use the engine's braking
effect to reduce the speed. If this is not
sufficient, brake gently. When doing so,
make sure that the vehicle is facing in the
direction of the line of fall.
R Observe the notes on driving in mountain-
ous terrain (Y page 173).
R Drive slowly.
R Do not drive at an angle down steep
inclines. Steer into the line of fall and drive
with the front wheels aligned straight. Oth-
erwise, the vehicle could slip sideways, tip
and overturn.
R Check that the brakes are working normally
after a long downhill stretch. Driving systems
Cruise control
Important safety notes G
WARNING
The brake pedal moves when cruise control
brakes the vehicle. Afoot in the area under
the brake pedal could become trapped. The
movement of the pedal, and therefore the
vehicle's ability to brake, may be restricted by
objects in the area under the brake. There is
a risk of an accident and injury.
Do not place your foot under the brake pedal.
Keep the area under the brake pedal free from
obstructions.
If you fail to adapt your driving style, cruise
control can neither reduce the risk of acci-
dent nor override the laws of physics. Cruise
control cannot take account of road, weather
and traffic conditions. Cruise control is only
an aid. You are responsible for the distance
to the vehicle in front, for vehicle speed and
for braking in good time. Adjust your driving
style to the traffic conditions. Only engage
cruise control when the current road, weather
and traffic conditions permit it to be done
safely. Drive carefully and maintain a suitable
distance to the vehicle in front. Driving systems
173Driving and parking Z
Page 183 of 357
to the vehicle in front, for vehicle speed, for
braking in good time and for staying in lane.
Only engage SPEEDTRONIC when the current
road, weather and traffi
cconditions permit it
to be done safely. Drive carefully and main-
tain a suitable distance to the vehicle in front.
X Check whether LIM indicator lamp ;is on.
If it is on, variable SPEEDTRONIC is already
selected.
If it is not, press the cruise control lever in
the direction of arrow A.
LIM indicator lamp ;in the cruise control
lever lights up. Variable SPEEDTRONIC is
selected.
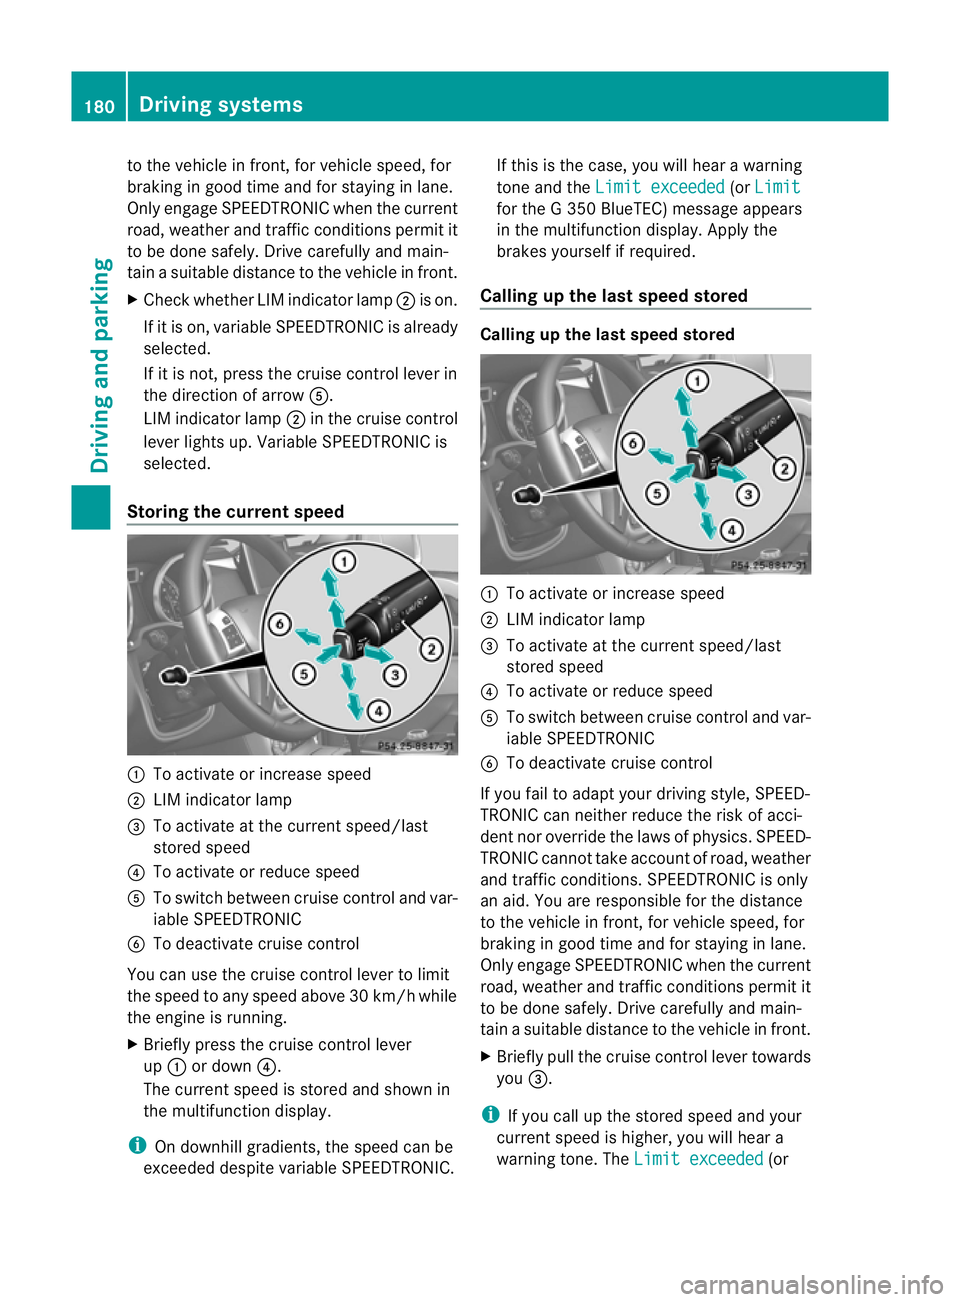
Storing the current speed :
To activate or increase speed
; LIM indicator lamp
= To activate at the current speed/last
stored speed
? To activate or reduce speed
A To switch between cruise control and var-
iable SPEEDTRONIC
B To deactivate cruise control
You can use the cruise control lever to limit
the speed to any speed above 30 km/hw hile
the engine is running.
X Briefly press the cruise control lever
up : or down ?.
The current speed is stored and shown in
the multifunction display.
i On downhill gradients, the speed can be
exceeded despite variable SPEEDTRONIC. If this is the case, you will hear a warning
tone and the
Limit exceeded (or
Limit for the G 350 BlueTEC) message appears
in the multifunction display. Apply the
brakes yourself if required.
Calling up the last speed stored Calling up the last speed stored
:
To activate or increase speed
; LIM indicator lamp
= To activate at the current speed/last
stored speed
? To activate or reduce speed
A To switch between cruise control and var-
iable SPEEDTRONIC
B To deactivate cruise control
If you fail to adapt your driving style, SPEED-
TRONIC can neither reduce the risk of acci-
dent nor override the laws of physics. SPEED-
TRONIC cannot take account of road, weather
and traffic conditions. SPEEDTRONIC is only
an aid. You are responsible for the distance
to the vehicle in front, for vehicle speed, for
braking in good time and for staying in lane.
Only engage SPEEDTRONIC when the current
road, weather and traffic conditions permit it
to be done safely. Drive carefully and main-
tain a suitable distance to the vehicle in front.
X Briefly pull the cruise control lever towards
you =.
i If you call up the stored speed and your
current speed is higher, you will hear a
warning tone. The Limit exceeded (or180
Driving systemsDriving and parking
Page 195 of 357
The brightness of the indicator/warning
lamps is adjusted automatically according to
the ambient light.
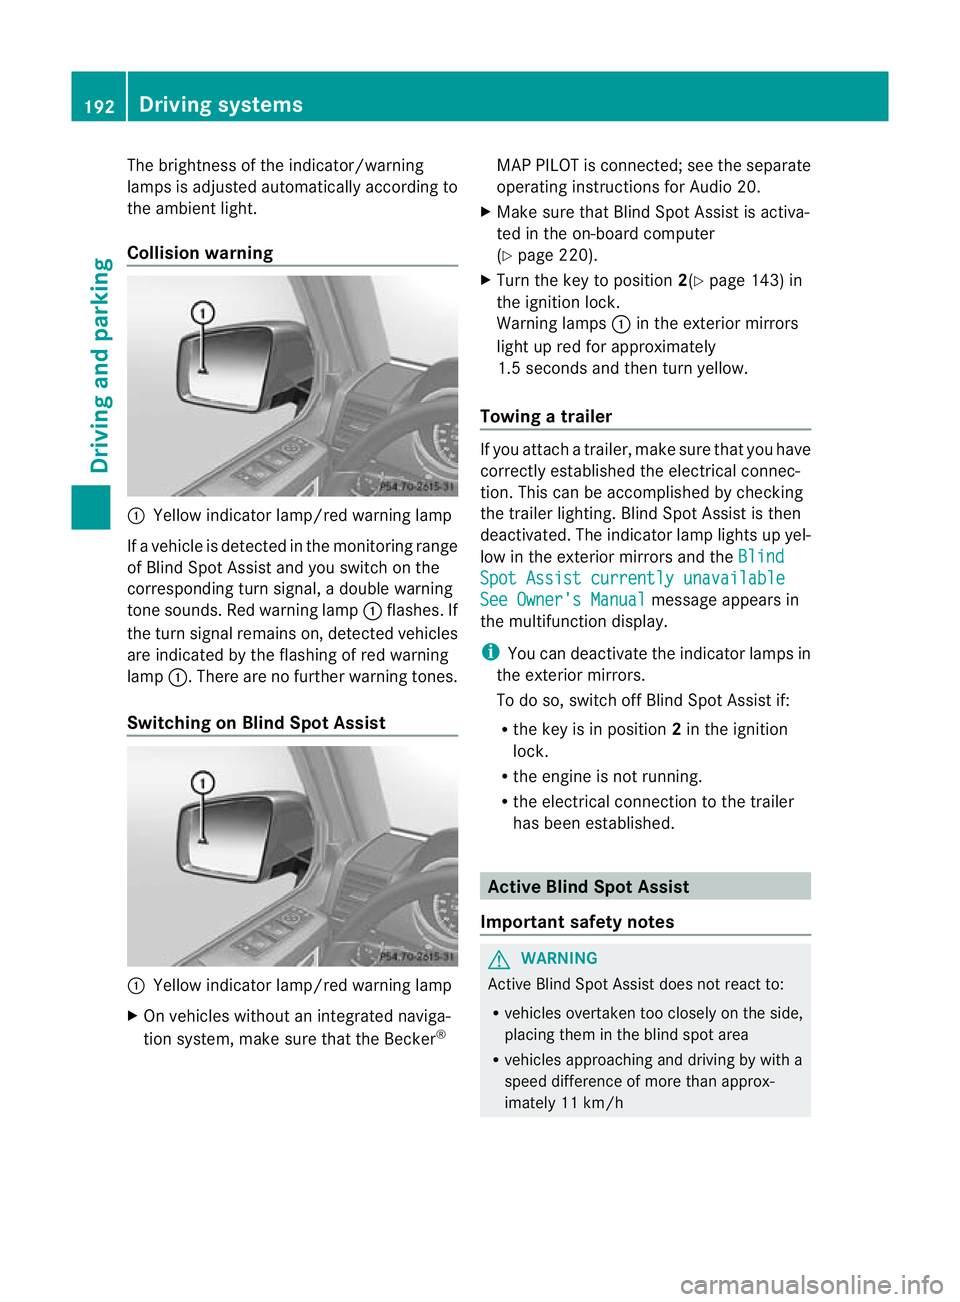
Collision warning
:
Yellow indicator lamp/red warning lamp
If a vehicle is detected in the monitoring range
of Blind Spot Assist and you switch on the
corresponding turn signal, a double warning
tone sounds. Red warning lamp :flashes. If
the turn signal remains on, detected vehicles
are indicated by the flashing of red warning
lamp :.There are no further warning tones.
Switching on Blind Spot Assist :
Yellow indicator lamp/red warning lamp
X On vehicles without an integrated naviga-
tion system, make sure that the Becker ®MAP PILOT is connected; see the separate
operating instructions for Audio 20.
X Make sure that Blind Spot Assist is activa-
ted in the on-board computer
(Y page 220).
X Turn the key to position 2(Ypage 143) in
the ignition lock.
Warning lamps :in the exterior mirrors
light up red for approximately
1.5 seconds and then turn yellow.
Towing atrailer If you attach a trailer, make sure tha
tyou have
correctly established the electrical connec-
tion. This can be accomplished by checking
the trailer lighting. Blind Spot Assist is then
deactivated. The indicator lamp lights up yel-
low in the exterior mirrors and the Blind Spot Assist currently unavailable
See Owner's Manual message appears in
the multifunction display.
i You can deactivate the indicator lamps in
the exterior mirrors.
To do so, switch off Blind Spot Assist if:
R the key is in position 2in the ignition
lock.
R the engine is not running.
R the electrical connection to the trailer
has been established. Active Blind Spot Assist
Important safety notes G
WARNING
Active Blind Spot Assist does not react to:
R vehicles overtaken too closely on the side,
placing them in the blind spot area
R vehicles approaching and driving by with a
speed difference of more than approx-
imately 11 km/h 192
Driving systemsDriving and parking
Page 199 of 357
X
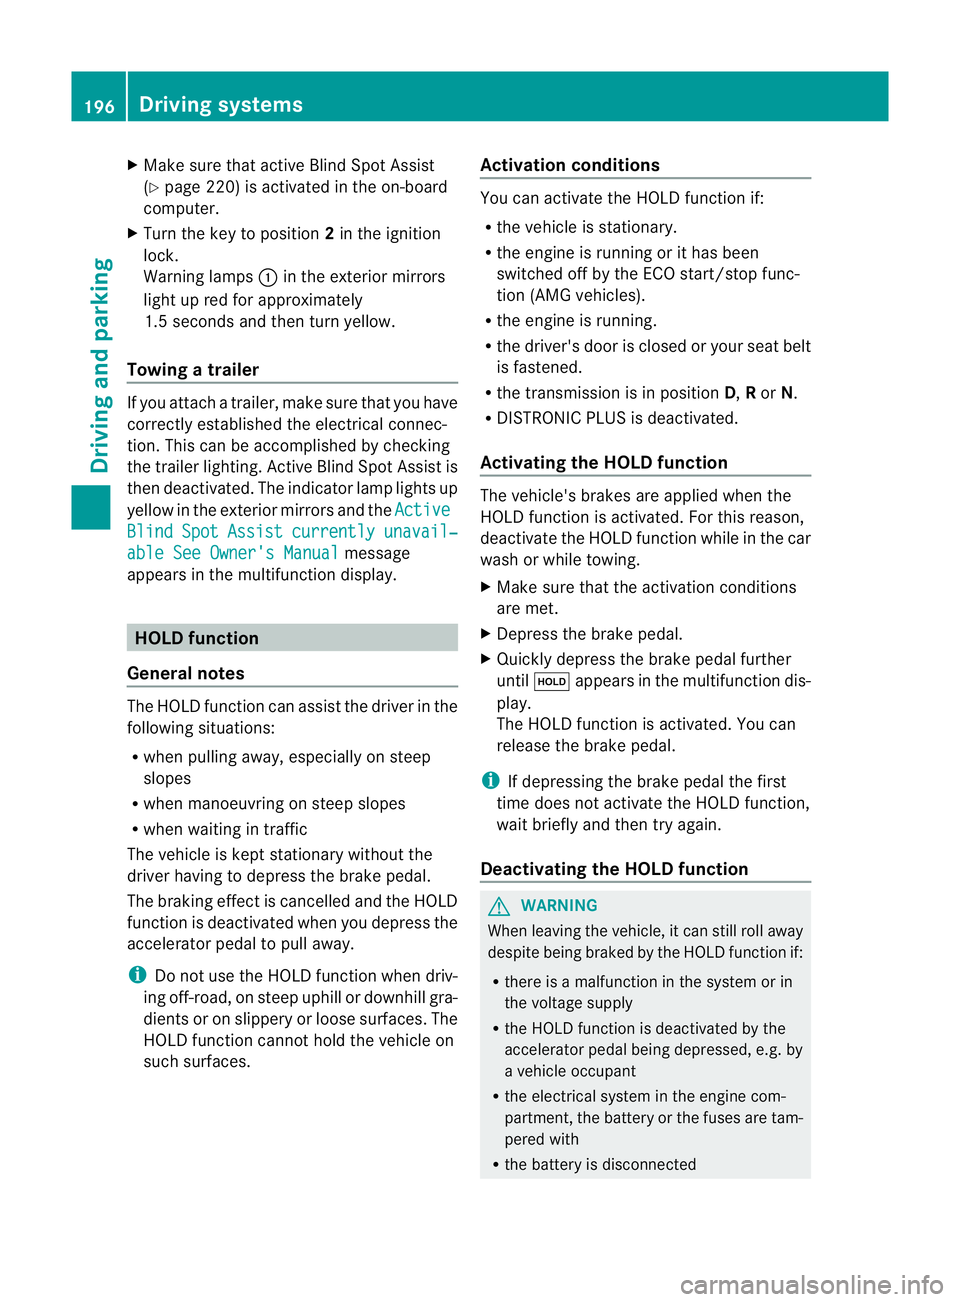
Make sure that active Blind Spot Assist
(Y page 220) is activated in the on-board
computer.
X Turn the key to position 2in the ignition
lock.
Warning lamps :in the exterior mirrors
light up red for approximately
1.5 seconds and then turn yellow.
Towing atrailer If you attach a trailer, make sure tha
tyou have
correctly established the electrical connec-
tion. This can be accomplished by checking
the trailer lighting. Active Blind Spot Assist is
then deactivated. The indicator lamp lights up
yellow in the exterior mirrors and the ActiveBlind Spot Assist currently unavail‐
able See Owner's Manual message
appears in the multifunction display. HOLD function
General notes The HOLD function can assist the driver in the
following situations:
R
when pulling away, especially on steep
slopes
R when manoeuvring on steep slopes
R when waiting in traffic
The vehicle is kept stationary without the
driver having to depress the brake pedal.
The braking effect is cancelled and the HOLD
function is deactivated when you depress the
accelerator pedal to pull away.
i Do not use the HOLD function when driv-
ing off-road, on steep uphill or downhill gra-
dients or on slippery or loose surfaces. The
HOLD function cannot hold the vehicle on
such surfaces. Activation conditions You can activate the HOLD function if:
R
the vehicle is stationary.
R the engine is running or it has been
switched off by the ECO start/stop func-
tion (AMG vehicles).
R the engine is running.
R the driver's door is closed or your seat belt
is fastened.
R the transmission is in position D,Ror N.
R DISTRONIC PLUS is deactivated.
Activating the HOLD function The vehicle's brakes are applied when the
HOLD function is activated. For this reason,
deactivate the HOLD function while in the car
wash or while towing.
X
Make sure that the activation conditions
are met.
X Depress the brake pedal.
X Quickly depress the brake pedal further
until ë appears in the multifunction dis-
play.
The HOLD function is activated. You can
release the brake pedal.
i If depressing the brake pedal the first
time does not activate the HOLD function,
wait briefly and then try again.
Deactivating the HOLD function G
WARNING
When leaving the vehicle, it can still roll away
despite being braked by the HOLD function if:
R there is a malfunction in the system or in
the voltage supply
R the HOLD function is deactivated by the
accelerator pedal being depressed, e.g. by
a vehicle occupant
R the electrical system in the engine com-
partment, the battery or the fuses are tam-
pered with
R the battery is disconnected 196
Driving systemsDriving and parking
Page 206 of 357
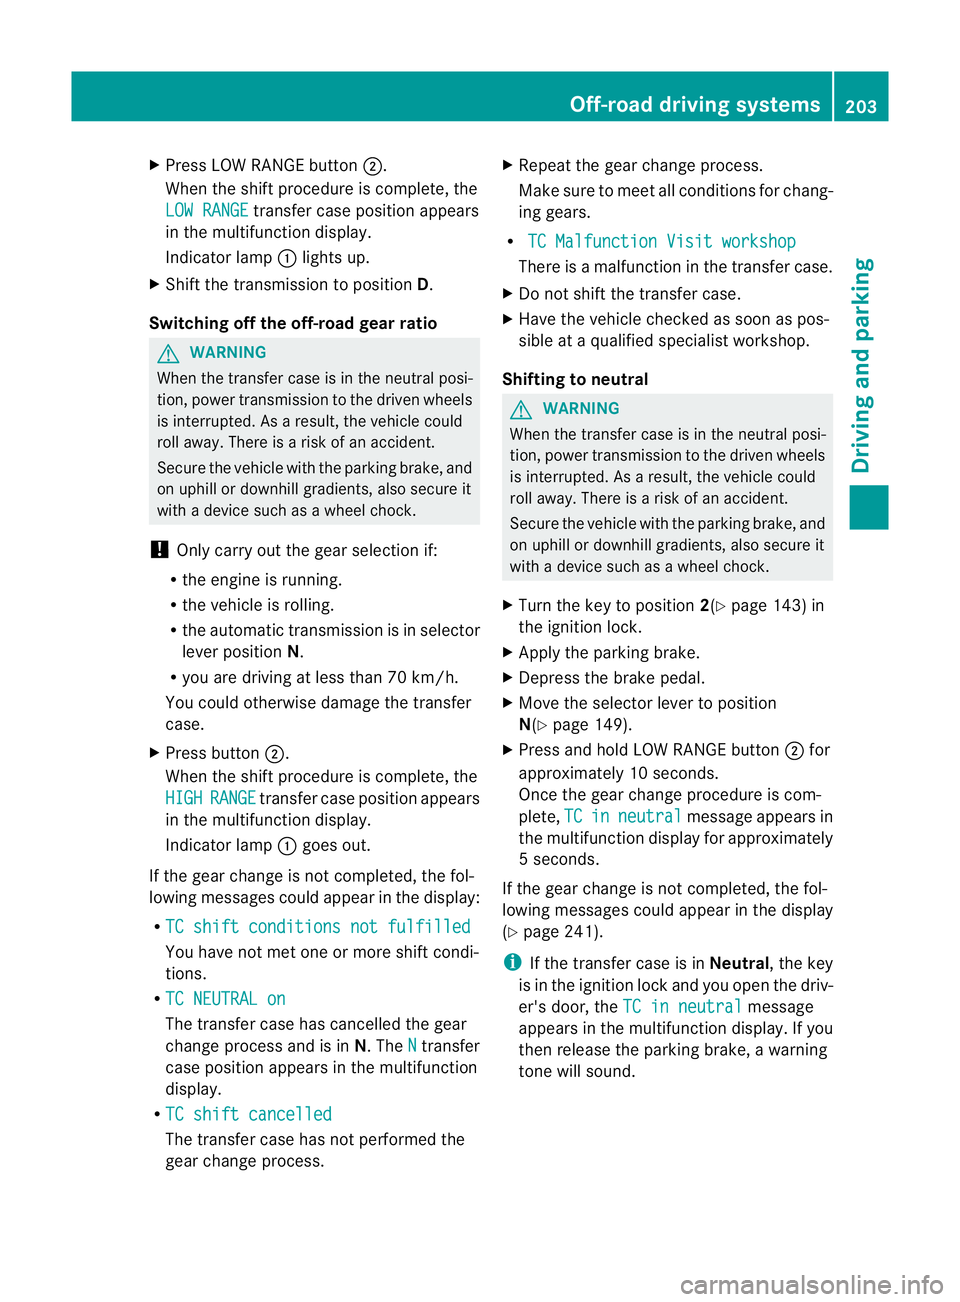
X
Press LOW RANGE button ;.
When the shift procedure is complete, the
LOW RANGE transfer case position appears
in the multifunction display.
Indicator lamp :lights up.
X Shift the transmission to position D.
Switching off the off-road gear ratio G
WARNING
When the transfer case is in the neutral posi-
tion, power transmission to the driven wheels
is interrupted. As a result, the vehicle could
roll away .There is a risk of an accident.
Secure the vehicle with the parking brake, and
on uphill or downhill gradients, also secure it
with a device such as a wheel chock.
! Only carry out the gear selection if:
R the engine is running.
R the vehicle is rolling.
R the automatic transmission is in selector
lever position N.
R you are driving at less than 70 km/h.
You could otherwise damage the transfer
case.
X Press button ;.
When the shift procedure is complete, the
HIGH RANGE transfer case position appears
in the multifunction display.
Indicator lamp :goes out.
If the gear change is not completed, the fol-
lowing messages could appearint he display:
R TC shift conditions not fulfilled You have not met one or more shift condi-
tions.
R TC NEUTRAL on The transfer case has cancelled the gear
change process and is in N.TheN transfer
case position appears in the multifunction
display.
R TC shift cancelled The transfer case has not performed the
gear change process. X
Repeatt he gear change process.
Make sure to meet all conditions for chang-
ing gears.
R TC Malfunction Visit workshop There is a malfunction in the transfer case.
X Do not shift the transfer case.
X Have the vehicle checked as soon as pos-
sible at a qualified specialist workshop.
Shifting to neutral G
WARNING
When the transfer case is in the neutral posi-
tion, power transmission to the driven wheels
is interrupted. As a result, the vehicle could
roll away.T here is a risk of an accident.
Secure the vehicle with the parking brake, and
on uphill or downhill gradients, also secure it
with a device such as a wheel chock.
X Turn the key to position 2(Ypage 143) in
the ignition lock.
X Apply the parking brake.
X Depress the brake pedal.
X Move the selector lever to position
N(Y page 149).
X Press and hold LOW RANGE button ;for
approximately 10 seconds.
Once the gear change procedure is com-
plete, TC in neutral message appears in
the multifunction display for approximately
5s econds.
If the gear change is not completed, the fol-
lowing messages could appear in the display
(Y page 241).
i If the transfer case is in Neutral, the key
is in the ignition lock and you open the driv-
er's door, the TC in neutral message
appears in the multifunction display. If you
then release the parking brake, a warning
tone will sound. Off-road driving systems
203Driving and parking Z
Page 240 of 357
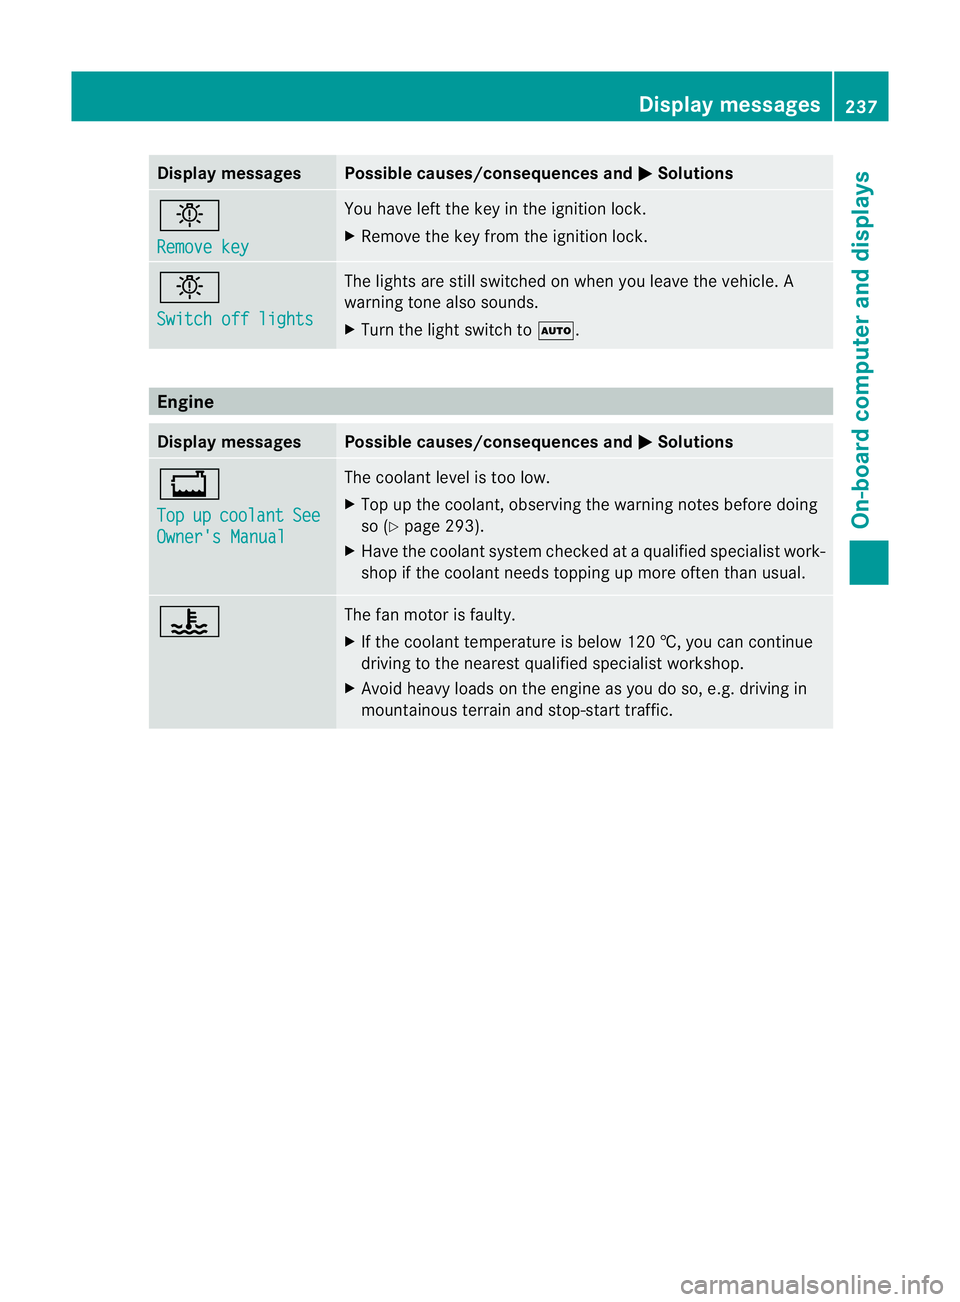
Display messages Possible causes/consequences and
M Solutions
b
Remove key You have lef
tthe key in the ignition lock.
X Remove the key from the ignition lock. b
Switch off lights The lights are still switched on when you leave the vehicle. A
warning tone also sounds.
X
Turn the light switch to Ã.Engine
Display messages Possible causes/consequences and
M Solutions
+
Top
up coolant See
Owner's Manual The coolant level is too low.
X
Top up the coolant, observing the warning notes before doing
so (Y page 293).
X Have the coolant system checked at a qualified specialist work-
shop if the coolant needs topping up more often than usual. ? The fan motor is faulty.
X
If the coolant temperature is below 120 †, you can continue
driving to the nearest qualified specialist workshop.
X Avoid heavy loads on the engine as you do so, e.g. driving in
mountainous terrain and stop-start traffic. Display messages
237On-board computer and displays Z
Page 260 of 357
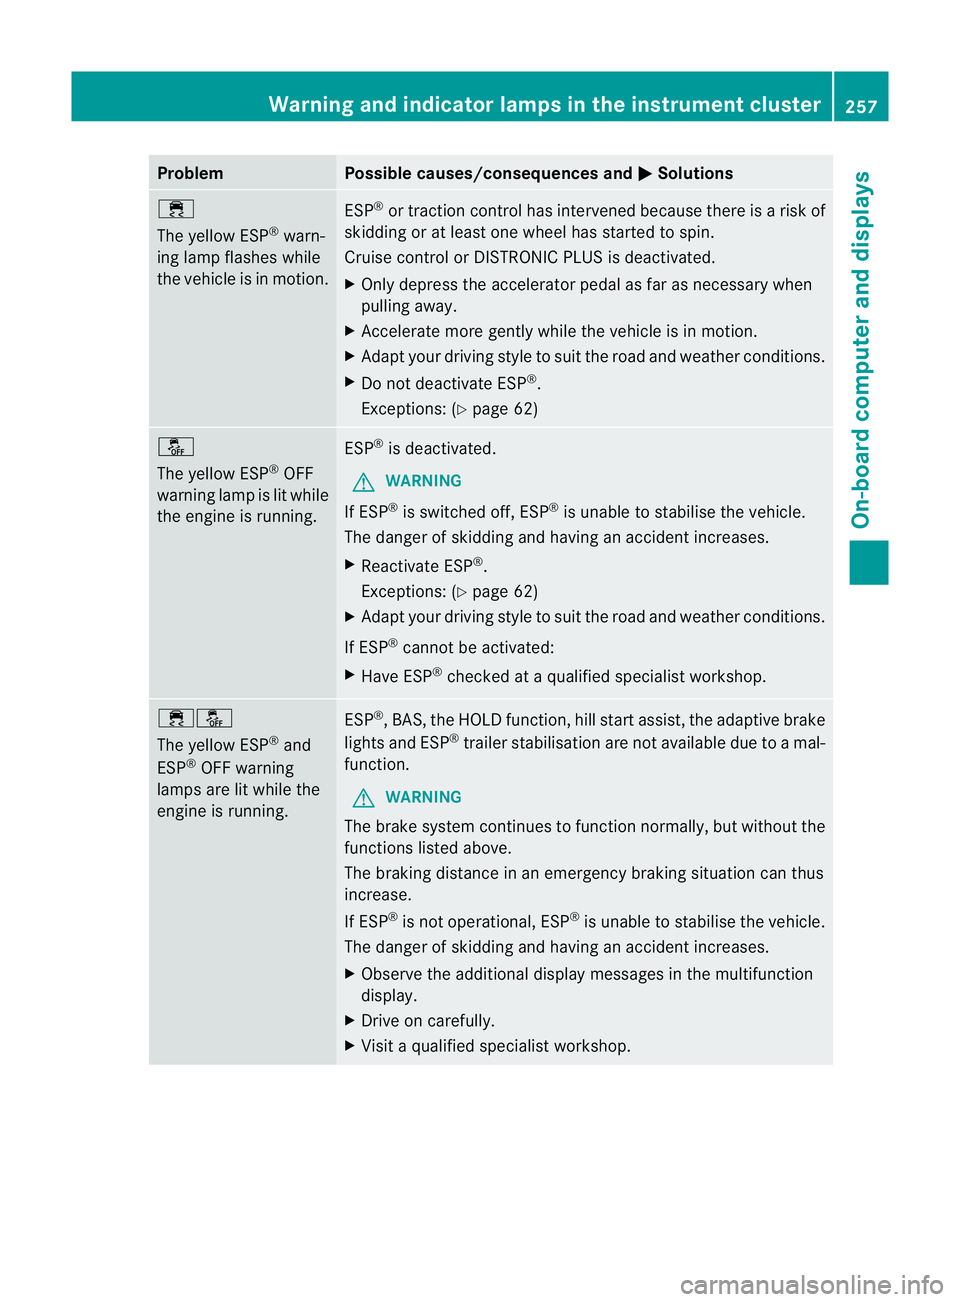
Problem Possible causes/consequences and
M Solutions
÷
The yellow ESP
®
warn-
ing lamp flashes while
the vehicle is in motion. ESP
®
or traction control has intervened because there is a risk of
skidding or at least one wheel has started to spin.
Cruise control or DISTRONIC PLUS is deactivated.
X Only depress the accelerator pedal as far as necessary when
pulling away.
X Accelerate more gently while the vehicle is in motion.
X Adapt your driving style to suit the road and weather conditions.
X Do not deactivate ESP ®
.
Exceptions: (Y page 62) å
The yellow ESP
®
OFF
warning lamp is lit while
the engine is running. ESP
®
is deactivated.
G WARNING
If ESP ®
is switched off, ESP ®
is unable to stabilise the vehicle.
The danger of skidding and having an accident increases.
X Reactivate ESP ®
.
Exceptions: (Y page 62)
X Adapt your driving style to suit the road and weather conditions.
If ESP ®
cannot be activated:
X Have ESP ®
checked at a qualified specialist workshop. ֌
The yellow ESP
®
and
ESP ®
OFF warning
lamps are lit while the
engine is running. ESP
®
, BAS, the HOLD function, hill start assist, the adaptive brake
lights and ESP ®
trailer stabilisation are not available due to a mal-
function.
G WARNING
The brake system continues to function normally, but without the
functions listed above.
The braking distance in an emergency braking situation can thus
increase.
If ESP ®
is not operational, ESP ®
is unable to stabilise the vehicle.
The danger of skidding and having an accident increases.
X Observe the additional display messages in the multifunction
display.
X Drive on carefully.
X Visit a qualified specialist workshop. Warning and indicator lamps in the instrument cluster
257On-board computer and displays Z
Page 262 of 357
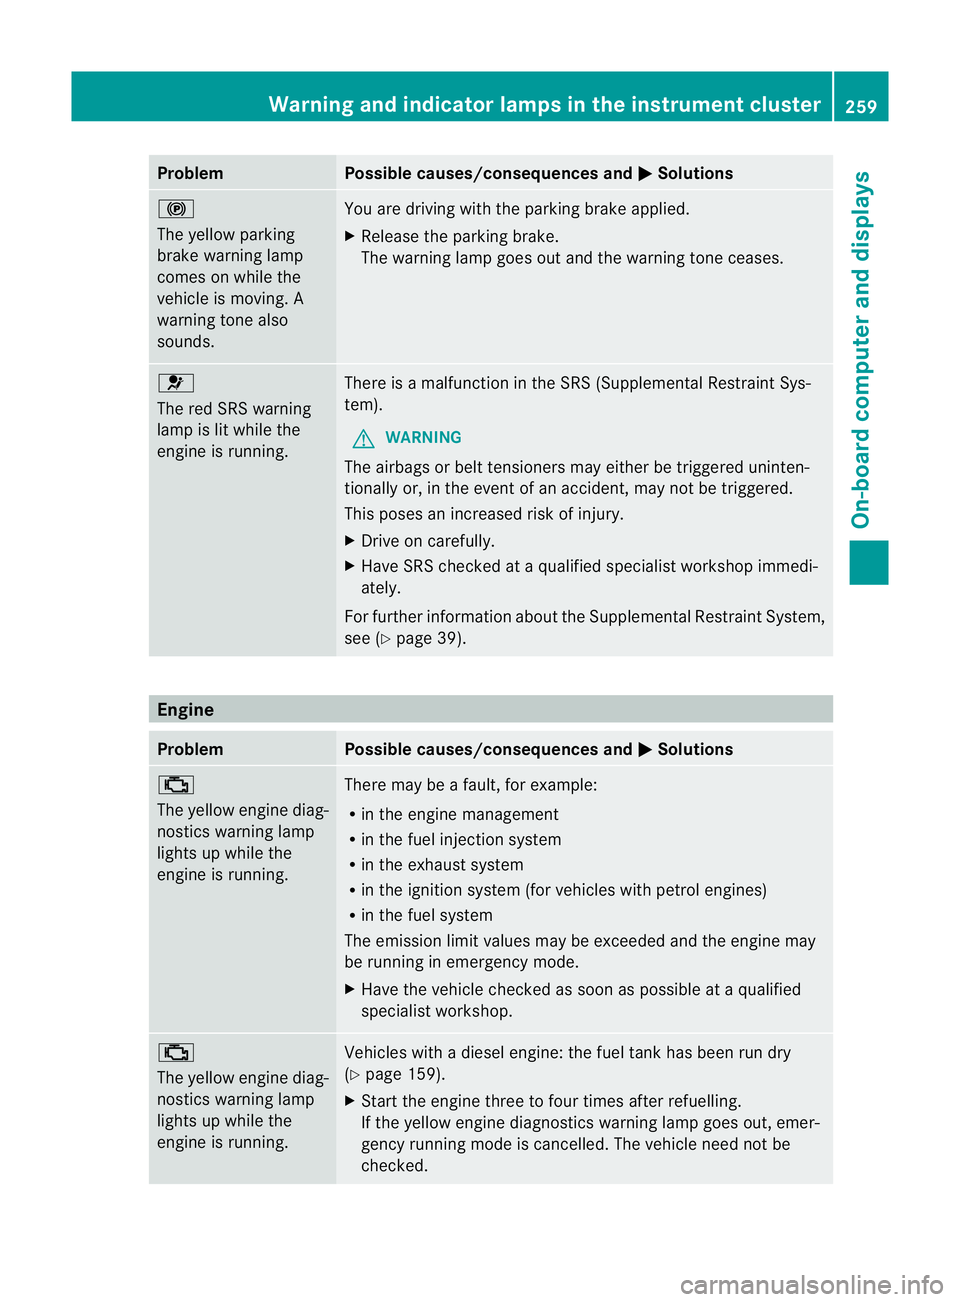
Problem Possible causes/consequences and
M Solutions
!
The yellow parking
brake warning lamp
comes on while the
vehicle is moving. A
warning tone also
sounds.
You are driving with the parking brake applied.
X
Release the parking brake.
The warning lamp goes out and the warning tone ceases. 6
The red SRS warning
lamp is lit while the
engine is running.
There is a malfunction in the SRS (Supplemental Restraint Sys-
tem).
G WARNING
The airbags or belt tensioners may either be triggered uninten-
tionally or, in the event of an accident, may not be triggered.
This poses an increased risk of injury.
X Drive on carefully.
X Have SRS checked at a qualified specialist workshop immedi-
ately.
For further information about the Supplemental Restraint System,
see (Y page 39). Engine
Problem Possible causes/consequences and
M Solutions
;
The yellow engine diag-
nostics warning lamp
lights up while the
engine is running.
There may be a fault, for example:
R
in the engine management
R in the fuel injection system
R in the exhaust system
R in the ignition system (for vehicles with petrol engines)
R in the fuel system
The emission limit values may be exceeded and the engine may
be running in emergency mode.
X Have the vehicle checked as soon as possible at a qualified
specialist workshop. ;
The yellow engine diag-
nostics warning lamp
lights up while the
engine is running.
Vehicles with a diesel engine: the fuel tank has been run dry
(Y
page 159).
X Start the engine three to four times after refuelling.
If the yellow engine diagnostics warning lamp goes out, emer-
gency running mode is cancelled. The vehicle need not be
checked. Warning and indicator lamps in the instrument cluster
259On-board computer and displays Z
Page 265 of 357
Problem Possible causes/consequences and
M Solutions
X
Leave the vehicle and keep a safe distance from the vehicle until
the engine has cooled down.
X Check the coolant level and top up the coolant, observing the
warning notes (Y page 293).
X If you have to top up the coolant frequently, have the engine
cooling system checked.
X Make sure that the air supply to the engine radiator is not
blocked, e.g. by frozen slush.
X If the coolant temperature is below 120 †, you can continue
driving to the nearest qualified specialist workshop.
X Avoid subjecting the engine to heavy loads, e.g. driving in moun-
tainous terrain and stop-start driving. Driving systems
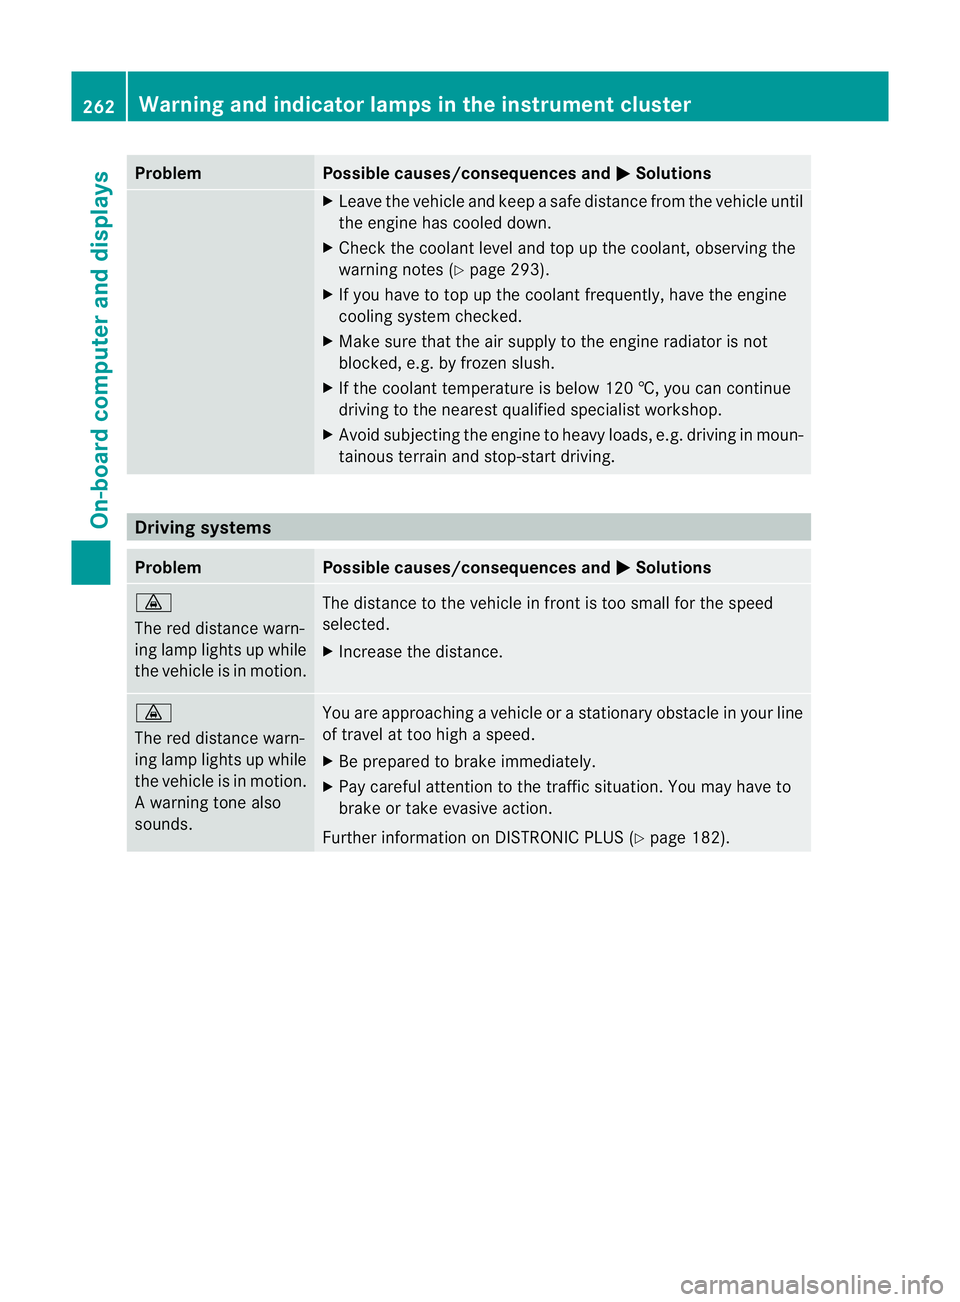
Problem Possible causes/consequences and
M Solutions
·
The red distance warn-
ing lamp lights up while
the vehicle is in motion. The distance to the vehicle in front is too small for the speed
selected.
X
Increase the distance. ·
The red distance warn-
ing lamp lights up while
the vehicle is in motion.
Aw arning tone also
sounds. You are approaching a vehicle or a stationary obstacle in your line
of travel at too high a speed.
X
Be prepared to brake immediately.
X Pay careful attention to the traffic situation. You may have to
brake or take evasive action.
Further information on DISTRONIC PLUS (Y page 182).262
Warning and indicator lamps in the instrument clusterOn-board computer and displays