four wheel drive MERCEDES-BENZ G-CLASS SUV 2012 Owners Manual
[x] Cancel search | Manufacturer: MERCEDES-BENZ, Model Year: 2012, Model line: G-CLASS SUV, Model: MERCEDES-BENZ G-CLASS SUV 2012Pages: 357, PDF Size: 8.86 MB
Page 7 of 357
1, 2, 3 ...
12 Vsocket ........................................ 278
4ETS (Electronic Traction System) Function/notes ................................ 62
4MATIC (permanent four-wheel
drive) .................................................. 197
4MATIC off-road system ...................197 A
ABS (Anti-lock Braking System) Display message ............................ 229
Function/notes ................................ 60
Important safety notes ....................60
Warning lamp ................................. 254
Activating/deactivating air-recir-
culation mode .................................... 133
Active Blin dSpot Assist
Activating/deactivating (on-
board computer) ............................ 220
Display message ............................ 243
Function/notes ............................. 193
Towing atrailer .............................. 196
ADAPTIVE BRAKE ................................. 64
Adaptive brake lamps .........................61
AdBlue ®
Display message ............................ 240
Notes ............................................. 345
topping up ..................................... 160
Additives (engine oil) ........................346
Airbags Front airbag (driver, front
passenger )....................................... 41
Important safety guidelines .............40
PASSENGER AIRBAG OFF warning
lamp ................................................. 50
Triggering ......................................... 39
Windowba g...................................... 42
Airc onditioning
Windscreen heating .......................132
Air-conditioning system
see Climate control
Airf ilter (white display message) ....240
Airv ents
Important safet ynotes .................. 139
Rea r............................................... 140
Setting ........................................... 139Setting the centre air vents
...........139
Setting the side air vents ...............139
Alarm system
see ATA (Anti-Theft Alarm system)
All-wheel drive
Transfe rcase ................................. 201
AMG menu (on-board computer) .....225
Anti-loc kBraking System
see ABS (Anti-lock Braking System)
Anti-Theft Alarm system
see ATA (Anti-Theft Alarm system)
Approach/departure angle ..............172
Aquaplaning ....................................... 167
Ashtray ............................................... 277
Assistance menu (on-board com-
puter) ................................................. .220
ASSYST service interval display Service messages ..................294, 295
ATA (Anti-Theft Alarm system)
Activating/deactivating ...................64
Function .......................................... .64
Interior motion sensor .....................65
Switching off the alarm ....................64
Tow-away protection ........................ 65
AUTO lights
Display message ............................ 236
see Lights
Automatic car wash ..........................296
Automatic engine start (ECO start/
stop function) .................................... 147
Automatic engine switch-off (ECO
start/stop function) ..........................146
Automatic headlamp mode ..............105
Automatic transmission Automatic drive program ...............153
Display message ............................ 248
Drive position (ECO start/stop
function) ........................................ 151
Driving tips .................................... 152
Emergency running mode ..............156
Engaging drive position .................. 151
Engaging neutra l............................ 150
Engaging revers egear ................... 150
Engaging the par kposition ............ 150
Important safety notes ..................149
Kickdow n....................................... 152
Manual drive program ....................1544
Index
Page 167 of 357
boosting effect. You will require considerably
more effor
tto steer and brake. There is a risk
of an accident.
Do not switch off the ignition while driving.
Vehicles with automatic transmission X
Shift the transmission to position P.
X Turn the key to position 0in the ignition
lock (Y page 143) and remove it.
The immobiliser is activated.
X Apply the parking brake firmly.
X Turn the steering wheel until the steering
wheel lock engages.
i If you switch the engine off with the trans-
mission in position Ror D, the automatic
transmission shifts to Nautomatically.
If you then open one of the front doors or
remove the key from the ignition, the auto-
matic transmission shifts to P.
If you shift the automatic transmission to
N before switching off the engine, the auto-
matic transmission remains in Neven if a
door is opened.
i The key can only be removed if the auto-
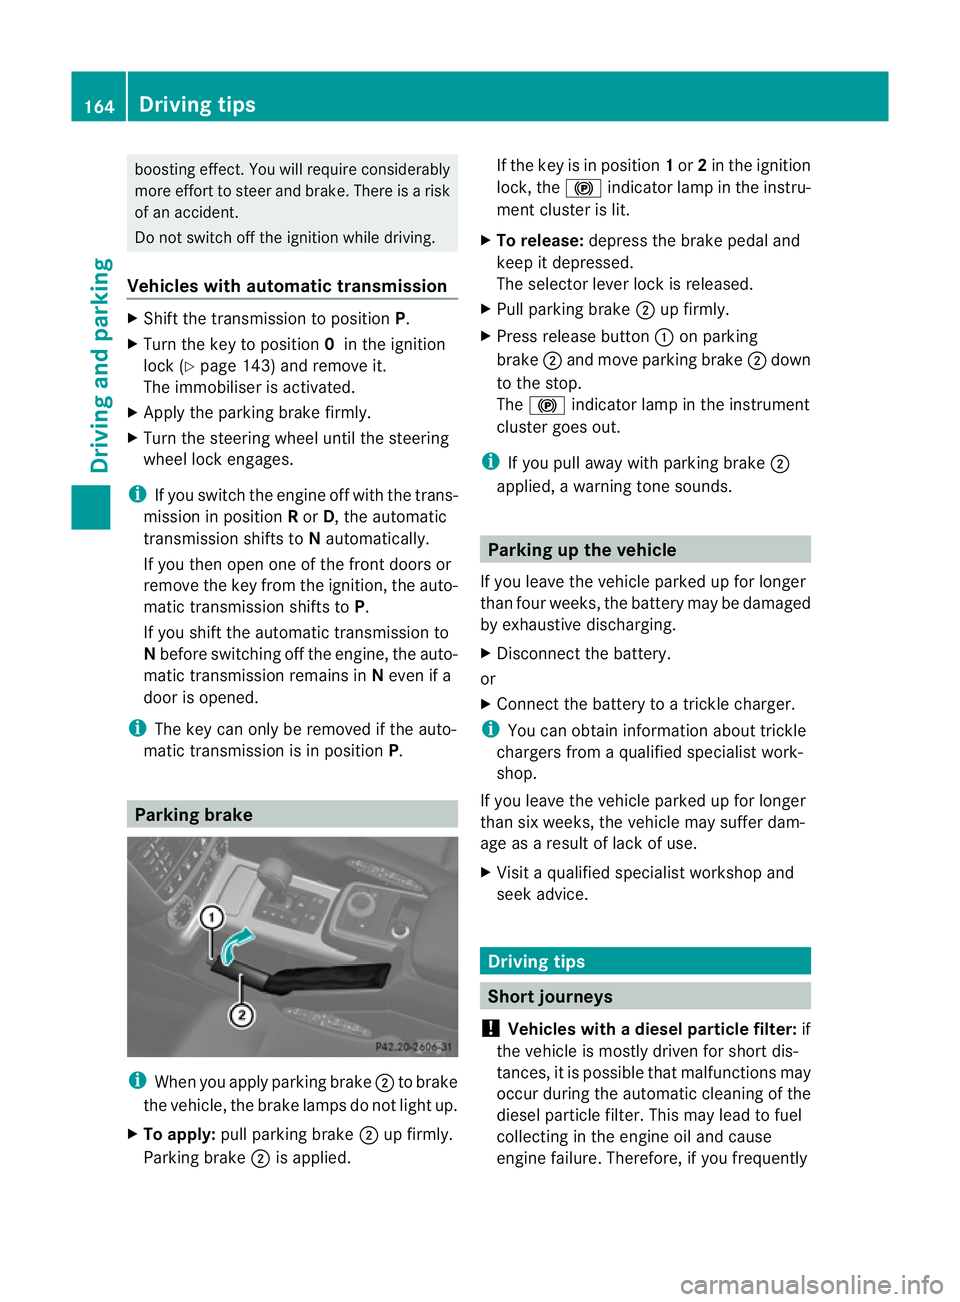
matic transmission is in position P.Parking brake
i
When you apply parking brake ;to brake
the vehicle, the brake lamps do not light up.
X To apply: pull parking brake ;up firmly.
Parking brake ;is applied. If the key is in position
1or 2in the ignition
lock, the !indicator lamp in the instru-
ment cluster is lit.
X To release: depress the brake pedal and
keep it depressed.
The selector lever lock is released.
X Pull parking brake ;up firmly.
X Press release button :on parking
brake ;and move parking brake ;down
to the stop.
The ! indicator lamp in the instrument
cluster goes out.
i If you pull away with parking brake ;
applied, a warning tone sounds. Parking up the vehicle
If you leave the vehicle parked up for longer
than four weeks, the battery may be damaged
by exhaustive discharging.
X Disconnect the battery.
or
X Connect the battery to a trickle charger.
i You can obtain information about trickle
chargers from a qualified specialist work-
shop.
If you leave the vehicle parked up for longer
than six weeks, the vehicle may suffer dam-
age as a result of lack of use.
X Visit a qualified specialist workshop and
seek advice. Driving tips
Short journeys
! Vehicles with adiesel particle filter: if
the vehicle is mostly driven for short dis-
tances, it is possible that malfunctions may
occur during the automatic cleaning of the
diesel particle filter. This may lead to fuel
collecting in the engine oil and cause
engine failure. Therefore, if you frequently 164
Driving tipsDriving and parking
Page 200 of 357
There is a risk of an accident.
Before leaving the vehicle, always deactivate
the HOLD function and secure the vehicle
from rolling away.
The HOLD function is deactivated automati-
cally if:
R you accelerate and the transmission is in
position Dor R.
R you shift the transmission to position P.
R you depress the brake pedal again with a
certain amount of pressure until ëdis-
appears from the multifunction display.
R you activate DISTRONIC PLUS.
On steep uphill or downhill gradients or if
there is a malfunction, the transmission may
also be automatically shifted into position P.4MATIC (permanent all-wheel drive)
! Never tow the vehicle with one axle
raised. This may damage the transfer case.
Damage of this sort is not covered by the
Mercedes-Benz implied warranty. All
wheels must remain either on the ground
or be fully raised. Observe the instructions
for towing the vehicle with all wheels in full
contact with the ground.
! When testing the parking brake, operate
the vehicle only briefly (for a maximum of
ten seconds) on a brake test dynamometer.
When doing this, turn the key to position
0 or 1in the ignition .Failure to do this can
cause damage to the drive train or the
brake system.
! A function or performance test should
only be carried out on atwin-axle dyna-
mometer. Before you operate the vehicle
on such a dynamometer, please consult a
qualified workshop .You could otherwise
damage the drive train or the brake system.
4MATIC ensures that all four wheels are per-
manently driven. Together with ESP ®
and
4ETS, it improves the traction of your vehicle whenever a drive wheel spins due to insuffi-
cient grip.
If a drive wheel spins due to insufficient grip:
R
when pulling away, only depress the accel-
erator pedal as far as is necessary.
R accelerate less when driving.
If you fail to adapt your driving style, 4MATIC
can neither reduce the risk of accident nor
override the laws of physics. 4MATIC cannot
take account of road, weather and traffic con-
ditions. 4MATIC is only an aid. You are
responsible for the distance to the vehicle in
front, for vehicle speed, for braking in good
time and for staying in lane. Only engage
4MATIC when the current road, weather and
traffic conditions permit it to be done safely,
and adapt your driving style accordingly.
Drive carefully and maintain a suitable dis-
tance to the vehicle in front.
i In wintry driving conditions, the maximum
effect of 4MATIC can only be achieved if
you use winter tyres (M+ Styres), with snow
chains if necessary.
Fo rinformation abou tdriving off-road, see
(Y page 169). PARKTRONIC
Important safety notes !
When parking, pay particular attention to
objects above or below the sensors, such
as flower pots or trailer drawbars .PARK-
TRONIC does not detect such objects when
they are in the immediate vicinity of the
vehicle. You could damage the vehicle or
the objects.
The sensors may not detect snow and
objects which absorb ultrasoni csources.
Ultrasonic sources, such as an automatic
car wash, a lorry's compressed-air brakes
or a pneumatic drill, could cause PARK-
TRONIC to malfunction.
PARKTRONIC may not function correctly on
uneven terrain. Driving systems
197Driving and parking Z
Page 327 of 357
Mercedes-Ben
zcannot accept responsibility
for this type of damage. M+S tyres
G
WARNING
M+S tyres with a tyre tread depth of less than
4mma re not suitable for use in winter as they
do not provide sufficient traction. There is a
risk of accident.
M+S tyres with a tread depth of less than
4 mm must be replaced. G
WARNING
The spare wheel and M+S tyres have different
tyre characteristics. Driving characteristics
can be severely impaired when you fit the
spare wheel. There is a risk of an accident.
You should therefore adapt yourd riving style
and drive carefully.H ave the spare wheel
replaced with a new wheel with an M+S tyre
at the nearest qualified specialist workshop.
At temperatures below +7 †, use winter tyres
or all-season tyres. Both types of tyre are
identified by the M+S marking.
Only winter tyres bearing the isnowflake
symbol in addition to the M+S marking pro-
vide the best possible grip in wintry road con-
ditions. Only these tyres will allow driving
safety systems such as ABS and ESP ®
to
function optimally in winter, as these tyres
have been designed specifically for driving on
snow.
Use M+S tyres of the same make and tread
on all wheels to maintain safe handling char-
acteristics.
Always observe the maximum permissible
speed specified for the M+S tyres you have
fitted.
If you fit M+S tyres that have a lower maxi-
mum permissible speed than that of the vehi-
cle, affix an appropriate warning sign in the
driver's field of vision .This can be obtained
at a qualified specialist workshop. Under these circumstances, you should also
restrict the maximum speed of the vehicle
using variable SPEEDTRONIC so that it does
not exceed the maximum permissible speed
for the M+S tyres(Y
page 178).
When you have fitted the M+S tyres:
X Check the tyre pressures (Y page 327).
X Restart the tyre pressure monitor
(Y page 328).
i You can obtain information about winter
tyres that have been approved by
Mercedes-Ben zespecially for your vehicle
at any Mercedes-Benz Service Centre.
i For further information about tyres, see
(Y page 333). Snow chains
! Information aboutt he use of snow chain
compatible AMG winter tyres is applicable
for AMG tyres. Use of snow chains is only
permissible with these tyres.
For safety reasons, Mercedes-Ben zrecom-
mends that you only use snow chains that
have been specially approved for your vehicle
by Mercedes-Benz, or that are of a corre-
sponding standard of quality.
R only use snow chains when the road sur-
face is completely snow-covered. Remove
the snow chains as soon as possible when
you come to road that is not snow-covered.
R local regulations may restrict the use of
snow chains. Observe the appropriate reg-
ulations if you wish to fit snow chains.
R Do not exceed the maximum permissible
speed of 50 km/h.
If you intend to fit snow chains, please bear
the following points in mind:
R snow chains cannot be fitted to all wheel/
tyre combinations (Y page 62).
R fit the snow chains on all four wheels for
maximum tractive power and driving sta-
bility. Observe the manufacturer's fitting
instructions. 324
Winter operationWheels and tyres
Page 330 of 357
i
The tyre pressure values given for low
loads are minimum values which offer you
good ride comfor tcharacteristics.
However, you can also use the values given
for higher loads. These are permissible and
will not adversely affect the running of the
vehicle. Checking the tyre pressures
Important safety notes Observe the notes on tyre pressure:
(Y
page 325).
Information on air pressure for the tyres on
your vehicle can be found:
R on the vehicle's tyre and loading informa-
tion table on the B-pillar (Y page 326)
R on the tyre pressure label on the fuel filler
flap (Y page 326)
R in the "Tyre pressure information" section
R in the "Tyre pressure information" section
(Y page 325)
Checking the tyre pressure manually To determine and set the correct tyre pres-
sure, proceed as follows:
X Remove the valve cap of the tyre that is to
be checked.
X Press the tyre pressure gauge securely
onto the valve.
X Read the tyre pressure and compare it with
the recommended value on the tyre and
loading information table on the B-pillar on
the driver's side of your vehicle
(Y page 326).
X The tyre pressure is too low: increase the
tyre pressure to the recommended value.
X The tyre pressure is too high: press down
the metal pin in the valve using the tip of a
pen, for example.
Air is released from the tyre.
X Check the tyre pressure again with the tyre
pressure gauge. X
Screw the valve cap onto the valve.
X Repeatt hese steps for the other tyres. Tyre pressure monitor
Important safety notes It is the driver's responsibility to set the tyre
pressure to the recommended cold tyre pres-
sure suitable for the operating situation
(Y
page 325). Note that the correct tyre pres-
sure for the current operating situation must
first be taught-in to the tyre pressure monitor.
if there is a substantial loss of pressure, the
warning threshold for the warning message is
aligned to the reference values taught-in.
Restart the tyre pressure monitor after
adjusting to the cold tyre pressure
(Y page 328). The current pressures are
saved as new reference values. This will
ensure that a warning message will only
appearift he tyre pressure drops significantly.
The tyre pressure monitor does not warn you
of an incorrectly set tyre pressure. Observe
the notes on the recommended tyre pressure
(Y page 325).
The tyre pressure monitor is not able to warn
you of a sudden loss of pressure, e.g. if the
tyre is penetrated by a foreign object. In the
event of a sudden loss of pressure, bring the
vehicle to a halt by braking carefully. Avoid
abrupt steering manoeuvres.
If a tyre pressure monitor system is fitted, the
vehicle's wheels have sensors fitted that
monitor the tyre pressures in all four tyres.
The tyre pressure monitor warns you when
the pressure drops in one or more of the
tyres. The tyre pressure monitor only func-
tions if the correct sensors are fitted to all
wheels.
Information on tyre pressures is displayed in
the multifunction display. After a few minutes
of driving, the current tyre pressure of each
tyre is shown in the multifunction display.
The tyre pressure values indicated by the on-
board computer may differ from those meas- Tyre pressure
327Wheels and tyres Z