display MERCEDES-BENZ G-CLASS SUV 2013 Owner's Manual
[x] Cancel search | Manufacturer: MERCEDES-BENZ, Model Year: 2013, Model line: G-CLASS SUV, Model: MERCEDES-BENZ G-CLASS SUV 2013Pages: 364, PDF Size: 9.62 MB
Page 31 of 364

Instrument cluster
Displays and controls
Function Page
0043
Speedometer with segments 210
0044
Multifunction display 212
0087
Tachometer 210
0085
Coolant temperature display 209
0083
Fuel gauge
0084
Instrument cluster lighting control 209Instrument cluster
29At a glance
Page 33 of 364
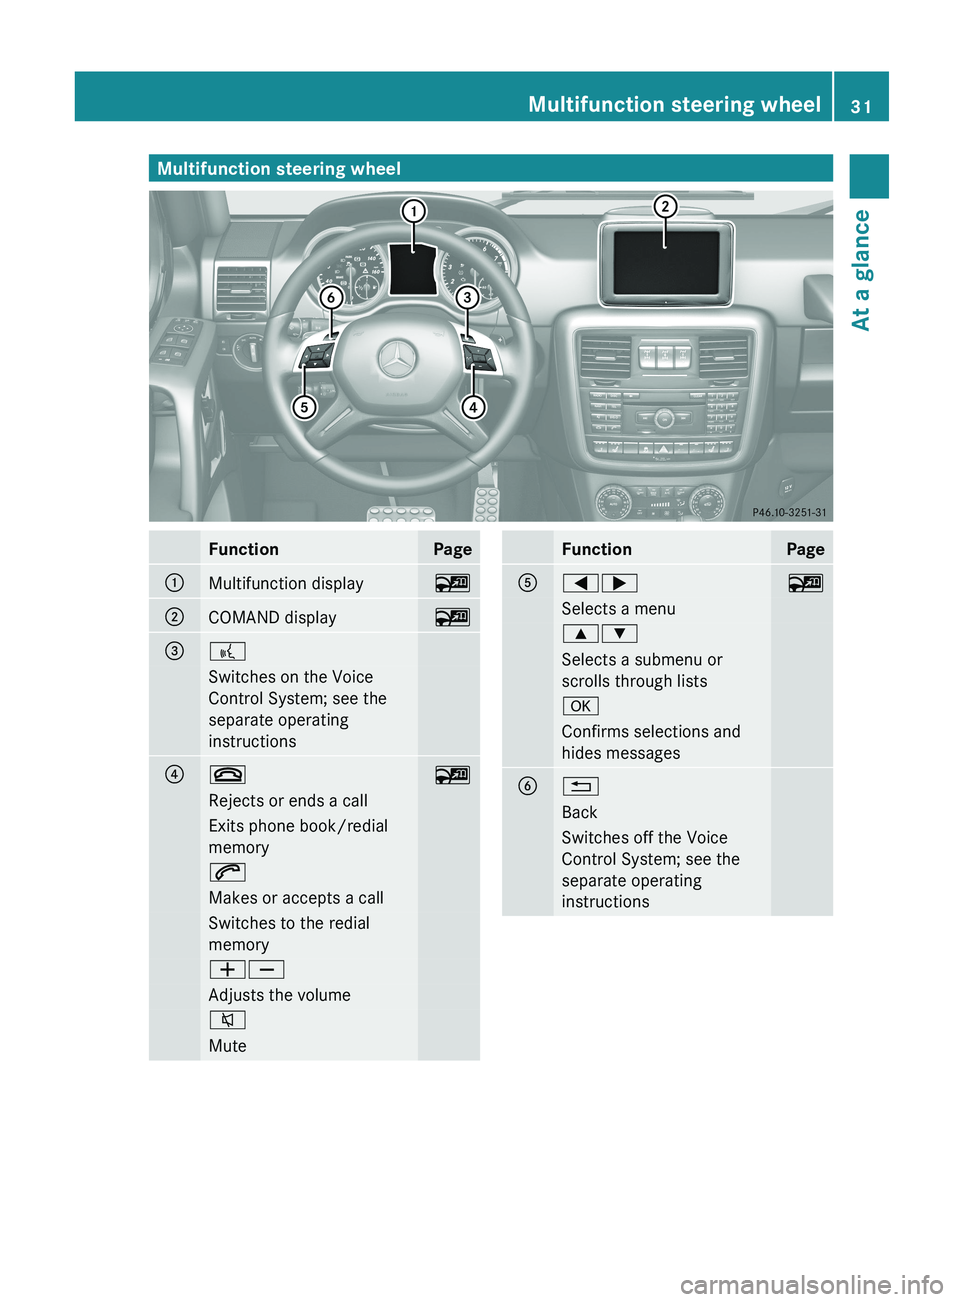
Multifunction steering wheel
Function Page
0043
Multifunction display 00FC
0044
COMAND display 00FC
0087
0062
Switches on the Voice
Control System; see the
separate operating
instructions
0085
007F
00FC
Rejects or ends a call
Exits phone book/redial
memory
006A
Makes or accepts a call
Switches to the redial
memory
00810082
Adjusts the volume
006C
Mute Function Page
0083
00590065
00FC
Selects a menu
00630064
Selects a submenu or
scrolls through lists
0076
Confirms selections and
hides messages
0084
0041
Back
Switches off the Voice
Control System; see the
separate operating
instructionsMultifunction steering wheel
31At a glance
Page 63 of 364
ABS (Anti-lock Braking System)
Important safety notes i
Observe the "Important safety notes"
section ( Y page 60). G
WARNING
If the ABS malfunctions, other driving systems
such as the BAS
or the ESP®
are also switched
off. Observe indicator and warning lamps that
may come on as well as messages in the
multifunction display that may appear.
If the ABS malfunctions, the wheels may lock
during hard braking, reducing the steering
capability and extending the braking distance. G
WARNING
If ABS is faulty, the wheels could lock when
braking. The steerability and braking
characteristics may be severely impaired.
Additionally, further driving safety systems
are deactivated. There
is
an increased danger
of skidding and accidents.
Drive on carefully. Have ABS checked
immediately at a qualified specialist
workshop.
ABS regulates brake pressure in such a way
that the wheels do not lock when you brake.
This allows you to continue steering the
vehicle when braking.
Provided that the differential locks are not
active, ABS works from a speed of about
5 mph (8 km/h) upwards, regardless of road-
surface conditions. ABS works on slippery
surfaces, even if you only brake gently.
The yellow 0025 ABS warning lamp in the
instrument cluster lights up when the ignition
is switched on. It goes out when the engine is
running.
Braking If ABS intervenes when braking, you will feel
a pulsing in the brake pedal. X
If ABS intervenes: continue to depress
the
brake pedal vigorously until the braking
situation is over.
X To make a full brake application:
depress the brake pedal with full force.
The pulsating brake pedal can be an
indication of hazardous road conditions, and
functions as a reminder to take extra care
while driving.
Off-road ABS If the
LOW RANGE shift range is
selected by
the transfer case, (Y page 199), an ABS
system specifically suited to off-road terrain
is automatically activated.
At speeds below 37 mph (60 km/h), the front
wheels lock cyclically during braking. The
digging-in effect achieved in the process
reduces the stopping distance on off-road
terrain. This limits steering capability. BAS (Brake Assist System)
i Observe the "Important safety notes"
section ( Y page 60). G
WARNING
If BAS is malfunctioning, the braking distance
in an emergency braking situation is
increased. There is a risk of an accident.
In an emergency braking situation, depress
the brake pedal with full force. ABS prevents
the wheels from locking.
BAS operates in emergency braking
situations. If you depress the brake pedal
quickly, BAS automatically boosts
the braking
force, thus shortening the stopping distance.
X Keep the brake pedal firmly depressed until
the emergency braking situation is over.
ABS prevents the wheels from locking.
The brakes will function as usual once you
release the brake pedal. BAS is deactivated. Driving safety systems
61
Safety Z
Page 64 of 364
Adaptive brake lamps
If you brake sharply from a speed of more
than 30 mph (50 km/h) or if braking is
assisted by BAS, the brake lamps flash
rapidly. In this way, traffic traveling behind
you is warned in an even more noticeable
manner.
If you brake sharply from a speed of more
than 45 mph (70 km/h) to a standstill, the
hazard warning lamps are activated
automatically. If
the brakes are applied again,
the brake lamps light up continuously. If you
drive faster than 6 mph (10 km/h), the hazard
warning lamps are deactivated automatically.
You can also switch off the hazard warning
lamps using the hazard warning button
(Y page 104). ESP
®
(Electronic Stability Program)
Important safety notes i
Observe the "Important safety notes"
section ( Y page 60).G
WARNING
If ESP ®
is malfunctioning, ESP ®
is unable to
stabilize the vehicle. Additionally, further
driving safety systems are deactivated. This
increases the risk
of
skidding and an accident.
Drive on carefully. Have ESP ®
checked at a
qualified specialist workshop.
! Only operate the vehicle for a maximum
of ten seconds on a brake test
dynamometer. Switch off the ignition.
Application of the brakes by ESP ®
may
otherwise destroy the brake system.
! A function or performance test should
only be carried out on a two-axle
dynamometer. Before you operate the
vehicle on such a dynamometer, please
consult a qualified workshop. You could
otherwise damage the drive train or the
brake system. ESP
®
monitors driving stability and traction.
Traction is the power transmission between
the tires and the road surface.
ESP ®
is deactivated if
the 00BB warning lamp
in the instrument cluster lights up
continuously when the engine is running.
If the 00E5 warning lamp and the 00BB
warning lamp are lit continuously, ESP ®
is not
available due to a malfunction.
Observe the information on warning lamps
(Y page 252) and any display messages that
appear in the instrument cluster
(Y page 226).
If ESP ®
detects that the vehicle is deviating
from the direction desired by the driver, one
or more wheels are braked to stabilize the
vehicle. If necessary, the engine output is also
modified to keep the vehicle on the desired
course within physical limits. ESP ®
assists
the driver when pulling away on wet or
slippery roads. ESP ®
can also stabilize the
vehicle during braking.
If ESP ®
intervenes, the 00E5 warning lamp
flashes in the instrument cluster.
If ESP ®
intervenes:
X Do not deactivate ESP ®
under any
circumstances.
X Only depress the accelerator pedal as far
as necessary when pulling away.
X Adapt your driving style to suit the
prevailing road and weather conditions.
i Only use wheels with the recommended
tire sizes. Only then will ESP ®
function
properly.
i If differential locks are
switched on, ABS,
BAS and ESP ®
switch themselves off
automatically.
4ETS (Electronic Traction System) Traction control remains active if you
deactivate ESP
®
. 62
Driving safety systems
Safety
Page 66 of 364
R
ESP ®
still provides support when you
brake.
R and are driving at above 37 mph
(60 km/h), ESP ®
still
intervenes when one
wheel reaches its grip limit even though it
is switched off.
i If ESP ®
is deactivated and one or more
wheels start to spin, the 00E5 warning lamp
in the instrument cluster flashes. In such
situations, ESP ®
will not stabilize the
vehicle.
i If ESP ®
is deactivated, it is automatically
reactivated when you drive faster than
37 mph (60 km/h) or if a predefined lateral
acceleration threshold has been exceeded.
Trailer stabilization G
WARNING
If road and weather conditions are poor,
trailer stabilization will not
be able to prevent
the vehicle/trailer combination from
swerving. Trailers with a high center of gravity
can tip over before ESP ®
can detect this.
There is a risk of an accident.
Always adapt your driving style to the
prevailing road and weather conditions.
Trailer stabilization does not work if ESP ®
is
deactivated because of a malfunction.
If your vehicle with trailer (vehicle/trailer
combination) begins to lurch, you can only
stabilize the vehicle/trailer combination by
depressing the brake firmly.
In this situation, ESP ®
assists you and can
detect if the vehicle/trailer combination
begins to lurch. ESP ®
slows the vehicle down
by braking and limiting the engine output until
the vehicle/trailer combination has
stabilized.
Trailer stabilization is active above speeds of
about 37 mph (60 km/h). EBD (electronic brake force
distribution)
i Observe the "Important safety notes"
section ( Y page 60). G
WARNING
If EBD has malfunctioned, the rear wheels can
still lock, e.g. under full braking. This
increases the risk of
skidding and an accident.
You should therefore adapt your driving style
to the different handling characteristics. Have
the brake system checked at a qualified
specialist workshop.
Observe information regarding indicator and
warning lamps ( Y page 250) as well as
display messages ( Y page 228).
EBD monitors and controls the brake
pressure on the rear wheels to improve
driving stability while braking. ADAPTIVE BRAKE
ADAPTIVE BRAKE provides increased
braking
safety. In addition to the braking function,
ADAPTIVE BRAKE also has the HOLD function
(Y page 192) and hill start assist
(Y page 141). Theft deterrent locking system
Immobilizer
X To activate: remove the SmartKey from
the ignition lock.
X To deactivate: switch on the ignition.
The immobilizer prevents your vehicle from
being started without the correct SmartKey.
When leaving the vehicle, always take the
SmartKey with you and lock the vehicle. The
engine can be started by anyone with a valid
SmartKey that is left inside the vehicle.
i The immobilizer is always deactivated
when you start the engine. 64
Theft deterrent locking system
Safety
Page 86 of 364
Useful information
i This Operator's Manual describes all
models and all standard and optional
equipment of your vehicle available at the
time of publication of the Operator's
Manual. Country-specific differences are
possible. Please note that
your vehicle may
not be equipped with all features
described. This also applies to safety-
related systems and functions.
i Read the information on qualified
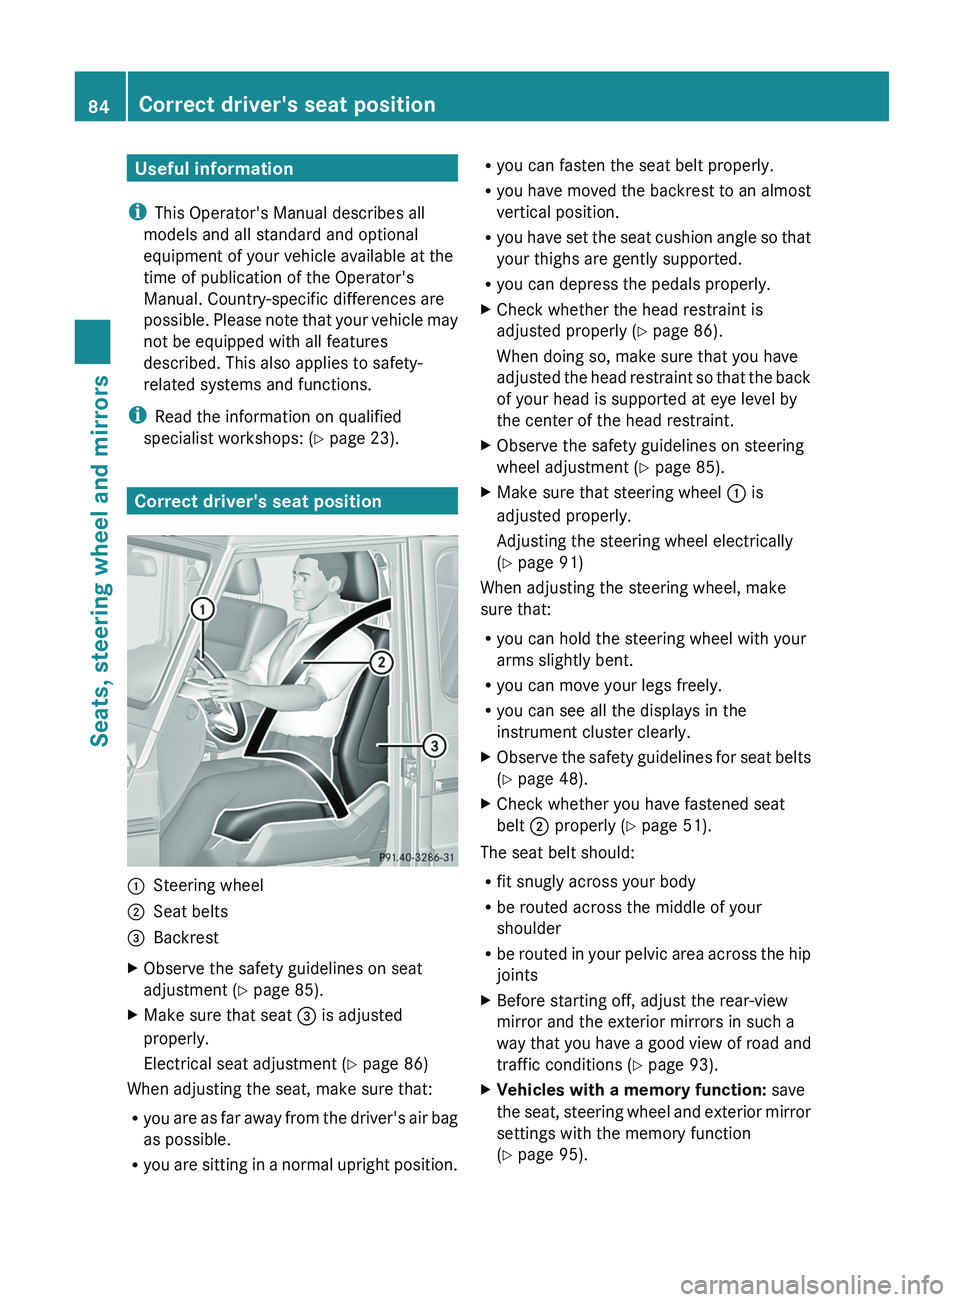
specialist workshops: ( Y page 23).Correct driver's seat position
0043
Steering wheel
0044 Seat belts
0087 Backrest
X Observe the safety guidelines on seat
adjustment ( Y page 85).
X Make sure that seat 0087 is adjusted
properly.
Electrical seat adjustment ( Y page 86)
When adjusting the seat, make sure that:
R you are as far
away from the driver's air bag
as possible.
R you are sitting in a normal upright position. R
you can fasten the seat belt properly.
R you have moved the
backrest to an almost
vertical position.
R you have set the seat cushion angle so that
your thighs are gently supported.
R you can depress the pedals properly.
X Check whether the head restraint is
adjusted properly ( Y page 86).
When doing so, make sure that you have
adjusted the
head restraint so that the back
of your head is supported at eye level by
the center of the head restraint.
X Observe the safety guidelines on steering
wheel adjustment ( Y page 85).
X Make sure that steering wheel 0043 is
adjusted properly.
Adjusting the steering wheel electrically
(Y page 91)
When adjusting the steering wheel, make
sure that:
R you can hold the steering wheel with your
arms slightly bent.
R you can move your legs freely.
R you can see all the displays in the
instrument cluster clearly.
X Observe the safety guidelines for seat belts
(Y page 48).
X Check whether you have fastened seat
belt 0044 properly ( Y page 51).
The seat belt should:
R fit snugly across your body
R be routed across the middle of your
shoulder
R be routed in your
pelvic area across the hip
joints
X Before starting off, adjust the rear-view
mirror and the exterior mirrors in such a
way that you have
a good view of road and
traffic conditions (Y page 93).
X Vehicles with a memory function: save
the seat, steering wheel
and exterior mirror
settings with the memory function
(Y page 95). 84
Correct driver's seat position
Seats, steering wheel and mirrors
Page 111 of 364
Bulbs and lamps are an important aspect of
vehicle safety. You
must
therefore make sure
that these function correctly at all times.
Have the headlamp setting checked regularly.
Other bulbs G
WARNING
Bulbs and lamps can become very hot. For
this reason, allow them to cool down before
changing them. Otherwise, you could burn
yourself when you touch them.
Keep bulbs out of the reach of children.
Otherwise, they could, for example, damage
the bulbs and injure themselves.
Never use a bulb which has been dropped.
Such a bulb may explode and injure you.
Halogen bulbs are pressurized and could
explode when you change them, especially if
they are very hot. You should therefore wear
eye protection and gloves when you are
changing them.
There are bulbs other than the Xenon bulbs
that you cannot replace. Replace only the
bulbs listed ( Y
page 109). Have the bulbs that
you cannot replace yourself changed at a
qualified specialist workshop.
If you require assistance changing bulbs,
consult a qualified specialist workshop.
Do not touch the glass tube of new bulbs with
your bare hands. Even minor contamination
can burn into the glass surface and reduce
the service life of the bulbs. Always use a lint-
free cloth or only touch the base of the bulb
when installing.
Only use bulbs of the correct type.
If the new bulb still does not light up, consult
a qualified specialist workshop.
Bulbs and lamps are an important aspect of
vehicle safety. You must therefore make sure
that these function correctly at all times.
Have the headlamp setting checked regularly. Before changing bulbs Have the following bulbs changed at a
qualified specialist workshop:
R
Additional turn signals in the exterior
mirrors
R High-mounted brake lamp
R High-beam/low-beam headlamps (Xenon
bulbs)
R Daytime running lamps
R Parking lamp/standing lamp
R License plate lamp
i Individual segments of the license plate
lamp LEDs may fail without a display
message appearing in the multifunction
display. Regularly check the license plate
lamp. If necessary, visit a qualified
specialist workshop.
You can replace the following bulbs:
R Fog lamp/cornering light with fog lamp
function
R Turn signal lamp (front)
R Brake/tail lamp
R Turn signal lamp (rear)
R Tail lamp/standing lamp
R Backup lamp
R Rear fog lamp
R Side marker lamps Overview: changing bulbs/bulb types
Front lamps You can change the following bulbs. The bulb
type can be found in the legend. Replacing bulbs
109
Lights and windshield wipers Z
Page 121 of 364
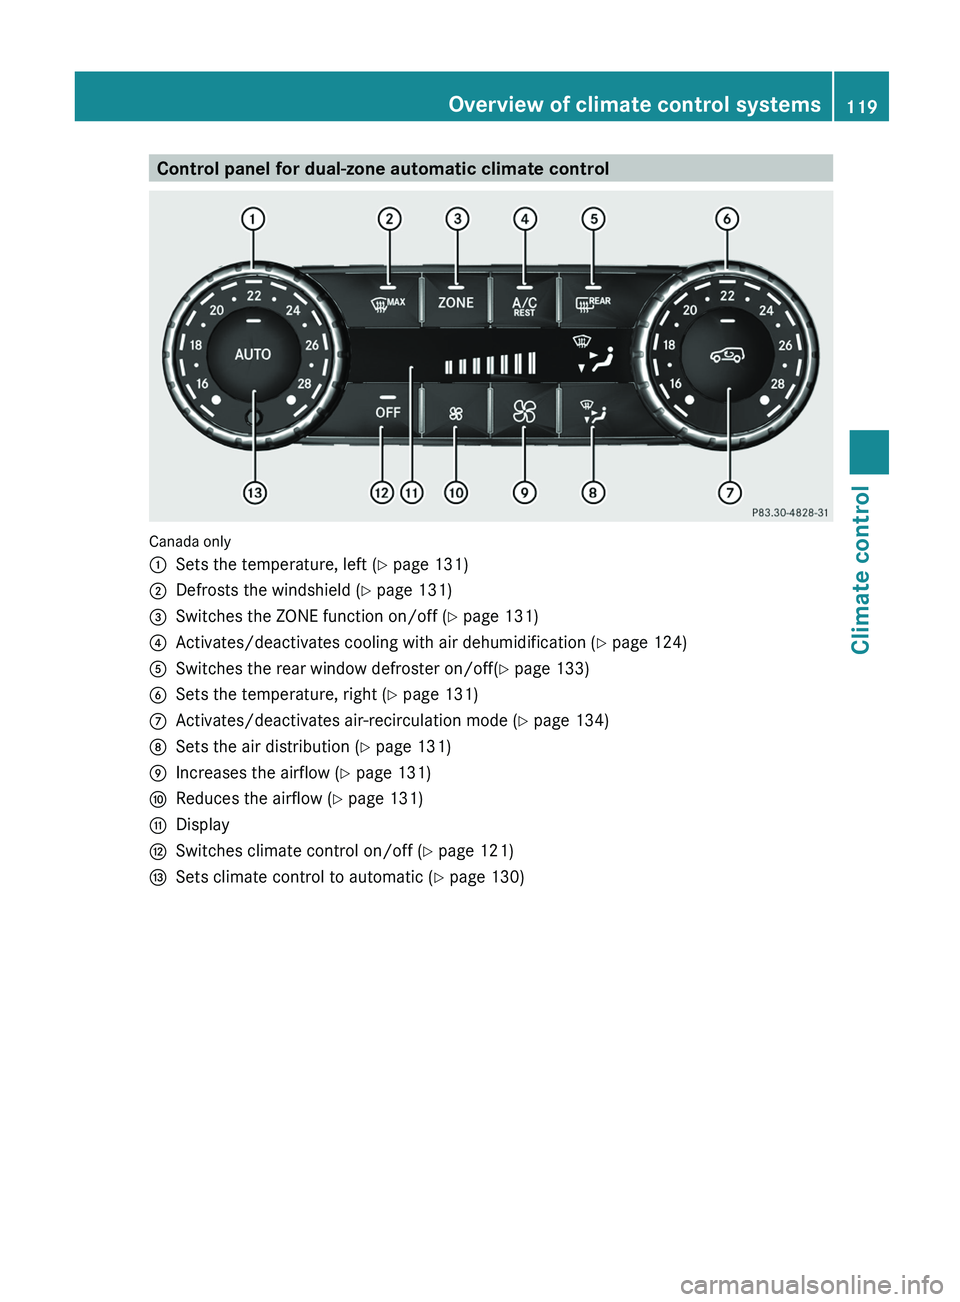
Control panel for dual-zone automatic climate control
Canada only
0043
Sets the temperature, left ( Y page 131)
0044 Defrosts the windshield ( Y page 131)
0087 Switches the ZONE function on/off ( Y page 131)
0085 Activates/deactivates cooling with air dehumidification ( Y page 124)
0083 Switches the rear window defroster on/off( Y page 133)
0084 Sets the temperature, right ( Y page 131)
006B Activates/deactivates air-recirculation mode (Y page 134)
006C Sets the air distribution (Y page 131)
006D Increases the airflow ( Y page 131)
006E Reduces the airflow ( Y page 131)
006F Display
0070 Switches climate control on/off ( Y page 121)
0071 Sets climate control to automatic (Y page 130) Overview of climate control systems
119Climate control Z
Page 122 of 364
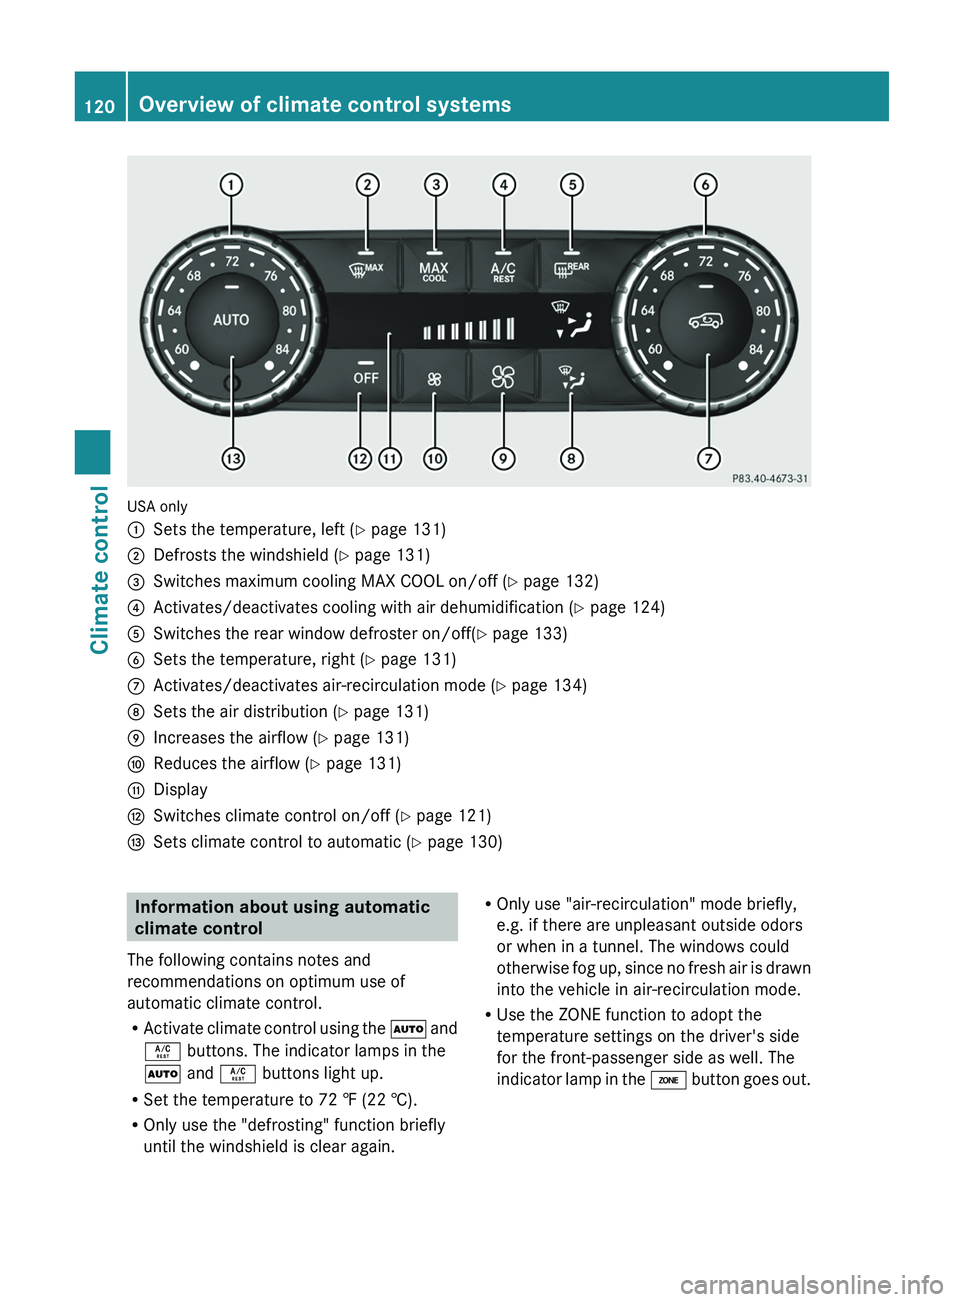
USA only
0043
Sets the temperature, left ( Y page 131)
0044 Defrosts the windshield ( Y page 131)
0087 Switches maximum cooling MAX COOL on/off ( Y page 132)
0085 Activates/deactivates cooling with air dehumidification ( Y page 124)
0083 Switches the rear window defroster on/off( Y page 133)
0084 Sets the temperature, right ( Y page 131)
006B Activates/deactivates air-recirculation mode (Y page 134)
006C Sets the air distribution (Y page 131)
006D Increases the airflow ( Y page 131)
006E Reduces the airflow ( Y page 131)
006F Display
0070 Switches climate control on/off ( Y page 121)
0071 Sets climate control to automatic (Y page 130) Information about using automatic
climate control
The following contains notes and
recommendations on optimum use of
automatic climate control.
R Activate climate control using
the 0058 and
0056 buttons. The indicator lamps in the
0058 and 0056 buttons light up.
R Set the temperature to 72 ‡ (22 †).
R Only use the "defrosting" function briefly
until the windshield is clear again. R
Only use "air-recirculation" mode briefly,
e.g. if there are unpleasant outside odors
or when in a tunnel. The windows could
otherwise fog up, since
no fresh air is drawn
into the vehicle in air-recirculation mode.
R Use the ZONE function to adopt the
temperature settings on the driver's side
for the front-passenger side as well. The
indicator lamp in the 00D6 button goes out.120
Overview of climate control systems
Climate control
Page 123 of 364
Operating the climate control systems
Activating/deactivating climate control
Points to observe before use G
WARNING
When the climate control system is deactivated, the outside air supply and circulation are also
deactivated. Only choose this setting for a short time. Otherwise the windows could fog up,
impairing visibility and endangering you and others.
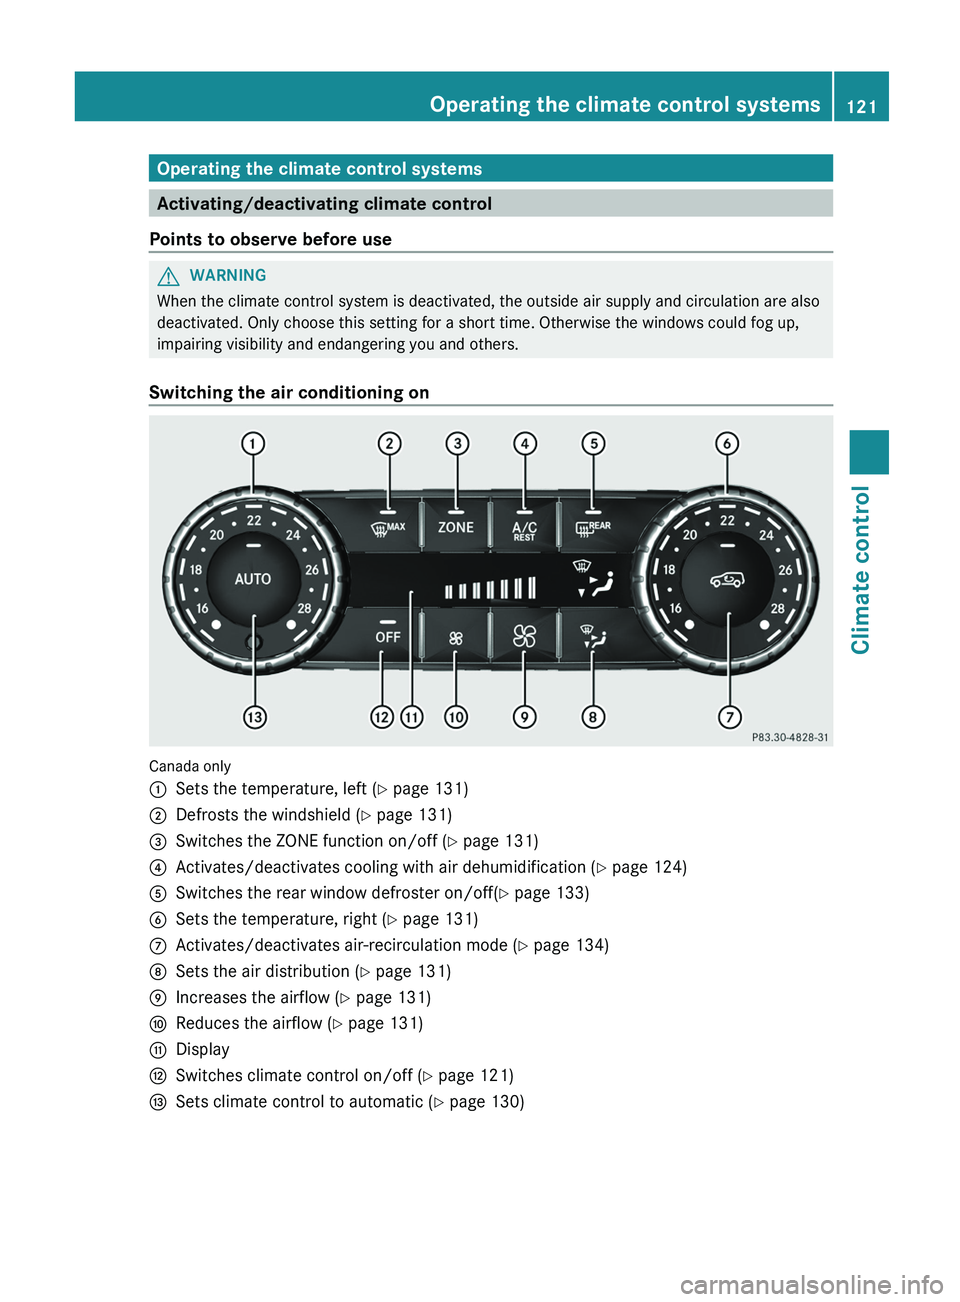
Switching the air conditioning on Canada only
0043
Sets the temperature, left ( Y page 131)
0044 Defrosts the windshield ( Y page 131)
0087 Switches the ZONE function on/off ( Y page 131)
0085 Activates/deactivates cooling with air dehumidification ( Y page 124)
0083 Switches the rear window defroster on/off( Y page 133)
0084 Sets the temperature, right ( Y page 131)
006B Activates/deactivates air-recirculation mode (Y page 134)
006C Sets the air distribution (Y page 131)
006D Increases the airflow ( Y page 131)
006E Reduces the airflow ( Y page 131)
006F Display
0070 Switches climate control on/off ( Y page 121)
0071 Sets climate control to automatic (Y page 130) Operating the climate control systems
121Climate control Z