MERCEDES-BENZ G-CLASS SUV 2014 Owners Manual
Manufacturer: MERCEDES-BENZ, Model Year: 2014, Model line: G-CLASS SUV, Model: MERCEDES-BENZ G-CLASS SUV 2014Pages: 272, PDF Size: 39.13 MB
Page 221 of 272
Jump-starting
G
WARNING
Battery acid is caustic. There is a risk of injury.
Avoid contact with the skin, eyes or clothing. Do not inhale any battery gases. Do not lean over
the battery. Keep children away from batteries. Wash battery acid immediately with water and
seek medical attention. G
WARNING
During charging and jump-starting, explosive gases can escape from the battery. There is a risk
of an explosion.
Particularly avoid fire, open flames, creating sparks and smoking. Ensure there is sufficient
ventilation while charging and jump-starting. Do not lean over a battery. G
WARNING
During the charging process, a battery produces hydrogen gas. If a short circuit occurs or sparks
are created, the hydrogen gas can ignite. There is a risk of an explosion.
R Make sure that the positive terminal of a connected battery does not come into contact with
vehicle parts.
R Never place metal objects or tools on a battery.
R It is important that you observe the described order of the battery terminals when connecting
and disconnecting a battery.
R When jump-starting, make sure that the battery poles with identical polarity are connected.
R It is particularly important to observe the described order when connecting and disconnecting
the jumper cables.
R Never connect or disconnect the battery terminals while the engine is running. G
WARNING
A discharged battery can freeze at temperatures below freezing point. When jump-starting the
vehicle or charging the battery, gases can escape from the battery. There is a risk of an explosion.
Allow the frozen battery to thaw out before charging it or jump-starting. G
WARNING
Non-combusted fuel can collect in the exhaust system and ignite. There is a risk of fire. Avoid
repeated and lengthy starting attempts.
! Avoid repeated and lengthy starting attempts. Otherwise, non-combusted fuel may
damage the catalytic converter and create a risk of fire.
Do not use a rapid charging device to start the vehicle.
Make sure the jumper cables are not damaged.
Make sure the jumper cables are not touching any other metal objects when they are
connected to the battery. Jump-starting
219Breakdown assistance Z
Page 222 of 272
If the indicator/warning lamps do not light up at temperatures around or below freezing point,
the discharged battery is likely to be frozen (a commonplace scenario). In this case, do not
jump-start the vehicle or recharge the battery.
Once the battery has thawed out, its service life may be dramatically reduced.
The starting characteristics can be impaired, particularly at low temperatures.
It is recommended that you have the thawed out battery checked at a qualified specialist
workshop.
Do not start the vehicle using a rapid charging device. If your vehicle's battery is discharged,
the engine can be jump-started from another vehicle or from a second battery using jumper
cables. Observe the following points:
R The battery is not accessible in all vehicles. If the other vehicle's battery is not accessible,
jump-start the vehicle using a second battery or a jump-starting device.
R Vehicles with a gasoline engine: only jump-start the vehicle when the engine and exhaust
system are cold.
R Do not start the engine if the battery is frozen. Let the battery thaw first.
R Jump-starting may only be performed from batteries with a nominal voltage of 12 V.
R Only use jumper cables which have a sufficient cross-section and insulated terminal clamps.
R If the battery is fully discharged, leave the battery that is being used to jump-start connected
for a few minutes before attempting to start. This charges the empty battery a little.
R Make sure that the two vehicles do not touch.
Make sure that:
R the jumper leads are not damaged.
R when the jumper cables are connected to the battery, uninsulated sections of the terminal
clamp do not come into contact with other metal sections.
R The jumper cables cannot come into contact with parts such as the pulley or the fan. These
parts move when the engine is started and while it is running.
X Apply the parking brake.
X Move the selector lever to position P.
X Switch off all electrical consumers (e.g. radio, blower, etc.).
X Open the hood (Y page 201).220
Jump-startingBreakdown assistance
Page 223 of 272
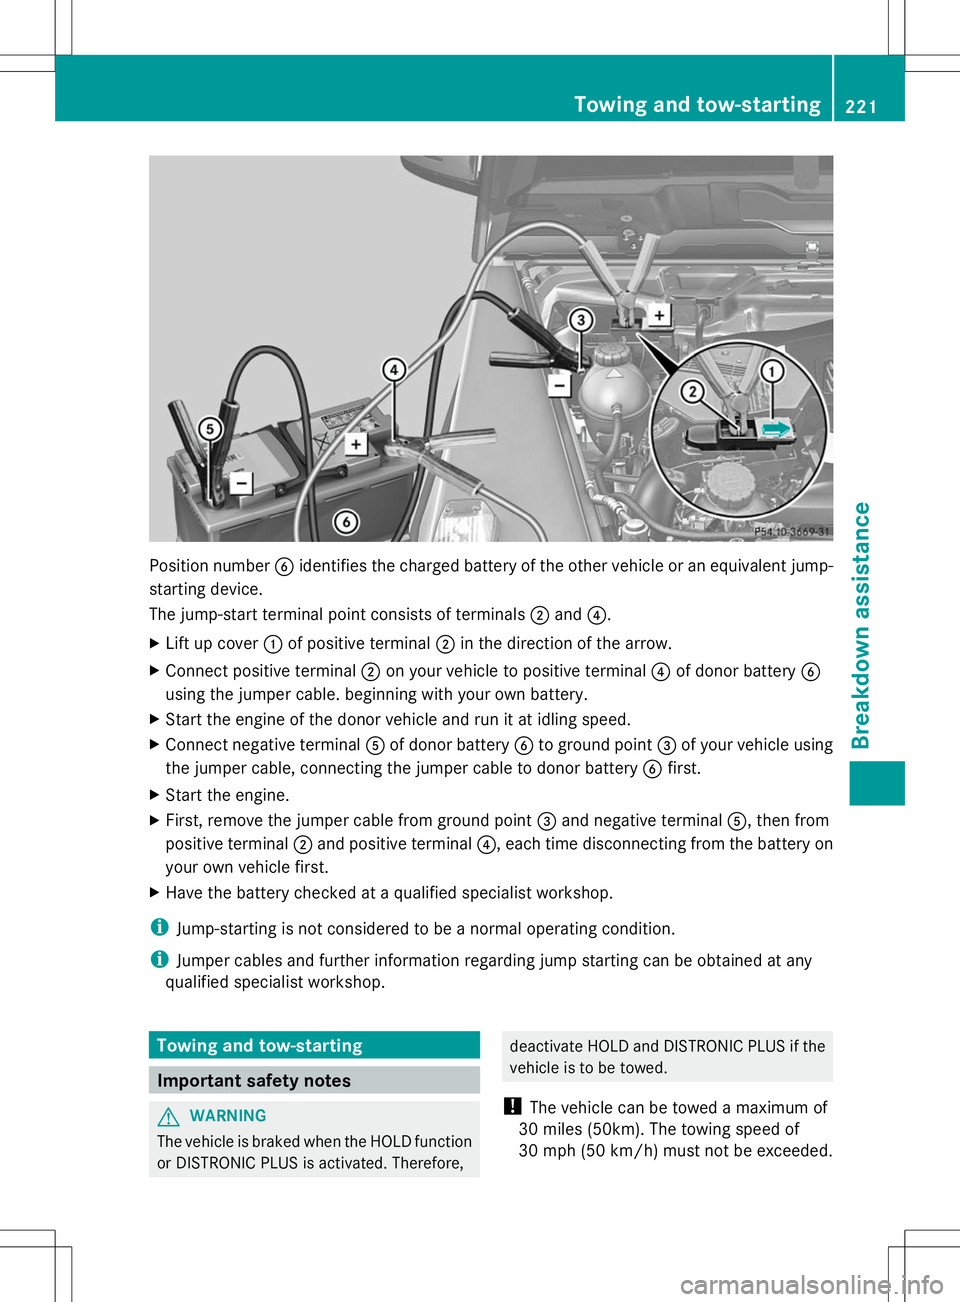
Position number
Bidentifies the charged battery of the other vehicle or an equivalent jump-
starting device.
The jump-start terminal point consists of terminals ;and ?.
X Lift up cover :of positive terminal ;in the direction of the arrow.
X Connect positive terminal ;on your vehicle to positive terminal ?of donor battery B
using the jumper cable. beginning with your own battery.
X Start the engine of the donor vehicle and run it at idling speed.
X Connect negative terminal Aof donor battery Bto ground point =of your vehicle using
the jumper cable, connecting the jumper cable to donor battery Bfirst.
X Start the engine.
X First, remove the jumper cable from ground point =and negative terminal A, then from
positive terminal ;and positive terminal ?, each time disconnecting from the battery on
your own vehicle first.
X Have the battery checked at a qualified specialist workshop.
i Jump-starting is not considered to be a normal operating condition.
i Jumper cables and further information regarding jump starting can be obtained at any
qualified specialist workshop. Towing and tow-starting
Important safety notes
G
WARNING
The vehicle is braked when the HOLD function
or DISTRONIC PLUS is activated. Therefore, deactivate HOLD and DISTRONIC PLUS if the
vehicle is to be towed.
! The vehicle can be towed a maximum of
30 miles (50km). The towing speed of
30 mph (50 km/h) must not be exceeded. Towing and tow-starting
221Breakdown assistance Z
Page 224 of 272
If the vehicle has to be towed more than
30 miles (50km), the entire vehicle must be
raised and transported.
! Only secure the tow cable or tow bar to
the towing eyes. You could otherwise
damage the vehicle.
! Do not tow with sling-type equipment.
This could damage the vehicle.
! Do not use the towing eyes for recovery
purposes as this could damage the vehicle.
If in doubt, recover the vehicle with a crane.
! When towing, pull away slowly and
smoothly. If the tractive power is too high,
the vehicles could be damaged.
! Your vehicles is equipped with an
automatic transmission. Therefore, you
must not have the vehicle tow-started. The
transmission may otherwise be damaged. G
WARNING
If the weight of the vehicle to be towed or tow-
started is greater than the permissible gross
weight of your vehicle:
R the towing eye could detach itself
R the vehicle/trailer combination could
rollover.
There is a risk of an accident.
When towing or tow-starting another vehicle,
its weight should not be greater than the
permissible gross weight of your vehicle.
Information on your vehicle's gross vehicle
weight rating can be found on the vehicle
identification plate (Y page 258).
It is better to have the vehicle transported
than to have it towed.
If the transfer case can be shifted into neutral
N, you can tow the vehicle. If the transfer case cannot be shifted into
neutral
N, you can tow the vehicle with one
axle raised. Please bear the following in mind:
R remove the propeller shaft between the
transfer case and the rolling axle.
R turn the SmartKey to position 1in the
ignition lock (Y page 97).
The battery must be connected and charged.
Otherwise, you:
R cannot turn the SmartKey in the ignition
lock to position 2(Ypage 97)
R cannot shift the automatic transmission to
position N
i Deactivate the automatic locking feature
(Y page 69). You could otherwise be locked
out when pushing or towing the vehicle. Towing eyes
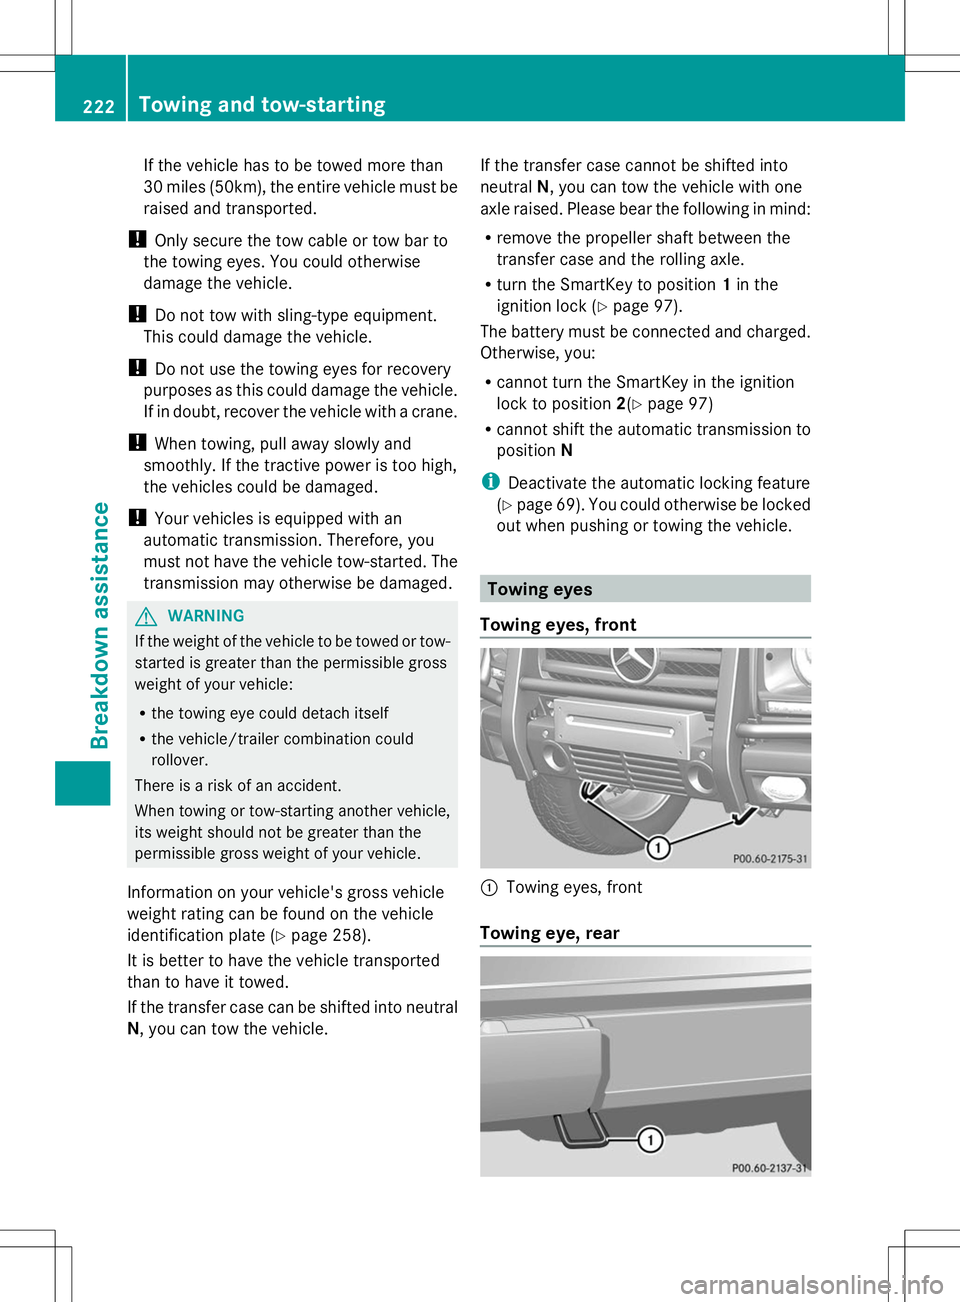
Towing eyes, front :
Towing eyes, front
Towing eye, rear 222
Towing and tow-startingBreakdown assistance
Page 225 of 272
Rear towing eye
:is located under the
bumper, on the left-hand side when viewed in
the direction of travel. Towing a vehicle with both axles on
the ground
It is important that you observe the safety
instructions when towing away your vehicle
(Y page 221).
X Switch on the hazard warning lamps
(Y page 82).
i In order to signal a change of direction
when towing the vehicle with the hazard
warning lamps switched on, use the
combination switch as usual. In this case,
only the turn signals for the desired
direction flash. When you reset the
combination switch, the hazard warning
lamps start flashing again.
X Turn the SmartKey to position 2in the
ignition lock (Y page 97).
X When the vehicle is stationary, depress the
brake pedal and keep it depressed.
X Shift the transfer case to
neutral(Y page 131).
X Shift the automatic transmission to
position N.
X Release the brake pedal.
X Release the parking brake (Y page 105).
i The transmission can only change gear if
the battery has sufficient charge.
If you cannot move the selector lever to N,
the propeller shafts to the driven axles
must be removed. Transporting the vehicle
! You may only secure the vehicle by the
wheels, not by parts of the vehicle such as
axle or steering components. Otherwise,
the vehicle could be damaged. Use the towing eyes to pull the vehicle if it
needs to be transported on a trailer or
transporter (Y
page 222).
X Apply the parking brake.
X Turn the SmartKey to position 2in the
ignition lock (Y page 97).
X Move the selector lever to N.
X Shift the transfer case to neutral
(Y page 131).
X Secure the towing cable to the towing eyes
(Y page 222).
X Make sure that the vehicle cannot roll
away.
X Release the parking brake.
X Load the vehicle onto the transporter.
As soon as the vehicle has been loaded:
X Apply the parking brake.
X Shift the automatic transmission to
position P.
X Turn the SmartKey to position 0in the
ignition lock (Y page 97) and remove it.
X Secure the vehicle. Recovering a vehicle that has become
stuck
! When recovering a vehicle that has
become stuck, pull it as smoothly and
evenly as possible. Excessive tractive
power could damage the vehicles.
If the drive wheels have become stuck in
loose or muddy ground, pull the vehicle out
with extreme caution, especially so if the
vehicle is loaded.
Never attempt to recover a stuck vehicle with
a trailer attached.
Pull out the vehicle backwards, if possible
using the tracks it made when it became
stuck. Towing and tow-starting
223Breakdown assistance Z
Page 226 of 272
Towing in the event of malfunctions
General notes !
If you are removing the propeller shaft,
use M10 nuts as spacers on the M8 bolts
and secure them with M8 nuts.
New self-locking nuts must be used when
the propeller shafts are refitted.
X Observe the safety notes as you do so
(Y page 221).
i Consult an authorized Mercedes-Benz
Center.
Engine damage, gear damage or
electrical malfunctions X
Move the selector lever to
position N(Ypage 100).
X Shift the transfer case to
neutral (Ypage 131).
In the event of damage to the transfer
case Have the propeller shafts between the axles
and the transfer case removed.
In the event of damage to the front axle Have the propeller shaft between the rear
axle and the transfer case removed.
Have the vehicle towed with the front axle
raised.
In the event of damage to the rear axle Have the propeller shaft between the front
axle and the transfer case removed.
Have the vehicle towed with the rear axle
raised and with wheel rollers under the front
axle. Tow-starting (emergency engine
starting)
! Vehicles with automatic transmission
must not be tow-started. You could
otherwise damage the automatic
transmission.
You can find information on "Jump-starting"
under (Y page 219). Fuses
Important safety notes
G
WARNING
If you manipulate or bridge a faulty fuse or if
you replace it with a fuse with a higher
amperage, the electric cables could be
overloaded. This could result in a fire. There
is a risk of an accident and injury.
Always replace faulty fuses with the specified
new fuses having the correct amperage.
! Only use fuses that have been approved
for Mercedes-Benz vehicles and which
have the correct fuse rating for the system
concerned. Otherwise, components or
systems could be damaged.
The fuses in your vehicle serve to close down
faulty circuits. If a fuse blows, all the
components on the circuit and their functions
stop operating.
Blown fuses must be replaced with fuses of
the same rating, which you can recognize by
the color and value. The fuse ratings are listed
in the fuse allocation chart.
i If a fuse has blown, contact a breakdown
service or an authorized Mercedes-Benz
Center.
If a newly inserted fuse also blows, have the
cause traced and rectified at a qualified
specialist workshop, e.g. an authorized
Mercedes-Benz Center. 224
FusesBreakdown assistance
Page 227 of 272
Before changing a fuse
X Park the vehicle and apply the parking
brake.
X Switch off all electrical consumers.
X Remove the SmartKey from the ignition
lock.
All indicator lamps in the instrument cluster
must be off.
The fuses are located in various fuse boxes:
R Main fuse box on the driver's side of the
dashboard
R Fuse box in the front-passenger footwell
R Fuse box in the transmission tunnel
R Fuse box in the battery case
R Fuse box in the cargo compartment
The fuse allocation chart and the spare fuses
are in the main fuse box on the dashboard
(Y page 225).
You will find the fuse removal device in the
vehicle tool kit (Y page 212). Dashboard fuse box
! Do not use a pointed object such as a
screwdriver to open the cover in the
dashboard. You could damage the
dashboard or the cover.
! Make sure that no moisture can enter the
fuse box when the cover is open.
! When closing the cover, make sure that it
is lying correctly on the fuse box. Moisture
seeping in or dirt could otherwise impair
the operation of the fuses. X
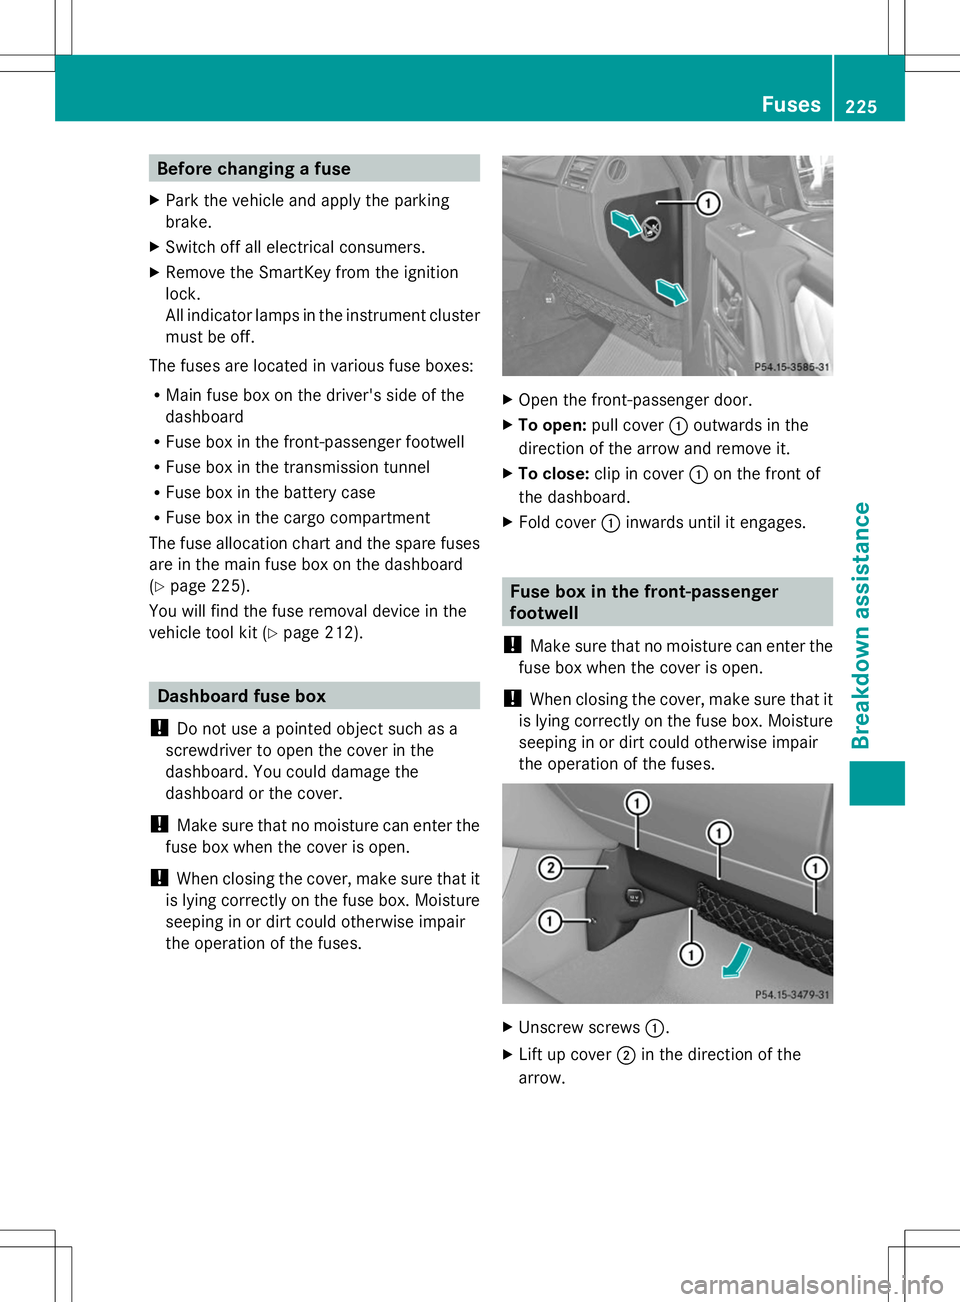
Open the front-passenger door.
X To open: pull cover :outwards in the
direction of the arrow and remove it.
X To close: clip in cover :on the front of
the dashboard.
X Fold cover :inwards until it engages. Fuse box in the front-passenger
footwell
! Make sure that no moisture can enter the
fuse box when the cover is open.
! When closing the cover, make sure that it
is lying correctly on the fuse box. Moisture
seeping in or dirt could otherwise impair
the operation of the fuses. X
Unscrew screws :.
X Lift up cover ;in the direction of the
arrow. Fuses
225Breakdo wn assis tance Z
Page 228 of 272
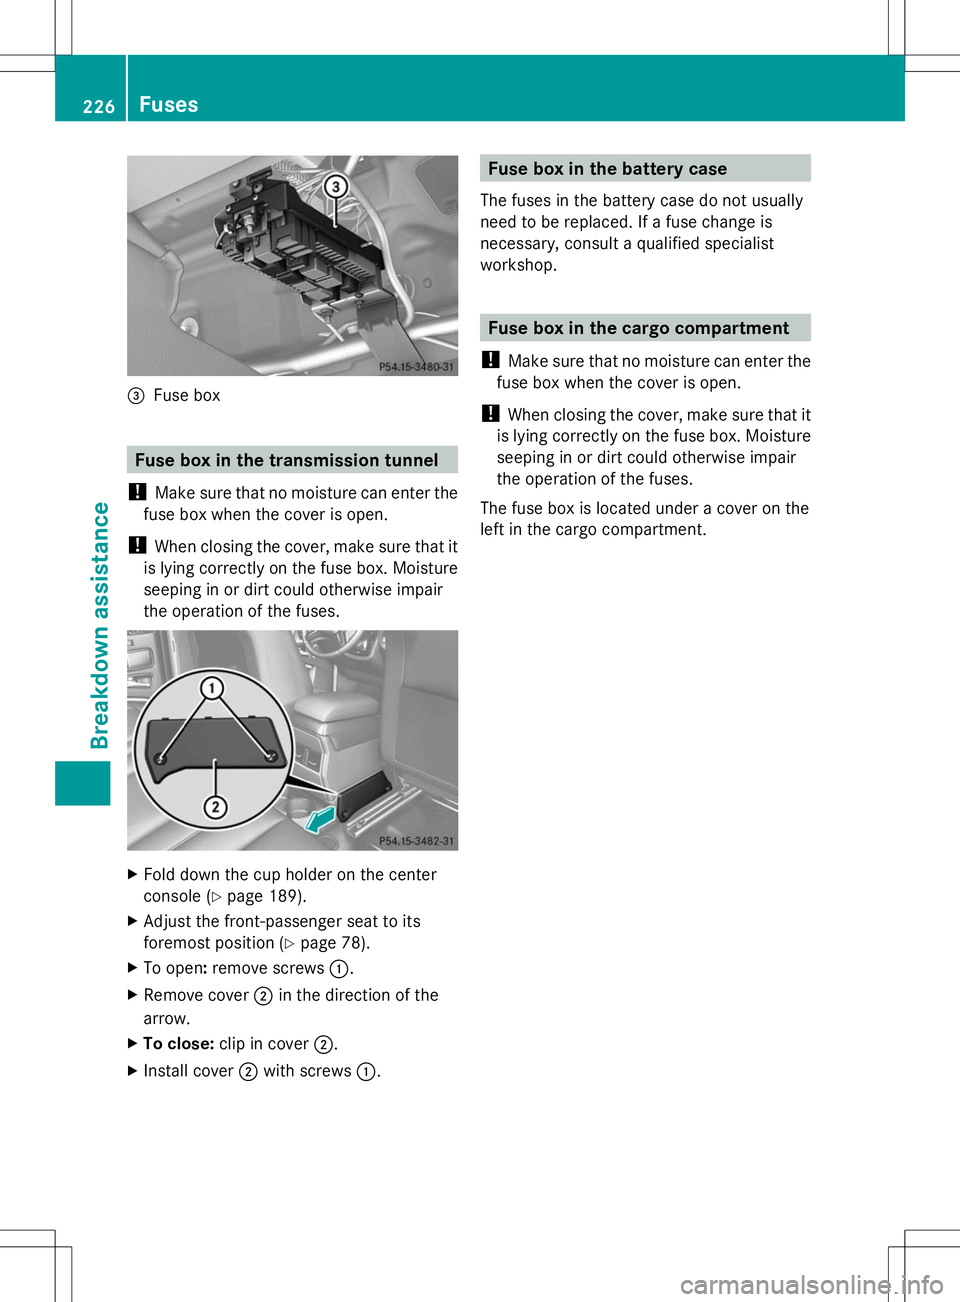
=
Fuse box Fuse box in the transmission tunnel
! Make sure that no moisture can enter the
fuse box when the cover is open.
! When closing the cover, make sure that it
is lying correctly on the fuse box. Moisture
seeping in or dirt could otherwise impair
the operation of the fuses. X
Fold down the cup holder on the center
console (Y page 189).
X Adjust the front-passenger seat to its
foremost position (Y page 78).
X To open: remove screws :.
X Remove cover ;in the direction of the
arrow.
X To close: clip in cover ;.
X Install cover ;with screws :. Fuse box in the battery case
The fuses in the battery case do not usually
need to be replaced. If a fuse change is
necessary, consult a qualified specialist
workshop. Fuse box in the cargo compartment
! Make sure that no moisture can enter the
fuse box when the cover is open.
! When closing the cover, make sure that it
is lying correctly on the fuse box. Moisture
seeping in or dirt could otherwise impair
the operation of the fuses.
The fuse box is located under a cover on the
left in the cargo compartment. 226
FusesBreakdown assistance
Page 229 of 272
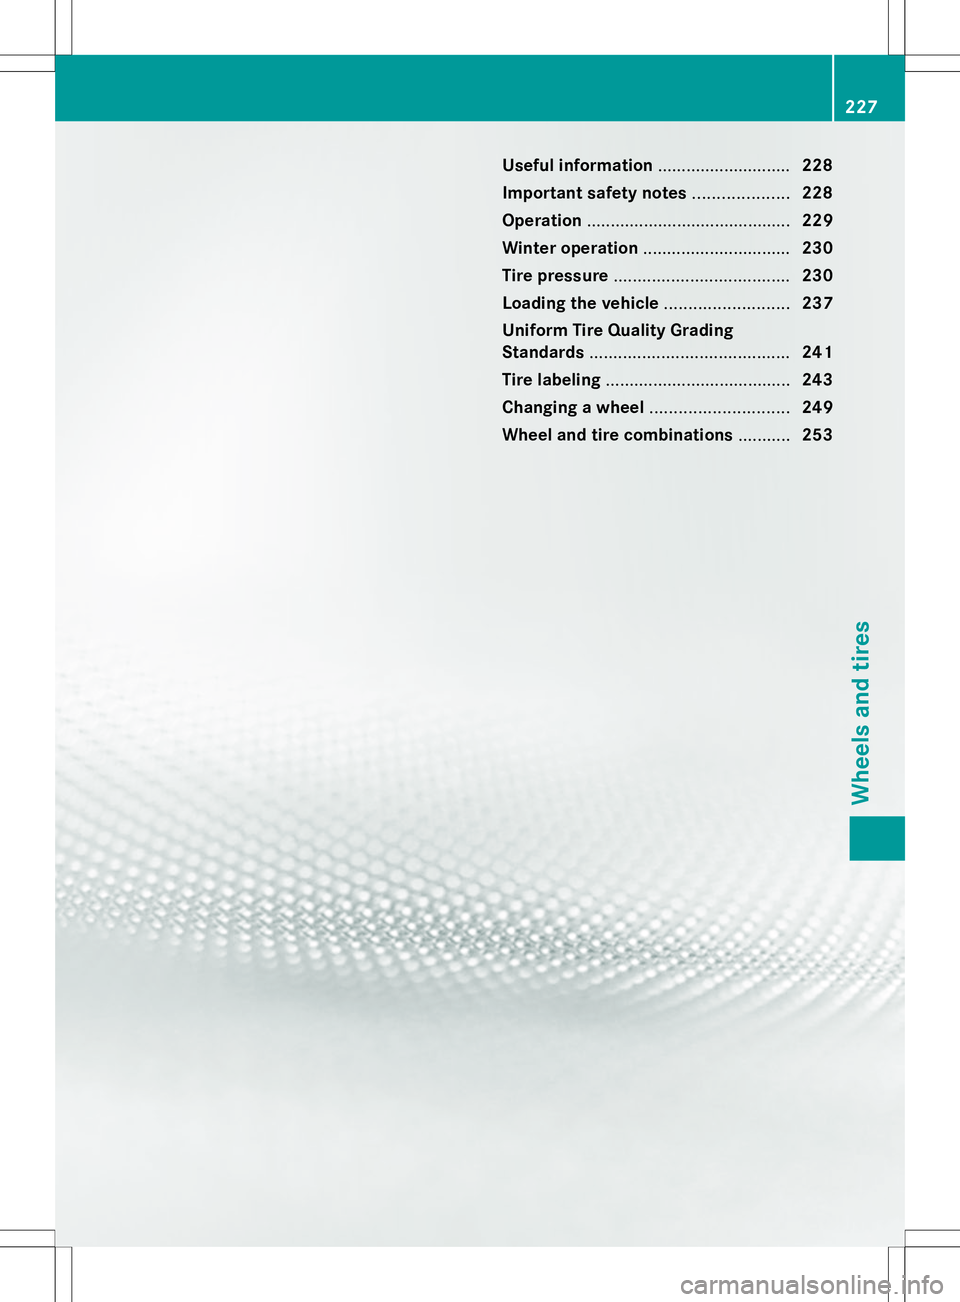
Useful information
............................228
Important safety notes ....................228
Operation ........................................... 229
Winter operation ............................... 230
Tire pressure ..................................... 230
Loading the vehicle ..........................237
Uniform Tire Quality Grading
Standards .......................................... 241
Tire labeling ....................................... 243
Changing a wheel ............................. 249
Wheel and tire combinations ...........253 227Wheels and tires
Page 230 of 272
Useful information
i This Operator's Manual describes all
models and all standard and optional
equipment of your vehicle available at the
time of publication of the Operator's
Manual. Country-specific differences are
possible. Please note that your vehicle may
not be equipped with all features
described. This also applies to safety-
related systems and functions.
i Read the information on qualified
specialist workshops: (Y page 27).Important safety notes
G
WARNING
Replace rims or tires with the same
designation, manufacturer and type as shown
on the original part. For further information
contact an authorized Mercedes-Benz Center.
If incorrectly sized rims and tires are
mounted, the wheel brakes or suspension
components can be damaged. Also, the
operating clearance of the wheels and the
tires may no longer be correct. G
WARNING
Worn, old tires can cause accidents. If the tire
tread is worn to minimum tread depth, or if
the tires have sustained damage, replace
them.
When replacing rims, only use genuine
Mercedes-Benz wheel bolts specified for the
particular rim type. Failure to do so can result
in the bolts loosening and possibly an
accident.
Retreaded tires are not tested or
recommended by Mercedes-Benz, since
previous damage cannot always be
recognized on retreads. The operating safety
of the vehicle cannot be assured when such
tires are used. G
WARNING
If you notice sudden significant vibrations or
unusual handling performance or if you
suspect that damage has occurred to the
vehicle, you should activate the hazard
warning lamps, gently reduce speed and
carefully head for an area that is located at a
safe distance from the road.
Check the tires and the underside of the
vehicle for damage. If the vehicle seems
unsafe, have the vehicle towed away to the
nearest Mercedes-Benz Center or tire dealer
to be repaired. G
WARNING
Do not drive with a flat tire. A flat tire affects
the ability to steer or brake the vehicle. You
might lose control of the vehicle. Continued
driving with a flat tire or driving at high speed
with a flat tire will cause excessive heat build-
up and possibly a fire. G
Warning
A flat tire severely impairs the driving,
steering and braking characteristics of the
vehicle. There is a risk of an accident.
do not drive with a flat tire. Immediately
replace the flat tire with your spare wheel, or
consult a qualified specialist workshop.
Consult an authorized Mercedes-Benz Center
if you require information on approved and
recommended tires and wheels for summer
and winter operation. Advice on purchasing
and caring for tires is also available there.
Accessories that are not approved for your
vehicle by Mercedes-Benz or are not being
used correctly can impair the operating
safety.
Before purchasing and using non-approved
accessories, visit a qualified specialist
workshop and ask about:
R suitability
R legal stipulations
R factory recommendations 228
Important safety notesWheels and tires