MERCEDES-BENZ G-CLASS SUV 2014 Owners Manual
Manufacturer: MERCEDES-BENZ, Model Year: 2014, Model line: G-CLASS SUV, Model: MERCEDES-BENZ G-CLASS SUV 2014Pages: 272, PDF Size: 39.13 MB
Page 181 of 272
R
Weather display
R Internet General notes
Conditions for access To use COMAND Online Mercedes-Benz Apps
and Internet access, the following conditions
must be fulfilled:
R mbrace is activated and operational
R mbrace is activated for COMAND Online
Mercedes-Benz Apps and Internet access
Priority of connections: an emergency call
has the highest priority. When a service call,
e.g. a breakdown service call or the MB Info
Call, is active, an emergency call can still be
initiated.
A service call, on the other hand, has priority
over a current Internet connection. For this
reason, you cannot connect to the Internet
during a service call.
i The availability of individual COMAND
Online Mercedes-Benz Apps may vary
depending on the country.
i The terms of use are shown when
COMAND Online is used for the first time
and then once a year thereafter. Only read
and accept the terms of use when the
vehicle is stationary.
i Internet pages cannot be shown while the
vehicle is in motion. Establishing/ending the connection
Establishing the connection Preconditions for establishing a connection
can be found under "General notes"
(Y
page 179).
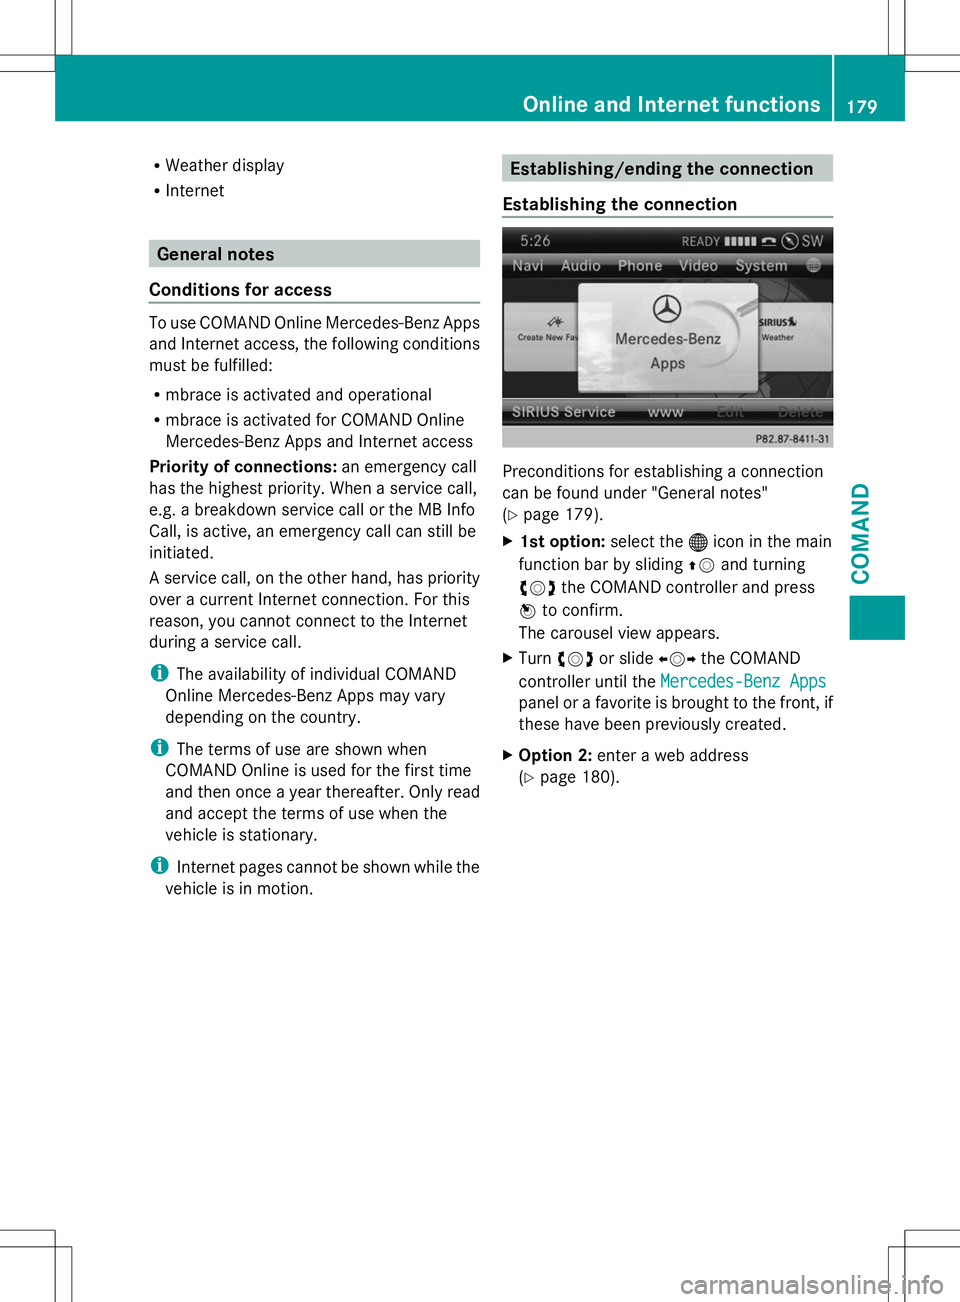
X 1st option: select the®icon in the main
function bar by sliding ZVand turning
cVd the COMAND controller and press
W to confirm.
The carousel view appears.
X Turn cVd or slide XVYthe COMAND
controller until the Mercedes-Benz Apps Mercedes-Benz Apps
panel or a favorite is brought to the front, if
these have been previously created.
X Option 2: enter a web address
(Y page 180). Online and Internet functions
179COMAND Z
Page 182 of 272
X
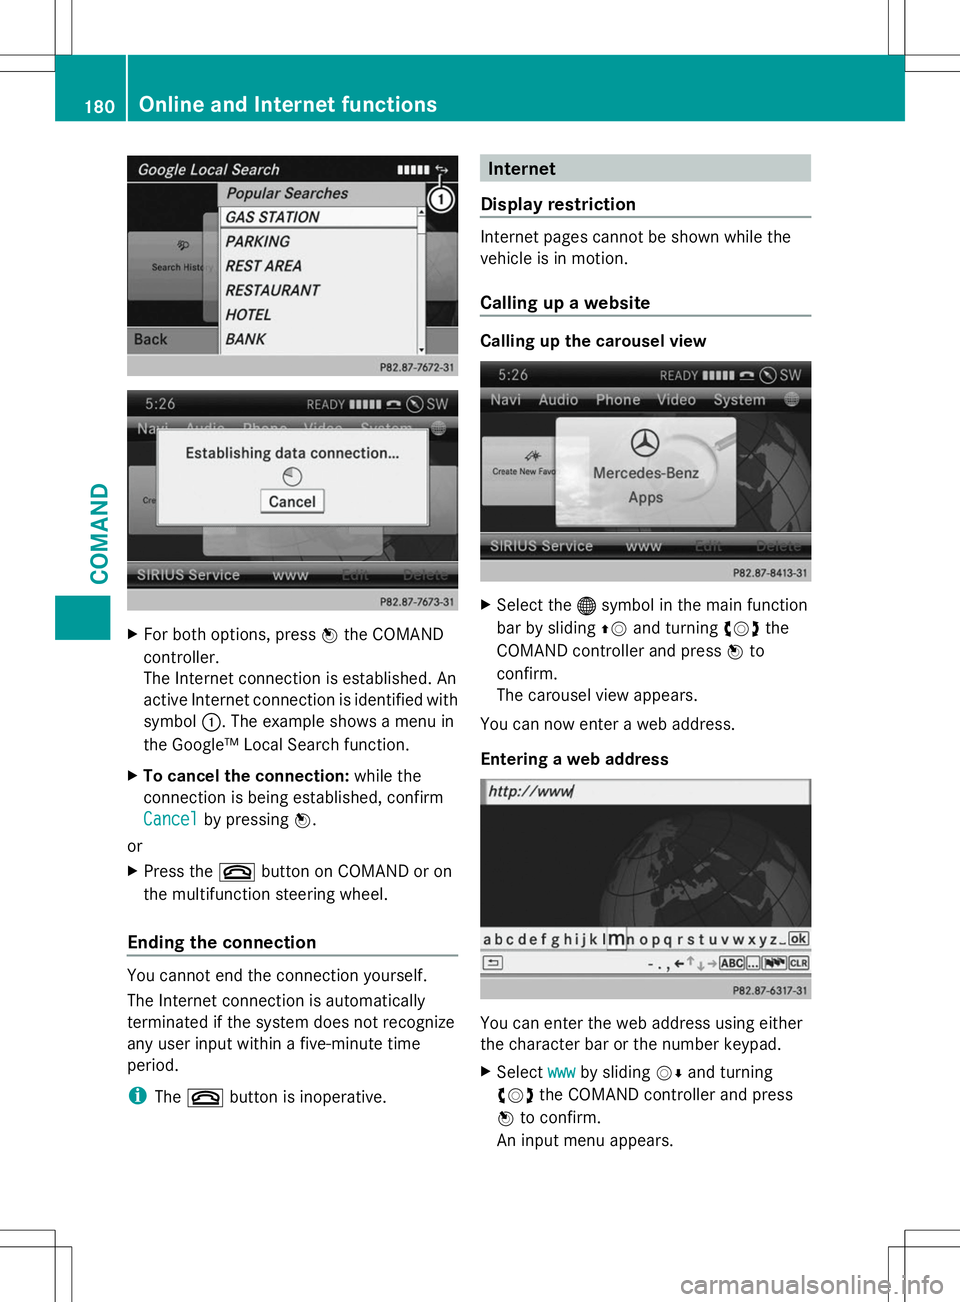
For both options, press Wthe COMAND
controller.
The Internet connection is established. An
active Internet connection is identified with
symbol :. The example shows a menu in
the Google™ Local Search function.
X To cancel the connection: while the
connection is being established, confirm
Cancel
Cancel by pressing W.
or
X Press the ~button on COMAND or on
the multifunction steering wheel.
Ending the connection You cannot end the connection yourself.
The Internet connection is automatically
terminated if the system does not recognize
any user input within a five-minute time
period.
i The ~ button is inoperative. Internet
Display restriction Internet pages cannot be shown while the
vehicle is in motion.
Calling up a website
Calling up the carousel view
X
Select the ®symbol in the main function
bar by sliding ZVand turning cVdthe
COMAND controller and press Wto
confirm.
The carousel view appears.
You can now enter a web address.
Entering a web address You can enter the web address using either
the character bar or the number keypad.
X
Select www wwwby sliding VÆand turning
cVd the COMAND controller and press
W to confirm.
An input menu appears. 180
Online and Internet functionsCOMAND
Page 183 of 272
X
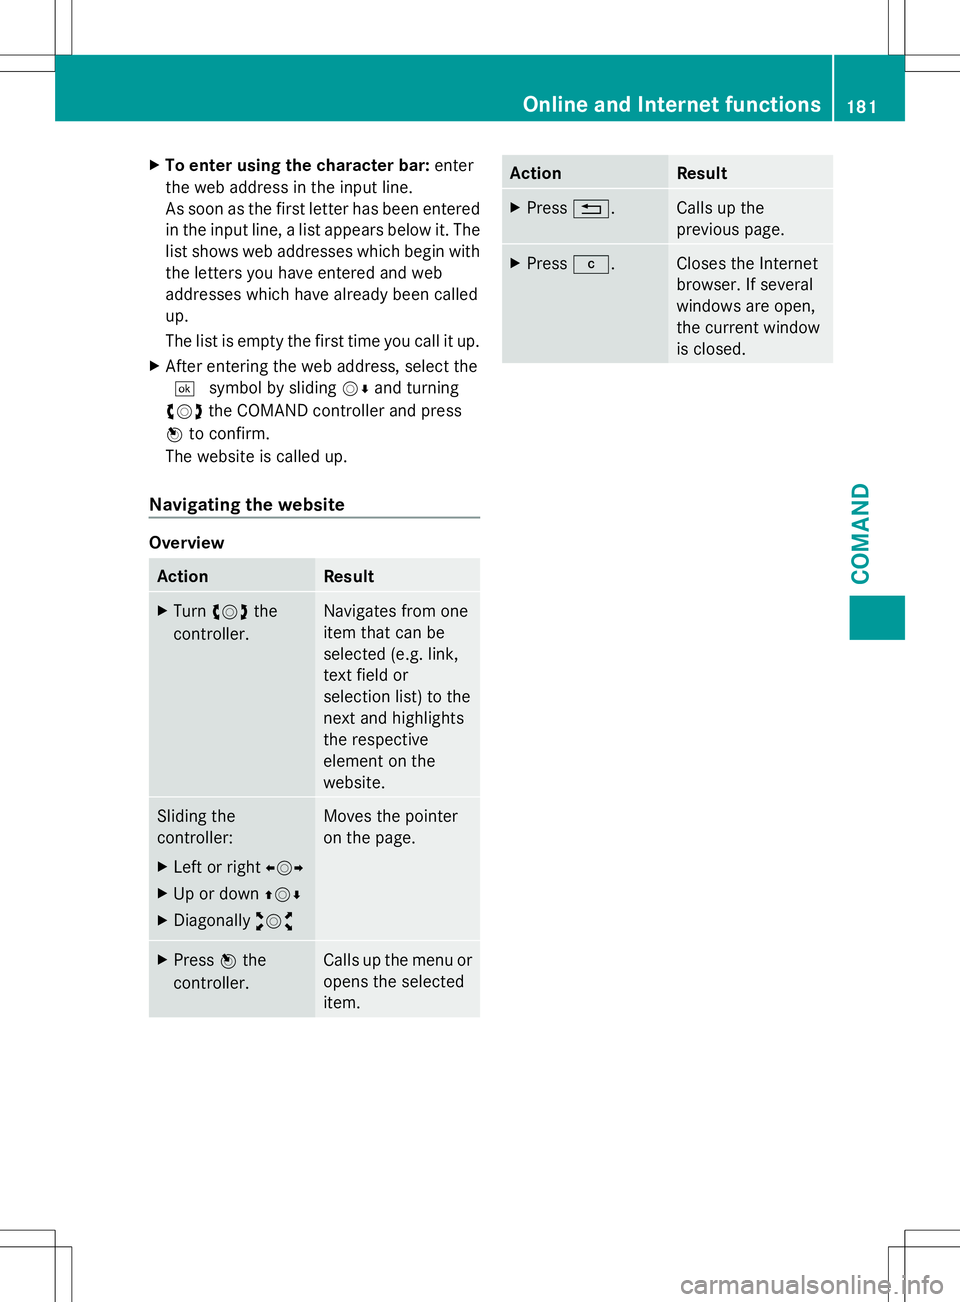
To enter using the character bar: enter
the web address in the input line.
As soon as the first letter has been entered
in the input line, a list appears below it. The
list shows web addresses which begin with
the letters you have entered and web
addresses which have already been called
up.
The list is empty the first time you call it up.
X After entering the web address, select the
¬ symbol by sliding VÆand turning
cVd the COMAND controller and press
W to confirm.
The website is called up.
Navigating the website Overview
Action Result
X
Turn cVd the
controller. Navigates from one
item that can be
selected (e.g. link,
text field or
selection list) to the
next and highlights
the respective
element on the
website.
Sliding the
controller:
X
Left or right XVY
X Up or down ZVÆ
X Diagonally aVb Moves the pointer
on the page.
X
Press Wthe
controller. Calls up the menu or
opens the selected
item. Action Result
X
Press %. Calls up the
previous page.
X
Press j. Closes the Internet
browser. If several
windows are open,
the current window
is closed. Online and Internet functions
181COMAND Z
Page 184 of 272

182
Page 185 of 272
Useful information
............................184
Loading guidelines ............................184
Stowage areas .................................. 185
Features ............................................. 189 183Stowage and features
Page 186 of 272
Useful information
i This Operator's Manual describes all
models and all standard and optional
equipment of your vehicle available at the
time of publication of the Operator's
Manual. Country-specific differences are
possible. Please note that your vehicle may
not be equipped with all features
described. This also applies to safety-
related systems and functions.
i Read the information on qualified
specialist workshops: (Y page 27).Loading guidelines
G
WARNING
Always fasten items being carried as securely
as possible using cargo tie-down rings and
fastening materials appropriate for the weight
and size of the load.
In an accident, during hard braking or sudden
maneuvers, loose items will be thrown around
inside the vehicle. This can cause injury to
vehicle occupants unless the items are
securely fastened in the vehicle.
To help avoid personal injury during a collision
or sudden maneuver, exercise care when
transporting cargo. Do not pile luggage or
cargo higher than the seat backrests.
Never drive a vehicle with the tailgate open.
Deadly carbon monoxide (CO) gases may
enter vehicle interior resulting in
unconsciousness and death. Driving, braking and steering characteristics
change depending on:
R
type of load
R weight
R the center of gravity of the load
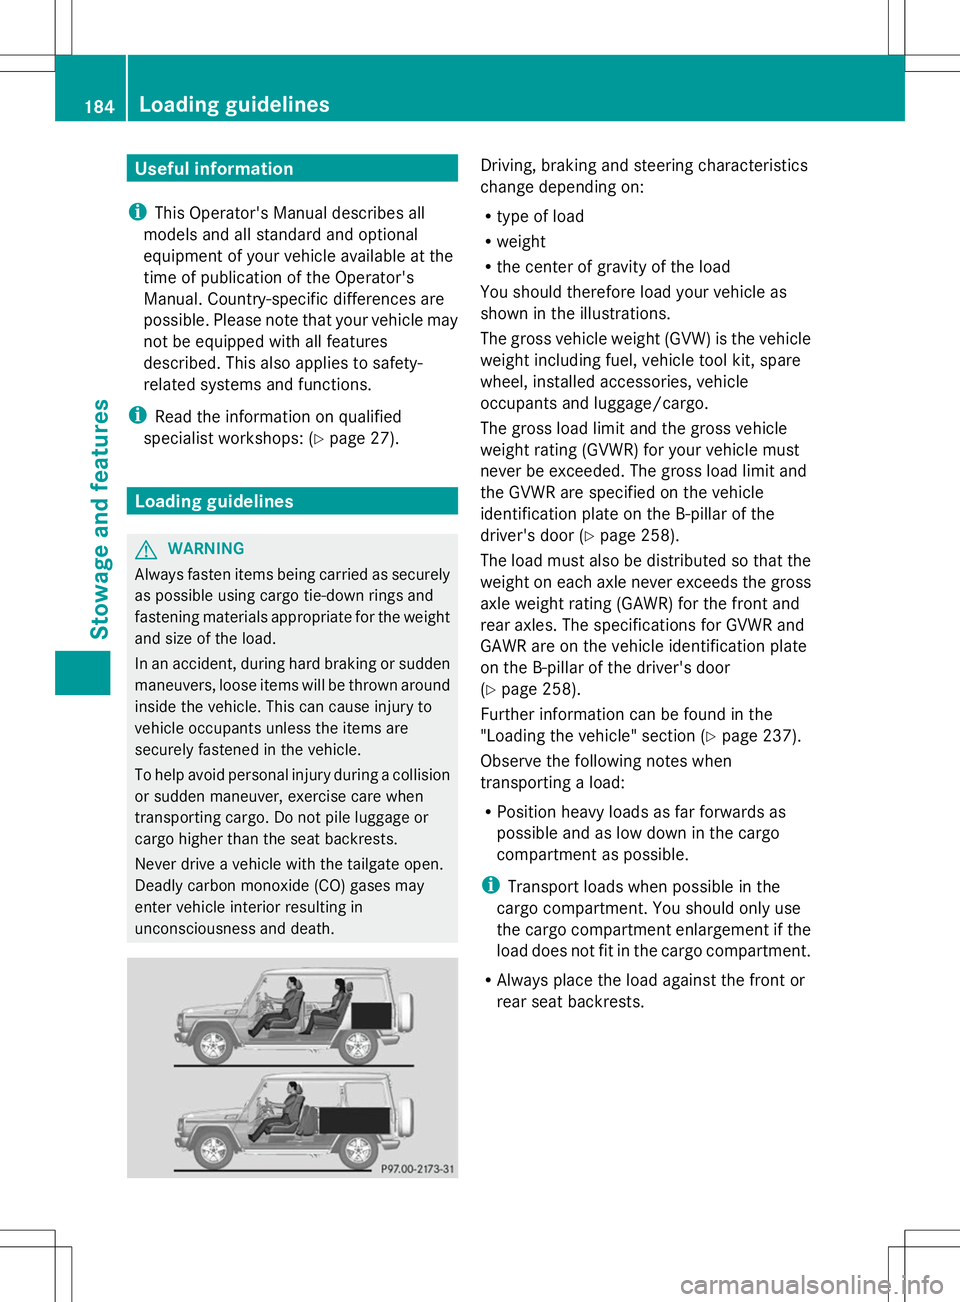
You should therefore load your vehicle as
shown in the illustrations.
The gross vehicle weight (GVW) is the vehicle
weight including fuel, vehicle tool kit, spare
wheel, installed accessories, vehicle
occupants and luggage/cargo.
The gross load limit and the gross vehicle
weight rating (GVWR) for your vehicle must
never be exceeded. The gross load limit and
the GVWR are specified on the vehicle
identification plate on the B-pillar of the
driver's door (Y page 258).
The load must also be distributed so that the
weight on each axle never exceeds the gross
axle weight rating (GAWR) for the front and
rear axles. The specifications for GVWR and
GAWR are on the vehicle identification plate
on the B-pillar of the driver's door
(Y page 258).
Further information can be found in the
"Loading the vehicle" section ( Ypage 237).
Observe the following notes when
transporting a load:
R Position heavy loads as far forwards as
possible and as low down in the cargo
compartment as possible.
i Transport loads when possible in the
cargo compartment. You should only use
the cargo compartment enlargement if the
load does not fit in the cargo compartment.
R Always place the load against the front or
rear seat backrests. 184
Loading guidelinesStowage and features
Page 187 of 272
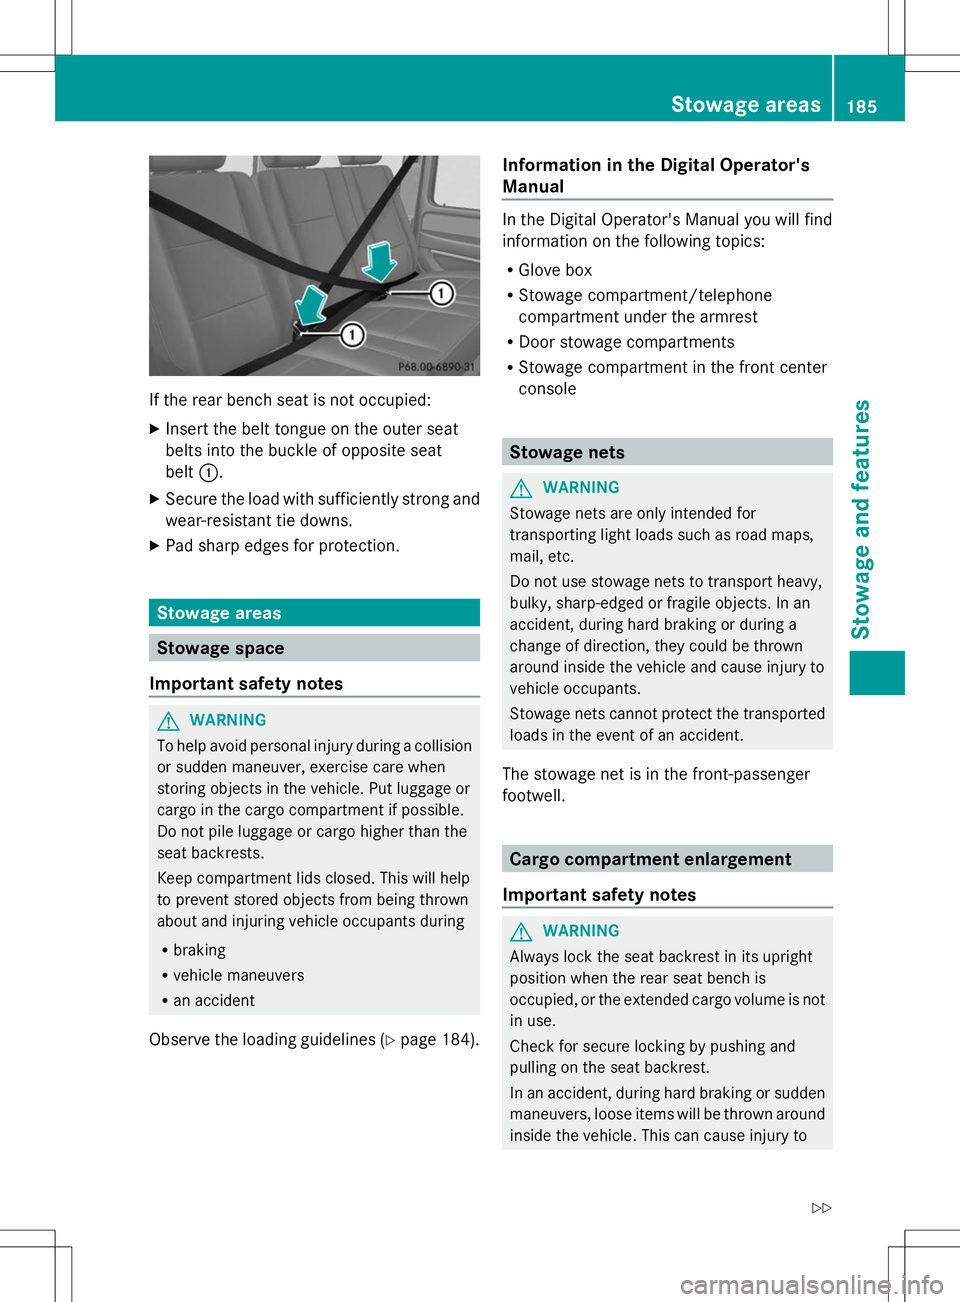
If the rear bench seat is not occupied:
X Insert the belt tongue on the outer seat
belts into the buckle of opposite seat
belt :.
X Secure the load with sufficiently strong and
wear-resistant tie downs.
X Pad sharp edges for protection. Stowage areas
Stowage space
Important safety notes G
WARNING
To help avoid personal injury during a collision
or sudden maneuver, exercise care when
storing objects in the vehicle. Put luggage or
cargo in the cargo compartment if possible.
Do not pile luggage or cargo higher than the
seat backrests.
Keep compartment lids closed. This will help
to prevent stored objects from being thrown
about and injuring vehicle occupants during
R braking
R vehicle maneuvers
R an accident
Observe the loading guidelines (Y page 184).Information in the Digital Operator's
Manual In the Digital Operator's Manual you will find
information on the following topics:
R
Glove box
R Stowage compartment/telephone
compartment under the armrest
R Door stowage compartments
R Stowage compartment in the front center
console Stowage nets
G
WARNING
Stowage nets are only intended for
transporting light loads such as road maps,
mail, etc.
Do not use stowage nets to transport heavy,
bulky, sharp-edged or fragile objects. In an
accident, during hard braking or during a
change of direction, they could be thrown
around inside the vehicle and cause injury to
vehicle occupants.
Stowage nets cannot protect the transported
loads in the event of an accident.
The stowage net is in the front-passenger
footwell. Cargo compartment enlargement
Important safety notes G
WARNING
Always lock the seat backrest in its upright
position when the rear seat bench is
occupied, or the extended cargo volume is not
in use.
Check for secure locking by pushing and
pulling on the seat backrest.
In an accident, during hard braking or sudden
maneuvers, loose items will be thrown around
inside the vehicle. This can cause injury to Stowage areas
185Stowage and features
Z
Page 188 of 272
vehicle occupants unless the items are
securely fastened in the vehicle.
To help avoid personal injury during a collision
or sudden maneuver, exercise care when
transporting cargo. G
WARNING
Failure to assure that the seat bench and seat
backrests are locked into place could result
in an increased chance of injury in an
accident.
Never place hands under seat or near any
moving parts while a seat is being adjusted.
For safety reasons, the rear seat bench must
only be adjusted when the vehicle is
stationary.
Never drive a vehicle with the tailgate open.
Deadly carbon monoxide (CO) gases may
enter vehicle interior resulting in
unconsciousness and death.
! Ensure that you remove all containers
from the cup holder in the rear before
folding the seat backrest and the seat
cushion of the rear bench seat forwards.
Observe the loading guidelines (Y page 184).
The rear bench seat is split symmetrically.
The left-hand and right-hand rear seats can
be folded down to increase the cargo
compartment capacity. The following
changes are possible:
R fold the seat backrests forward
R fold the rear bench seat back fully Folding the seat backrest forward To fold forward the seat backrests, proceed
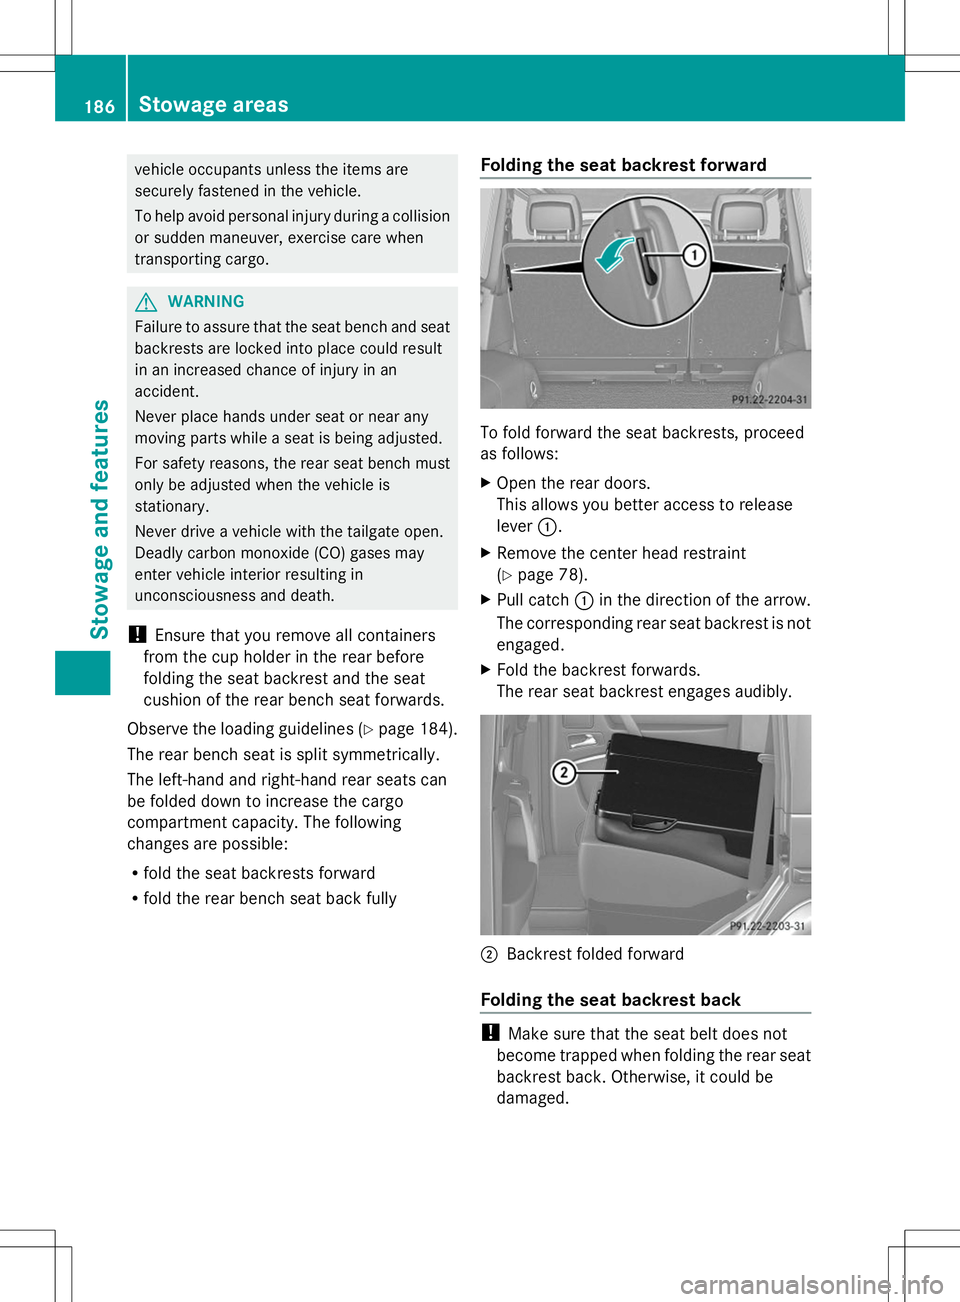
as follows:
X
Open the rear doors.
This allows you better access to release
lever :.
X Remove the center head restraint
(Y page 78).
X Pull catch :in the direction of the arrow.
The corresponding rear seat backrest is not
engaged.
X Fold the backrest forwards.
The rear seat backrest engages audibly. ;
Backrest folded forward
Folding the seat backrest back !
Make sure that the seat belt does not
become trapped when folding the rear seat
backrest back. Otherwise, it could be
damaged. 186
Stowage areasStowage and features
Page 189 of 272
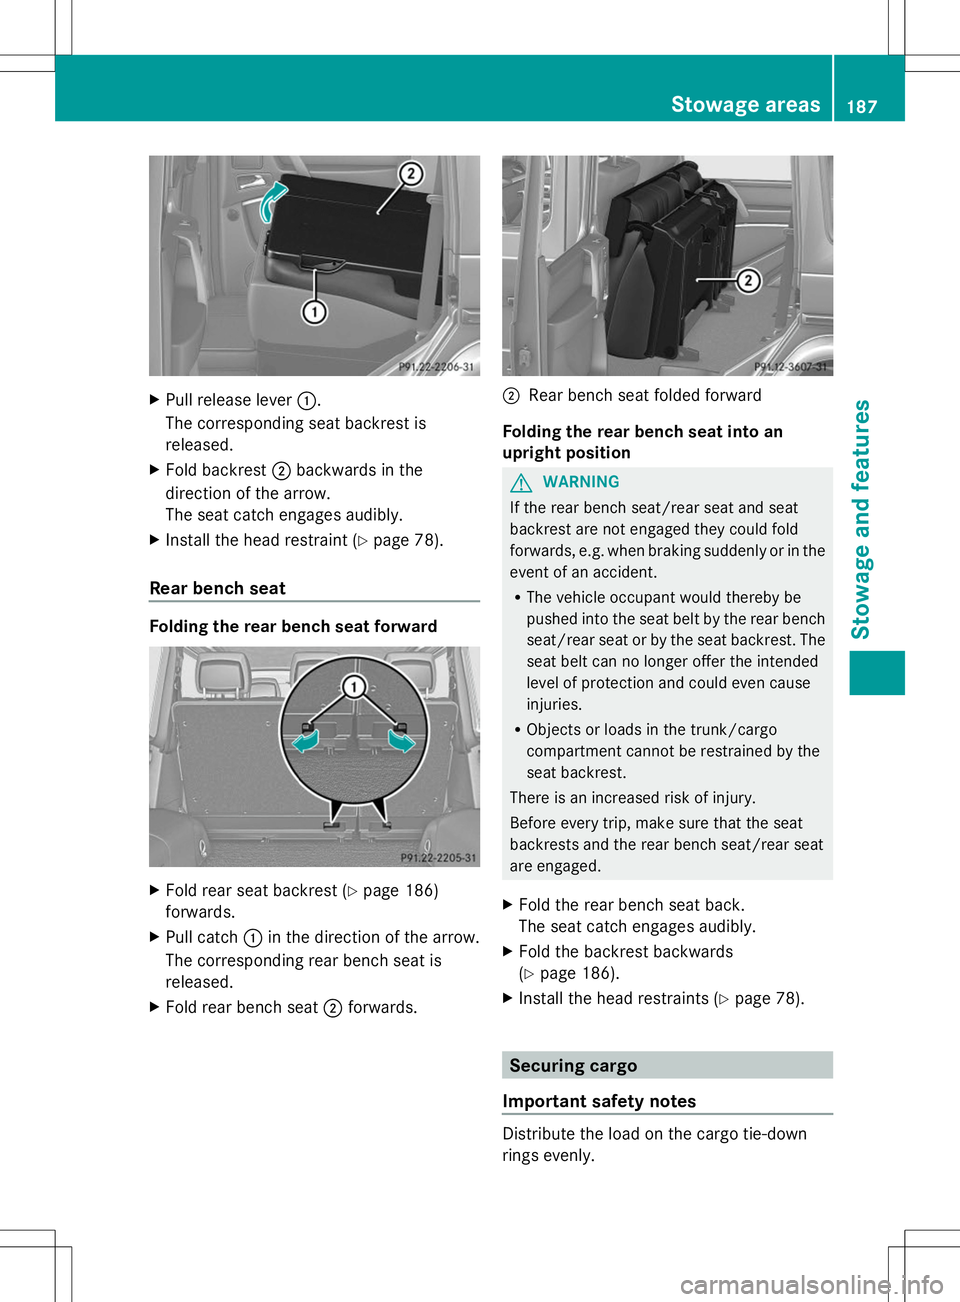
X
Pull release lever :.
The corresponding seat backrest is
released.
X Fold backrest ;backwards in the
direction of the arrow.
The seat catch engages audibly.
X Install the head restraint (Y page 78).
Rear bench seat Folding the rear bench seat forward
X
Fold rear seat backrest (Y page 186)
forwards.
X Pull catch :in the direction of the arrow.
The corresponding rear bench seat is
released.
X Fold rear bench seat ;forwards. ;
Rear bench seat folded forward
Folding the rear bench seat into an
upright position G
WARNING
If the rear bench seat/rear seat and seat
backrest are not engaged they could fold
forwards, e.g. when braking suddenly or in the
event of an accident.
R The vehicle occupant would thereby be
pushed into the seat belt by the rear bench
seat/rear seat or by the seat backrest. The
seat belt can no longer offer the intended
level of protection and could even cause
injuries.
R Objects or loads in the trunk/cargo
compartment cannot be restrained by the
seat backrest.
There is an increased risk of injury.
Before every trip, make sure that the seat
backrests and the rear bench seat/rear seat
are engaged.
X Fold the rear bench seat back.
The seat catch engages audibly.
X Fold the backrest backwards
(Y page 186).
X Install the head restraints (Y page 78). Securing cargo
Important safety notes Distribute the load on the cargo tie-down
rings evenly. Stowage areas
187Stowage and features Z
Page 190 of 272
Do not tamper with or repair cargo tie-down
point, cargo tie down rings or tie downs. Have
maintenance work as well as modifications,
installations and conversions carried out at a
qualified specialist workshop (Y page 27).
Observe the following notes on securing
loads:
R Secure the load using the cargo tie-down
rings.
R Do not use elastic straps or nets to secure
a load, as these are only intended as an
anti-slip protection for light loads.
R Do not route tie-downs across sharp edges
or corners.
R Pad sharp edges for protection.
R Only use tie downs that have been checked
in accordance with applicable standards,
e.g. lashing nets or lashing straps.
R Fill the spaces between the load and the
cargo compartment walls and the wheel
mountings in a form-locking way. Only use
dimensionally stable transportation aids
for this, such as chocks, wooden fixings or
padding.
Cargo tie-down rings in the cargo
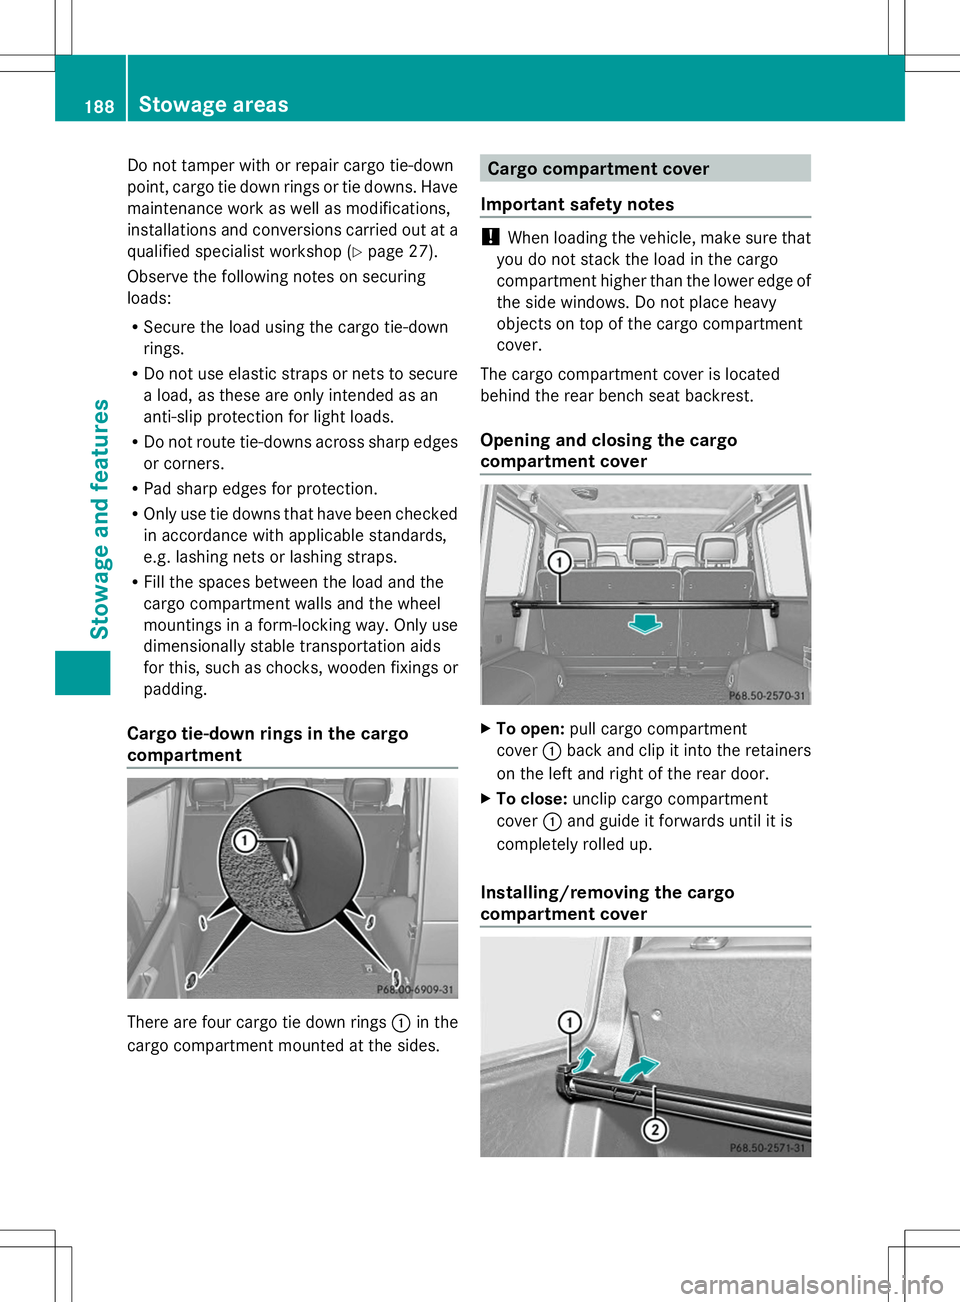
compartment There are four cargo tie down rings
:in the
cargo compartment mounted at the sides. Cargo compartment cover
Important safety notes !
When loading the vehicle, make sure that
you do not stack the load in the cargo
compartment higher than the lower edge of
the side windows. Do not place heavy
objects on top of the cargo compartment
cover.
The cargo compartment cover is located
behind the rear bench seat backrest.
Opening and closing the cargo
compartment cover X
To open: pull cargo compartment
cover :back and clip it into the retainers
on the left and right of the rear door.
X To close: unclip cargo compartment
cover :and guide it forwards until it is
completely rolled up.
Installing/removing the cargo
compartment cover 188
Sto
wage areasStowage an d features