key MERCEDES-BENZ G-CLASS SUV 2014 Service Manual
[x] Cancel search | Manufacturer: MERCEDES-BENZ, Model Year: 2014, Model line: G-CLASS SUV, Model: MERCEDES-BENZ G-CLASS SUV 2014Pages: 272, PDF Size: 39.13 MB
Page 107 of 272
G
WARNING
If you switch off the ignition while driving,
safety-relevant functions are only available
with limitations, or not at all. This could affect,
for example, the power steering and the brake
boosting effect. You will require considerably
more effort to steer and brake. There is a risk
of an accident.
Do not switch off the ignition while driving. Switching off the engine
Important safety notes G
WARNING
If you switch off the ignition while driving,
safety-relevant functions are only available
with limitations, or not at all. This could affect,
for example, the power steering and the brake
boosting effect. You will require considerably
more effort to steer and brake. There is a risk
of an accident.
Do not switch off the ignition while driving. G
WARNING
The automatic transmission switches to
neutral position Nwhen you switch off the
engine. The vehicle may roll away. There is a
risk of an accident.
After switching off the engine, always switch
to parking position P. Prevent the parked
vehicle from rolling away by applying the
parking brake.
Information in the Digital Operator's
Manual A description of how to switch off the engine
can be found in the Digital Operator's Manual.
Parking brake
G
WARNING
If you must brake the vehicle with the parking
brake, the braking distance is considerably longer and the wheels could lock. There is an
increased danger of skidding and accidents.
Only use the parking brake to brake the
vehicle when the service brake is faulty. Do
not apply the parking brake too firmly. If the
wheels lock, release the parking brake until
the wheels begin turning again.
G
WARNING
If you leave children unsupervised in the
vehicle, they could set it in motion by, for
example:
R releasing the parking brake
R shifting the automatic transmission out of
the parking position P
R starting the engine.
They could also operate the vehicle's
equipment. There is a risk of an accident and
injury.
When leaving the vehicle, always take the
SmartKey with you and lock the vehicle. Never
leave children unsupervised in the vehicle. i
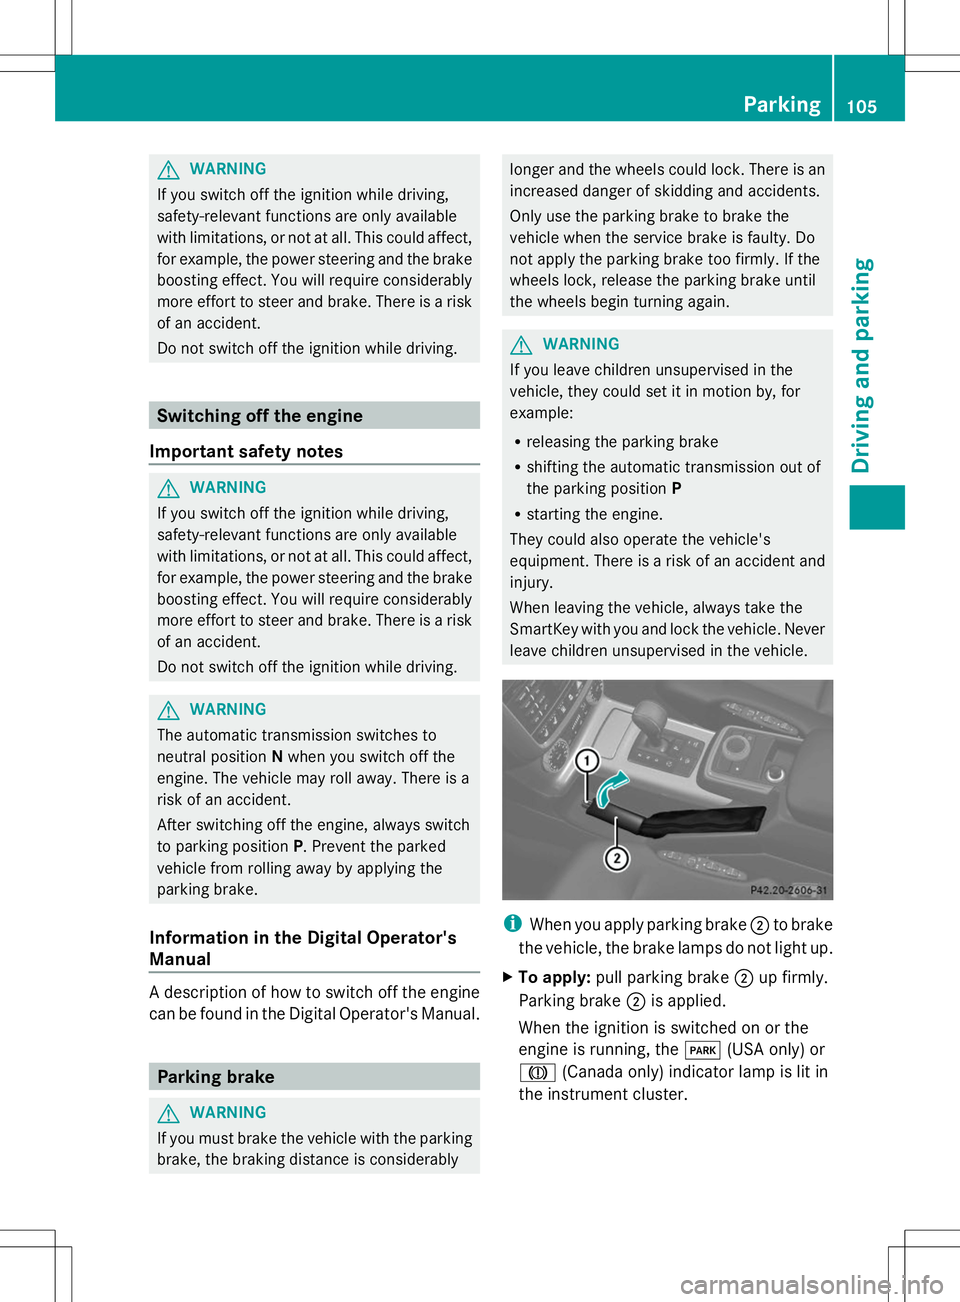
When you apply parking brake ;to brake
the vehicle, the brake lamps do not light up.
X To apply: pull parking brake ;up firmly.
Parking brake ;is applied.
When the ignition is switched on or the
engine is running, the F(USA only) or
J (Canada only) indicator lamp is lit in
the instrument cluster. Parking
105Driving and parking Z
Page 125 of 272
Collision warning
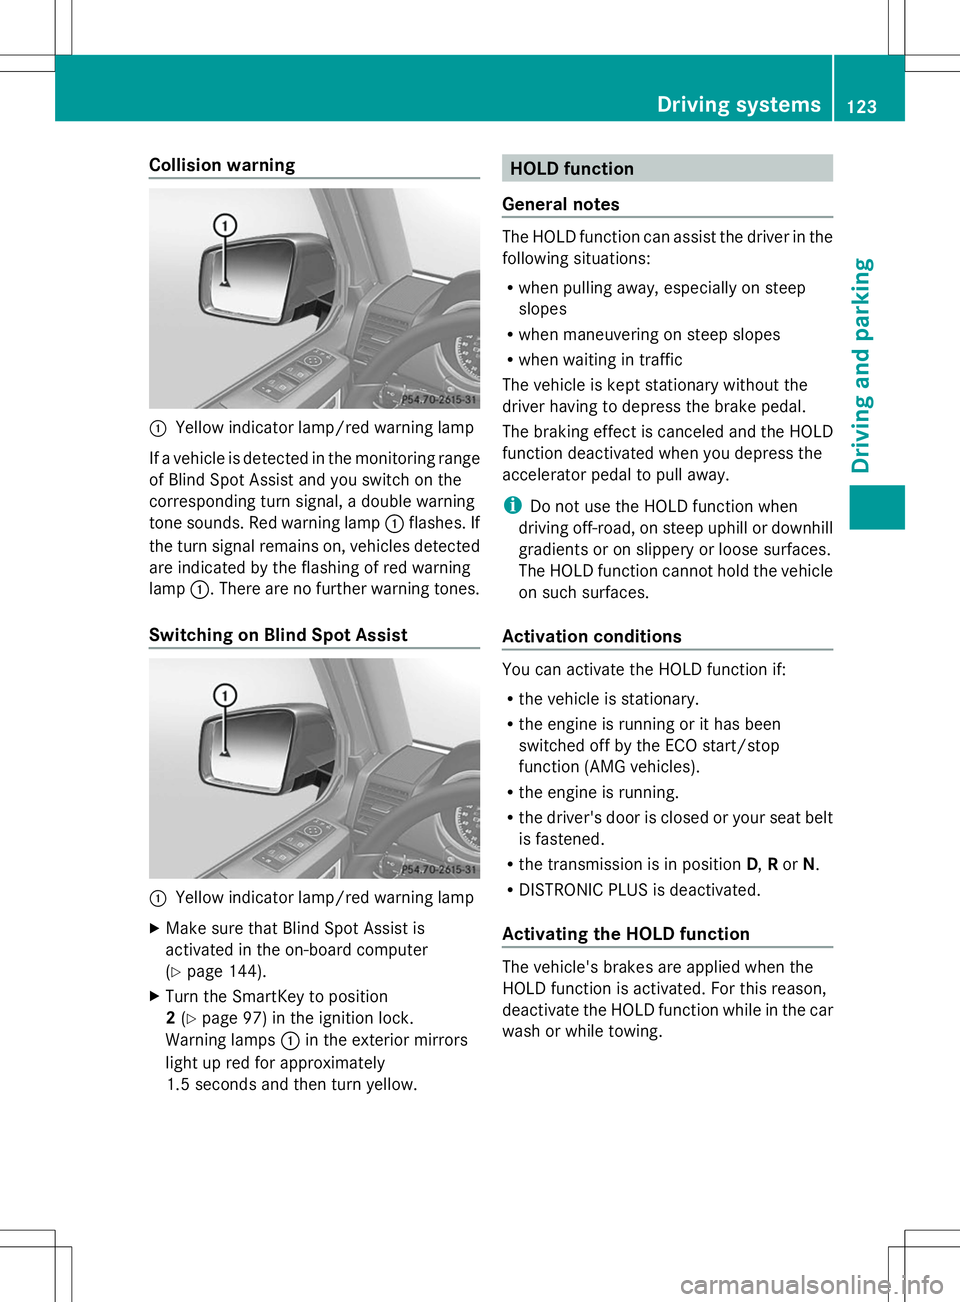
:
Yellow indicator lamp/red warning lamp
If a vehicle is detected in the monitoring range
of Blind Spot Assist and you switch on the
corresponding turn signal, a double warning
tone sounds. Red warning lamp :flashes. If
the turn signal remains on, vehicles detected
are indicated by the flashing of red warning
lamp :. There are no further warning tones.
Switching on Blind Spot Assist :
Yellow indicator lamp/red warning lamp
X Make sure that Blind Spot Assist is
activated in the on-board computer
(Y page 144).
X Turn the SmartKey to position
2(Y page 97) in the ignition lock.
Warning lamps :in the exterior mirrors
light up red for approximately
1.5 seconds and then turn yellow. HOLD function
General notes The HOLD function can assist the driver in the
following situations:
R
when pulling away, especially on steep
slopes
R when maneuvering on steep slopes
R when waiting in traffic
The vehicle is kept stationary without the
driver having to depress the brake pedal.
The braking effect is canceled and the HOLD
function deactivated when you depress the
accelerator pedal to pull away.
i Do not use the HOLD function when
driving off-road, on steep uphill or downhill
gradients or on slippery or loose surfaces.
The HOLD function cannot hold the vehicle
on such surfaces.
Activation conditions You can activate the HOLD function if:
R
the vehicle is stationary.
R the engine is running or it has been
switched off by the ECO start/stop
function (AMG vehicles).
R the engine is running.
R the driver's door is closed or your seat belt
is fastened.
R the transmission is in position D,Ror N.
R DISTRONIC PLUS is deactivated.
Activating the HOLD function The vehicle's brakes are applied when the
HOLD function is activated. For this reason,
deactivate the HOLD function while in the car
wash or while towing. Driving systems
123Driving and parking Z
Page 126 of 272
X
Make sure that the activation conditions
are met.
X Depress the brake pedal.
X Quickly depress the brake pedal further
until ë appears in the multifunction
display.
The HOLD function is activated. You can
release the brake pedal.
i If depressing the brake pedal the first
time does not activate the HOLD function,
wait briefly and then try again.
Deactivating the HOLD function G
WARNING
When leaving the vehicle, it can still roll away
despite being braked by the HOLD function if:
R there is a malfunction in the system or in
the voltage supply.
R the HOLD function has been deactivated by
pressing the accelerator pedal or the brake
pedal, e.g. by a vehicle occupant.
R the electrical system in the engine
compartment, the battery or the fuses have
been tampered with.
R the battery is disconnected
There is a risk of an accident.
If you wish to exit the vehicle, always turn off
the HOLD function and secure the vehicle
against rolling away.
The HOLD function is deactivated
automatically if:
R you accelerate and the transmission is in
position Dor R.
R you shift the transmission to position P.
R you depress the brake pedal again with a
certain amount of pressure until ë
disappears from the multifunction display.
R you activate DISTRONIC PLUS.
On steep uphill or downhill gradients or if
there is a malfunction, the transmission may
also be automatically shifted into position P. 4MATIC (permanent four-wheel drive)
! Never tow the vehicle with one axle
raised. This may damage the transfer case.
Damage of this sort is not covered by the
Mercedes-Benz Limited Warranty. All
wheels must remain either on the ground
or be fully raised. Observe the instructions
for towing the vehicle with all wheels in full
contact with the ground.
! When testing the parking brake, operate
the vehicle only briefly (for a maximum of
ten seconds) on a brake test dynamometer.
When doing this, turn the SmartKey to
position 0or 1in the ignition. Failure to do
this can cause damage to the drive train or
the brake system.
! A function or performance test should
only be carried out on a two-axle
dynamometer. Before you operate the
vehicle on such a dynamometer, please
consult a qualified workshop. You could
otherwise damage the drive train or the
brake system.
4MATIC ensures that all four wheels are
permanently driven. Together with ESP ®
and
4ETS, it improves the traction of your vehicle
whenever a drive wheel spins due to
insufficient grip.
If a drive wheel spins due to insufficient grip:
R Only depress the accelerator pedal as far
as necessary when pulling away.
R Accelerate less when driving.
If you fail to adapt your driving style, 4MATIC
can neither reduce the risk of accident nor
override the laws of physics. 4MATIC cannot
take account of road, weather and traffic
conditions. 4MATIC is only an aid. You are
responsible for the distance to the vehicle in
front, for vehicle speed, for braking in good
time and for staying in lane. Only engage
4MATIC when the current road, weather and
traffic conditions permit it to be done safely,
and adapt your driving style accordingly.
Drive carefully and maintain a suitable
distance to the vehicle in front. 124
Driving systemsDriving and parking
Page 129 of 272
One or more segments light up as the vehicle
approaches an obstacle, depending on the
vehicle's distance from the obstacle.
From the:
R sixth segment onwards, you will hear an
intermittent warning tone for
approximately two seconds.
R seventh segment onwards, you will hear a
warning tone for approximately two
seconds. This indicates that you have now
reached the minimum distance.
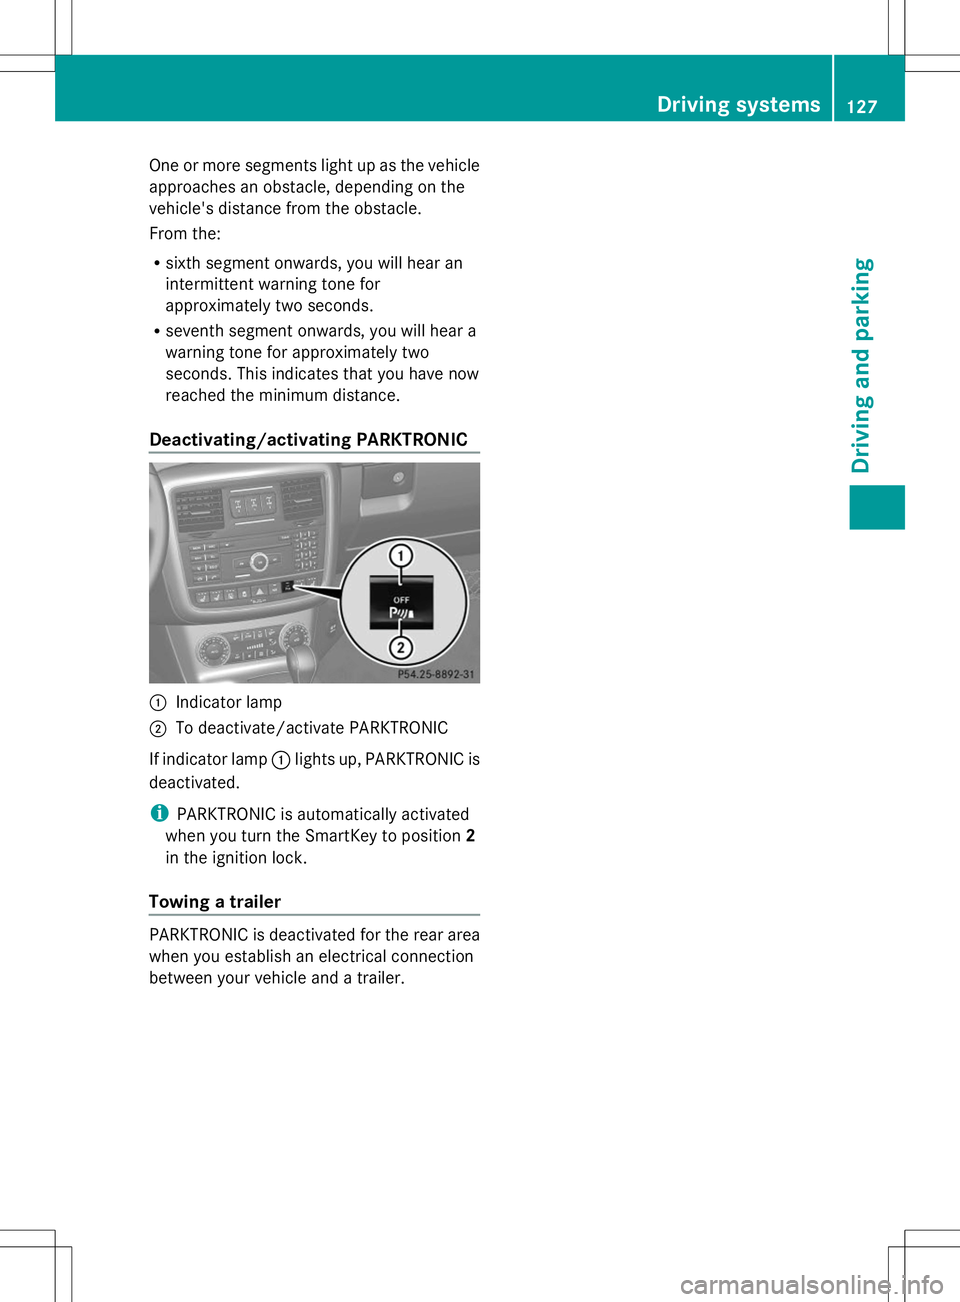
Deactivating/activating PARKTRONIC :
Indicator lamp
; To deactivate/activate PARKTRONIC
If indicator lamp :lights up, PARKTRONIC is
deactivated.
i PARKTRONIC is automatically activated
when you turn the SmartKey to position 2
in the ignition lock.
Towing a trailer PARKTRONIC is deactivated for the rear area
when you establish an electrical connection
between your vehicle and a trailer. Driving systems
127Driving and parking Z
Page 131 of 272
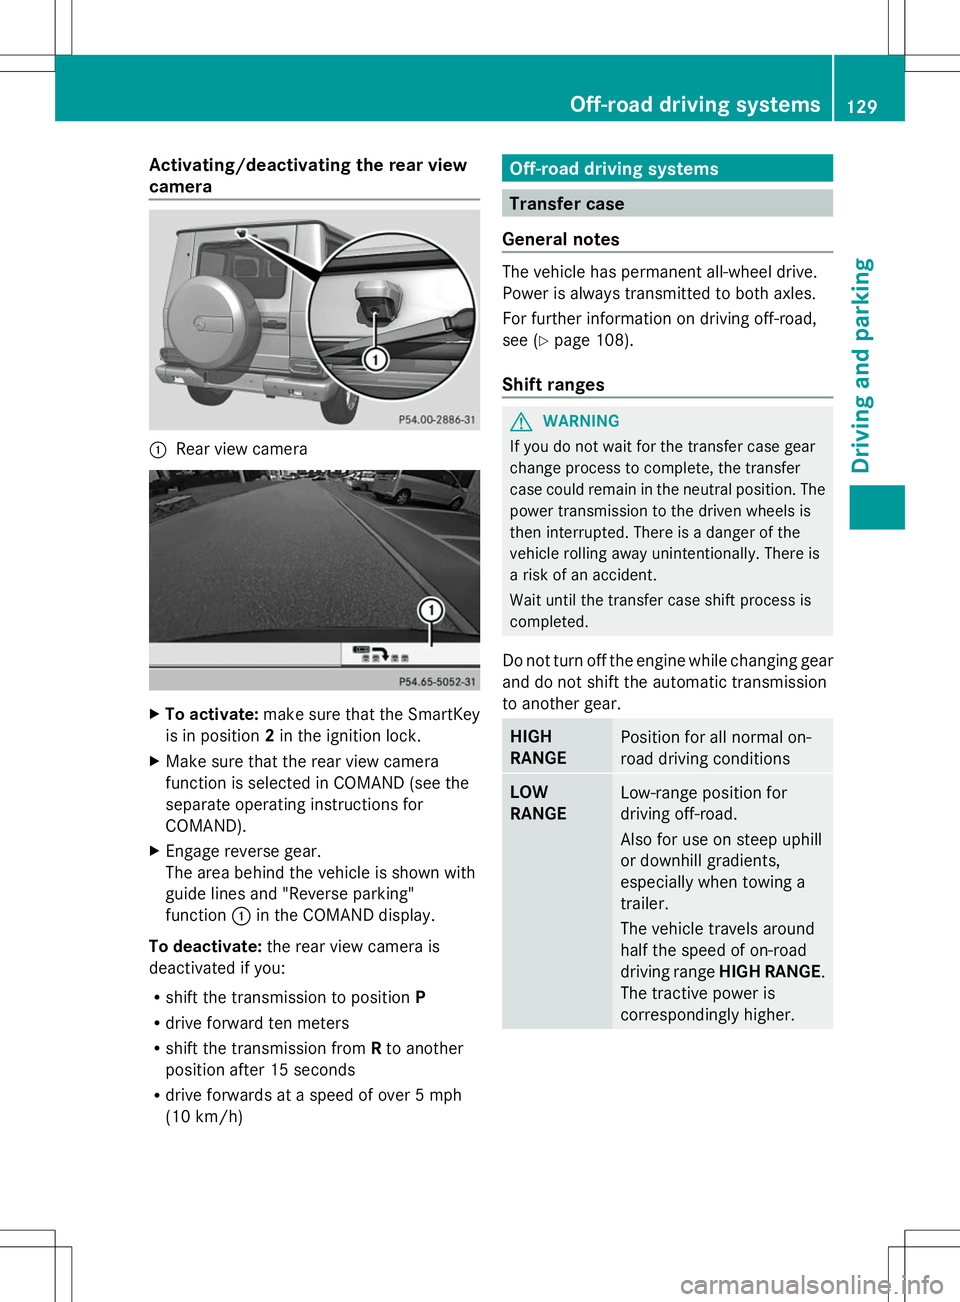
Activating/deactivating the rear view
camera :
Rear view camera X
To activate: make sure that the SmartKey
is in position 2in the ignition lock.
X Make sure that the rear view camera
function is selected in COMAND (see the
separate operating instructions for
COMAND).
X Engage reverse gear.
The area behind the vehicle is shown with
guide lines and "Reverse parking"
function :in the COMAND display.
To deactivate: the rear view camera is
deactivated if you:
R shift the transmission to position P
R drive forward ten meters
R shift the transmission from Rto another
position after 15 seconds
R drive forwards at a speed of over 5 mph
(10 km/h) Off-road driving systems
Transfer case
General notes The vehicle has permanent all-wheel drive.
Power is always transmitted to both axles.
For further information on driving off-road,
see (Y
page 108).
Shift ranges G
WARNING
If you do not wait for the transfer case gear
change process to complete, the transfer
case could remain in the neutral position. The
power transmission to the driven wheels is
then interrupted. There is a danger of the
vehicle rolling away unintentionally. There is
a risk of an accident.
Wait until the transfer case shift process is
completed.
Do not turn off the engine while changing gear
and do not shift the automatic transmission
to another gear. HIGH
RANGE
Position for all normal on-
road driving conditions
LOW
RANGE
Low-range position for
driving off-road.
Also for use on steep uphill
or downhill gradients,
especially when towing a
trailer.
The vehicle travels around
half the speed of on-road
driving range
HIGH RANGE.
The tractive power is
correspondingly higher. Off-road driving systems
129Driving and parking Z
Page 133 of 272
If the gear change is not completed, the
following messages could appear in the
display:
R TC shift Conditions Not Fulfilled TC shift Conditions Not Fulfilled
You have not met one or more shift
conditions.
R TC NEUTRAL On
TC NEUTRAL On
The transfer case has canceled the gear
change process and is in N. Transfer case
position N
N appears in the multifunction
display.
R TC shift Canceled TC shift Canceled
The transfer case has not performed the
gear change process.
X Carry out the gear change process again.
Make sure to meet all conditions for
changing gears.
R TC Malfunction Visit Workshop
TC Malfunction Visit Workshop
There is a malfunction in the transfer case.
X Do not shift the transfer case.
X Have the vehicle checked as soon as
possible at a qualified specialist workshop.
Shifting to neutral G
WARNING
When the transfer case is in the neutral
position, power transmission to the driven
wheels is interrupted. As a result, the vehicle
could roll away. There is a risk of an accident.
Secure the vehicle with the parking brake, and
on uphill or downhill gradients, also secure it
with a device such as a wheel chock.
X Turn the SmartKey to position 2in the
ignition lock (Y page 97).
X Apply the parking brake.
X Depress the brake pedal.
X Move the selector lever to position
N(Y page 100).
X Press and hold LOW RANGE button ;for
approximately 10 seconds.
When the shift procedure is complete, the
TC In Neutral TC In Neutral message appears in the
multifunction display for 5 seconds. If the gear change is not completed, the
following messages could appear in the
display (Y
page 144).
i If the transfer case is in Neutral, the
SmartKey is in the ignition lock and you
open the driver's door, the TC In TC In
Neutral Neutral message appears in the
multifunction display. If you then release
the parking brake, a warning tone will
sound. Differential locks
General notes G
WARNING
When the differential locks are engaged, ABS,
4ETS, ESP ®
and BAS are deactivated. As a
result, the wheels could lock when braking
and the braking distance is increased. There
is a risk of an accident.
Disengage the differential locks immediately
on firm surfaces with good grip.
! In order to avoid damage to the transfer
case, you must operate the vehicle on a
dynamometer (1-axle dynamometer) only
if:
R the axle not driven on is jacked up
or
R the corresponding propeller shaft is
disconnected and the transfer case
differential lock is engaged.
Otherwise, the transfer case can be
damaged.
Differential locks improve the traction of the
vehicle. Off-road driving systems
131Driving and parking Z
Page 145 of 272
R
Multifunction display
R Outside temperature display Operating the on-board computer
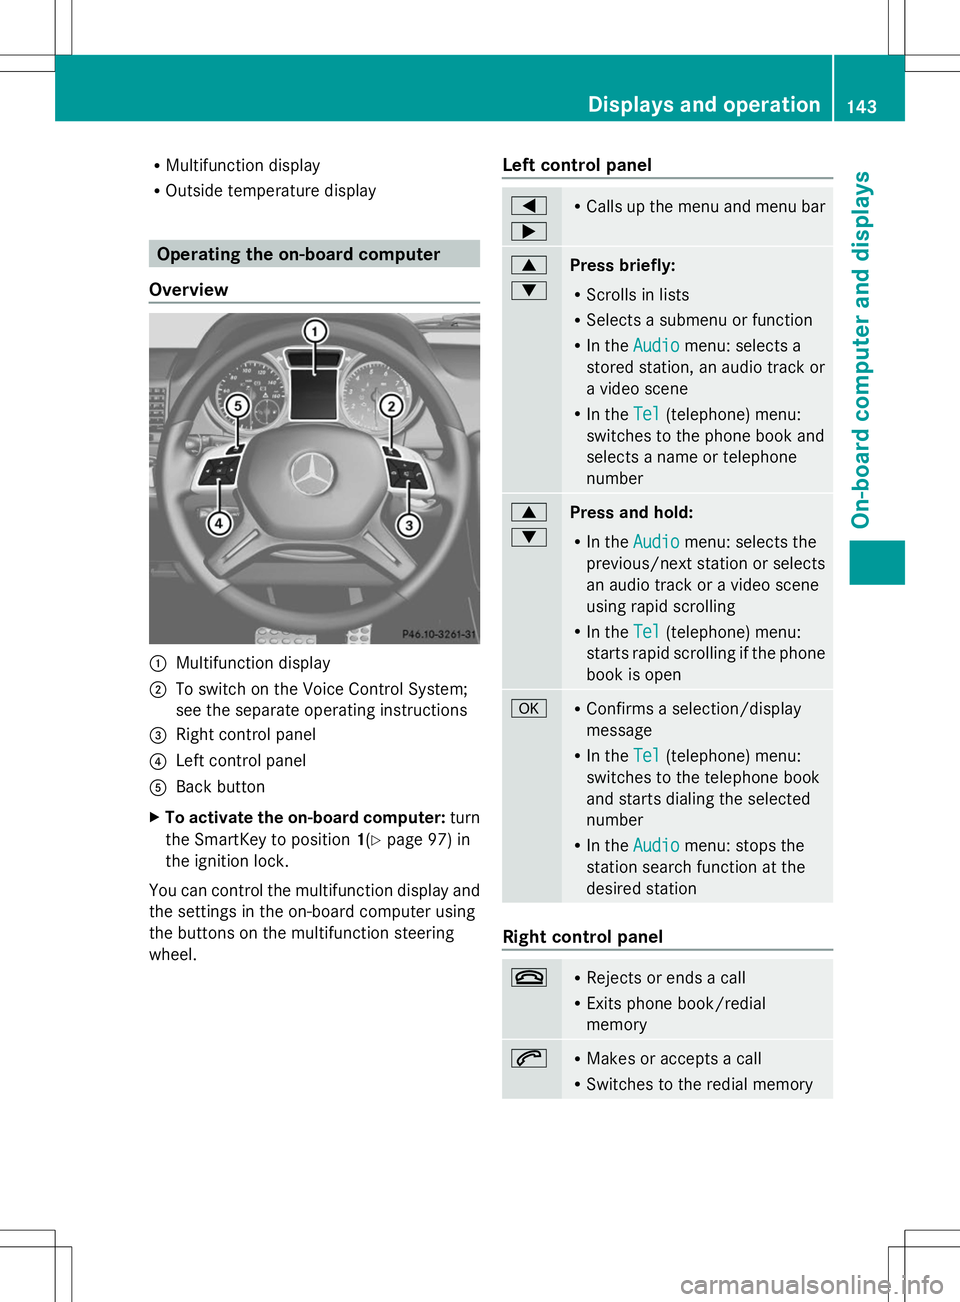
Overview :
Multifunction display
; To switch on the Voice Control System;
see the separate operating instructions
= Right control panel
? Left control panel
A Back button
X To activate the on-board computer: turn
the SmartKey to position 1(Ypage 97) in
the ignition lock.
You can control the multifunction display and
the settings in the on-board computer using
the buttons on the multifunction steering
wheel. Left control panel =
; R
Calls up the menu and menu bar 9
:
Press briefly:
R
Scrolls in lists
R Selects a submenu or function
R In the Audio
Audio menu: selects a
stored station, an audio track or
a video scene
R In the Tel Tel(telephone) menu:
switches to the phone book and
selects a name or telephone
number 9
:
Press and hold:
R
In the Audio Audio menu: selects the
previous/next station or selects
an audio track or a video scene
using rapid scrolling
R In the Tel Tel(telephone) menu:
starts rapid scrolling if the phone
book is open a R
Confirms a selection/display
message
R In the Tel Tel(telephone) menu:
switches to the telephone book
and starts dialing the selected
number
R In the Audio Audio menu: stops the
station search function at the
desired station Right control panel
~ R
Rejects or ends a call
R Exits phone book/redial
memory 6 R
Makes or accepts a call
R Switches to the redial memory Displays and operation
143On-board computer and displays Z
Page 182 of 272
X
For both options, press Wthe COMAND
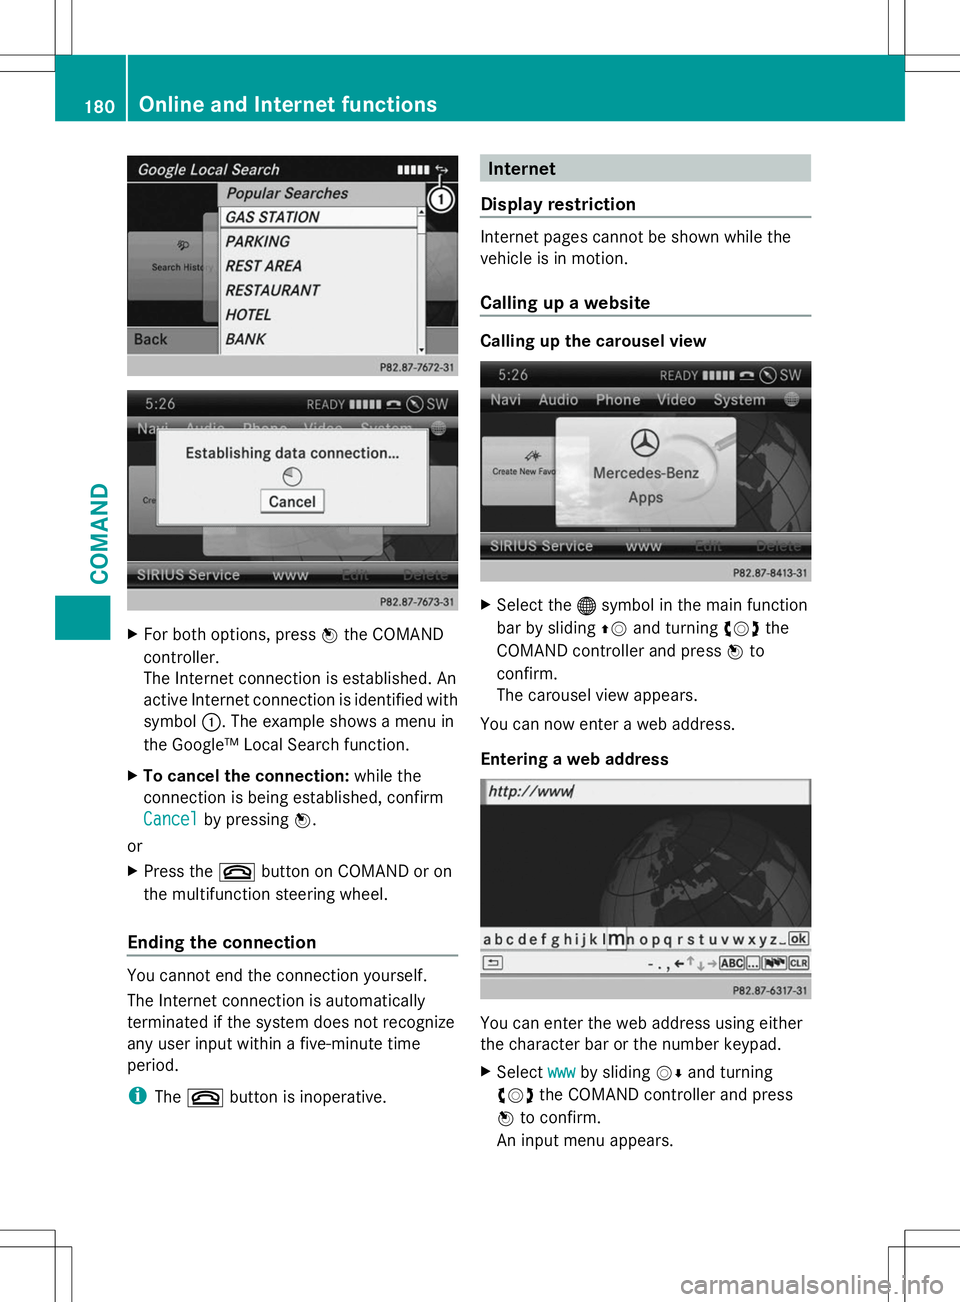
controller.
The Internet connection is established. An
active Internet connection is identified with
symbol :. The example shows a menu in
the Google™ Local Search function.
X To cancel the connection: while the
connection is being established, confirm
Cancel
Cancel by pressing W.
or
X Press the ~button on COMAND or on
the multifunction steering wheel.
Ending the connection You cannot end the connection yourself.
The Internet connection is automatically
terminated if the system does not recognize
any user input within a five-minute time
period.
i The ~ button is inoperative. Internet
Display restriction Internet pages cannot be shown while the
vehicle is in motion.
Calling up a website
Calling up the carousel view
X
Select the ®symbol in the main function
bar by sliding ZVand turning cVdthe
COMAND controller and press Wto
confirm.
The carousel view appears.
You can now enter a web address.
Entering a web address You can enter the web address using either
the character bar or the number keypad.
X
Select www wwwby sliding VÆand turning
cVd the COMAND controller and press
W to confirm.
An input menu appears. 180
Online and Internet functionsCOMAND
Page 197 of 272
i
To achieve the best result, insert new
batteries in garage door remote control
A of your garage door drive before
programming.
X Delete the memory of the integrated
remote control (Y page 189) before
programming it for the first time.
X Turn the SmartKey to position
2(Y page 97) in the ignition lock.
X Press and hold transmitter button ;,=
or ?.
After a short time, indicator lamp :will
start flashing. It flashes approximately
once per second.
i Indicator lamp :flashes immediately
the first time that the transmitter button is
programmed. If this transmitter button has
already been programmed, indicator
lamp :will only start flashing at a rate of
once a second after 20 seconds have
elapsed.
X Continue to hold the transmitter button.
X Point transmitter button Aof garage door
remote control Btowards the transmitter
buttons on the rear-view mirror at a
distance of 2 to 12 inches (5 to 30 cm).
i The distance between garage door
remote control Aand the integrated
garage door opener depends on the system
of the garage door drive. Several attempts
might be necessary. You should test every
position for at least 20 seconds before
trying another position.
X Keep transmitter button Bon garage door
remote control Apressed until indicator
lamp :starts to flash rapidly.
The programming has been successful if
indicator lamp :flashes rapidly.
X Release transmitter buttons ;,=or?
on the integrated remote control and
transmitter button Bon the garage door
remote control. If indicator lamp
:goes out after
approximately 20 seconds and has not
flashed rapidly:
X Release transmitter buttons ;,=or?
on the integrated remote control and
transmitter button Bon the garage door
remote control.
X Repeat the procedure for the other
transmitter buttons. When doing so, vary
the distance between the garage door's
remote control and the transmitter buttons
in the rear-view mirror.
i If the garage door system works with a
rolling code, you must synchronize the
remote control integrated in the rear-view
mirror with the garage door system
receiver after programming.
You will find further information in the
garage door opening system's operating
instructions, e.g. the sections on
"Synchronizing the transmitter" or
"Registering a new transmitter". You can
also call the hotline mentioned above.
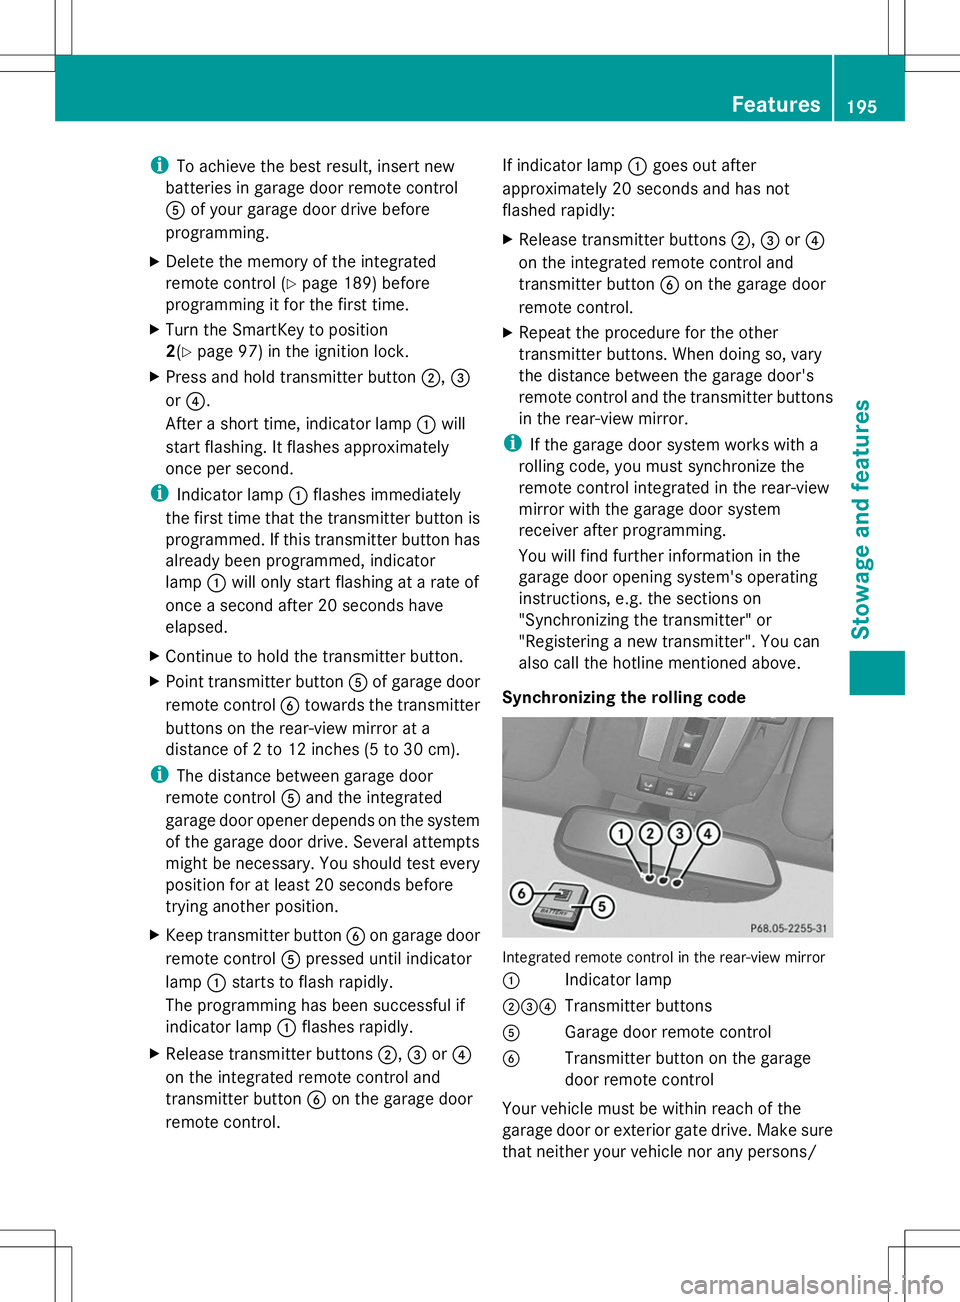
Synchronizing the rolling code Integrated remote control in the rear-view mirror
:
Indicator lamp
;=? Transmitter buttons
A Garage door remote control
B Transmitter button on the garage
door remote control
Your vehicle must be within reach of the
garage door or exterior gate drive. Make sure
that neither your vehicle nor any persons/ Features
195Stowage and features Z
Page 198 of 272
objects are present within the sweep of the
door or gate.
Observe the safety notes when performing
the rolling code synchronization
(Y page 193).
X Turn the SmartKey to position
2(Y page 97) in the ignition lock.
X Press the programming button of the door
or gate drive (see the door or gate drive
operating instructions, e.g. under
"Programming of additional remote
controls").
i Usually, you now have 30 seconds to
initiate the next step.
X Press previously programmed button ;,
= or? of the integrated garage door
opener until the door closes.
The rolling code synchronization is then
complete.
Notes on programming the remote
control
Canadian radio frequency laws require a
"break" (or interruption) of the transmission
signals after broadcasting for a few seconds.
Therefore, these signals may not last long
enough for the integrated remote control to
recognize the signal during programming.
Comparable with Canadian law, American
garage door openers also have a built-in
"interruption".
If you live in Canada or have difficulties
programming the garage door opener
(regardless of where you live) when using the
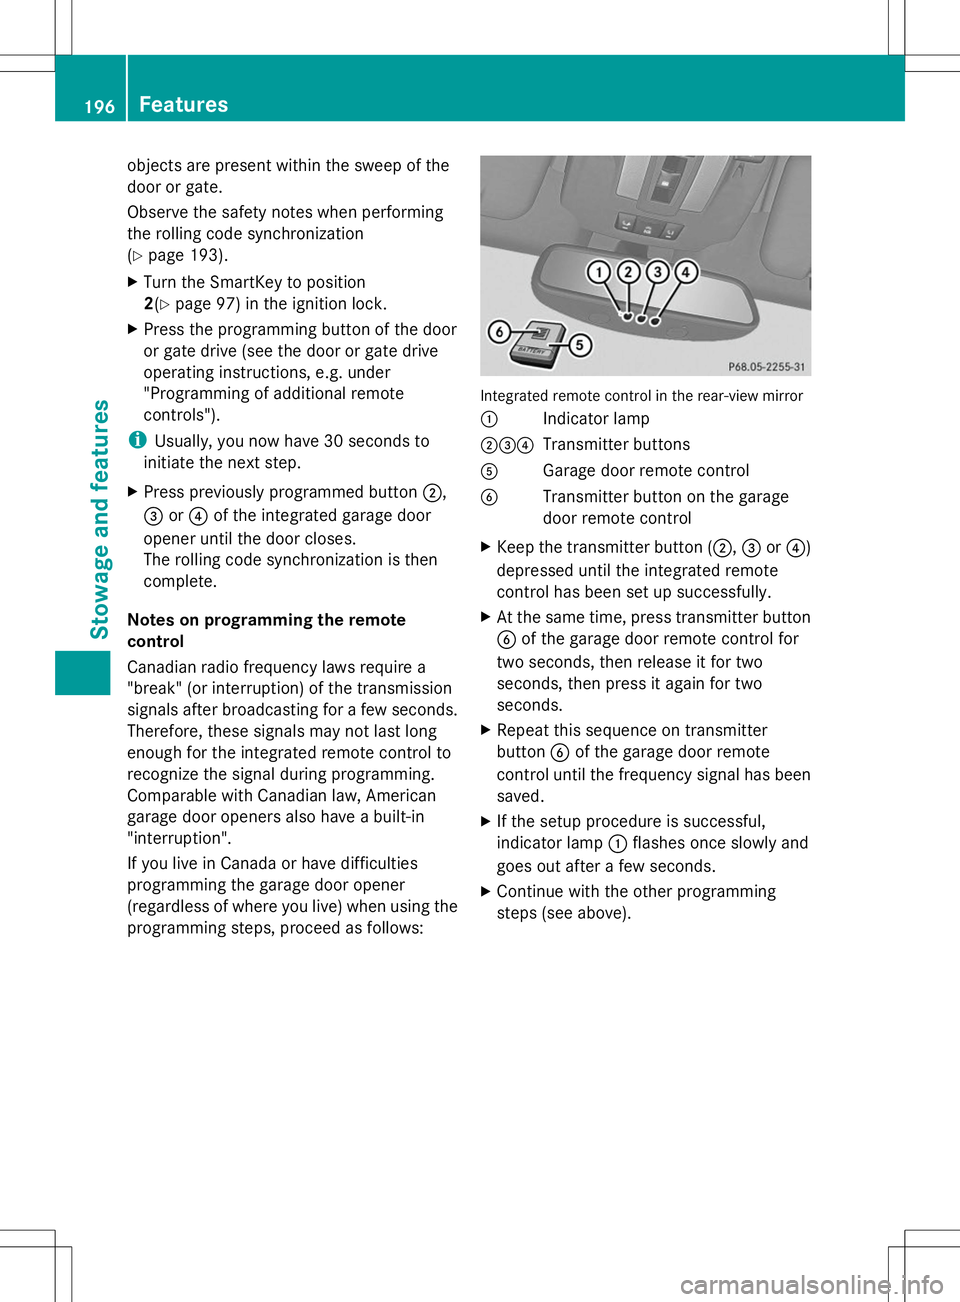
programming steps, proceed as follows: Integrated remote control in the rear-view mirror
:
Indicator lamp
;=? Transmitter buttons
A Garage door remote control
B Transmitter button on the garage
door remote control
X Keep the transmitter button (;, =or?)
depressed until the integrated remote
control has been set up successfully.
X At the same time, press transmitter button
B of the garage door remote control for
two seconds, then release it for two
seconds, then press it again for two
seconds.
X Repeat this sequence on transmitter
button Bof the garage door remote
control until the frequency signal has been
saved.
X If the setup procedure is successful,
indicator lamp :flashes once slowly and
goes out after a few seconds.
X Continue with the other programming
steps (see above). 196
FeaturesStowage and features