spare tire MERCEDES-BENZ G-CLASS SUV 2014 Owners Manual
[x] Cancel search | Manufacturer: MERCEDES-BENZ, Model Year: 2014, Model line: G-CLASS SUV, Model: MERCEDES-BENZ G-CLASS SUV 2014Pages: 272, PDF Size: 39.13 MB
Page 18 of 272
Sockets
Front-passenger footwell ...............189
Points to observe before use .........189
Trunk ............................................. 189
Soft top
Cleaning ......................................... 206
SOS
see mbrace
Spare fuses ........................................ 225
Spare wheel Mounting ....................................... 249
Notes/data .................................... 255
Spare wheel bracket at the rear ....213
Stainless-steel spare hub cap ........213
Specialist workshop ............................ 27
Special seat belt retractor .................. 51
Speed, controlling see Cruise control
Speedometer
In the Instrument cluster ...............142
Segments ...................................... 142
Selecting the unit of measurement 144
see Instrument cluster
SPEEDTRONIC
Display message ............................ 144
Selecting ........................................ 113
Variabl e......................................... 112
SRS
see SRS (Supplemental Restraint
System)
SRS (Supplemental Restraint
System)
Display message .................... 144, 149
Introduction ..................................... 40
Warning lamp ................................. 164
Warning lamp (function) ................... 40
Standing lamps
Display message ............................ 144
Switching on/off .............................. 83
Starting the engine
Important safety notes ....................98
Steering (display message) ......144, 157
Steering wheel Adjusting (electrically) .....................79
Buttons (on-board computer) ......... 143
Important safety notes ....................79
Paddle shifters ............................... 101Steering wheel heating
....................79
Storing settings (memory function) .. 79
Steering wheel (cleaning
instructions) ...................................... 210
Steering wheel paddle shifters ........101
Stopwatch (RACETIMER) ................... 144
Stowage areas ................................... 185
Stowage compartments Armrest (under) ............................. 185
Center console .............................. 185
Cup holders ................................... 189
Display message) ........................... 144
Door stowage compartment ..........185
Glove box ...................................... .185
Important safety information .........185
Summer tires ..................................... 230
Supplemental Restraint System see SRS (Supplemental Restraint
System)
Surround lighting (on-board
computer) .......................................... 144
Suspension tuning SETUP (on-board computer) ..........144
Switching air-recirculation mode
on/off ................................................... 94
Switching off the alarm (ATA) ............64
Systems settings (COMAND) see also Digital Operator's Manual 170 T
Tachometer ........................................ 142
Tailgate Display message ............................ 144
Opening dimensions ......................264
Tail lamps
Display message ............................ 144
see Lights
Tank content
Fuel gauge ..................................... 142
Technical data
Capacities ...................................... 258
Tires ............................................... 253
Tires/wheels ................................. 253
Trailer loads ................................... 266
Vehicle data ................................... 264
Wheels ........................................... 25316
Index
Page 110 of 272
Off-road driving
Important safety notes G
WARNING
Do not load items on the basic carrier bars. It
may cause instability during some maneuvers
which could result in an accident.
Drive slowly in unknown terrain. This will
make it easier to recognize unexpected
obstacles and avoid damage to the vehicle.
To help avoid the vehicle rolling over, never
turn it around on steep inclines. If the vehicle
cannot complete the attempted climb, back it
down in reverse gear.
Do not drive along the side of a slope. The
vehicle might otherwise rollover. If in doing so
the vehicle begins to show a tendency to roll,
immediately steer into a line of gravity
(straight up or downhill).
Never let the vehicle roll backwards in idle.
You may lose control of the vehicle if you use
only the service brake. For information on
driving downhill, see "Driving downhill".
When driving off-road, sand, mud and water,
possibly mixed with oil, for example, could get
into the brakes. This could result in a reduced
braking effect or in total brake failure and also
in increased wear and tear. The braking
characteristics change depending on the
material ingressing the brakes. Clean the
brakes after driving off-road. If you detect a
reduced braking effect or grinding noises,
have the brake system checked in a qualified
specialist workshop as soon as possible.
Adapt your driving style to the different
braking characteristics.
Driving off-road increases the likelihood of
damage to the vehicle, which, in turn, can lead
to failure of the mechanical assembly or
systems. Adapt your driving style to suit the
terrain conditions. Drive carefully. Have
damage to the vehicle rectified immediately
at a qualified specialist workshop. Checklist before driving off-road !
If the engine oil warning lamp lights up
while the vehicle is in motion, stop the
vehicle in a safe place as soon as possible.
Check the engine oil level. The engine oil
warning lamp warning must not be ignored.
Continuing the journey while the symbol is
displayed could lead to engine damage.
X Engine oil level: check the engine oil level
and add oil if necessary.
Only then does the engine receive enough
oil when the vehicle is standing on a steep
incline.
X Tire-changing tool kit: check that the jack
is working and make sure you have the lug
wrench, a robust tow cable and a folding
spade in the vehicle.
X Wheels and tires: check the tire tread
depth and tire pressure.
X Check for damage and remove any foreign
objects, e.g. small stones, from the
wheels/tires.
X Replace any missing valve caps.
X Replace dented or damaged wheels.
X Carry a sound spare wheel.
Checklist after driving off-road Driving over rough terrain places greater
demands on your vehicle than driving on
normal roads. After driving off-road, check
the vehicle. This allows you to detect damage
promptly and reduce the risk of an accident
to yourself and other road users.
X Shift the transfer case to HIGH
RANGE(Y page 130).
X Disengage the differential locks
(Y page 134).
X Clean the headlamps and rear lights and
check for damage.
X Clean the front and rear license plates.
X Clean the wheels and tires with a water jet
and remove any foreign objects. 108
Driving tipsDriving and parking
Page 194 of 272
the multifunction display and the COMAND
system is muted.
If a connection can be made, the Call
Call
Connected
Connected message appears in the
multifunction display.
If a mobile phone network is available and
there is sufficient GPS reception, the mbrace
system transmits data to the Response
Center, for example:
R Current location of the vehicle
R Vehicle identification number
R Vehicle model
R Vehicle color
i The COMAND display shows that an
mbrace call is active. You can switch to the
navigation menu during the call by pressing
the NAVI button on COMAND. Voice output
is not available.
A voice connection is established between
the Mercedes-Benz Roadside Assistance
Representative and the vehicle occupants.
The Mercedes-Benz Roadside Assistance
Representative either sends a qualified
Mercedes-Benz technician or makes
arrangements for your vehicle to be
transported to the nearest authorized
Mercedes-Benz Center. You may be charged
for services such as repair work and/or
towing. Further details are available in your
mbrace manual.
X Describe the type of assistance needed.
i If the indicator lamp in Roadside
Assistance button :is flashing
continuously and no voice connection with
the Response center has been established,
then the mbrace system has not been able
to initiate a Roadside Assistance call (e.g.
the relevant mobile phone network is not
available). The Call Failed
Call Failed message
appears in the multifunction display. X
To end a call: press the~button on the
multifunction steering wheel.
or
X Press the corresponding button for ending
a phone call on COMAND.
i Sign and drive services 2
: you are not
charged for services such as jump-starting,
providing a few gallons of fuel for a fuel tank
that has been run dry or changing a faulty
tire with the vehicle's own spare wheel.
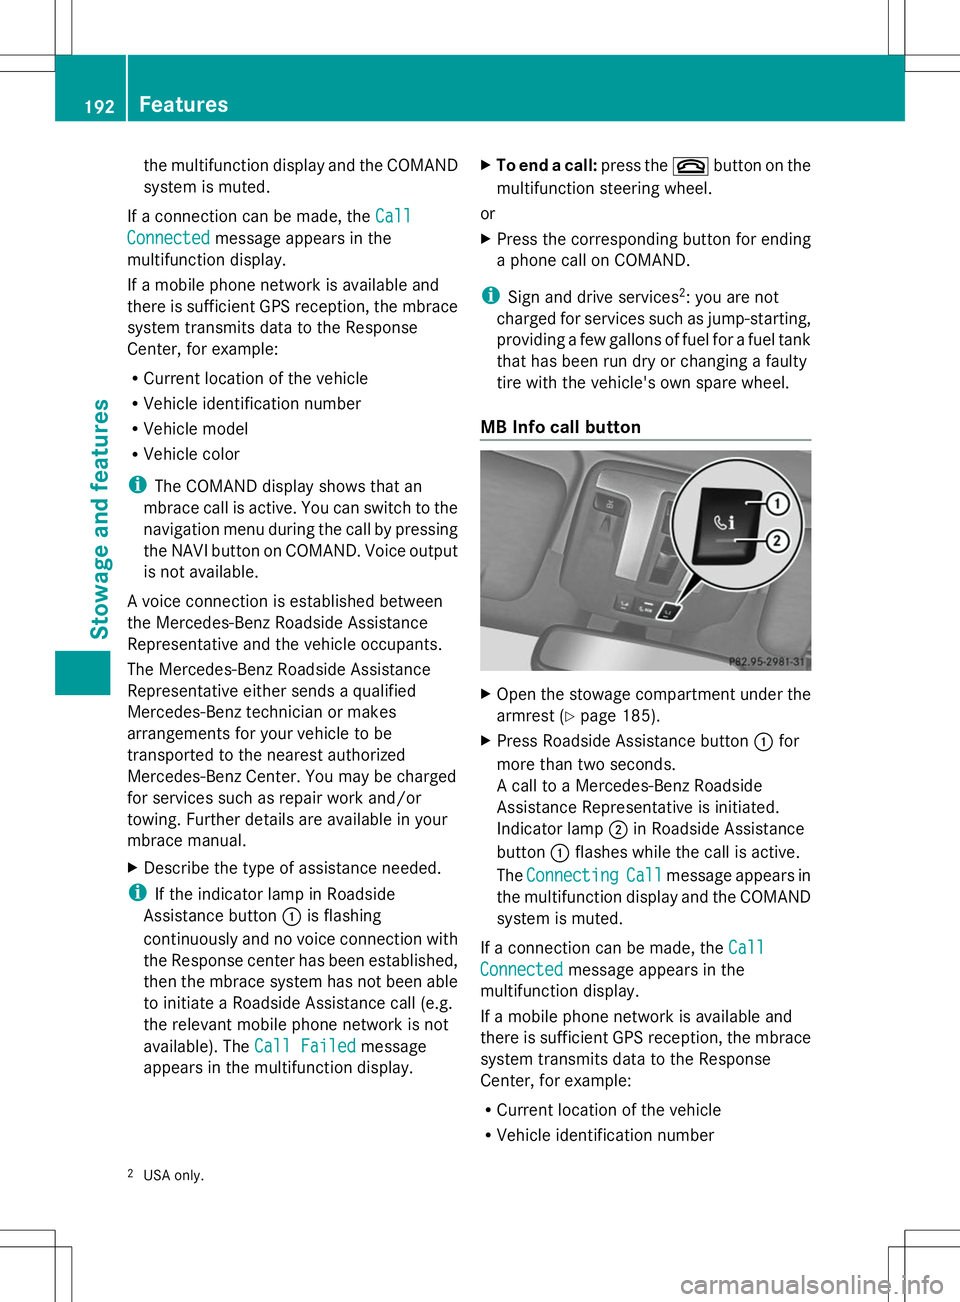
MB Info call button X
Open the stowage compartment under the
armrest (Y page 185).
X Press Roadside Assistance button :for
more than two seconds.
A call to a Mercedes-Benz Roadside
Assistance Representative is initiated.
Indicator lamp ;in Roadside Assistance
button :flashes while the call is active.
The Connecting Connecting Call
Callmessage appears in
the multifunction display and the COMAND
system is muted.
If a connection can be made, the Call Call
Connected
Connected message appears in the
multifunction display.
If a mobile phone network is available and
there is sufficient GPS reception, the mbrace
system transmits data to the Response
Center, for example:
R Current location of the vehicle
R Vehicle identification number
2 USA only. 192
FeaturesSto
wage an d features
Page 215 of 272
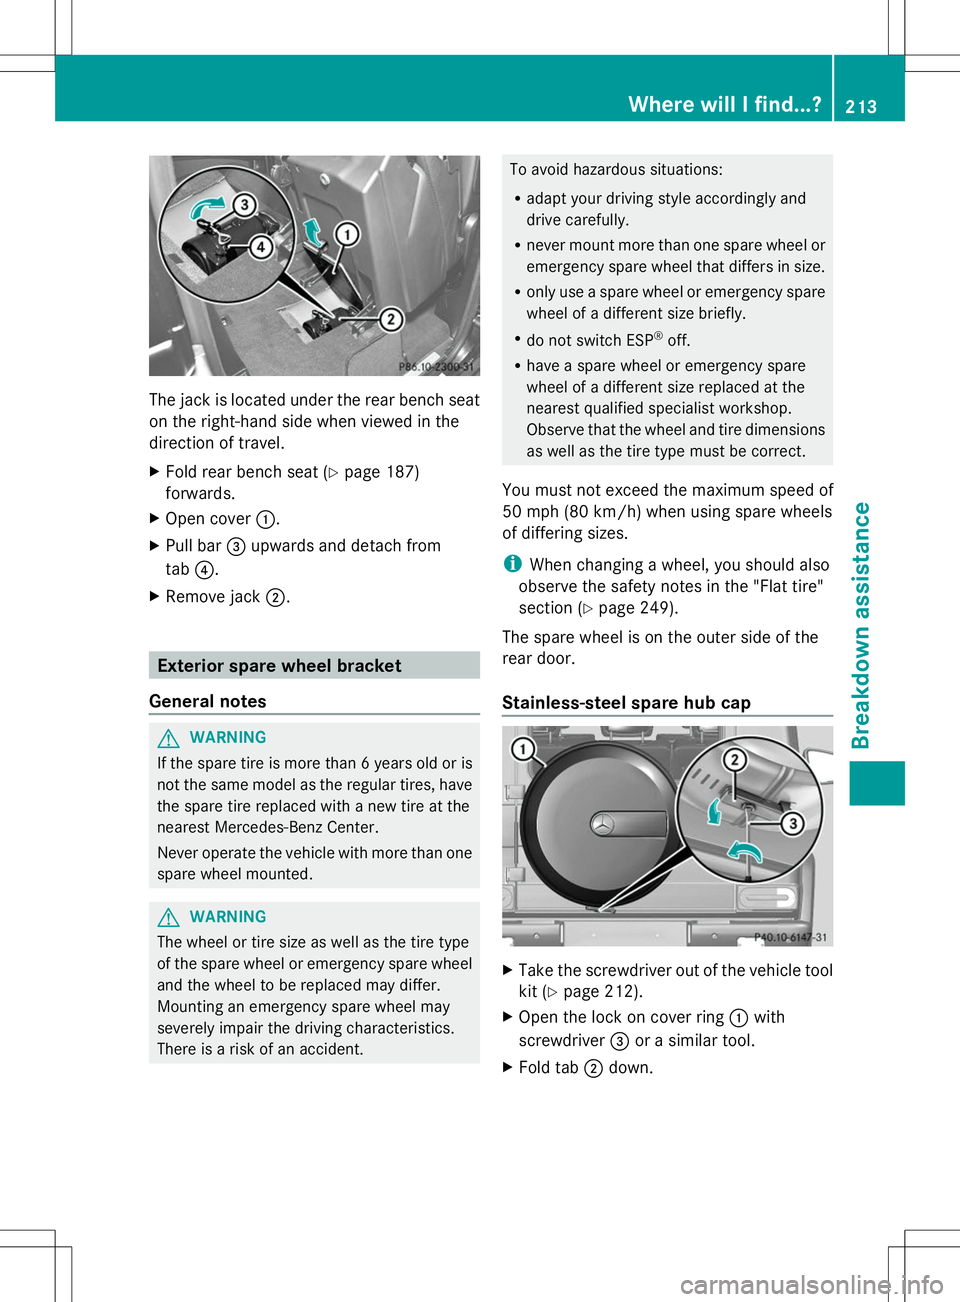
The jack is located under the rear bench seat
on the right-hand side when viewed in the
direction of travel.
X Fold rear bench seat (Y page 187)
forwards.
X Open cover :.
X Pull bar =upwards and detach from
tab ?.
X Remove jack ;. Exterior spare wheel bracket
General notes G
WARNING
If the spare tire is more than 6 years old or is
not the same model as the regular tires, have
the spare tire replaced with a new tire at the
nearest Mercedes-Benz Center.
Never operate the vehicle with more than one
spare wheel mounted. G
WARNING
The wheel or tire size as well as the tire type
of the spare wheel or emergency spare wheel
and the wheel to be replaced may differ.
Mounting an emergency spare wheel may
severely impair the driving characteristics.
There is a risk of an accident. To avoid hazardous situations:
R
adapt your driving style accordingly and
drive carefully.
R never mount more than one spare wheel or
emergency spare wheel that differs in size.
R only use a spare wheel or emergency spare
wheel of a different size briefly.
R do not switch ESP ®
off.
R have a spare wheel or emergency spare
wheel of a different size replaced at the
nearest qualified specialist workshop.
Observe that the wheel and tire dimensions
as well as the tire type must be correct.
You must not exceed the maximum speed of
50 mph (80 km/h) when using spare wheels
of differing sizes.
i When changing a wheel, you should also
observe the safety notes in the "Flat tire"
section (Y page 249).
The spare wheel is on the outer side of the
rear door.
Stainless-steel spare hub cap X
Take the screwdriver out of the vehicle tool
kit (Y page 212).
X Open the lock on cover ring :with
screwdriver =or a similar tool.
X Fold tab ;down. Where will I find...?
213Breakdown assistance Z
Page 216 of 272
X
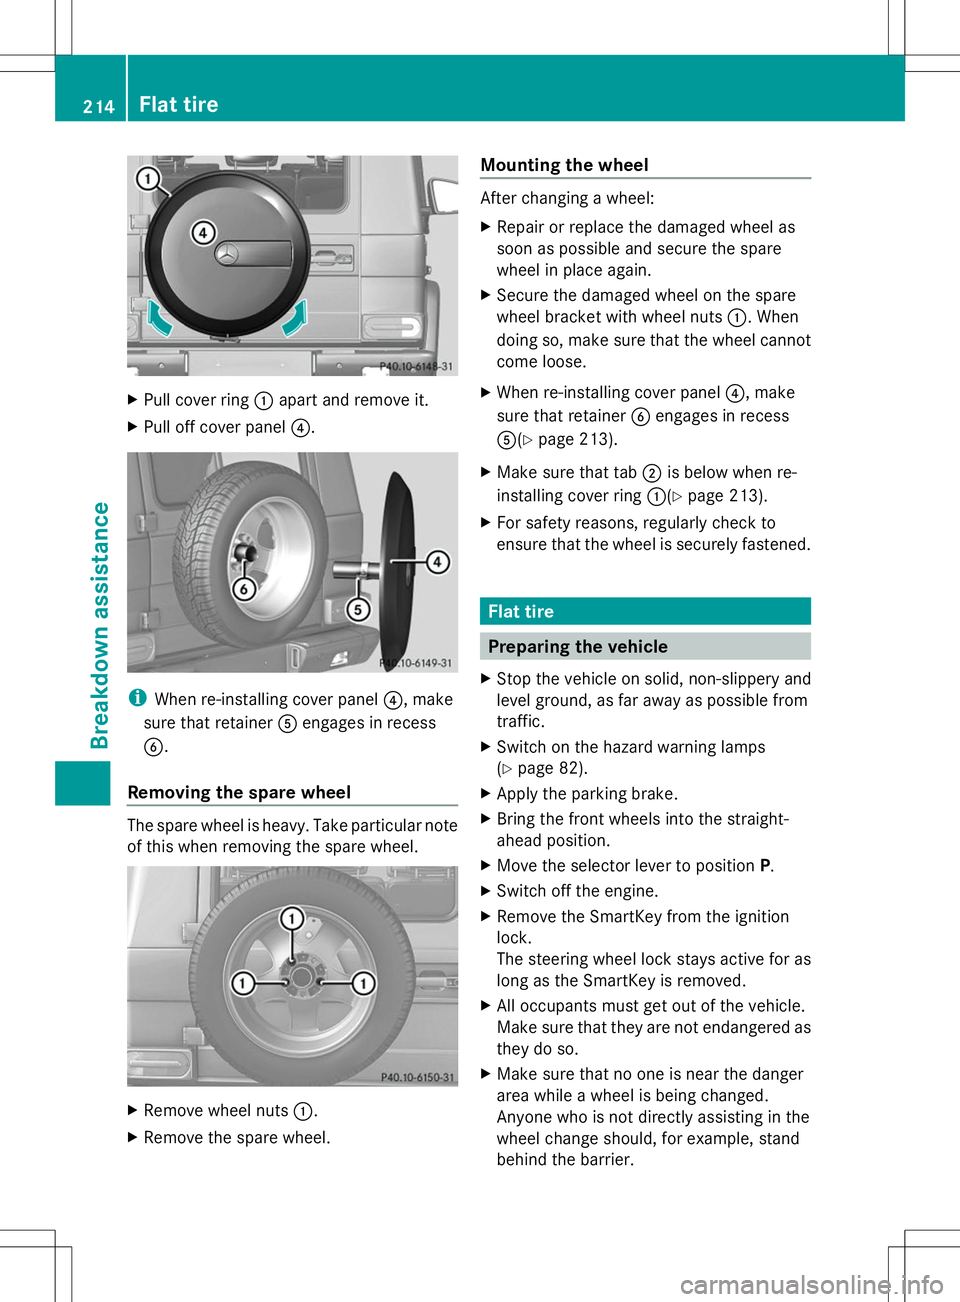
Pull cover ring :apart and remove it.
X Pull off cover panel ?.i
When re-installing cover panel ?, make
sure that retainer Aengages in recess
B.
Removing the spare wheel The spare wheel is heavy. Take particular note
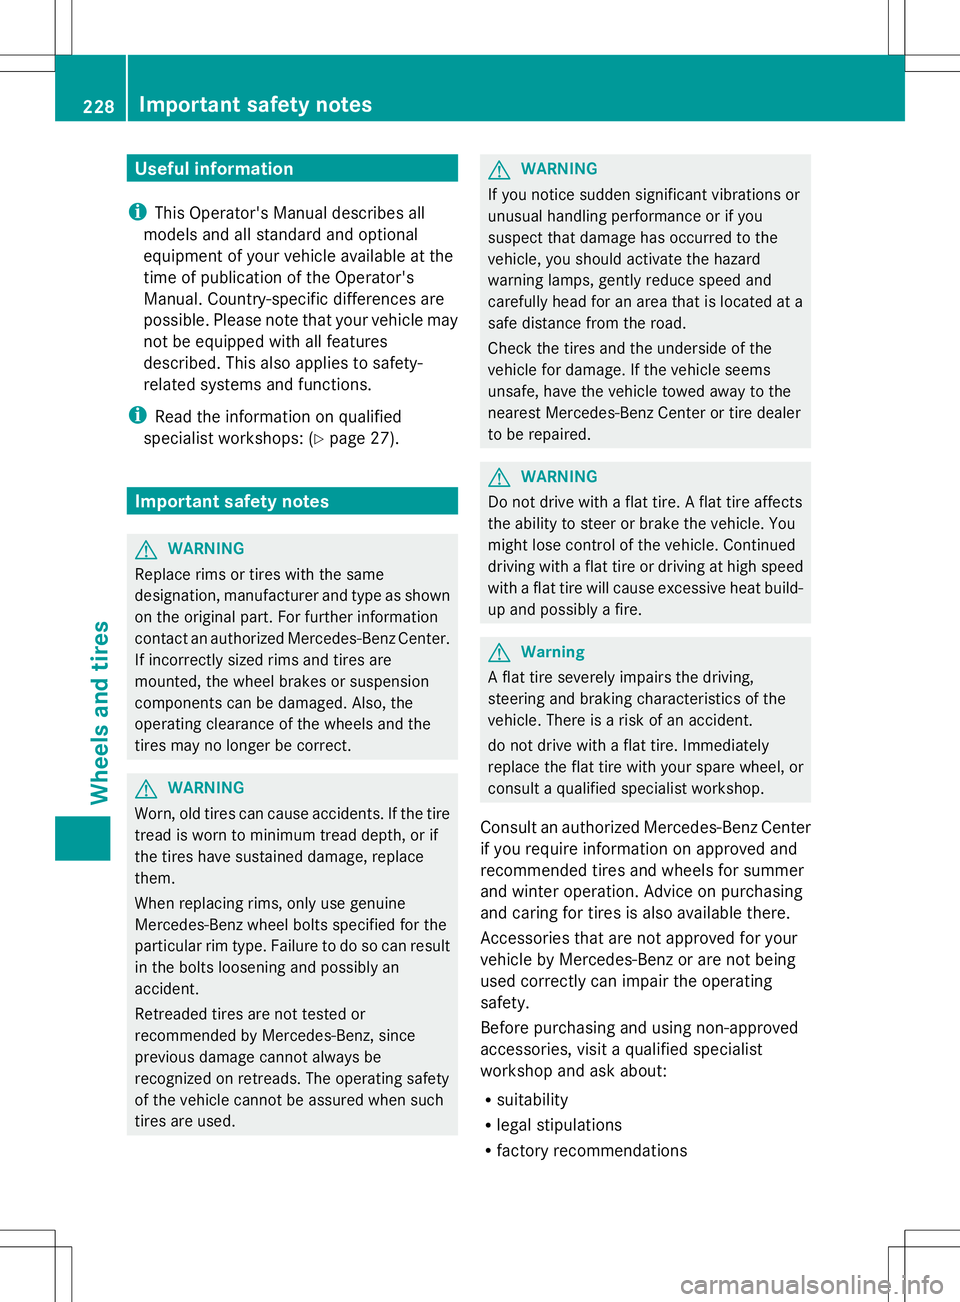
of this when removing the spare wheel. X
Remove wheel nuts :.
X Remove the spare wheel. Mounting the wheel After changing a wheel:
X
Repair or replace the damaged wheel as
soon as possible and secure the spare
wheel in place again.
X Secure the damaged wheel on the spare
wheel bracket with wheel nuts :. When
doing so, make sure that the wheel cannot
come loose.
X When re-installing cover panel ?, make
sure that retainer Bengages in recess
A(Y page 213).
X Make sure that tab ;is below when re-
installing cover ring :(Ypage 213).
X For safety reasons, regularly check to
ensure that the wheel is securely fastened. Flat tire
Preparing the vehicle
X Stop the vehicle on solid, non-slippery and
level ground, as far away as possible from
traffic.
X Switch on the hazard warning lamps
(Y page 82).
X Apply the parking brake.
X Bring the front wheels into the straight-
ahead position.
X Move the selector lever to position P.
X Switch off the engine.
X Remove the SmartKey from the ignition
lock.
The steering wheel lock stays active for as
long as the SmartKey is removed.
X All occupants must get out of the vehicle.
Make sure that they are not endangered as
they do so.
X Make sure that no one is near the danger
area while a wheel is being changed.
Anyone who is not directly assisting in the
wheel change should, for example, stand
behind the barrier. 214
Flat tireBreakdown assistance
Page 230 of 272
Useful information
i This Operator's Manual describes all
models and all standard and optional
equipment of your vehicle available at the
time of publication of the Operator's
Manual. Country-specific differences are
possible. Please note that your vehicle may
not be equipped with all features
described. This also applies to safety-
related systems and functions.
i Read the information on qualified
specialist workshops: (Y page 27).Important safety notes
G
WARNING
Replace rims or tires with the same
designation, manufacturer and type as shown
on the original part. For further information
contact an authorized Mercedes-Benz Center.
If incorrectly sized rims and tires are
mounted, the wheel brakes or suspension
components can be damaged. Also, the
operating clearance of the wheels and the
tires may no longer be correct. G
WARNING
Worn, old tires can cause accidents. If the tire
tread is worn to minimum tread depth, or if
the tires have sustained damage, replace
them.
When replacing rims, only use genuine
Mercedes-Benz wheel bolts specified for the
particular rim type. Failure to do so can result
in the bolts loosening and possibly an
accident.
Retreaded tires are not tested or
recommended by Mercedes-Benz, since
previous damage cannot always be
recognized on retreads. The operating safety
of the vehicle cannot be assured when such
tires are used. G
WARNING
If you notice sudden significant vibrations or
unusual handling performance or if you
suspect that damage has occurred to the
vehicle, you should activate the hazard
warning lamps, gently reduce speed and
carefully head for an area that is located at a
safe distance from the road.
Check the tires and the underside of the
vehicle for damage. If the vehicle seems
unsafe, have the vehicle towed away to the
nearest Mercedes-Benz Center or tire dealer
to be repaired. G
WARNING
Do not drive with a flat tire. A flat tire affects
the ability to steer or brake the vehicle. You
might lose control of the vehicle. Continued
driving with a flat tire or driving at high speed
with a flat tire will cause excessive heat build-
up and possibly a fire. G
Warning
A flat tire severely impairs the driving,
steering and braking characteristics of the
vehicle. There is a risk of an accident.
do not drive with a flat tire. Immediately
replace the flat tire with your spare wheel, or
consult a qualified specialist workshop.
Consult an authorized Mercedes-Benz Center
if you require information on approved and
recommended tires and wheels for summer
and winter operation. Advice on purchasing
and caring for tires is also available there.
Accessories that are not approved for your
vehicle by Mercedes-Benz or are not being
used correctly can impair the operating
safety.
Before purchasing and using non-approved
accessories, visit a qualified specialist
workshop and ask about:
R suitability
R legal stipulations
R factory recommendations 228
Important safety notesWheels and tires
Page 231 of 272
Information on the dimensions and types of
wheels and tires for your vehicle can be found
in the "Wheel/tire combinations" section
(Y page 253).
Information on air pressure for the tires on
your vehicle can be found:
R on the tire pressure label on the fuel filler
flap
R in the "Tire pressure" section
i Further information on wheels and tires
can be obtained at any qualified specialist
workshop. Operation
Notes on driving
If the vehicle is heavily loaded, check the tire
pressures and correct them if necessary.
When parking your vehicle, make sure that
the tires do not get deformed by the curb or
other obstacles. If it is necessary to drive over
curbs, speed humps or similar elevations, try
to do so slowly and at an obtuse angle.
Otherwise, the tires, particularly the
sidewalls, may be damaged. Regular checking of wheels and tires
G
WARNING
Regularly check the tires for damage.
Damaged tires can cause tire inflation
pressure loss. As a result, you could lose
control of your vehicle.
Worn, old tires can cause accidents. If the tire
tread is worn to minimum tread depth, or if
the tires have sustained damage, replace
them.
R Regularly check the wheels and tires of
your vehicle for damage at least once a
month, as well as after driving off-road or
on rough roads. Damage includes bulges
and deformation on tires, cuts, punctures,
cracks or severe corrosion on wheels, for example. Damaged wheels can cause a
loss of tire pressure.
R Regularly check the tire tread depth and
the condition of the tread across the whole
width of the tire (Y page 229). In order to
inspect the inner side of the tire surface,
turn the steering wheel to full lock.
R All wheels must have a valve cap to protect
the valve against dirt and moisture. Do not
install anything onto the valve other than
the standard valve cap or a valve cap
approved by Mercedes-Benz for your
vehicle.
Do not install anything onto the valve, such
as tire pressure monitoring systems.
R You should regularly check the pressure of
all your tires including the spare wheel,
particularly prior to long trips. Adjust the
tire pressure as necessary (Y page 236).
The service life of tires depends, among other
things, on the following factors:
R driving style
R tire pressure
R distance covered Tire tread
G
WARNING
Although the applicable federal motor vehicle
safety laws consider a tire to be worn when
the treadwear indicators (TWI) become visible
at approximately áinches (1.6 mm), we
recommend that you do not allow your tires
to wear down to that level. As tread depth
approaches âinches (3 mm) the adhesion
properties on a wet road are sharply reduced.
Depending upon the weather and/or road
surface (conditions), the tire traction varies
widely. Operation
229Wheels and tires Z
Page 232 of 272
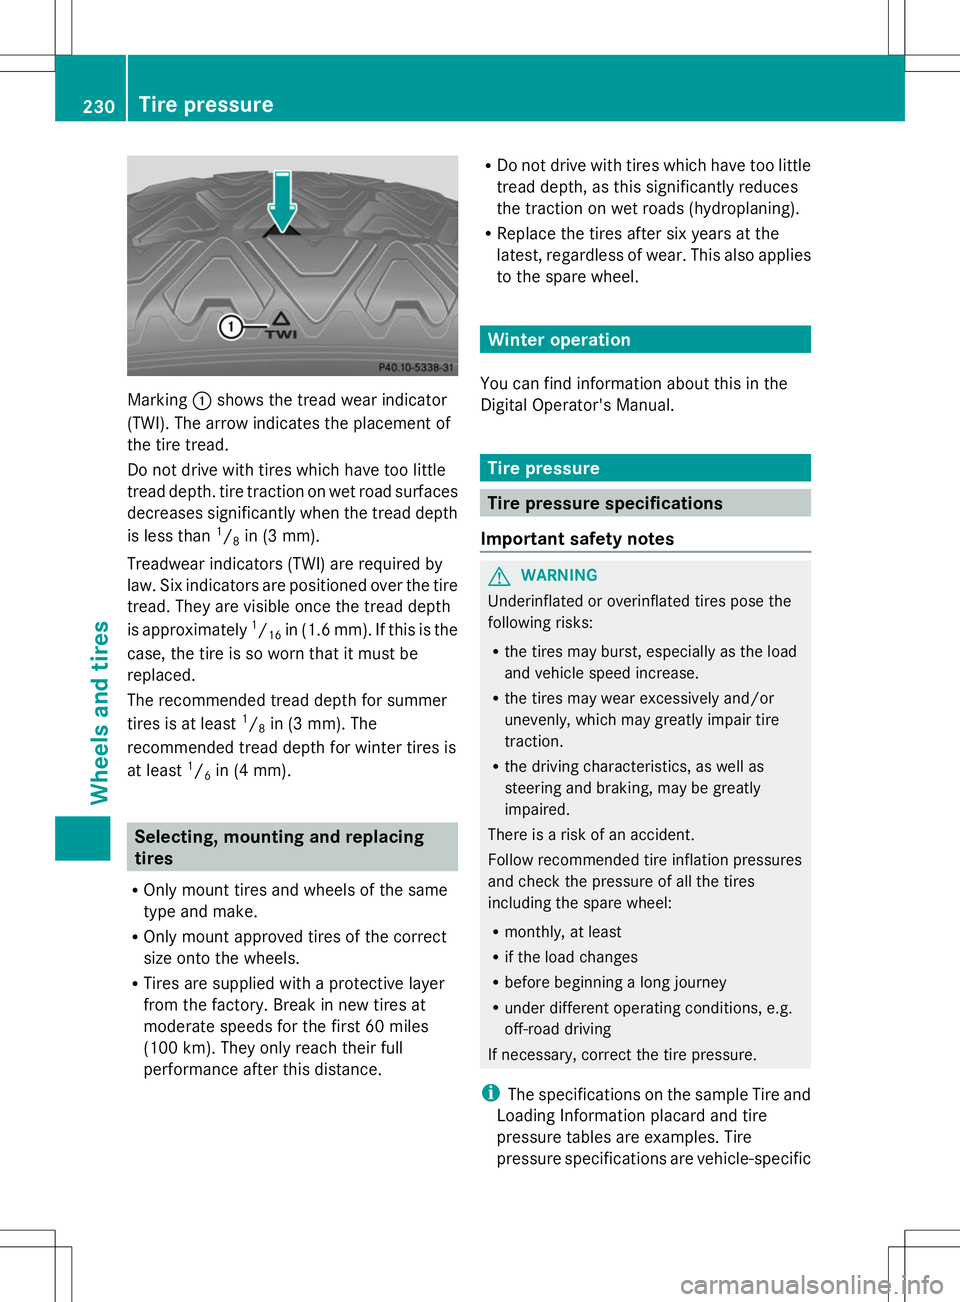
Marking
:shows the tread wear indicator
(TWI). The arrow indicates the placement of
the tire tread.
Do not drive with tires which have too little
tread depth. tire traction on wet road surfaces
decreases significantly when the tread depth
is less than 1
/ 8 in (3 mm).
Treadwear indicators (TWI) are required by
law. Six indicators are positioned over the tire
tread. They are visible once the tread depth
is approximately 1
/ 16 in (1.6 mm). If this is the
case, the tire is so worn that it must be
replaced.
The recommended tread depth for summer
tires is at least 1
/ 8 in (3 mm). The
recommended tread depth for winter tires is
at least 1
/ 6 in (4 mm). Selecting, mounting and replacing
tires
R Only mount tires and wheels of the same
type and make.
R Only mount approved tires of the correct
size onto the wheels.
R Tires are supplied with a protective layer
from the factory. Break in new tires at
moderate speeds for the first 60 miles
(100 km). They only reach their full
performance after this distance. R
Do not drive with tires which have too little
tread depth, as this significantly reduces
the traction on wet roads (hydroplaning).
R Replace the tires after six years at the
latest, regardless of wear. This also applies
to the spare wheel. Winter operation
You can find information about this in the
Digital Operator's Manual. Tire pressure
Tire pressure specifications
Important safety notes G
WARNING
Underinflated or overinflated tires pose the
following risks:
R the tires may burst, especially as the load
and vehicle speed increase.
R the tires may wear excessively and/or
unevenly, which may greatly impair tire
traction.
R the driving characteristics, as well as
steering and braking, may be greatly
impaired.
There is a risk of an accident.
Follow recommended tire inflation pressures
and check the pressure of all the tires
including the spare wheel:
R monthly, at least
R if the load changes
R before beginning a long journey
R under different operating conditions, e.g.
off-road driving
If necessary, correct the tire pressure.
i The specifications on the sample Tire and
Loading Information placard and tire
pressure tables are examples. Tire
pressure specifications are vehicle-specific 230
Tire pressureWheels and tires
Page 235 of 272
tires. The tire pressure would otherwise be
too low.
Observe the recommended tire pressures for
cold tires:
R on the Tire and Loading Information placard
on the B-pillar on the driver's side
R in the tire pressure table on the inside of
the fuel filler flap
Observe the following for the tire pressure on
the spare wheel:
R the tire and loading information table on
the B-pillar on the driver's side.
R the tire pressure sticker on the inside of the
fuel filler flap. Underinflated or overinflated tires
Underinflation G
WARNING
Tires with pressure that is too low can
overheat and burst as a consequence. In
addition, they also suffer from excessive and/
or irregular wear, which can severely impair
the braking properties and the driving
characteristics. There is a risk of an accident.
Avoid tire pressures that are too low in all the
tires, including the spare wheel.
Underinflated tires may:
R overheat, leading to tire defects
R have an adverse effect on handling
characteristics
R wear quickly and unevenly
R have an adverse effect on fuel consumption
Overinflation G
WARNING
Tires with excessively high pressure can burst
because they are damaged more easily by
road debris, potholes etc. In addition, they
also suffer from irregular wear, which can
severely impair the braking properties and the driving characteristics. There is a risk of an
accident.
Avoid tire pressures that are too high in all the
tires, including the spare wheel.
Overinflated tires may:
R increase the braking distance
R have an adverse effect on handling
characteristics
R wear quickly and unevenly
R have an adverse effect on ride comfort
R be more susceptible to damage
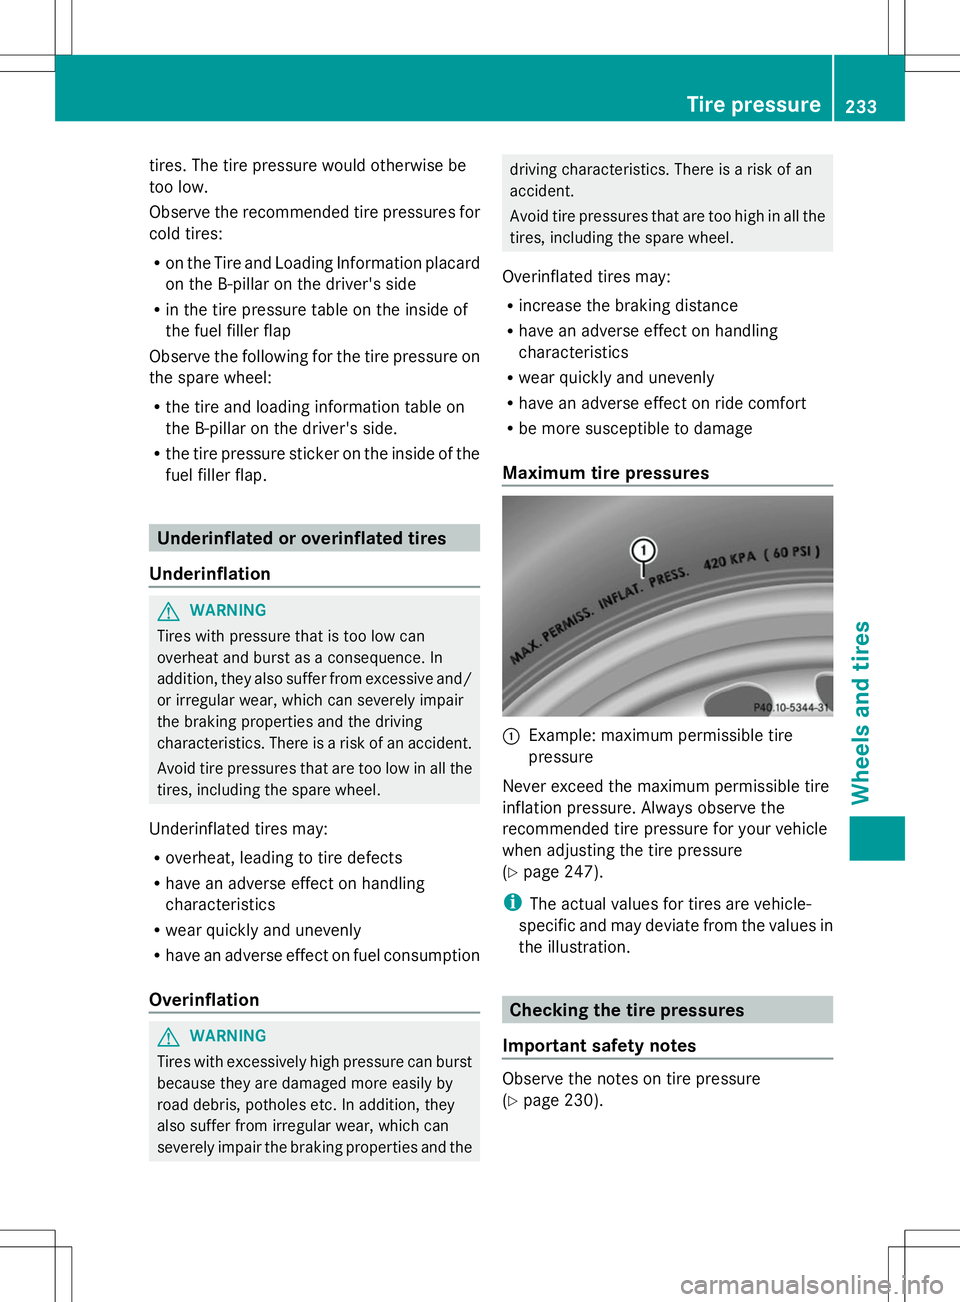
Maximum tire pressures :
Example: maximum permissible tire
pressure
Never exceed the maximum permissible tire
inflation pressure. Always observe the
recommended tire pressure for your vehicle
when adjusting the tire pressure
(Y page 247).
i The actual values for tires are vehicle-
specific and may deviate from the values in
the illustration. Checking the tire pressures
Important safety notes Observe the notes on tire pressure
(Y
page 230). Tire pressure
233Wheels and tires Z
Page 236 of 272
Information on air pressure for the tires on
your vehicle can be found:
R on the vehicle's Tire and Loading
Information placard on the B-pillar
R on the tire pressure label on the fuel filler
flap
R in the "Tire pressure information" section
Checking tire pressures manually To determine and set the correct tire
pressure, proceed as follows:
X Remove the valve cap of the tire that is to
be checked.
X Press the tire pressure gauge securely onto
the valve.
X Read the tire pressure and compare it with
the recommended value on the Tire and
Loading Information placard on the B-pillar
on the driver's side of your vehicle
(Y page 231).
X The tire pressure is too low: increase the
tire pressure to the recommended value.
X The tire pressure is too high: press down
the metal pin in the valve using the tip of a
pen, for example.
Air is released from the tire.
X Check the tire pressure again with the tire
pressure gauge.
X Screw the valve cap onto the valve.
X Repeat these steps for the other tires. Tire pressure monitor
Important safety notes G
WARNING
Each tire, including the spare (if provided),
should be checked at least once a month
when cold and inflated to the pressure
recommended by the vehicle manufacturer
on the Tire and Loading Information placard
on the driver's door B-pillar or the tire
pressure label on the inside of the fuel filler
flap. If your vehicle has tires of a different size than the size indicated on the Tire and Loading
Information placard or the tire pressure label,
you should determine the proper tire pressure
for those tires.
As an added safety feature, your vehicle has
been equipped with a tire pressure monitoring
system (TPMS) that illuminates a low tire
pressure telltale when one or more of your
tires are significantly underinflated.
Accordingly, when the low tire pressure
telltale illuminates, you should stop and check
your tires as soon as possible, and inflate
them to the proper pressure. Driving on a
significantly underinflated tire causes the tire
to overheat and can lead to tire failure.
Underinflation also reduces fuel efficiency
and tire tread life, and may affect the vehicle's
handling and stopping ability.
Please note that the TPMS is not a substitute
for proper tire maintenance, and it is the
driver's responsibility to maintain correct tire
pressure, even if underinflation has not
reached the level to trigger illumination of the
TPMS low tire pressure telltale.
USA only:
Your vehicle has also been equipped with a
TPMS malfunction indicator to indicate if the
system is not operating properly. The TPMS
malfunction indicator is combined with the
low tire pressure telltale. When the system
detects a malfunction, the warning lamp will
flash for approximately a minute and then
remain continuously illuminated. This
sequence will be repeated every time the
vehicle is started as long as the malfunction
exists.
When the malfunction indicator is illuminated,
the system may not be able to detect or signal
low tire pressure as intended. TPMS
malfunctions may occur for a variety of
reasons, including the installation of
incompatible replacement or alternate tires
or wheels on the vehicle that prevent the
TPMS from functioning properly. Always
check the TPMS malfunction telltale after
replacing one or more tires or wheels on your 234
Tire pressureWheels and tires