MERCEDES-BENZ G-CLASS SUV 2015 Owners Manual
Manufacturer: MERCEDES-BENZ, Model Year: 2015, Model line: G-CLASS SUV, Model: MERCEDES-BENZ G-CLASS SUV 2015Pages: 274, PDF Size: 31.95 MB
Page 141 of 274
Driving tips
If the trailer swings from side to side:
X Do not accelerate.
X Do not counter-steer.
X Brake if necessary.
R Maintain a greater distance from the vehi-
cle in front than when driving without a
trailer.
R Avoid braking abruptly. If possible, brake
gently at first to allow the trailer to run on.
Then, increase the braking force rapidly.
R The values given for gradient-climbing
capabilities from a standstill refer to sea
level. When driving in mountainous areas,
note that the power output of the engine
and, consequently, the vehicle's gradient-
climbing capability, decreases with
increasing altitude.
Assembling the ball coupling
Assembling the ball coupling
GWARNING
The ball coupling can be damaged if the nut on the ball coupling is tightened using the incor- rect torque. As a result, the trailer may
detach. There is a risk of an accident.
Immediately after installing, have the tighten-
ing torque checked at a qualified specialist
workshop.
!Mercedes-Benz recommends that you
only use ball couplings tested and
approved for use on Mercedes-Benz vehi-
cles. This helps to avoid damage to the
vehicle.
Observe the manufacturer's installation
instructions if you use a ball coupling other than the one supplied.
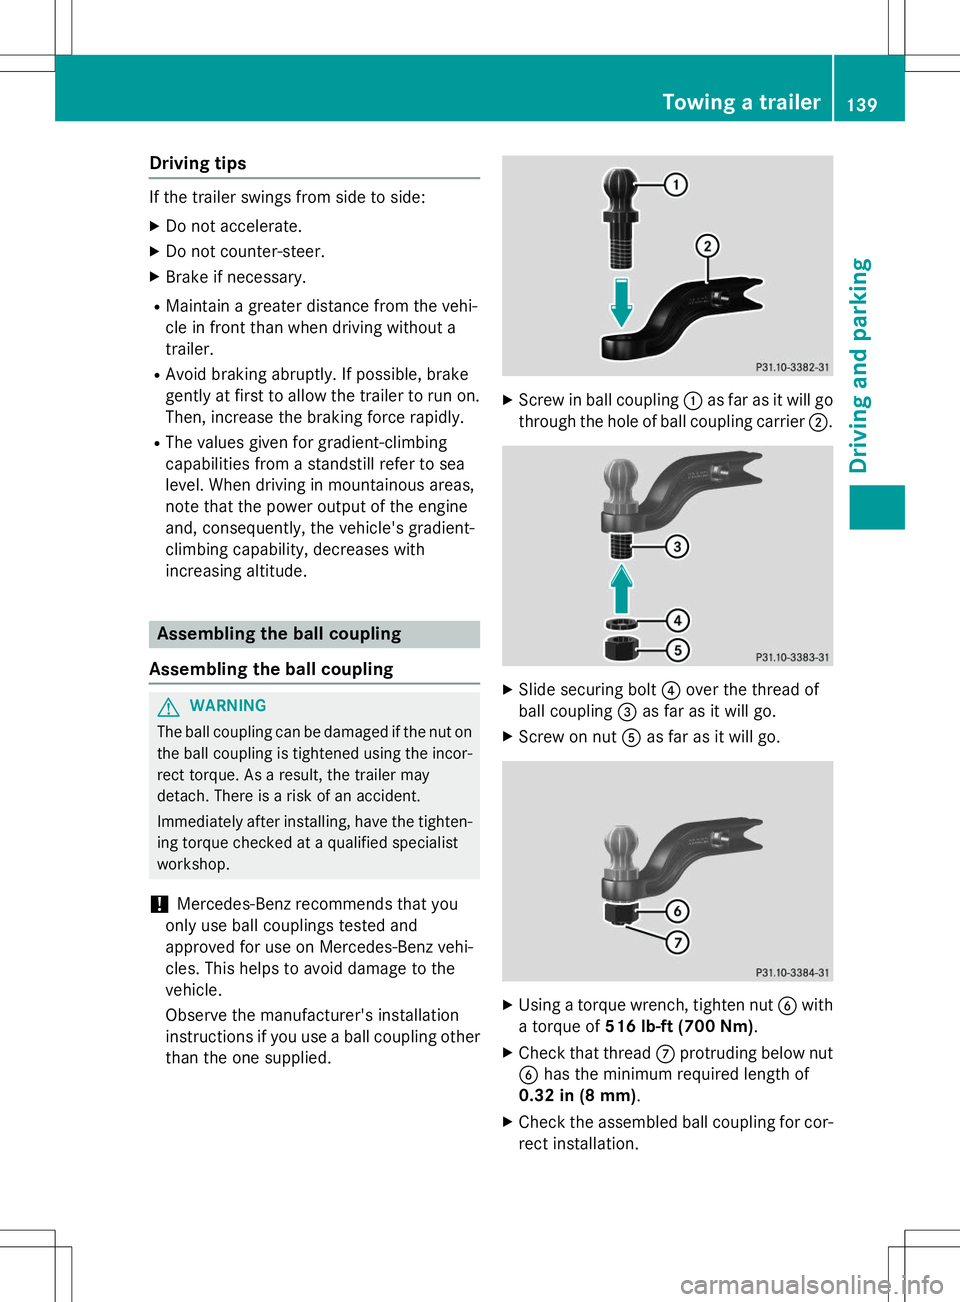
X Screw in ball coupling :as far as it will go
through the hole of ball coupling carrier ;.
X
Slide securing bolt ?over the thread of
ball coupling =as far as it will go.
X Screw on nut Aas far as it will go.
X
Using a torque wrench, tighten nut Bwith
a torque of 516 lb-ft (700 Nm) .
X Check that thread Cprotruding below nut
B has the minimum required length of
0.32 in (8 mm).
X Check the assembled ball coupling for cor-
rect installation.
Towing a trailer139
Driving and pa rking
Z
Page 142 of 274
iAlso observe the height of the trailer cou-
pling and the trailer manufacturer's instruc- tions.
iDepending on the height of the trailer
coupling, you may have to turn the ball cou-
pling 180° to install it on the ball coupling
carrier. The assembly is otherwise identi-
cal.
Installing the ball coupling
GWARNING
If the ball coupling is not installed correctly or not secured with the bolt provided and the
corresponding spring cotter, the trailer may
come loose. There is a risk of an accident.
Always install and secure the ball coupling as
described. Before every journey, ensure that
the ball coupling is secured with the bolt and
the corresponding spring cotter.
GWARNING
If the ball coupling is not correctly installed
and secured, it can come loose during the
journey and endanger other road users. There is a risk of an accident and injury.
Always install and secure the ball coupling as
described. Before every journey, ensure that
the ball coupling is secured with the bolt and
the corresponding spring cotter.
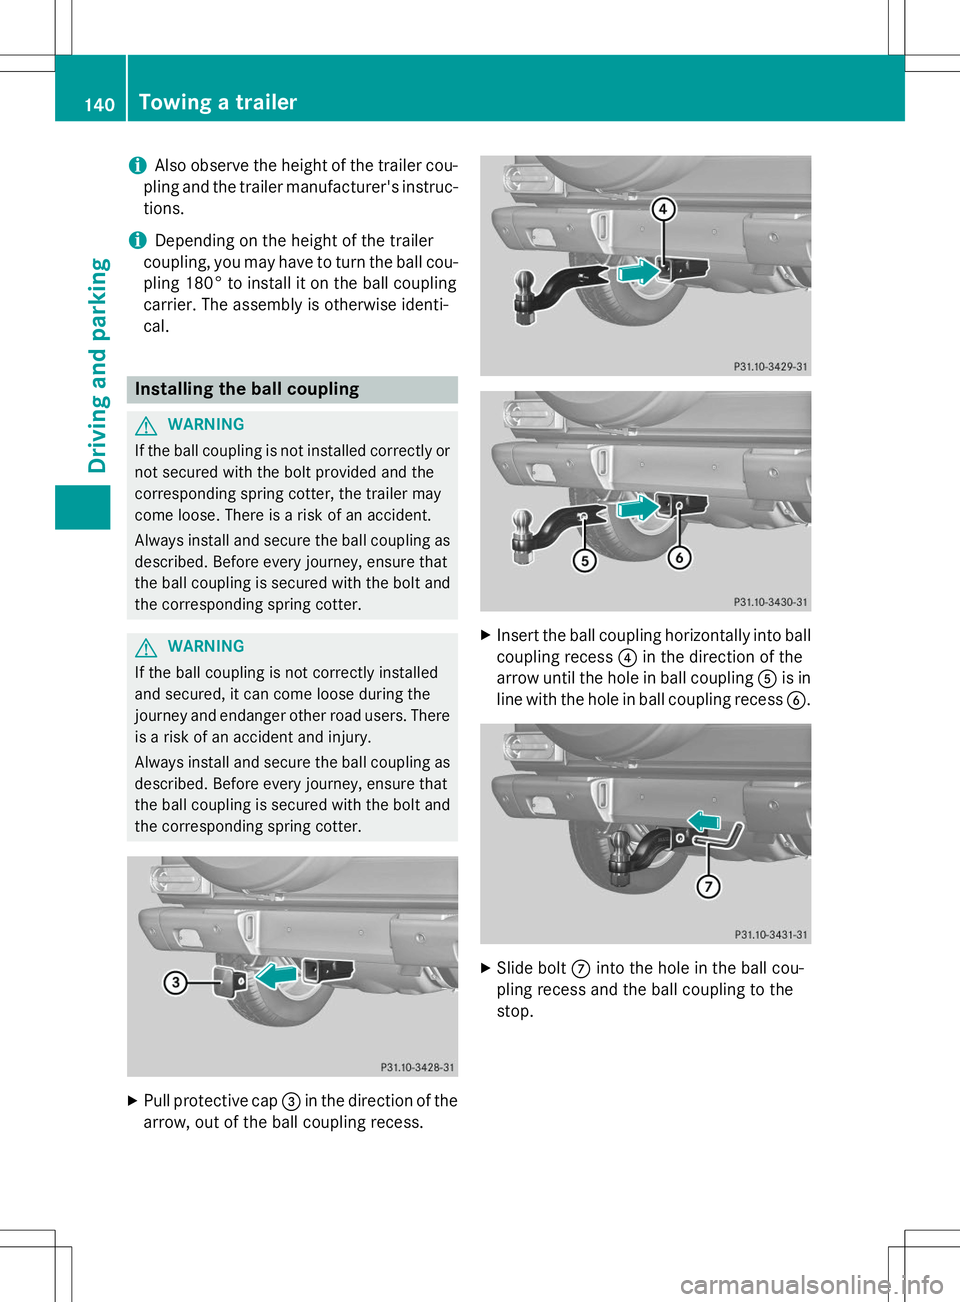
X Pull protective cap =in the direction of the
arrow, out of the ball coupling recess.
X Insert the ball coupling horizontally into ball
coupling recess ?in the direction of the
arrow until the hole in ball coupling Ais in
line with the hole in ball coupling recess B.
X
Slide bolt Cinto the hole in the ball cou-
pling recess and the ball coupling to the
stop.
140Towing a trailer
Driving an d parking
Page 143 of 274
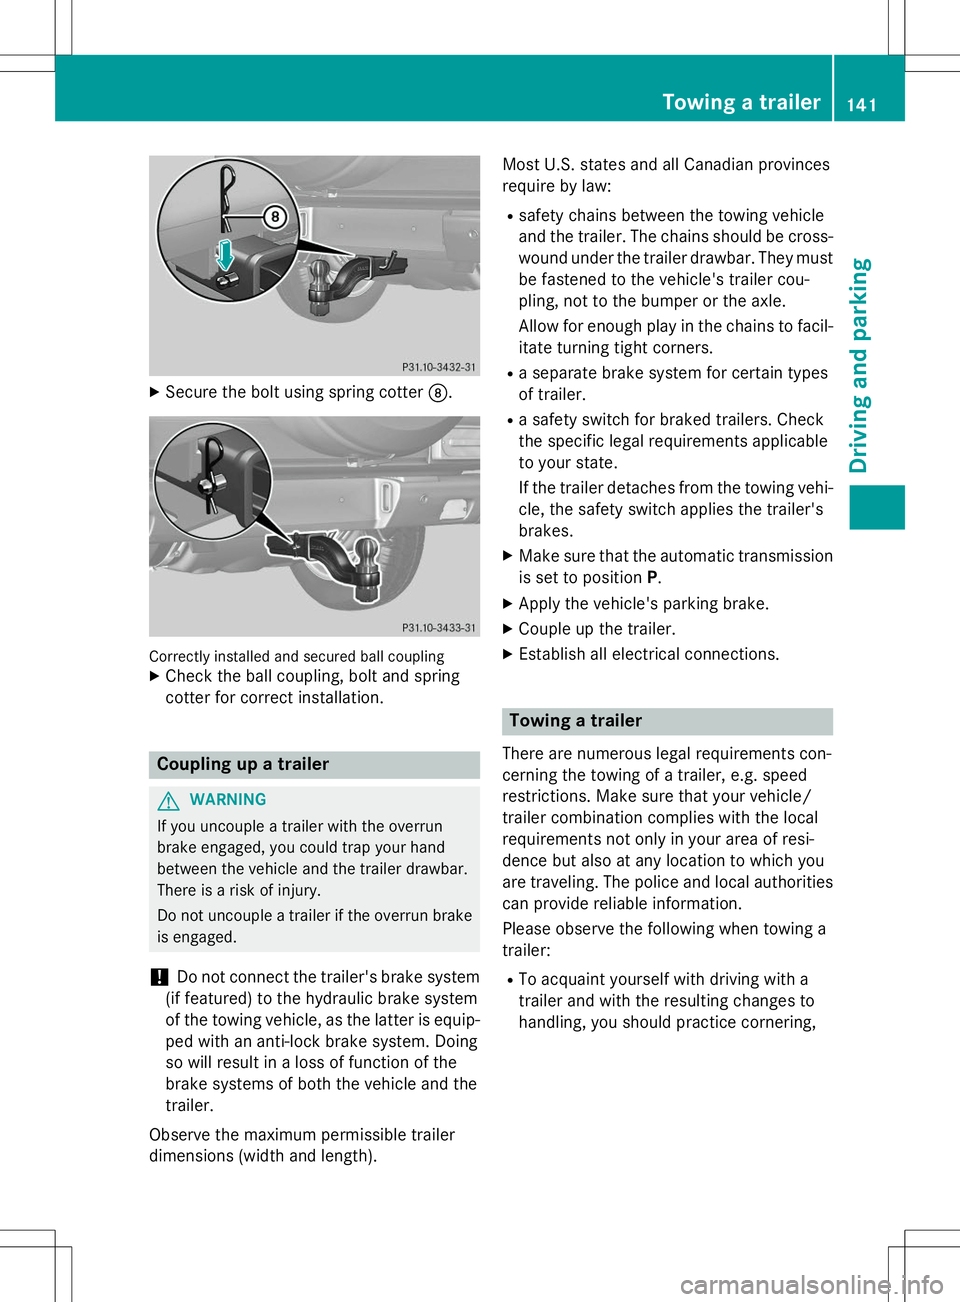
XSecure the bolt using spring cotter D.
Correctly installed and secured ball couplingX
Check the ball coupling, bolt and spring
cotter for correct installation.
Coupling up a trailer
GWARNING
If you uncouple a trailer with the overrun
brake engaged, you could trap your hand
between the vehicle and the trailer drawbar.
There is a risk of injury.
Do not uncouple a trailer if the overrun brake
is engaged.
!Do not connect the trailer's brake system
(if featured) to the hydraulic brake system
of the towing vehicle, as the latter is equip-
ped with an anti-lock brake system. Doing
so will result in a loss of function of the
brake systems of both the vehicle and the
trailer.
Observe the maximum permissible trailer
dimensions (width and length). Most U.S. states and all Canadian provinces
require by law:
R safety chains between the towing vehicle
and the trailer. The chains should be cross-
wound under the trailer drawbar. They must
be fastened to the vehicle's trailer cou-
pling, not to the bumper or the axle.
Allow for enough play in the chains to facil- itate turning tight corners.
R a separate brake system for certain types
of trailer.
R a safety switch for braked trailers. Check
the specific legal requirements applicable
to your state.
If the trailer detaches from the towing vehi-
cle, the safety switch applies the trailer's
brakes.
X Make sure that the automatic transmission
is set to position P.
X Apply the vehicle's parking brake.
X Couple up the trailer.
X Establish all electrical connections.
Towing a trailer
There are numerous legal requirements con-
cerning the towing of a trailer, e.g. speed
restrictions. Make sure that your vehicle/
trailer combination complies with the local
requirements not only in your area of resi-
dence but also at any location to which you
are traveling. The police and local authorities
can provide reliable information.
Please observe the following when towing a
trailer:
R To acquaint yourself with driving with a
trailer and with the resulting changes to
handling, you should practice cornering,
Towing a trailer141
Driving and parking
Z
Page 144 of 274
stopping and backing up in a traffic-free location.
R Before driving, check:
- Trailer tow hitch
- Safety switch for braked trailers
- Safety chains
- Electrical connections
- Lights
- Wheels
R Adjust the exterior mirrors to provide an
unobstructed view of the rear section of the
trailer.
R If the trailer features electronically control-
led brakes, pull away the vehicle/trailer
combination carefully, manually brake
using the brake controller, and check the
brakes for correct function.
R Secure any objects on the trailer to prevent
the cargo from slipping when the vehicle is
in motion.
R If you couple up a trailer, regularly check
the cargo for secure fastening and make
sure that the trailer lamps and (if applica-
ble) the trailer brakes are functioning cor-rectly.
R Bear in mind that the handling will be less
stable when towing a trailer than when driv-
ing without one. Avoid sudden steeringmovements.
R The vehicle/trailer combination is heavier,
accelerates more slowly, has a decreased
gradient climbing capability and a longer
braking distance.
It is more susceptible to side winds and
requires more careful steering.
R If possible, avoid abrupt braking. Depress
the brake pedal moderately at first, so that
the trailer can activate its own brakes. Thenincrease the pressure on the brake pedal.
R If the automatic transmission continues to
shift back and forth between two gears
when driving up or downhill, restrict the
shift range. Select shift range 4, 3, 2,or1.
A lower gear and lower speed reduce the
risk of engine failure. R
When driving downhill, shift to a lower gear
to utilize the engine's braking effect.
Avoid continuous brake application as this
may overheat the vehicle brakes and, if
installed, the trailer brakes.
R If the coolant temperature increases dra-
matically while the air-conditioning system
is switched on, switch off the air-condition-
ing system.
Coolant heat can additionally be dissipated
by opening the windows and by setting the
blower fan and the interior temperature tomaximum.
R When overtaking, pay particular attention
to the extended length of your vehicle/
trailer combination.
Due to the length of your vehicle/trailer
combination, you will have to travel an addi-
tional distance beyond the vehicle you are
overtaking before returning to the previous lane.
Decoupling a trailer
!
Do not disconnect a trailer with an
engaged overrun brake. Otherwise, your
vehicle could be damaged by the rebound- ing of the overrun brake.
X Make sure that the automatic transmission
is set to position P.
X Apply the parking brake.
X Start the engine.
X Close all doors, including the rear door.
X Apply the trailer's parking brake.
X Detach the trailer cable and decouple thetrailer.
X Switch off the engine.
Permissible trailer and drawbar loads
Weight specifications
The gross trailer weight is calculated by add-
ing the weight of the trailer to the weight of
142Towing a trailer
Driving and parking
Page 145 of 274
the load and equipment on the trailer. Missingvalues for model G 63 AMG and G 65 AMG
were not available at the time of going to
print.
The maximum permissible trailer drawbar
noseweight is the maximum weight with
which the trailer drawbar can be loaded:
562 lbs (255 kg). Limit for Mercedes-Benz-
approved trailer couplings.
Loading a trailer
R When loading the trailer, make sure that
neither the permissible gross weight of the
trailer nor the gross vehicle weight is
exceeded. The permissible gross vehicle
weight is indicated on the identification
plate on the B-pillar on the driver's side of
the vehicle.
You can find the maximum permissible val-
ues on the type plates of your vehicle and
the trailer. Always observe the lowest
respective value when determining the
maximum weight with which you can load
the vehicle and the trailer.
R The trailer drawbar load on the ball coupling
must be added to the rear axle load to avoid exceeding the permissible gross axle
weight. The permissible gross vehicle
weight is indicated on the identification
plate on the B-pillar on the driver's side of
the vehicle.
iMercedes-Benz recommends a trailer
load where the trailer drawbar noseweight
accounts for 8% to 15% of the trailer's per-
missible gross weight.
iThe weight of additional accessories, pas-
sengers, and cargo reduces the permissi-
ble trailer load and drawbar load for your
vehicle.
Checking the vehicle and trailer weight
R Determine the maximum permissible gross
vehicle weight of the vehicle. Weigh the
car/trailer combination, including the driver, passenger, trailer and load on a cali-
brated weighing machine.
R Check the gross axle weight rating of the
front and rear axles, the gross weight of the
trailer and trailer drawbar load.
Information in the Digital Operator's
Manual
In the Digital Operator's Manual you will find
information on the following topics:
R Trailer power supply
R Bulb failure indicator for LED lamps
R Trailer with 7-pin connector
Towing a trailer143
Driving an d parking
Z
Page 146 of 274
144
Page 147 of 274
Useful information............................146
Important safety notes .....................146
Displays and operation .....................146
Menus and submenus ......................147
Display messages ............................. 148
Warning and indicator lamps in the instrument cluster ............................160
145
On-board computer and displays
Page 148 of 274
Useful information
iThis Operator's Manual describes all
models and all standard and optional equip- ment of your vehicle available at the time of
publication of the Operator's Manual.
Country-specific differences are possible.
Please note that your vehicle may not be
equipped with all features described. This
also applies to safety-related systems and
functions.
iRead the information on qualified special-
ist workshops: ( Ypage 28).
Important safety notes
GWARNING
If you operate information systems and com-
munication equipment integrated in the vehi-
cle while driving, you will be distracted from
traffic conditions. You could also lose controlof the vehicle. There is a risk of an accident.
Only operate the equipment when the traffic
situation permits. If you are not sure that this
is possible, park the vehicle paying attention
to traffic conditions and operate the equip-
ment when the vehicle is stationary.
GWARNING
If the instrument cluster has failed or mal-
functioned, you may not recognize function
restrictions in systems relevant to safety. The operating safety of your vehicle may be
impaired. There is a risk of an accident.
Drive on carefully. Have the vehicle checked
at a qualified specialist workshop immedi-ately.
The on-board computer only shows messages
or warnings from certain systems in the mul- tifunction display. You should therefore make
sure your vehicle is operating safely at all
times. Otherwise, a vehicle that is not oper-
ating safely may cause an accident. You must observe the legal requirements for
the country in which you are currently driving
when operating the on-board computer.
For an illustration of the instrument cluster,
see ( Ypage 146).
Displays and operation
Information in the Digital Operator's
Manual
In the Digital Operator's Manual you will find
information on the following topics: R
Instrument cluster
R Instrument cluster lighting
R Coolant temperature display
R Tachometer
R Speedometer with segments
R Multifunction display
R Outside temperature display
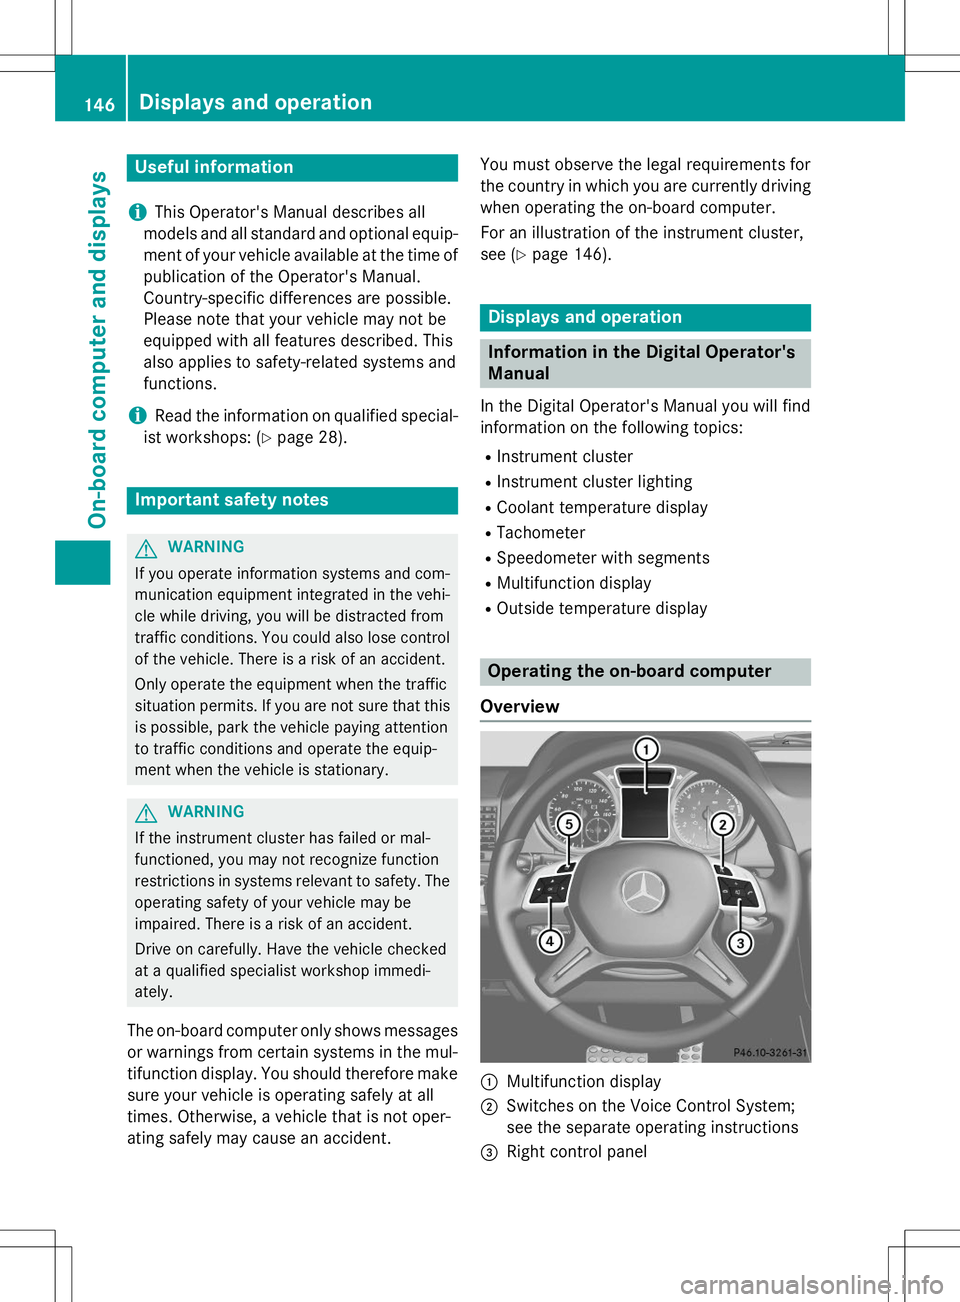
Operating the on-board computer
Overview
:Multifunction display
;Switches on the Voice Control System;
see the separate operating instructions
=Right control panel
146Displays and operation
On-board computer and displays
Page 149 of 274
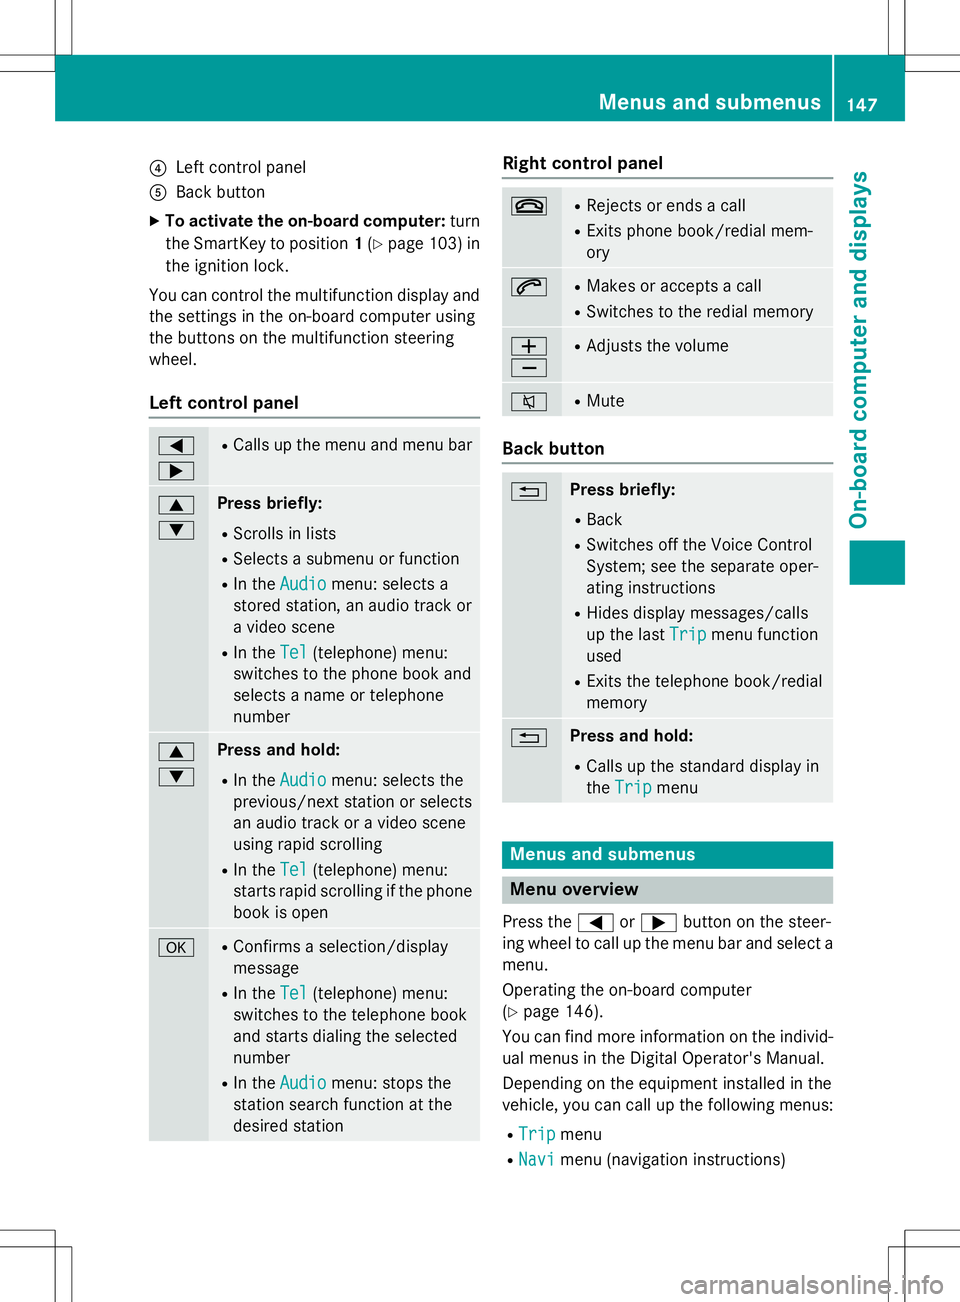
?Left control panel
ABack button
X To activate the on-board computer: turn
the SmartKey to position 1(Y page 103) in
the ignition lock.
You can control the multifunction display and
the settings in the on-board computer using
the buttons on the multifunction steering
wheel.
Left control panel
= ;R Calls up the menu and menu bar
9 :Press briefly:
R Scrolls in lists
R Selects a submenu or function
R In the
Audiomenu: selects a
stored station, an audio track or
a video scene
R In the
Tel(telephone) menu:
switches to the phone book and
selects a name or telephonenumber
9 :Press and hold:
R In the
Audiomenu: selects the
previous/next station or selects
an audio track or a video scene
using rapid scrolling
R In the
Tel(telephone) menu:
starts rapid scrolling if the phone
book is open
aR Confirms a selection/display
message
R In the
Tel(telephone) menu:
switches to the telephone book
and starts dialing the selectednumber
R In the
Audiomenu: stops the
station search function at the
desired station
Right control panel
~R Rejects or ends a call
R Exits phone book/redial mem- ory
6RMakes or accepts a call
R Switches to the redial memory
W XRAdjusts the volume
8RMute
Back button
%Press briefly:
R Back
R Switches off the Voice Control
System; see the separate oper-
ating instructions
R Hides display messages/calls
up the last
Tripmenu function
used
R Exits the telephone book/redial memory
%Press and hold:
R Calls up the standard display in the
Tripmenu
Menus and submenus
Menu overview
Press the =or; button on the steer-
ing wheel to call up the menu bar and select a
menu.
Operating the on-board computer ( Y page 146).
You can find more information on the individ-
ual menus in the Digital Operator's Manual.
Depending on the equipment installed in the
vehicle, you can call up the following menus:
R
Tripmenu
R
Navimenu (navigation instructions)
Menus and submenus147
On-board computer and displays
Z
Page 150 of 274
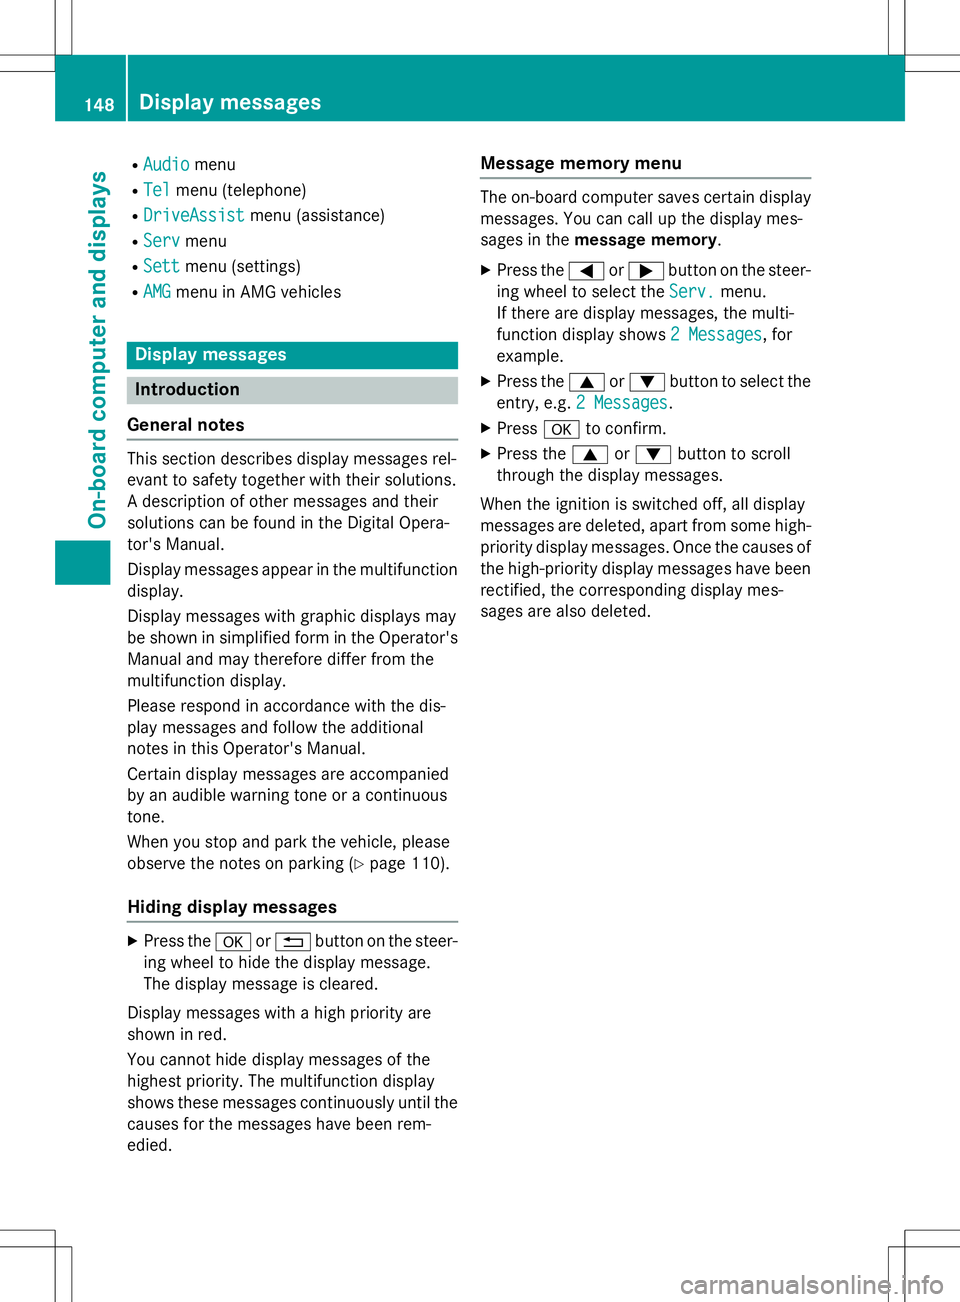
RAudioAudiomenu
R
TelTelmenu (telephone)
R
DriveAssistDriveAssistmenu (assistance)
R
ServServmenu
R
SettSettmenu (settings)
R
AMGAMGmenu in AMG vehicles
Display messages
Introduction
General notes
This section describes display messages rel-
evant to safety together with their solutions.
A description of other messages and their
solutions can be found in the Digital Opera-
tor's Manual.
Display messages appear in the multifunction
display.
Display messages with graphic displays may
be shown in simplified form in the Operator's Manual and may therefore differ from the
multifunction display.
Please respond in accordance with the dis-
play messages and follow the additional
notes in this Operator's Manual.
Certain display messages are accompanied
by an audible warning tone or a continuoustone.
When you stop and park the vehicle, please
observe the notes on parking ( Ypage 110).
Hiding display messages
X
Press the aor% button on the steer-
ing wheel to hide the display message.
The display message is cleared.
Display messages with a high priority are
shown in red.
You cannot hide display messages of the
highest priority. The multifunction display
shows these messages continuously until the
causes for the messages have been rem-edied.
Message memory menu
The on-board computer saves certain display
messages. You can call up the display mes-
sages in the message memory .
X Press the =or; button on the steer-
ing wheel to select the
Serv.Serv.menu.
If there are display messages, the multi-
function display shows
2 Messages2 Messages, for
example.
X Press the 9or: button to select the
entry, e.g.
2 Messages2 Messages.
X Press ato confirm.
X Press the 9or: button to scroll
through the display messages.
When the ignition is switched off, all display
messages are deleted, apart from some high-
priority display messages. Once the causes of the high-priority display messages have been
rectified, the corresponding display mes-
sages are also deleted.
148Display messages
On-board computer and displays