ESP MERCEDES-BENZ G-CLASS SUV 2016 Owner's Manual
[x] Cancel search | Manufacturer: MERCEDES-BENZ, Model Year: 2016, Model line: G-CLASS SUV, Model: MERCEDES-BENZ G-CLASS SUV 2016Pages: 261, PDF Size: 6.01 MB
Page 70 of 261
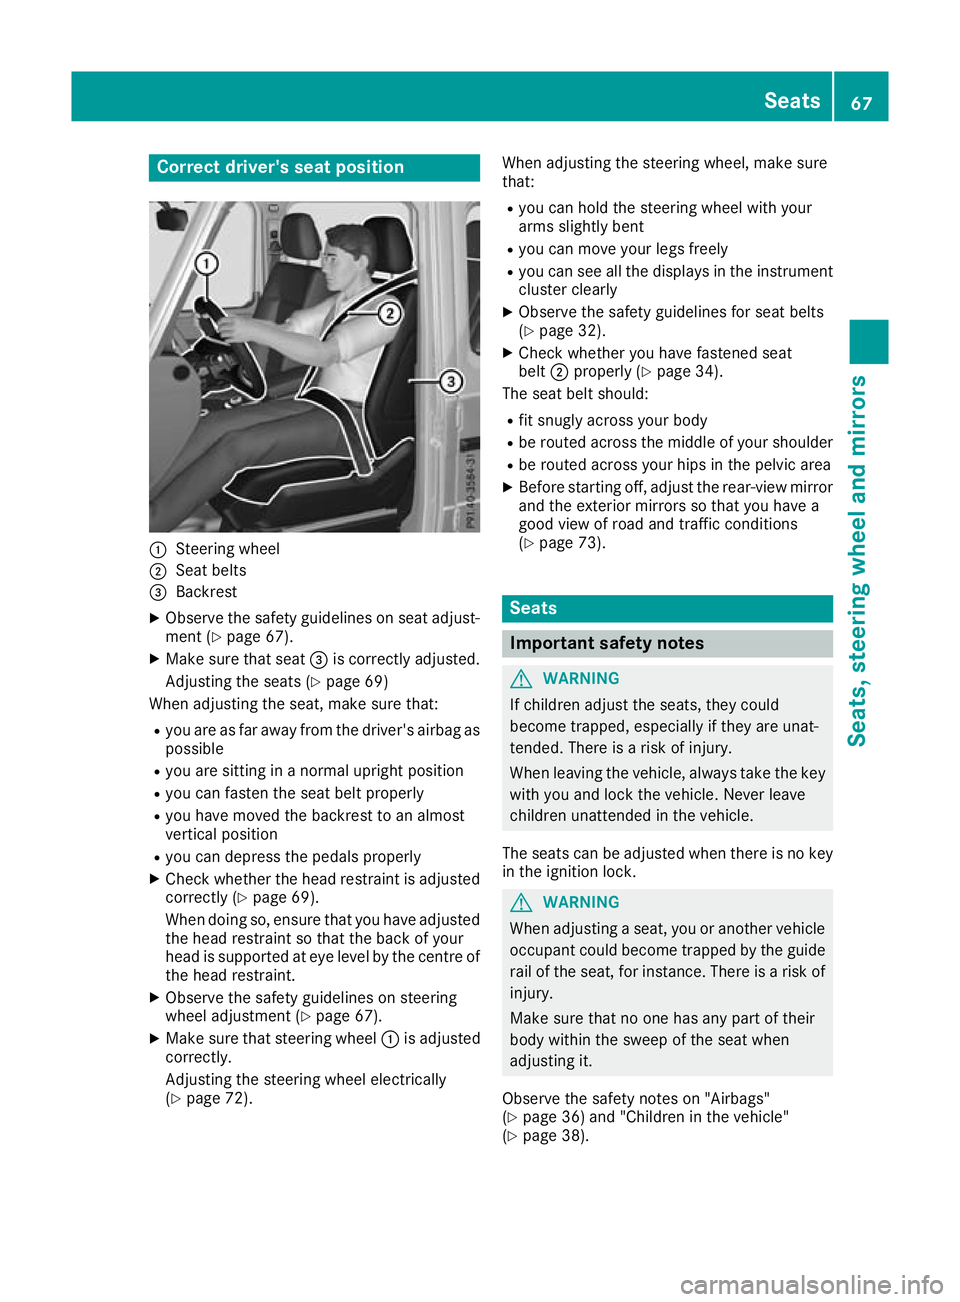
Correct driver's seat position
:
Steerin gwheel
; Seatbelts
= Backrest
X Observe the safety guideline sonseata djust-
ment (Y page 67).
X Make sure that seat =is correctly adjusted.
Adjusting the seats (Y page 69)
Whe nadjusting the seat, make sure that:
R youa re as far away from the driver' sairba gas
possible
R youa re sitting in anorma lupright position
R youc an fasten the sea tbeltp roperly
R youh avem ovedthe backrest to an almost
vertical position
R youc an depress the pedal sproperly
X Check whethe rthe hea drestraint is adjusted
correctly (Y page 69).
Whe ndoing so, ensure that yo uhavea djusted
the hea drestraint so that the back of your
hea diss upported at ey elev el by the centre of
the hea drestraint.
X Observe the safety guideline sonsteering
wheel adjustment (Y page 67).
X Make sure that steering wheel :is adjusted
correctly.
Adjusting the steering wheel electrically
(Y page 72). Whe
nadjustin gthe steerin gwheel, make sure
that:
R you can hold the steerin gwheel with your
arms slightly bent
R you can move your legs freely
R you can see all the displays in the instrument
cluster clearly
X Observe the safety guidelines for seat belts
(Y page 32).
X Check whether you have fastened seat
belt ;properly (Y page 34).
The seat belt should:
R fit snugly across your body
R be routed across the middle of your shoulder
R be routed across your hips in the pelvic area
X Befor estarting off, adjust the rear-view mirror
and the exterior mirrors so that you have a
good view of road and traffic conditions
(Y page 73). Seats
Important safety notes
G
WARNING
If children adjust the seats, they could
become trapped, especially if they are unat-
tended. Ther eisarisk of injury.
When leaving the vehicle, alwayst ake the key
with you and lock the vehicle. Never leave
children unattended in the vehicle.
The seats can be adjusted when there is no key
in the ignitio nlock. G
WARNING
When adjusting aseat, you or another vehicle
occupant coul dbecome trappe dbythe guide
rail of the seat, for instance. There is arisk of
injury.
Make sure that no one has any part of their
body withi nthe swee pofthe seat when
adjusting it.
Observe the safety notes on "Airbags"
(Y page3 6) and "Children in the vehicle"
(Y page3 8). Seats
67Seats,steering wheela nd mirrors Z
Page 76 of 261
The last position of the steerin
gcolumn is stored
when you switch off the ignition. Mirrors
Rear-view mirror
G
WARNING
Electrolyte may escape if the glass in an auto- matic anti-dazzle mirro rbreaks. The electro-
lyte is harmfu land causes irritation. It must
not come into contact with yours kin, eyes,
respiratory organs or clothing or be swal-
lowed. There is arisk of injury.
If you come into contact with the electrolyte,
observe the following:
R Rinse off the electrolyte from yours kin
immediatel ywith water.
R Immediately rinse the electrolyte out of
youre yest horoughly with clea nwater.
R If the electrolyte is swallowed,i mmediately
rinse yourm outh out thoroughly.Don ot
induce vomiting.
R If electrolyte comes into contact with your
skin or hairoriss wallowed,seek medical
attention immediately.
R Immediately change out of clothing which
has come into contact with electrolyte.
R If an allergic reactio noccurs, seek medical
attention immediately.
X Adjust the rear-view mirror in such away that
you have agood view of road and traffic con-
ditions behind you.
The rear-view mirror automatically goes into
anti-dazzle mode if:
R the ignitio nisswitched on
R incident light from headlamps strikes the sen-
sor in the rear-view mirror
The rear-view mirror does not go into anti-dazzle
mode if reverse gearise ngaged or if the interior
lighting is switched on. Exterior mi
rrors
Adjusting th eexterio rmirror smanually X
Adjust th eexterio rmirrors in such awaythat
yo uc an get agoodo verview of roa dand traf-
fic conditions. Mirrors
73Seats, steering wheel and mirrors Z
Page 78 of 261
Automati
cheadlamp mode G
WARNING
When th elight switch is set to Ã,the
dipped-beam headlamps may not be switched on automatically if there is fog, snow or othercauses of poor visibility due to the weather
conditions such as spray. There is arisk of an
accident.
In such situations, turn the light switch to
L.
The automatic headlamp feature is only an aid.
The drive risresponsibl efor the vehicl elighting
at all times.
à is the preferre dlight switch position.
The light setting is automatically selected
according to the brightness of the ambient light,
but not in the event of poor visibility due to
weather conditions such as fog, snow or spray.
X To switch on the automatic headlamps:
turn the light switch to the Ãposition.
With the key in position 1in the ignitio nlock,
the side lamp sare switched on or off auto-
matically depending on the brightness of the
ambient light.
If you have switched on the Daytime driv‐ Daytime driv‐
ing lights
ing lights functionvia the on-board com-
puter, the daytime driving lights or the side
lamps and dipped-beam headlamps will
switch on or off automaticallyw hile the
engine is running.
When the dipped-beam headlamps are
switched on, the green Lindicator lamp in
the instrument cluster lights up. Rear foglamp
The rear fog lamp improves the visibility of your vehicle for the traffic behind in the event of
heavy fog. You must observe the legal require-
ment sfor the country in which yo uare currently
driving when operating the rea rfog lamp.
X To switc honthe rear fog lamp: turn the key
in the ignition lock to position 2or star tthe
engine.
X Turn the light switch to the Lposition.
X Press the Rbutton.
The yellow Rindicator lamp on the instru-
ment cluster lights up. Sid
elamps
! When the battery is discharged heavily,t
he
side lamps or parking lamps are automatically
switched off to facilitate an engine start.
Always park your vehicle safely and in awell lit
area, in accordance with the relevant legal
stipulations. Avoid using the Tside lamps
for periods lasting several hours. Where pos-
sible, switch on the right Xor left W
parking lamp.
X To switch on: turn the light switch to the
T position.
The green Tindicator lamp on the instru-
ment cluster lights up. Parking lamps
Switching on the parking lamps ensures that the
correspondin gside of the vehicle is illuminated.
X To switch on the parking lamp: turn the key
to position uin the ignition lock or remove
the key.
X Turn the light switch to the W(left-hand
side of the vehicle) or X(right-hand side of
the vehicle) position. Headlamp cleaning system
The headlamps are cleaned automatically if the
"Wipe with washer fluid" function is operated
ten times (Y page 81) while the lights are on
and the engin eisrunning. When you switch off
the ignition, the automatic headlamp cleaning
system is reset and counting is resumed from 0. Exterior lighting
75Lightsand windscreen wipers Z
Page 79 of 261
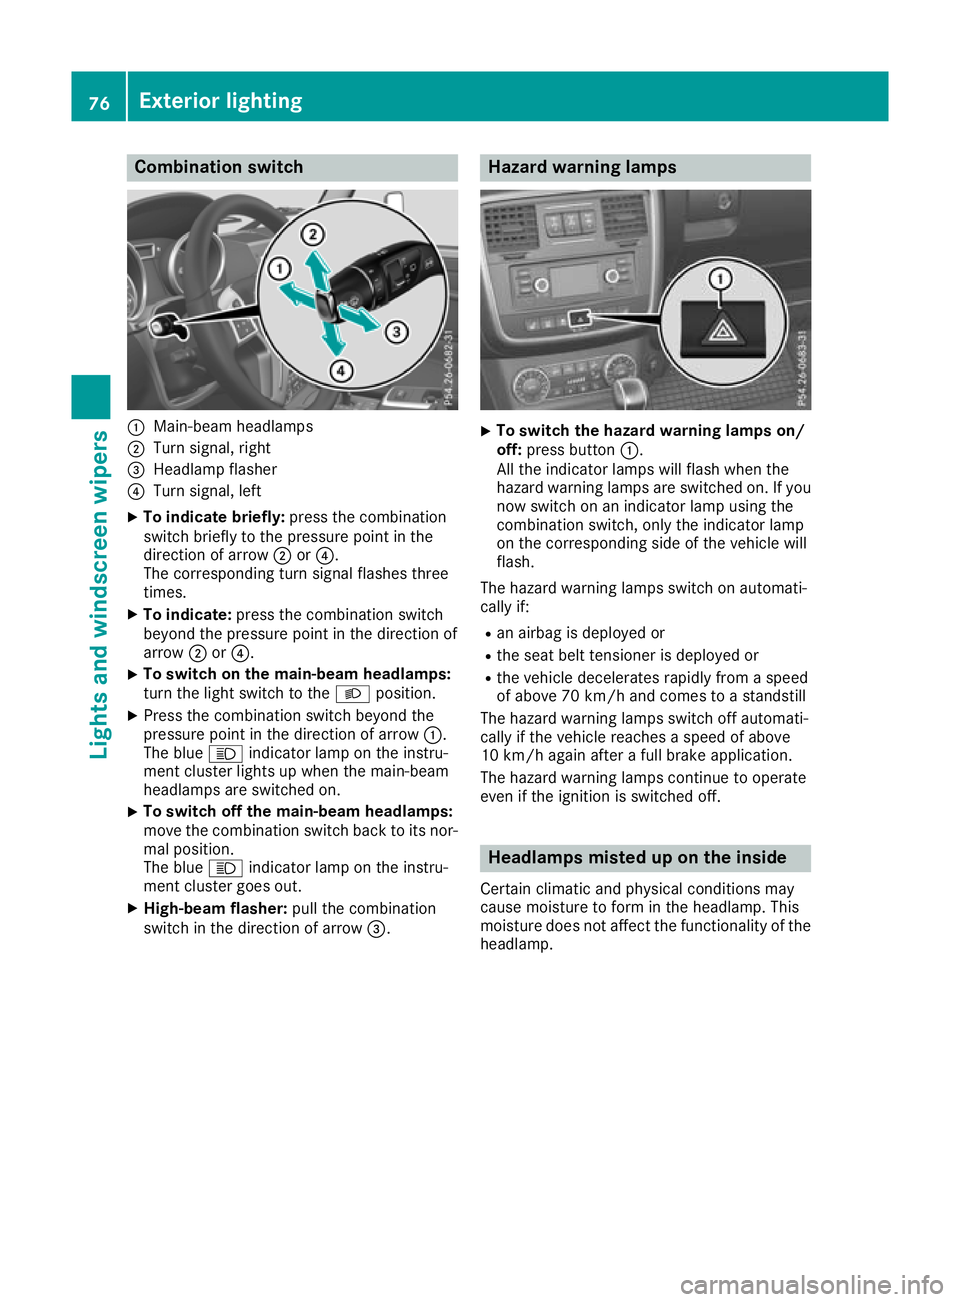
Combination switch
:
Main-beam headlamps
; Turnsignal, right
= Headlamp flasher
? Turn signal, left
X To indicate briefly: press the combination
switch briefly to the pressure point in the
direction of arrow ;or?.
The corresponding turn signal flashes three
times.
X To indicate: press the combination switch
beyond the pressure point in the direction of
arrow ;or?.
X To switch on the main-beam headlamps:
turn the light switch to the
Lposition.
X Press the combination switch beyond the
pressure point in the direction of arrow :.
The blue Kindicator lamp on the instru-
ment cluster lights up when the main-beam
headlamps are switched on.
X To switch off the main-beam headlamps:
move the combination switch back to its nor-
mal position.
The blue Kindicator lamp on the instru-
ment cluster goes out.
X High-beam flasher: pull the combination
switch in the direction of arrow =. Hazard warning lamps
X
To switch the hazard warning lamps on/
off: press button :.
All the indicator lamps will flash when the
hazard warnin glam ps are switched on. If you
now switch on an indicator lamp using the
combinatio nswitch ,onlyt he indicator lamp
on the corresponding side of the vehicl ewill
flash.
The hazard warning lamps switch on automati-
cally if: R an airba gisdeploye dor
R the sea tbeltt ensioner is deployed or
R the vehicl edecelerates rapidly from aspeed
of above 70 km/h and come stoastandstill
The hazard warning lamps switch off automati-
cally if the vehicl ereache saspeed of above
10 km/h agai nafteraf ullb rake application.
The hazard warning lamps continue to operate
eve nift he ignition is switched off. Headlamps miste
duponthe inside
Certain climatic and physical conditions may
caus emoisture to form in the headlamp. This
moisture does not affect the functionality of the headlamp. 76
Exterior lightingLigh
tsand windscreen wipers
Page 81 of 261
Make sure that the interior lighting does not
remain switched on too long after the engine
has been switched off.
X To switch on: press thecsymbol on
switch B(Ypage 77).
X To switch off: move switchBto the centre
position (Y page 77).
Reading lamps X To switch on/off: press the respective p
button (Y page 77).
Rear interior lighting X To switch on/off: press thetbutton
(Y page 77).
i When you open
arear side door, the rear
interior lighting switches on. Then, you cannot
switch it off using the tbutton.
If you leave the front doors open for along
time, switch the rear interior lighting off. In
this way,y ou can avoid draining the battery.
Luggage compartment lighting X To switch on/off: press thetbutton
(Y page 77).
i If you open the rear door, the luggagec
om-
partment lighting switches on. Then, you can-
not switch it off using the tbutton.
If you leave the rear door open for along time,
switch the luggagec ompartmentlighting off.
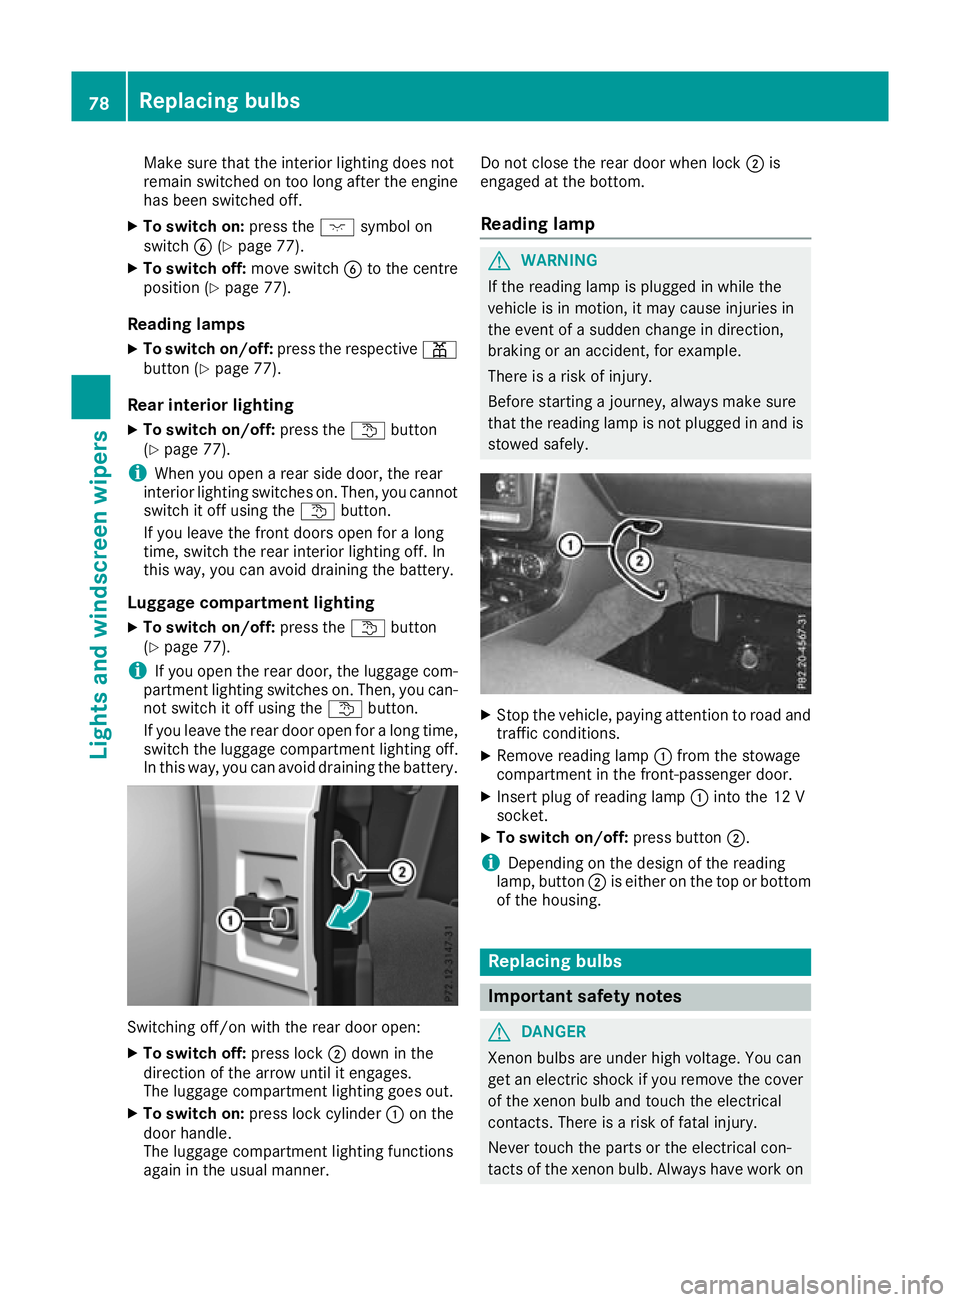
In this way,y ou can avoid draining the battery. Switching off/on with the rear door open:
X To switch off: press lock;down in the
direction of the arrow until it eng ages.
The luggage compartment lighting goe sout.
X To switc hon:press lock cylinder :on the
doo rhandle.
The luggage compartment lighting functions
agai nint he usua lmanner. Do not close the rea
rdoorw henlock ;is
engaged at the bottom.
Readin glamp G
WARNING
If the reading lamp is plugged in while the
vehicl eisinm otion, it may caus einjurie sin
the event of asudden change in direction,
braking or an accident, for example.
There is arisk of injury.
Before starting ajourney ,alwaysm ake sure
that the reading lamp is not plugged in and is stowed safely. X
Stop the vehicle, paying attentio ntoroada nd
traffic conditions.
X Remove reading lamp :from the stowage
compartment in the front-passenger door.
X Insert plug of reading lamp :into the 12 V
socket.
X To switc hon/off: press button ;.
i Depending on the desig
nofthe reading
lamp, button ;is either on the top or bottom
of the housing. Replacing bulbs
Importan
tsafety notes G
DANGER
Xenon bulbs are under high voltage. You can
get an electric shock if you remove th ecover
of th exenon bulb and touch th eelectrical
contacts. There is ariskoff atal injury.
Never touch th epartsort heelectrical con-
tacts of th exenon bulb. Always hav eworkon 78
Replacing bulbsLights
and windscreen wipers
Page 84 of 261
X
Turn the respective bulb anti-clockwise,
applying slight pressure, and pull it out of the
bulb holder.
X Insert the new bulb into the bulb holder and,
applying slight pressure, turn it clockwise
until it engages.
X Fit lens ;.
X Tighten screws :.
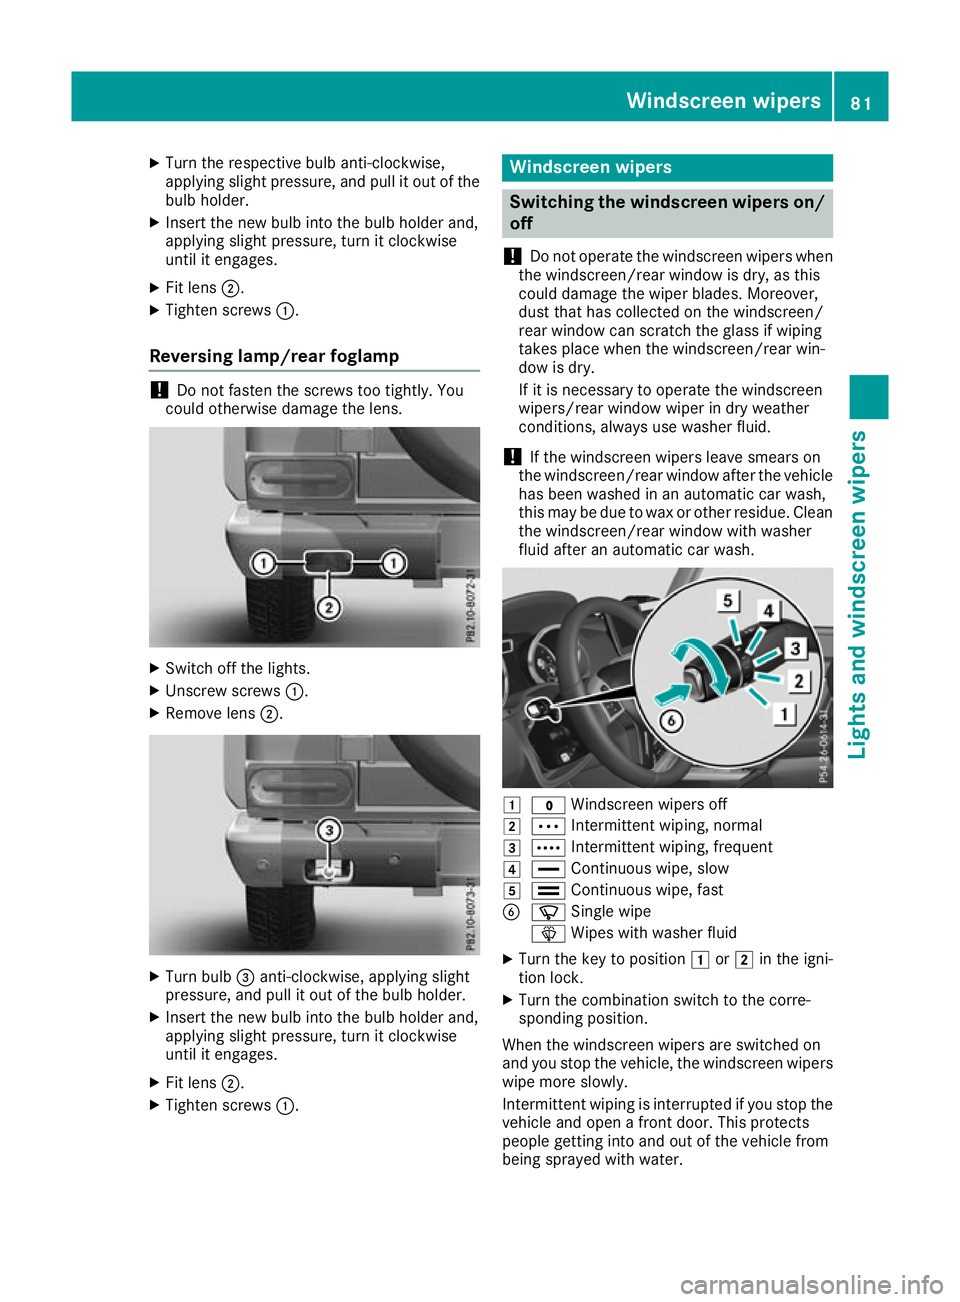
Reversing lamp/rear foglamp !
Do not fasten the screws too tightly. You
could otherwise damage the lens. X
Switch off the lights.
X Unscrew screws :.
X Remove lens ;. X
Turn bulb =anti-clockwise, applying slight
pressure, and pull it out of the bulb holder.
X Insert the new bulb into the bulb holder and,
applying slight pressure, turn it clockwise
until it engages.
X Fit lens ;.
X Tighten screws :. Windscreen wipers
Switching the windscreen wipers on/
off
! Do not operate the windscreen wipers when
the windscreen/rear window is dry, as this
could damage the wiper blades. Moreover,
dust that has collected on the windscreen/
rear window can scratc hthe glass if wiping
takes place when the windscreen/rear win-
dow is dry.
If it is necessary to operate the windscreen
wipers/rear window wiper in dry weather
conditions, always use washer fluid.
! If the windscreen wipers leave smears on
the windscreen/rear window after the vehicle has been washed in an automatic car wash,
this may be due to wax or other residue. Clean
the windscreen/rear window with washer
fluid after an automatic car wash. 1
$ Windscreen wipers off
2 Ä Intermittent wiping, normal
3 Å Intermittent wiping, frequent
4 ° Continuous wipe, slow
5 ¯ Continuous wipe, fast
B í Single wipe
î Wipes with washer fluid
X Turn the key to position 1or2 in the igni-
tion lock.
X Turn the combination switch to the corre-
sponding position.
When the windscreen wipers are switched on
and you stop the vehicle, the windscreen wipers
wipe more slowly.
Intermittent wiping is interrupted if you stop the
vehicle and open afron tdoor. This protects
people getting into and out of the vehicle from
being sprayed with water. Windscreen wipers
81Lightsand windscreen wipers Z
Page 85 of 261
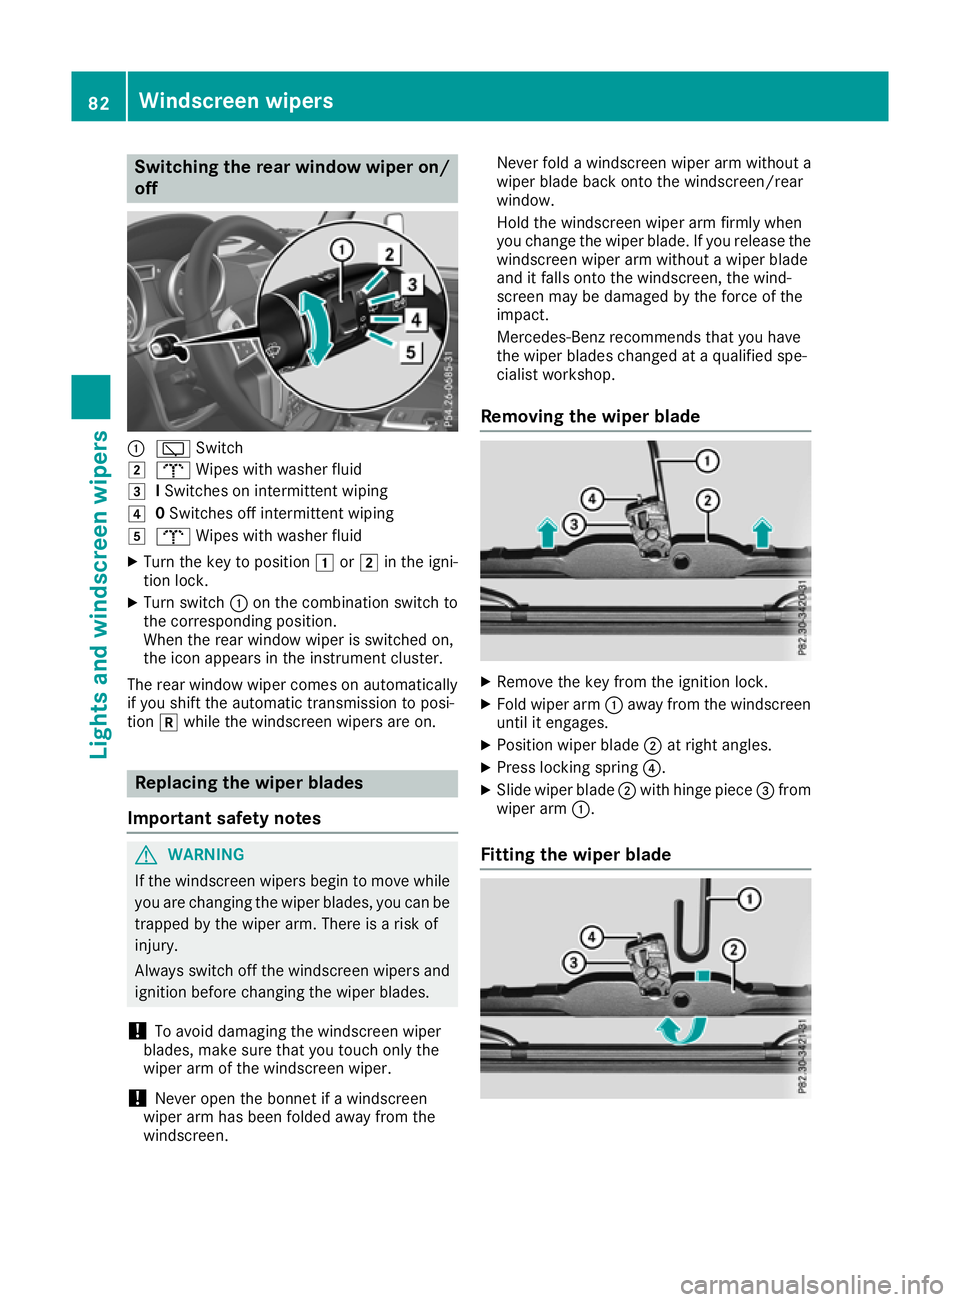
Switching the rear window wiper on/
off :
è Switch
2 b Wipes with washer fluid
3 ISwitches on intermittent wiping
4 0Switches off intermittent wiping
5 b Wipes with washer fluid
X Turn the key to position 1or2 in the igni-
tio nlock.
X Turn switch :on the combination switch to
the corresponding position.
Whe nthe rea rwindow wiper is switched on,
the ico nappears in the instrument cluster.
The rea rwindow wiper come sonautomatically
if yo ushift the automatic transmissio ntoposi-
tion kwhil ethe windscreen wiper sare on. Replacing the wiper blades
Important safety notes G
WARNING
If the windscreen wipers begi ntomove while
you are changing the wiper blades, you can be trappe dbythe wiper arm. There is arisk of
injury.
Always switch off the windscreen wipers and
ignitio nbefore changing the wiper blades.
! To avoi
ddamaging the windscreen wiper
blades, make sure that you touch only the
wiper arm of the windscreen wiper.
! Never open the bonnet if
awindscreen
wiper arm has been folde dawayfrom the
windscreen. Never fold
awindscreen wipera rm withouta
wiperb ladeback onto the windscreen/rear
window.
Hold the windscreen wipera rm firmly when
you change the wiperb lade. If you release the
windscreen wipera rm withoutawiperblade
and it falls onto the windscreen, the wind-
screen may be damaged by the force of the
impact.
Mercedes-Benz recommends that you have
the wiperb lades changed at aqualifieds pe-
cialist workshop.
Removing the wiper blade X
Remove the key from the ignitio nlock.
X Fold wiper arm :away from th ewindscreen
until it engages.
X Position wiper blade ;at right angles.
X Press lockin gspring ?.
X Slide wiper blade ;withhinge piece =from
wiper arm :.
Fitting th ewiper blade 82
Windscreen wipersLight
sand windscreen wipers
Page 86 of 261
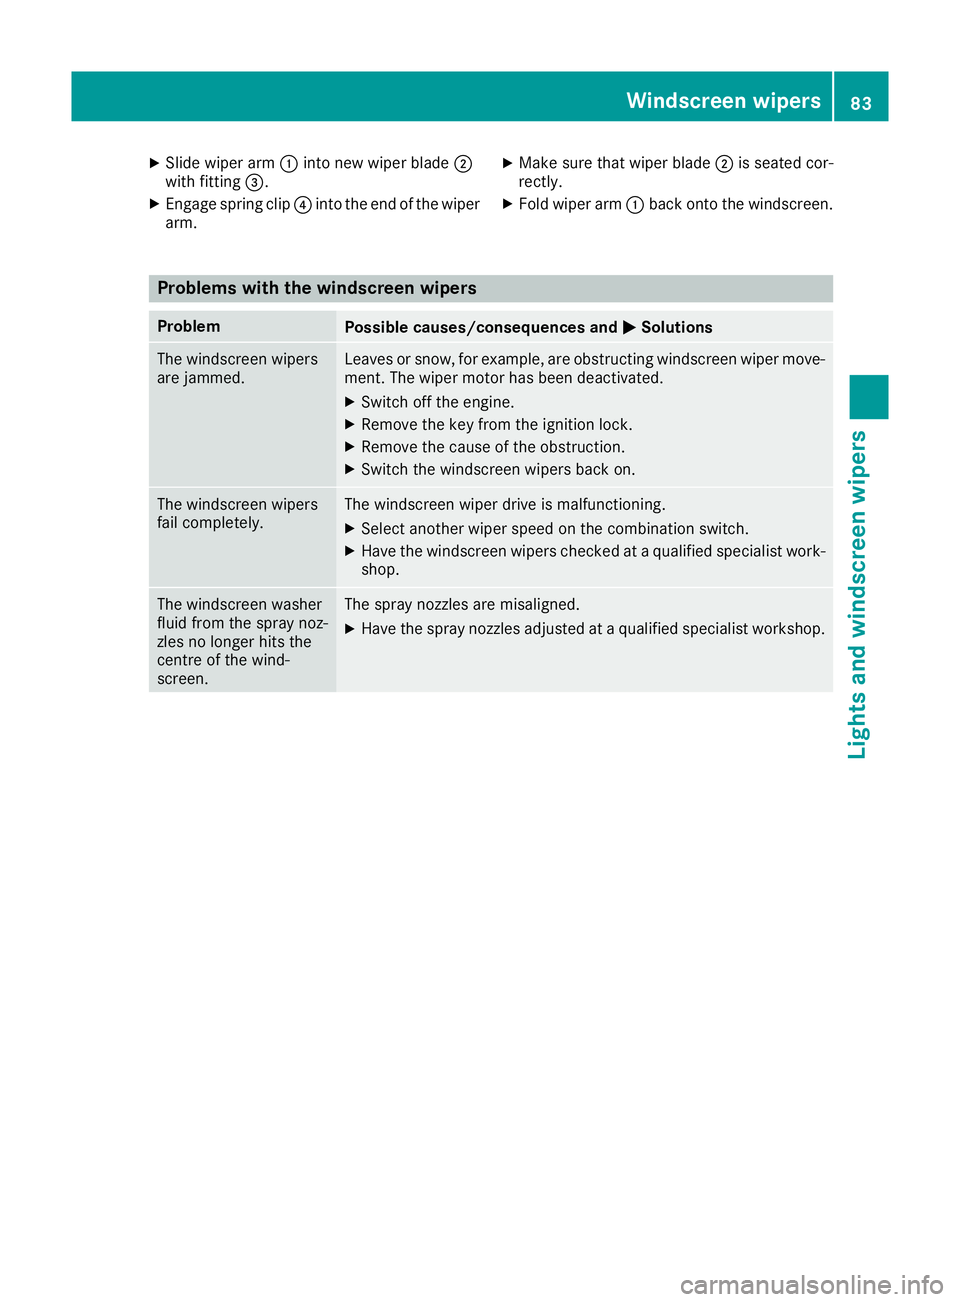
X
Slide wiper arm :into new wiper blade ;
with fitting =.
X Engag espring clip ?into the end of the wiper
arm. X
Mak esure that wiper blade ;is seated cor-
rectly.
X Fold wiper arm :back onto the windscreen. Problems with the windscreen wipers
Problem
Possible causes/consequences and
M
MSolutions The windscreen wipers
are jammed. Leaves or snow, for example, are obstructing windscreen wiper move-
ment. The wiper motor has been deactivated.
X Switch off the engine.
X Remove the key from the ignition lock.
X Remove the cause of the obstruction.
X Switch the windscreen wipers back on. The windscreen wipers
fail completely. The windscreen wiper drive is malfunctioning.
X Select another wiper speed on the combination switch.
X Have the windscreen wipers checked at aqualified specialist work-
shop. The windscreen washer
fluid from the spray noz-
zles no longer hits the
centre of the wind-
screen. The spray nozzles are misaligned.
X Have the spray nozzles adjusted at aqualified specialist workshop. Windscreenw
ipers
83Lightsand windscreen wipers Z
Page 92 of 261
Activating/deactivating air-recircula-
tion mode
Genera lnotes If yo
uactivate air-recirculation mode, the win-
dows can mist up more quickly, particularly at
low temperatures. Use air-recirculation mode
only briefl ytoprevent the window sfrom misting
up.
Activating/deactivating X
Turn the key to position 2(Ypage 96) in
the ignition lock.
X To activa te:press the dbutton.
The indicator lamp in the dbutton lights
up.
i Air-recirculation mode is automatically acti-
vated at high levels of pollution or at high out-
side temperatures. When air-recirculation
mode is activated automatically, the indicator
lamp in the dbutton is not lit.
Outside air is added after about 30 minutes.
X To deactivate: press thedbutton.
The indicator lamp in the dbutton goes
out.
i Air-recirculation mode is deactivated auto-
matically:
R after approximately five minutes at outside
temperatures below approximately 5†
R after approximately five minutes if "Cooling
with air dehumidification" is deactivated
R after approximately 30 minutes at outside
temperatures above approximately 5†Switching the residual heat on/off
General notes It is possible to make use of the residual heat of
the engine to continue heating the stationary
vehicle for up to 30 minutes after the engine has
been switched off. The heating time depends on
the set interior temperature. Switching on/off X
Turn the key to position g(Ypage 96) in
the ignition lock or remove it.
X To switch on: press theÁbutton.
The indicator lamp in the Ábutton lights
up.
i The blower will run at
alow speed regardless
of the airflow setting.
i If you switch on the residual heat function at
high temperatures, only the ventilation will be
activated.
X To switch off: press theÁbutton.
The indicator lamp in the Ábutton goes
out.
Residua lheat is switched off automatically:
R after approximately 30 minutes
R when the ignition is switched on
R if the battery voltage drops
R if the coolant temperature is too low
R when the auxiliary heating is switched on Auxiliary heating
Important safety notes G
DAN
GER
If th eexhaust pipe is blocke dorsufficient
ventilation is no tpossible, toxic exhaust
fumes can ente rthe vehicle, especially car-
bon monoxide. This is th ecase, e.g. in
enclosed spaces, or if th evehicl eiss tuck in
snow. There is ariskoff atal injuries.
You should switch off th eauxiliary heating in
enclosed spaces whic hdonothav eane xtrac-
tion system, e.g. agarage. If th evehicl eis
stuck in snow and you mus tleav ethe auxiliary
heating running, keep th eexhaust pipe and
th ea rea around th evehicl eclear of snow. To
guarantee asufficien tsupply of fresh air, open
aw indow on th eside of th evehicl eaway from
th ew ind. G
WARNING
When th eauxiliary heating is switched on,
parts of the vehicl ecan become very hot. Operating the climate control system
89Climate control
Z
Page 95 of 261
appear
sontheremot econtrol display and the
runnin gtimeisz erom inutes.
Settin gthe departure time
Mak esure that th etimes et in th evehicle is
correc tbefore settin gthe departur etime.O th-
erwise, th eauxiliary heating may activat eatthe
wron gtimea nd at an unsuitable location. When
settin gthe departur etime, also observ ethe
important safety note s(Ypage 89).
X Briefly pres sthe u button.
X Pres sthe , or. button repeatedly
until th etimetobec hanged appear sonthe
display.
X Pres sthe u and^ button satthesame
time.
The Îsymbo lontheremot econtrol display
flashes.
X Pres sthe , or. button to set the
desired departur etime.
i The longer you pres
sthe , or. but-
ton, th efaster th etimec hanges.
X Pres sthe u and^ button satthesame
time.
The new departur etimeiss tored.
Activating th eset departure time
X Briefly pres sthe u button.
X Pres sthe , or. button repeatedly
until th edesired departur etimea ppear son
th ed isplay.
X Pres sthe u button.
The Ísymbol, th edepartur etimea nd,
dependin gontheselecte ddepartur etime,
th el etter A, BorCappear sonthedisplay.
Deactivatin gthe set departure time
X Briefly pres sthe u button.
The status of th eauxiliary heating is show non
th ed isplay.
X Pres sthe . button.
The first departur etim es toreda ppear sonthe
display.
X Pres sthe ^ button.
OFF is show nontheremot econtrol display. Replacing th
ebatterie sinthe remote
control Importan
tsafety notes G
WARNING
Batterie scontain toxic and corrosive substan-
ces. If batterie sare swallowed,itc an result in
severe health problems. There is arisk of fatal
injury.
Keep batterie sout of the reach of children. If
ab attery is swallowed,s eek medical attention
immediately. H
Environmental note Batteries contain pollutants.
It is illegal to dispose of them
with the household rubbish.
They must be collected sep-
arately and disposed of in anenvironmentall yresponsible
recycling system. Dispose of batteries in an
environmentall
yresponsible
manner. Take discharged
batteries to aquali fied spe-
cialist workshop or to acol-
lectio npoint for used batter-
ies.
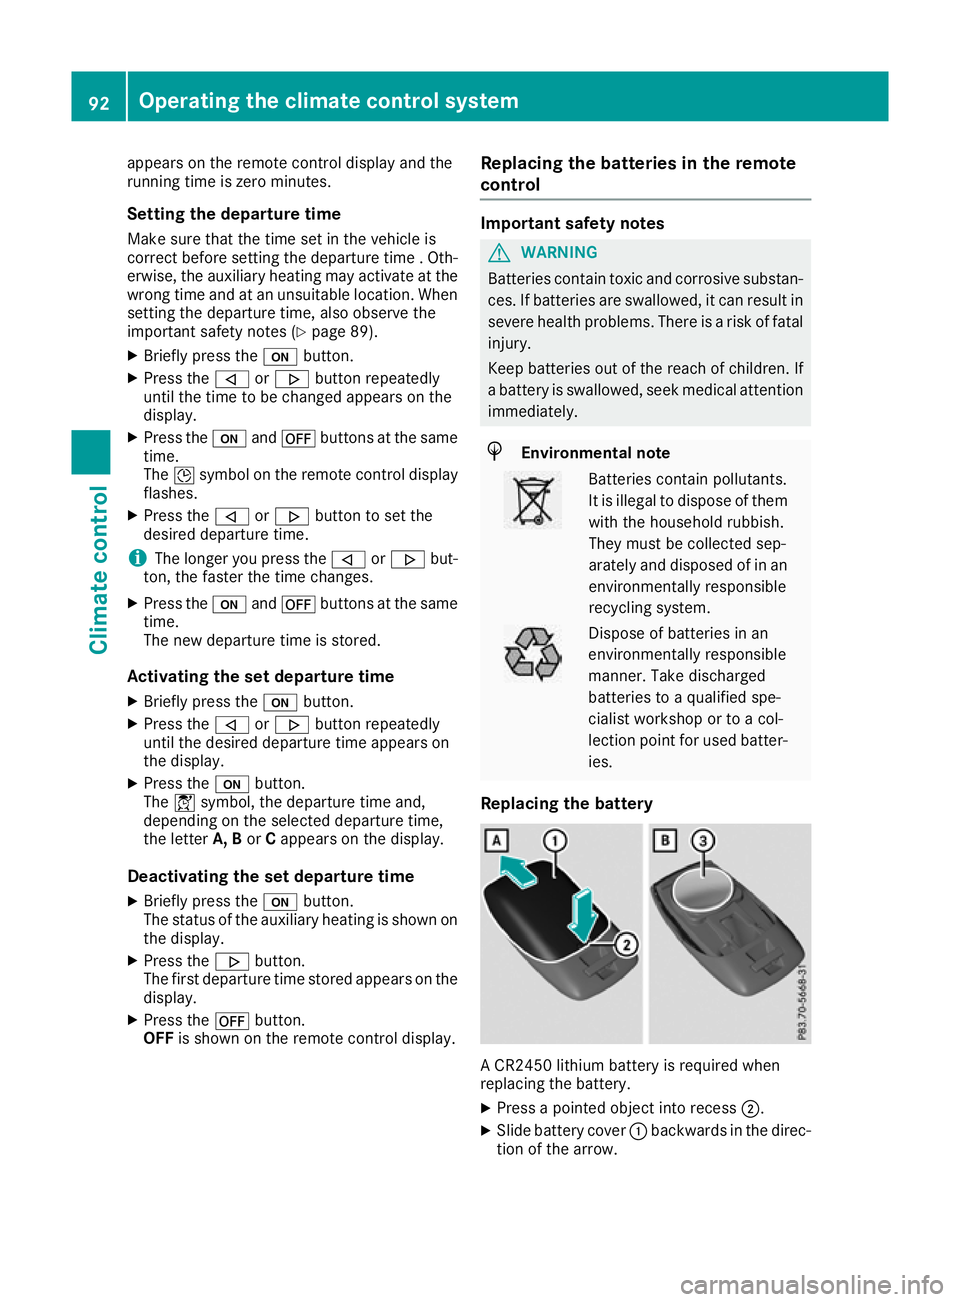
Replacin gthe battery AC
R2450 lithium battery is required when
replacing the battery.
X Press apointe dobject into recess ;.
X Slide battery cover :backwards in the direc-
tio noft he arrow. 92
Operatin
gthe climat econtrol systemClimat econt rol