check engine light MERCEDES-BENZ G-CLASS SUV 2016 Owners Manual
[x] Cancel search | Manufacturer: MERCEDES-BENZ, Model Year: 2016, Model line: G-CLASS SUV, Model: MERCEDES-BENZ G-CLASS SUV 2016Pages: 261, PDF Size: 6.01 MB
Page 10 of 261
Setting the airflow ........................... 87
Setting the temperature .................. 86
Switching air-recirculation mode
on/of
f.............................................. 89
Switching on/of f.............................. 85
Switching residua lheato n/of f........ 89
Switching the rea rwindow heat-
ing on/of f........................................ 88
Switching the ZONE function
on/of f.............................................. 87
THERMATI Cautomatic climate
control (2-zone) ............................... 84
Cloc k(on-board computer) ............... 138
Cockpit
Overview .......................................... 25
COMAND display
Cleaning ......................................... 220
Combination switch ............................ 76
Constant headlamp mode
see Daytime driving lights
Consumptio nstatistics (on-board
computer) .......................................... 134
Coolant (engine)
Checking the level ......................... 215
Displa ymessage ............................ 146
Note s............................................. 253
Temperature gaug e........................ 131
Warning lamp ................................. 162
Cooling
see Climate control
Copyright ............................................. 24
Correc tuse ........................................ 165
Cup holder
Important safety notes .................. 206 D
Data seeT echnica ldata
Dat e(on-board computer) ................ 138
Daytime drivin glights
Displa ymessage ............................ 145
Switchin gon/of f(on-boar dcom-
puter) ............................................ .138
Switching on/off (switch) ................ 74
Declaration of conformity (multi-
media system) ................................... 165
Declarations of conformity ................. 22Delaye
dswitch-off
Exterio rlighting (on-boar dcom-
puter) ............................................ .138
Interior lighting .............................. 139
Destination
Entering ......................................... 182
Entering by address ....................... 182
Entering from destination mem-
ory ................................................. 183
Entering from the last destina-
tions .............................................. 183
Entering using the map .................. 184
Route guidance .............................. 187
Saving ............................................ 187
Selecting from points of interest ... 183
Diagnostic sconnection ..................... .23
Diesel .................................................. 251
Diesel particle filter .......................... 115
Differential lock
Disengaging .................................. .127
Front axle ...................................... 126
General notes ................................ 125
Rea raxle ........................................ 126
Transfe rcase ................................. 126
Differential locks ............................... 125
Engaging ........................................ 126
Terrain .......................................... .125
Digital speedometer ......................... 134
Dipped-beam headlamp
Switching on/off .............................. 74
Dipped-beam headlamps
Display message ............................ 145
Setting for driving abroad (sym-
metrical) .......................................... 74
Display message
ASSYST service interva ldispla y..... 215
Driving systems ............................ .149
Display messages
Calling up (on-board computer) ..... 141
Engine ............................................ 146
General information ....................... 141
Hiding (on-board computer) ........... 141
Key ................................................ 155
Lights ............................................. 145
Safety systems .............................. 142
Tyres .............................................. 150
Vehicle .......................................... .153 Index
7
Page 12 of 261
Electromagnetic compatibility
Declaratio nofconformit y................ 22
Emergenc ycall9 99 or 112 .............. 179
Emergenc ykey
Unlocking the driver' sdoor.............. 62
Emergenc ykey element
Function/note s................................ 58
Genera lnotes .................................. 58
Inserting .......................................... 59
Locking vehicl e................................ 62
Removing ......................................... 58
Emergenc yrelease
Driver's doo r.................................... 62
Emergenc yunlocking
Vehicl e............................................. 62
Engine
Displa ymessage ............................ 146
ECO start/stop function .................. 97
Engine number ............................... 250
Jump-starting ................................. 227
Running irregularly ......................... 100
Starting problems .......................... 100
Starting the engine with the key ...... 96
Stopping ........................................ 114
Tow-starting (vehicle )..................... 232
Warning lamp (engine diagnos-
tics) ............................................... 162
Engine electronics
Note s............................................. 248
Problem (fault) ............................... 100
Engine oil
Additives ........................................ 253
Checking the oi llev el ..................... 213
Checking the oi llev el using the
dipstick .......................................... 213
Checking the oi llev el using the
on-board compute r........................ 213
Displa ymessage ............................ 147
Filling capacity ............................... 253
Genera lnotes ................................ 252
Note sabout oilg rade s................... 252
Note sono illevel/consumption .... 213
Topping up ..................................... 213
Entering an address .......................... 182
Entering the town .............................. 182
Environmental protection
Returning an end-of-life vehicl e....... 20 ESP
®
(Electroni cStability Pro-
gram)
Characteristics ................................ .54
Deactivating/activating ................... 54
Display message ............................ 142
Function/note s................................ 53
Genera lnotes .................................. 53
Important safety guideline s............. 54
Trailer stabilisation .......................... 55
Warning lamp ................................. 159
ETS/4ETS (Electroni cTraction Sys-
tem) ...................................................... 54
Exhaust
see Exhaus tpipe
Exhaus tpipe
Cleaning ......................................... 219
Exterior lighting
Cleaning ......................................... 219
see Lights F
Factor ysettings ................................ 173
Fault message
see Display messages
File formats ........................................ 178
Filler cap
see Fuel fille rflap
Fire extinguisher .............................. .222
First-aid kit ......................................... 222
Fitting awheel
Fitting awheel ............................... 245
Lowering the vehicle ..................... .246
Preparing the vehicle ..................... 243
Raising the vehicle ......................... 244
Removing awheel .......................... 245
Securing the vehicle against roll-
ing away ........................................ 244
Flat tyre
Changing awheel/fitting the
spare wheel ................................... 243
Preparing the vehicle ..................... 224
Foldin gthe seat backrest (rear)
forwards/back .................................. 201
Frequencies
Mobile phone ................................. 248
Two-way radio ................................ 248 Index
9
Page 14 of 261
Interior lighting
.................................. .77
Automatic contro lsystem ................ 77
Delayed switch-off (on-board
computer) ...................................... 139
Luggage compartment lighting ........ 78
Manua lcontro l................................. 77
Overview .......................................... 77
Reading lamp ................................... 78
Rear interio rlighting ........................ 78
iPod ®
and iPhone ®
Audio playback .............................. 178
ISOFIX chil dseats ecur ings ystem .... 40 J
Jack Declaration of conformity ................ 22
Pump leve r.....................................2 44
Storage location ............................ 223
Using ............................................. 244
Jump starting (engine) ......................227 K
Key Changing the battery ....................... 59
Checki ngtheb attery ...................... .59
Display message ............................ 155
Doo rcentral locking/unlocking ....... 57
Emergency key element ................... 58
Important safety note s.................... 57
Los s................................................. 60
Modifying the programming ............. 58
Overview .......................................... 57
Positions (ignition lock) .................... 96
Problem (malfunction) ..................... 60
Starting the engine .......................... 96
Ke yp ositions
Key .................................................. 96 L
Language (on-board computer) ........ 138
Lashin geyelets ................................ .203
Licenc eplate lamp (display mes-
sage) ................................................... 145
Light sensor (display message) ....... 145Lights
Activating/deac tivating th einte-
rior lighting delayed switch-off ...... .139
Automatic headlamp mode .............. 75
Combination switch ......................... 76
Dipped-bea mheadlamps ................. 74
Driving abroad ................................. 74
General notes .................................. 74
Hazard warning lamps ..................... 76
Headlamp flasher ............................ .76
Light switch .....................................74
Main-beam headlamps ..................... 76
Misted up headlamps ....................... 76
Parking lamps ..................................75
Rear foglamp .................................. .75
Sid elam ps ....................................... 75
Switching the daytime driving
lights on/of f(on -board com-
puter) ............................................. 138
Switching the daytime driving
lights on/of f(switch) ....................... 74
Switching the exterio rlighting
delaye dswitch-off on/of f(on-
board computer) ............................ 138
Switching the surround lighting
on/of f(on -board computer) .......... 138
Turn signal s..................................... 76
see Interior lighting
see Replacing bulbs
Loadin gguidelines ............................ 198
Locking
see Central locking
Locking (doors)
Automati c........................................ 62
Emergency locking ........................... 62
From inside (central locking but-
ton) .................................................. 62
Locking centrally
see Central locking
Locking verification signal (on-
board computer) ............................... 139
LO WR ANGE off-road gear ................ 124
Luggag ecom partment cover
Fitting/removing ........................... 204
Important safety notes .................. 203
Notes/function .............................. 203
Opening and closing ...................... 203 Index
11
Page 34 of 261
Occupant safety
Introduction to the restraint system
The restraint system can reduce the risk of vehi- cle occupant scom ingi ntoc ontac twithp artsof
th ev ehicle's interio rintheevent of an accident.
The restrain tsystem can also reduce th eforces
to whic hvehicl eoccupant sare subjecte dduring
an accident.
The restrain tsystem includes the:
R seat belt system
R airbags
R child restrain tsystem
R child seat securin gsystem
The component softherestrain tsystem wor kin
conjunction wit heacho ther.T hey can only offer
protection if all vehicl eoccupant salways:
R have th eseat belt correctl yfastened
(Y page 33)
R have th eseat and head restrain tadjusted
properly (Y page 67)
As th edriver, you must also mak esuret hatthe
steering whee lisalso adjusted properly.
Observ ethe information on th ecorrect driver's
seat position (Y page 67).
In addition ,you must mak esuret ha tthe airbags
can inflat eproperly if they are deployed
(Y page 36).
An airbag supplement sacorrectly wornseat
belt .Asana dditional safet ydevice ,the airbag
increases th elevel of protection for vehicle
occupant sintheevent of an accident. The air-
bags are no tdeployed, for example, in th eevent
of an acciden tinwhichs ufficien tprotection is
offere dbytheseat belt .Inaddition ,onlyt ho se
airbags, whic hintheapplicable acciden tsitua-
tion soffer additional protection ,are deployed in
th ee vent of an accident. However, th eseat belt
and airbag generally do no tprotect against
objects penetrating th evehicl efromt heout-
side.
Information on how th erestrain tsystem oper-
ate scan be foun dunder "Deploymen tofbelt
tensioners and airbags" (Y page 37).
Se e" Children in th evehicle" for information on
children travellin gwithy ou in th evehicl easw ell
as on child restrain tsystems (Y page 38). Important safety notes
G
WARNING
If th erestraint system is modified, it may no
longer work as intended. The restraint system
may then not perform its intended protective function by failing in an accident or triggering
unexpectedly,f or example. There is an
increased risk of injury ,possibly even fatal.
Never modify parts of the restraint system. Do not attempt to modify the wiring as wellas
electronic components or their software.
If it is necessary to adjust the vehicl etoaccom-
modate aperso nwith disabilities, contact a
qualified specialist workshop. Mercedes-Benz
recommends that you use aMercedes-Benz
Service Centre for this. Restraint system warnin
glamp
The functions of the restraint system are
checke dafterthe ignition is switched on and at
regular interval swhile the engine is running.
Therefore, malfunctions can be detected in
goo dtime.
The 6 restraint system warning lamp on the
instrument cluster lights up when the ignition is switched on. It goe soutno later than afew sec-
onds afte rthe vehicl eisstarted. The compo-
nents of the restraint system are in operational
readiness.
Am alfunction ha soccurred if the 6restraint
system warning lamp:
R doe snot light up afte rthe ignition is switched
on
R doe snot go ou tafte raf ew seconds with the
engine running
R lights up agai nwhile the engine is running G
WARNING
If the restra ints ystem is malfunctioning,
restraint system components may be trig-
gered unintentionally or may not deploy as
intended during an accident. This may affect
the seat beltt ensioner or airbag, for example.
This poses an increased risk of injury or even
fatal injury. Occupant safety
31Safety
Z
Page 55 of 261
Pets in the vehicle
G
WARNING
If you leave animals unsupervised or unse-
cured in the vehicle, they may push abutton
or as witch, for example.
They could:
R activate vehicl eequipment and become
trapped, for example
R switch vehicl esystems on or off, thus
endangering other road users
In the event of an accident, sudden braking or
abrupt changes of direction, unsecured ani-
mals coul dbeflung around the vehicle, injur-
ing the vehicl eoccupants. There is arisk of an
accident and injury.
Never leave animals unattended in the vehi-
cle. Always secure animals correctly during a
journey ,e.g. in an anima ltransport box. Driving safe
tysystems Drivin
gsafet ys ystems overview
In this section ,you will fin dinformati on about
th ef ollowin gdrivin gsafet ysystems:
R AB S(Anti-lock Braking System)
(Y page 52)
R BA S(Brake Assist System) (Y page 53)
R Adaptive brake lights (Y page 53)
R ESP ®
(Electronic Stability Program)
(Y page 53)
R EB D( electronic brak eforce distributi on)
(Y page 55)
R ADAPTIV EBRAKE (Y page 56) Important safety notes
If you fail to adapt your driving style or if you are
inattentive, th edriving safet ysystems can nei-
ther reduce th eriskofana ccidentnor override
th el aws of physics .Drivin gs afet ysystems are
merely aids designed to assist driving .You are
responsible for maintainin gthe distanc etothe
vehicl einfront,for vehicl espeed, for braking in
goo dtime, and for staying in lane. Always adapt
your driving style to suit th eprevailing road and weather conditions and maintain
asafe distance
fro mt hevehicle in front .Drive carefully.
The driving safet ysystems described work as
effectively as possible only when there is ade-
quate contac tbetween th etyres and th eroad
surface. Pay particular attention to th einforma-
tio nr egarding tyres, recommended minimum
tyr etread depths etc .inthe"Wheels and tyres"
sectio n(Ypage 235).
In wintry driving conditions ,always use winter
tyres (M+S tyres) and, if necessary, snow
chains. Only in this way will th edriving safety
systems described in this sectio nwork as effec-
tively as possible. ABS (Anti-lock Braking System)
Genera linformation AB
Sregulate sbrake pressure in such awaythat
the wheels do not lock when yo ubrake. This
allows yo utocontinue steering the vehicl ewhen
braking.
The yellow !ABS warning lamp in the instru-
ment cluster lights up when the ignition is
switched on. It goe soutwhen the engine is run-
ning.
ABS works from aspeed of abou t8km/h,
regardless of road-surface conditions. ABS
works on slippery surfaces ,evenw heny ou
brake onl ygently.
Important safety notes i
Observ
ethe "Important safety notes" sec-
tion (Y page 52). G
WARNING
If ABS is faulty, the wheels could lock when
braking. The steerability and braking charac-
teristics may be severely impaired.A ddition-
ally, further driving safety systems are deac-
tivated. There is an increased dange rofskid-
ding and accidents.
Drive on carefully.H ave ABS checked imme-
diately at aqualified specialist workshop.
If ABS is malfunctioning, other systems ,includ-
ing driving safety systems ,willa lsob ecome
inoperative. Observe the information on the ABS warning lamp (Y page158) and display mes- 52
Driving safety systemsSafety
Page 57 of 261
4ETS (Electronic Traction System)
i
Observ
ethe "Important safety notes" sec-
tion (Y page 52).
4ETS traction control is part of ESP ®
.
4ETS traction control is no longer active above a
speed of approximately 60 km/h.
Traction control brakes the drive wheels indi-
vidually if they spin. This enables you to pull
awaya nd accelerate on slippery surfaces, e.g. if
the road surface is slippery on one side. In addi-
tion, more drive torque is transferred to the
wheel or wheels with traction.
Traction control remains active if you deactivate
ESP ®
.
Important safety notes i
Observe the "Important safety notes" sec-
tion (Y page 52). G
WARNING
If ESP ®
is malfunctioning, ESP ®
is unable to
stabilise the vehicle. In addition, other driving
safety systems are switched off. This increa-
ses the risk of skidding and an accident.
Drive on carefully.H ave ESP®
checked at a
qualified specialist workshop.
! Only operate the vehicl
efor am aximu mof
ten seconds on abrake dynamometer. Switch
off the ignition.
Application of the brakes by ESP ®
may oth-
erwise destroy the brake system.
! Af
unction or performance test should only
be carrie dout on atwin-axle dynamometer.
Before you operate the vehicl eonsuch a
dynamometer, please consult aqualified
workshop. You coul dotherwise damage the
drive train or the brake system.
If the å ESP®
OFF warning lamp lights up
continuously,E SP®
is deactivated.
If the ÷ ESP®
warning lamp lights up contin-
uously,E SP®
is not available due to amalfunc-
tion.
Observe the information on warning lamps
(Y page1 59) and display messages which may
be displayed in the instrument cluster
(Y page1 42). Use only wheels with the recommended tyre
sizes. Only then will ESP ®
functio nproperly.
If differential locks are switched on, ABS,B AS
and ESP ®
switch off automatically.
Characteristics of ESP ® General information
If the ÷ ESP warning lamp goes out before
you begin the journey, ESP ®
is automatically
active.
If ESP ®
intervenes,t he÷ ESP®
warning lamp
flashes on the instrument cluster.
If ESP ®
intervenes:
X Do not deactivate ESP ®
under any circum-
stances.
X When pulling away, depress the accelerator
pedalo nly as far as is necessary.
X Adapt yourd riving style to suit the prevailing
road and weather conditions.
ECO start/stop function
The ECO start/stop function switches the
engine off automaticall yifthe vehicle stops
moving. When the vehicle pulls awaya gain, the
engine starts automatically. ESP ®
remains in its
previously selected status, e.g. if ESP ®
was
deactivated before the engine was automati-
callys witched off.
Deactivating/activating ESP ® Im
portant safety notes
i Observ
ethe "Importan tsafety notes" sec-
tio n(Ypage 52).
You can select between th efollowin gESP®
sta-
tuses:
R ESP ®
is activated
R ESP ®
is deactivated G
WARNING
If yo udeactivate ESP ®
,E SP ®
no longer sta-
bilises the vehicle. There is an increased risk
of skidding and an accident.
Only deactivate ESP ®
in the situations descri-
bed in the following. 54
Driving safety systemsSafety
Page 63 of 261
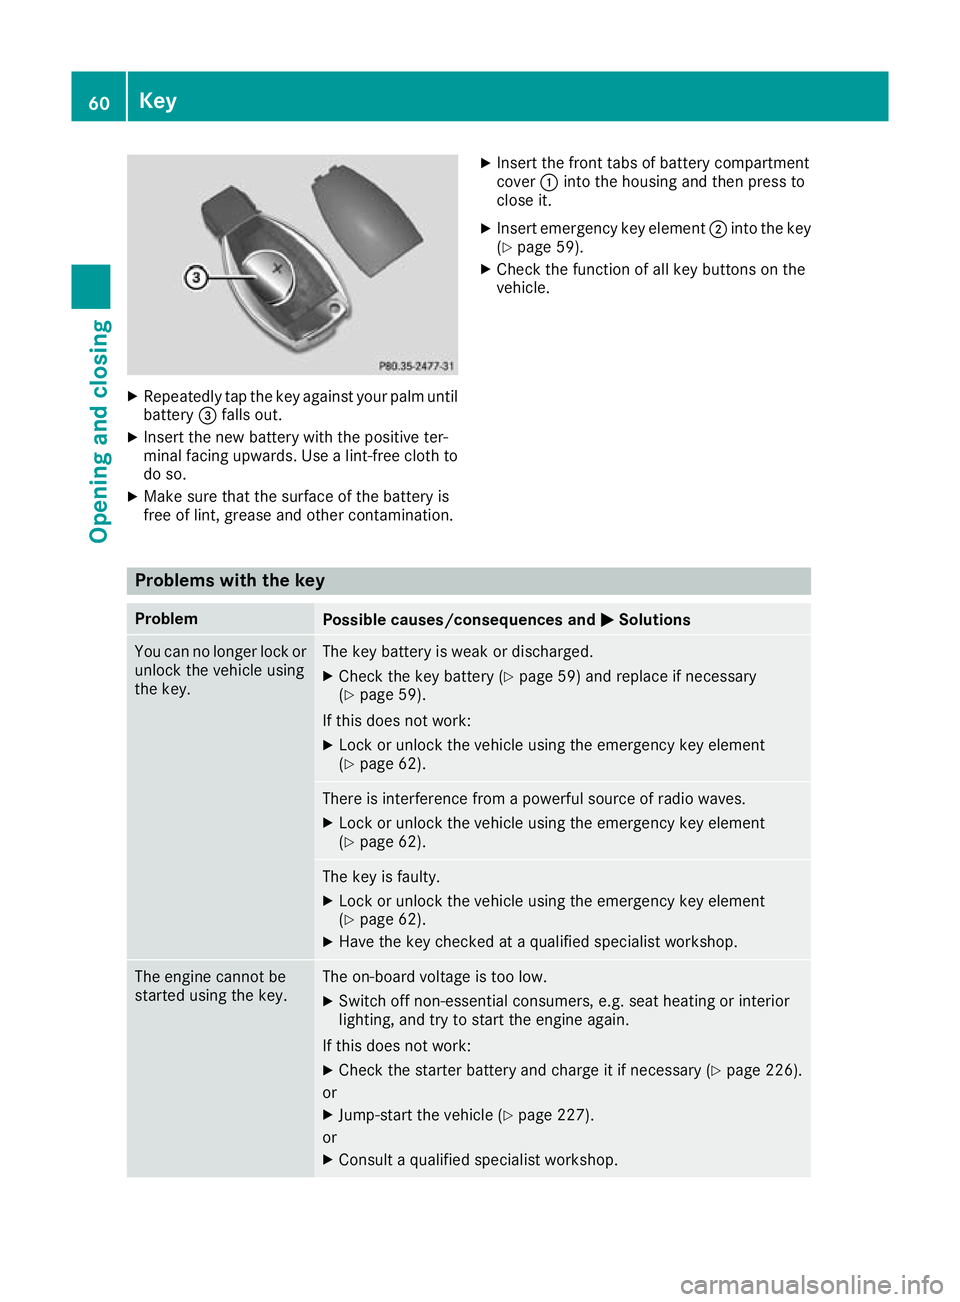
X
Repeatedly tap th ekeyagainst your palm until
battery =falls out.
X Inser tthe newb attery wit hthe positive ter-
minal facing upwards. Use alint-free cloth to
do so.
X Mak esuret hatthe surfac eofthebattery is
free of lint, grease and other contamination. X
Insert th efront tabs of battery compartment
cover :into the housing and then press to
close it.
X Insert emergency key element ;into the key
(Y page 59).
X Check the function of all key buttons on the
vehicle. Problem
swith the key Problem
Possible causes/consequences and
M MSolutions You can no longer lock or
unlock the vehicle using
the key. The key battery is weak or discharged.
X Check the key battery (Y page 59) and replace if necessary
(Y page 59).
If this does not work: X Lock or unlock the vehicle using the emergency key element
(Y page 62). There is interferenc
efrom apowerful source of radio waves.
X Lock or unlock the vehicle using the emergenc ykey element
(Y page 62). The key is faulty.
X Lock or unlock the vehicle using the emergenc ykey element
(Y page 62).
X Have the key checked at aqualified specialist workshop. The engine cannot be
started using the key. The on-board voltage is too low.
X Switch off non-essential consumers, e.g. seat heating or interior
lighting, and try to start the engine again.
If this does not work:
X Check the starter battery and charge it if necessary (Y page 226).
or X Jump-start the vehicle (Y page 227).
or X Consult aqualified specialist workshop. 60
KeyOpening and closing
Page 86 of 261
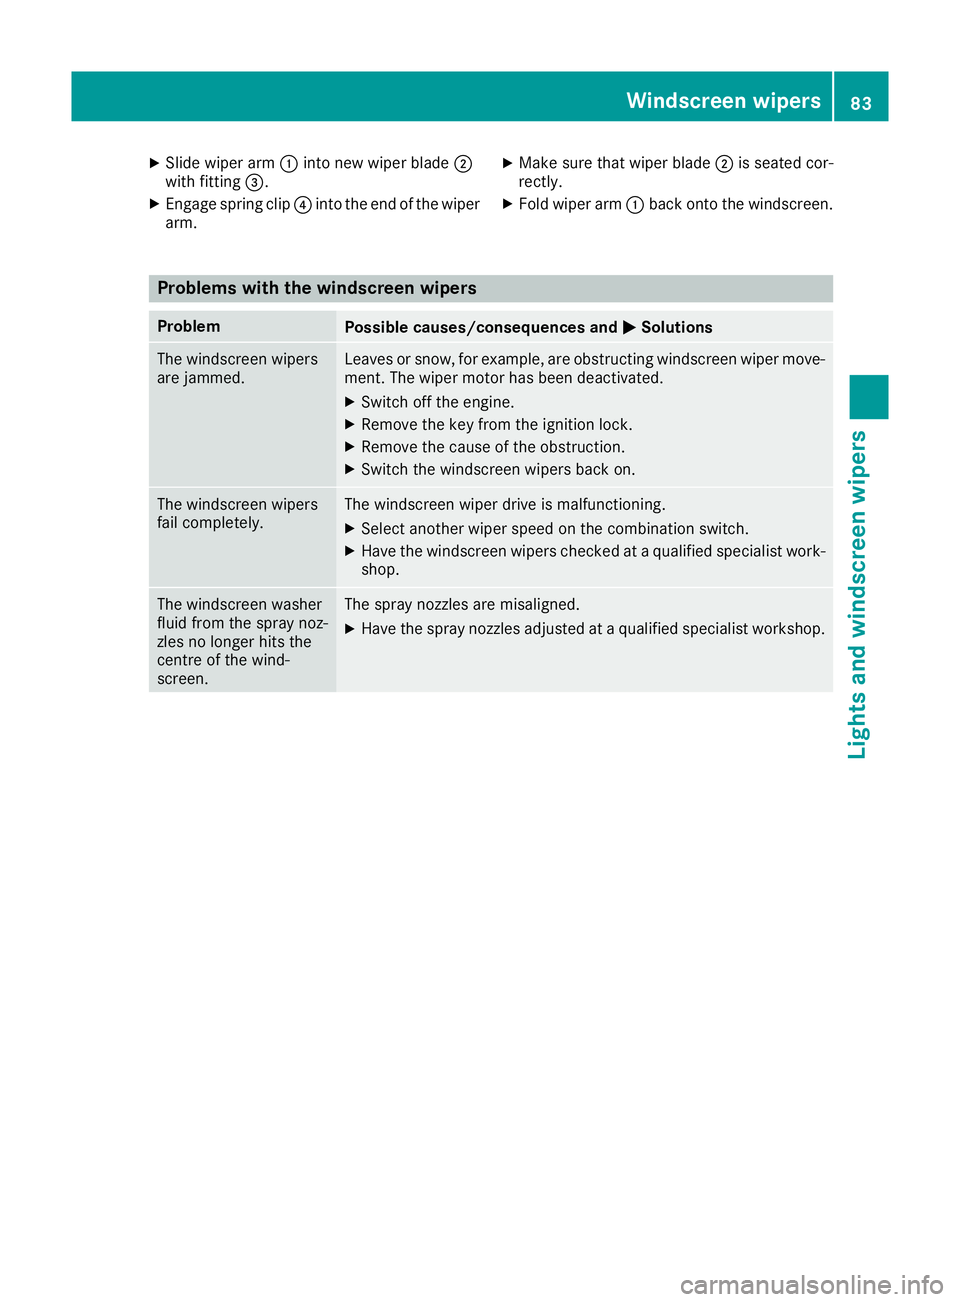
X
Slide wiper arm :into new wiper blade ;
with fitting =.
X Engag espring clip ?into the end of the wiper
arm. X
Mak esure that wiper blade ;is seated cor-
rectly.
X Fold wiper arm :back onto the windscreen. Problems with the windscreen wipers
Problem
Possible causes/consequences and
M
MSolutions The windscreen wipers
are jammed. Leaves or snow, for example, are obstructing windscreen wiper move-
ment. The wiper motor has been deactivated.
X Switch off the engine.
X Remove the key from the ignition lock.
X Remove the cause of the obstruction.
X Switch the windscreen wipers back on. The windscreen wipers
fail completely. The windscreen wiper drive is malfunctioning.
X Select another wiper speed on the combination switch.
X Have the windscreen wipers checked at aqualified specialist work-
shop. The windscreen washer
fluid from the spray noz-
zles no longer hits the
centre of the wind-
screen. The spray nozzles are misaligned.
X Have the spray nozzles adjusted at aqualified specialist workshop. Windscreenw
ipers
83Lightsand windscreen wipers Z
Page 99 of 261
!
Avoid high engine speeds when the engine
is cold. The engine's service life could other-
wise be significantly shortened. Do not use
the engine's full performance until it has
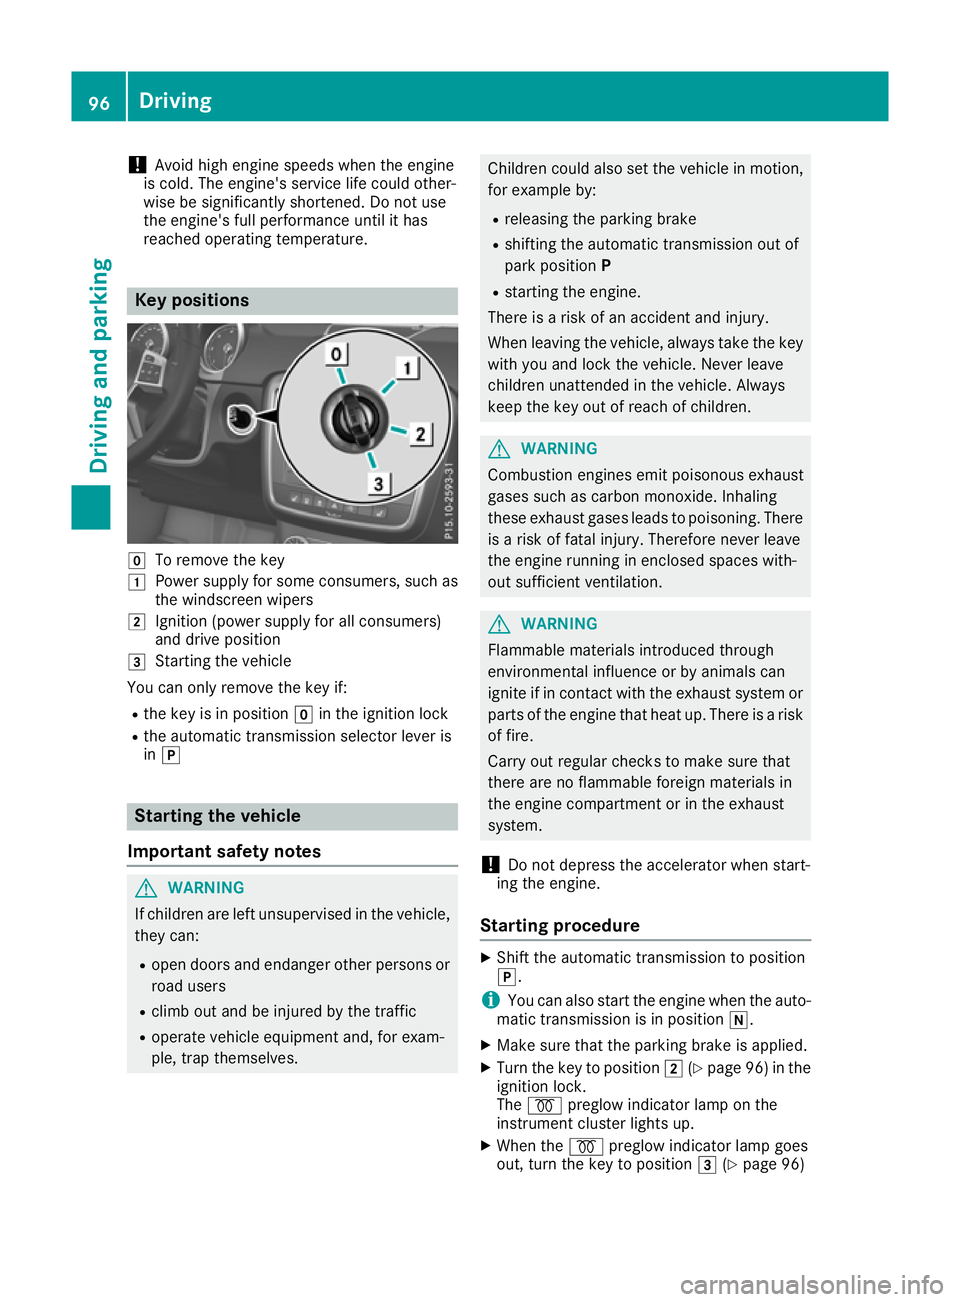
reached operating temperature. Key positions
g
To remove the key
1 Power supply for some consumers, such as
the windscreen wipers
2 Ignition (power supply for all consumers)
and drive position
3 Starting the vehicle
You can only remove the key if: R the key is in position gin the ignition lock
R the automatic transmission selector lever is
in j Starting the vehicle
Important safety notes G
WARNING
If children are left unsupervised in the vehicle, they can:
R open doors and endanger other persons or
road users
R climb out and be injured by the traffic
R operate vehicle equipment and, for exam-
ple, trap themselves. Children could als
oset th evehicle in motion,
for example by:
R releasin gthe parking brake
R shiftin gthe automatic transmission out of
park position P
R starting th eengine.
Ther eisar iskofana ccidentand injury.
When leaving th evehicle ,always tak ethe key
wit hyou and loc kthe vehicle .Never leave
children unattende dinthevehicle .Always
keep th ekeyout of reac hofchildren. G
WARNING
Combustion engine semit poisonous exhaust
gase ssuch as carbon monoxide .Inhaling
these exhaust gase sleads to poisoning. There
is ar isk of fatal injury .Therefore never leave
the engine running in enclose dspace swith-
out sufficient ventilation. G
WARNING
Flammable materials introduced through
environmental influence or by animals can
ignite if in contact with the exhaust system or parts of the engine that heat up. There is arisk
of fire.
Carry out regular checks to make sure that
there are no flammable foreig nmaterials in
the engine compartment or in the exhaust
system.
! Do not depress the accelerator when start-
ing the engine.
Starting procedure X
Shift the automatic transmissio ntoposition
j.
i You can also star
tthe engine when the auto-
mati ctransmissio nisinpositioni.
X Make sure that the parking brake is applied.
X Turn the key to position 2(Ypage 96) in the
ignition lock.
The % preglow indicator lamp on the
instrument cluster lights up.
X Whe nthe % preglow indicator lamp goes
out, turn the key to position 3(Ypage 96) 96
DrivingDrivin
gand park ing
Page 123 of 261
Observe the following notes:
R stop the vehicle before you drive off-road and,
if necessary, shift the transfer case to the
LOW RANGE off-road driving position
(Y page 124)
R engage the differential locks if necessary
(Y page 126)
i ABS,4
ETS, ESP ®
and BAS are deactivated
while the differential locks are engaged. This
allowst he front wheels to lock briefly, so that
they can dig into aloose surface. However,
please note that locked wheels skid and can
no longer steer.
R Make sure that items of luggage and loads are
stowed safely and are well secured
(Y page 203).
R To avoid damaging the vehicle, make sure
there is always sufficient ground clearance.
R Alwaysk eep the engine running and in gear
when driving on adownhill gradient.
R Alwaysk eep the engine running and in gear
when driving on aslope.
R Drive slowly and evenly, if necessary at walk-
ing pace.
R Ensure that the wheels are in contact with the
ground at all times.
R Drive with extreme care on unknown off-road
routes where visibility is poor. For safety rea- sons, get out of the vehicle first and survey
the off-road route.
R Check the depth of water before fording rivers
and streams.
R Watch out for obstacles.
R Alwaysk eep the doors, the rear door, the side
windows and the sliding sunroof closed while
the vehicle is in motion.
R Do not deviate from marked routes.
R Match your speed to the terrain. The rougher,
steeper or more ruts on the terrain, the slower your speed should be.
R Do not jump with the vehicle. This will inter-
rupt the vehicle's propulsion.
R Avoid high engine speeds. Drive at appropri-
ate engine speeds.
R Alwaysc heck the vehicle for damage after off-
road driving.
Do not use the HOLD function when driving off- road, on steep uphillord ownhill gradients or on
slippery or loose surfaces. The HOLD function
cannot hold the vehicle on such surfaces. You can obtain further information aboutr
etro-
fittin gspecial all-terrain tyres from aqualified
specialis tworkshop.
Checklist before off-roa ddriving X
Engine oil level: check the engine oil and top
it up if necessary.
When driving on steep gradients, the oil level must be sufficiently high to ensure acorrect
oil supply in th evehicle.
X Hav ethe AdBlue ®
level checked at aqualified
specialist workshop (Y page 111).
X Tyre-change tool kit: check that thejackis
working and mak esure that th ewheel
wrench, arobus ttow cable and afolding
spade are in th evehicle.
X Wheels and tyres: check thetyret read
dept hand tyr epressure.
X Chec kfor damage and remove any foreign
objects, e.g .small stones, fro mthewheels/
tyres.
X Replace any missing valv ecaps.
X Replace dented or damage dwheels .Also
check th espare wheel.
X Wheels: dented or ben twheels can lead to a
loss of tyr epressure and damage to th etyre
bead. Before driving off-road, check the
wheels and replac ethemifn ecessary.
Checklist after off-roa ddriving !
If you detect damage to the vehicl
eafter
driving off-road, have the vehicle checked
immediately at aqualified specialist work-
shop.
Driving over rough terrain places greater
demands on your vehicle than driving on normal
roads. After driving off-road, check the vehicle.
This allowsy ou to detect damage promptly and
reduce the risk of an accident to yourselfa nd
other road users.
X Shift the transfer case to the on-road position
HIGH RANGE (Ypage 124).
X Disengage the differential locks
(Y page 127).
X Cleant he headlamps and rear lights and
check for damage.
X Cleant he front and rear licence plates.
X Cleant he wheels and tyres with awater jet
and remove any foreign objects. 120
Drivingt
ipsDriving and parking