weight MERCEDES-BENZ GL-Class 2012 X164 Owner's Guide
[x] Cancel search | Manufacturer: MERCEDES-BENZ, Model Year: 2012, Model line: GL-Class, Model: MERCEDES-BENZ GL-Class 2012 X164Pages: 384, PDF Size: 15.71 MB
Page 101 of 384
The seat belt should:
R fit snugly across your body
R be routed across the middle of your
shoulder
R be routed in your pelvic area across the
hip jointsXBefore starting off, adjust the rear-view
mirror and the exterior mirrors
( Y page 112) in such a way that you have
a good view of road and traffic conditions.XVehicles with a memory function: save
the seat, steering wheel and exterior mirror
settings ( Y page 114).
Seats
Important safety notes
GWARNING
In order to avoid possible loss of vehicle
control, all seat, head restraint, steering
wheel and rear view mirror adjustments, as
well as fastening of seat belts, must be done
before setting the vehicle in motion.
GWARNING
Do not adjust the driver's seat while driving.
Adjusting the seat while driving could cause
the driver to lose control of the vehicle.
Never travel in a moving vehicle with the seat
backrest in an excessively reclined position as
this can be dangerous. You could slide under
the seat belt in a collision. If you slide under
it, the seat belt would apply force at the
abdomen or neck. This could cause serious or
fatal injuries. The seat backrest and seat belts
provide the best restraint when the wearer is
in a position that is as upright as possible and
seat belts are properly positioned on the
body.
GWARNING
Your seat belt must be adjusted so that you
can correctly fasten your seat belt.
Observe the following points:
R adjust the seat backrest until your arms are
slightly angled when holding the steering
wheel.
R adjust the seat to a comfortable seating
position that still allows you to reach the
accelerator/brake pedal safely. The
position should be as far back as possible
with the driver still able to operate the
controls properly.
R adjust the head restraint so that it is as
close to the head as possible and the center
of the head restraint supports the back of
the head at eye level.
R never place hands under the seat or near
any moving parts while a seat is being
adjusted.
Failure to do so could result in an accident
and/or serious personal injury.GWARNING
The electrically adjustable seats can be
operated at any time. Therefore, do not leave
children unattended in the vehicle, or with
access to an unlocked vehicle. A child's
unsupervised access to a vehicle could result
in an accident and/or serious personal injury.
GWARNING
According to accident statistics, children are
safer when properly restrained in the rear
seating positions than in the front seating
position. Thus, we strongly recommend that
children be placed in the rear seats whenever
possible. Regardless of seating position,
children 12 years old and under must be
seated and properly secured in an
appropriately sized infant restraint, toddler
restraint, or booster seat recommended for
the size and weight of the child. For additional
information, see "Children in the vehicle".
A child's risk of serious or fatal injuries is
significantly increased if the child restraints
are not properly secured in the vehicle and/
or the child is not properly secured in the child
restraint.
Seats99Seats, steering wheel and mirrorsZ
Page 215 of 384
Permissible trailer loads and drawbar
noseweights
Weight specifications
The Gross Trailer Weight (GTW) is the
combined weight of the trailer together with
the cargo and equipment loaded on the
trailer. Permissible gross weight: 7500 lb
(3402 kg).
The permissible Trailer drawbar Weight
Rating (TWR) is the maximum weight
permitted on the trailer drawbar: 600 lb
(272 kg) limit for Mercedes-Benz-approved
trailer couplings.
Loading a trailer
R When loading a trailer, please note that
neither the permissible gross trailer weight
nor the permissible Gross Vehicle Weight
Rating (GVWR) may be exceeded. The
permissible Gross Vehicle Weight Rating
(GVWR) is specified on the type plate
located on the B-pillar on the driver's side
of your vehicle.
You can find the maximum permissible
values on the type plates of your vehicle
and the trailer. Always observe the lowest
respective value when determining the
maximum weight with which you can load
the vehicle and the trailer.
R The drawbar noseweight acting on the ball
coupling has to be added to the rear axle
weight in order to prevent the permissible
Gross Axle Weight Rating (GAWR) from
being exceeded. The permissible Gross
Vehicle Weight Rating (GVWR) is specified
on the type plate located on the B-pillar on
the driver's side of your vehicle.
i Mercedes-Benz recommends loading the
trailer so that the drawbar noseweight
remains between 8% and 15% of the
permissible gross trailer weight.
i The weight of additional accessories,
passengers, and cargo reduces the
permissible trailer load and drawbar
noseweight for your vehicle.
Checking the vehicle and trailer weight
R To check that the weights of the towing
vehicle and the trailer comply with the
maximum permissible values, have the
vehicle/trailer combination (including the
driver, passengers, and cargo with a fully
laden trailer) weighed on a calibrated
weighbridge.
R Check the gross axle weight rating of the
front and rear axle, the Gross Trailer Weight
(GTW), and the drawbar noseweight.
Trailer power supply
The trailer power socket of your vehicle is
designed for connecting the 7-pin connector
supplied as part of the Mercedes-Benz-
approved trailer coupling.
i Depending on your trailer, you may need
an adapter to connect your trailer to the
vehicle.
Further information is available from any
authorized Mercedes-Benz Center.
Trailer towing213Driving and parkingZ
Page 240 of 384
Display messagesPossible causes/consequences and M SolutionsFront Passenger
Airbag Enabled
See Operator's
ManualThe front-passenger air bag is enabled during the journey, even
though:
R a child, a small adult or an object weighing less than the
system's weight threshold is located on the front-passenger
seat.
R the front-passenger seat is unoccupied.
The system may detect objects or forces applying additional
weight on the seat.XPull over and stop the vehicle safely as soon as possible, paying
attention to road and traffic conditions.XEngage the parking brake.XSwitch off the ignition.XOpen the front-passenger door.XRemove the child and the child restraint system from the front-
passenger seat.XIf necessary, secure the child in a child restraint system on a
suitable rear seat.XMake sure that no objects are exerting force on the seat, e.g.:
R trapped books, bags, etc. lying on, behind or beside the seat
R head restraints pressing against the headliner
The system may otherwise detect these forces and interpret the
seat occupant's weight as greater than it actually is.XKeep the seat unoccupied, close the front-passenger door and
switch on the ignition.
Observe the 42 (Y page 45) indicator lamp and the
multifunction display and check the following:
Seat unoccupied and ignition switched on:
R the 42 indicator lamp must light up and remain lit.
When the indicator lamp is on, OCS (Y page 45) has deactivated
the front-passenger air bag.
R the Front Passenger Airbag Enabled See Operator's
Manual or Front Passenger Airbag Disabled See
Operator's Manual display messages must not appear in the
multifunction display. Wait for a period of at least 60 seconds
until the necessary system checks have been completed and to
make sure that the display messages do not appear in the
multifunction display.
If these conditions are met, the front-passenger seat can be
occupied again. Whether the 42 indicator lamp
remains lit or goes out depends on how OCS classifies the
occupant.
If the conditions are not met, the system is not operating correctly.
238Display messagesOn-board computer and displays
Page 242 of 384
Display messagesPossible causes/consequences and M SolutionsFront Passenger
Airbag Disabled
See Operator's
ManualThe front-passenger air bag is deactivated during the journey even
though an adult or a person larger than a certain size is occupying
the front-passenger seat. If additional forces are applied to the
seat, the system may interpret the occupant's weight as lower
than it actually is.XPull over and stop the vehicle safely as soon as possible, paying
attention to road and traffic conditions.XEngage the parking brake.XSwitch off the ignition.XHave the occupant get out of the vehicle.XSet the seat higher ( Y page 100).XMake sure that no objects are exerting force on the seat, e.g.
books, bags etc. lying under, behind or beside the seat.
These forces may otherwise cause the system to detect too low
a weight and interpret the seat occupant's weight as less than
it actually is.XKeep the seat unoccupied, close the front-passenger door and
switch on the ignition.
Observe the 42 (Y page 45) indicator lamp and the
multifunction display and check the following:
Seat unoccupied and ignition switched on:
R the 42 indicator lamp must light up and remain lit.
When the indicator lamp is on, OCS (Y page 45) has deactivated
the front-passenger air bag.
R the Front Passenger Airbag Enabled See Operator's
Manual or Front Passenger Airbag Disabled See
Operator's Manual display messages must not appear in the
multifunction display. Wait for a period of at least 60 seconds
until the necessary system checks have been completed and to
make sure that the display messages do not appear in the
multifunction display.
If these conditions are met, the front-passenger seat can be
occupied again. Whether the 42 indicator lamp
remains lit or goes out depends on how OCS classifies the
occupant.
If the conditions are not met, the system is not operating correctly.
XVisit a qualified specialist workshop immediately.240Display messagesOn-board computer and displays
Page 270 of 384
Useful information
i This Operator's Manual describes all
models and all standard and optional
equipment of your vehicle available at the
time of publication of the Operator's
Manual. Country-specific differences are
possible. Please note that your vehicle may
not be equipped with all features
described. This also applies to safety-
related systems and functions.
i Please read the information on qualified
specialist workshops ( Y page 24).
Loading guidelines
GWARNING
Always fasten items being carried as securely
as possible. Use cargo tie-down rings and
fastening materials appropriate for the weight
and size of the load.
In an accident, during hard braking or sudden
maneuvers, loose items will be thrown around
inside the vehicle. This can cause injury to
vehicle occupants unless the items are
securely fastened in the vehicle.
To help avoid personal injury during a collision
or sudden maneuver, exercise care when
transporting cargo. Do not pile luggage or
cargo higher than the seat backrests.
The cargo compartment is the preferred place
to carry objects. Always use cargo tie-down
rings, and if so equipped, always use the cargo
net when transporting cargo.
Never drive a vehicle with the tailgate open.
Deadly carbon monoxide (CO) gases may
enter vehicle interior resulting in
unconsciousness and death.
The gross vehicle weight (GVW) is the vehicle
weight including fuel, vehicle tool kit, spare
wheel, installed accessories, vehicle
occupants and luggage/cargo.
The gross load limit and the gross vehicle
weight rating (GVWR) for your vehicle must
never be exceeded. The gross load limit and
the GVWR are specified on the vehicle
identification plate on the B-pillar of the
driver's door ( Y page 349).
The load must also be distributed so that the
weight on each axle never exceeds the gross
axle weight rating (GAWR) for the front and
rear axles. The specifications for GVWR and
GAWR are on the vehicle identification plate
on the B-pillar of the driver's door
( Y page 349).
Further information can be found in the
"Loading the vehicle" section ( Y page 349).
The handling characteristics of a laden
vehicle are dependent on the distribution of
the load within the vehicle. For this reason,
you should observe the following notes when
transporting a load:
R position heavy loads as far forwards as
possible and as low down in the cargo
compartment as possible.
R the load must not protrude above the upper
edge of the seat backrests.
R always place the load against the rear or
front seat backrests. Make sure that the
seat backrests are securely locked into
place.
R hook in the cargo net when loading.
R always place the load behind unoccupied
seats if possible.
R secure the load with sufficiently strong and
wear-resistant tie down. pad sharp edges
for protection.
Stowage areas
Stowage compartments
Important safety notes
GWARNING
To help avoid personal injury during a collision
or sudden maneuver, exercise care when
storing objects in the vehicle. Put luggage or
cargo in the cargo compartment if possible.
268Stowage areasStowing and features
Page 272 of 384
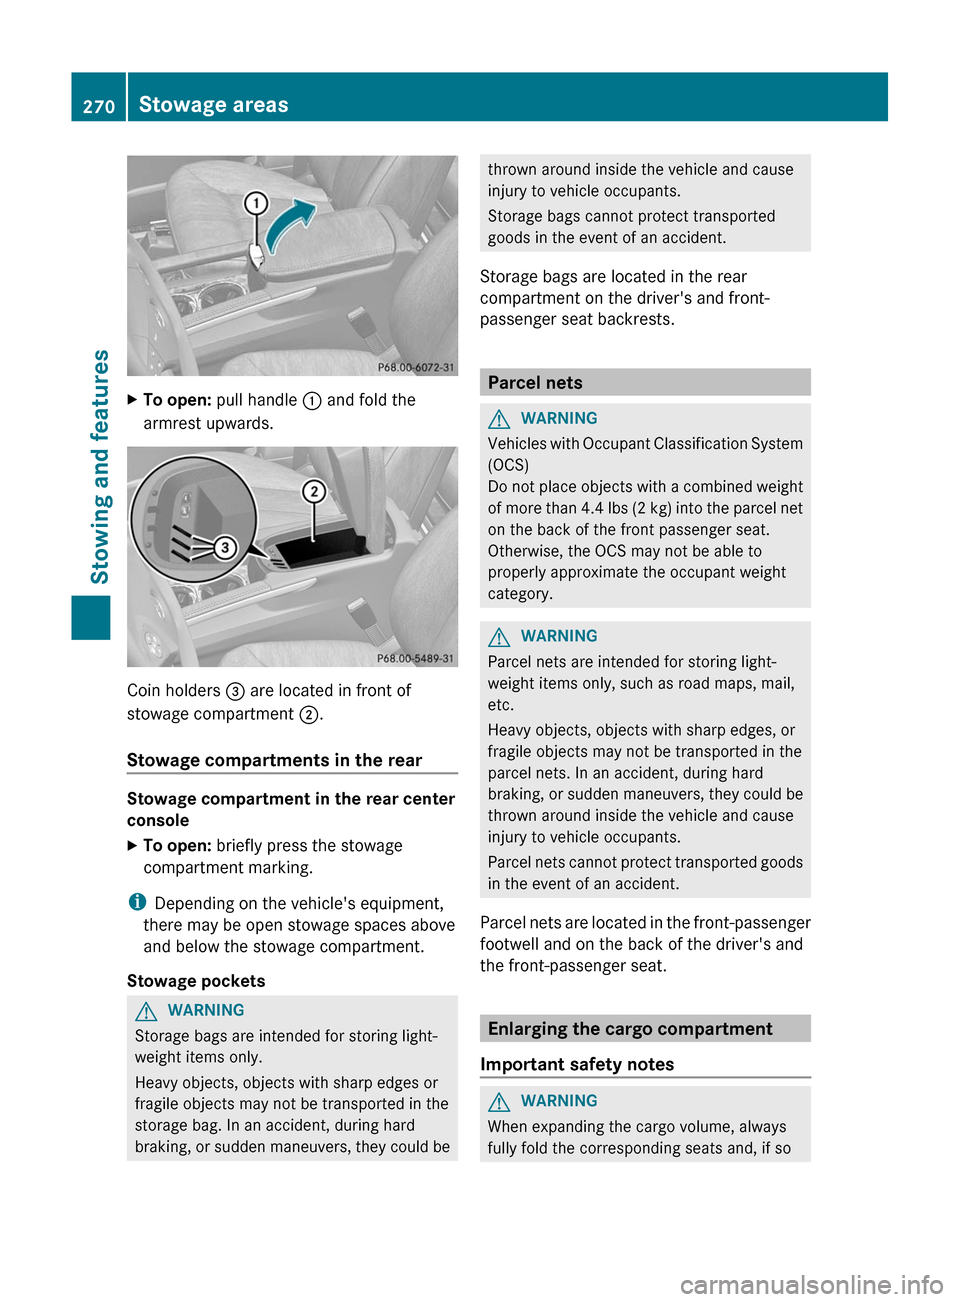
XTo open: pull handle : and fold the
armrest upwards.
Coin holders = are located in front of
stowage compartment ;.
Stowage compartments in the rear
Stowage compartment in the rear center
console
XTo open: briefly press the stowage
compartment marking.
i Depending on the vehicle's equipment,
there may be open stowage spaces above
and below the stowage compartment.
Stowage pockets
GWARNING
Storage bags are intended for storing light-
weight items only.
Heavy objects, objects with sharp edges or
fragile objects may not be transported in the
storage bag. In an accident, during hard
braking, or sudden maneuvers, they could be
thrown around inside the vehicle and cause
injury to vehicle occupants.
Storage bags cannot protect transported
goods in the event of an accident.
Storage bags are located in the rear
compartment on the driver's and front-
passenger seat backrests.
Parcel nets
GWARNING
Vehicles with Occupant Classification System
(OCS)
Do not place objects with a combined weight
of more than 4.4 lbs (2 kg) into the parcel net
on the back of the front passenger seat.
Otherwise, the OCS may not be able to
properly approximate the occupant weight
category.
GWARNING
Parcel nets are intended for storing light-
weight items only, such as road maps, mail,
etc.
Heavy objects, objects with sharp edges, or
fragile objects may not be transported in the
parcel nets. In an accident, during hard
braking, or sudden maneuvers, they could be
thrown around inside the vehicle and cause
injury to vehicle occupants.
Parcel nets cannot protect transported goods
in the event of an accident.
Parcel nets are located in the front-passenger
footwell and on the back of the driver's and
the front-passenger seat.
Enlarging the cargo compartment
Important safety notes
GWARNING
When expanding the cargo volume, always
fully fold the corresponding seats and, if so
270Stowage areasStowing and features
Page 275 of 384
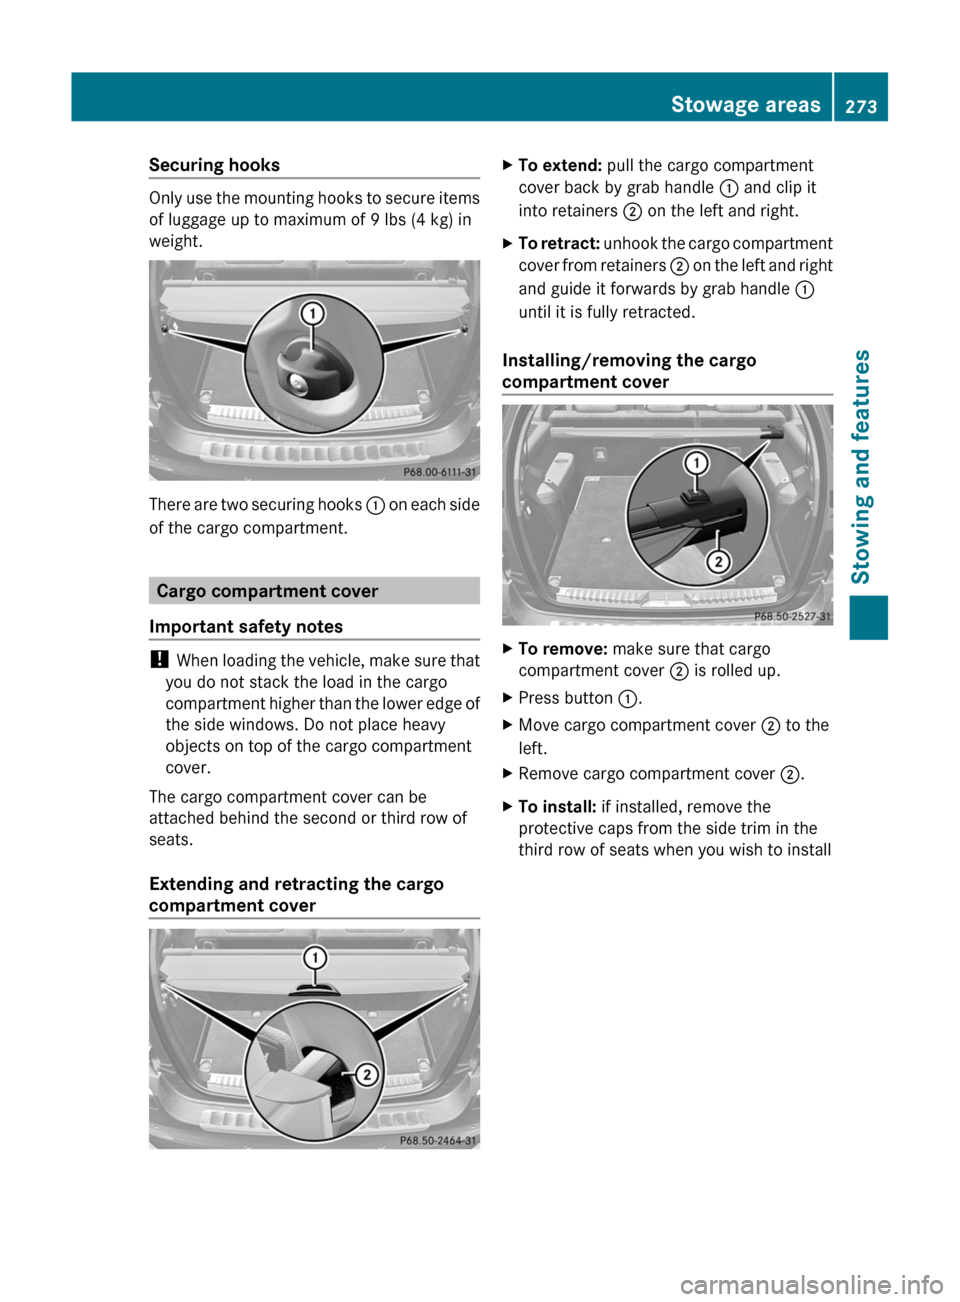
Securing hooks
Only use the mounting hooks to secure items
of luggage up to maximum of 9 lbs (4 kg) in
weight.
There are two securing hooks : on each side
of the cargo compartment.
Cargo compartment cover
Important safety notes
! When loading the vehicle, make sure that
you do not stack the load in the cargo
compartment higher than the lower edge of
the side windows. Do not place heavy
objects on top of the cargo compartment
cover.
The cargo compartment cover can be
attached behind the second or third row of
seats.
Extending and retracting the cargo
compartment cover
XTo extend: pull the cargo compartment
cover back by grab handle : and clip it
into retainers ; on the left and right.XTo retract: unhook the cargo compartment
cover from retainers ; on the left and right
and guide it forwards by grab handle :
until it is fully retracted.
Installing/removing the cargo
compartment cover
XTo remove: make sure that cargo
compartment cover ; is rolled up.XPress button :.XMove cargo compartment cover ; to the
left.XRemove cargo compartment cover ;.XTo install: if installed, remove the
protective caps from the side trim in the
third row of seats when you wish to installStowage areas273Stowing and featuresZ
Page 280 of 384
XSecure the roof carrier to roof rails :.XObserve the manufacturer's installation
instructions.
Cross bar
Points to observe before use
The maximum roof load that can be used with
additional accessories decreases by the dead
weight of the crossbars (13.7 lbs/6.2 kg).
! Note that installing the crossbar
increases the vehicle height by 50 mm
compared to the height stated in the
"Technical data" section.
The wrench and the Allen key are located with
the vehicle tool kit in the stowage space
underneath the trunk floor ( Y page 314).
i Replacement parts are available as
Mercedes-Benz accessories. Contact your
authorized Mercedes-Benz Service Center.
Installing the crossbars
GWARNING
Please follow these installation instructions
carefully. Caution should be exercised to
avoid damage to the vehicle while installing
the crossbars. Also, be careful not to injure
yourself or others while installing and
adjusting the crossbars or loading items on
them.
Each individual step of the installation
instructions, the warning notices, the general
safety precautions and the instructions for
use must be followed exactly. If the crossbars
are not mounted correctly, they and the
objects attached to them could come loose
from your vehicle and cause an accident,
thereby injuring you and other persons and/
or causing damage to property, including
damage to your vehicle.
GWARNING
Every time the crossbars are mounted, before
you set off on a journey and periodically
during longer journeys, check all the screws
on the crossbars to make sure that they are
secure, and tighten them if necessary. Repeat
these checks at regular intervals as road-
surface conditions dictate, and at least after
every 1500 miles (2500 km) of continuous
use.
Otherwise, the crossbars, mounted
accessories and the objects attached to them
could come loose from the vehicle causing an
accident, thereby injuring you and other
persons and/or causing damage to property,
including damage to your vehicle.
Do not use lubricant on the screws of the
crossbars. The screws could work loose and
the crossbars could become detached from
your vehicle, together with the objects
attached to them causing an accident,
thereby injuring you and other persons and/
or causing damage to property, including
damage to your vehicle.GWARNING
Only install the crossbars at the exact
locations designated on the roof rails. The
designated locations for the front crossbars
are between the markings engraved on the
inside of the roof rails. The designated
locations for the rear crossbars are between
the gaps on the roof rails.
Otherwise, the crossbars, mounted
accessories and the objects attached to them
could come loose from the vehicle causing an
accident, thereby injuring you and other
persons and/or causing damage to property,
including damage to your vehicle.
GWARNING
A roof load creates a greater surface area
exposed to the wind and causes the vehicle
to have a higher center of gravity, thereby
changing the vehicle's driving characteristics.
Accordingly, the additional weight on the roof
of the vehicle can have a detrimental effect
on braking, cornering and acceleration.
Never exceed the maximum permissible roof
load or the maximum permissible vehicle
278Stowage areasStowing and features
Page 281 of 384
weight, even when accessories for the
crossbars (e.g. ski racks, bicycle racks, etc.)
are being used. Overloading the vehicle could
result in an accident. When calculating the
weight placed on the roof please make sure
to add the weight of the crossbars, accessory
racks and the load carried together.
Always adapt your driving style to the road,
traffic and weather conditions, and drive with
added caution when the roof is loaded.
Always drive with extreme care when the
carrier is loaded. Take into consideration that
when the carrier is loaded, the handling
characteristics are different from those when
operating the vehicle without a carrier loaded.GWARNING
Do not use accessories which have not been
approved by Mercedes-Benz for use in
conjunction with these crossbars. If non-
approved accessories are used, these
accessories and/or the objects attached to
them could come loose from the vehicle,
thereby injuring you and other persons and/
or causing damage to property, including
damage to your vehicle.
! Have a second person assist you when
installing the crossbars. Otherwise, the
vehicle could be damaged.
! Objects that are attached to crossbar
system accessories must not limit or
obstruct the movement of the sliding
sunroof. Otherwise, the tilt/sliding sunroof
could be damaged when it is raised.
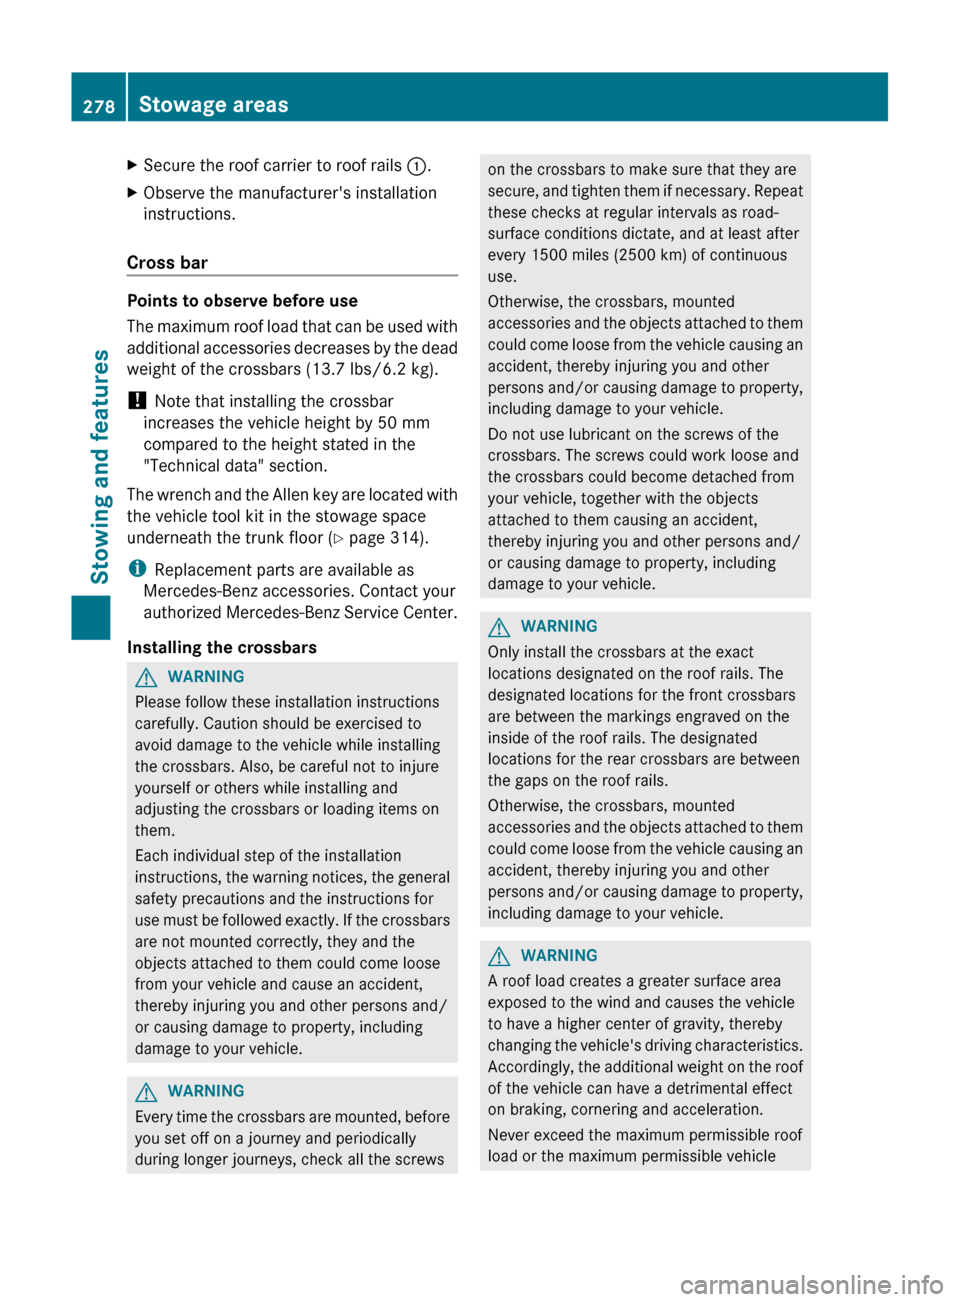
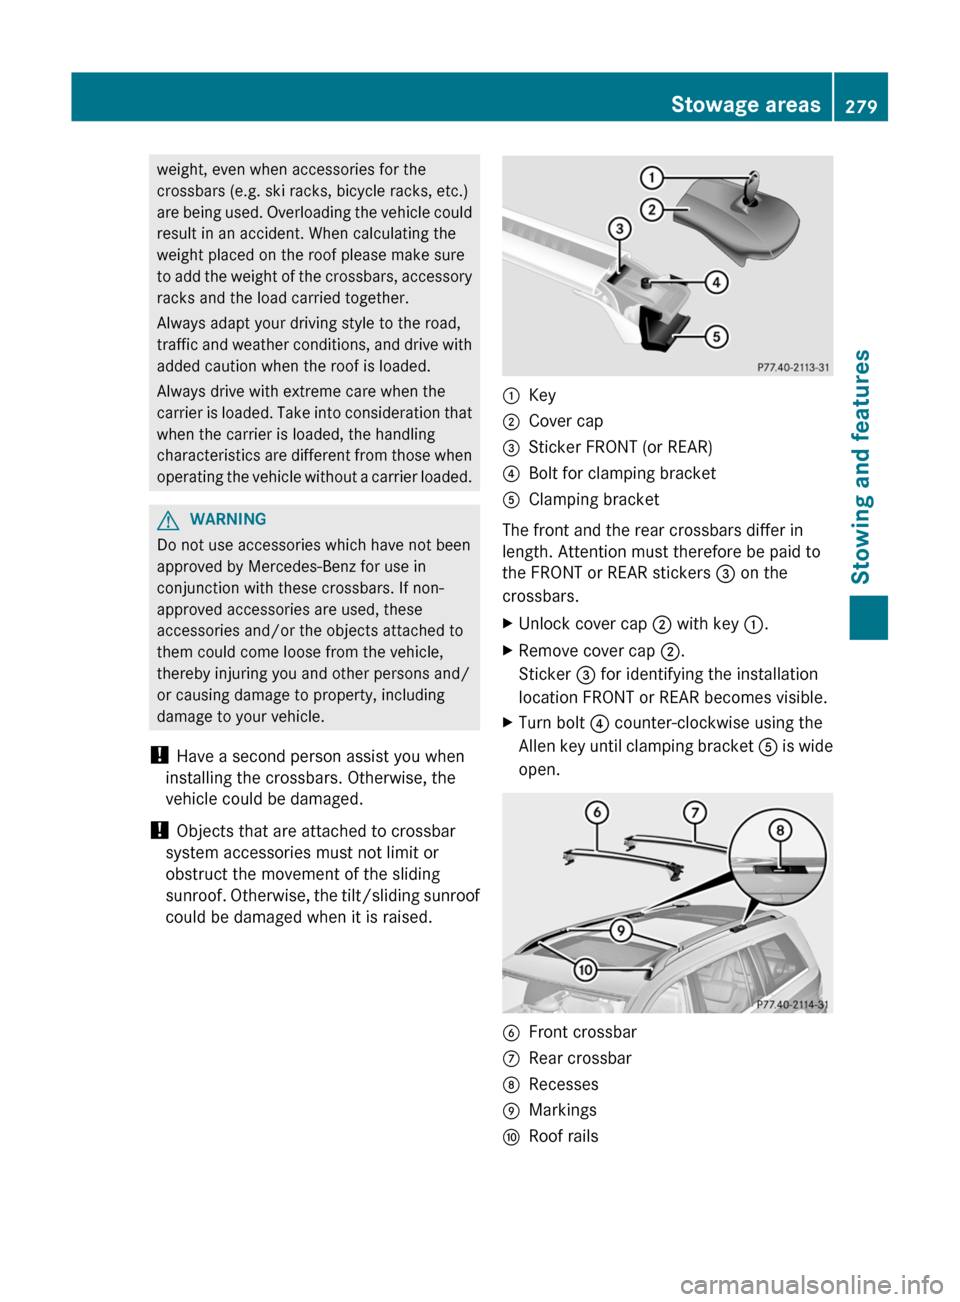
:Key;Cover cap=Sticker FRONT (or REAR)?Bolt for clamping bracketAClamping bracket
The front and the rear crossbars differ in
length. Attention must therefore be paid to
the FRONT or REAR stickers = on the
crossbars.
XUnlock cover cap ; with key :.XRemove cover cap ;.
Sticker = for identifying the installation
location FRONT or REAR becomes visible.XTurn bolt ? counter-clockwise using the
Allen key until clamping bracket A is wide
open.BFront crossbarCRear crossbarDRecessesEMarkingsFRoof railsStowage areas279Stowing and featuresZ
Page 284 of 384
Features
Cup holders
Important safety notes
GWARNING
In order to help prevent spilling liquids on
vehicle occupants and/or vehicle equipment,
only use containers that fit into the cup
holder. Use lids on open containers and do
not fill containers to a height where the
contents, especially hot liquids, could spill
during braking, vehicle maneuvers, or in an
accident. Liquids spilled on vehicle occupants
may cause serious personal injury. Liquids
spilled on vehicle equipment may cause
damage not covered by the Mercedes-Benz
Limited Warranty.
When not in use, keep the cup holder closed.
An open cup holder may cause injury to you
or others when contacted during braking,
vehicle maneuvers, or in an accident.
Keep in mind that objects placed in the cup
holder may come loose during braking,
vehicle maneuvers, or in an accident and be
thrown around in the vehicle interior. Objects
thrown around in the vehicle interior may
cause an accident and/or serious personal
injury.
Cup holder in the front-compartment
center console
In the front part of the center console, there
is a cup holder and a removable support with
a card holder.
You can remove the cup holder to clean it.
Clean with clear, lukewarm water only.
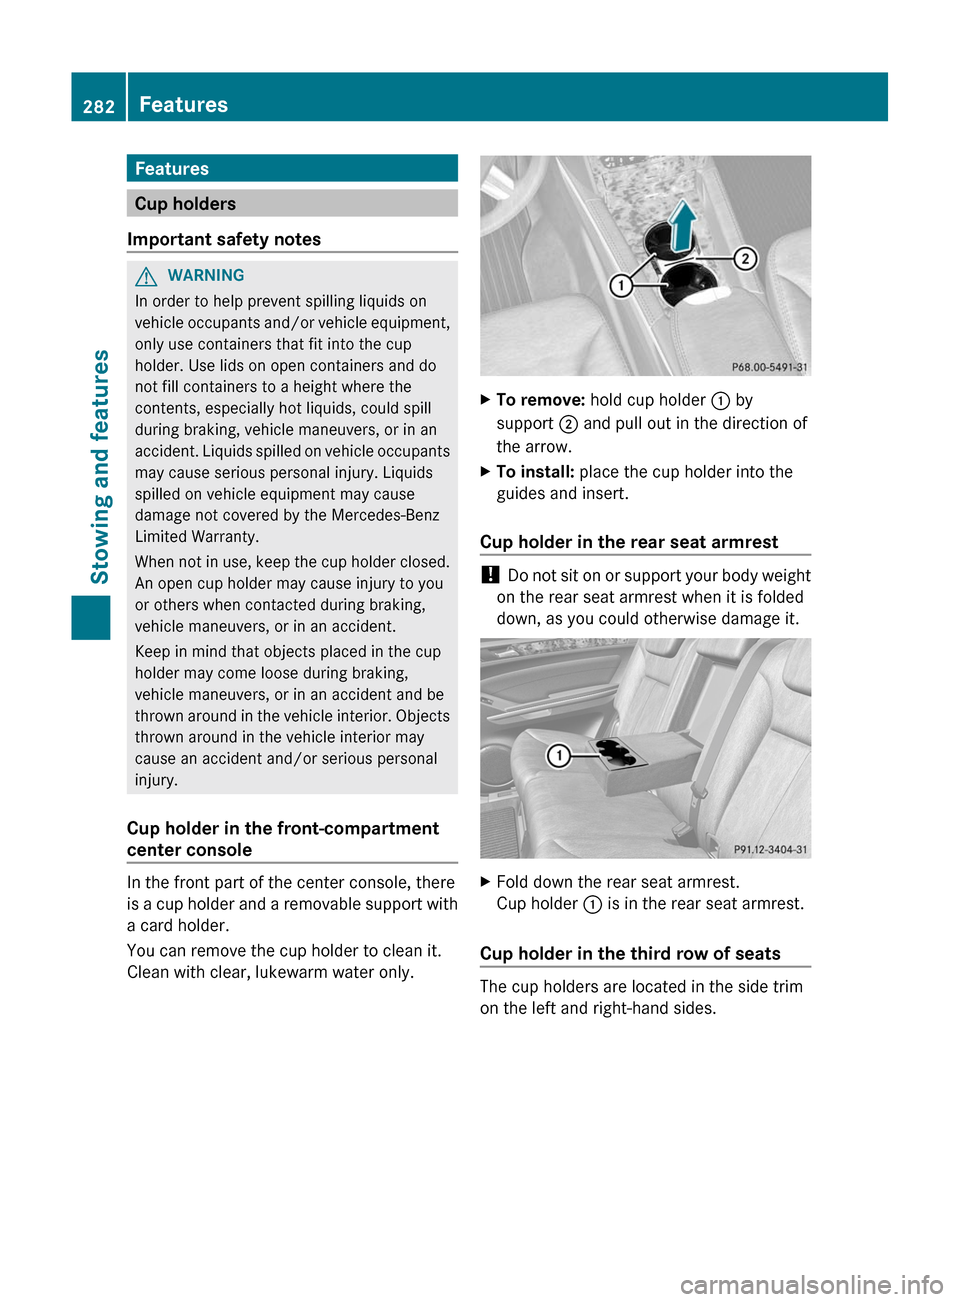
XTo remove: hold cup holder : by
support ; and pull out in the direction of
the arrow.XTo install: place the cup holder into the
guides and insert.
Cup holder in the rear seat armrest
! Do not sit on or support your body weight
on the rear seat armrest when it is folded
down, as you could otherwise damage it.
XFold down the rear seat armrest.
Cup holder : is in the rear seat armrest.
Cup holder in the third row of seats
The cup holders are located in the side trim
on the left and right-hand sides.
282FeaturesStowing and features