MERCEDES-BENZ GL-Class 2014 X166 Owner's Manual
Manufacturer: MERCEDES-BENZ, Model Year: 2014, Model line: GL-Class, Model: MERCEDES-BENZ GL-Class 2014 X166Pages: 462, PDF Size: 32.46 MB
Page 111 of 462
the height and angle of the head restraints to
the correct position.
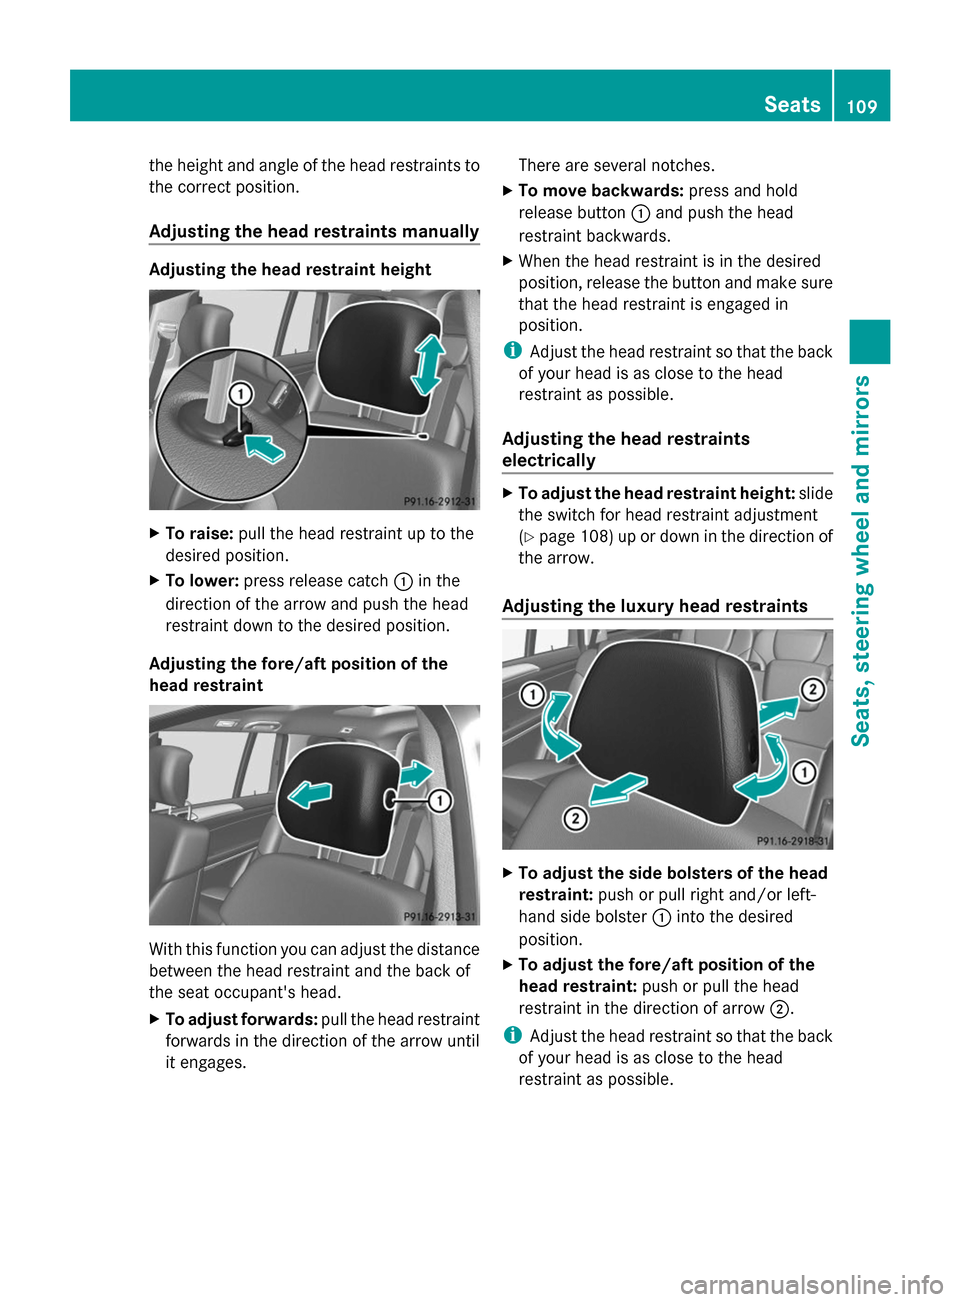
Adjusting the head restraints manually Adjusting the head restraint height
X
To raise: pull the head restraint up to the
desired position.
X To lower: press release catch :in the
direction of the arrow and push the head
restraint down to the desired position.
Adjusting the fore/aft position of the
head restraint With this function you can adjust the distance
between the head restraint and the back of
the seat occupant's head.
X To adjust forwards: pull the head restraint
forwards in the direction of the arrow until
it engages. There are several notches.
X To move backwards: press and hold
release button :and push the head
restraint backwards.
X When the head restraint is in the desired
position, release the button and make sure
that the head restraint is engaged in
position.
i Adjust the head restraint so that the back
of your head is as close to the head
restraint as possible.
Adjusting the head restraints
electrically X
To adjust the head restraint height: slide
the switch for head restraint adjustment
(Y page 108) up or down in the direction of
the arrow.
Adjusting the luxury head restraints X
To adjust the side bolsters of the head
restraint: push or pull right and/or left-
hand side bolster :into the desired
position.
X To adjust the fore/aft position of the
head restraint: push or pull the head
restraint in the direction of arrow ;.
i Adjust the head restraint so that the back
of your head is as close to the head
restraint as possible. Seats
109Seats, steering wheel and mirrors Z
Page 112 of 462

Rear seat head restraints
Adjusting the rear seat head restraint
height X
Once the head restraint is fully lowered,
press release catch :.
X To raise: pull the head restraint up to the
desired position.
X To lower: press release catch :and push
the head restraint down until it is in the
desired position.
Removing and installing the rear seat
head restraints X
To remove: pull the head restraint up to
the stop.
X Press release catch :and pull the head
restraint out of the guides.
X To re-install: insert the head restraint so
that the notches on the bar are on the left
when viewed in the direction of travel.
X Push the head restraint down until you hear
it engage in position. Rear seats (second and third row of
seats)
Important safety notes G
WARNING
If the seat and backrest are not engaged, they
can fold forwards, e.g. in the event of sudden
braking or an accident.
R This will cause the vehicle occupants to be
forced into the seat belt by a seat or
backrest which is not engaged. The seat
belt can no longer offer the intended level
of protection and could even cause injuries.
R A child restraint system would no longer be
anchored or positioned correctly and would
not be able to perform its required function.
R The seat backrests cannot restrain objects
or loads in the cargo compartment.
There is an increased risk of injury.
Always make sure that the seat and backrest
are engaged as described:
R before traveling with a passenger on a seat
with the EASY-ENTRY/EXIT feature
R after you have adjusted the seat
R after the EASY-ENTRY/EXIT feature has
been used
R after the cargo compartment enlargement
has been folded forwards G
WARNING
The seat does not engage in the entry/exit
position. The seat could fold back suddenly,
e.g. when accelerating, braking, changing
direction suddenly or in the event of an
accident. Persons in the sweep of the seat
could become trapped. There is a risk of
injury.
Always fold back a seat which has been folded
forwards before you pull away. Make sure that
the seat and backrest engage fully. 110
SeatsSeats, steering wheel and mirrors
Page 113 of 462
G
WARNING
Children could become trapped if they adjust
the seats, particularly when unattended.
There is a risk of injury.
When leaving the vehicle, always take the
SmartKey with you and lock the vehicle. Never
leave children unsupervised in the vehicle. G
WARNING
When you adjust a seat, you or other vehicle
occupants could become trapped, e.g. on the
seat guide rail. There is a risk of injury.
Make sure when adjusting a seat that no one
has any body parts in the sweep of the seat.
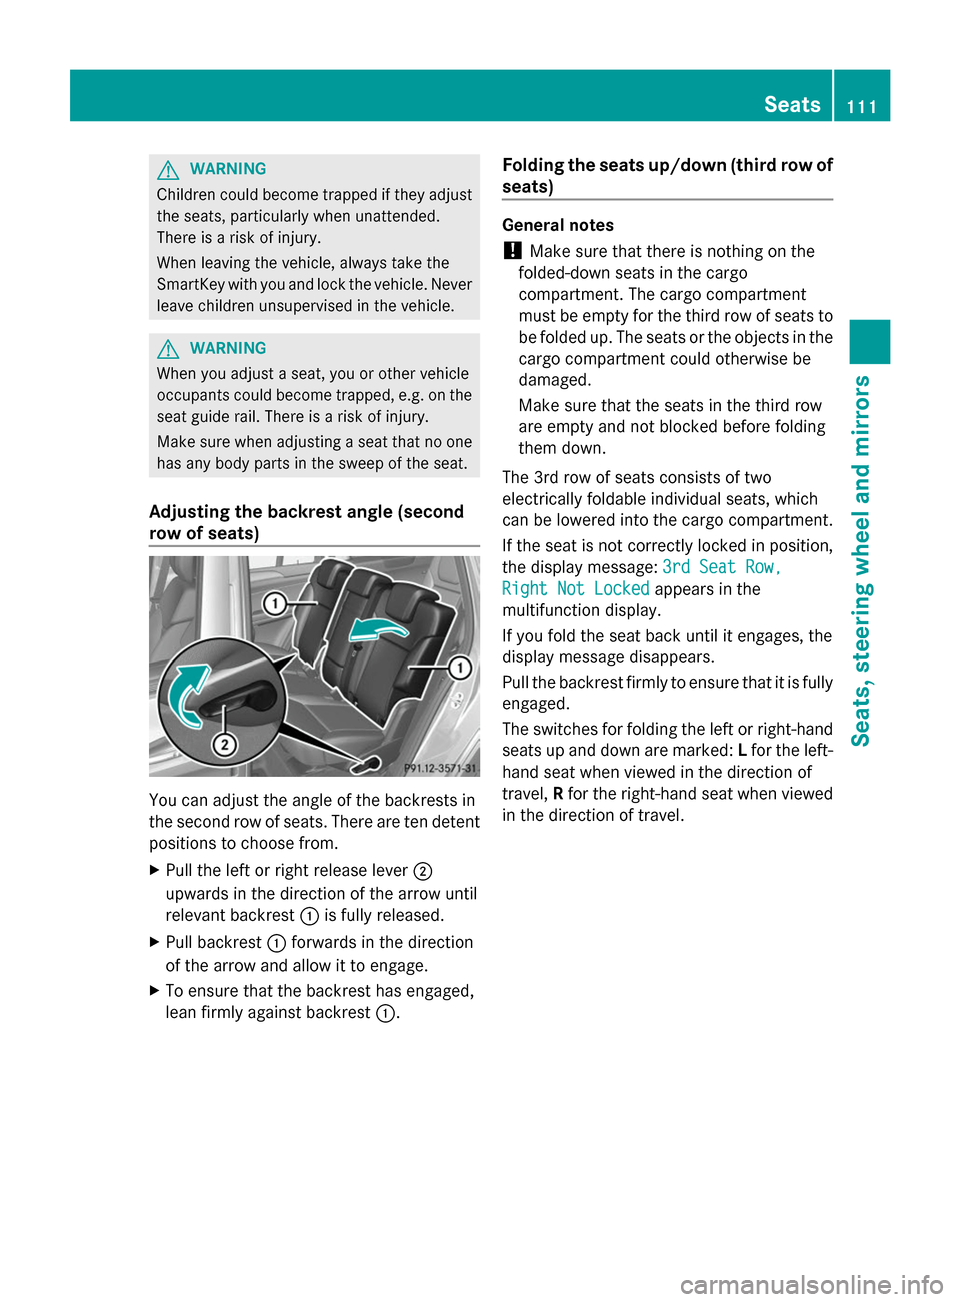
Adjusting the backrest angle (second
row of seats) You can adjust the angle of the backrests in
the second row of seats. There are ten detent
positions to choose from.
X
Pull the left or right release lever ;
upwards in the direction of the arrow until
relevant backrest :is fully released.
X Pull backrest :forwards in the direction
of the arrow and allow it to engage.
X To ensure that the backrest has engaged,
lean firmly against backrest :.Folding the seats up/down (third row of
seats) General notes
!
Make sure that there is nothing on the
folded-down seats in the cargo
compartment. The cargo compartment
must be empty for the third row of seats to
be folded up. The seats or the objects in the
cargo compartment could otherwise be
damaged.
Make sure that the seats in the third row
are empty and not blocked before folding
them down.
The 3rd row of seats consists of two
electrically foldable individual seats, which
can be lowered into the cargo compartment.
If the seat is not correctly locked in position,
the display message: 3rd Seat Row, 3rd Seat Row,
Right Not Locked
Right Not Locked appears in the
multifunction display.
If you fold the seat back until it engages, the
display message disappears.
Pull the backrest firmly to ensure that it is fully
engaged.
The switches for folding the left or right-hand
seats up and down are marked: Lfor the left-
hand seat when viewed in the direction of
travel, Rfor the right-hand seat when viewed
in the direction of travel. Seats
111Seats, steering wheel and mirrors Z
Page 114 of 462

Folding forwards/back in the rear
compartment Example:
Rswitch
X To fold down: fold the right-hand outer
seat in the second row of seats forwards
(Y page 113).
X Briefly pull switch :.
The seat folds up.
X To stop the automatic folding: briefly pull
switch :again.
X To fold down: briefly press switch :.
The seat folds down.
X To stop the automatic folding: briefly
press switch :again.
Folding down/up in the cargo
compartment Example:
Lswitch
X To fold down: fold the right-hand outer
seat in the second row of seats forwards
(Y page 113).
X Briefly press switch :.
The seat folds up. X
To stop the automatic folding: briefly
press switch :again.
X To fold down: briefly pull switch :.
The seat folds down.
X To stop the automatic folding: briefly pull
switch :again.
Detachable panel (third row of seats) !
If there are objects underneath the seat,
the seat can no longer be folded up or down
fully. The seat could be damaged.
Only drive with the panel completely
installed. If you drop objects underneath the seats in
the 3rd row, you can remove the panel in
order to reach beneath the seat.
X
To open: fold the corresponding seat up or
down (Y page 111).
X Once the seat is folded halfway up or down,
briefly press the button again to stop the
automatic movement.
X Grasp the panel recess.
X Pull the panel in the direction of the arrow
and remove it.
X To close: fold the corresponding seat up or
down (Y page 111).
X Once the seat is folded halfway up or down,
briefly press the button again to stop the
automatic movement.
X Attach the panel using the guide pins.
X Push the panel downwards until it engages.
X Fold the seat up and down fully to check
that the panel is seated correctly. 112
SeatsSeats, steering wheel and
mirrors
Page 115 of 462
Folding down the seats in the second
row manually Important safety notes
G
WARNING
If the seat and backrest are not engaged, they
can fold forwards, e.g. in the event of sudden
braking or an accident.
R This will cause the vehicle occupants to be
forced into the seat belt by a seat or
backrest which is not engaged. The seat
belt can no longer offer the intended level
of protection and could even cause injuries.
R A child restraint system would no longer be
anchored or positioned correctly and would
not be able to perform its required function.
R The seat backrests cannot restrain objects
or loads in the cargo compartment.
There is an increased risk of injury.
Always make sure that the seat and backrest
are engaged as described:
R before traveling with a passenger on a seat
with the EASY-ENTRY/EXIT feature
R after you have adjusted the seat
R after the EASY-ENTRY/EXIT feature has
been used
R after the cargo compartment enlargement
has been folded forwards G
WARNING
The seat does not engage in the entry/exit
position. The seat could fold back suddenly,
e.g. when accelerating, braking, changing
direction suddenly or in the event of an
accident. Persons in the sweep of the seat
could become trapped. There is a risk of
injury.
Always fold back a seat which has been folded
forwards before you pull away. Make sure that
the seat and backrest engage fully.
General notes
To enter or exit the third row of seats: the
outer left and right seats of the second row
can be folded down. One of the outer seats of the 2nd row is in the
entry/exit position: the multifunction display
shows, e.g. the
2nd 2ndSeat
Seat Row,
Row,Right
Right Not
Not
Locked
Locked display message.
If you fold the seat back until it engages, the
display message disappears.
Pull the backrest firmly to ensure that it is fully
engaged.
i Further related subjects:
R Cargo compartment enlargement
(folding the second row of seats
forwards) ( Ypage 344)
R Folding the seats in the third row
forwards/back (Y page 111)
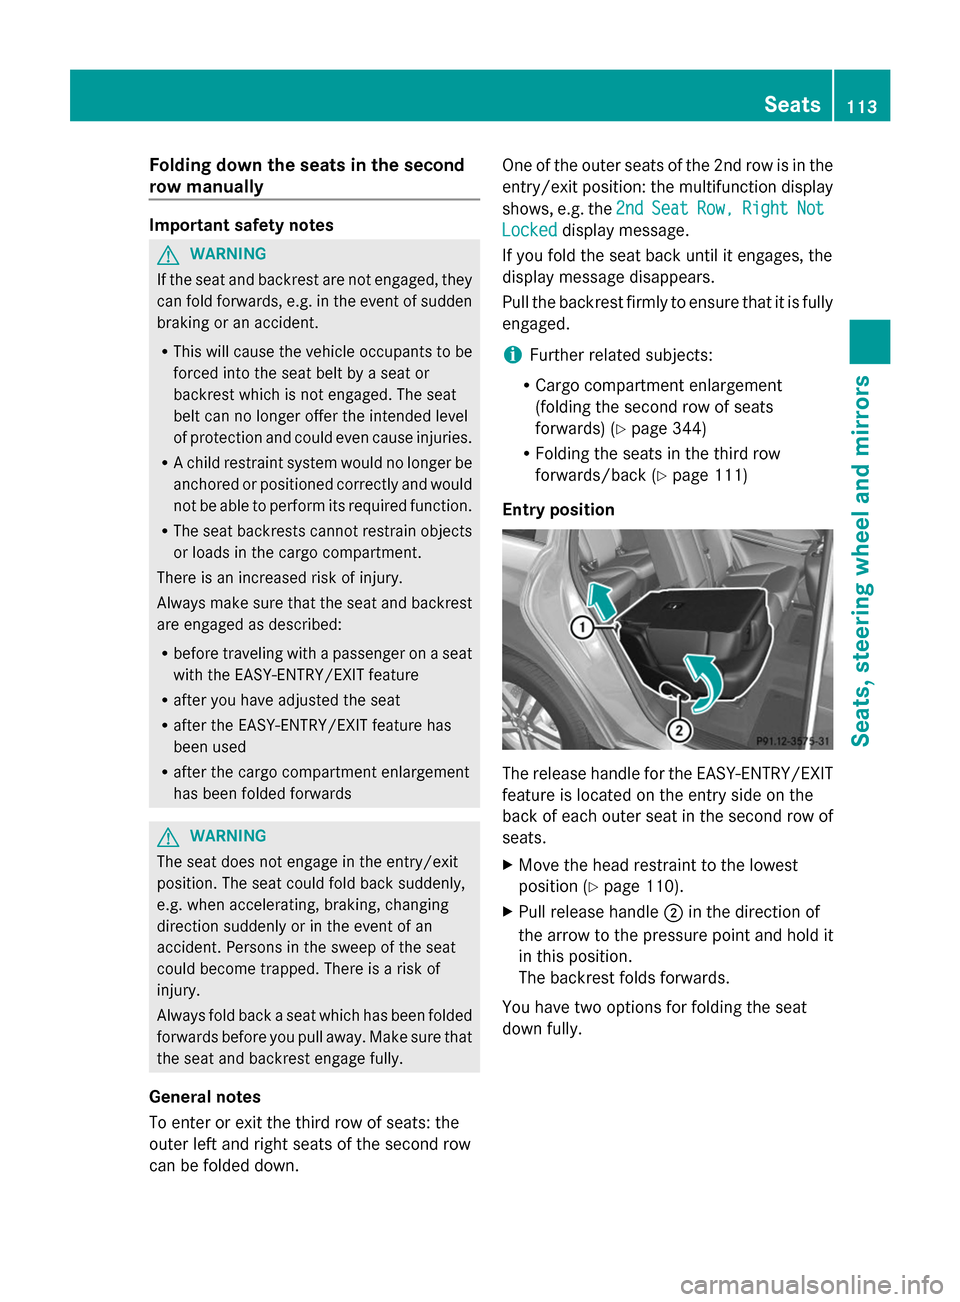
Entry position The release handle for the EASY-ENTRY/EXIT
feature is located on the entry side on the
back of each outer seat in the second row of
seats.
X
Move the head restraint to the lowest
position (Y page 110).
X Pull release handle ;in the direction of
the arrow to the pressure point and hold it
in this position.
The backrest folds forwards.
You have two options for folding the seat
down fully. Seats
113Seats, steering wheel and mirrors Z
Page 116 of 462
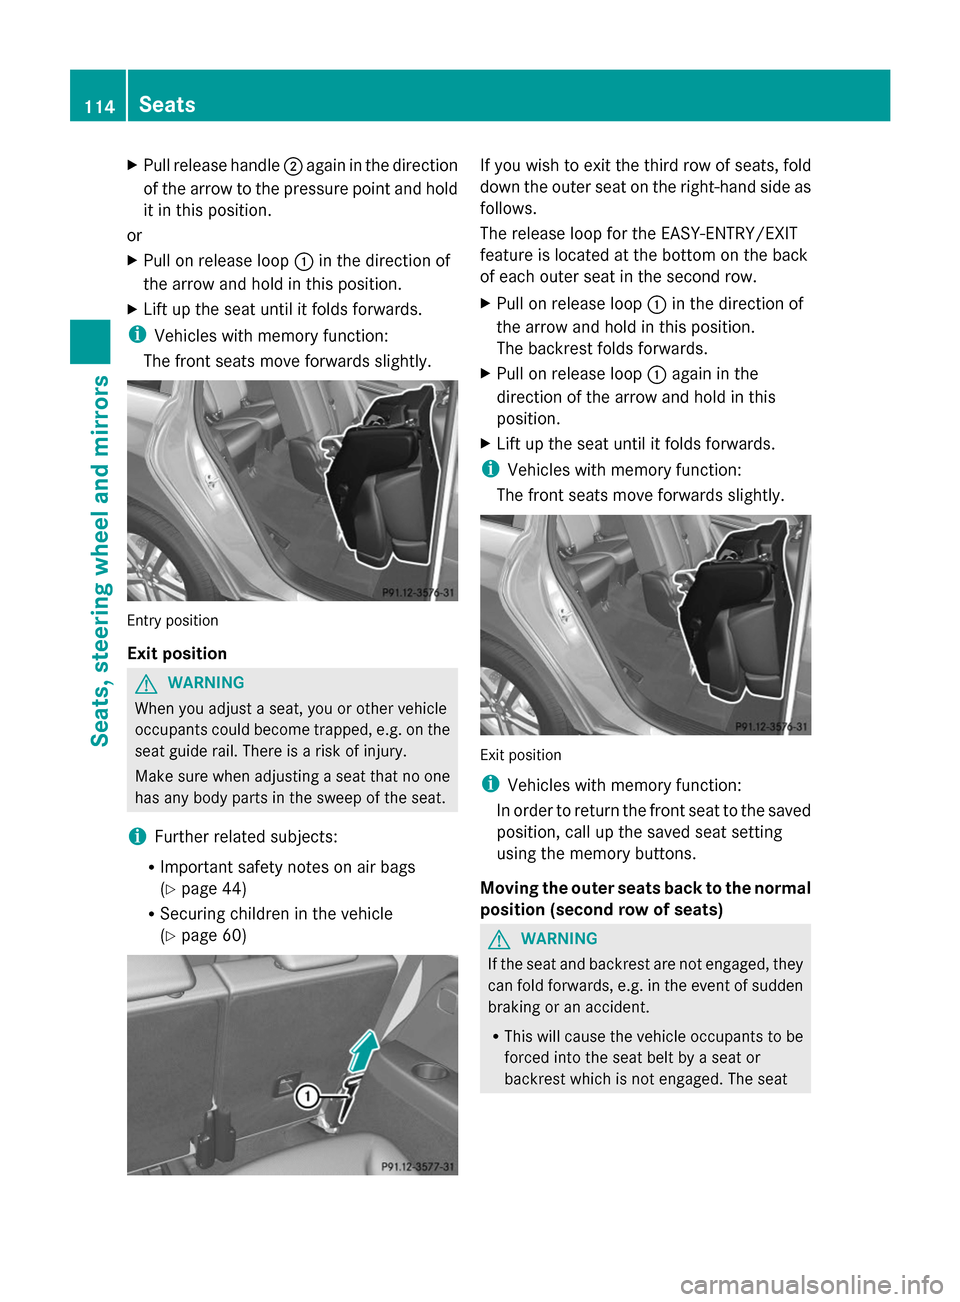
X
Pull release handle ;again in the direction
of the arrow to the pressure point and hold
it in this position.
or
X Pull on release loop :in the direction of
the arrow and hold in this position.
X Lift up the seat until it folds forwards.
i Vehicles with memory function:
The front seats move forwards slightly. Entry position
Exit position
G
WARNING
When you adjust a seat, you or other vehicle
occupants could become trapped, e.g. on the
seat guide rail. There is a risk of injury.
Make sure when adjusting a seat that no one
has any body parts in the sweep of the seat.
i Further related subjects:
R Important safety notes on air bags
(Y page 44)
R Securing children in the vehicle
(Y page 60) If you wish to exit the third row of seats, fold
down the outer seat on the right-hand side as
follows.
The release loop for the EASY-ENTRY/EXIT
feature is located at the bottom on the back
of each outer seat in the second row.
X
Pull on release loop :in the direction of
the arrow and hold in this position.
The backrest folds forwards.
X Pull on release loop :again in the
direction of the arrow and hold in this
position.
X Lift up the seat until it folds forwards.
i Vehicles with memory function:
The front seats move forwards slightly. Exit position
i
Vehicles with memory function:
In order to return the front seat to the saved
position, call up the saved seat setting
using the memory buttons.
Moving the outer seats back to the normal
position (second row of seats) G
WARNING
If the seat and backrest are not engaged, they
can fold forwards, e.g. in the event of sudden
braking or an accident.
R This will cause the vehicle occupants to be
forced into the seat belt by a seat or
backrest which is not engaged. The seat 114
SeatsSeats, steering wheel and mirrors
Page 117 of 462
belt can no longer offer the intended level
of protection and could even cause injuries.
R A child restraint system would no longer be
anchored or positioned correctly and would
not be able to perform its required function.
R The seat backrests cannot restrain objects
or loads in the cargo compartment.
There is an increased risk of injury.
Always make sure that the seat and backrest
are engaged as described:
R before traveling with a passenger on a seat
with the EASY-ENTRY/EXIT feature
R after you have adjusted the seat
R after the EASY-ENTRY/EXIT feature has
been used
R after the cargo compartment enlargement
has been folded forwards G
WARNING
The seat does not engage in the entry/exit
position. The seat could fold back suddenly,
e.g. when accelerating, braking, changing
direction suddenly or in the event of an
accident. Persons in the sweep of the seat
could become trapped. There is a risk of
injury.
Always fold back a seat which has been folded
forwards before you pull away. Make sure that
the seat and backrest engage fully.
X To lock the seat: fold back the seat until
it engages.
X Fold back the backrest until it engages.
Folding down the seats in the second
row electrically Important safety notes
G
WARNING
If the seat and backrest are not engaged, they
can fold forwards, e.g. in the event of sudden
braking or an accident.
R This will cause the vehicle occupants to be
forced into the seat belt by a seat or backrest which is not engaged. The seat
belt can no longer offer the intended level
of protection and could even cause injuries.
R A child restraint system would no longer be
anchored or positioned correctly and would
not be able to perform its required function.
R The seat backrests cannot restrain objects
or loads in the cargo compartment.
There is an increased risk of injury.
Always make sure that the seat and backrest
are engaged as described:
R before traveling with a passenger on a seat
with the EASY-ENTRY/EXIT feature
R after you have adjusted the seat
R after the EASY-ENTRY/EXIT feature has
been used
R after the cargo compartment enlargement
has been folded forwards G
WARNING
The seat does not engage in the entry/exit
position. The seat could fold back suddenly,
e.g. when accelerating, braking, changing
direction suddenly or in the event of an
accident. Persons in the sweep of the seat
could become trapped. There is a risk of
injury.
Always fold back a seat which has been folded
forwards before you pull away. Make sure that
the seat and backrest engage fully.
General notes
To enter or exit the third row of seats: the
outer left and right seats of the second row
can be folded down electrically.
One of the outer seats of the second row is in
the entry/exit position: the multifunction
display shows, e.g. the 2nd Seat Row, 2nd Seat Row,
Right Not locked
Right Not locked display message.
If you fold the seat back until it engages, the
display message disappears.
Pull the backrest firmly to ensure that it is fully
engaged. Seats
115Seats, steering wheel and mirrors Z
Page 118 of 462
i
Further related subjects:
R Cargo compartment enlargement
(folding the second row of seats
forwards) (Y page 344)
R Folding the seats in the third row
forwards/back (Y page 111)
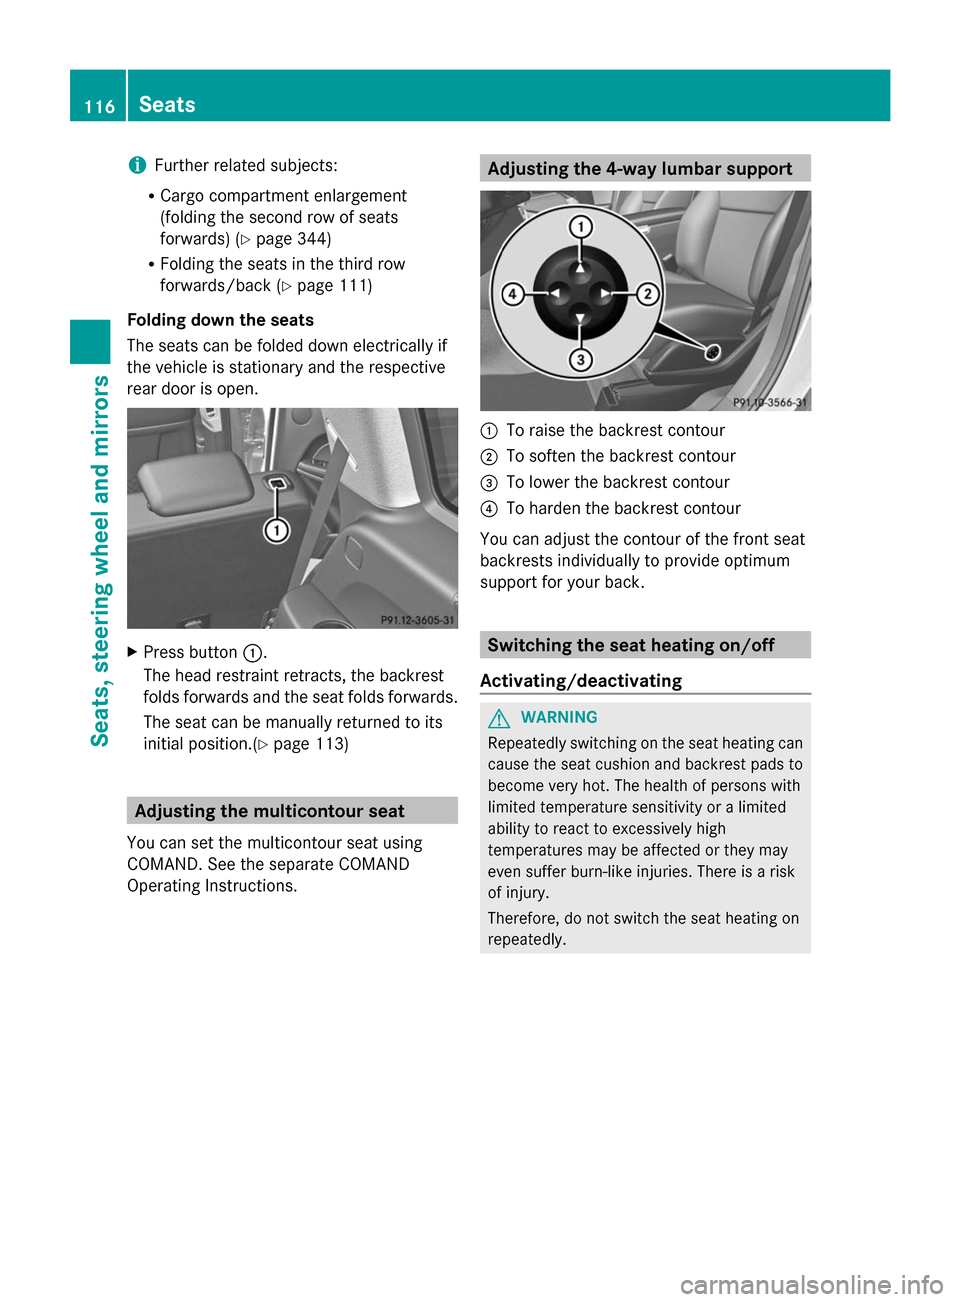
Folding down the seats
The seats can be folded down electrically if
the vehicle is stationary and the respective
rear door is open. X
Press button :.
The head restraint retracts, the backrest
folds forwards and the seat folds forwards.
The seat can be manually returned to its
initial position.(Y page 113) Adjusting the multicontour seat
You can set the multicontour seat using
COMAND. See the separate COMAND
Operating Instructions. Adjusting the 4-way lumbar support
:
To raise the backrest contour
; To soften the backrest contour
= To lower the backrest contour
? To harden the backrest contour
You can adjust the contour of the front seat
backrests individually to provide optimum
support for your back. Switching the seat heating on/off
Activating/deactivating G
WARNING
Repeatedly switching on the seat heating can
cause the seat cushion and backrest pads to
become very hot. The health of persons with
limited temperature sensitivity or a limited
ability to react to excessively high
temperatures may be affected or they may
even suffer burn-like injuries. There is a risk
of injury.
Therefore, do not switch the seat heating on
repeatedly. 116
SeatsSeats, steering wheel and mirrors
Page 119 of 462
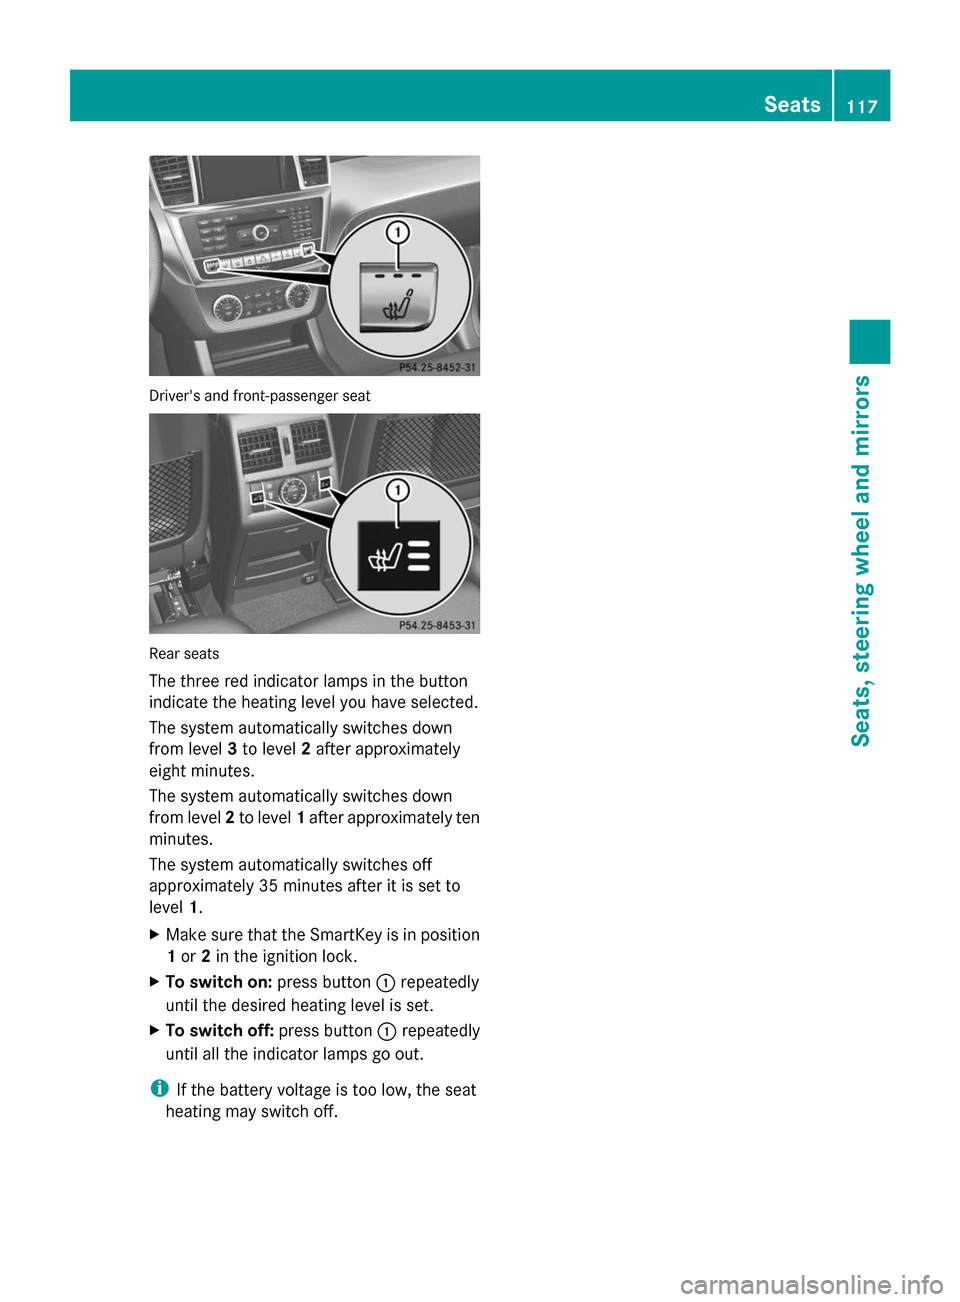
Driver's and front-passenger seat
Rear seats
The three red indicator lamps in the button
indicate the heating level you have selected.
The system automatically switches down
from level 3to level 2after approximately
eight minutes.
The system automatically switches down
from level 2to level 1after approximately ten
minutes.
The system automatically switches off
approximately 35 minutes after it is set to
level 1.
X Make sure that the SmartKey is in position
1 or 2in the ignition lock.
X To switch on: press button:repeatedly
until the desired heating level is set.
X To switch off: press button:repeatedly
until all the indicator lamps go out.
i If the battery voltage is too low, the seat
heating may switch off. Seats
117Seats, steering wheel and mirrors Z
Page 120 of 462
Problems with the seat heating
Problem Possible causes/consequences and
M
MSolutions The seat heating has
switched off
prematurely or cannot
be switched on. The on-board voltage is too low because too many electrical
consumers are switched on.
X Switch off electrical consumers that you do not need, such as
the rear window defroster or interior lighting.
Once the battery is sufficiently charged, the seat heating will
switch back on automatically. Switching the seat ventilation on/off
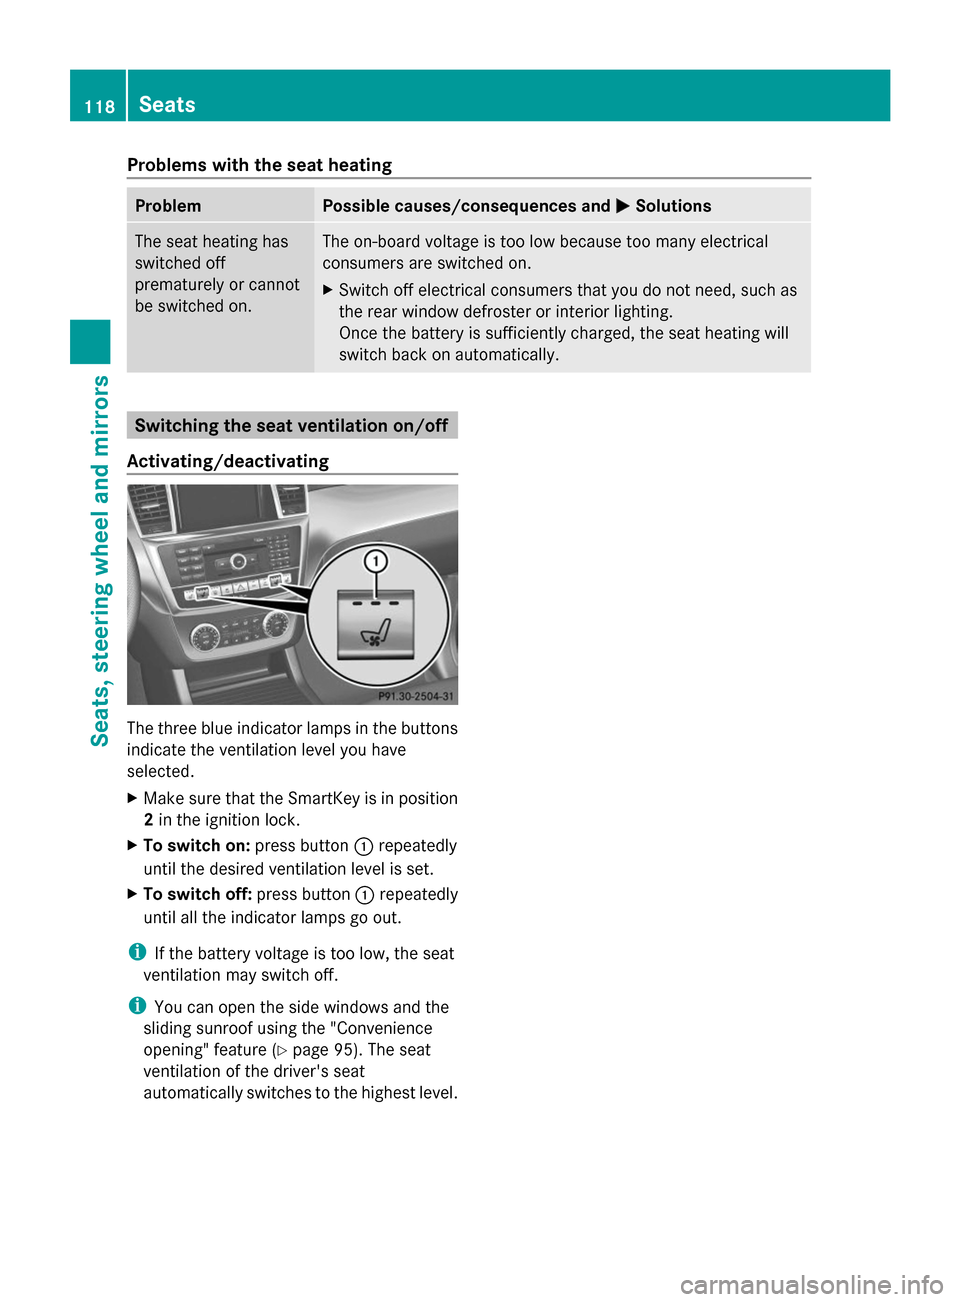
Activating/deactivating The three blue indicator lamps in the buttons
indicate the ventilation level you have
selected.
X Make sure that the SmartKey is in position
2 in the ignition lock.
X To switch on: press button:repeatedly
until the desired ventilation level is set.
X To switch off: press button:repeatedly
until all the indicator lamps go out.
i If the battery voltage is too low, the seat
ventilation may switch off.
i You can open the side windows and the
sliding sunroof using the "Convenience
opening" feature (Y page 95). The seat
ventilation of the driver's seat
automatically switches to the highest level. 118
SeatsSeats, steering wheel and mirrors