display MERCEDES-BENZ GL-Class 2016 X166 Repair Manual
[x] Cancel search | Manufacturer: MERCEDES-BENZ, Model Year: 2016, Model line: GL-Class, Model: MERCEDES-BENZ GL-Class 2016 X166Pages: 462, PDF Size: 10.44 MB
Page 201 of 462
specialist workshop as soon as possible.
Adapt your driving style to the different brak-
ing characteristics.
Driving off-road increases the likelihood of
damage to the vehicle, which, in turn, can lead
to failure of the mechanical assembly or sys-
tems. Adapt your driving style to suit the ter-
rain conditions. Drive carefully. Have damage
to the vehicle rectified immediately at a quali-
fied specialist workshop.
Do not switch to transmission positionN
when driving off-road. If you try to brake the
vehicle using the service brake, you could
lose control of the vehicle. If the gradient is
too steep for your vehicle, drive back down in
reverse gear.
General notes
Read this section carefully before driving your
vehicle off-road. Practice by driving over more
gentle off-road terrain first.
Familiarize yourself with the characteristics
of your vehicle and the gear shift operation
before driving through difficult terrain.
The following driving systems are specially
adapted to off-road driving:
ROff-road program 1 and 2 (vehicles with the
ON&OFFROAD package) (
Ypage 258)
RLOW RANGE off-road gear (vehicles with
the ON&OFFROAD package)
(
Ypage 259)
RDifferential lock (vehicles with the
ON&OFFROAD package) (
Ypage 259)
ROff-road ABS (Ypage 69)
ROff-road 4ETS (Ypage 73)
RAIRMATIC package (vehicle level)
(
Ypage 218)
RDSR (Downhill Speed Regulation)
(
Ypage 257)
Observe the following notes:
RStop the vehicle before starting to drive
along an off-road route.
RSelect a vehicle level that is suitable for the
terrain. To avoid damaging the vehicle, make sure there is always sufficient ground
clearance.
RCheck that items of luggage and loads are
stowed safely and are well secured
(
Ypage 345).
RAlways keep the engine running and in gear
when driving on a downhill gradient. Acti-
vate DSR (
Ypage 257).
RAlways keep the engine running and in gear
when driving on a slope.
RAdapt your speed to the terrain. The
rougher, steeper or more ruts on the ter-
rain, the slower your speed should be.
RDo not jump with the vehicle as this will
interrupt the vehicle's propulsion.
RDrive with extreme care on unfamiliar off-
road routes where visibility is poor. For
safety reasons, get out of the vehicle first
and survey the off-road route.
RLook out for obstacles, such as rocks,
holes, tree stumps and furrows.
RAlways keep the doors, the tailgate, the
side windows and the sliding sunroof
closed while the vehicle is in motion.
RDo not shift the automatic transmission to
transmission position N.
RObserve the notes on off-road fording
(
Ypage 197).
iDo not use the HOLD function when driv-
ing off-road, on steep uphill or downhill gra-
dients or on slippery or loose surfaces. The
HOLD function cannot hold the vehicle on
such surfaces.
Checklist before driving off-road
!If the engine oil warning lamp lights up
while the vehicle is in motion, stop the vehi- cle in a safe place as soon as possible.
Check the engine oil level. The engine oil
warning lamp warning must not be ignored.
Continuing the journey while the symbol is
displayed could lead to engine damage.
XEngine oil level: check the engine oil level
and add oil if necessary.
Driving tips199
Driving and parking
Z
Page 205 of 462
select a lower gear in good time on long and
steep downhill gradients, especially if the
vehicle is laden or towing a trailer. By doing
so, you will make use of the braking effect of
the engine. This relieves the load on the brake
system and prevents the brakes from over-
heating and wearing too quickly.
Use cruise control only if road and traffic con-
ditions make it appropriate to maintain a
steady speed for a prolonged period. You can
store any road speed above 20 mph
(30 km/h).
iCruise control should not be activated
when driving off-road.
Important safety notes
If you fail to adapt your driving style, cruise
control can neither reduce the risk of an acci-
dent nor override the laws of physics. Cruise
control cannot take into account the road,
traffic and weather conditions. Cruise control
is only an aid. You are responsible for the dis-
tance to the vehicle in front, for vehicle speed,
for braking in good time and for staying in
your lane.
Do not use cruise control:
Rin road and traffic conditions which do not
allow you to maintain a constant speed e.g.
in heavy traffic or on winding roads
Ron slippery road surfaces. Braking or accel- erating could cause the drive wheels to lose
traction and the vehicle could then skid
Rwhen there is poor visibility, e.g. due to fog,
heavy rain or snow
If there is a change of drivers, advise the new
driver of the speed stored.
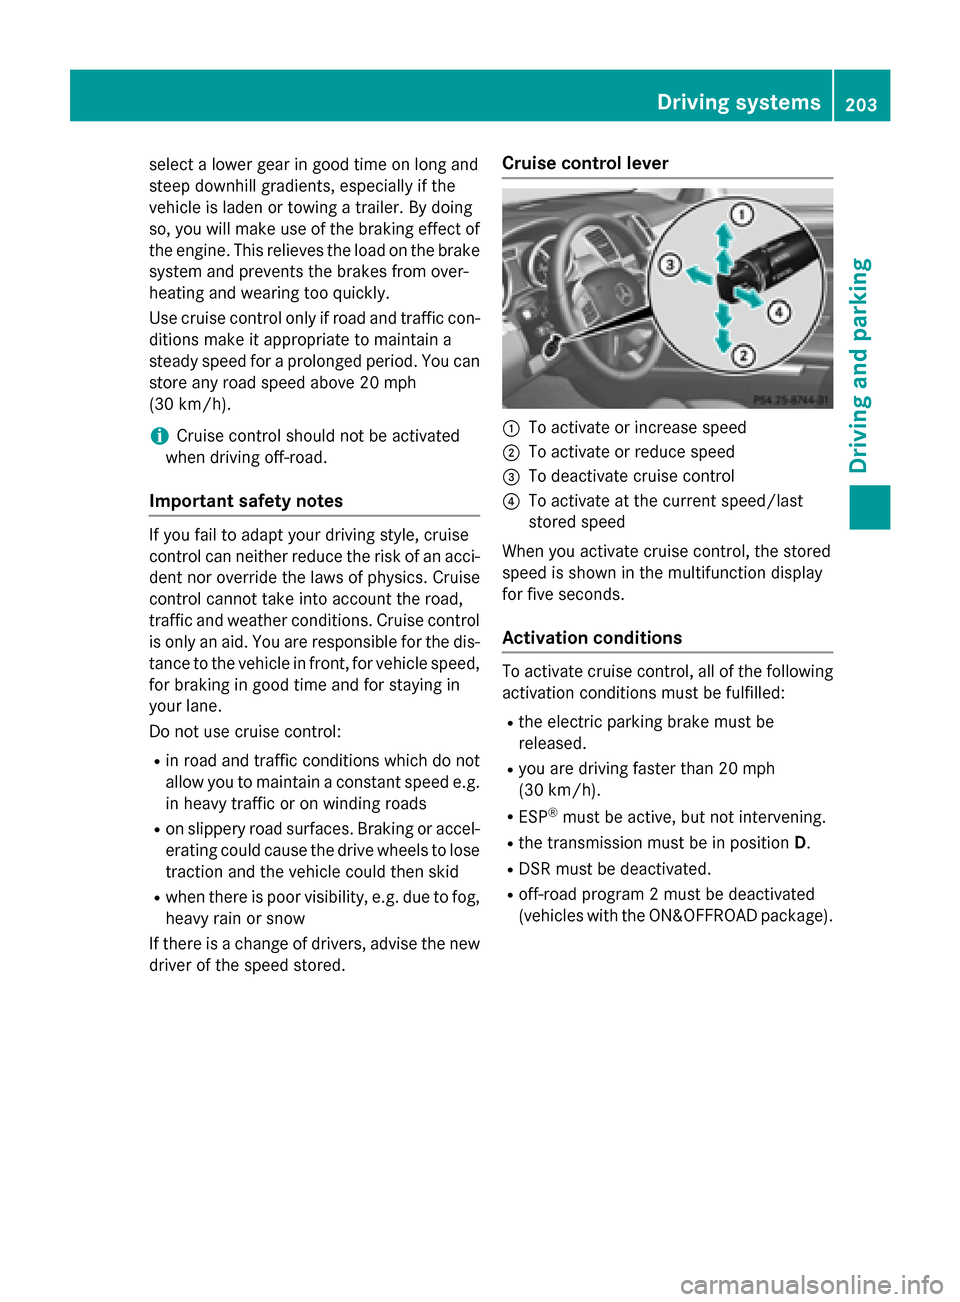
Cruise control lever
:To activate or increase speed
;To activate or reduce speed
=To deactivate cruise control
?To activate at the current speed/last
stored speed
When you activate cruise control, the stored
speed is shown in the multifunction display
for five seconds.
Activation conditions
To activate cruise control, all of the following
activation conditions must be fulfilled:
Rthe electric parking brake must be
released.
Ryou are driving faster than 20 mph
(30 km/h).
RESP®must be active, but not intervening.
Rthe transmission must be in position D.
RDSR must be deactivated.
Roff-road program 2 must be deactivated
(vehicles with the ON&OFFROAD package).
Driving systems203
Driving and parking
Z
Page 210 of 462
Activating
XBrieflypullthe cruise control lever towards
you =, up :ordown ?.
DI ST RONIC PLUS isselected.
XTo ad just the set speed in 1 mph incre-
ments (1 km/h increments): briefly
press the cruise control lever up :to the
pressure point for a higher speed, or
down ?for a lower speed.
Every time the cruise control lever is
pressed up or down, the last speed stored
is increased or reduced.
or
XTo ad just the set speed in 5 mph incre-
ments (10 km/h increments): briefly
press the cruise control lever up :past
the pressure point for a higher speed, or
down ?for a lower speed.
Every time the cruise control lever is
pressed up or down, the last speed stored
is increased or reduced.
XRemove your foot from the accelerator
pedal.
Your veh icleadapts its speed to that of the
veh icle in front, but only up to the desired
stored speed.
When driving at speeds below 20 mph
(30 km /h), you can only activate DISTRONIC
PLUS ifthe vehicle infront has been detected
and isshown in the multifunction display. If
the veh icle infrontisno longer detected and
disp layed, for example because ithas
changed lanes, DI STRONIC PLUS isdeactiva-
te d. You willhear a warning tone ifth is is the
case.
iIf you donot fully release the accelerator
pedal, theDISTRONIC
PLUSPassivemes-
sage appears inthe multifunction display.
The set distance to a slower-moving vehicle
in front willthen not bemaintaine d.You will
be driv ing at the speed you determine by
the position of the accelerator pedal. Activating at
the current speed/last
stored speed
GWARNIN G
If you call up th estore dspee dand it differs
from th ecurren tspeed, th evehicl eacceler -
ate sor decelerates. If you do no tknow th e
store dspeed, th evehicl ecould accelerate or
brak eune xpectedly. Ther eis aris kof an acci-
dent.
Pay attentio nto th eroad and traffic condi-
tions before calling up th estore dspeed. If you
do no tknow th estore dspeed, store th e
desired spee dagain .
XBriefly pullthe cruise control lever towards
you =.
XRemo veyour foot from the accelerator
pedal.
DI ST RONIC PLUS isoperational and when
first activated accepts the current speed or adjusts the vehicle's speed to the last
speed store d.
Driving with DISTRONIC PLUS
Pulling away and driving
XIfyou want topull away with
DISTRO NIC PLUS: remove your foot from
the brake pedal.
XBriefly pull the cruise control lever towards
you =, up :or down ?.
or
XAccelerate briefly.
Your veh iclepulls away and adapts its
speed to that of the vehicle infront.
If there isno vehicle infront, DI STRONIC
PLUS operates inthe same way as cruise
control.
If DI ST RONIC PLUS detects that the vehicle in
front has slowed down,it brakes your vehicle.
In this way, the distance you have selected is
maintaine d.
If DI ST RONIC PLUS detects a faster-moving
vehicle infront, itincreases the driving speed.
208Driving systems
Driving and parking
Page 212 of 462
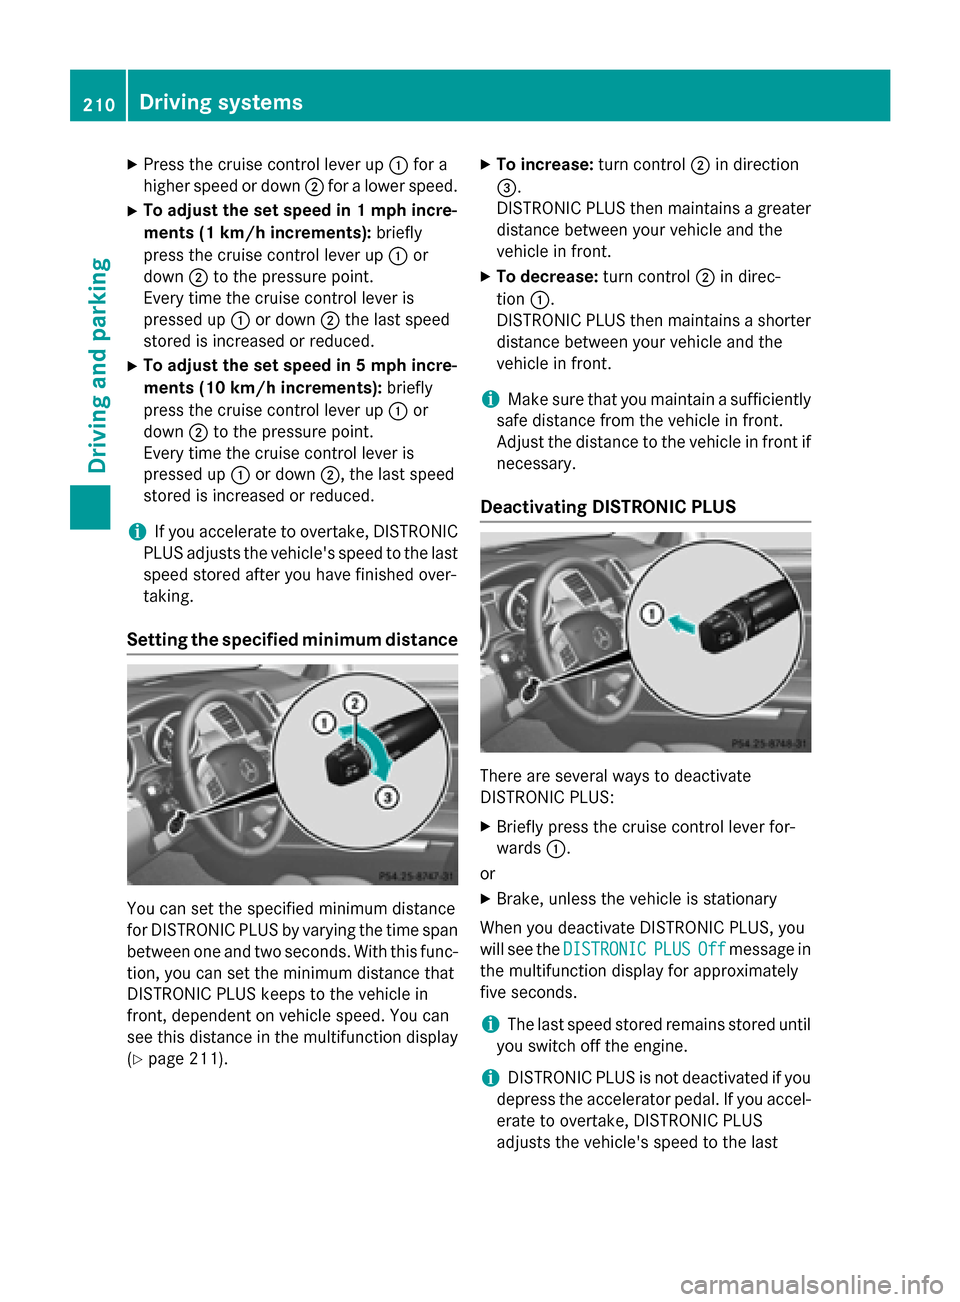
XPress the cruise control lever up:for a
higher speed or down ;for a lower speed.
XTo adjust the set speed in 1 mph incre-
ments (1 km/h increments): briefly
press the cruise control lever up :or
down ;to the pressure point.
Every time the cruise control lever is
pressed up :or down ;the last speed
stored is increased or reduced.
XTo adjust the set speed in 5 mph incre-
ments (10 km/h increments): briefly
press the cruise control lever up :or
down ;to the pressure point.
Every time the cruise control lever is
pressed up :or down ;, the last speed
stored is increased or reduced.
iIf you accelerate to overtake, DISTRONIC
PLUS adjusts the vehicle's speed to the last
speed stored after you have finished over-
taking.
Setting the specified minimum distance
You can set the specified minimum distance
for DISTRONIC PLUS by varying the time span
between one and two seconds. With this func-
tion, you can set the minimum distance that
DISTRONIC PLUS keeps to the vehicle in
front, dependent on vehicle speed. You can
see this distance in the multifunction display
(
Ypage 211).
XTo increase: turn control;in direction
=.
DISTRONIC PLUS then maintains a greater
distance between your vehicle and the
vehicle in front.
XTo decrease: turn control;in direc-
tion :.
DISTRONIC PLUS then maintains a shorter distance between your vehicle and the
vehicle in front.
iMake sure that you maintain a sufficiently
safe distance from the vehicle in front.
Adjust the distance to the vehicle in front if
necessary.
Deactivating DISTRONIC PLUS
There are several ways to deactivate
DISTRONIC PLUS:
XBriefly press the cruise control lever for-
wards :.
or
XBrake, unless the vehicle is stationary
When you deactivate DISTRONIC PLUS, you
will see the DISTRONIC
PLUSOffmessage in
the multifunction display for approximately
five seconds.
iThe last speed stored remains stored until
you switch off the engine.
iDISTRONIC PLUS is not deactivated if you
depress the accelerator pedal. If you accel- erate to overtake, DISTRONIC PLUS
adjusts the vehicle's speed to the last
210Driving systems
Driving and parking
Page 213 of 462
speed stored after you have finished over-
taking.
DISTRONIC PLUS is automatically deactiva-
ted if:
Ryou engage the electric parking brake or if
the vehicle is automatically secured with
the electric parking brake
Ryou are driving slower than 15 mph
(25 km/h) and there is no vehicle in front,
or if the vehicle in front is no longer detec-
ted
RESP®intervenes or you deactivate ESP®
Rthe transmission is in the P,Ror Nposition
Ryou pull the cruise control lever towards
you in order to pull away and the front-
passenger door or one of the rear doors is
open
Ryou activate DSR
Ryou activate off-road program 2 on vehicles
with the ON&OFFROAD package
Rthe vehicle has skidded
If DISTRONIC PLUS is deactivated, you will
hear a warning tone. You will see the
DISTRONIC PLUS Off
message in the multi-
function display for approximately five sec-
onds.
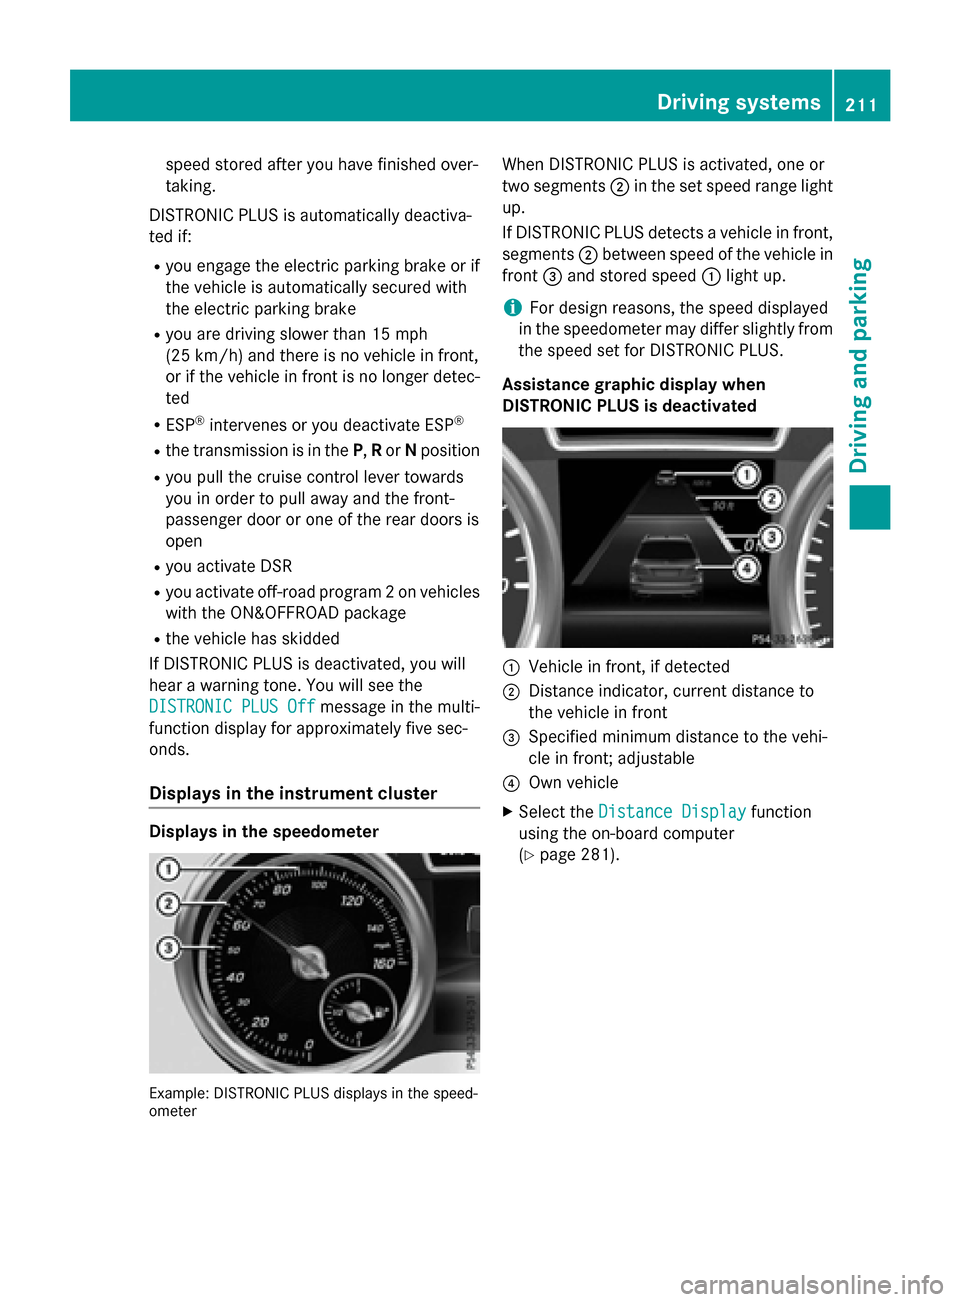
Displays in the instrument cluster
Displays in the speedometer
Example: DISTRONIC PLUS displays in the speed-
ometer
When DISTRONIC PLUS is activated, one or
two segments ;in the set speed range light
up.
If DISTRONIC PLUS detects a vehicle in front,
segments ;between speed of the vehicle in
front =and stored speed :light up.
iFor design reasons, the speed displayed
in the speedometer may differ slightly from
the speed set for DISTRONIC PLUS.
Assistance graphic display when
DISTRONIC PLUS is deactivated
:Vehicle in front, if detected
;Distance indicator, current distance to
the vehicle in front
=Specified minimum distance to the vehi-
cle in front; adjustable
?Own vehicle
XSelect the Distance Displayfunction
using the on-board computer
(
Ypage 281).
Driving systems211
Driving and parking
Z
Page 214 of 462
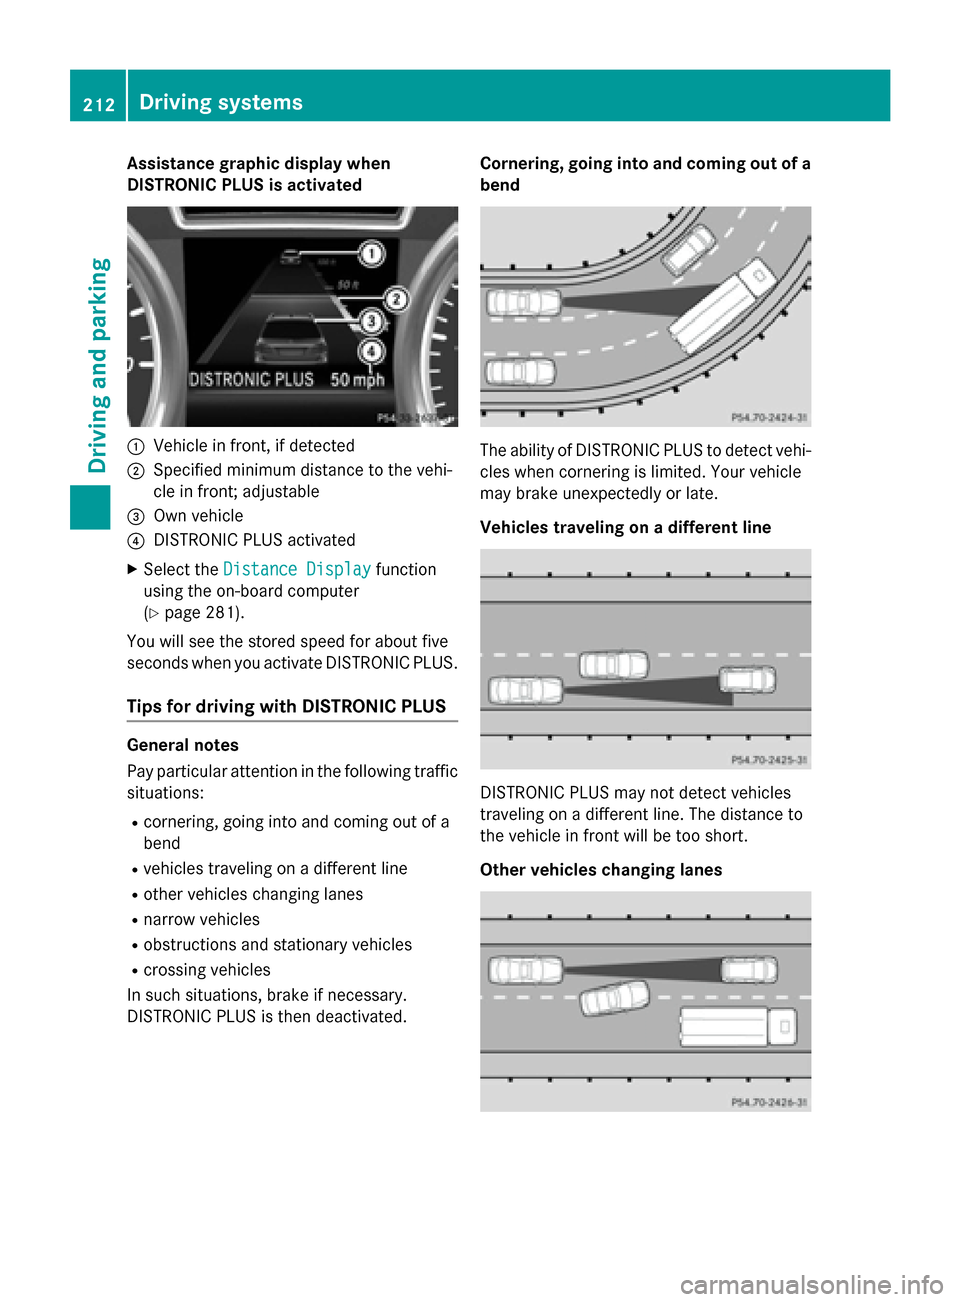
Assistance graphic display when
DISTRONIC PLUS is activated
:Vehicle infront,ifdetected
;Spe cified minimum distance to the veh i-
cle infront; adjustable
=Own veh icle
?DIST RONIC PLUS activated
XSe lect the Distance Displayfunction
using the on-board computer
(
Ypage 281).
You willsee the stored speed for about five
seconds when you activate DI STRONIC PLU S.
Tips for driving with DISTRONIC PLUS
General notes
Pay particular attention inthe following traff ic
situations:
Rcornering, going into and coming out of a
bend
Rveh icles traveling on a different line
Rother veh icles changing lanes
Rnarrow veh icles
Robstructions and stationary vehicles
Rcrossing vehicles
In such situations, brake ifnecessary.
DI ST RONIC PLUS is then deactivated. Corn
ering, going into and coming out ofa
bend
The abilit y of DI STRONIC PLUS to detect veh i-
cles when cornering is limited. Your vehicle
may brake unexpectedly or late.
Vehicles traveling ona different line
DIST RONIC PLUS may not detect vehicles
traveling on a different line. The distance to
the veh icle infrontwill be too short.
Other vehicles changing lanes
212Driving systems
Driving and parking
Page 217 of 462
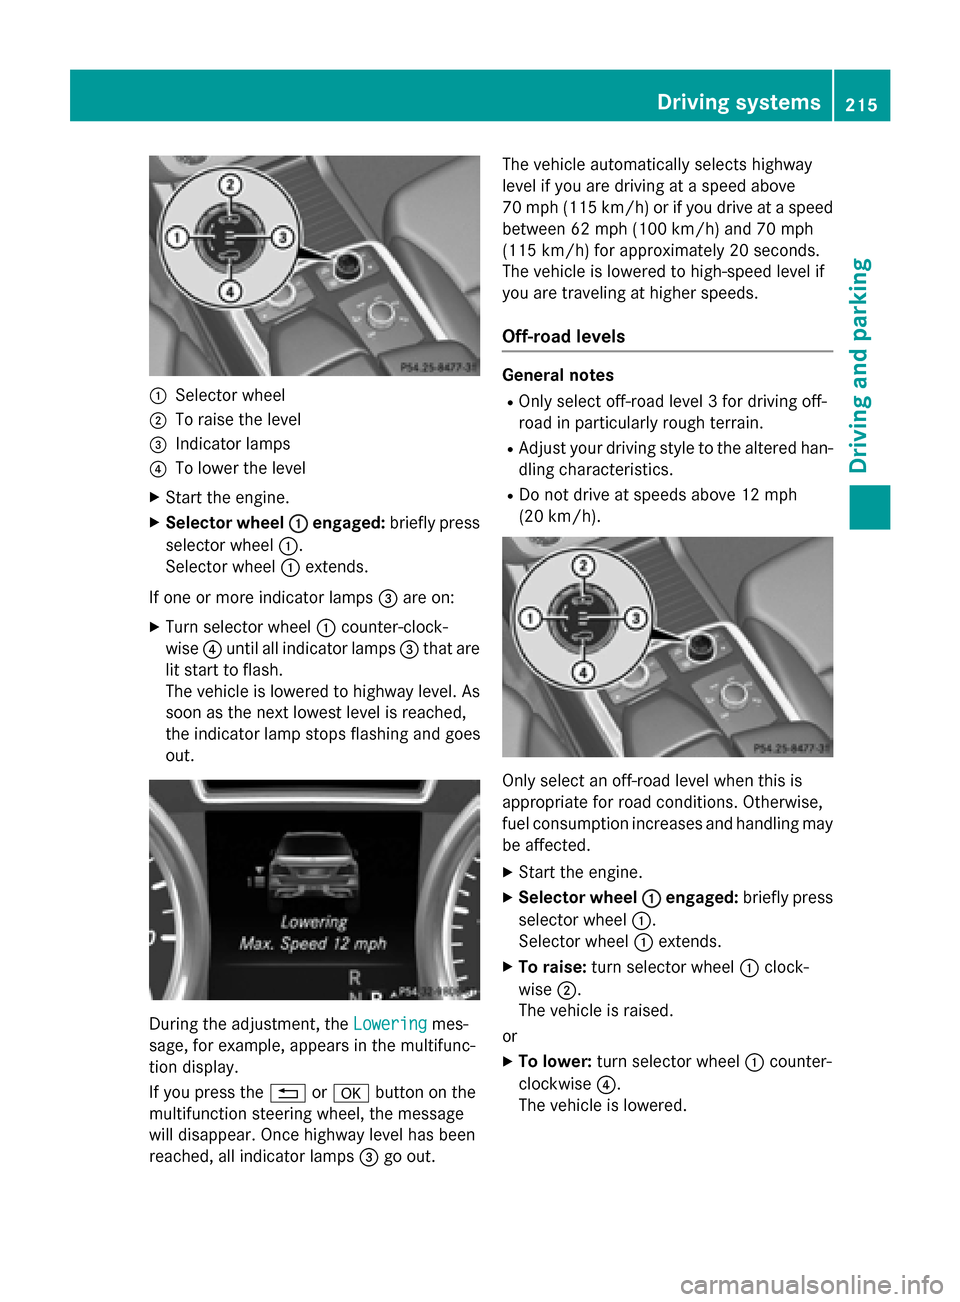
:Selector wheel
;To raise the level
=Indicator lamps
?To lower the level
XStart the engine.
XSelector wheel:engaged:briefly press
selector wheel :.
Selector wheel :extends.
If one or more indicator lamps =are on:
XTurn selector wheel :counter-clock-
wise ?until all indicator lamps =that are
lit start to flash.
The vehicle is lowered to highway level. As
soon as the next lowest level is reached,
the indicator lamp stops flashing and goes
out.
During the adjustment, the Loweringmes-
sage, for example, appears in the multifunc-
tion display.
If you press the %ora button on the
multifunction steering wheel, the message
will disappear. Once highway level has been
reached, all indicator lamps =go out. The vehicle automatically selects highway
level if you are driving at a speed above
70 mph (115 km/h) or if you drive at a speed
between 62 mph (100 km/h) and 70 mph
(115 km/h) for approximately 20 seconds.
The vehicle is lowered to high-speed level if
you are traveling at higher speeds.
Off-road levels
General notes
ROnly select off-road level 3 for driving off-
road in particularly rough terrain.
RAdjust your driving style to the altered han-
dling characteristics.
RDo not drive at speeds above 12 mph
(20 km/h).
Only select an off-road level when this is
appropriate for road conditions. Otherwise,
fuel consumption increases and handling may
be affected.
XStart the engine.
XSelector wheel
:engaged:briefly press
selector wheel :.
Selector wheel :extends.
XTo raise: turn selector wheel :clock-
wise ;.
The vehicle is raised.
or
XTo lower: turn selector wheel :counter-
clockwise ?.
The vehicle is lowered.
Driving systems215
Driving and parking
Z
Page 218 of 462
Indicator lamps=for the desired off-road
level flash:
ROff-road level 1: the lower indicator lamp
flashes
ROff-road level 2: the lower and center indi-
cator lamps flash
ROff-road level 3: all three indicator lamps
flash
The vehicle adjusts to the off-road level selec- ted. As soon as an off-road level is reached,
the corresponding indicator lamp stops flash-
ing and lights up constantly.
Raising the vehicle
During the adjustment, the Vehicle Rising
message, for example, appears in the multi-
function display.
The vehicle rises from highway level to off-
road level 1.
If you press the%ora button on the
multifunction steering wheel, the message
will disappear.
iUp to off-road level 2, you can hide the
messages using the %ora button
on the multifunction steering wheel.
Once off-road level 2 has been reached, the
lower and center indicator lamps of the selec-
tor wheel are on.
While the adjustment from off-road level 2 to
off-road level 3 is taking place, you will see a
message such as the following in the multi-
function display: Vehicle Rising Max.
Speed 12 mph (20 km/h). The
Max. Speed 12 mph (20 km/h)
mes-
sage draws your attention to the maximum
speed permitted for off-road level 3.
Once off-road level 3 has been reached, you
will see a message shown in white in the mul-
tifunction display, for example: Max.
Speed
12 mph (20 km/h).
If you drive above 20 km/h at off-road level 3,
you will see the following message shown in
red in the multifunction display: Vehicle
LoweringMax.Speed12mph (20km/h).
iYou cannot clear these messages.
You also hear a warning. The vehicle is low-
ered and off-road level 3 is canceled.
If you continue to increase your speed, the
red message continues to be shown in the
multifunction display. The newly set level is
not displayed until the vehicle has been set to
a level suitable for the current speed.
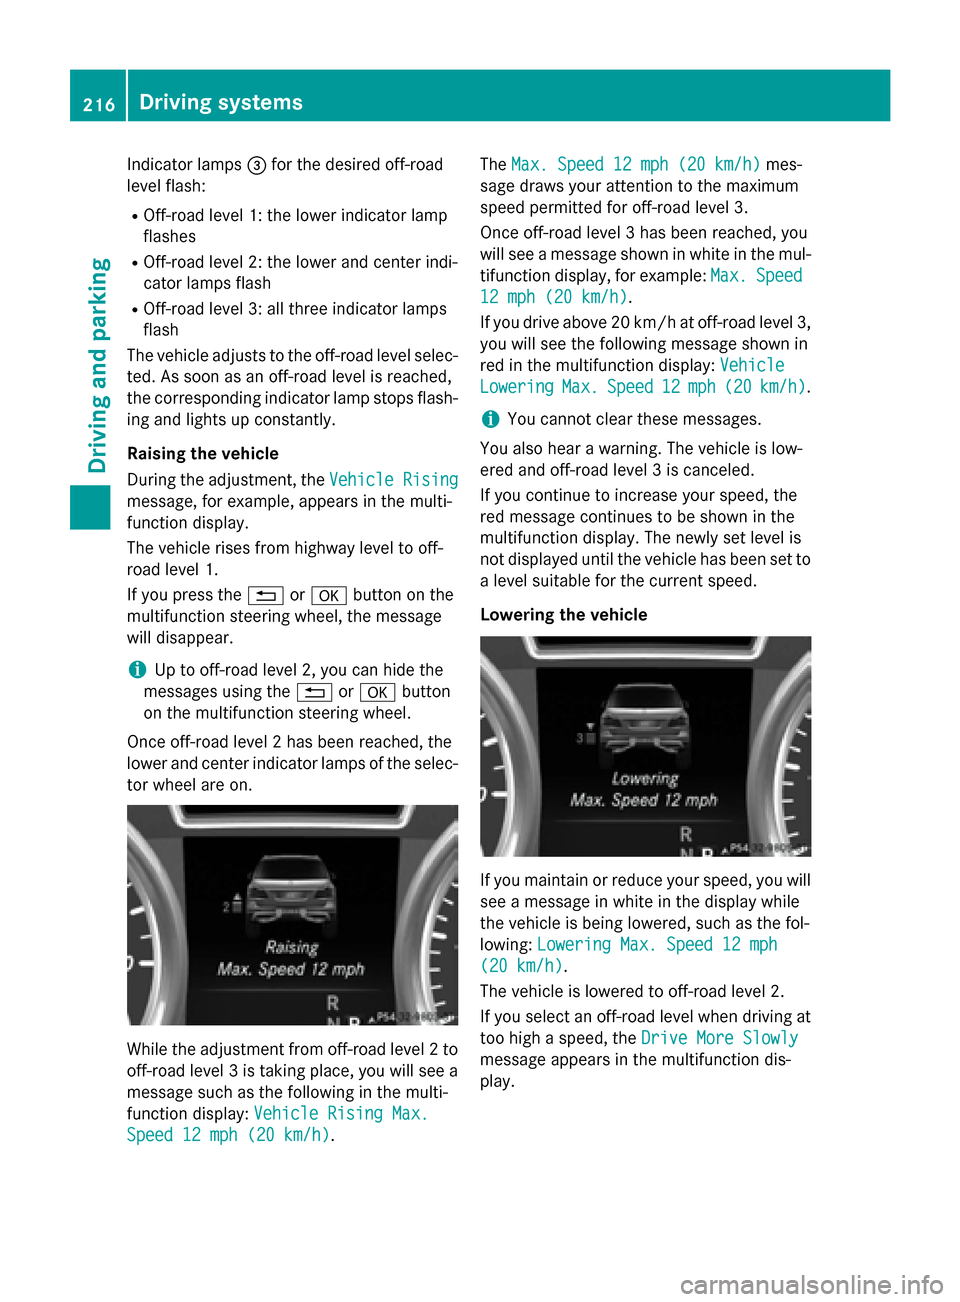
Lowering the vehicle
If you maintain or reduce your speed, you will
see a message in white in the display while
the vehicle is being lowered, such as the fol-
lowing: Lowering Max. Speed 12 mph
(20 km/h).
The vehicle is lowered to off-road level 2.
If you select an off-road level when driving at
too high a speed, the Drive More Slowly
message appears in the multifunction dis-
play.
216Driving systems
Driving and parking
Page 219 of 462
You can select from the following:
ROff-road level 1 at speeds up to 60 mph
(100 km/h)
ROff-road level 2 at speeds up to 40 mph
(65 km/h)
ROff-road level 3 at speeds up to 12 mph
(20 km/h)
If you are driving above 50 mph (80 km/h) or
drive between 40 mph (65 km/h) and 50 mph (80 km/h) for longer than 20 seconds, off-
road level 2 will be canceled. The vehicle is
lowered to off-road level 1.
You will see a message in the multifunction
display, for example: Lowering
.
If you are driving above 70 mph (115 km/h) or
drive between 62 mph (100 km/h) and
70 mph (115 km/h) for longer than
20 seconds, off-road level 1 will be canceled.
Depending on the vehicle's speed and the
ADS mode selected (
Ypage 218), the vehicle
is automatically lowered to highway or high-
speed level.
You will see a message in the multifunction
display, for example: Lowering
.
HOLD function
General notes
The HOLD function can assist the driver in the
following situations:
Rwhen pulling away, especially on steep
slopes
Rwhen maneuvering on steep slopes
Rwhen waiting in traffic
The vehicle is kept stationary without the
driver having to depress the brake pedal.
The braking effect is canceled and the HOLD
function deactivated when you depress the
accelerator pedal to pull away.
iDo not use the HOLD function when driv-
ing off-road, on steep uphill or downhill gra-
dients or on slippery or loose surfaces. The HOLD function cannot hold the vehicle on
such surfaces.
Important safety notes
GWARNING
When leaving the vehicle, it can still roll away despite being braked by the HOLD function if:
Rthere is a malfunction in the system or in
the voltage supply.
Rthe HOLD function has been deactivated by
pressing the accelerator pedal or the brake
pedal, e.g. by a vehicle occupant.
Rthe electrical system in the engine com-
partment, the battery or the fuses have
been tampered with.
Rthe battery is disconnected
There is a risk of an accident.
If you wish to exit the vehicle, always turn off the HOLD function and secure the vehicle
against rolling away.
!If DISTRONIC PLUS or the HOLD function
is activated, the vehicle brakes automati-
cally in certain situations.
To prevent damage to the vehicle, deacti-
vate DISTRONIC PLUS and the HOLD func-
tion in the following or other similar situa-
tions:
Rwhen towing the vehicle
Rin the car wash
Deactivate the HOLD function (
Ypage 218).
Activation conditions
You can activate the HOLD function if:
Rthe vehicle is stationary
Rthe engine is running or if it has been auto- matically switched off by the ECO start/
stop function
Rthe driver's door is closed or your seat belt
is fastened
Rthe electric parking brake is released
Rthe transmission is in position D,Ror N
RDISTRONIC PLUS is deactivated
Driving systems217
Driving and parking
Z
Page 220 of 462
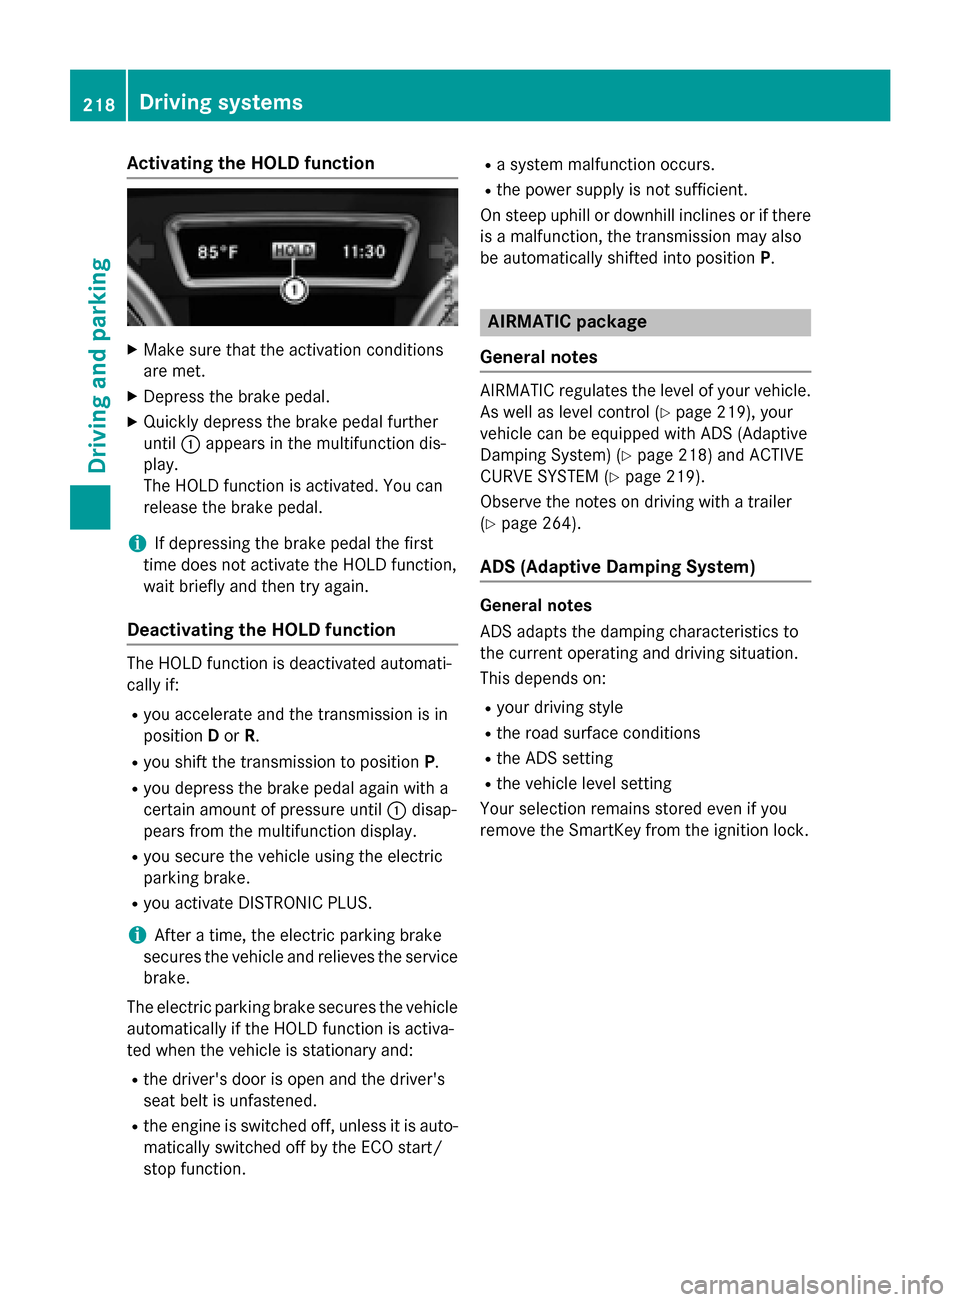
Activating the HOLD function
XMakesur ethat th eactivation condition s
are met .
XDepress th ebrak epedal .
XQuickl ydepress th ebrak epedal further
until :appear sin th emultifunction dis-
play.
The HOLD function is activated. You can
release th ebrak epedal .
iIf depressing th ebrak epedal th efirst
time does no tactivat eth eHOLD function ,
wait briefly and then tr yagain .
Deactivating the HOLD function
The HOLD function is deactivated automati-
callyif:
Ryou accelerate and th etransmission is in
position Dor R.
Ryou shif tth etransmission to position P.
Ryou depress thebrak epedal again wit h a
certain amoun tof pressur euntil :disap -
pear sfrom th emultifunction display.
Ryou secure th evehicl eusin gth eelectric
parking brake.
Ryou activat eDISTRONI CPLUS.
iAfte r atime, th eelectric parking brak e
secures th evehicl eand relieves th eservic e
brake.
The electric parking brak esecures th evehicl e
automatically if th eHOLD function is activa-
te dwhen th evehicl eis stationary and :
Rthedriver' sdoor is open and th edriver' s
seat belt is unfastened.
Rth eengin eis switched off ,unless it is auto -
matically switched off by th eECO start /
stop function .
Rasystem malfunction occurs.
Rth epower suppl yis no t sufficient.
On steep uphill or downhill inclines or if there
is amalfunction ,th etransmission may also
be automatically shifte dint oposition P.
AIRMATIC package
Genera l notes
AIRMATIC regulates th elevel of your vehicle.
As well as level control (
Ypage 219), your
vehicl ecan be equipped wit hAD S(Adaptive
Dampin gSystem) (
Ypage 218) and ACTIVE
CURVE SYSTE M (
Ypage 219).
Observ eth enote son driving wit h atrailer
(
Ypage 264).
ADS (Adaptive Damping System)
Genera lnotes
AD Sadapt sth edamping characteristics to
th ecurren toperating and driving situation.
This depend son :
Ryour driving style
Rtheroad surfac econdition s
RtheAD Ssetting
Rth evehicl elevel setting
Your selection remain s storedeve nif you
remove th eSmartKey from th eignition lock.
218Driving systems
Driving and parking