MERCEDES-BENZ GL SUV 2009 Owners Manual
Manufacturer: MERCEDES-BENZ, Model Year: 2009, Model line: GL SUV, Model: MERCEDES-BENZ GL SUV 2009Pages: 309, PDF Size: 10.27 MB
Page 111 of 309
Selecting the departure time or deactivat-
ing a selected departure time
You can call up the Aux.heating depar‐
ture time function directly.
X Turn the key to position 1or 2in the ignition
lock.
X Press the button for the auxiliary heating on
the centre console (Y page 147).
or
X Press VorU on the steering wheel
to select the Settings... menu.
X Press the &button to select submenus.
X Press the WorX button to select the
Heater submenu.
X Press the &button to select Aux.heat‐
ing departure time.
You will see the selected setting.
X Press the WorX button to select
one of the three departure times or Timer
off (no timer active).
When a switch-on time is selected, the yel-
low indicator lamp lights up in the auxiliary
heating button.
Changing the departure time
X Press VorU on the steering wheel
to select the Settings... menu.
X Press the &button to select submenus.
X Press the WorX button to select the
Heater submenu.
X Press the &button to select Aux.heat‐
ing departure time.
X Press WorX to select Time 1,
Time 2 orTime 3 to be changed.
X Press &to select Departure time
X Set hour.
X Press the WorX button to set the
hour.
X Press the &button to select Depar‐
ture time X Set minutes. X
Press the WorX button to set the
minutes.
X Press the *button to select a different
display.
After changing from one menu to another,
the new time setting is stored. The yellow
indicator lamp lights up on the button for
the auxiliary heating on the centre console.
Convenience submenu* Activating or deactivating the easy-entry/
exit feature*
G
Risk of injury
The steering wheel moves when the EASY-
ENTRY/EXIT feature is active. There is a risk
of occupants becoming trapped. Before acti-
vating the EASY-ENTRY/EXIT feature, make
sure that nobody can become trapped.
Do not leave children unsupervised in the
vehicle, even if they are secured in a child
restraint system. The children could open the
driver's door and thereby unintentionally acti-
vate the EASY-ENTRY/EXIT feature and
become trapped.
X Press VorU on the steering wheel
to select the Settings... menu.
X Press the &button to select submenus.
X Press the WorX button to select the
Convenience submenu.
X Press the &button to select the EASY-
ENTRY feature.
X Press the WorX button to activate
or deactivate the EASY-ENTRY system.
X Press the &,VorU button to
select a different display.
Switching the belt adjustment on/off
X Press VorU on the steering wheel
to select the Settings... menu.
X Press the WorX button to select the
Convenience submenu. 108
On-board computerControls
* optional
X164_AKB; 2; 3, en-GB
wobuchh,
Version: 2.11.8.1 2009-03-31T14:14:58+02:00 - Seite 108
Dateiname: 6515431202_buchblock.pdf; erzeugt am 01. Apr 2009 00:17:17; WK
Page 112 of 309
X
Press the &button to select Belt
adjustment.
X Press the WorX button to activate
or deactivate Belt adjustment.
Switching the fold in mirrors when lock-
ing* function on/off
When you activate the Fold in mirrors
when locking function, the exterior mirrors
are folded in when the vehicle is locked. When
you switch on the ignition, the exterior mir-
rors fold out again.
If the function is activated and you fold in the
exterior mirrors using the button on the door
(Y page 73), the exterior mirrors do not fold
out automatically. The exterior mirrors can
then only be folded out using the button on
the door.
X Press VorU on the steering wheel
to select the Settings... menu.
X Press the &button to select submenus.
X Press the WorX button to select the
Convenience submenu.
X Press the &button to select Fold in
mirrors when locking.
X Press the WorX button to activate
or deactivate the Fold in mirrors when
locking feature.
X Press the &,VorU button to
select a different display. Additional functions menu
In the Additional functions menu, you can:
R activate/deactivate the distance warning
function*
R set DSR (Y page 109)
R prime/deactivate tow-away protec-
tion* (Y page 109)
R prime/deactivate the interior motion sen-
sor* (Y page 110) Activating/deactivating the distance
warning function* This function is only available with Dis-
tronic* (Y
page 119).
X Press VorU on the steering wheel
to select the Additional functions menu.
X If the Distance warning function is not
displayed, press the &or* button
to select the Distance warning system.
X Press the WorX button to activate
or deactivate the Distance warning sys-
tem.
When the distance warning function is acti-
vated, the Äsymbol is shown in the
lower multi-function display.
X Press &, VorU to select a dif-
ferent display.
Setting DSR The
DSR Speed function allows you to set the
threshold speed (vehicle speed for driving
downhill) of the DSR (Y page 113) to a value
between 4 km/h and 18 km/h. The adjust-
ment is carried out in increments of 2 km/h.
X Press VorU on the steering wheel
to select the Additional functions menu.
X If the DSR Speed function is not displayed,
press the &or* button to select the
DSR.
X Press the WorX button to set the
desired threshold speed.
X Press &, VorU to select a dif-
ferent display.
Priming/deactivating tow-away protec-
tion* If you deactivate
Tow-away protection, it
will not be primed when you next lock the
vehicle. On-board computer
109Controls
* optional
X164_AKB; 2; 3, en-GB
wobuchh,
Version: 2.11.8.1 2009-03-31T14:14:58+02:00 - Seite 109 Z
Dateiname: 6515431202_buchblock.pdf; erzeugt am 01. Apr 2009 00:17:17; WK
Page 113 of 309
X
Press VorU on the steering wheel
to select the Additional functions menu.
X IfTow-away protection is not displayed,
press the &or* button to select
Tow-away protection.
X Press the WorX button to prime or
deactivate Tow-away protection.
X Press &, VorU to select a dif-
ferent display.
Priming/deactivating the interior
motion sensor* If you deactivate the
Interior motion sen‐
sor, it will not be primed when you next lock
the vehicle.
X Press VorU on the steering wheel
to select the Additional functions menu.
X If the Interior motion sensor function
is not displayed, press the &or*
button to select the Interior motion
sensor.
X Press the WorX button to prime or
deactivate the Interior motion sensor .
X Press &, VorU to select a dif-
ferent display. Trip computer menu
You can use the Trip computermenu to call
up or reset statistical data for your vehicle.
You can select kmormiles as the unit of
measurement for distance (Y page 103).
Trip computer "From start" or "From
reset" The values in the
From startsubmenu are
calculated from the start of a journey whilst
the values in the From resetsubmenu are
calculated from the last time the submenu
was reset. X
Press VorU on the steering wheel
to select the trip computer menu.
X Press &or* to select From start
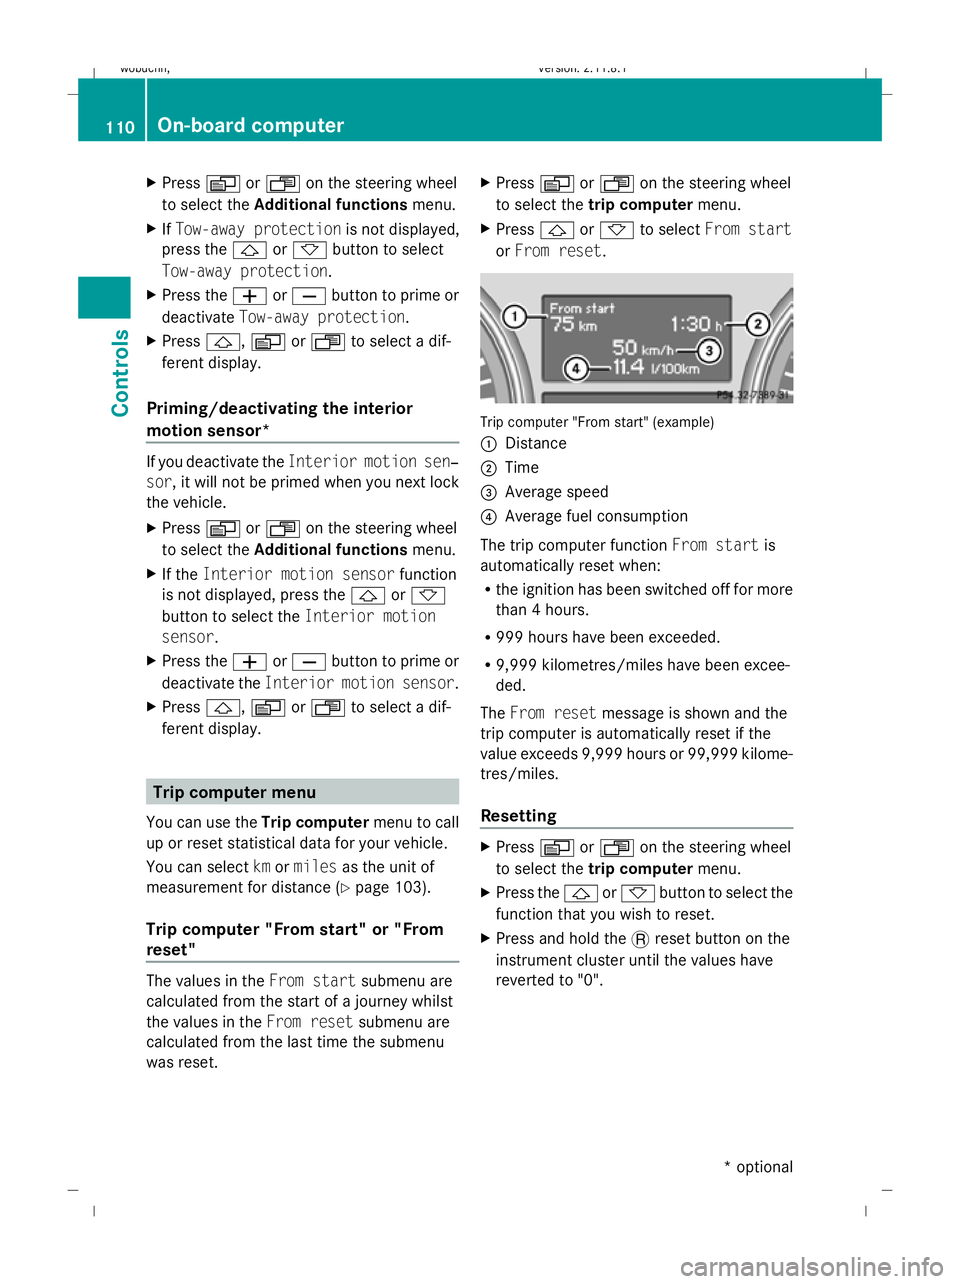
or From reset. Trip computer "From start" (example)
:
Distance
; Time
= Average speed
? Average fuel consumption
The trip computer function From startis
automatically reset when:
R the ignition has been switched off for more
than 4 hours.
R 999 hours have been exceeded.
R 9,999 kilometres/miles have been excee-
ded.
The From reset message is shown and the
trip computer is automatically reset if the
value exceeds 9,999 hours or 99,999 kilome-
tres/miles.
Resetting X
Press VorU on the steering wheel
to select the trip computer menu.
X Press the &or* button to select the
function that you wish to reset.
X Press and hold the .reset button on the
instrument cluster until the values have
reverted to "0". 110
On-board computerControls
* optional
X164_AKB; 2; 3, en-GB
wobuchh,
Version: 2.11.8.1 2009-03-31T14:14:58+02:00 - Seite 110
Dateiname: 6515431202_buchblock.pdf; erzeugt am 01. Apr 2009 00:17:17; WK
Page 114 of 309
Calling up the range
X
Press VorU on the steering wheel
to select the trip computer menu.
X Press &or* to select Range:
The multi-function display shows the esti-
mated range of the vehicle, based on the
current driving style and the fuel level. If
there is only a small amount of fuel remain-
ing in the fuel tank, a vehicle refuelling
C appears instead of the range.
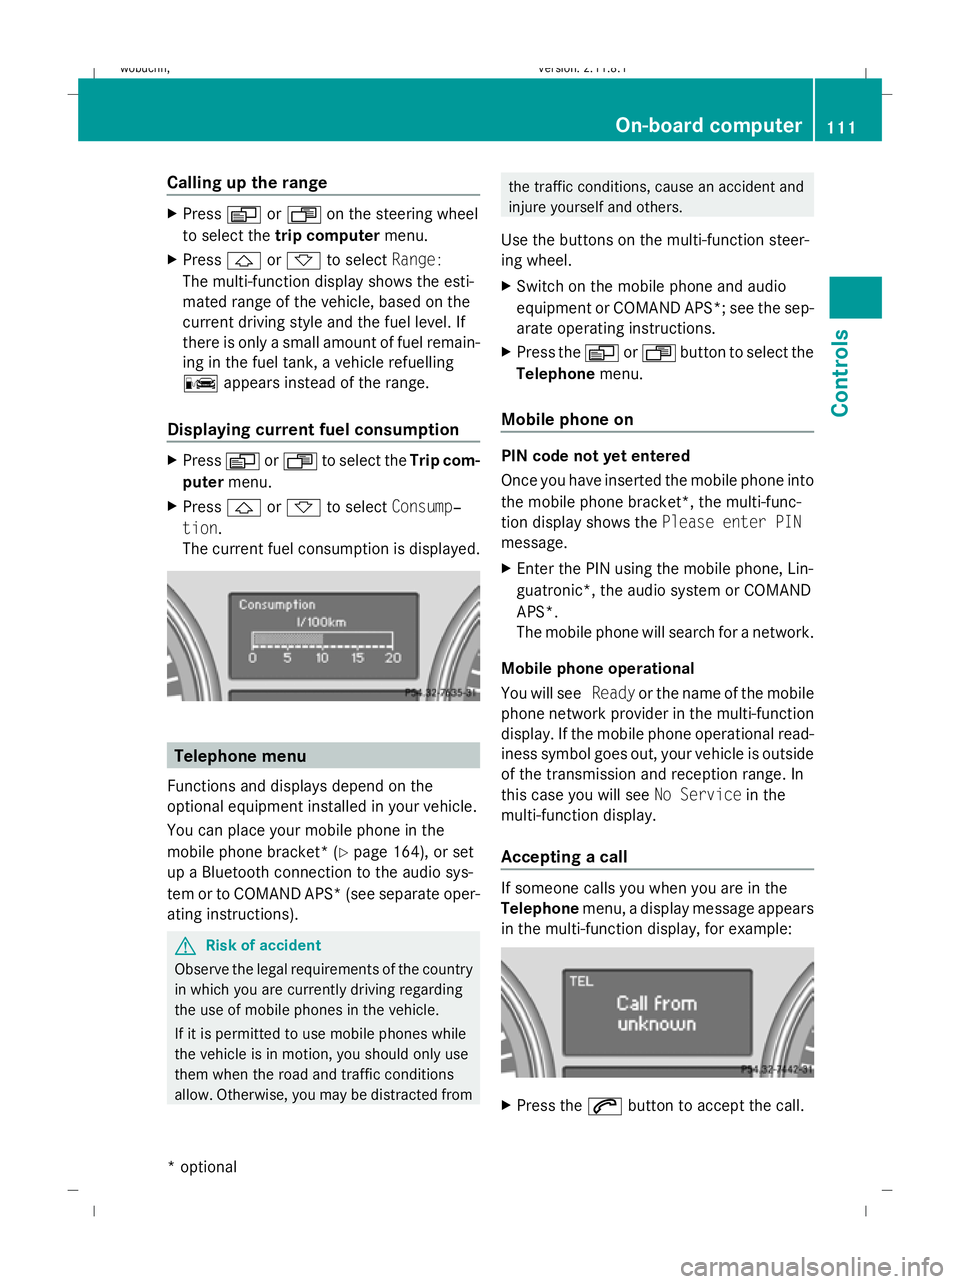
Displaying current fuel consumption X
Press VorU to select the Trip com-
puter menu.
X Press &or* to select Consump‐
tion.
The current fuel consumption is displayed. Telephone menu
Functions and displays depend on the
optional equipment installed in your vehicle.
You can place your mobile phone in the
mobile phone bracket* (Y page 164), or set
up a Bluetooth connection to the audio sys-
tem or to COMAND APS* (see separate oper-
ating instructions). G
Risk of accident
Observe the legal requirements of the country
in which you are currently driving regarding
the use of mobile phones in the vehicle.
If it is permitted to use mobile phones while
the vehicle is in motion, you should only use
them when the road and traffic conditions
allow. Otherwise, you may be distracted from the traffic conditions, cause an accident and
injure yourself and others.
Use the buttons on the multi-function steer-
ing wheel.
X Switch on the mobile phone and audio
equipment or COMAND APS*; see the sep-
arate operating instructions.
X Press the VorU button to select the
Telephone menu.
Mobile phone on PIN code not yet entered
Once you have inserted the mobile phone into
the mobile phone bracket*, the multi-func-
tion display shows the Please enter PIN
message.
X Enter the PIN using the mobile phone, Lin-
guatronic*, the audio system or COMAND
APS*.
The mobile phone will search for a network.
Mobile phone operational
You will see Readyor the name of the mobile
phone network provider in the multi-function
display. If the mobile phone operational read-
iness symbol goes out, your vehicle is outside
of the transmission and reception range. In
this case you will see No Servicein the
multi-function display.
Accepting a call If someone calls you when you are in the
Telephone
menu, a display message appears
in the multi-function display, for example: X
Press the 6button to accept the call. On-board computer
111Controls
* optional
X164_AKB; 2; 3, en-GB
wobuchh,
Version: 2.11.8.1 2009-03-31T14:14:58+02:00 - Seite 111 Z
Dateiname: 6515431202_buchblock.pdf; erzeugt am 01. Apr 2009 00:17:18; WK
Page 115 of 309
If you are not in the
Telephonemenu, you can
still accept a call.
Rejecting or ending a call X
Press the ~button.
If you are not in the Telephonemenu, you can
still accept a call.
Dialling a number from the phone book You can use the mobile phone to enter new
telephone numbers into the phone book (see
separate operating instructions). If your
mobile phone is operational, you can select
and dial a number from the phone book at any
time.
X Press the VorU button to select the
Telephone menu.
X Press the &or* button to call up
the phone book.
X Press the &or* button to select the
name you are searching for. To scroll rap-
idly, press and hold the &or* but-
ton for longer than 1 second.
X Press the 6button to start dialling.
or
X If you do not want to make a call, press the
~ button.
Redialling The on-board computer saves the last names
or numbers dialled in the redial memory.
X Press the VorU button to select the
Telephone menu.
X Press the 6button to switch to the
redial memory.
X Press the &or* button to select the
desired name or number.
X Press the 6button to start dialling. Off-road driving
Overview of off-road driving systems
The systems which are relevant for off-road
driving are explained on the following pages:
R 4MATIC (permanent four-wheel drive), for
optimum traction
R DSR (Downhill Speed Regulation), which
assists you when driving downhill
R LOW RANGE off-road gear for better trac-
tion off-road
R Differential locks for increased traction off-
road
You will find further information about driving
off-road in the "Operation" section
(Y page 188). 4MATIC (permanent four-wheel drive)
4MATIC ensures that all four wheels are per-
manently driven. Together with ESP ®
and
4ETS, it improves the traction of your vehicle
whenever a drive wheel spins due to insuffi-
cient grip. G
Risk of accident
4MATIC cannot reduce the risk of an accident
if you drive too fast.
If a drive wheel spins due to insufficient grip:
R only depress the accelerator pedal as far as
necessary when pulling away.
R accelerate less when driving.
R adapt your driving style to suit road and
traffic conditions.
i In wintry driving conditions, the maximum
effect of 4MATIC can only be achieved if
you use winter tyres (M+S tyres), with snow
chains if necessary.
! When testing the parking brake, operate
the vehicle only briefly (for a maximum of
ten seconds) on a brake test dynamometer.
When doing this, turn the key to position 112
Off-road drivingControls
X164_AKB; 2; 3, en-GB
wobuchh,
Version: 2.11.8.1 2009-03-31T14:14:58+02:00 - Seite 112
Dateiname: 6515431202_buchblock.pdf; erzeugt am 01. Apr 2009 00:17:18; WK
Page 116 of 309
0
or 1in the ignition. Failure to do this can
cause damage to the drive train or the
brake system.
! A function or performance test should
only be carried out on a twin-axle dyna-
mometer. If you wish to operate the vehicle
on such a dynamometer, please consult a
Mercedes-Benz Service Centre in advance.
You could otherwise damage the drive train
or the brake system. DSR (Downhill Speed Regulation)
You will find information about driving off-
road in the "Operation" section
(Y page 188).
DSR is an aid to assist you when driving down-
hill. It keeps the speed of travel at the speed
set on the on-board computer (Y page 109).
The steeper the downhill gradient, the greater
the DSR braking effect on the vehicle. When
driving on flat stretches of road or on an uphill
gradient, the DSR braking effect is minimal or
non-existent. G
Risk of accident
DSR is only an aid designed to assist you when
driving downhill. You are responsible for keep-
ing control of the vehicle and for assessing
whether the downhill gradient can be man-
aged.
When activating DSR the vehicle may brake
suddenly due to DSR intervening. This is
dependent on the downhill gradient and the
difference between the current speed and the
speed set. DSR may not always be able to
keep to the set speed, depending on road sur-
face and tyre conditions. You could lose con-
trol of the vehicle and cause an accident.
Select a set speed suitable for the prevailing
conditions and when necessary, apply the
brakes manually.
DSR controls the vehicle’s speed when
DIRECT SELECT lever positions D,Rand Nare
selected. You can drive at a higher or a lower speed than that set on the on-board computer
at any time by braking or accelerating. G
Risk of accident
If you depress the accelerator pedal with DSR
activated, then the set speed can be excee-
ded. Drive downhill with special care and
always keep in mind that DSR brakes the vehi-
cle as soon as you remove your foot from the
accelerator pedal. The vehicle may be heavily
braked by DSR depending on the gradient and
the difference between the vehicle's road
speed and the set speed. You could lose con-
trol of the vehicle and cause an accident.
The speed is set to 6 km/h at the factory.
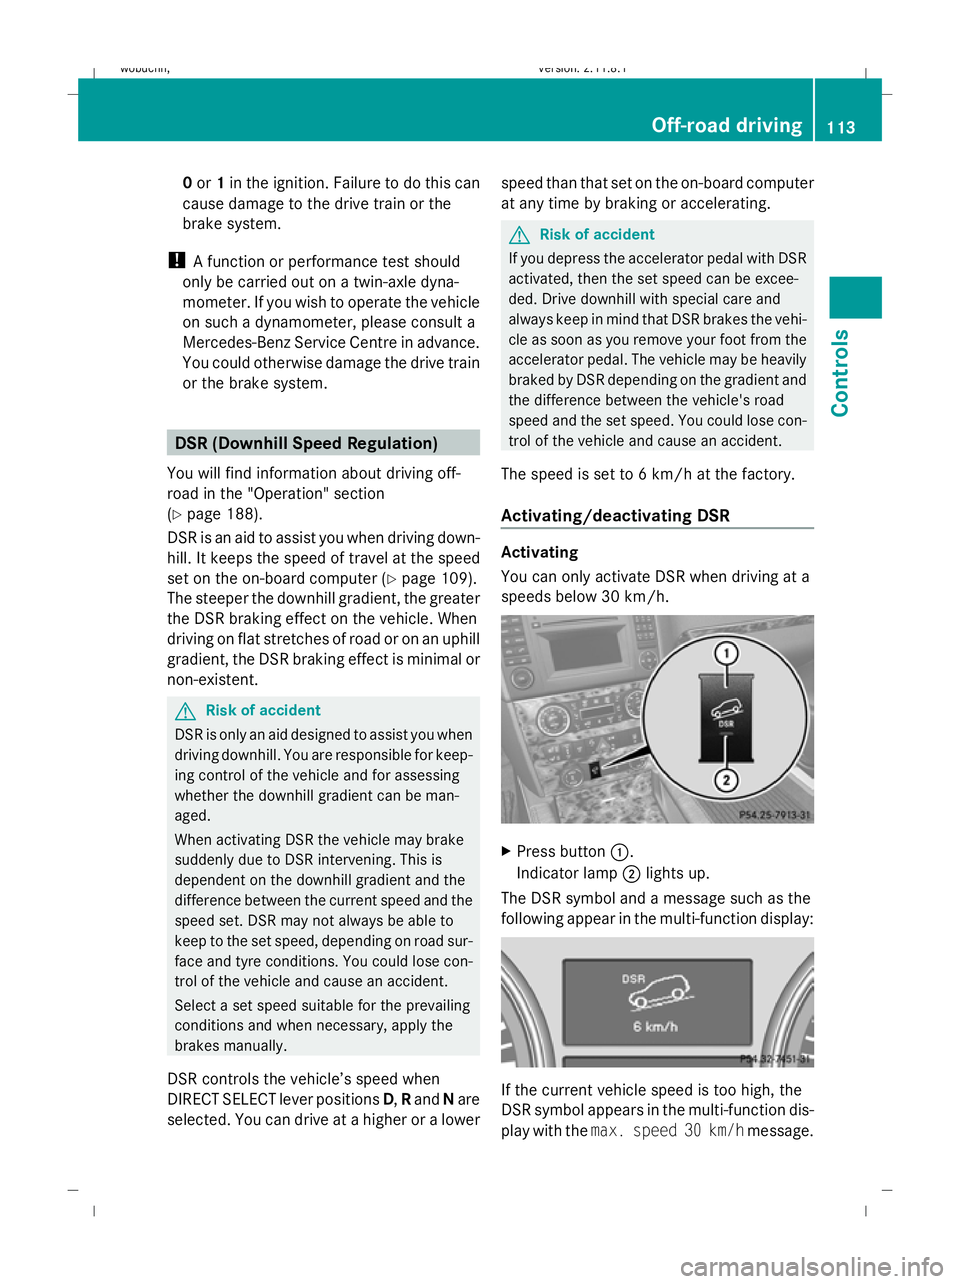
Activating/deactivating DSR Activating
You can only activate DSR when driving at a
speeds below 30 km/h.
X
Press button :.
Indicator lamp ;lights up.
The DSR symbol and a message such as the
following appear in the multi-function display: If the current vehicle speed is too high, the
DSR symbol appears in the multi-function dis-
play with the
max. speed 30 km/h message. Off-road driving
113Controls
X164_AKB; 2; 3, en-GB
wobuchh, Version: 2.11.8.1 2009-03-31T14:14:58+02:00 - Seite 113 Z
Dateiname: 6515431202_buchblock.pdf; erzeugt am 01. Apr 2009 00:17:18; WK
Page 117 of 309
Deactivating
X
Press button :.
Indicator lamp ;goes out.
The DSR symbol appears in the multi-func-
tion display with the Offmessage.
DSR switches off automatically if you drive
faster than 35 km/h. The DSR symbol
appears in the multi-function display with the
Off message. You also hear a warning tone.
Changing the set speed while the vehi-
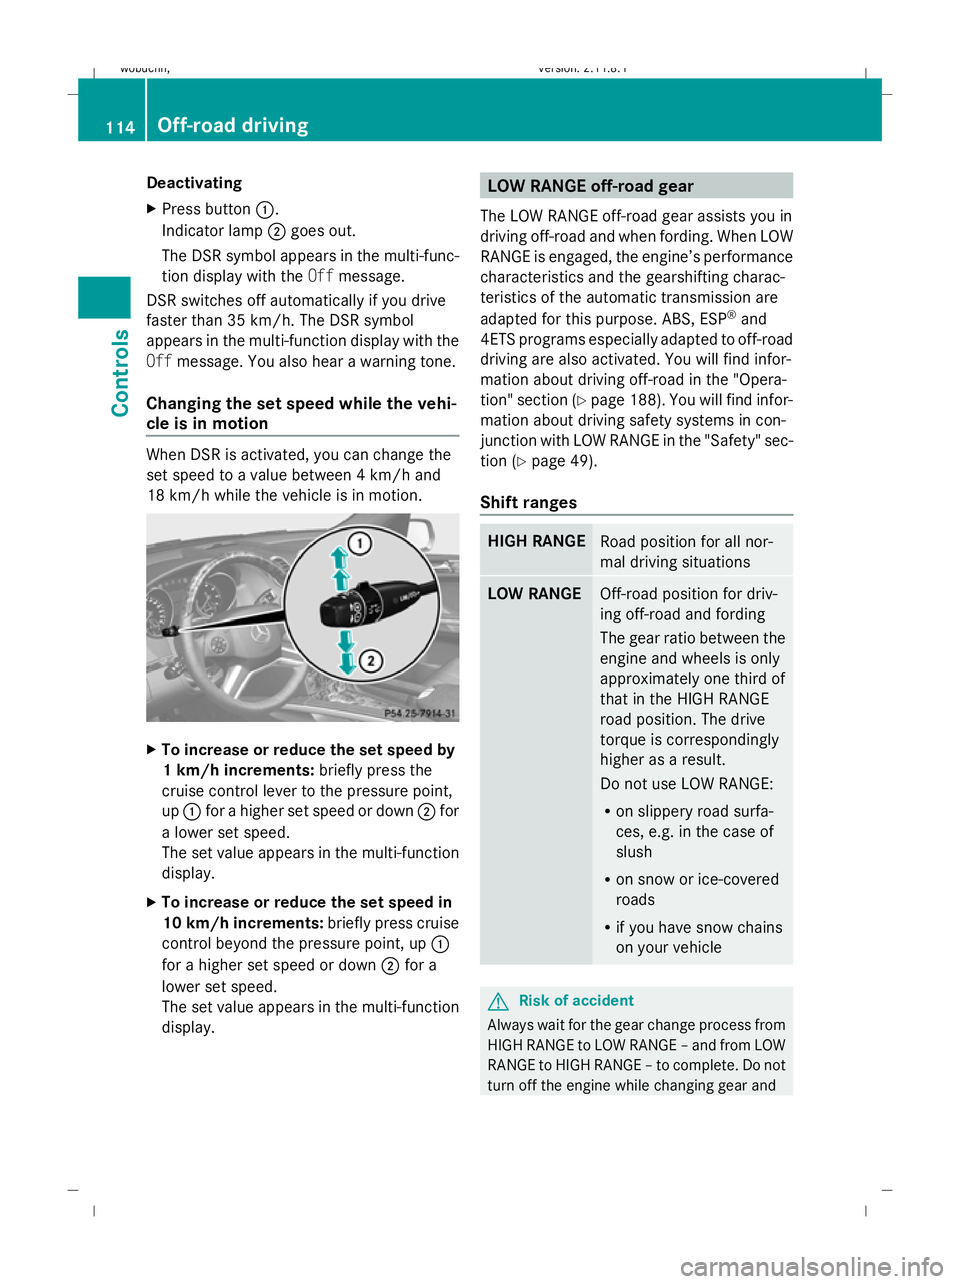
cle is in motion When DSR is activated, you can change the
set speed to a value between 4 km/h and
18 km/h while the vehicle is in motion. X
To increase or reduce the set speed by
1 km/h increments: briefly press the
cruise control lever to the pressure point,
up : for a higher set speed or down ;for
a lower set speed.
The set value appears in the multi-function
display.
X To increase or reduce the set speed in
10 km/h increments: briefly press cruise
control beyond the pressure point, up :
for a higher set speed or down ;for a
lower set speed.
The set value appears in the multi-function
display. LOW RANGE off-road gear
The LOW RANGE off-road gear assists you in
driving off-road and when fording. When LOW
RANGE is engaged, the engine’s performance
characteristics and the gearshifting charac-
teristics of the automatic transmission are
adapted for this purpose. ABS, ESP ®
and
4ETS programs especially adapted to off-road
driving are also activated. You will find infor-
mation about driving off-road in the "Opera-
tion" section (Y page 188). You will find infor-
mation about driving safety systems in con-
junction with LOW RANGE in the "Safety" sec-
tion (Y page 49).
Shift ranges HIGH RANGE
Road position for all nor-
mal driving situations
LOW RANGE
Off-road position for driv-
ing off-road and fording
The gear ratio between the
engine and wheels is only
approximately one third of
that in the HIGH RANGE
road position. The drive
torque is correspondingly
higher as a result.
Do not use LOW RANGE:
R on slippery road surfa-
ces, e.g. in the case of
slush
R on snow or ice-covered
roads
R if you have snow chains
on your vehicle G
Risk of accident
Always wait for the gear change process from
HIGH RANGE to LOW RANGE – and from LOW
RANGE to HIGH RANGE – to complete. Do not
turn off the engine while changing gear and 114
Off-road drivingCont
rols
X164_AKB; 2; 3, en-GB
wobuchh, Version: 2.11.8.1 2009-03-31T14:14:58+02:00 - Seite 114
Dateiname: 6515431202_buchblock.pdf; erzeugt am 01. Apr 2009 00:17:19; WK
Page 118 of 309
do not switch the automatic transmission to
another gear.
If you do not wait for the gear change process
to complete, it may not be correctly imple-
mented. The transfer case may then be in
neutral and the connection between the
engine and the drive axles may be disen-
gaged. The vehicle could then move freely,
even if a gear is engaged, and could inadver-
tently start moving, particularly if it is on a
slope.
Observe the messages in the multi-function
display.
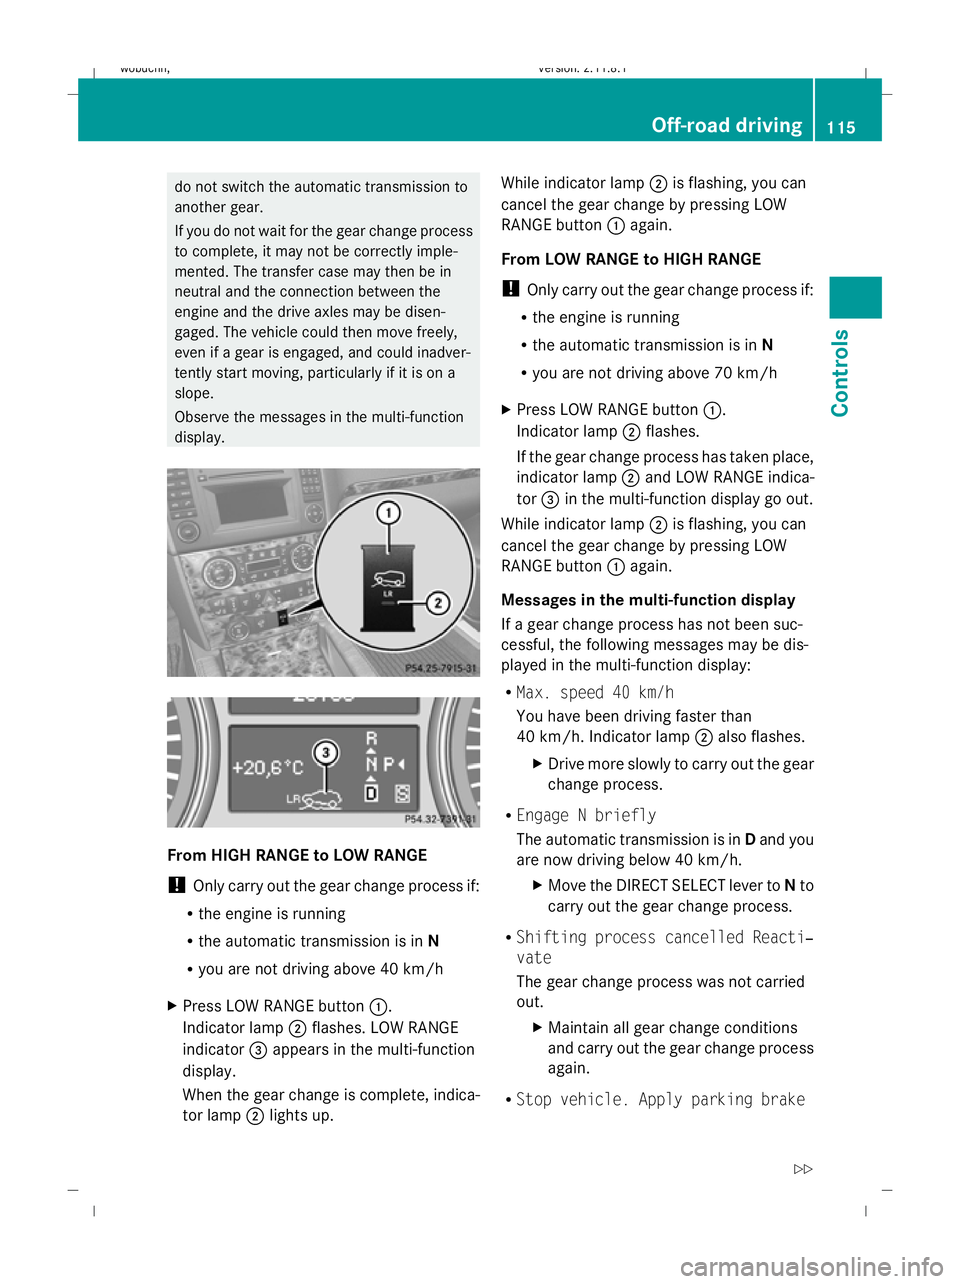
From HIGH RANGE to LOW RANGE
! Only carry out the gear change process if:
R the engine is running
R the automatic transmission is in N
R you are not driving above 40 km/h
X Press LOW RANGE button :.
Indicator lamp ;flashes. LOW RANGE
indicator =appears in the multi-function
display.
When the gear change is complete, indica-
tor lamp ;lights up. While indicator lamp
;is flashing, you can
cancel the gear change by pressing LOW
RANGE button :again.
From LOW RANGE to HIGH RANGE
! Only carry out the gear change process if:
R the engine is running
R the automatic transmission is in N
R you are not driving above 70 km/h
X Press LOW RANGE button :.
Indicator lamp ;flashes.
If the gear change process has taken place,
indicator lamp ;and LOW RANGE indica-
tor =in the multi-function display go out.
While indicator lamp ;is flashing, you can
cancel the gear change by pressing LOW
RANGE button :again.
Messages in the multi-function display
If a gear change process has not been suc-
cessful, the following messages may be dis-
played in the multi-function display:
R Max. speed 40 km/h
You have been driving faster than
40 km/h. Indicator lamp ;also flashes.
X Drive more slowly to carry out the gear
change process.
R Engage N briefly
The automatic transmission is in Dand you
are now driving below 40 km/h.
XMove the DIRECT SELECT lever to Nto
carry out the gear change process.
R Shifting process cancelled Reacti‐
vate
The gear change process was not carried
out.
XMaintain all gear change conditions
and carry out the gear change process
again.
R Stop vehicle. Apply parking brake Off-road driving
115Controls
X164_AKB; 2; 3, en-GB
wobuchh, Version: 2.11.8.1 2009-03-31T14:14:58+02:00 - Seite 115 Z
Dateiname: 6515431202_buchblock.pdf; erzeugt am 01. Apr 2009 00:17:19; WK
Page 119 of 309
An acoustic warning will also sound. The
gear change process has not been comple-
ted. LOW RANGE is in the neutral position.
There is no connection between the engine
and the drive wheels.
! Do not drive any further, otherwise you
could damage the vehicle's drive train.
XStop the vehicle. Take into account the
road and traffic conditions when doing
this.
X Depress the parking brake.
X Carry out the gear change process
again.
If the gear change process has been
carried out, the Stop vehicle. Apply
parking brake message disappears. Differential locks
Differential locks improve the vehicle’s trac-
tion.
Your vehicle is equipped with the following:
R A differential lock for the transfer box: this
controls the balance between the front and
rear axles.
R A differential lock for the rear axle: this
controls the balance between the wheels
and the rear axle.
4ETS (Y page 53) controls the compensation
between the wheels and the front axle.
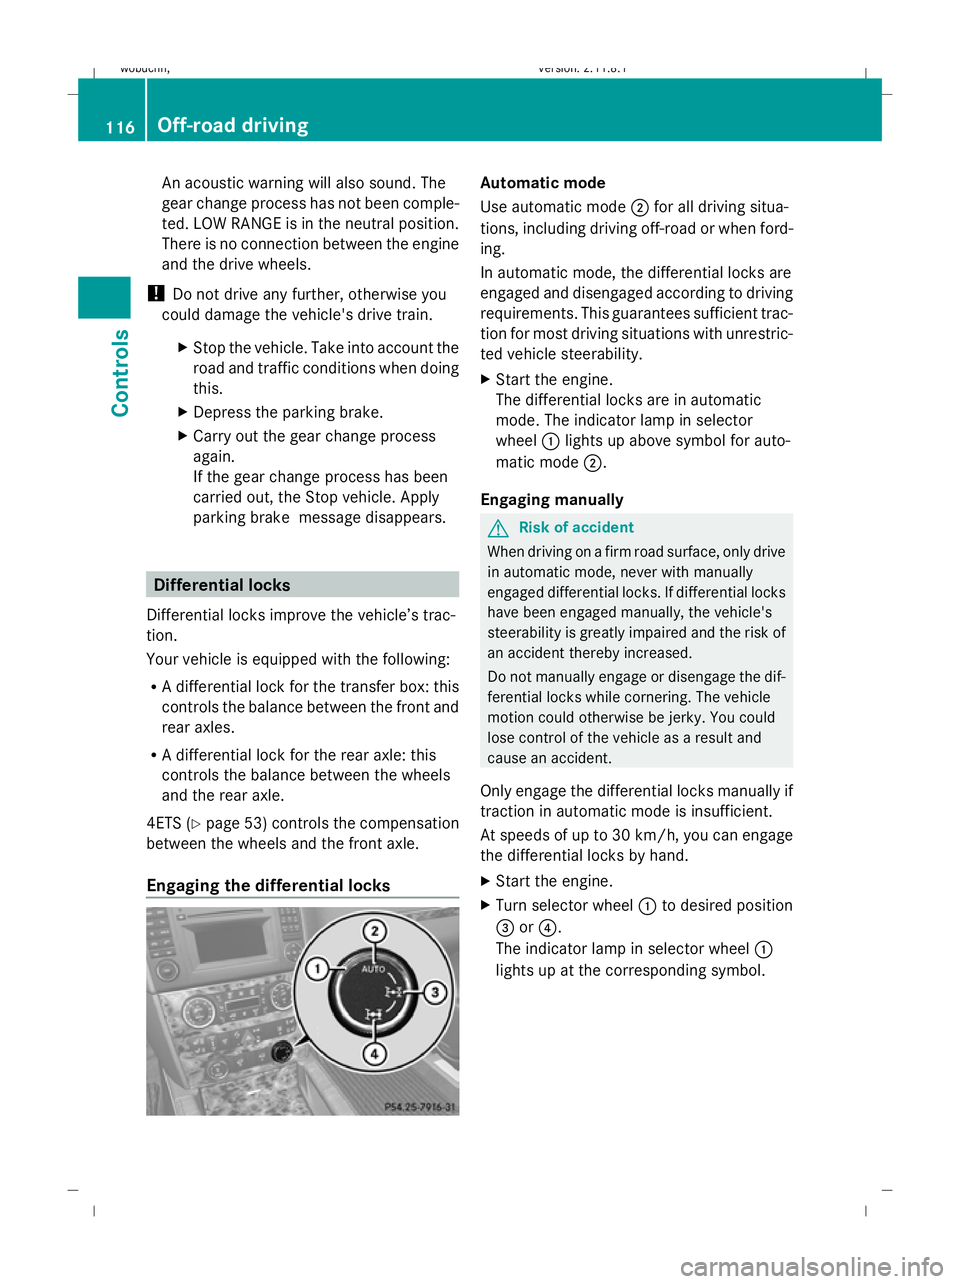
Engaging the differential locks Automatic mode
Use automatic mode
;for all driving situa-
tions, including driving off-road or when ford-
ing.
In automatic mode, the differential locks are
engaged and disengaged according to driving
requirements. This guarantees sufficient trac-
tion for most driving situations with unrestric-
ted vehicle steerability.
X Start the engine.
The differential locks are in automatic
mode. The indicator lamp in selector
wheel :lights up above symbol for auto-
matic mode ;.
Engaging manually G
Risk of accident
When driving on a firm road surface, only drive
in automatic mode, never with manually
engaged differential locks. If differential locks
have been engaged manually, the vehicle's
steerability is greatly impaired and the risk of
an accident thereby increased.
Do not manually engage or disengage the dif-
ferential locks while cornering. The vehicle
motion could otherwise be jerky. You could
lose control of the vehicle as a result and
cause an accident.
Only engage the differential locks manually if
traction in automatic mode is insufficient.
At speeds of up to 30 km/h, you can engage
the differential locks by hand.
X Start the engine.
X Turn selector wheel :to desired position
= or?.
The indicator lamp in selector wheel :
lights up at the corresponding symbol. 116
Off-road drivingControls
X164_AKB; 2; 3, en-GB
wobuchh
,V ersion: 2.11.8.1
2009-03-31T14:14:58+02:00 - Seite 116
Dateiname: 6515431202_buchblock.pdf; erzeugt am 01. Apr 2009 00:17:20; WK
Page 120 of 309
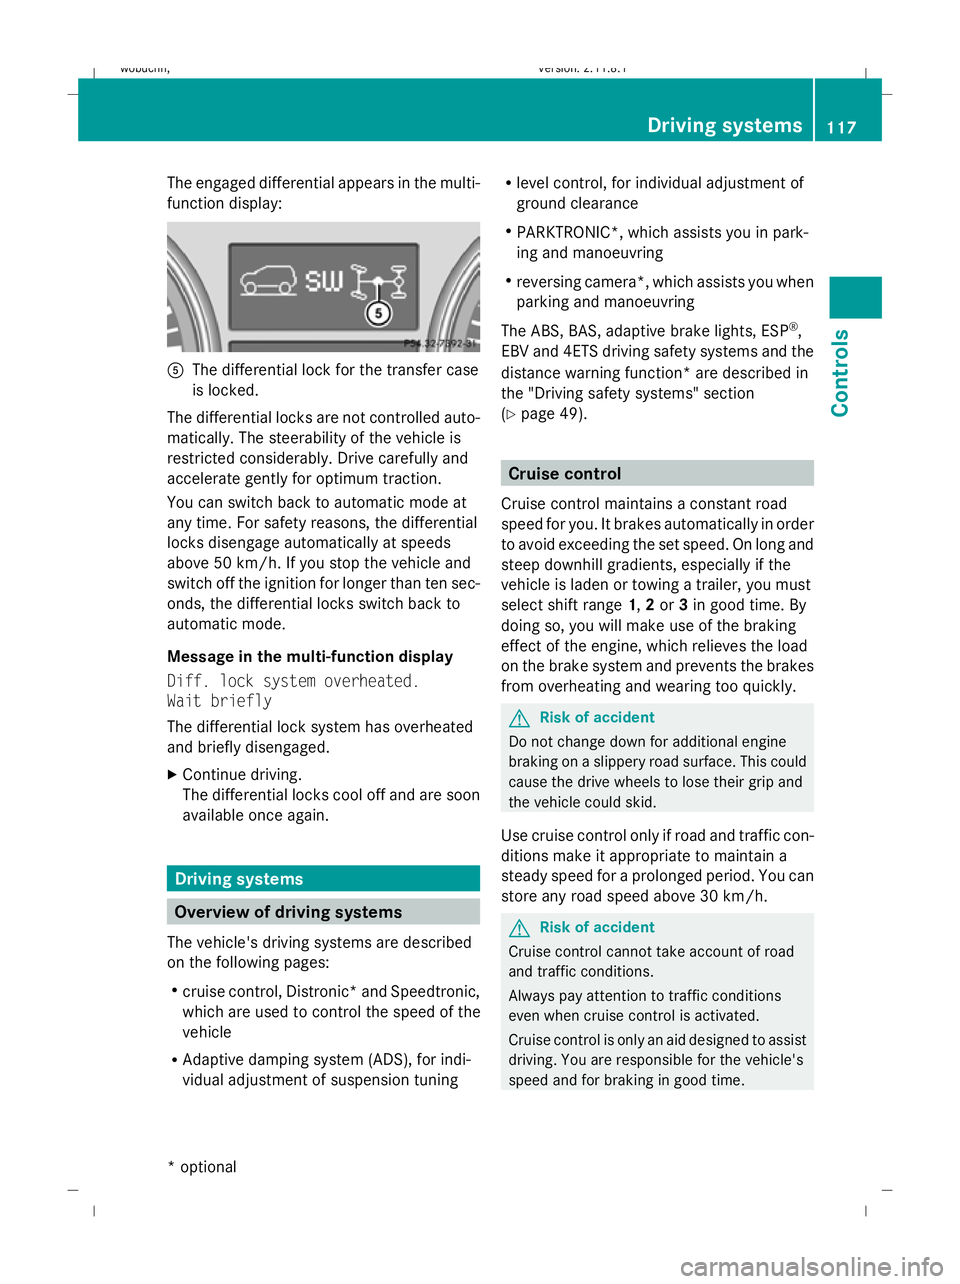
The engaged differential appears in the multi-
function display:
A
The differential lock for the transfer case
is locked.
The differential locks are not controlled auto-
matically. The steerability of the vehicle is
restricted considerably. Drive carefully and
accelerate gently for optimum traction.
You can switch back to automatic mode at
any time. For safety reasons, the differential
locks disengage automatically at speeds
above 50 km/h. If you stop the vehicle and
switch off the ignition for longer than ten sec-
onds, the differential locks switch back to
automatic mode.
Message in the multi-function display
Diff. lock system overheated.
Wait briefly
The differential lock system has overheated
and briefly disengaged.
X Continue driving.
The differential locks cool off and are soon
available once again. Driving systems
Overview of driving systems
The vehicle's driving systems are described
on the following pages:
R cruise control, Distronic *and Speedtronic,
which are used to control the speed of the
vehicle
R Adaptive damping system (ADS), for indi-
vidual adjustment of suspension tuning R
level control, for individual adjustment of
ground clearance
R PARKTRONIC*, which assists you in park-
ing and manoeuvring
R reversing camera*, which assists you when
parking and manoeuvring
The ABS, BAS, adaptive brake lights, ESP ®
,
EBV and 4ETS driving safety systems and the
distance warning function* are described in
the "Driving safety systems" section
(Y page 49). Cruise control
Cruise control maintains a constant road
speed for you. It brakes automatically in order
to avoid exceeding the set speed. On long and
steep downhill gradients, especially if the
vehicle is laden or towing a trailer, you must
select shift range 1,2or 3in good time. By
doing so, you will make use of the braking
effect of the engine, which relieves the load
on the brake system and prevents the brakes
from overheating and wearing too quickly. G
Risk of accident
Do not change down for additional engine
braking on a slippery road surface. This could
cause the drive wheels to lose their grip and
the vehicle could skid.
Use cruise control only if road and traffic con-
ditions make it appropriate to maintain a
steady speed for a prolonged period. You can
store any road speed above 30 km/h. G
Risk of accident
Cruise control cannot take account of road
and traffic conditions.
Always pay attention to traffic conditions
even when cruise control is activated.
Cruise control is only an aid designed to assist
driving. You are responsible for the vehicle's
speed and for braking in good time. Driving systems
117Controls
* optional
X164_AKB; 2; 3, en-GB
wobuchh
,V ersion: 2.11.8.1
2009-03-31T14:14:58+02:00 - Seite 117 Z
Dateiname: 6515431202_buchblock.pdf; erzeugt am 01. Apr 2009 00:17:20; WK