warning MERCEDES-BENZ GL SUV 2012 Owners Manual
[x] Cancel search | Manufacturer: MERCEDES-BENZ, Model Year: 2012, Model line: GL SUV, Model: MERCEDES-BENZ GL SUV 2012Pages: 441, PDF Size: 10.66 MB
Page 257 of 441

Off-road progra
m2 X
Selector wheel : engaged:
brieflypress
selector wheel :.
Selector wheel :extends.
X To select: turn selector wheel :unti lindi-
cator lamp ;comes on.
Off-road indicator =appears in the multi-
function display.
R off-road level 2isset and the vehicle is
raised by +6 0mmcompared to the high-
way level.
R DSR is switched on.
R the differential lock is closed.
Off-road program 2automatically switches to
off-road program 1ifyou dri vefaster than
45 km/h.
Select off-roa dprogram 2for rou gh terrain,
e.g. for steep and/o runeven terrain or for
driving on rocky terrain.
i Your vehicl ehas an automatically activa-
te dd ifferential loc kfor the transfer case. It
con trols the balance between the front and
rea raxles. The differential lock improves the vehicle's
traction. 4ETS (Y
page66) controls the bal-
ance between both wheels on an axle.
Yo uc an only activate off-road program 2
when driving at speeds below 40 km/h.
LOW RANGE off- roadgear (vehicles
with the ON&OFFROAD package) General notes
G
WARNING
Always wait for the gear change process from
HIGH RANGE to LOW RANGE –and from LOW
RANGE to HIGH RANGE –tocomplete. Do not
tur no ff the engine while changing gear and
do not switch the automati ctrans mission to
another gear.
If you do not wait for the gear change process
to complete, it ma ynot be correctly imple-
men ted. The transfer case may then be in
neutral and the connection between the
engine and the driv eaxles may be disen-
gaged. The vehicl ecould then mov efreely,
eve nifa gear is engaged, and coul dinadver-
tently start moving, particularly if it is on a
slope.
Observe the following descriptio nin"Mes-
sages in the multifunc tion display". :
LOW RANGE off -road gear button
; LOW RANGE off-road gear indicator lamp 254
Driving systemsDriving and parking
Page 260 of 441

R
uphill or downhill gradien tinpercentage
R on-road/off-road program selected
R condition of the differential lock for the
transfer case
R the LOW RANGE off -road gear is selected
R condition of the LOW RANGE off -road
gear
R the on-roa dtrailer progra misselected Towing
atrailer Note
sont owingatrailer
Important safety notes G
WARNING
Veh icle sw ithl evel control:
Th ev ehicle level can be change dinadver-
tently, e.g. whe nchanged by anot her person.
If yo uare coupling up or uncoupling atrailer
when this happens ,you coul dbecom etrap-
ped. Bod yparts can also become trapped
between the vehicle body and tyres, or under-
neath the vehicle. This pose sarisk of injury.
When coupling up or uncoupling, make sure
that no-one:
R opens or closes the doors or tailgate
R initiates the level control or presses the
AD Ss witch
R locks or unlock sthe vehicle. G
WARNING
The brakin gsystem can overheat if you leave
your foot on the brake pedal while driving.
This increase sthe brakin gdistanc eand could
even cause the braking system to fail. There
is ar isk of an accident.
Never use the brake pedal as afootrest. Do
not simultaneously depress both the brake
pedal and the accelera torp edal while driving. G
WAR
NING
You could los econtrol of the vehicle/trailer
combination if it begins to swerve. The vehi- cle/
trailer combination could even overturn.
There is arisk of an accident.
On no account should you attempt to
straighten out the vehicle/trailer combina-
tion by increasing speed. Decrease your
speed and do not countersteer .Brake if nec-
essary. G
WARNING
If you excee dthe permissible noseweight
while carrying aload, the carrier system could
detac hfrom th evehicle and fall on the road.
There is arisk of an acciden tand injury.
Always maintain the permissible noseweight
whe ncarrying loads. G
WARNING
If the ball coupling is not correctly engaged ,it
coul ddetac hwhile drivin gand fall on the road.
There is arisk of an acciden tand injury.
Engag ethe ball coupling as described. G
WARNING
If the ball coupling is not cor rectly engaged,
the traile rcan detach. There is arisk of an
accident.
Always engage the ball coupling as described.
! Depressing the brake pedal constantly
results in excessive and premature wear to
the brake pads.
You can use carrier systems, e.g. bicycle
rack sorload-bearing implements, on the ball
coupling. The maximum noseweight of
75 kg applies when using carrier system son
the ball coupling.
Whe nreversin gthe vehicle towards the
trailer ,make sure there is nobody between
the trailer and the vehicle.
Couple and uncouple the trailer carefully. If
you do not couple the trailer to the towing
vehicle correctly, the trailer could become
detached. Towin
gatrailer
257Driving an dparking Z
Page 262 of 441
reasons concerning th
eoperating permit.
This also applie sincountries in which the
permissible maximum speed for vehicle/
trailer combinations is above 100 km/h.
When towing atrailer, your vehicle's handling
characteristics wil lbedifferen tincomparison
to when drivin gwithout atrailer and it will
consume more fuel.
On long and stee pdownhil lgradients ,you
must select shift range 1,2or 3in good time.
i This also applies if you have activated
cruise con trol, SPEEDTRONIC or DI S-
TRONIC PLUS.
This will use the brakin geffect of th eengine,
so les sbraking wil lberequired to prevent the
vehicle from gainin gspeed. This relieves the
load on the brak esystem and prevent sthe
brakes from overheating and wearing too
quickly .Ifyou need additional braking,
depress the brake pedal repeatedly rather
than con tinuously.
Driving tips If the trailer swings from sid
etoside:
X Do not accelerate.
X Do not countersteer.
X Brake if necessary.
R Maintain agreater distance from th evehi-
cle in front than when driving without a
trailer.
R Avoid braking abruptly. If possible, brake
gently at first to allow the trailer to run on.
Then, increase the braking force rapidly.
R The values given for gradient-climbing
capabilities from astandstill refer to sea
level. Whe ndriving in mountainou sareas,
note that th epower outpu tofthe engine,
and consequen tlyt he vehicle' sgradient-
climbing capability ,decrease with increas-
ing altitude. Folding out the ball coupling
G
WARNING
If the ball coupling is not correctly engaged,
the trailer can detach. There is arisk of an
accident.
Always engage the ball coupling as described. G
WARNING
If you release the ball coupling or it does not
engage correctly when folding in, it will swing
out. Within pivoting range of the ball coupling,
there is an increased risk of an accident and
injury.
Only release the ball coupling if the pivoting
range is unobstruc ted. Alway smake sure that
the ball coupling engages when folding in.
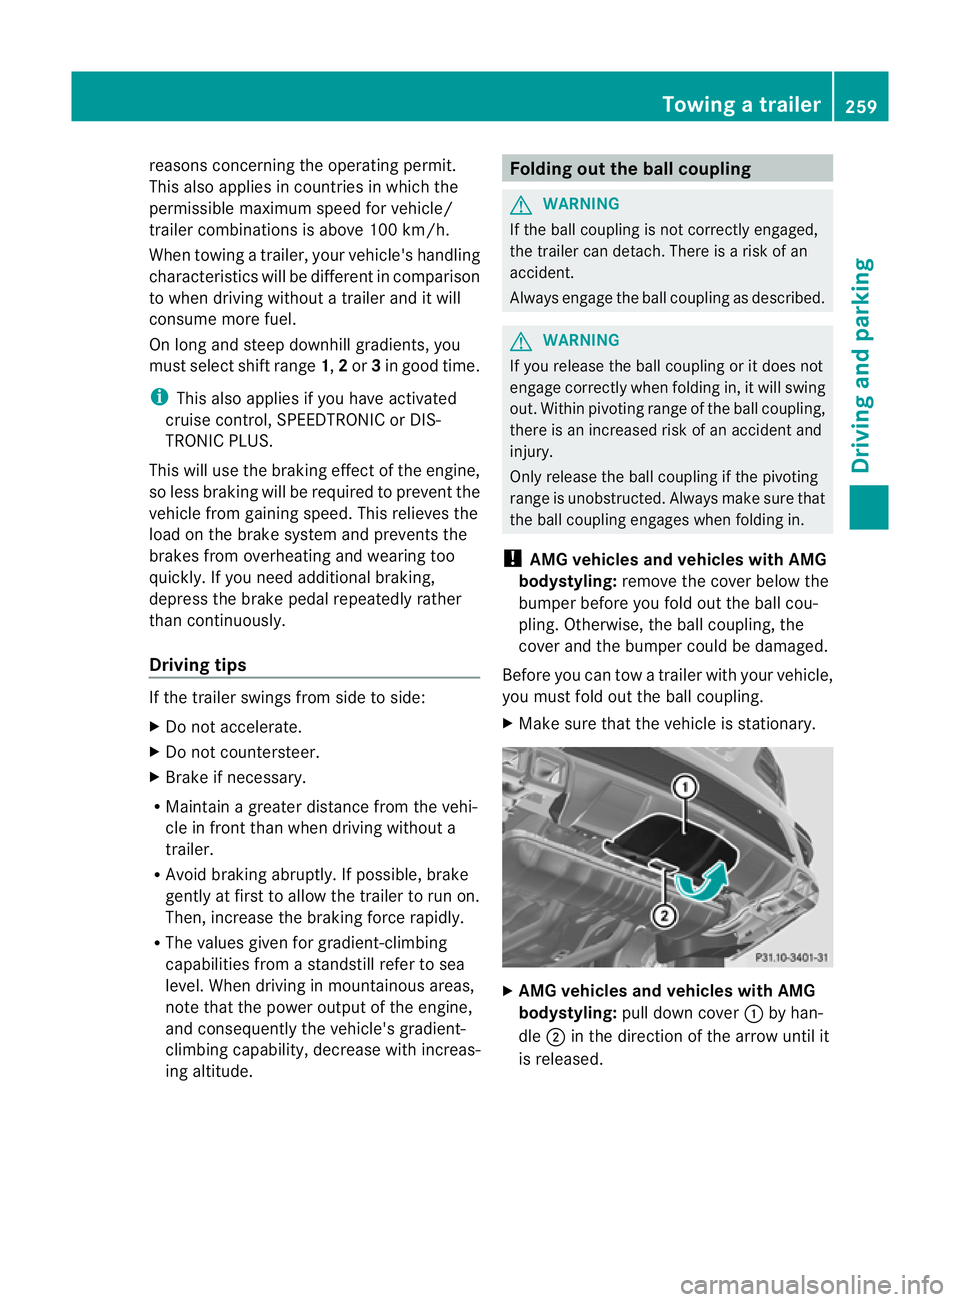
! AMG vehicles and vehicles with AMG
bodystyling: remove the cover below the
bumper before you fold out the ball cou-
pling. Otherwise, the ball coupling, the
cover and the bumper could be damaged.
Before you can tow atrailer with your vehicle,
yo um ust fold out the ball coupling.
X Make sure that the vehicle is stationary. X
AMG vehicles and vehicles with AMG
bodystyling: pull down cover :by han-
dle ;in the direction of the arrow until it
is released. Towin
gatrailer
259Driving an dparking Z
Page 263 of 441

X
AMG vehicles and vehicles with AMG
bodystyling: release cover =from the
bracket at the rea rand sto witsafely. X
Open the tailgate.
X Pull release knob :until the ball coupling
unlocks.
The ball coupling folds out from under the
rear bumper.
The indicator lamp on the release knob
flashes .The trailer socket folds away auto-
matically. X
Press the ball couplin ginthe direction of
the arrow until it engages in avertical posi-
tion.
The indicator lam ponthe release knob
goes off.
The multifunction display shows the
Chec ktrailer hitch lock message
until th eball coupling is engaged.
X Remove the protective covering from the
ball coupling and store it in asafe place. Coupling up
atrailer
Important safety notes G
WARNING
Vehicles with level control:
If you disconnec tthe trailer cable, the vehicle
is lowered. This can cause you or other sto
become trapped between the vehicl ebody
and tyres, or underneat hthe vehicle. This
poses arisk of injury.
Make sure that no-on eisinthe immediate
vicinit yofthe wheel arch or underneath the
vehicle when disconnectin gthe trailer cable.
Vehicles with th eAIRMATIC package X
Make sure that the transmission is in posi-
tion P.
X Engage the electric parking brake.
X Start the engine.
X Set the vehicle to highway level
(Y page 213).
X Set the Adaptive Damping System (ADS )to
AUTO orCOMF (Ypage 212).
X Switch off the engine.
X Close the doors and tailgate.
X Position the trailer level behind the vehicle.
X Coupl eupthe trailer.
X Establish the electric con nectio nbetween
the vehicle and the trailer.
X Check that the trailer lighting system is
working. 260
Towing
atrailerDriving an dparking
Page 264 of 441

i
If yo uhave coupled atrail er,the vehicle
will remain at highwa ylevel.
The vehicle automatically lowers to high-
way level if you driv efaster than 30km/h
with atrailer. The vehicle is not lowered to
high-speed level even if you are travelling
at higher speeds.
This also applies when using accessories
that are plugged int othe socket of the
trailer tow hitc h(e.g .ab icycle rack). Uncoupling
atrailer
Importan tsafety notes G
WARNING
If yo uuncoupl eatrailer with an engaged over-
ru nb rake ,you coul dtrap your hand be tween
th ev ehicle and th etrailer drawbar .This poses
ar isk of injury.
Do not uncouple atrailer wit hanengaged
overrun brake. G
WARNING
Vehicle swith level control:
If you disconnec tthe trailer cable, the vehicle
is lowered. This can cause you or other sto
become trapped between the vehicl ebody
and tyres, or underneat hthe vehicle. This
poses arisk of injury.
Make sure that no-on eisinthe immediate
vicinit yofthe wheel arch or underneath the
vehicle when disconnectin gthe trailer cable.
! Do not disconnec tatrailer with an
engaged overrun brake. Otherwise, your
vehicl ecould be damaged by the rebound-
ing of the overru nbrake.
! Remove th einstalled adapter cable
before folding in the ball coupling. Other-
wise, damage may occur to the rear
bumpe rand the adapter cable. Vehicle
swith the AIRMATIC package X
Make sure that the transmission is in posi-
tion P.
X Engage the electric parking brake.
X Star tthe engine.
X Close the doors and tailgate.
X Secur ethe trailer against rolling away.
X Remove the trailer cable and decouple the
trailer.
X Switc hoff th eengine. Folding in the ball coupling
G
WARNING
If you releas ethe ball coupling or it does not
engage correc tlyw hen folding in, it will swing
out. Within pivotin grange of the ball coupling,
there is an increased risk of an accident and
injury.
Only release the ball coupling if the pivoting
range is unobstructed. Always make sure that
the ball coupling engages when folding in.
Fold the ball coupling back in if you are not
using the trailer tow hitch.
X Make sure that the vehicle is stationary and
the trailer cables are disconnected.
X Place the protective covering on the ball
coupling.
X Open the tailgate. Towin
gatrailer
261Driving an dparking Z
Page 269 of 441

Usefu
linfor mati on
i This Owner's Manual describes all mod-
els, series and optional equipment for your
vehicle that were available at the time of
going to press. National variation sare pos-
sible. Note that your vehicl emay not be
equippe dwith all of the function sdescri-
bed. This is also the case for system sand
functions relevant to safety.
i Read the information on qualified special-
ist workshops: (Y page25). Impo
rtantsafety notes G
WARNING
Onl yuse the on-boar dcompu terw hen road
and traffic condition spermit .You would oth-
erwise be distracted and unable to concen-
trate properly on driving, and coul dcause an
accident. G
WARNING
No message swill be displayed if either the
instrument cluster or the multifunction dis-
play is inoperative.
As aresult, you will not be able to see infor-
mation about your driving conditions, such as
speed, outside temperature, warning and indi-
cator lamps, display messages or system fail-
ures. Drivin gcharacteristic smay be impaired.
Adjust your driving style and vehicle speed
accordingly.
Contact aqualified specialist workshop
immediately. G
WARNING
The on-board computer only records and dis-
plays malfunctions and warnings from certain
systems. For this reason, you should always
make sure that your vehicle is safe to use. You
could otherwis ecause an accident by driving
an unsafe vehicle. G
WARNING
The operating safety of your vehicle could be
impaired if maintenance work is carried out
incorrectly. This could cause you to lose con-
trol of your vehicle and cause an accident.
Moreover, the safety systems may no longer
be able to protect you or others as they are
designed to do.
Always have service work carried out at a
qualified specialis tworkshop.
For an illustration of the instrumen tcluster,
see (Y page 30). 266
Important safety notesOn-board computer and displays
Page 271 of 441

? Coolan ttemperatur e(Ypage 26 8)
A Multifunction displa y(Ypage 27 0)
B Instrumen tcluster lighting (Y page 268) Instrument cluster lighting
The lighting in the instrument")
=
Rev coun ter( Ypage 268)
? Coolan ttemperatur e(Ypage 26 8)
A Multifunction displa y(Ypage 27 0)
B Instrumen tcluster lighting (Y page 268) Instrument cluster lighting
The lighting in the instrument cluster ,inthe
displays and the controls in the vehicle inte-
rior can be adjusted usin gthe brightness con-
trol knob.
The brightness control knob is on the bottom
lef toft he instrumen tcluster (Y page 30).
X Turn the brightness control knob clockwise
or anti-clockwise.
If the light switch is set to Ã,Tor
L,t he brightness is dependant upon
the brightness of the ambient light.
i The light sensor in the instrumen tcluster
automatically controls the brightness of
the multifunction display.
In daylight, the displays in the instrument
cluster are not illuminated. Coolant temperature gauge
The coolant temperature gauge is in the
instrument cluster on the right-hand side
(Y page 30).
Under normal operatin gcondition sand with
the specified coolant level ,the coolant tem-
perature ma yrise to 120 †.
At high outside temperatures and when driv-
ing uphill, the coolant temperature may rise
to the end of the scale. Rev counter
! Do not drive in the overrevving range.
Doin gsow ill damage the engine.
The red band in the rev counter indicates the
engine's overrevving range. The fuel supply is interrupted to protec
tthe
engin ewhen the red band is reached. Outside tem
perature display G
WARNING
At temperatures just above freezing point, the
street may be icy, especially in wooded areas
or on bridges. If you do not adapt your driving
style to the conditio ns,the vehicle coul dskid.
For this reason, adapt your driving style and
speed to the weather conditions.
The outside temperature displa yisinthe mul-
tifunc tion display (Y page 270).
Changes in the outside temperatur eare dis-
played afte rashort delay. Speedomete
rwith segments
The segments in the speedometer indicate
which speed range is avai lable.
R Cruise control activated (Y page 193):
The segment slight up from the stored
speed to the maximum speed.
R Variabl eSPEEDTRONIC activated
(Y page 196):
The segments light up from the star tofthe
scal etot he selected limit speed.
R DISTRONI CPLUS activate d(Ypage 198):
One or two segment sinthe set speed
range light up.
R DISTRONI CPLUS detects avehicle in front:
The segments between the speed of the
vehicle in fron tand the store dspeed light
up. 268
Display
sand operationOn-board computer and displays
Page 281 of 441
.
X Switc honthe radar")
If the
Sensors deactivated messa
ge
appears, the radar senso rsystem is deacti-
vated.
X Check whether or not the radar sensor sys-
tem is permitted to be activated
(Y page 433).
X Switc honthe radar sensor system
(Y page 28 3).
Activating/deactivating distance warn-
ing function X
Press =or; on the steering wheel
to select the Assist. menu.
X Press 9or: to select Dist. warn‐
ing .
X Press the abutton.
The curren tselection is displayed.
X To activate/deac tivate: press the a
button again.
When the distanc ewarning function is acti-
vated, the multifunction display shows the
Ä symbol if the HOLD function is not acti-
vated (Y page 211).
Vehicles with Active Parking Assist: if
PARKTRONIC is activated and you are driving
at as peed under 35 km/h, the jActive
Parkin gAssist symbol is shown instead of the
Ä symbol ( Ypage 21 9).
Further information on the distance warning
function (Y page63).
Activating/deactivatin gPRE-SAFE ®
Brake PRE-SAFE
®
Brake is only available in vehicles
with DISTRONIC PLUS.
X Press =or; on the steering wheel
to select the Assist. menu.
X Pres sthe 9 or: button to select
PRE-SA FEBrake .X
Press the abutton.
The curren tselection is displayed.
X To activate/deac tivate: press the a
button again.
When PRE-SAFE ®
Brak eisa ctivated, the mul-
tifunction displa yshows the Äsymbol as
long as the HOL Dfunction is not activated
(Y page 211).
Vehicles with Active Parking Assist: if
PARKTRONIC is activated and you are driving
at as peed under 35 km/h, the jActive
Parkin gAssist symbol is shown instead of the
Ä symbol ( Ypage 21 9).
If the PRE-SA FEBrake: Sensors deacti‐ vated message appears
,the radar sensor
system is deactivated.
X Chec kwhether or not the radar sensor sys-
tem is permi tted to be activated
(Y page 43 3).
X Switch on the radar senso rsystem
(Y page 283).
For more information on PRE-SAFE ®
Brake,
see (Y page 68).
Activating/deactivating ATTENTION
ASSIST X
Press =or; on the stee ring wheel
to select the Assist. menu.
X Pres sthe 9 or: button to select
Attent ionA sst. X
Press the abutton.
The curren tselection is displayed.
X To activate/deac tivate: press the a
button again.
When ATTENTION ASSI STis activated, the
À symbol appears in the multifunction
display when the ignition is on.
For further information about ATTENTION
ASSIST, see (Y page 232).278
Menus and submenusOn-boar
dcomputer and displays
Page 282 of 441

Activating/deactivating Blind Spot
Assist X
Press =or; on thesteering wheel
to select the Assist. menu.
X Pres sthe 9 or: buttontos elect
Blin dSpot Asst. .
X Press the abutton.
Th ec urrent selection is displayed.
X To activate/deactivate: press thea
button again.
If the BlindSpot Assist Sensors deac‐ tivated or
Active blind spot assist. sensor system deactivated message
appears ,the radar sensor system is deacti-
vated.
X Chec kwhether or not the radar sensor sys-
tem is permitted to be activated
(Y page 433).
X Switc hont he radar sensor system
(Y page 283).
For further information about Blind Spot
Assist ,see (Y page 238).
For further information about Active Blind
Spot Assist ,see (Y page 242).
Activating/deactivating Lane Keeping
Assist X
Press =or; on the steerin gwheel
to selec tthe Assist. menu.
X Press the 9or: button to select
Lane Keep .Asst. X
Press the abutton.
Th ec urrent selection is displayed.
X Press ato confirm.
X Press :or9 to set Off ,
Standard or
Adaptive .
X Press the abutton to save the setting.
When Lane Keeping Assis torActive Lane
Keeping Assist is activated, the Ãsymbol
appears in the multifunction displa ywhen the
ignition is on. For further information about Lane Keeping
Assist
,see (Y page 240).
For further information about Active Lane
Keepin gAssist ,see (Y page 245). Service menu
In the
Serv. menu, you have the following
options:
R call up display messages in message mem-
ory (Y page 290)
R restart the tyr epressure loss warning sys-
tem (Y page 401)
R check th etyre pressure electronically
(Y page 402)
R call up service due date (Y page 365) Settings menu
Introduction In the
Settings menu, you have the following
options:
R changing the instrument cluster settings
(Y page 280)
R changing the ligh tsettings (Y page 280)
R changing the vehicle settings
(Y page 283)
R changing the auxiliary heatin gsettings
(Y page 284) Menu
sand submenus
279On-board computer and displays Z
Page 287 of 441

When you are close to radi
otelescope facili-
ties, the rada rsensor system will be deacti-
vated automatically.
The following system sare switche doff when
th er adar senso rsystem is deactivated:
R DISTRONIC PLUS (Y page 198)
R BAS PLUS (Y page 62)
R PRE-SAFE ®
Brak e(Ypage 68)
R Blin dSpot Assist (Y page 238)
R Active Blin dSpot Assist (Y page 242)
Heating submenu Auxiliary heating dep
arture time G
WARNING
Exhaus tfumes are produced when the auxili-
ary heating is in operation. Inhaling the se
exhaus tfumes can be poisonous. You should
therefor eswitch off th eauxiliar yheating in
confine dspaces without an extraction sys-
tem, e.g .agarage. G
WARNING
When operating the auxiliary heating parts of
the vehicle can get very hot. Make sure that
the exhaust system does not under any cir-
cumstances come into contact with easily
ignitable material such as dry grass or fuels.
The material could otherwise ignite and set
the vehicle alight. Choos eyour parkin gspot
accordingly.
Operating the auxiliary heating is thus pro-
hibited at fillin gstations or when your vehicle
is being refuelled .You must therefor eswitch
off the auxiliary heating at filling stations.
! Operating the auxiliary heating/ventila-
tion draws on the vehicle battery. After you
have heated or ventilated the vehicle a
maximum of two times, drive for alonger
distance.
This func tion is only available on vehicles with
auxiliary heatin g(Ypage 148). In the
Heating submenu, you can select a
stored departure tim eorchange adeparture
time.
The auxiliary heatin gtimer func tion calcu-
lates the switch-on tim eaccording to the out-
sid etemperatur esothat the vehicle is pre-
heate dbyt he departur etime. When the
departur etime is reached, the auxiliary heat-
ing continues to heat for afurther five
minutes and then switches off. The auxiliary
heating adopts the THERMATI Cor
THERMOTRONI Ctemperature setting.
You can switc hoff th eauxiliary heating by
using the remot econtrol or the auxiliar yheat-
ing button on the centre console.
i Swit chthe auxiliary heating on regularly
once amonthfor about ten minutes.
Selecting th edepartur etime or deactivat-
ing aselected depa rtur et ime
X Press the =or; button on the steer-
ing wheel to select the Settings menu.
X Press the :or9 button to select the
Heating submenu.
X Press ato confirm.
You will see the selected setting.
X Press ato confirm.
X Press the :or9 button to select
one of the three departur etimes or Timer off (no timer active).
X Press ato confirm.
If ad eparture tim eisselected, the yellow
indicator lam plights up on the auxiliary
heating button.
Changing the depa rtur et ime
X Press the =or; button on the steer-
ing wheel to select the Settings menu.
X Press the :or9 button to select the
Heating submenu.
X Press ato confirm.
You will see the selected setting.
X Press ato confirm. 284
Menus and submenusOn-board computer and displays