open bonnet MERCEDES-BENZ GL SUV 2012 User Guide
[x] Cancel search | Manufacturer: MERCEDES-BENZ, Model Year: 2012, Model line: GL SUV, Model: MERCEDES-BENZ GL SUV 2012Pages: 441, PDF Size: 10.66 MB
Page 364 of 441
To avoi
dthe risk of burns, only touc hthose
component sdescribed in the Owner's Manual
and observ ethe relevant safety notes. G
WARNING
The radiator fa nbetween the radiator and the
engine can star tautomatically, even if the key
has been removed from the ignition lock. For
this reason, you must not reach into the fan
rotation area. You could otherwis ebeinjured.
Vehicles with apetrol engine: The elec-
tronic ignition system uses high voltage. For
this reason ,you must never touc hignition
system component s(ignition coil, ignition
cables, spark plug connectors or test socket)
while:
R the engine is running
R the engine is being started
R the ignition is switched on and the engine
is being cranked by hand
You could otherwise suffer an electric shock
and be seriously or even fatally injured.
Vehicles with adiesel engine: The elec-
tronic injection control uses high voltage. For
this reason ,you must never touc hinjection
system components while:
R the engi neis running
R the engin eisbeing started
R the ignition is switched on
You could otherwise suffer an electric shock
and be seriously or even fatally injured. G
WAR
NING
The winds creen wipers and wiper linkage
could be set in motion.
When the bonnet is open, you or others could
be injured by the wiper linkage.
Make sure that the windscreen wipers are
switched off .Remov ethe key or make sure
that no ignition position has been selected
with KEYLESS-GO. All indi cator lamps must be
off in the instrumen tpanel.
! Make sure that the windscreen wipers are
not folded away from the windscreen. Oth- er
wise ,you could damage the windscreen
wipers or the bonnet. X
Make sure tha tthe windscreen wiper sare
switche doff.
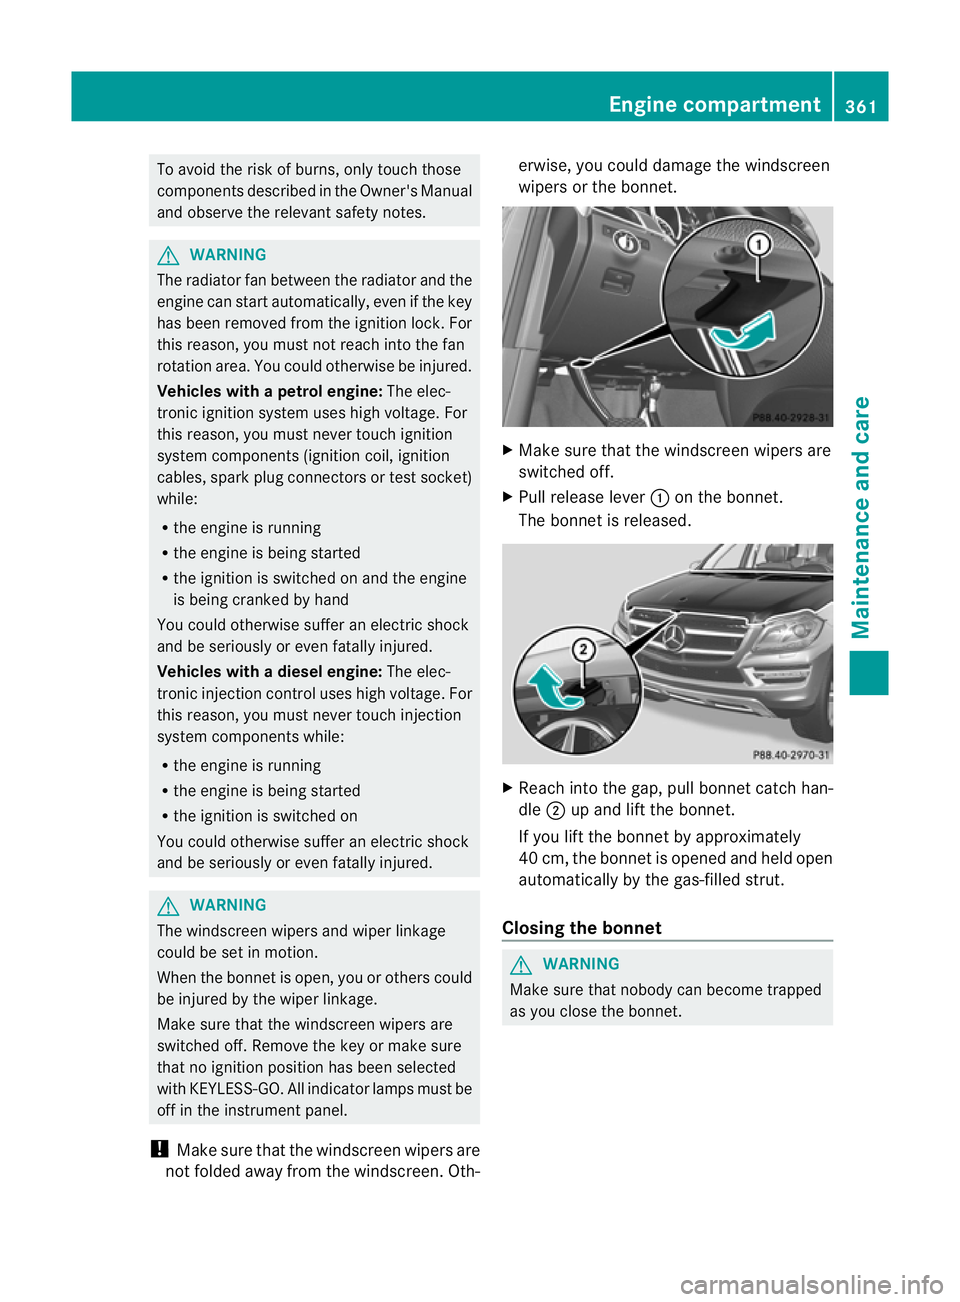
X Pull release lever :on th ebonnet.
The bonnet is released. X
Reac hinto the gap ,pull bonnet catch han-
dle ;up and lift the bonnet.
If you lift the bonnet by approximately
40 cm, the bonnet is opened and held open
automatically by the gas-filled strut.
Closing the bonnet G
WARNING
Make sure that nobody can become trapped
as you close the bonnet. Eng
inecompartment
361Maintenance and care Z
Page 365 of 441
X
Lower th ebonnet and let it fal lfrom a
heig ht of approx imately 20 cm.
X Check that the bonnet has engaged prop-
erly.
If the bonnet can be raised slightly, it is not
properly engaged. Open it again and close
it with alittle more force. Radiator
Vehicles with adiesel engine: do not cover
the radiator .Donot use therma lmats, insect
protection covers or anything similar. Doing
so can cause the Onboard Diagnostics Sys-
tem to display inaccurat evalues. Some of
these values are legally required and must
always be correct. Engin
eoil
Genera lnotes Dependin
gonyour drivin gstyle, the vehicle
consumes up to 0.8 lofoil per 1,00 0km. The
oi lc onsumption ma ybehigher than this when
the vehicle is new or if you frequently drive at
high engine speeds.
Dependin gonthe engine, the oil dipstick may
be installed at adifferent location.
When checking the oil level:
R park the vehicle on alevel surface.
R the engine should be switched off for
approximately fiv eminutes if the engine is
at normal operating tempera ture.
R if the engine is not at normal operating
tempera ture,e.g. if the engine was only
started briefly, wait about 30 minutes
before carrying out the measurement. Checkin
gthe oi llevel using the oil dip-
stick Example: vehicles with
apetrol engine Example: vehicles with
adiesel engine
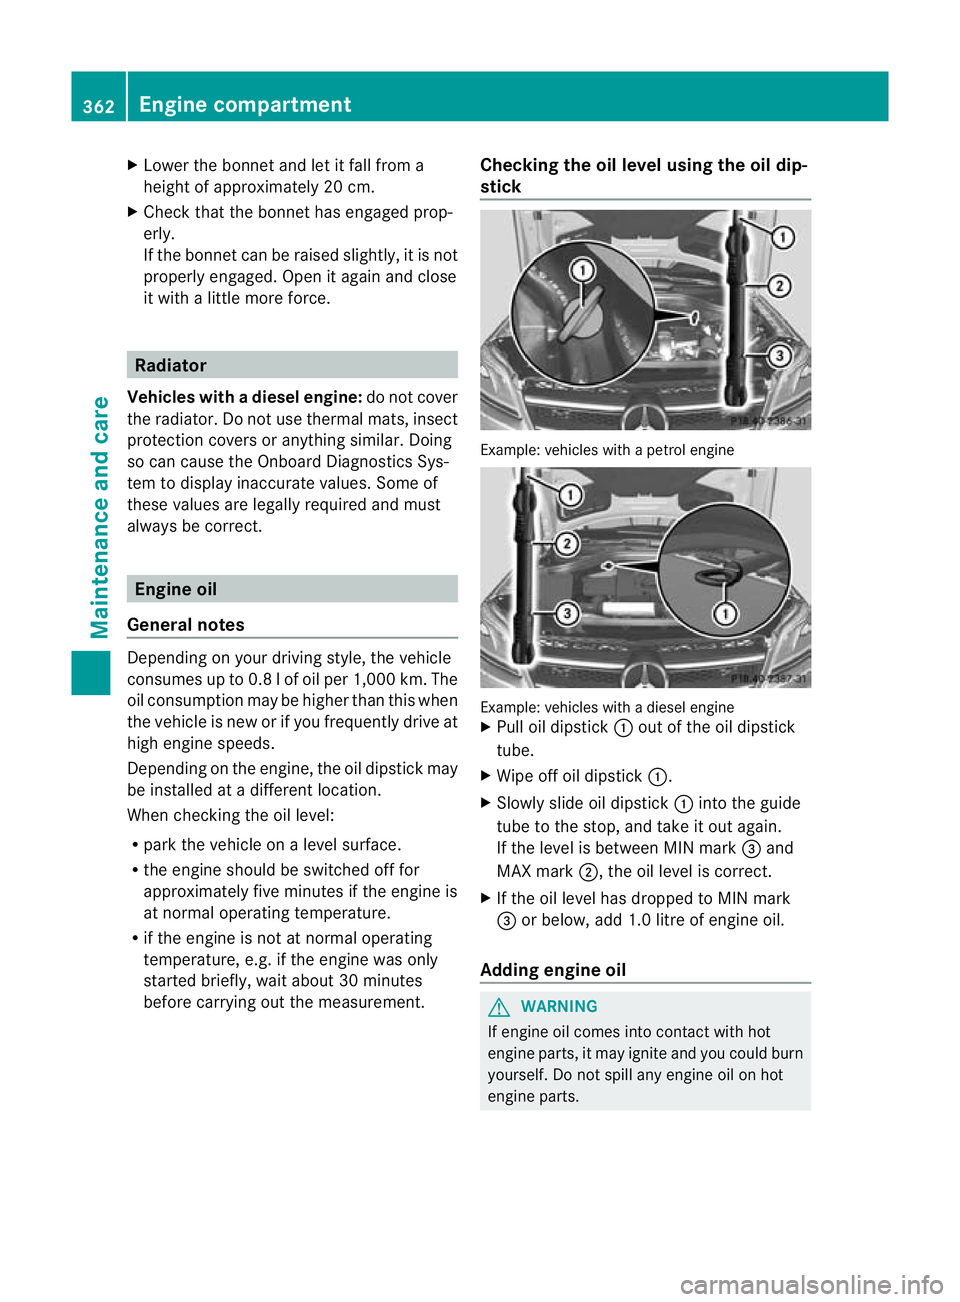
X Pull oil dipstick :out of the oil dipstick
tube.
X Wipe off oil dipstick :.
X Slowly slide oil dipstick :into the guide
tube to the stop, and take it out again.
If the level is between MIN mark =and
MAX mark ;,the oil level is correct.
X If the oil level has dropped to MIN mark
= or below, add 1. 0litre of engine oil.
Adding engine oil G
WARNING
If engine oil comes into contact with hot
engine parts, it may ignite and you could burn
yourself .Donot spill any engin eoil on hot
engine parts. 362
Engine compartmentMaintenance and care
Page 388 of 441
accessory. It permits the chargin
gofthe bat-
tery in its installed position. Contac ta
Mercedes-Ben zService Centre for informa-
tion and availability. Charge the batter yin
accordance with the separate instructions for
the battery charger.
The jump-starting connection point is in the
engine compartmen t(Ypage 386).
Read the batter ycharger' soperating instruc-
tions befor echarging the battery.
X Open the bonnet (Y page 360).
X Connect the battery charger to the positive
terminal and earth point in the sam eorder
as when connecting th edonor battery in
the jump-startin gprocedure
(Y page 386). Battery (vehi
cle)
385Breakdown assistance Z
Page 390 of 441
Do not us
earapid charging device to start the vehicle. If your vehicle' sbattery is discharg ed,
the engine can be jump-starte dfroma nothe rvehicle or fr omasecon dbattery using jump
leads. Observe the following points:
R the battery is not acce ssiblein allvehicles .Ifthe other vehicle' sbattery is not accessible,
jump-start the vehicle using asecond batter yorajump-star ting device.
R vehicles with apetrol engine: only jump-star tthe vehicle when the engin eand exhaust
system are cold.
R do not start the engine if the battery is frozen. Let the battery thaw first.
R jump-starting may only be performed from batteries with anominal voltage of 12 V.
R only use jum pleads that have asufficient cross-section and insulated terminal clamps.
R if the battery is fully discharged, leave the battery that is being used to jump-start connected
for afew minutes befor eattempting to start. Thi scharges the empty battery alittle.
R make sure that the two vehicles do not touch.
Make sure that:
R the jump leads are not damaged.
R non-insulated parts of the terminal clamps do not come into contact with other metal parts
while the jump leads are connected to the battery.
R the jump leads cannot come into contact with parts such as the V-belt pulle yorthe fan.
These parts mov ewhen the engin eisstarted and whil eitisr unning.
X Secure the vehicle by applying the electric parking brake.
X Shift the transmission to position P.
X Turn the key to position 0in the ignition lock and remove it (Y page 159). On vehicles with
KEYLESS-GO, make sure the ignition is switched off (Y page 159). All indicator lamps in the
instrumen tcluster must be off.
X Switch off all electrical consumer s(e.g. radio, blower, etc.).
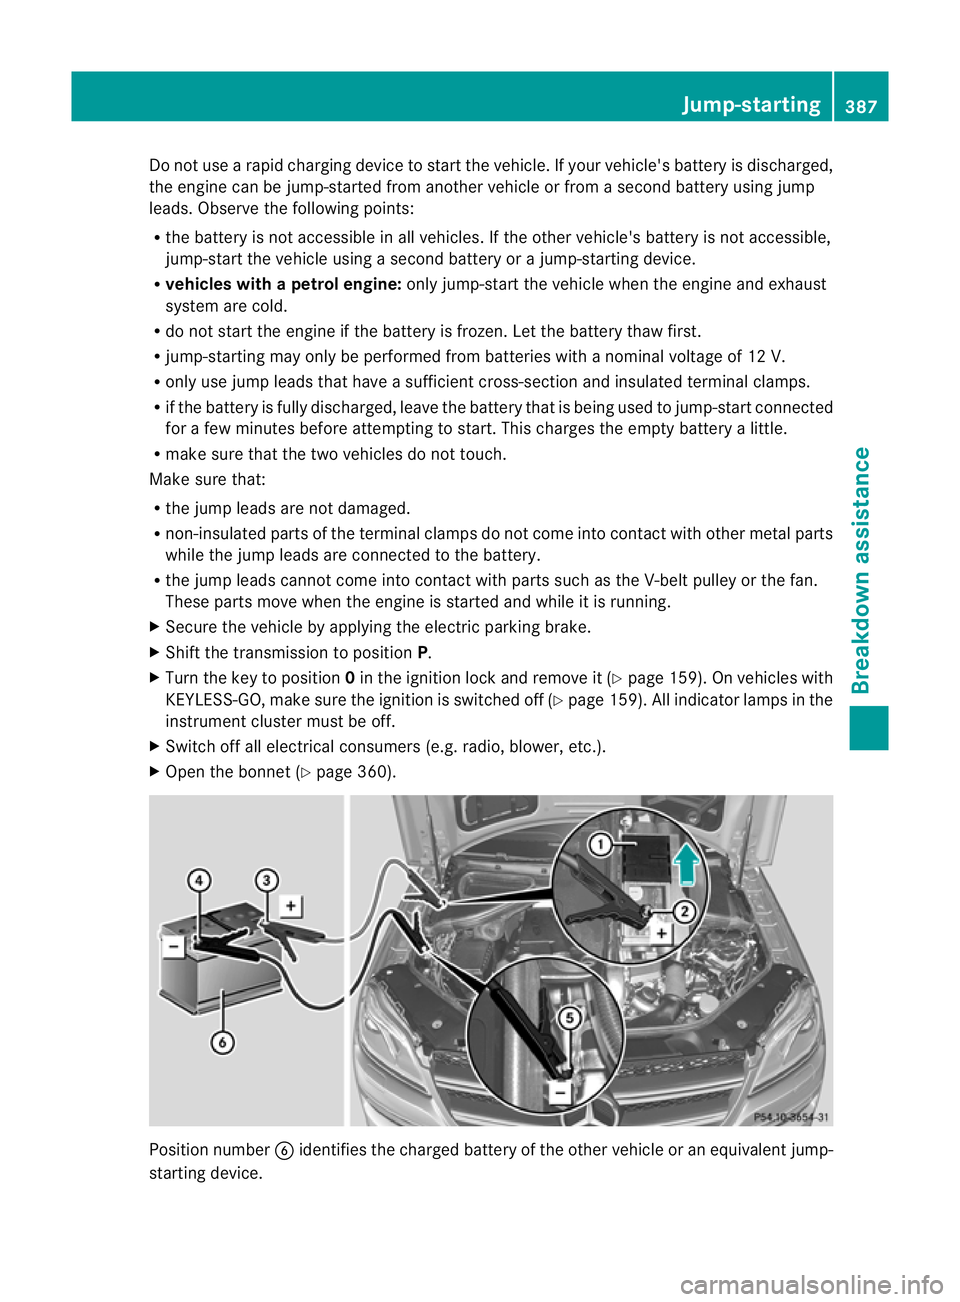
X Open the bonnet (Y page 360).Position number
Bidentifies the charged batter yofthe other vehicle or an equivalent jump-
startin gdevice. Jump-starting
387Breakdown assistance Z
Page 395 of 441
The fuses in your vehicle serv
etoclose down
faulty circuits .Ifafuse blows, all the compo-
nen tson th ecircuit and their function sstop
operating.
Blown fuse smust be replaced with fuses of
the same rating, which you can recognise by
the colour and fuse rating. The fuse ratings
are listed in the fuse allocation chart.
If the newly inser tedf use also blows ,have the
cause traced and rectified at aqualified spe-
cialist workshop, e.g. aMercedes-Benz
Servic eCentre. Befor
ereplacing afuse
X Secure th evehicle against rollin gaway
(Y page 181).
X Switch off all electrical consumers.
X Turn the key to position 0in the ignition
lock and remove it (Y page 159). On vehi-
cles with KEYLESS-GO, mak esure the igni-
tion is switched off (Y page 159).
All indicator lamps in the instrumen tcluster
must be off.
The fuses are located in various fuse boxes:
R fuse box on the fron t-passenger side of the
dashboard
R fuse box in the engine compartmen tonthe
right-hand side of the vehicle, when viewed
in the direction of travel
R fuse box under the rea rbench seat
The fuse allocation char tisl ocated in the fuse
box under the rea rbench seat (Y page 393). Dashboar
dfuse box
! Do not us eapointed objec tsuch as a
screwdriver to open the cover in the dash-
board. You could damage the dashboard or
the cover.
! Make sure that no moisture can enter the
fuse box when the cover is open.
! When closing the cover, make sure that it
is lying correctly on the fuse box. Moisture seeping in or dirt could otherwis
eimpair
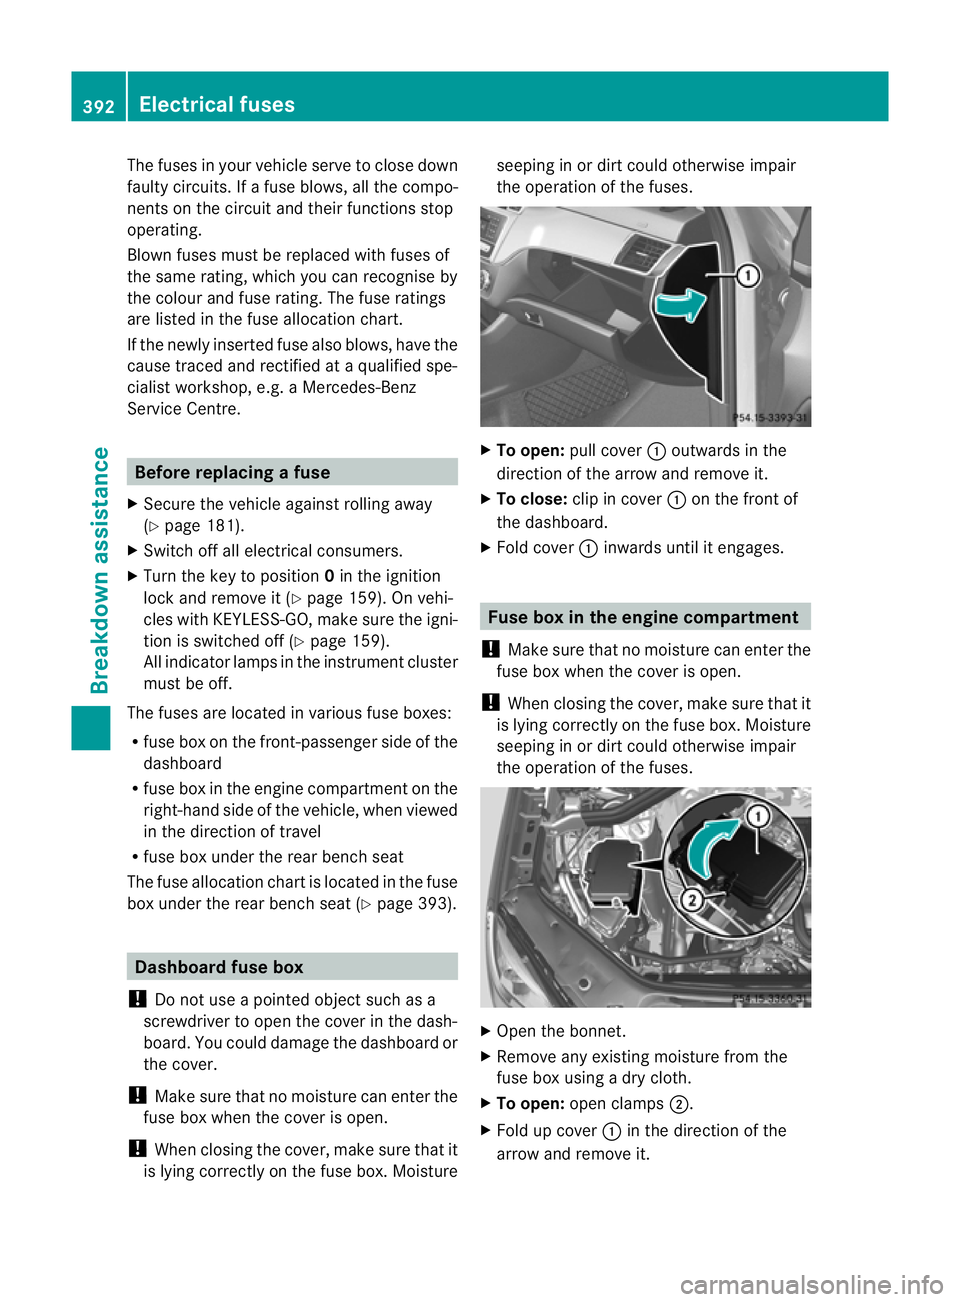
th eo peration of the fuses. X
To open: pull cover :outwards in the
direction of the arrow and remove it.
X To close: clip in cover :on the front of
the dashboard.
X Fold cover :inwards unti litengages. Fuse box in the engine compartment
! Make sure that no moisture can enter the
fuse box whe nthe cover is open.
! When closing the cover, make sur ethat it
is lyin gcorrectly on the fuse box. Moisture
seeping in or dir tcould otherwise impair
the operation of the fuses. X
Open the bonnet.
X Remove any existing moistur efrom the
fus eb ox using adry cloth.
X To open: open clamps ;.
X Fol dupc over:in the direction of the
arrow and remove it. 392
Electrical fusesBreakdown assistance
Page 396 of 441
X
To close: check whethe rthe seal is seated
correc tlyinc over:.
X Insert cover :at the side of the fuse box
int ot he retainers.
X Fold down cover :and close clamps ;.
X Close the bonnet. Fuse box under th
erear bench seat
! Make sure that no moisture can enter the
fuse box when the cover is open.
! When closing the cover, make sure that it
is lying correctly on the fuse box. Moisture
seeping in or dirt could otherwise impair
the operation of the fuses or the cover
could be damaged by the rear bench seat.
X Fold the left-hand rear bench seat forward
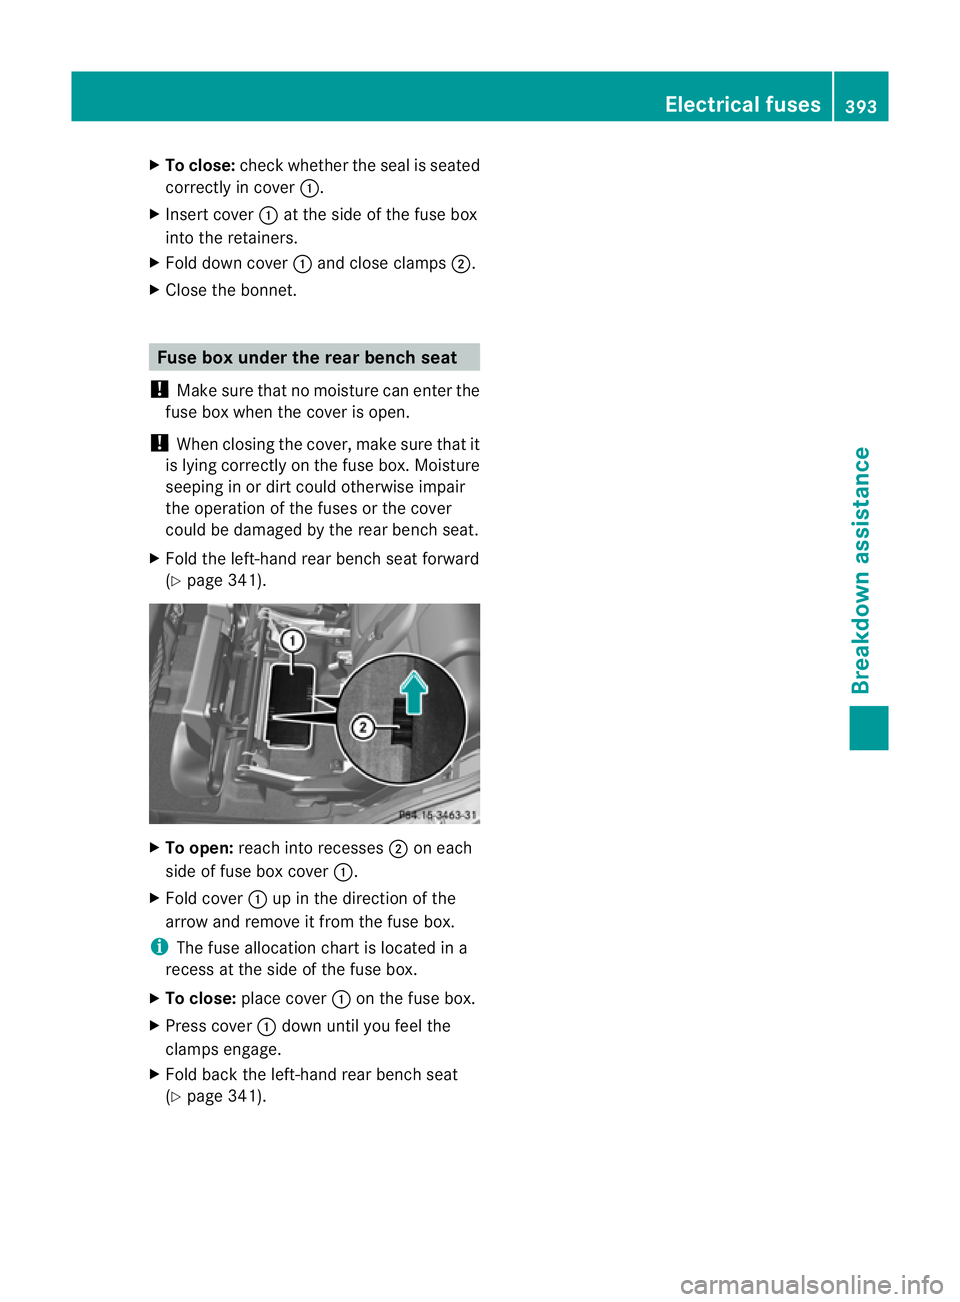
(Y page 341). X
To open: reach into recesses ;on each
side of fuse box cover :.
X Fold cover :up in the direction of the
arrow and remov eitfrom th efuse box.
i The fuse allocation chart is located in a
recess at the side of the fuse box.
X To close: place cover :on the fuse box.
X Press cover :down until you feel the
clamps engage.
X Fold back the left-hand rear bench seat
(Y page 341). Electrical fuses
393Breakdown assistance Z