fuel MERCEDES-BENZ GL SUV 2012 Owner's Manual
[x] Cancel search | Manufacturer: MERCEDES-BENZ, Model Year: 2012, Model line: GL SUV, Model: MERCEDES-BENZ GL SUV 2012Pages: 441, PDF Size: 10.66 MB
Page 178 of 441
G
WARNING
Electrostati ccharge can lead to the creation
of sparks and to fuel vapours igniting. There
is ar isk of fire and explosion.
Touch the vehicle bodywork just before open-
ing the fuel filler cap. This wil ldischarge a
possible electrostatic charge.
! Do not use petrol to refuel vehicle swith a
diesel engine. Do not use diesel to refu el
vehicles wit hapetrol engine. Do not switch
on the igniti on if youaccidentally refuel
with the wrong fuel. Otherwise, the fuel will
ente rthe fuel system .Even small amounts
of th ewrong fue lcould result in damage to
the fuel system and the engine. The repair
cost sare high .Notif yaq ualified specialist
workshop and have the fuel tan kand fuel
lines draine dcompletely.
! Overfilling the fuel tan kcould damage the
fuel system.
! Take care not to spill any fuel on painted
surfaces .You coul dotherwis edamage the
paintwork.
! Use afilter when adding fuel from afuel
can. The fuel lines and/or the diesel injec-
tion system could otherwis ebeblocked by
particles from the fuel can.
If you overfill the fuel tank ,fuel could spray
out when the fuel pump nozzle is removed.
Further information on fuel and on fuel grades
can be found in the "Fuel" section
(Y page 423). Refuelling
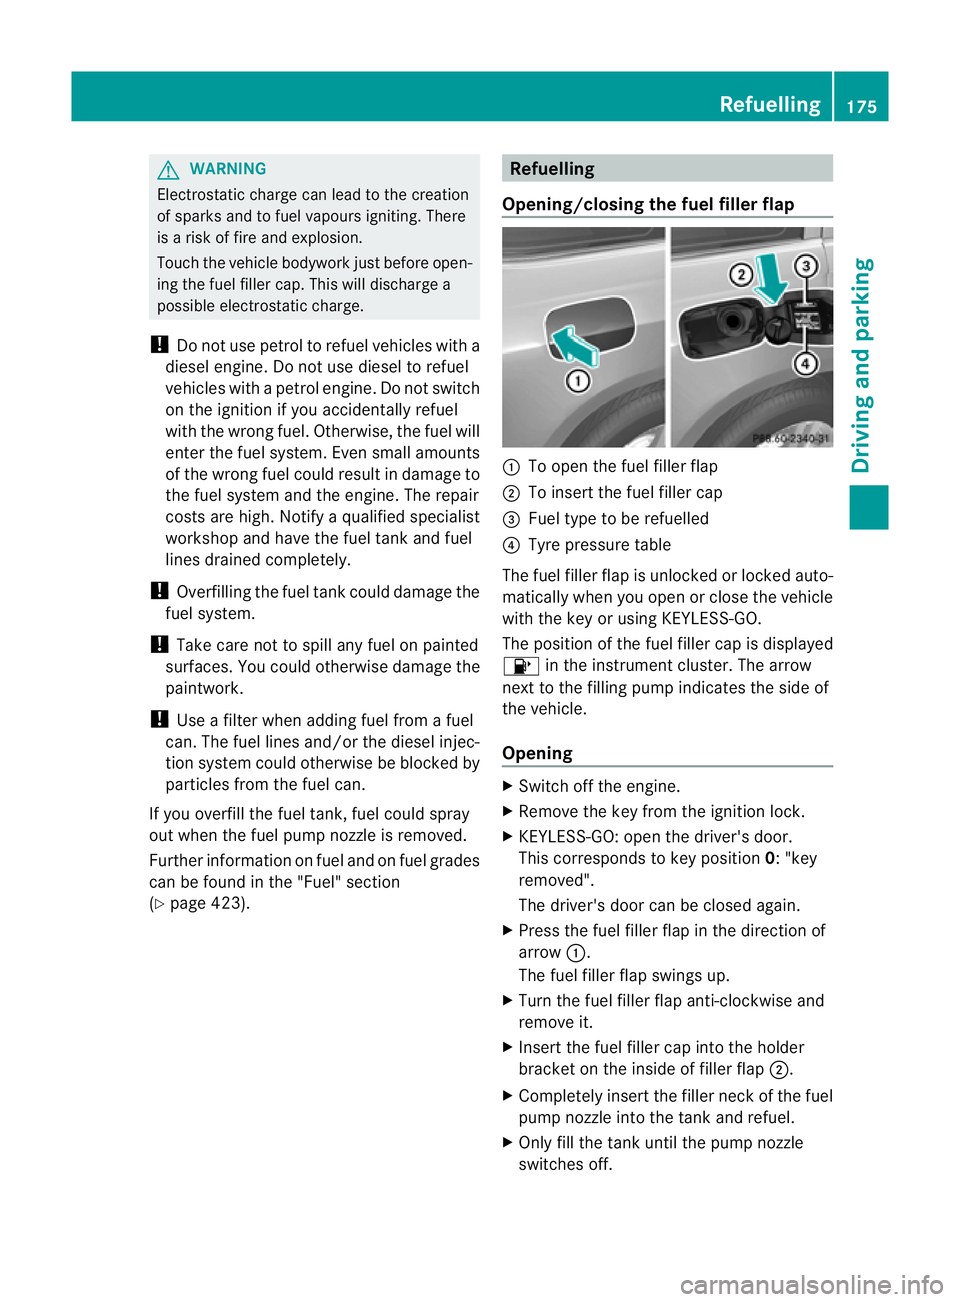
Opening/closing the fuel filler flap :
To open the fuel filler flap
; To insert the fuel filler cap
= Fuel type to be refuelled
? Tyre pressure table
The fuel filler flap is unlocked or locked auto-
matically when you open or close the vehicle
with the key or using KEYLESS-GO.
The position of the fuel filler cap is displayed
8 in the instrument cluster. The arrow
next to the filling pump indicates the side of
the vehicle.
Opening X
Switch off the engine.
X Remove the key from the ignition lock.
X KEYLESS-GO: open the driver' sdoor.
This corresponds to key position 0:"key
removed".
The driver's doo rcan be closed again.
X Press the fuel filler flap in the direction of
arrow :.
The fuel filler flap swings up.
X Turn the fuel filler flap anti-clockwise and
remove it.
X Insert the fuel filler cap into the holder
bracket on the inside of filler flap ;.
X Completely insert the filler neck of the fuel
pump nozzle into the tank and refuel.
X Only fill the tank until the pump nozzle
switches off. Refuelling
175Driving and parking Z
Page 179 of 441
i
Do not ad dany mor efuel after the pump
stop sfilling for the first time. Otherwise,
fuel may leak out.
Closing X
Replace the cap on the fille rneck and turn
cloc kwise until it engages audibly.
X Close the fuel filler flap.
i Close the fuel filler flap before lockin gthe
vehicle. 176
RefuellingDriving and parking
Page 180 of 441
Problems wit
hthe fuel and fuel tank Problem Possible causes/consequences and
M Solutions
Fue
lisl eakin gfrom the
vehicle. Th
ef uel line or the fuel tank is faulty.
G WARNING
Risk of explosion or fire.
X Turn the key to position 0in the ignition lock and remove it
immediately (Y page 159).
X Do not restart the engine under any circumstances.
X Consult aqualified specialist workshop. The engine does not
start. The fuel tank of
avehicle with adiesel engine has been run com-
pletely dry.
X Refuel the vehicle with at least 5litres of diesel.
X Turn the ignition on for approximately ten seconds
(Y page 159).
X Start the engin econtinuously for amaximum of ten seconds
until it runs smoothly.
If the engine does not star t:
X Tur nthe igni tion on again for amaximum of ten seconds
(Y page 159).
X Start the engine again continuously for amaximum of ten sec-
onds until it runs smoothly.
If the engine does not star tafter th reea ttempts:
X Consult aqualified specialist workshop. The fuel filler flap can-
not be opened. The fuel filler flap is not unlocked.
or
The key battery is discharged.
X
Unlock the vehicle (Y page 77).
or
X Unlock the vehicle using the emergency key element
(Y page 78). The fuel filler flap is unlocked, but the opening mechanism is jam-
med.
X
Consult aqualified special istworkshop. Refuelling
177Driving and parking Z
Page 181 of 441
AdBlue
®
(BlueTEC vehicles only)
Important notes on use To function properly, BlueTE
Cexhaust gas
aftertreatmen tmust be operate dwitht he
reduc inga gen tAdBlue ®
.
When the supply of AdBlue ®
is almost used
up, the Refill AdBlue See Owner's Man‐
ual message is shown in the multifunction
display.
When the AdBlue ®
supply drops to amini-
mum ,the Refill AdBlue No star tinXXXX km message is show
ninthe multifunc-
tion display.
If the Refill AdBlue No star tinXXXX km message is show
ninthe multifunction dis-
play ,you can still drive the vehicle over the
distance shown. If AdBlue ®
is not topped up,
you will subsequen tlybe unable to start the
engine.R efill the AdBlue ®
tank or have the
AdBlue ®
tank refilled at aqualified specialist
workshop. If the Refill AdBlue Eng. star
tnot possible message appears in
th em ultifunction display and the engine does
not start ,you must top up with at least 3. 8l
of AdBlue ®
(approximately 2AdBlue ®
refill
bottles).
i If you driv ethe vehicle faster than
15 km /h,the Refill AdBlue Se eOwn‐ er's Manual message goes ou
tafter
approximately one minute.
If th eoutside temperature is lower than
Ò11 †, it may be difficult to top up. If
AdBlue ®
is frozen and there is an activ ewarn-
ing indicator, topping up may not be possible.
Park the vehicle in awarm place, e.g. in a
garage, until AdBlue ®
has become liquid
again. Topping up is then possible again.
Alternatively, have the AdBlue ®
tank refilled
at aq ualified specialist workshop.
Further information about BlueTEC exhaust
gas aftertreatment and about AdBlue ®
can
be obtained from any Mercedes-Benz Service
Centre. Importan
tsafety notes on the refilling
procedure AdBlue
®
is aw ater-solubl efluid for the
exhaust gas aftertreatment of diesel engines.
It is:
R not poisonous
R colourless and odourless
R not flammable
When you open the AdBlue ®
container ,small
amounts of ammonia vapou rmay be
released.
Ammonia vapours have apungent odour and
are particularly irritating to the skin, to
mucous membranes and to the eyes. You may
experienc eaburnin gsensation in your eyes,
nose and throat. Coughing and waterin gof
the eyes are possible.
Do not inhale any ammonia vapours that may
be released. Fill the AdBlue ®
tank only in well-
ventilated areas.
AdBlue ®
must not come into contact with
your skin, eyes or clothing and must not be
swallowed .Keep AdBlue ®
away from chil-
dren.
If you or other person scome int ocontact with
AdBlue ®
,o bserv ethe following:
R Rinse AdBlue ®
from your skin immediately
with soap and water.
R If AdBlue ®
comes int ocontact with your
eyes, immediately rinse them thoroughly
with clea nwater. Seek medical attention
immediately.
R If AdBlue ®
has been swallowed, rinse your
mouth out immediately. Drin kplent yof
water .Seek medical attention immedi-
ately.
R Change out of clothing contaminated with
AdBlue ®
immediately.
! Only use AdBlue ®
in accordanc ewith
ISO 22241. Do not mix any additives with
AdBlue ®
,a nd do not dilute AdBlue ®
with
water. Thi smay destroy the BlueTEC
exhaust gas aftertreatmen tsystem. 178
RefuellingDriving and parking
Page 182 of 441
!
In order to fil lthe AdBlue ®
tank, the vehi-
cle must be parked on alevel surface. The
AdBlue ®
tank can only be filled as intended
with the vehicle parked on alevel surface.
Fluctuations in capacity will thus be avoi-
ded. Filling avehicle standing on an uneven
surface is not permitted. There is adanger
of overfilling, which can cause damage to
BlueTEC exhaust gas aftertreatmen tcom-
ponen ts.
! Surfaces which have come into contact
with AdBlue ®
while refilling shoul dbe
rinsed immediately wit hwater, or remove
AdBlue ®
with amoist clot hand cold water.
If AdBlue ®
has alread ycrystallised, us ea
sponge and cold water to clean the area.
AdBlue ®
residue crystallises after acertain
amount of tim eand soils the affected sur-
faces.
! AdBlue ®
is not afuel additive and must
not be added to the fuel tank .IfAdBlue ®
is
added to the fuel tank ,this can lead to
engin edamage.
Have the AdBlue ®
tank refilled at aqualified
specialist workshop. However ,you can also
top up the AdBlue ®
tan k:
R at afilling station with an AdBlue ®
filling
pump
R with AdBlue ®
refill bottles
R with an AdBlue ®
refill canister
When the pump nozzle switches off automat-
ically during filling at afilling pump, the
AdBlue ®
tank has been completely filled. Do
not fill the AdBlue ®
tank any fur ther.
AdBlue ®
may leak out.
For fur ther information on AdBlue ®
,s ee
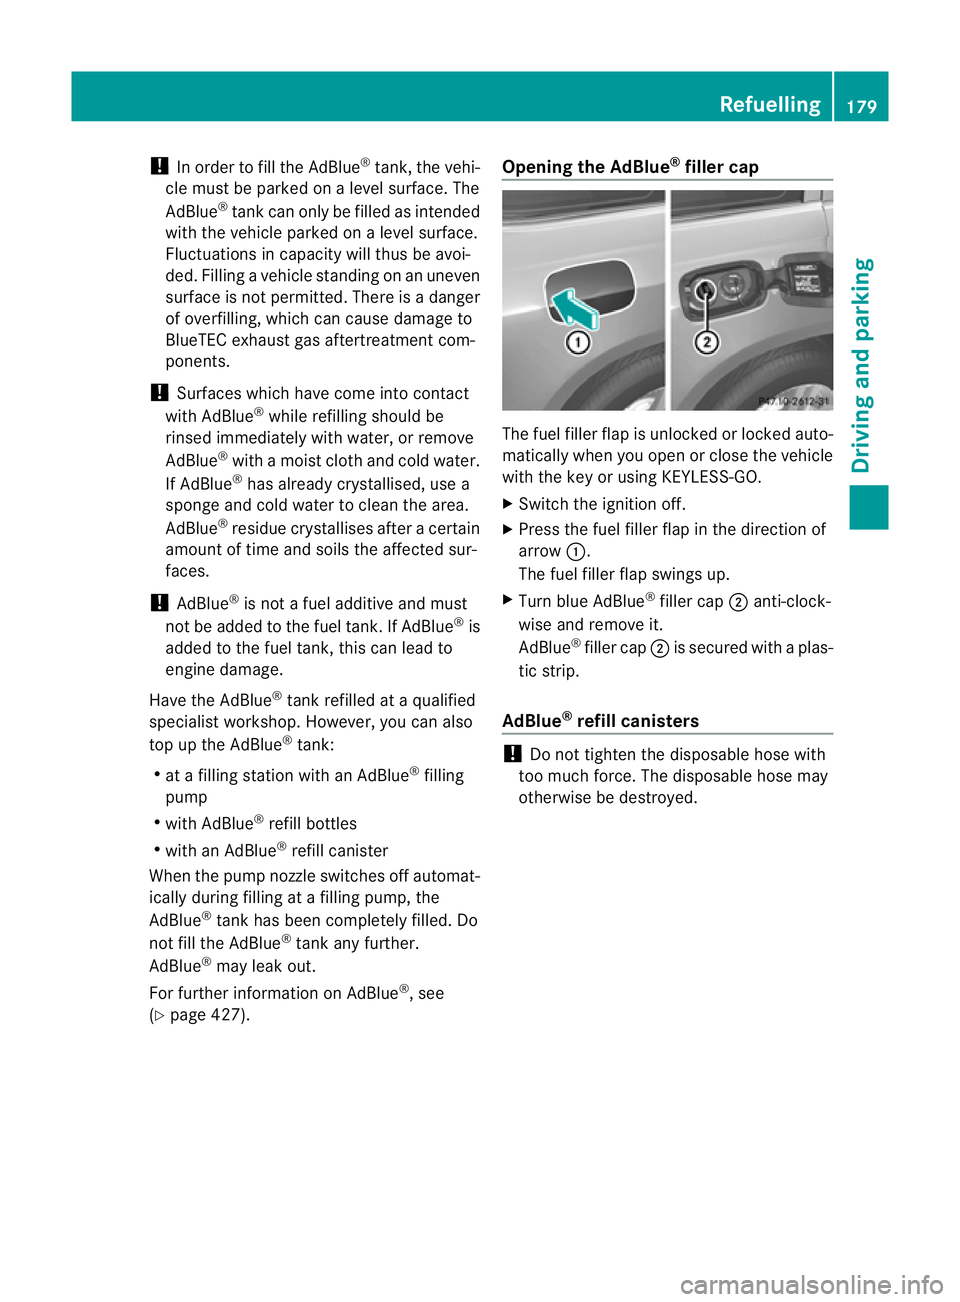
(Y page 42 7). Opening th
eAdBlue ®
fille rcap Th
ef uel filler flap is unlocked or locked auto-
matically when you open or close the vehicle
with the key or using KEYLESS-GO.
X Switc hthe igni tion off.
X Press the fuel filler fla pinthe direction of
arrow :.
The fuel filler fla pswings up.
X Turn blue AdBlue ®
filler cap ;anti-clock-
wise and remov eit.
AdBlue ®
filler cap ;is secured with aplas-
tic strip.
AdBlue ®
refill canisters !
Do not tighten the disposable hose with
too muc hforce. The disposable hose may
otherwise be destroyed. Ref
uelling
179Driving and parking Z
Page 183 of 441
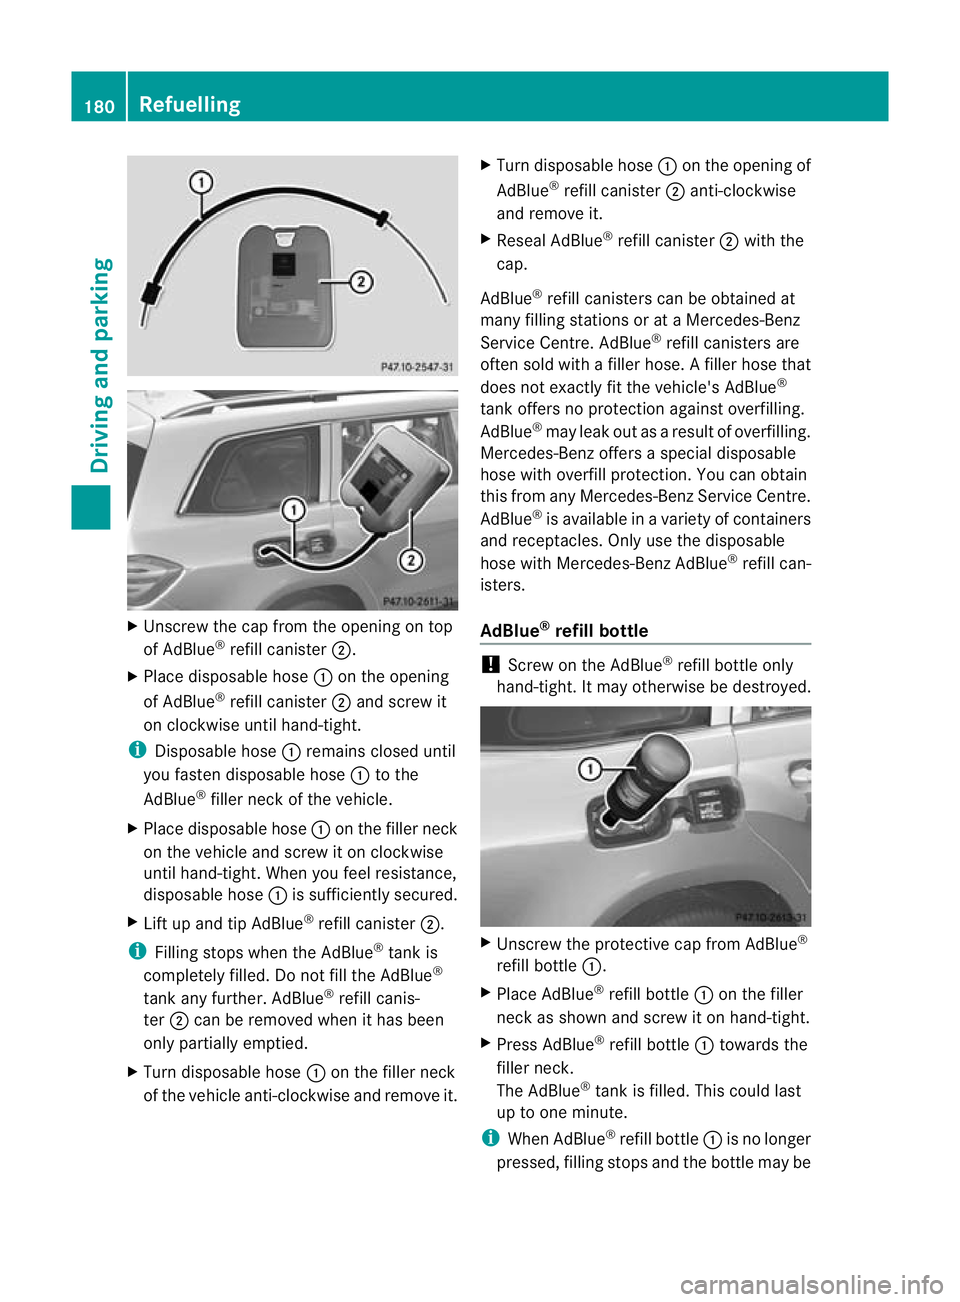
X
Unscre wthe cap from the opening on top
of AdBlue ®
refill canister ;.
X Plac edisposable hose :on the opening
of AdBlue ®
refill canister ;and screw it
on clockwise until hand-tight.
i Disposable hose :remains closed until
you fasten disposable hose :to the
AdBlue ®
filler neck of the vehicle.
X Place disposable hose :on the filler neck
on the vehicle and screw it on clockwise
until hand-tight. When you feel resistance,
disposable hose :is sufficiently secured.
X Lif tu pa nd tip AdBlue ®
refill canister ;.
i Filling stops whe nthe AdBlue ®
tan kis
completely fille d.Do no tfill the AdBlue ®
tank any further. AdBlue ®
refill canis-
ter ;can be removed when it has been
only partially emptied.
X Turn disposable hose :on the filler neck
of the vehicle anti-clockwise and remov eit. X
Turn disposable hose :on the opening of
AdBlue ®
refill canister ;anti-clockwise
and remove it.
X Reseal AdBlue ®
refill canister ;with the
cap.
AdBlue ®
refill canisters can be obtained at
many filling statio nsor at aMercedes-Benz
Servic eCentre. AdBlue ®
refill canisters are
often sold with afiller hose. Afiller hose that
does not exactly fit the vehicle's AdBlue ®
tan koffers no pro tection agains toverfilling.
AdBlue ®
may leak ou tasar esult of overfilling.
Mercedes-Ben zoffers aspecial disposable
hose with overfill protection. You can obtain
this from any Mercedes-Benz Servic eCentre.
AdBlue ®
is available in avariety of containers
and receptacles. Only use the disposable
hos ewith Mercedes-Benz AdBlue ®
refill can-
isters.
AdBlue ®
refill bottle !
Screw on the AdBlue ®
refill bottle only
hand-tight. It may otherwis ebedestroyed. X
Unscrew the protectiv ecap from AdBlue ®
refill bottle :.
X Place AdBlue ®
refill bottle :on the filler
neck as sho wn andscre witonh and-tight.
X Press AdBlue ®
refill bottle :towards the
fille rneck.
The AdBlue ®
tank is filled. Thi scould last
up to one min ute.
i Whe nAdBlue ®
refill bottle :is no longer
pressed, filling stops and the bottle may be 180
RefuellingDriving and parking
Page 184 of 441
take
noff ag aina fter be ingo nly partially
emptied.
X Releas eAdBlue ®
refil lbottle :.
X Tur nAdBlue ®
refil lbottle :anti-clockwise
and remove it.
X Screw the protective cap onto AdBlue ®
refill bottle :again.
AdBlue ®
refill bottles can be obtained at many
fil ling stations or at aMercedes-Benz Ser vice
Centre. Refil lbottles withou tathreaded seal
offer no protection agains toverfilling.
AdBlue ®
may leak ou tasaresult of overfilling.
Mercedes Ben zoffers special refi llbottles
with athrea deds eal. Thes eare avail able at
any Mercedes-Benz Service Centre.
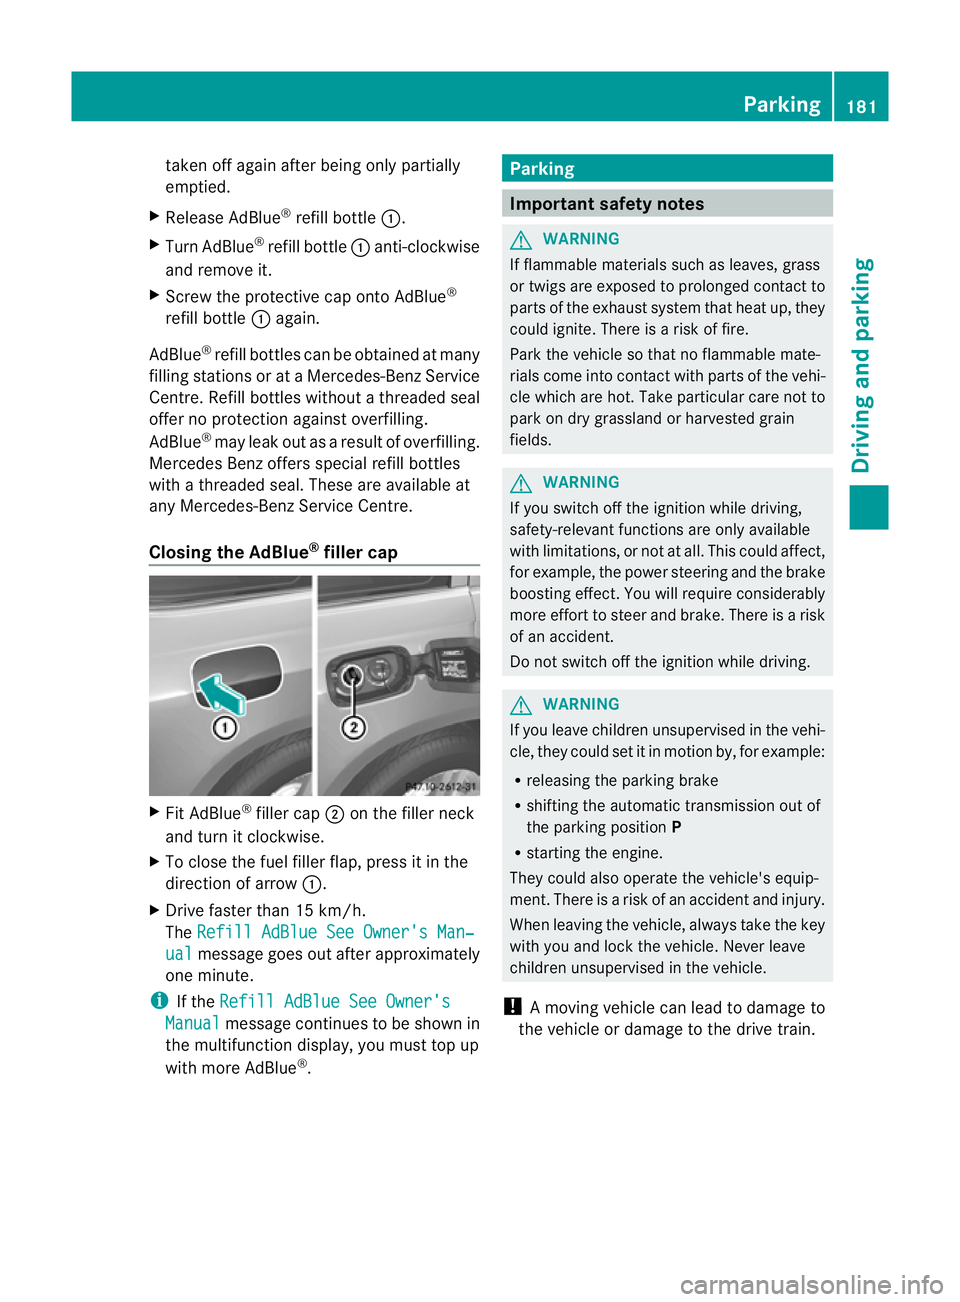
Closin gthe AdBlue ®
fil lerc ap X
Fit AdBl ue®
filler cap ;on th efiller neck
and turn it clockwise.
X To close the fuel filler flap, press it in the
direction of arrow :.
X Driv efaster than 15 km/h.
The Refill AdBlue Se eOwner' sMan‐ ual message goes ou
tafter approximately
one minute.
i If the Refill AdBlue See Owner's Manual message continues to be show
nin
the multifunctio ndisplay, you must top up
with mor eAdBlue ®
. Parking
Important safety notes
G
WAR
NING
If flammable materials such as leaves ,grass
or twigs are exposed to prolo nged contac tto
part soft he exhaust system that heat up, they
coul dignite. There is arisk of fire.
Park the vehicle so that no flammable mate-
rials come int ocontac twith parts of the vehi-
cle which are hot. Take particular care not to
park on dry grassland or harvested grain
fields. G
WARNING
If you switch off the ignition while driving,
safety-relevan tfunctions are only available
with lim itations, or not at all .This coul daffect,
for example, the powe rsteering and the brake
boosting effect .You will require considerably
mor eeffort to steer and brake. There is arisk
of an accident.
Do not switch off the ignition while driving. G
WARNING
If you leave children unsupervised in the vehi-
cle, they could set it in motion by, for example:
R releasing the parking brake
R shifting the automatic transmission out of
the parking position P
R starting the engine.
They could also operate the vehicle's equip-
ment .There is arisk of an accident and injury.
When leaving the vehicle, always take the key
with you and lock the vehicle. Never leave
children unsupervised in the vehicle.
! Am ovin gvehicle can lead to damage to
the vehicle or damage to the driv etrain. Parking
181Driving and parking Z
Page 187 of 441
X
While driving, push handle :of the elect ric
parking brake.
The vehicle can also be braked durin gan
emergency using the electric parking brake.
i The vehicle is braked for as long as the
handle of the electric parking brak eis
pressed. The longer the electric parking
brak ehandle is depressed, the greater the
braking force.
During braking:
R aw arning ton esounds
R the Releas epark. brake message
appears
R ther ed ! indicato rlamp in the instru-
ment cluster flashes
When the vehicle has been braked to astand-
still ,the electric parkin gbrake is engaged. Parkin
gupthe vehicle
If you leave th evehicle parked up for longer
than four weeks, the batter ymay be damaged
by exhaustive discharging.
X Disconnect the batter yorconnec tittoa
trickle charger.
i You can obtai ninformation about trickle
chargers from aqualified specialist work-
shop.
If you leave the vehicl eparked up for longer
than six weeks, the vehicl emay suffer dam-
age as aresult of lack of use.
X Visi taq ualifieds pecialist workshop and
seek advice. Driving tips
General notes
Impo rtant safety notes G
WARNING
If you switch off the ignition while driving,
safety-relevant functions are only available with limitations, or not at all
.This coul daffect,
for example, the powe rsteering and the brake
boosting effect .You will require considerably
mor eeffort to steer and brake. There is arisk
of an accident.
Do not switch off the ignition while driving.
Drive sensibly –save fuel Observe the fol
lowing tips to save fuel:
X The tyres should always be inflated to the
recomm ended tyr epressure.
X Remove unnecessary lo ads.
X Remov eroof carriers when they are not
needed.
X Warm up the engine at low engine speeds.
X Avoid frequent acceleration or braking.
X observe the service intervals in the Service
Booklet or in the service interval display.
Have all the maintenan cework carried in
accordanc ewith Daimler AG regulations.
Fuel consumption also increases when driv-
ing in cold weather, in stop-start traffic and in
hilly terrain. Short journeys
! Vehicles with adiesel particle filter: if
the vehicle is mostly driven for short dis-
tances, it is possible that malfunctions may
occur durin gthe automa ticc leaning of the
diesel particle filter. This may lead to fuel
collectin ginthe engin eoil and cause
engin efailure. Therefore, if you frequently
drive short distances, you should tak ea20
minu tetrip on amotorwa yorrural road at
least every 500km. Braking
Important safet ynotes G
WARNING
If you shift down on aslippery road surfac ein
an attempt to increase the engine's braking 184
Driving tipsDrivin
gand parking
Page 193 of 441
Checklist after driving off-road
!
If you detect damag etothe vehicl eafter
dri ving off-road, have the vehicle checked
immediately at aqualified specialist work-
shop.
X Vehicles with th eON&O FFROAD pack-
age: activat ethe on-road program
(Y page 253).
X Vehicles without th eON&O FFROAD
package: deactivate the on- road program
(Y page 252).
X Deac tivate the LOW RANGE off-roa dgear
(Y page 254).
X Deactiva teDS R(Ypage 251).
X Lowe rthe vehicle level again to alevel suit-
able to the road conditions, e.g. to the high-
way/high-speed level.
X Clean the headlamps and rear lights and
check for damage.
X Clean the front and rear licence plates.
X Clean the wheels/tyres with awater jet and
remove any foreign objects.
X Clea nthe wheels, wheel arches and the
vehicle underside with awater jet; check
for any foreign objects and damage.
X Check whethe rtwigs or other parts of
plants have become trapped. These
increase the risk of fire and can damage
fuel pipes, brake hose sorthe rubber bel-
lows of the axl ejoint sand propeller shafts.
X After the trip, examine without fail the
entire undercarriage, wheels ,tyres, brakes,
bodywork structure, steering, chassis and
exhaus tsystem for damage.
X After driving for extended period sacross
sand ,mud, gravel, water or in similarly dirty
conditions, have the brake discs, wheels,
brake pads/lining sand axle joints checked
and cleaned.
X If you detect strong vibrations after off-road
travel, check for foreig nobject sinthe
wheels and drive train and remove them if
necessary. Foreign objec ts candisturb the
balance and cause vibrations. Driving over rough terrain places greater
demands on your vehicle than drivin
gonnor-
ma lroads. Af terd riving off- road, check the
vehicle. This allow syou to detec tdamage
promptly and reduce the risk of an accident
to yourself and other road users.
Driving on sand Observe the following rules when driving on
sand:
R
vehicle swith the ON&OFFROAD pack-
age: select off- road program 1
(Y page 253).
R vehicle swithou tthe ON&OFFROAD
package: select theoff-road program
(Y pag e252).
R select ahigher vehicle level.
R select ashift range appropriate to the ter-
rain.
R drive quickly to overcom ethe rolling resist-
ance. Otherwise, the vehicle' swheels
could becom estuck in loose ground.
R drive in the track sofother vehicle sifpos-
sible. Make sure that:
- the tyr eruts are not too deep.
- the sand is sufficiently firm.
- the ground clearance of the vehicle is
sufficient.
Tyr eruts and gravel roads !
Check that th eruts are not too deep and
that your vehicle has sufficient clearance.
Otherwise, your vehicle could be damaged
or bottom out and get stuck.
Observe the following rules when driving
along ruts in off-road terrain or on roads with
loos egravel:
R Activate th eoff-road program
(Y pag e252).
R Vehicle swith the AIRMATIC package:
select araised vehicle level.
R Avoid high engine speeds.
R Restrict the shift range to 1.190
Driving tipsDriving and parking
Page 211 of 441
clearance. You will oth
erwise damag ethe
vehicle.
Lev elcontro ladapt sthe vehicle level auto-
matically to the current operating and driving
situation. Thi sresults in reduced fuel con-
sumption and improved handling.
Make changes to the vehicle level whil ethe
vehicle is in motion. Thi senable sthe vehicle
to adjus ttothe new level as quickly as pos-
sible.
The vehicle level ma ychange visibly if you
par kthe vehicle and the outside temperature
changes. If the temperatur edrops, th evehi-
cle level lowers; with an increase in temper-
ature, the vehicle level rises.
If you unloc kthe vehicle or open adoor, the
vehicle begins to compensate for load dis-
crepancies while still parked. However, for
significant leve lchanges, e.g. after the vehi-
cle has been stationar yfor along period, the
engin emust be running. For safety reasons,
the vehicle is only lowered when the doors are
closed .Lowering is interrupted if adoor is
opened; it con tinues once the doo rhas been
closed.
For information about driving off-road, see
(Y page 188).
Basic settings The exten
ttowhich the vehicle is raised or
lowered depend sonthe basic setting selec-
ted.
Select:
R Highway/high-spee dlevel for driving on
normal roads
R Off -road level 1for drivin goneasily nego-
tiable off-road terrain
R Off-road level 2for drivin gonnormal off-
roa dterrain
R Off -road level 3for freeing the vehicle from
especially difficult off -road terrain at low
speeds The individual vehicle levels differ from high-
way level as follows:
R
highway level: +/– 0mm
R high-spee dlevel: –1 5mm
R off-road leve l1:30mma bove highway level
R off-road level 2: 60 mm above highway level
R off-road level 3: 90 mm above highway level
Highway/high-speed level !
Make sure there is enough groun dclear-
ance when the vehicle is being lowered. It
could otherwise hit the ground, damaging
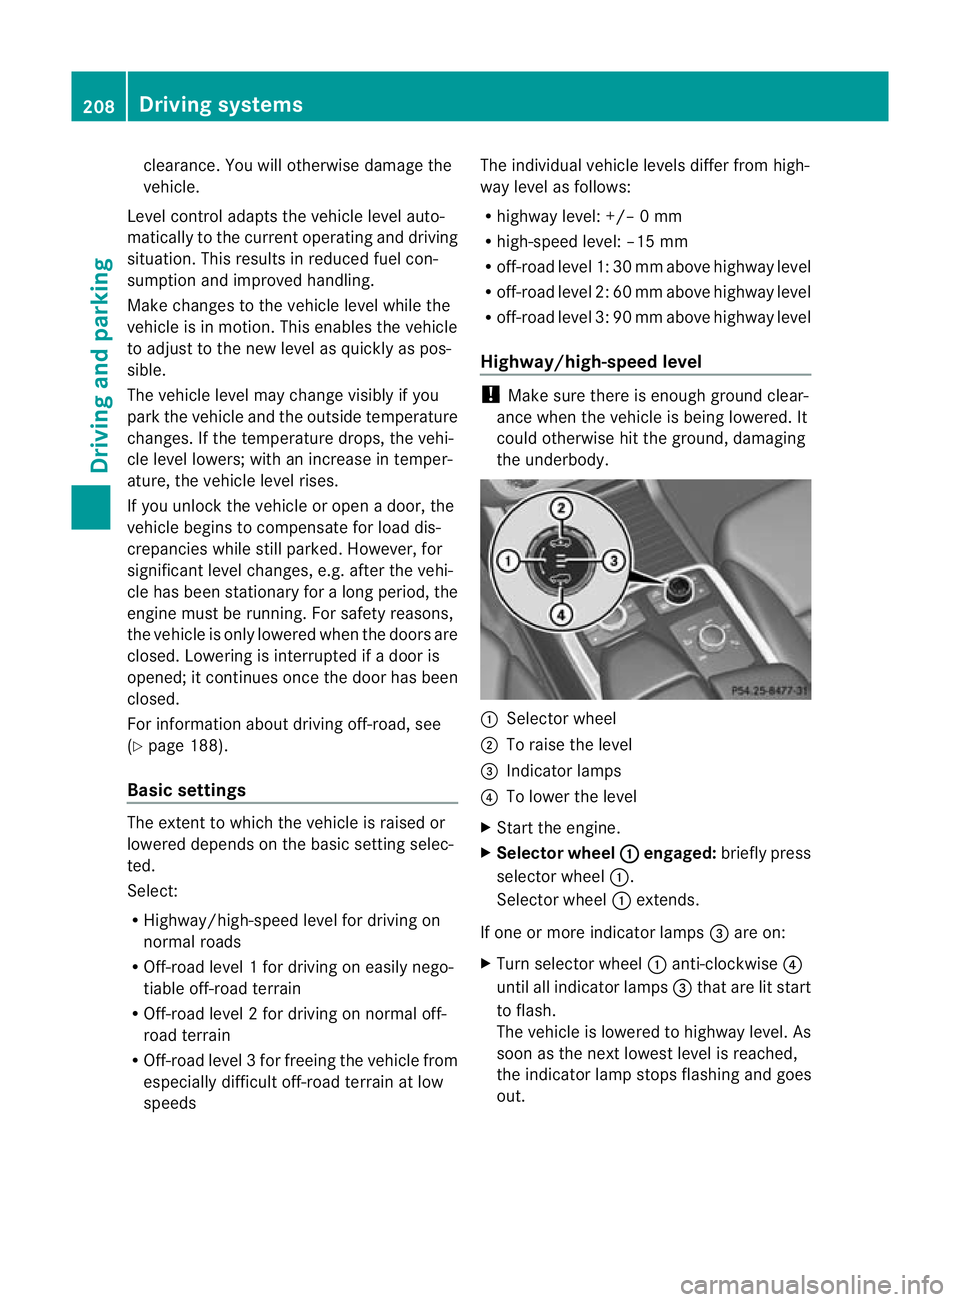
the underbody. :
Selector wheel
; To raise the level
= Indicator lamps
? To lower the level
X Star tthe engine.
X Selector wheel : engaged:
brieflypress
selecto rwheel :.
Selector wheel :extends.
If one or mor eindicato rlamps =are on:
X Turn selector wheel :anti-clockwise ?
until all indicator lamps =that are lit start
to flash.
The vehicle is lowered to highway level. As
soon as the next lowes tlevel is reached,
the indicator lam pstops flashing and goes
out. 208
Drivin
gsystemsDrivin gand pa rking