seats MERCEDES-BENZ GL SUV 2012 Owner's Manual
[x] Cancel search | Manufacturer: MERCEDES-BENZ, Model Year: 2012, Model line: GL SUV, Model: MERCEDES-BENZ GL SUV 2012Pages: 441, PDF Size: 10.66 MB
Page 109 of 441
If yo
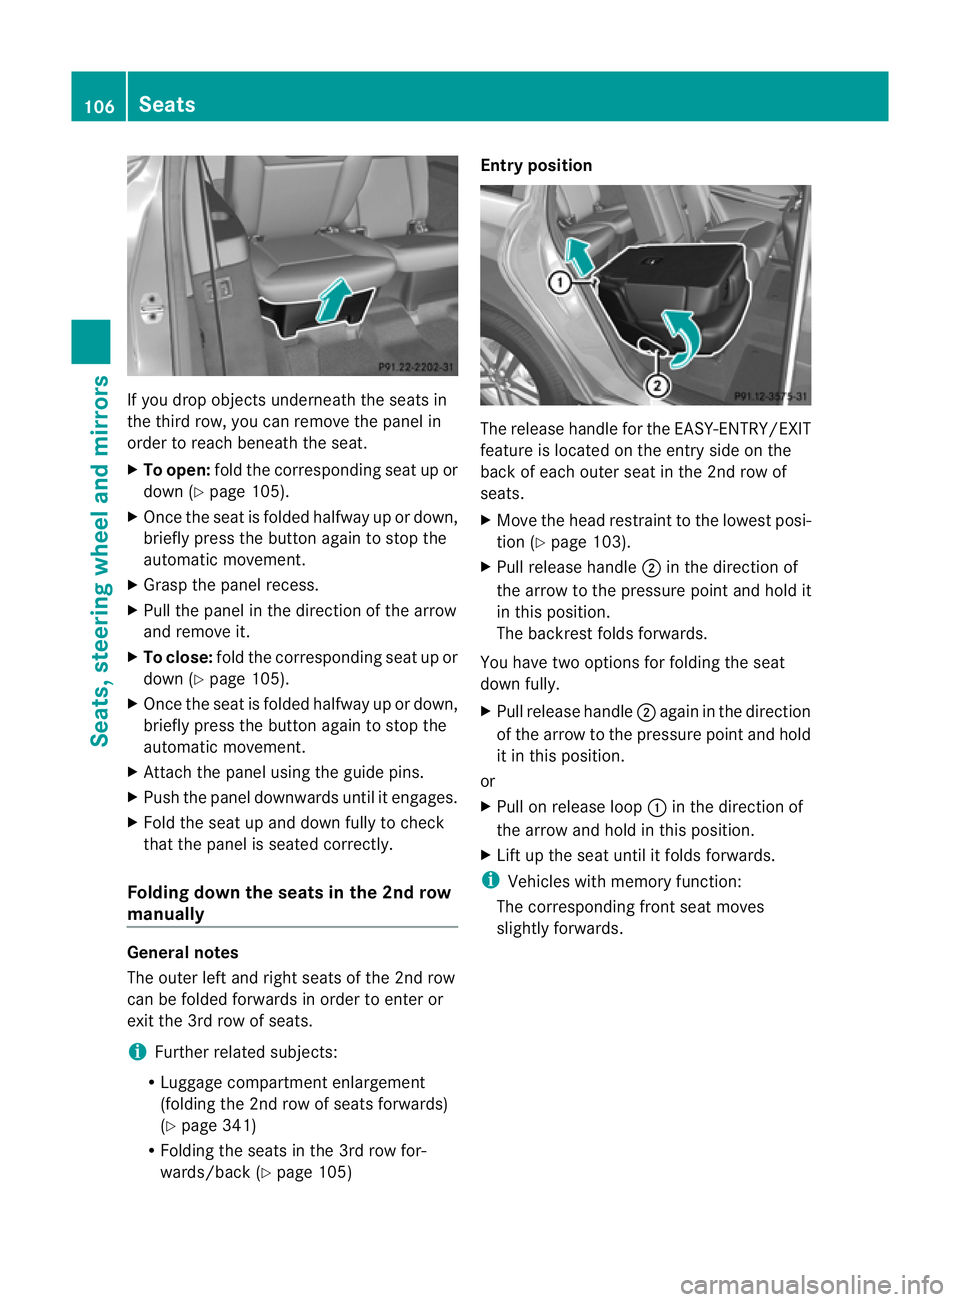
udrop objects underne atht he seats in
the thir drow, you can remove the panel in
order to reach beneat hthe seat.
X To open: foldt he correspondin gseat up or
down (Y page 105).
X Once the seat is folded halfway up or down,
briefly press the button again to stop the
autom atic movement.
X Grasp the panel recess.
X Pul lthe pane lint he direction of the arrow
and remove it.
X To close: foldthe correspondin gseat up or
down (Y page 105).
X Once the seat is folded halfway up or down,
briefly press the button again to stop the
autom atic movement.
X Attach the panel using the guide pins.
X Push the panel downwards until it engages.
X Fold the seat up and down fully to check
that the panel is seated correctly.
Folding down the seats in the 2nd row
manually General notes
The outer left and right seats of the 2nd row
can be folded forwar
dsin order to enter or
exit the 3r drow of seats.
i Further related subjects:
R Luggage compartment enlargement
(folding the 2n drow of seats forwar ds)
( Y page 341)
R Folding the seats in the 3r drow for-
war ds/ back (Y page 105) Entry positi
on Th
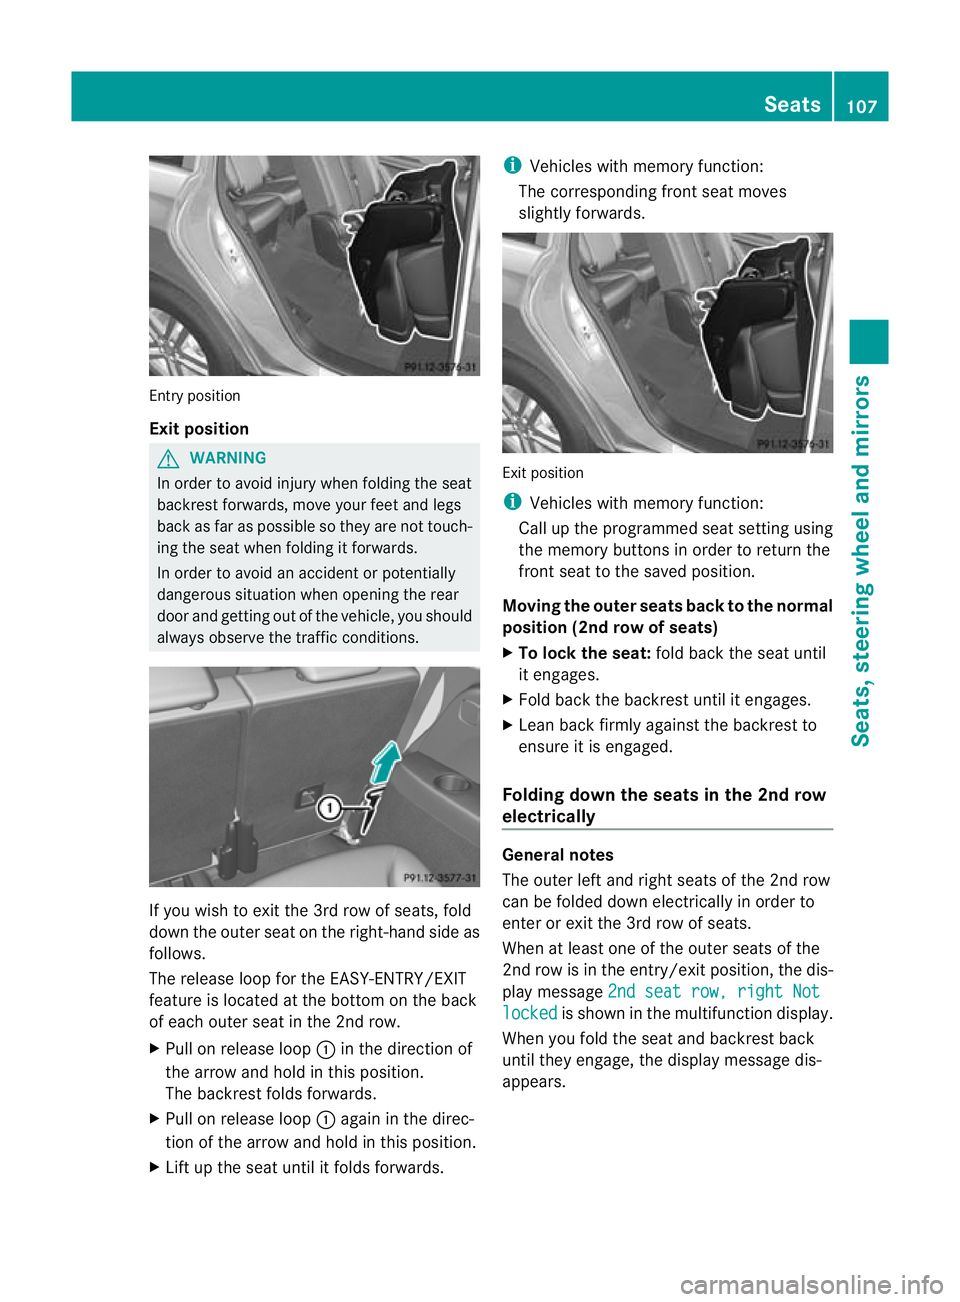
er eleas ehandle for the EASY-ENTRY/EXIT
feature is located on the entry side on the
back of each outer seat in the 2nd row of
seats.
X Move the head restraint to the lowest posi-
tion (Y page 103).
X Pul lreleas ehandle ;in the direction of
the arrow to the pressure point and hold it
in this position.
The backrest folds forwards.
You have two options for folding the seat
down fully.
X Pul lreleas ehandle ;again in the direction
of the arrow to the pressure point and hold
it in this position.
or
X Pul lonr eleas eloop :in the direction of
the arrow and hold in this position.
X Lif tu pt he seat until it folds forwar ds.
i Vehicl eswith memory function:
The corresponding front seat moves
slightly forwar ds.106
SeatsSeats, steerin
gwheel and mirrors
Page 110 of 441
Entry position
Exit position
G
WARNING
In order to avo idinjury when folding the seat
backres tforwards, mov eyour feet and legs
back as far as possible so they are not touch-
ing the seat when folding it forwards.
In order to avoi danaccident or potentially
dangerou ssituation when opening the rear
door and gettin gout of the vehicle, you should
alway sobserv ethe traffic conditions. If you wish to exit the 3r
drow of seats, fold
down the outer seat on the right -hand side as
follows.
The release loop for the EASY-ENTRY/EXIT
feature is located at the bottom on the back
of each outer seat in the 2nd row.
X Pull on release loop :in the direction of
the arrow and hold in this position.
The backrest folds forwards.
X Pull on release loop :again in the direc-
tion of the arrow and hold in this position.
X Lift up the seat until it folds forwards. i
Vehicles with memory function:
The corresponding front seat moves
slightly forwards. Exit position
i
Vehicles with memory function:
Call up the programmed seat setting using
the memory buttons in order to return the
front seat to the saved position.
Moving the outer seats back to the normal
position (2nd row of seats)
X To lock the seat: fold back the seat until
it engages.
X Fold back the backrest until it engages.
X Lean back firmly against the backrest to
ensure it is engaged.
Folding down the seats in the 2nd row
electrically General notes
The outer left and right seats of the 2nd row
can be folded down electrically in order to
enter or exit the 3rd row of seats.
When at least one of the outer seats of the
2nd row is in the entry/exit position, the dis-
play message
2nds eat row, right Not locked is show
ninthe multifunc tion display.
When you fold the seat and backrest back
until they engage, the display message dis-
appears. Seats
107Seats, steering wheel and mirrors Z
Page 111 of 441
i
Further related subjects:
R Luggage compartment enlargement
(folding the 2nd row of se atsf orwards)
(Y page 341)
R Folding the seats in the 3r drow for-
wards/back (Y page 105)
Folding down th eseats
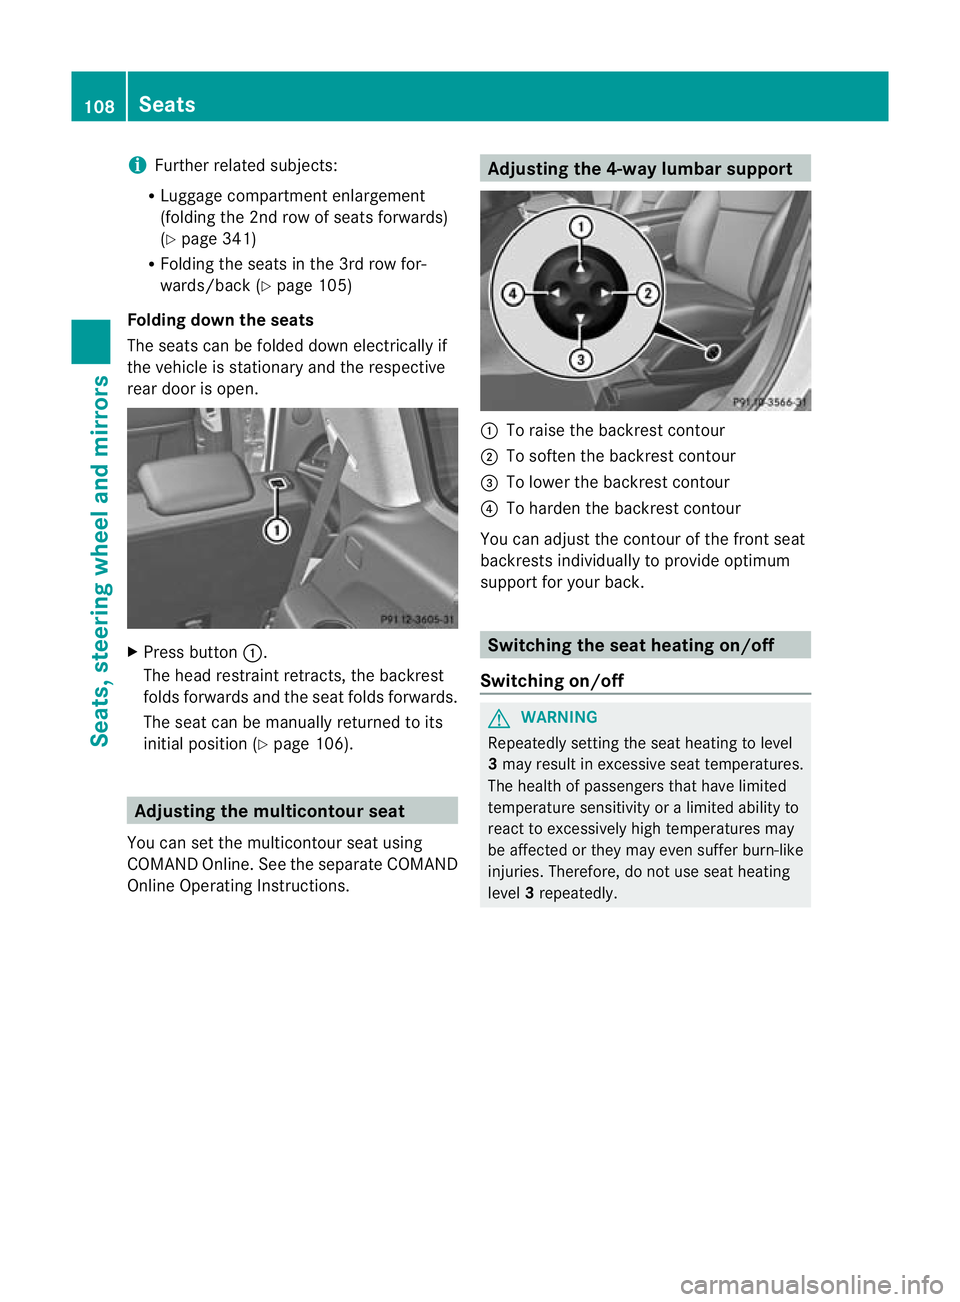
The seats can be folded dow nelectrically if
the vehicle is stationary and the respec tive
rea rdoor is open. X
Press button :.
The head restraint retracts, the backrest
folds forwards and the seat folds forwards.
The seat can be manually returne dtoits
initial position (Y page 106). Adjusting th
emulticon tour seat
Yo uc an set the multicontour seat using
COMAND Online. See the separat eCOMAND
Onli neOperating Instructions. Adjusting th
e4-way lumbar support :
To rais ethe bac krest contour
; To soften the backrest contour
= To lower the backrest contour
? To harden the backrest contour
You can adjust the contour of the fr ontseat
bac krest sindividually to provide optimum
support for your back. Switching th
eseat heating on/off
Switching on/off G
WARNING
Repeatedly settin gthe seat heating to level
3 ma yresult in excessiv eseat temperatures.
The health of passengers that have limited
temperatur esensitivit yoralimited ability to
react to excessively high temperatures may
be affected or they may even suffer burn-like
injuries. Therefore, do not use seat heating
level 3repeatedly. 108
SeatsSeats, steering wheel and mirrors
Page 112 of 441
Driver's and front-p
assenger seat Rear seats
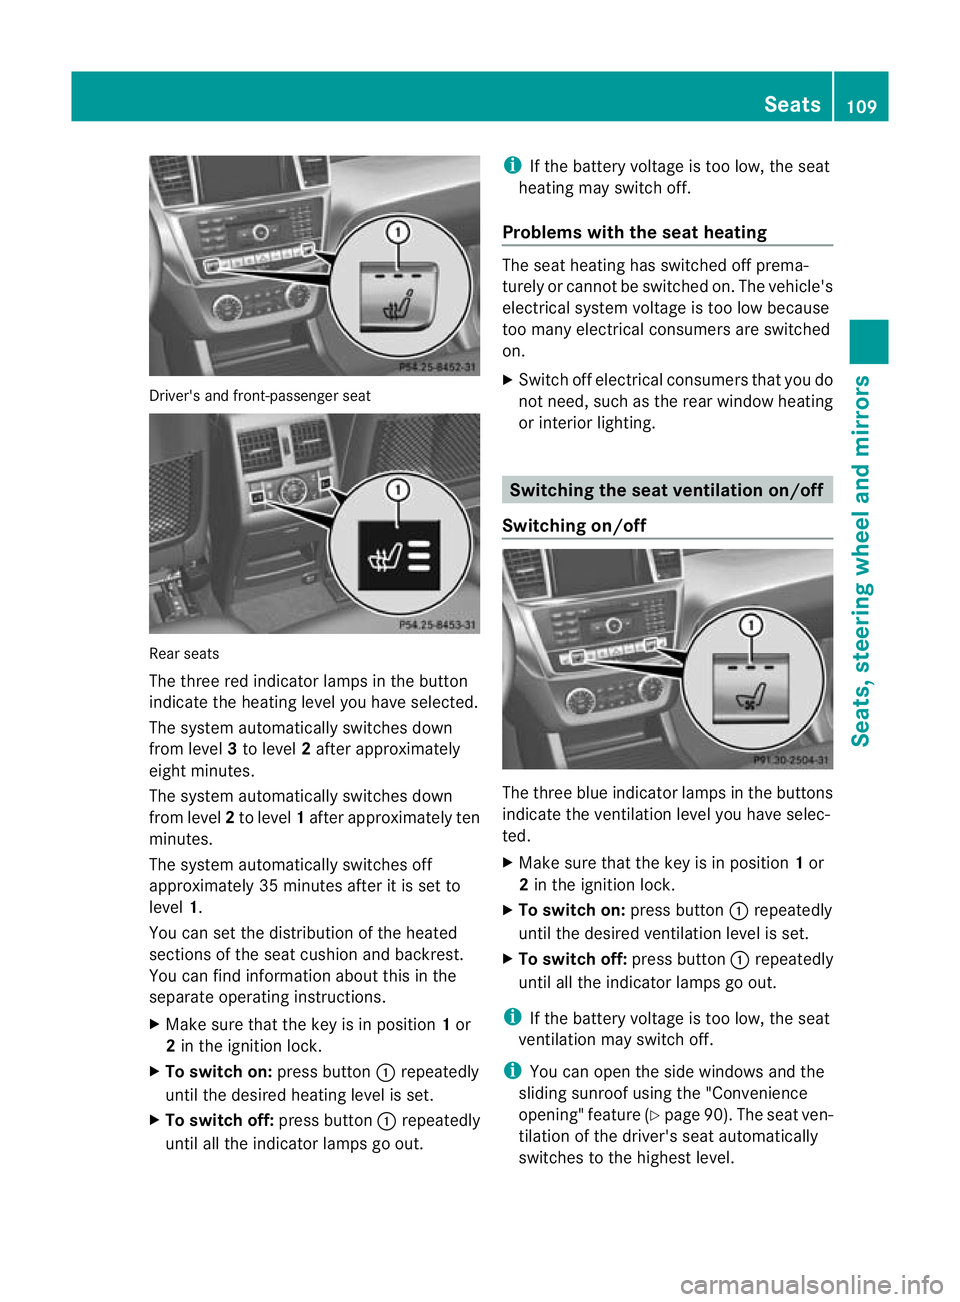
Th
et hree red indicat or lampsinthebutton
indicat ethe heating lev el youhave selected.
The system automatically switches down
from level 3to level 2after approximately
eight minutes.
The system automatically switches down
from level 2to level 1after approxima tely ten
minutes.
The system automatically switches off
approximately 35 minutes after it is set to
level 1.
You can set the distribution of the heated
sections of the seat cushion and backrest.
You can find information about this in the
separate operatin ginstructions.
X Make sure that the key is in position 1or
2 in the ignition lock.
X To switch on: pressbutton :repeatedly
until the desired heating level is set.
X To switch off: press button:repeatedly
until all the indicator lamps go out. i
If the batter yvoltage is too low, the seat
heatin gmay switch off.
Problems with the seat heating The seat heating has switched off prema-
turely or cannot be switched on. The vehicle's
electrical system voltage is too low because
too many electrical consumers are switched
on.
X
Switc hoff elect rical consumers that you do
not need, such as the rear window heating
or interior lighting. Switchin
gthe seat ventilation on/off
Switchin gon/off The three blue indicator lamps in the buttons
indicat
ethe ven tilation level you have selec-
ted.
X Make sure that the key is in position 1or
2 in the ignition lock.
X To switch on: press button:repeatedly
until the desired ventilation level is set.
X To switch off: press button:repeatedly
until all the indicator lamps go out.
i If the batter yvoltage is too low, the seat
ven tilation may switch off.
i You can open the side windows and the
sliding sunroof using the "Convenience
opening" featur e(Ypage 90). The seat ven-
tilation of the driver' sseat automatically
switches to the highest level. Seats
109Seats, steering wheel and mirrors Z
Page 113 of 441
Problems wit
hthe seat ventilation Th
es eat ven tilation has switched off prema-
turely or cannot be switched on. The vehicle's
electrical system voltage is too low because
too many electrical consumer sare switched
on.
X Switch off electrica lconsumers that you do
not need, such as the rea rwindow heating
or interior lighting. Steering wheel
Important safet
ynotes G
WARNING
Do not adjust the steering wheel while driving.
Adjusting the steering wheel while driving, or
drivin gwithout the steering wheel adjustment
featur elocked coul dcause the driver to lose
control of the vehicle.
The electrical steering wheel adjustment fea-
ture can be operated at any time. Therefore,
do not leave children unattended in the vehi-
cle, or with access to an unlocked vehicle. A
child's unsupervised access to avehicle could
result in an accident and/or serious personal
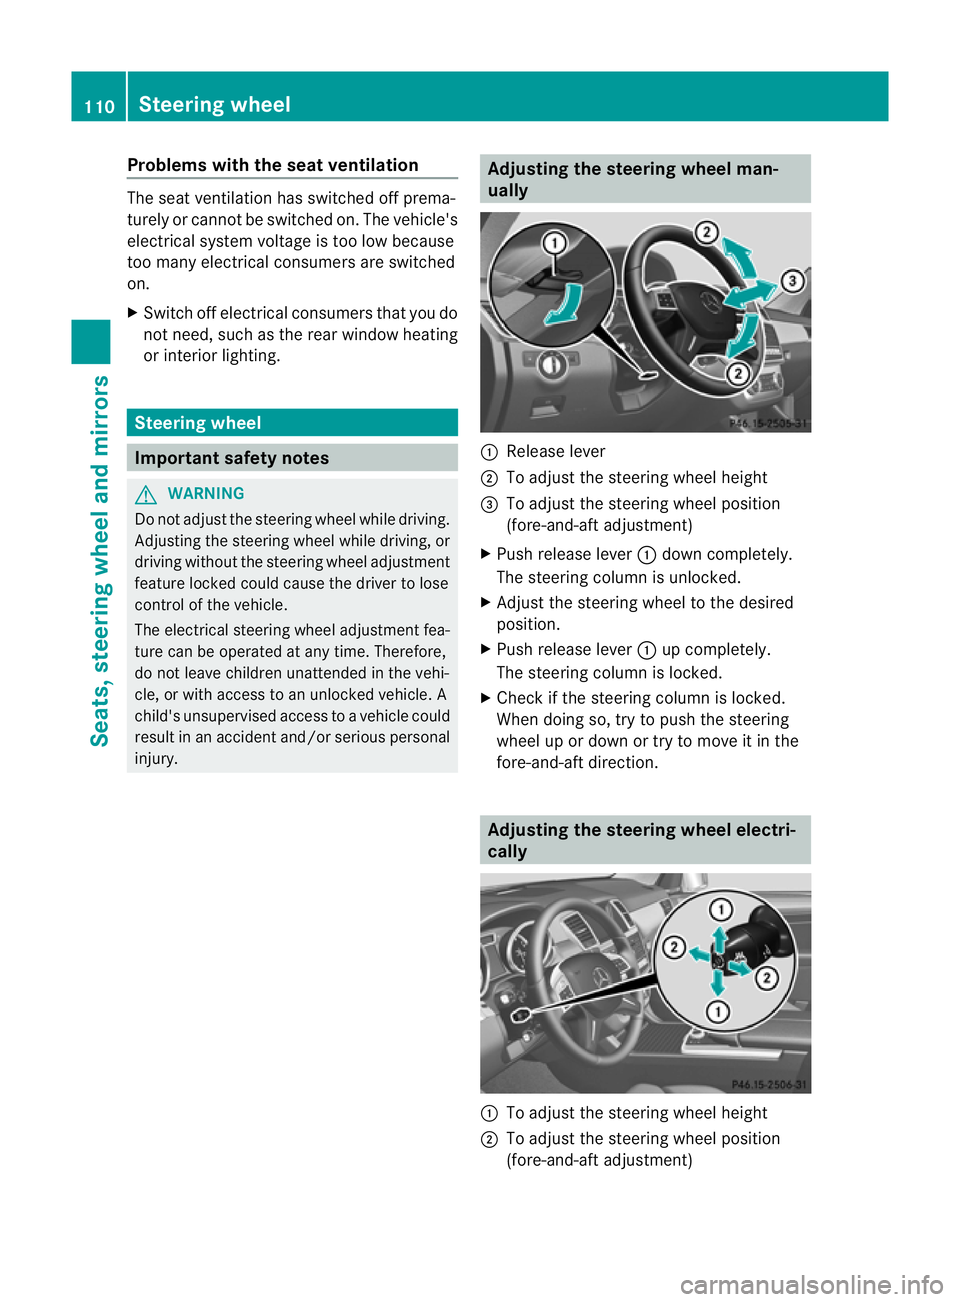
injury. Adjusting the steering whee
lman-
ually :
Release lever
; To adjus tthe steering wheel height
= To adjust the steering wheel position
(fore-and-af tadjustment)
X Push release lever :down completely.
The steerin gcolum nisu nlocked.
X Adjus tthe steering wheel to the desired
position.
X Push release lever :up completely.
The steering column is locked.
X Chec kifthe steering column is locked.
When doing so, tr ytopush the steering
wheel up or down or try to move it in the
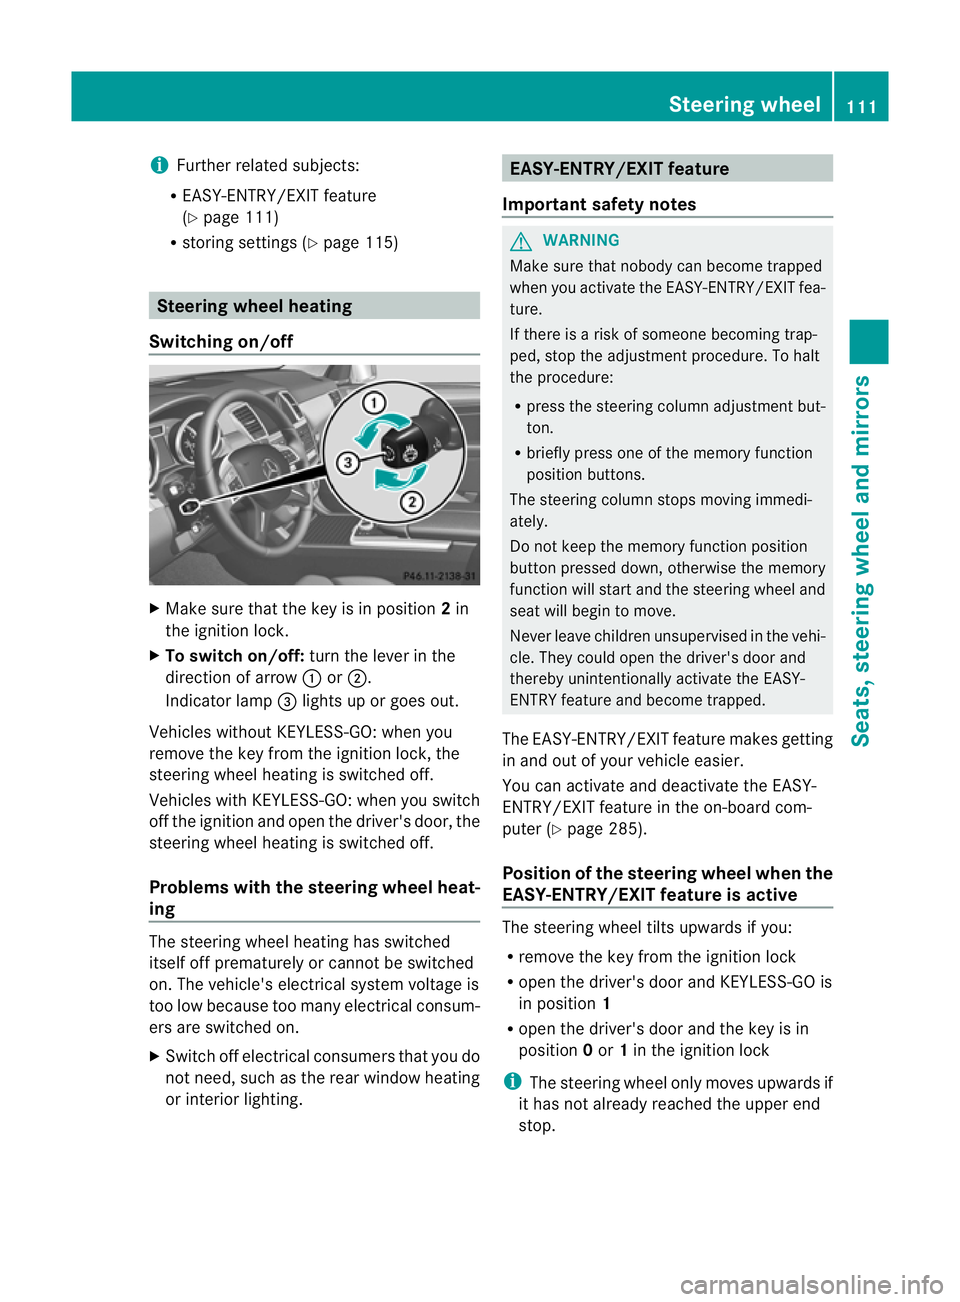
fore-and-aft direction. Adjusting the steering wheel electri-
cally :
To adjust the steering wheel height
; To adjust the steering wheel position
(fore-and-aft adjustment) 110
Steering wheelSeats, steerin
gwhee land mirrors
Page 114 of 441
i
Further related subjects:
R EASY-ENT RY/EXIT feature
(Y page 111)
R storing setting s(Ypag e115) Ste
ering wheel heating
Switchin gon/off X
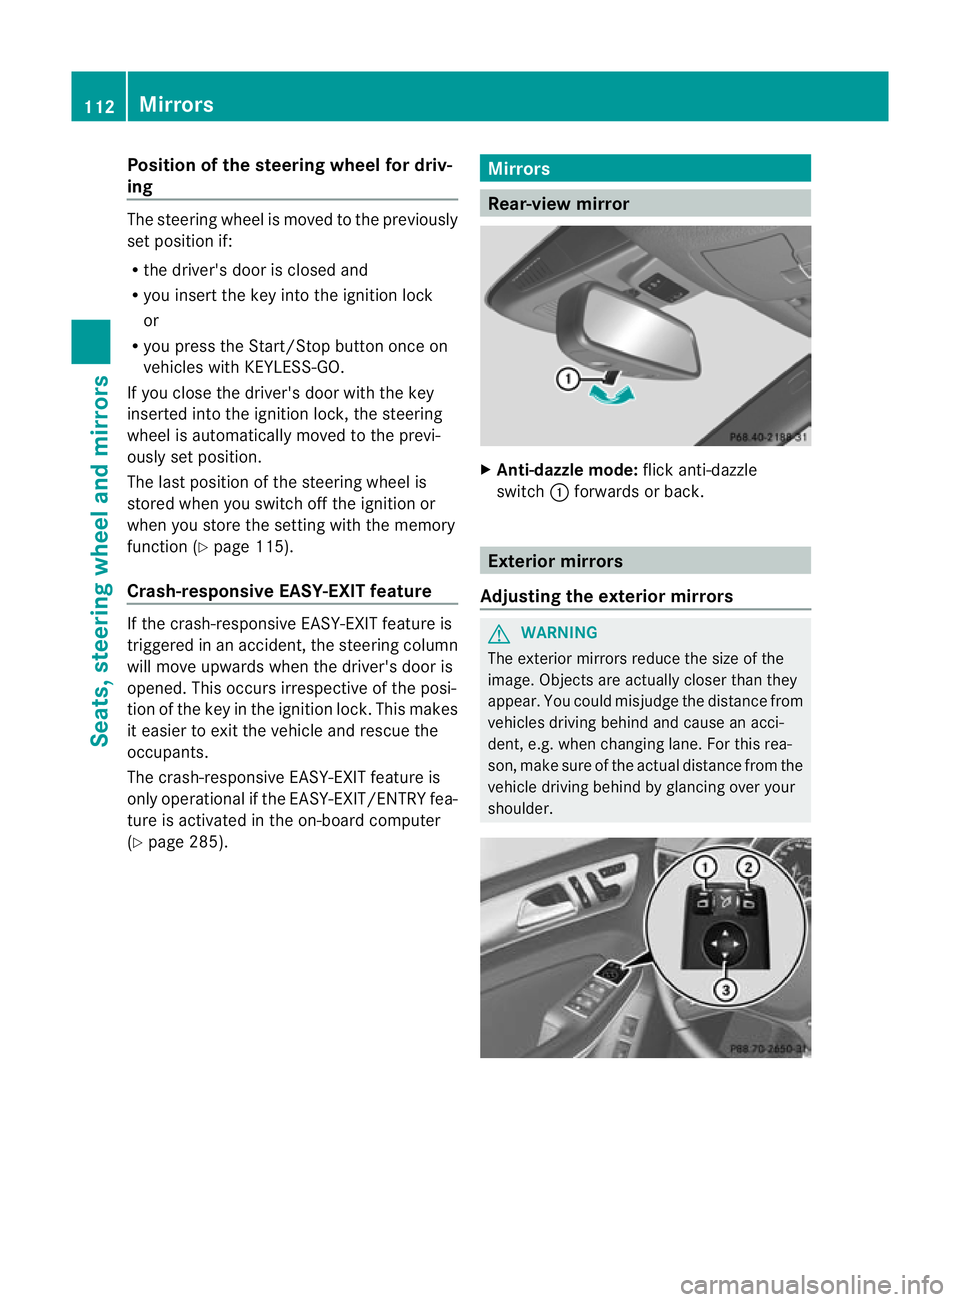
Make sure that the key is in position 2in
the ignition lock.
X To switch on/off: turn the lever in the
direction of arrow :or;.
Indicator lamp =lights up or goe sout.
Vehicles without KEYLESS-GO: when you
remove the key from the ignition lock, the
steering wheel heating is switched off.
Vehicles with KEYLESS-GO: when you switch
off the ignition and open the driver' sdoor, the
steerin gwheel heating is switched off.
Problems wit hthe steering whee lheat-
ing The steerin
gwheel heating has switched
itsel foff prematurely or cannot be switched
on. Th evehicle' selectrical system voltage is
too low because too many electrical consum-
ers are switched on.
X Switc hoff elect rical consumers that you do
not need, such as the rear window heating
or inte rior lighting. EASY-ENTRY/EXIT feature
Important safety notes G
WARNING
Make sur ethat nobody can becom etrapped
when you activate th eEASY-ENTRY/EXI Tfea-
ture.
If there is arisk of someon ebecomin gtrap-
ped, stop th eadjustment procedure. To halt
the procedure:
R press the steerin gcolum nadjustment but-
ton.
R briefly press one of the memory fun ction
position buttons.
The steerin gcolum nstops moving immedi-
ately.
Do not keep the memory function position
button pressed down, otherwise the memory
function will start and the steerin gwheel and
seat will begin to move.
Never leav echildren unsupervised in the vehi-
cle. They coul dopen the driver' sdoor and
thereby unin tentionally activate the EASY-
ENTRY feature and become trapped.
The EASY-ENTRY/EX ITfeature make sgetting
in and out of your vehicle easier.
You can activa teand deactivat ethe EASY-
ENTRY/ EXIT feature in th eon-board com-
puter (Y page285).
Positio nofthe steering whee lwhen the
EASY-ENTRY/EXIT feature is active Th
es teering whee ltilts upwards if you:
R remov ethe key from the ignition lock
R open the driver's door and KEYL ESS-GO is
in position 1
R ope nthe driver's door and the key is in
position 0or 1in the ignition lock
i The steerin gwheel only moves upwards if
it has not already reached the upper end
stop. Steering wheel
111Seats, steering whee land mirrors Z
Page 115 of 441
Position of th
esteerin gwheel for driv-
ing Th
es teering whee lismoved to the previously
set position if:
R the driver's door is closed and
R you inser tthe key int othe ignition lock
or
R you press the Star t/Stop butto nonce on
vehicles with KEYLESS-GO.
If you clos ethe driver's door with the key
inserted int othe ignition lock ,the steering
wheel is automatically moved to the previ-
ously set position.
The last position of the steering wheel is
stored when you switc hoff th eignition or
when you stor ethe setti ngwith the memory
function (Y page 115).
Crash-responsive EASY-EXIT fea tureIf th
ecrash-resp onsive EASY-EXIT feature is
trig gere dinana ccident,the steeri ngcolu mn
will mov eupwards when the driv er'sdoor is
opened. This occurs irrespective of the posi-
tion of the key in the ignition lock .This makes
it easier to exit the vehicle and rescue the
occupants.
The crash-responsive EASY-EXIT featur eis
only operational if the EASY-EXIT/ENTRY fea-
tur eisa ctivate dinthe on-boar dcomputer
(Y page 285). Mirrors
Rear-view mirror
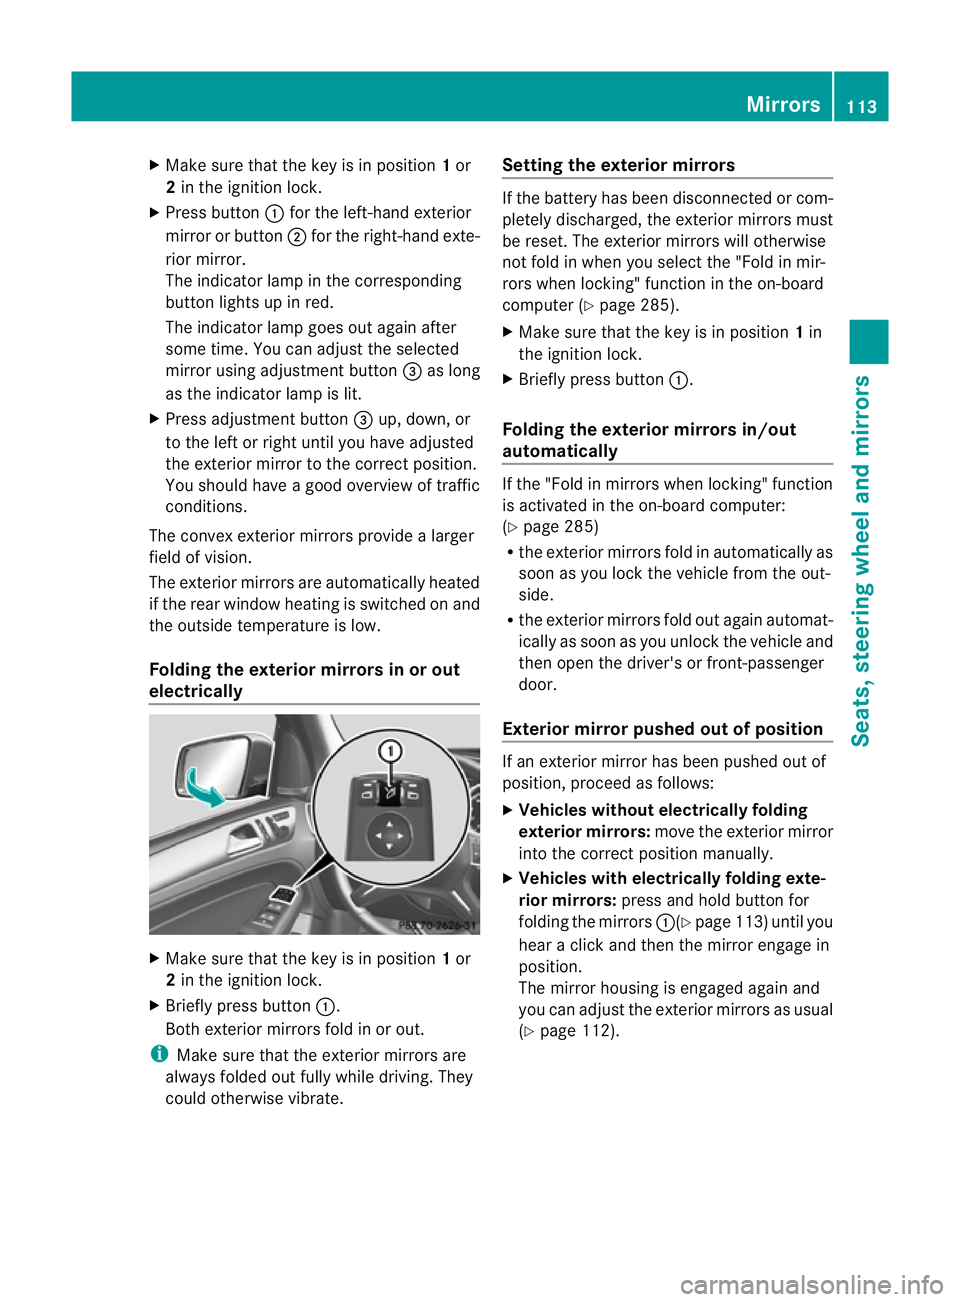
X
Anti-dazzle mode: flick anti-dazzle
switch :forwards or back. Exterior mirrors
Adjusting th eexterior mir rors G
WARNING
The exterior mirrors reduce the size of the
image. Objects are actually close rthan they
appear. You coul dmisjudge the distance from
vehicles drivin gbehind and cause an acci-
dent, e.g. when changing lane. For this rea-
son, mak esure of the actual distance from the
vehicle driving behind by glancing over your
shoulder. 112
MirrorsSeats, steerin
gwhee land mirrors
Page 116 of 441
X
Make sur ethat the key is in position 1or
2 in the ignition lock.
X Press button :for the left-hand exterior
mirror or button ;for the right-hand exte-
rior mirror.
The indicator lam pint he corresponding
button lights up in red.
The indicator lam pgoes out again after
some time. You can adjust the selected
mirror using adjustment button =as long
as the indicator lam pislit.
X Press adjustment button =up, down, or
to the left or right until you have adjusted
the exterior mirror to the correct position.
You should have agood overview of traffic
conditions.
The convex exterior mirror sprovide alarger
field of vision.
The exterior mirrors are automatically heated
if the rear window heating is switched on and
the outside temperature is low.
Folding the exterior mirrors in or out
electrically X
Make sure that the key is in position 1or
2 in the ignition lock.
X Briefly press button :.
Both exterior mirrors fold in or out.
i Make sure that the exterior mirrors are
always folded out fully while driving. They
could otherwise vibrate. Setting the exterior mirrors If the battery has been disconnected or com-
pletely discharged
,the exterior mirrors must
be reset .The exterior mirrors will otherwise
not fol dinwhen you selec tthe "Fold in mir-
ror sw hen locking" func tion in the on-board
computer (Y page 285).
X Make sure that the key is in position 1in
the ignition lock.
X Briefl ypres sbutton :.
Folding the exterior mirrors in/out
automatically If the "Fold in mirrors when locking" function
is activated in the on-board computer:
(Y
page 285)
R the exterior mirrors fold in automatically as
soo nasyou lock the vehicle from the out-
side.
R the exterior mirror sfold out again automat-
ically as soon as you unloc kthe vehicle and
then open the driver's or front-passenger
door.
Exterior mir rorp ushe dout of position If an exterior mirro
rhas been pushe dout of
position, proceed as follows:
X Vehicles without electrically folding
exterior mirrors: move the exterior mirror
into the correct position manually.
X Vehicles with electrically folding exte-
rior mirrors: press and hold button for
folding the mirrors :(Ypage 113 )until you
hea rac lick and then the mirror engage in
position.
The mirror housing is engaged again and
you can adjust the exterior mirrors as usual
(Y page 112). Mirrors
113Seats, steerin gwhee land mirrors Z
Page 117 of 441
Automati
canti-dazzle mirrors G
WA
RNING
If inciden tlight fro mheadlamps is prevented
from striking the sensor in the rear-view mir-
ror ,for instance, by luggage piled too high in
the vehicle, the mirror's automatic anti-dazzle
fun ction will not operate.
Incident light could then blind you. This may
distrac tyou from the traffic condition sand,
as aresult, you may cause an accident.
The rear-view mirror and the exterior mirror
on the driver' sside automatically go int oanti-
dazzle mode if the following conditions are
met simultaneously:
R the ignition is switched on and
R incide ntlight from headlamps strikes the
sensor in the rear-view mirror.
The mirror sdonot go int oanti-dazzle mode if
reverse gea risengaged or if the interior light-
ing is switched on. Parking position for the exterior mir-
ror on the front-passenge
rside
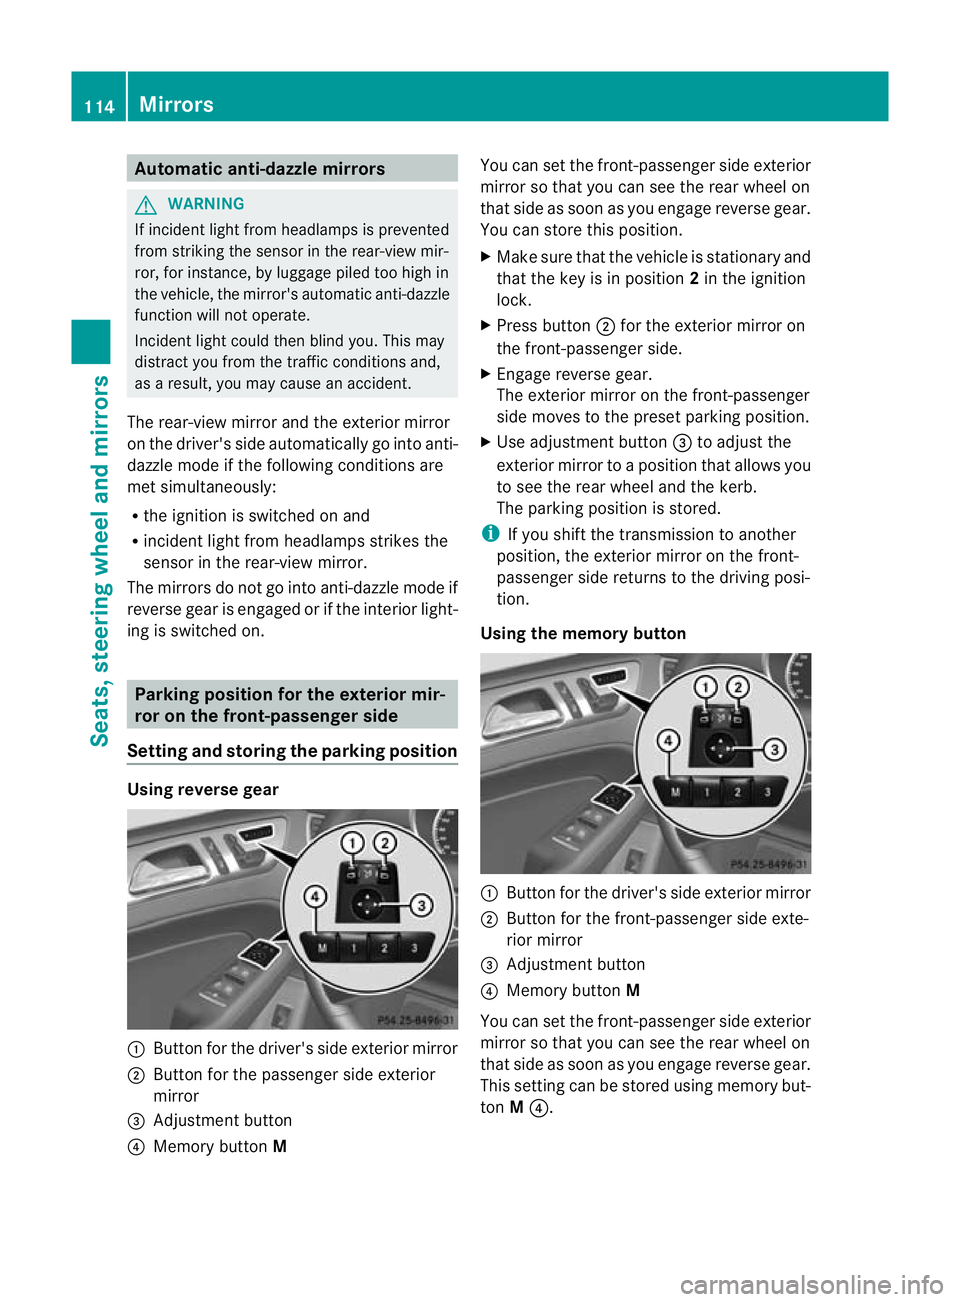
Setting and storing the parking position Using reverse gear
:
Button for the driver' sside exterior mirror
; Button for the passenger side exterior
mirror
= Adjustmen tbutton
? Memory button M You can set the front-passenger side exterior
mirror so that you can see the rear wheel on
that side as soo
nasyou engage revers egear.
You can stor ethis position.
X Make sur ethat the vehicle is stationary and
that the key is in position 2in the ignition
lock.
X Press button ;for the exterior mirror on
the front-passenger side.
X Engage revers egear.
The exterior mirror on the front-passenger
side moves to the preset parkin gposition.
X Use adjustment button =to adjust the
exterior mirror to aposition that allows you
to see the rea rwheel and the kerb.
The parkin gposition is stored.
i If you shift the transmission to anot her
po sition ,the exterior mirror on the front-
passenger side retur nsto the driving posi-
tion.
Usin gthe memory button :
Button for th edriver's side exterior mirror
; Button for th efront-passenge rside exte-
rior mirror
= Adjustmen tbutton
? Memory button M
You can set the front-passenger side exterior
mirror so that you can see the rear wheel on
that side as soo nasyou engage revers egear.
This setting can be stored using memory but-
ton M?. 114
MirrorsSeats, steering wheel and mirrors
Page 118 of 441
X
Make sur ethat the key is in position 2in
the ignition lock.
X With the exterior mirror on the front-
passenger side activated, use adjustment
button =to adjust the exterior mirror. In
the exterior mirror, the rea rwheel and the
ker bshould be visible.
X Press memory button M? and one of the
arrow sona djustment button =within
three seconds.
The parking position is stored if the exterior
mirror does not move.
X If the mirror moves out of position, repeat
the steps.
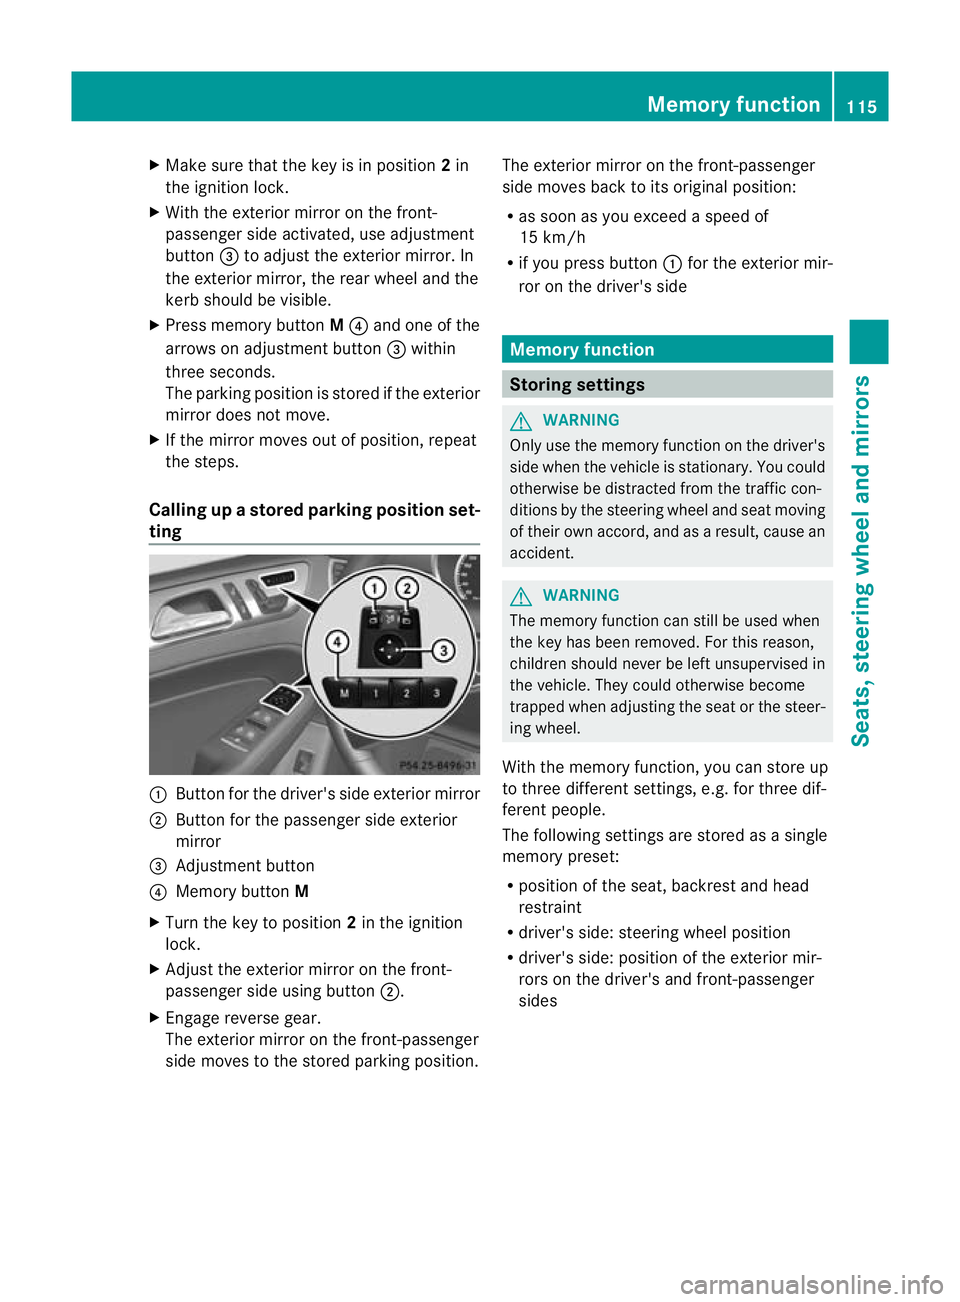
Calling up astore dparkin gposition set-
ting :
Button for the driver's sid eexterio rmirror
; Button for the passenger side exterior
mirror
= Adjustment button
? Memo rybutton M
X Turn the key to position 2in the ignition
lock.
X Adjust the exterior mir roront he front-
pa ssenger side usin gbutton ;.
X Engage reverse gear.
The exterior mirror on the front-passenger
side moves to the stored parking posi tion. The exterior mir
roront he front-passenger
side moves bac ktoits original position:
R as soo nasyou exceed aspeed of
15 km/h
R if you press button :for the exterior mir-
ror on the driv er'sside Me
mo ry function Storing settings
G
WARNING
Only use the memory function on the driver's
side when the vehicle is stationary. You could
otherwise be distracted fro mthe traffic con-
diti ons by th esteerin gwheel and seat moving
of their own accord, and as aresult ,cause an
accident. G
WARNING
The memory function can still be used when
the key has been removed. For this reason,
children shoul dnever be left unsupervised in
the vehicle. They could otherwise become
trapped when adjusting the seat or the steer-
ing wheel.
With the mem ory function,you can store up
to three differen tsettings, e.g. for three dif-
ferent people.
The followi ngsettings ar estore dasa single
mem orypreset:
R position of the seat ,backrest and head
restraint
R driver's side: steerin gwheel position
R driver' sside: position of the exterior mir-
ror so nthe driver' sand front-passenger
sides Memory function
115Seats, steering wheel and mirrors Z