seats MERCEDES-BENZ GL SUV 2012 Owner's Guide
[x] Cancel search | Manufacturer: MERCEDES-BENZ, Model Year: 2012, Model line: GL SUV, Model: MERCEDES-BENZ GL SUV 2012Pages: 441, PDF Size: 10.66 MB
Page 119 of 441
X
Adjust the sea t(Ypage 10 2).
X On the driver 'sside, adjust the steering
wheel (Y page 110)and th eexterio rmirrors
(Y page 112).
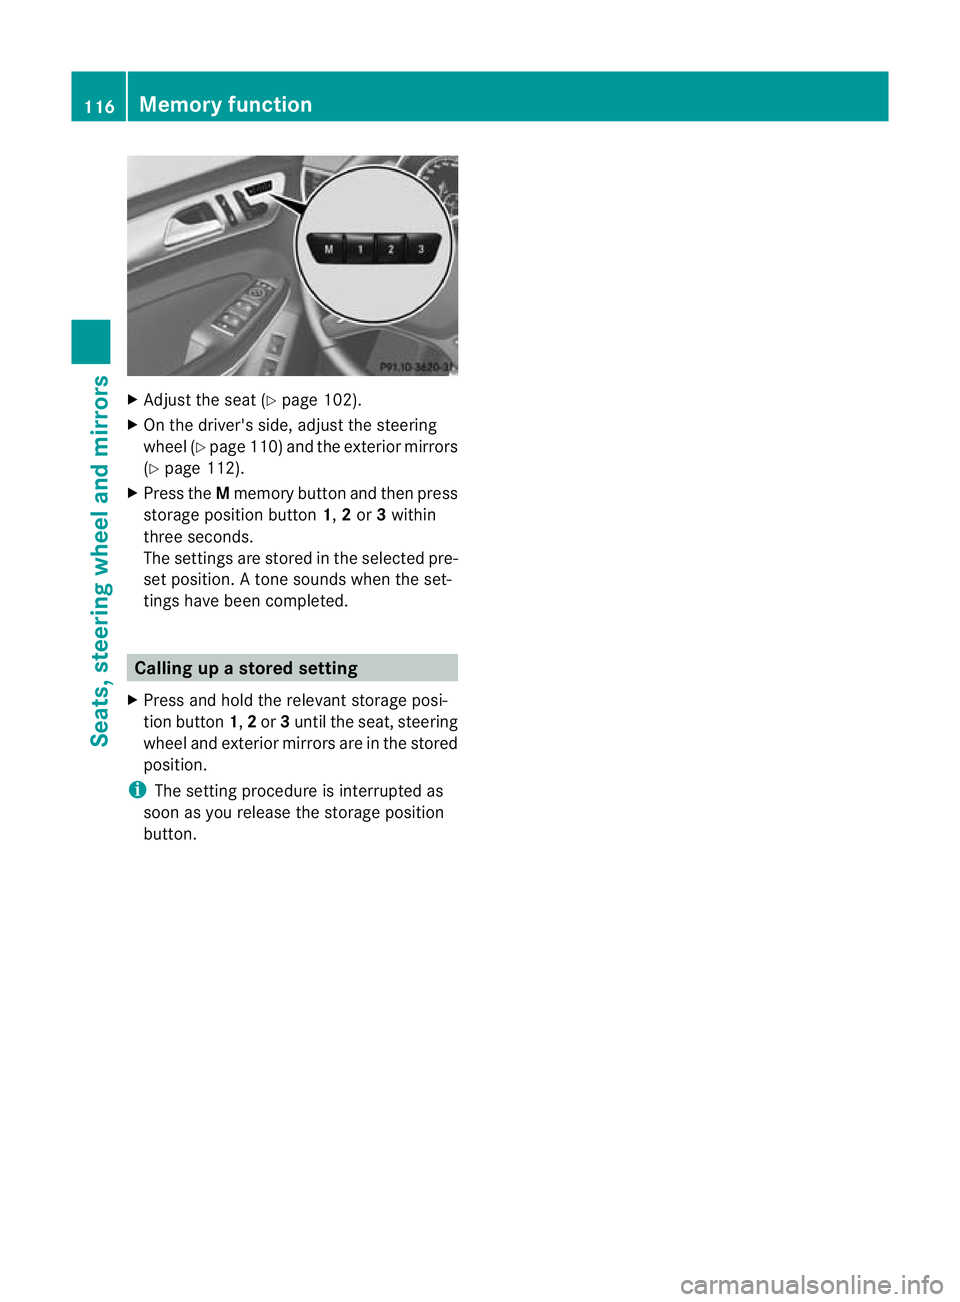
X Press the Mmemory button and then press
storage position button 1,2or 3within
three seconds.
The settings ar estored in the sel ected pre-
set pos ition. Atone sounds when the set-
tings have been completed. Calling up
astore dsetting
X Pres sand hol dthe rele vant storage posi-
tion button 1,2or 3until the seat ,steering
wheel and exterio rmirror sare in th estored
position.
i The settin gprocedure is interrup tedas
soon as you release the storage position
but ton. 116
Memory functionSeats, steering wheel and mirrors
Page 129 of 441
the main-bea
mheadlamps are switched on
automatically. The Kindicator lam pin
the instrument cluster also lights up.
If you are driving at speeds below
45 km/ horother road users are recog-
nised or the roads are adequately lit:
the main-beam headlamps are switched off
automatically. The Kindicator lamp in
the instrument cluster goe sout. The _
indicator lamp in the multifunction display
remains lit.
X To deactivate: move the combination
switch back to its normal position.
The _ indicator lamp in the instrument
cluster goes out. Headlamp
smisted up on the inside
The headlamps may mist up on the inside if
ther eish igh atmospheric humidity.
X Switc honthe lights and drive off.
The level of moistur ediminishes, depend-
ing on the lengt hofthe jour neya nd the
weather conditions (humidity and temper-
ature).
If the level of moisture doe snot diminish:
X Hav ethe headlamps checked at aqualified
specialist workshop. Interior lighting
Overview of interior lighting
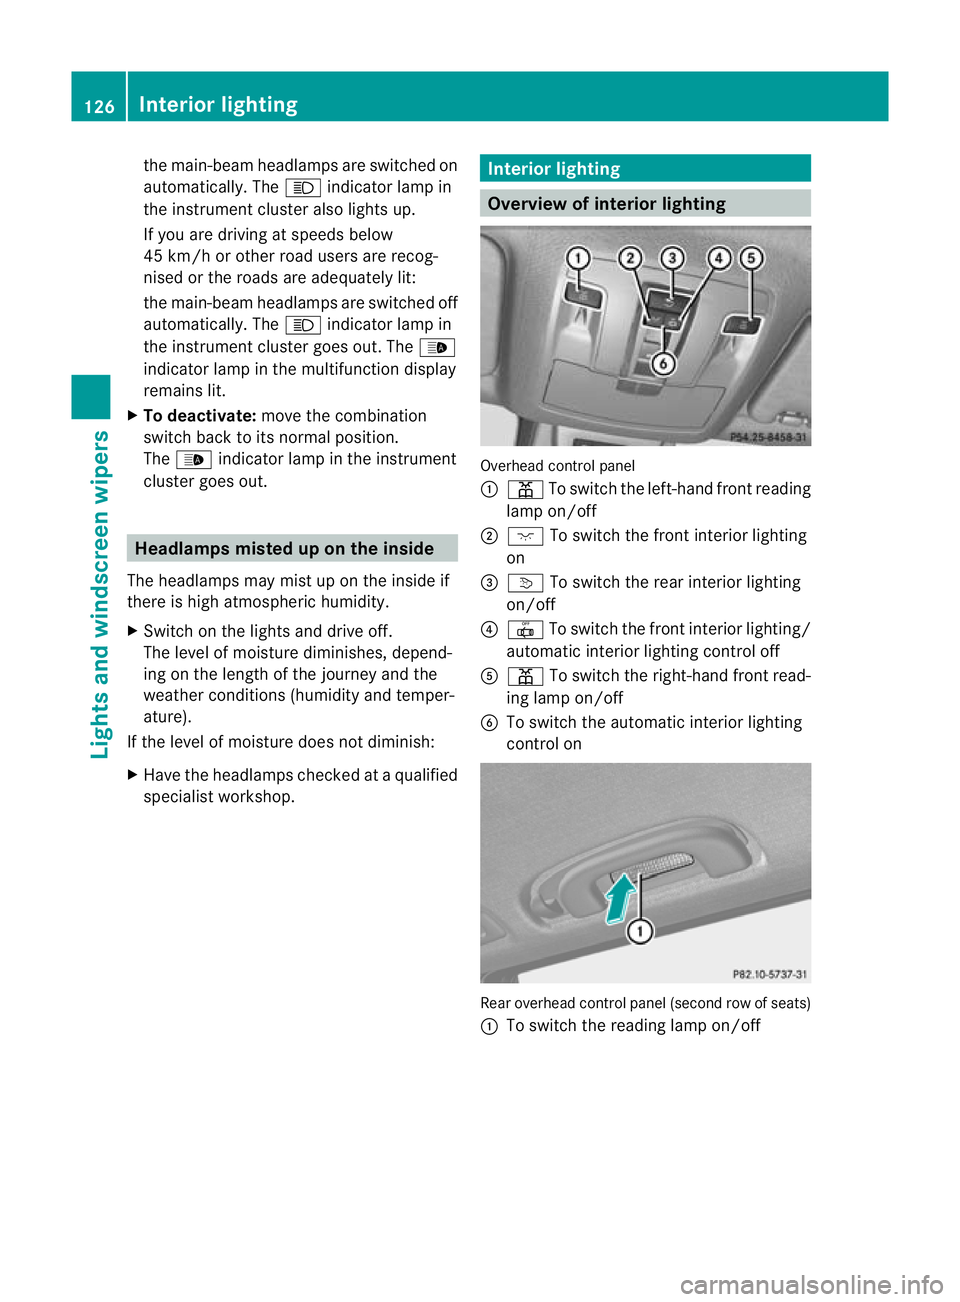
Overhead control panel
:
p To switch the left-hand fron treading
lam pon/off
; c To switch the fron tinterior lighting
on
= v To switch the rear interior lighting
on/off
? | To switch the fron tinterior light ing/
automatic int eriorl ightin gcontrol off
A p To switc hthe right-han dfront read-
ing lamp on/off
B To switch th eautomatic interior lighting
control on Rear overhead control panel (second row of seats)
: To switc hthe readin glamp on/off 126
Interior lightingLight
sand windscreen wipers
Page 130 of 441
Rear overhead control panel (thir
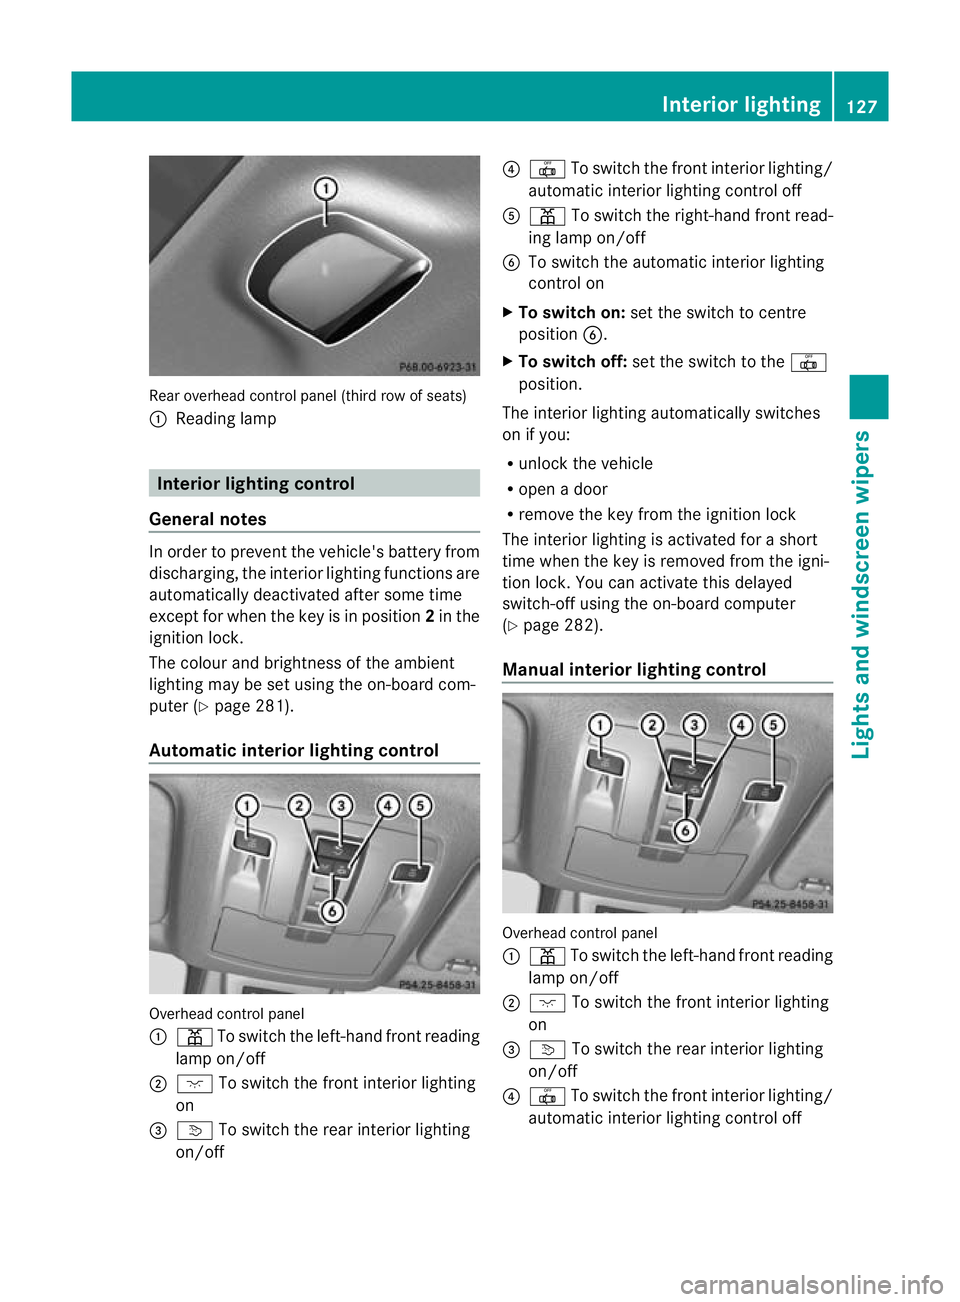
drow of seats)
: Readin glamp Interior lightin
gcontrol
General notes In order to preven
tthe vehicle' sbattery from
discharging, the interior lighting functions are
automatically deactivated after some time
except for when the key is in position 2in the
ignition lock.
The colour and brightness of the ambient
lighting may be set using the on-board com-
puter (Y page 281).
Automatic interior lighting control Overhead control panel
:
p To switch the left-hand front reading
lamp on/off
; c To switch the front interior lighting
on
= v To switch the rear interior lighting
on/off ?
| To switch the front interior lighting/
automatic interior lighting control off
A p To switch the right-hand front read-
ing lamp on/off
B To switch the automatic interior lighting
control on
X To switch on: set the switch to centre
position B.
X To switch off: set the switch to the |
position.
The interior lighting automatically switches
on if you:
R unlock the vehicle
R open adoor
R remove the key from the ignition lock
The interior lightin gisactivate dfor as hort
tim ew hen the key is removed from the igni-
tion lock .You can activate this delayed
switch-of fusing the on-boar dcomputer
(Y page 282).
Manua linterior lighting control Overhead con
trolpanel
: p To switch the left-hand front reading
lamp on/off
; c To switch the front interior lighting
on
= v To switch the rear interior lighting
on/off
? | To switch the front interior lighting/
automatic interior lighting control off Interior lighting
127Lights and windscreen wipers Z
Page 145 of 441
mid
ified according to the temperature selec-
ted.
Condensation may drip from the undersid eof
the vehicl ewhen cooling mode is active .This
is norma land not asign that there is amal-
function.
i The cooling with air dehumidification
function uses refrigerant R134a. This
refrigerant does not contain chlorofluoro-
carbons, and therefore does not damage
the ozone layer.
Switching on/off ¿
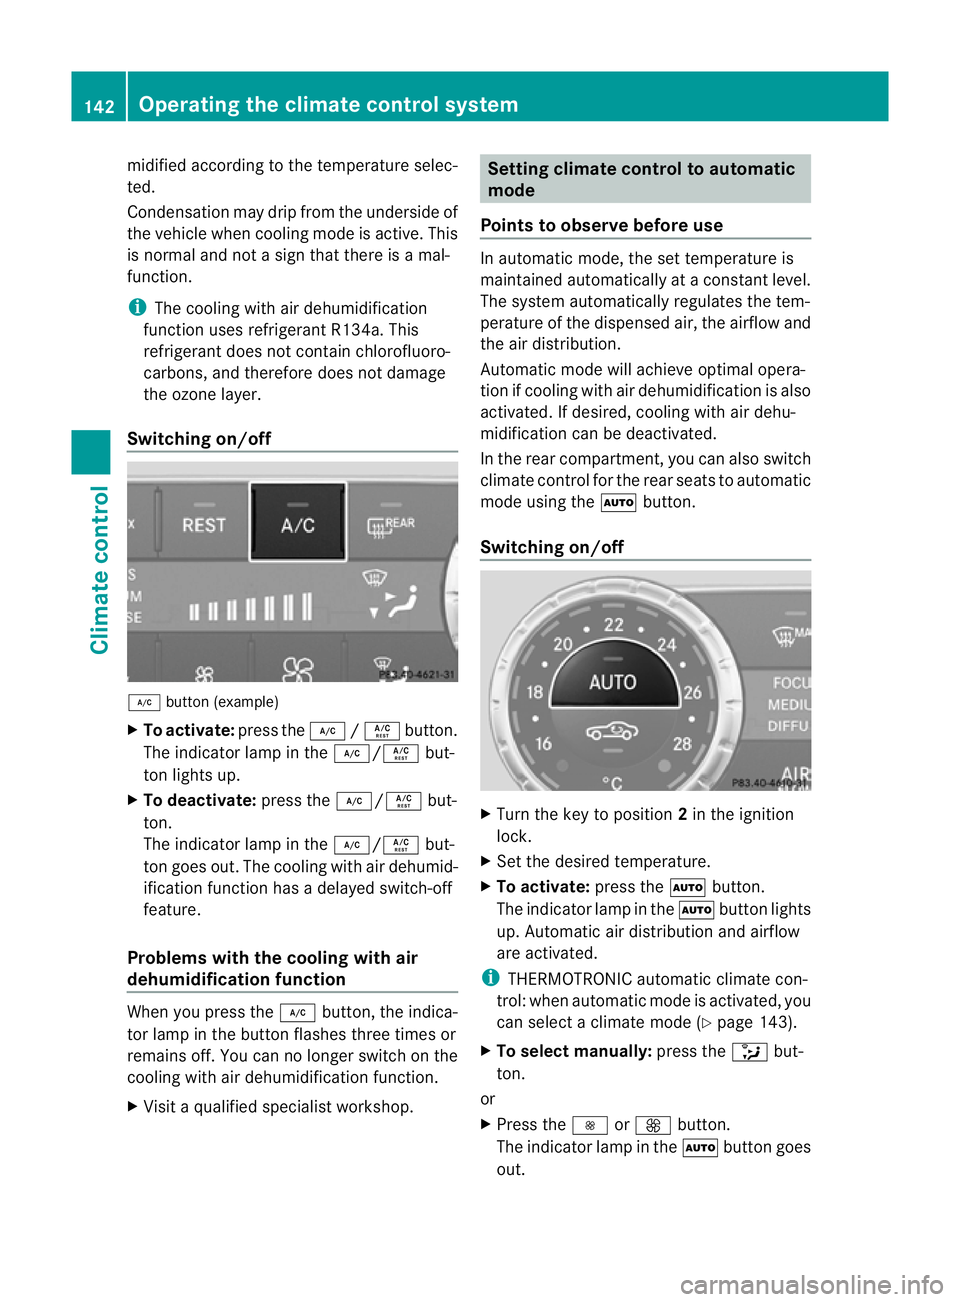
button (example)
X To activate: press the¿/Á button.
The indicator lamp in the ¿/Ábut-
ton lights up.
X To deactivate: press the¿/Á but-
ton.
The indicator lamp in the ¿/Ábut-
ton goes out. The cooling with air dehumid-
ificatio nfunction has adelayed switch-off
feature.
Problems with the cooling with air
dehumidification function When you press the
¿button ,the indica-
tor lam pint he button fla shes three times or
remains off .You can no longer switch on the
cooling with air dehumidification function.
X Visit aquali fieds pecialist workshop. Setting clima
tecontrol to automatic
mode
Points to observe before use In automatic mode, the set temperature is
maintained automatically at
aconstan tlevel.
The system automatically regulates the tem-
perature of the dispensed air ,the airflo wand
the air distribution.
Automatic mode will achieve optimal opera-
tion if cooling with air dehumidification is also
activated. If desired, cooling with air dehu-
midification can be deactivated.
In the rear compartment ,you can also switch
climate control for the rea rseats to automatic
mode using the Ãbutton.
Switching on/off X
Turn the key to position 2in the ignition
lock.
X Set the desired temperature.
X To activate: press theÃbutton.
The indicator lam pintheà button lights
up. Automati cair distribution and airflow
are activated.
i THERMOTRONIC automatic climat econ-
trol: when automatic mode is activated, you
can select aclimate mode (Y page 143).
X To select manually: press the_but-
ton.
or
X Press the IorK button.
The indicator lamp in the Ãbutton goes
out. 142
Operating th
eclimat econtrol systemClimat econtrol
Page 158 of 441
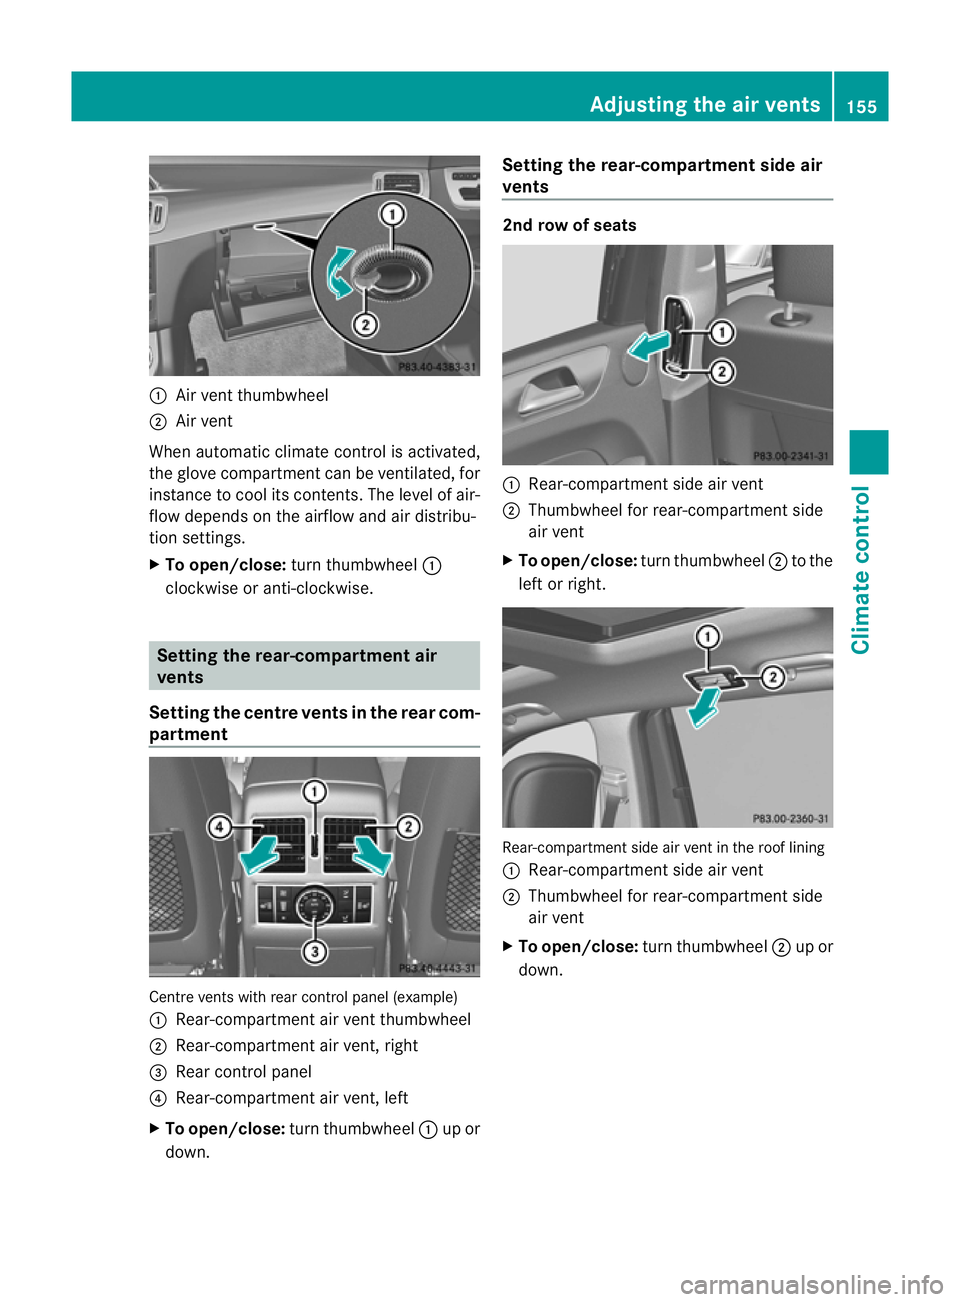
:
Air vent thumbwheel
; Air vent
Whe nautomatic climat econtrol is activated,
the glov ecompartment can be ventilated, for
insta ncetoc oolits contents .The level of air-
flo wd epends on the airflow and air distribu-
tion settings.
X To open/close: turnthumbwheel :
clockwise or anti-clockwise. Setting th
erear-compar tment air
vents
Setting the centre vents in the rear com-
partment Centr
events with rear control panel (example)
: Rear-compartmen tair vent thumbwheel
; Rear-compartment air vent ,right
= Rear control panel
? Rear-compartment air vent ,left
X To open/close: turnthumbwheel :up or
down. Setting th
erear-compar tment side air
vents 2nd row of seats
:
Rear-compartment side air vent
; Thumbwheel for rear-compar tmentside
air vent
X To open/close: turnthumbwheel ;to the
lef torr ight. Rear-compartmen
tside air vent in the roof lining
: Rear-compartment side air vent
; Thumbwheel for rear-compartment side
air vent
X To open/close: turn thumbwheel ;up or
down. Adjusting the air vents
155Climatecontrol Z
Page 159 of 441
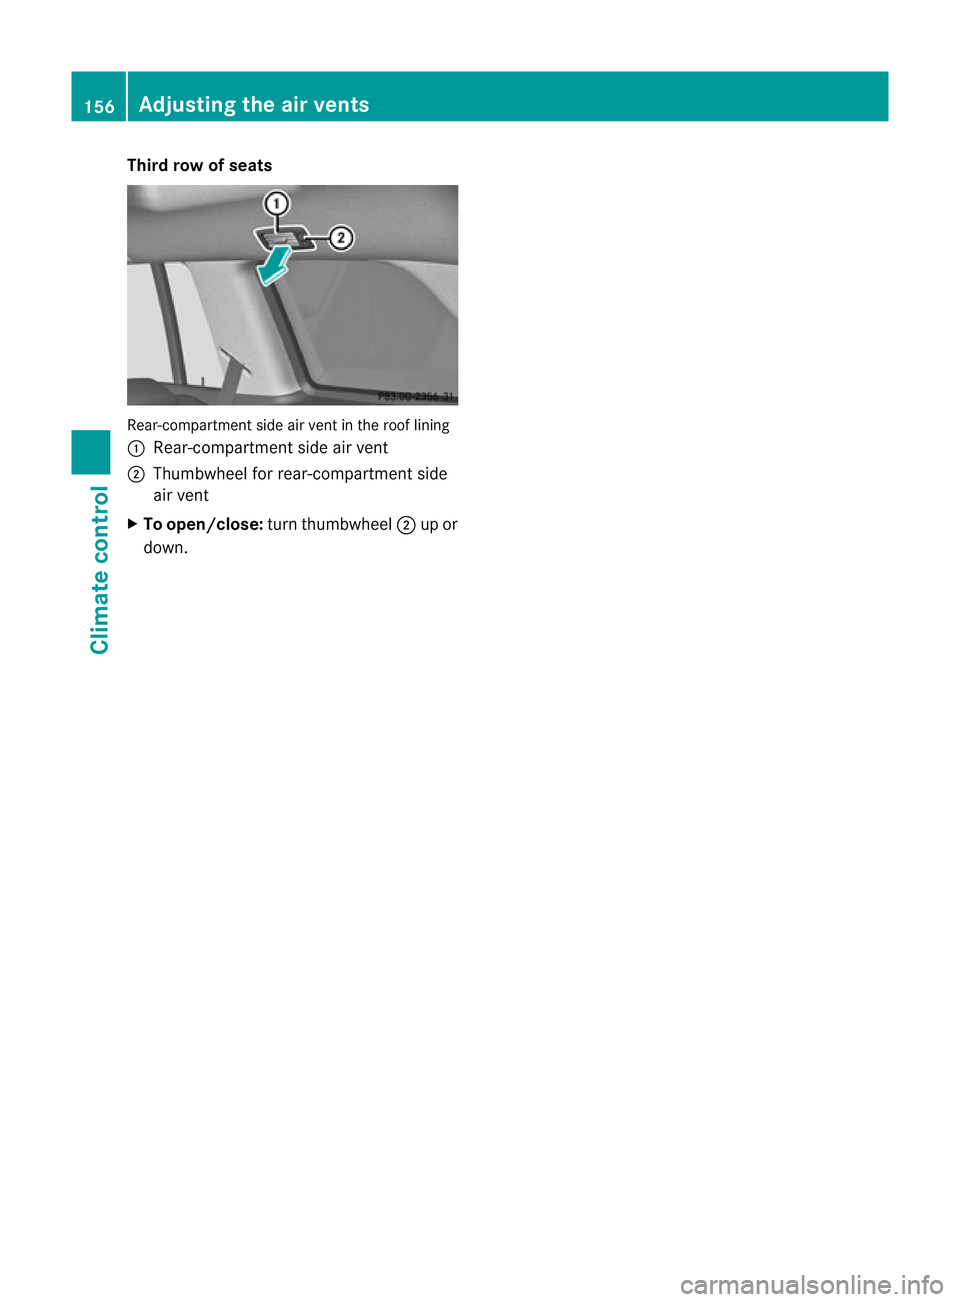
Third row of seats
Rear-compartment side ai
rvent in the roof lining
: Rear-compartment side ai rvent
; Thumbwhee lfor rear-compartment side
air vent
X To open/close: turn thumbwheel ;up or
down. 156
Adjusting the air ventsClimat
econtrol
Page 323 of 441
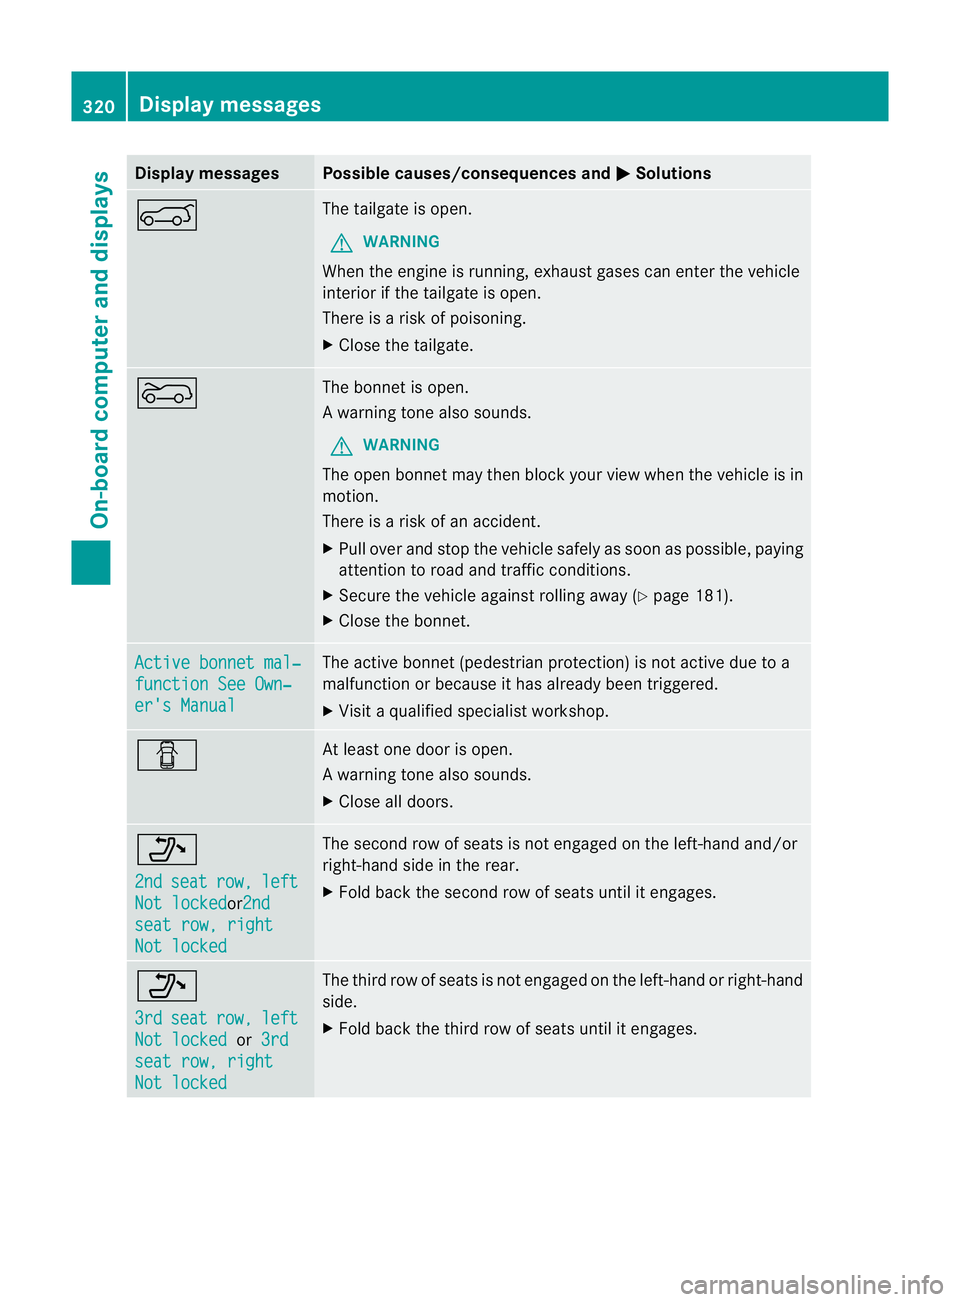
Displa
ymessages Possible causes/consequences and
M Solutions
A The tailgat
eisopen.
G WARNING
When the engine is running ,exhaus tgases can enter the vehicle
interior if the tailgate is open.
There is arisk of poisoning.
X Close the tailgate. ? The bonnet is open.
Aw
arning ton ealso sounds.
G WARNING
The open bonne tmay then block your view when the vehicle is in
motion.
There is arisk of an accident.
X Pull over and stop the vehicle safely as soon as possible ,paying
attention to road and traffic conditions.
X Secure the vehicle against rolling away (Y page 181).
X Close the bonnet. Active bonnet mal‐
function Se
eOwn‐ er's Manual Th
ea ctive bonnet (pedestrian prote ction) is not activ edue to a
malfunction or because it has already been triggered.
X Visit aqualified specialist workshop. C At least one door is open.
Aw
arning ton ealso sounds.
X Close all doors. _
2nd
se
at row, left
Not locked or
2nd sea
tr ow,r ight Not locked Th
es econ drow of seat sisnot engage donthe left-hand and/or
ri gh t-hand side in the rear.
X Fol db ackt he second row of seats unt ilit engages. _
3rd
seat row, left
No
tl ocked or
3rd sea
trow,r ight Not locked Th
et hird row of seats is not engaged on the left-hand or ri ght-hand
side.
X Fol db ackt he third row of seats unt ilit engages. 320
Display messagesOn-board computer and displays
Page 341 of 441
Usefu
linfor mati on
i This Owner's Manual describes all mod-
els, series and optional equipment for your
vehicle that were available at the time of
going to press. National variation sare pos-
sible. Note that your vehicl emay not be
equippe dwith all of the function sdescri-
bed. This is also the case for system sand
functions relevant to safety.
i Read the information on qualified special-
ist workshops: (Y page25). Stowage areas
Loadin
gguidelines G
WARNING
Secure and positio nthe load as described in
the loadin gguidelines.
Otherwise, vehicle occupants could
be injured by the load being thrown around in
the event of sharp braking, asudden change
in direction or an accident.
You will find further information in the "Secur-
ing aload" section.
Even if you follow all the loadin gguidelines,
the load will increase the risk of injury in the
event of an accident. G
WARNING
Keep the tailgate closed when the engine is
running. Otherwise, you could be poisoned by
exhaust fumes enterin gthe vehicle.
The handling characteristics of aladen vehi-
cle are dependent on the distribution of the
load within the vehicle. For this reason, you
should observe the following notes when
transporting aload:
R when transpor ting aload, never exceed the
maximum permissible gross vehicle weight or the permissible axle loads for the vehicle
(includin
goccupants).
R position heavy loads as far forward saspos-
sible and as low down in the load compart-
men tasp ossible.
R the load must not protrude abov ethe upper
edge of the seat backrests.
R always plac ethe load against the rea ror
front seat backrests .Make sure that the
seat backrests are securely locked into
place.
R hook in the safety net when loading.
R always place the load behind unoccupied
seats if possible.
R secure the load with sufficiently stron gand
wear-resistant lashing material. Pad sharp
edges for protection.
i Load restraints are available at any quali-
fied specialis tworkshop, e.g. aMercedes-
Benz Servic eCentre. Stowage compartments
Important safety notes G
WARNING
The stowage compartments must be closed
when item sare store dinthem. Luggage nets
ar en ot designed to secur eheavy item sof
luggage.
You or other vehicle occupant scould be
injure dbyo bjectsbeing thrown around if you:
R brak esharply
R change direction suddenly
R arei nvolved in an accident
Sharp-edge dand fragile object smust not be
placed in the luggag enet. 338
Stowage areasStowing and features
Page 344 of 441
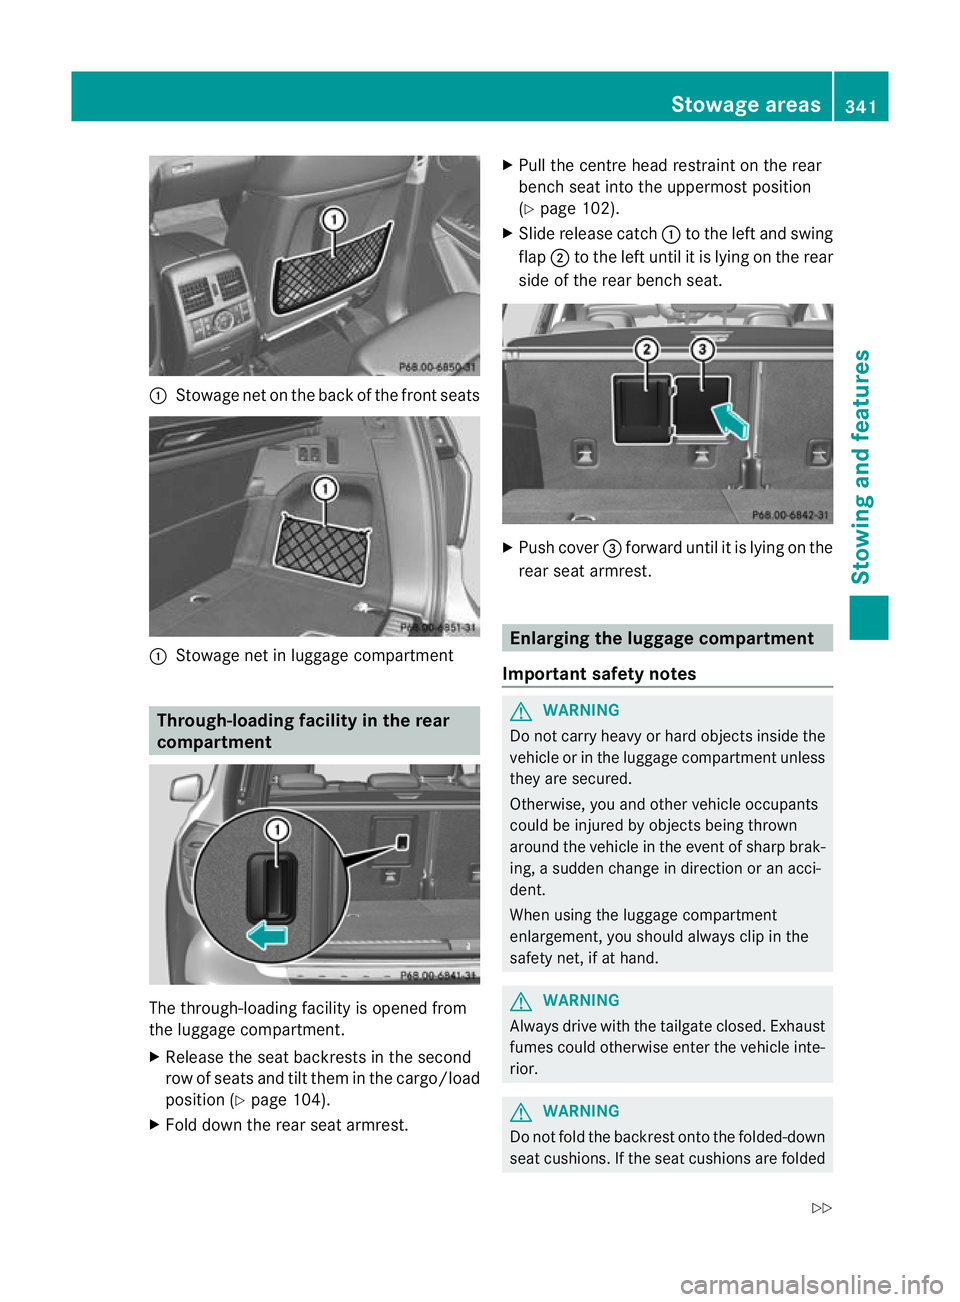
:
Stowag enet on the back of the front seats :
Stowag enet in luggage com partment Through-loadin
gfacility in the rear
compartment Th
et hrough-loading facility is opened from
the luggage com partment.
X Releas ethe sea tbackrest sinthesecond
row of seat sand tilt them in the cargo/load
position (Y page 104).
X Fold down the rear seat armrest. X
Pull the centre head restraint on the rear
bench seat into the uppermost position
(Y page 102).
X Slide release catch :to the left and swing
flap ;to the left until it is lying on the rear
side of the rear bench seat. X
Push cover =forward until it is lying on the
rear seat armrest. Enlarging the luggage compartment
Impor tantsafety notes G
WARNING
Do not carry heavy or hard objects inside the
vehicle or in the luggag ecompartmen tunless
they are secured.
Oth erwise, yo uand othe rvehicle occupants
could be injured by objects being thrown
around the vehicle in the event of sharp brak-
ing, asudden change in direction or an acci-
dent.
When using the luggag ecompartment
enlargement, you should always clip in the
safet ynet,ifath and. G
WARNING
Always drive with the tailgat eclosed. Exhaust
fumes could otherwise enter the vehicle inte-
rior. G
WARNING
Do not fold the backrest ont othe folded-down
seat cushi ons.Ift he seat cushi ons arefolded Stowage areas
341Stowing and fea tures
Z
Page 345 of 441
down, luggage can be thrown over the back-
rest int
othe passenger compar tment ,e.g.
during heavy braking, sudden changes of
direction or in the event of an accide nt.Y ou
coul dcause an acciden torcause injury to
yourself and others.
! Releas eand fold the sea tcushion
upwards befor efolding th erear bench seat
forward. Otherwise, th ebackrests may be
damaged.
When the backrest is folded forwards, the
front seats cannot be moved to their rear-
most position. Otherwise, the front seats
and the rea rbench seat could be damaged.
The left-hand and right-hand backrests in the
2n dr ow of seats can be folde dforwards sep-
arately to increase the luggage compartment
capacity.
On vehicles with a3rd row of seats ,you must
fold down the 3r drow of seats beforehand
(Y page 105) to obtain maximum luggage
compartment enlargement.
Folding th erear benc hseat forwards !
The backrest is heavy. Therefore, exer-
cise care when folding it down. Make sure
that the head restraints are pushed all the
way in so that the backrests and seat cush-
ions are not damaged. i
If the driver's or fron t-passenger seat is
set for alarger person, it may not be pos-
sible to fold the rear bench seat forwards.
In this case, move the front seats as far
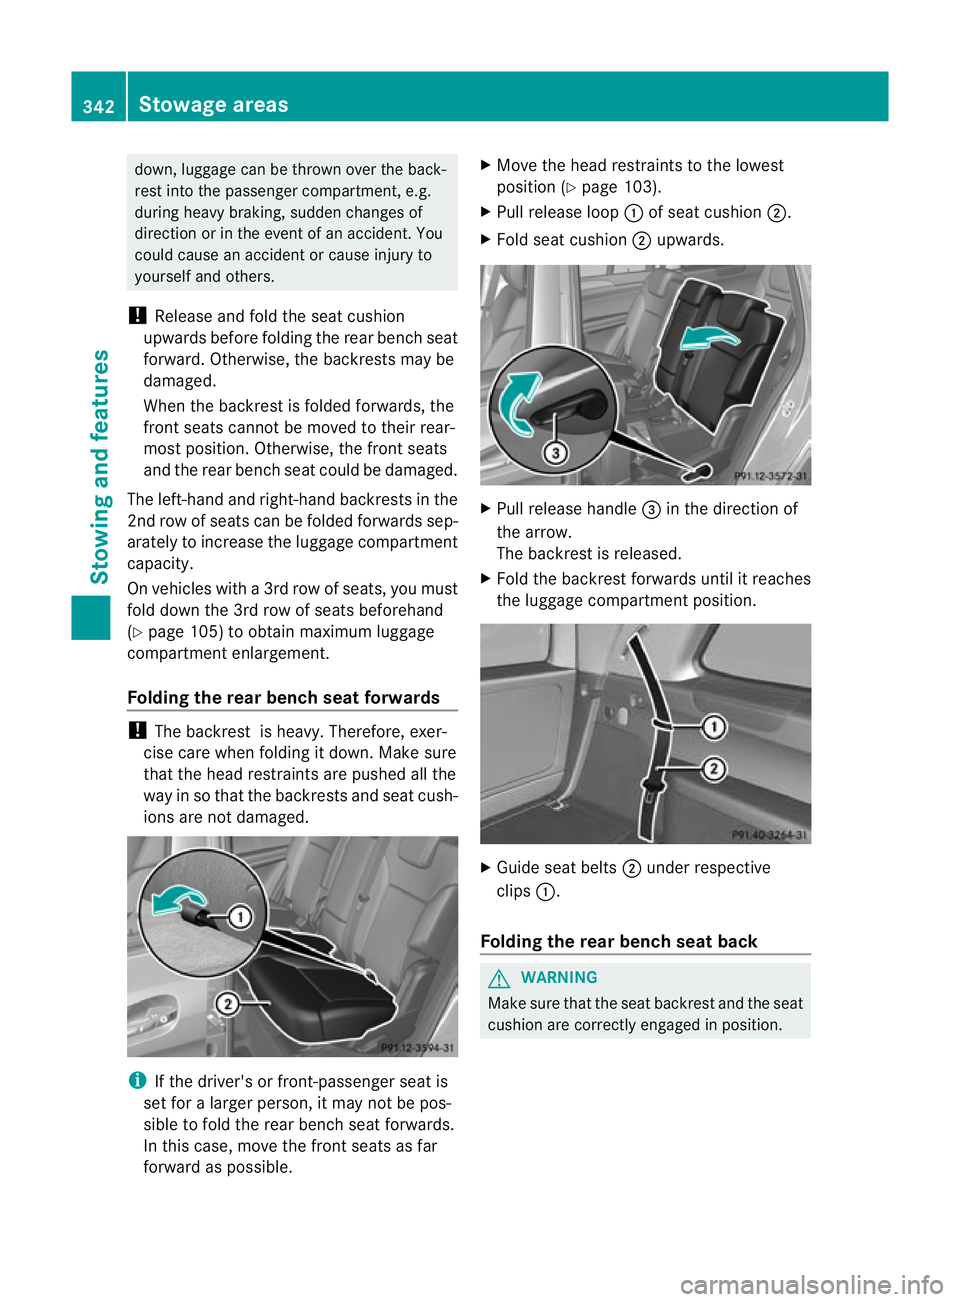
forward as possible. X
Move the head restraints to the lowest
position (Y page 103).
X Pull release loop :of seat cushion ;.
X Fold seat cushion ;upwards. X
Pull release handle =in the direction of
the arrow.
The backrest is released.
X Fold the backrest forwards until it reaches
the luggage compartment position. X
Guide seat belts ;under respective
clips :.
Foldin gthe rear benc hseat back G
WARNING
Mak esure that the seat backrest and th eseat
cushion are correctly engaged in position. 342
Stowage areasStowi
ng andfeatures