heating MERCEDES-BENZ GL SUV 2012 Owner's Guide
[x] Cancel search | Manufacturer: MERCEDES-BENZ, Model Year: 2012, Model line: GL SUV, Model: MERCEDES-BENZ GL SUV 2012Pages: 441, PDF Size: 10.66 MB
Page 202 of 441

G
WARNING
DISTRONIC PLUS canno ttake account of road
and traffic conditions. If DISTRONI Cdoes not
recognise or no longer recognises the vehicle
in front, do not activate DISTRONIC or, if it is
alr eady active, deactivate it. This is especially
the case:
R befor ecorners
R on filter lanes
R when changing to alane with faster moving
traffic
R in comple xdriving situations or where lanes
are diverte d,e.g. at roadworks on amotor-
way
DISTRONIC PLU Sotherwise maintains the
current spe ed setbyyou or accelerates up to
the set speed.
DISTRONIC PLU Scannot take account of
weather conditions. Deactivate, or do not
activate, DISTRONI CPLUS:
R if th eroads are slippery, snow-covered or
icy .The wheels coul dlose their grip when
brakin goraccelerating .The vehicle could
star ttos kid.
R if the sensors are dirty or there is poo rvis-
ibility, e.g. due to snow, rain or fog. Dis-
tance control may be impaired.
Always pay attention to traffic conditions
even when DISTRONIC PLU Sisactivate d.
Otherwise, you ma yfail to recognise dangers
in time, caus eanaccident and injure yourself
and others. G
WARNING
DISTRONIC PLUS brake syourvehicle up to a
maximu mof4m /s2
depending on its speed.
This corresponds to approximately 40% of
your vehicle's maximum braking power. You
must als oapply the brakes yourself if this
braking power is not sufficient.
If DISTRONI CPLUS detect sarisk of collision
with avehicle in front, an intermit tent warning
tone sounds. In addition, the ·distance
warning lamp in the instrument cluste rlights
up. Brak etoavoidac ollision. G
WAR
NING
The vehicle can be braked when DISTRONIC
PLUS is activated. For this reason, deactivate
DISTRONIC PLUS if the vehicle is to be set in
motion by othe rmeans (e.g. in acar wash or
by towing).
The radar senso rsystem is switched off auto-
matically in the vicinity of radio teles cope
facilities (Y page 433).
If you want DISTRONIC PLUS to assist you,
the radar sensor syste mmust be activated
(Y page 283 )and operational.
General notes DISTRONIC PLUS regulates the speed and
automati
cally helps you maintain the dis-
tanc etot he vehicle detected in front. DI S-
TRONIC PLU Sbrake sautomatically so that
the set spee disnot exceeded.
On long and steep downhil lgradients, espe-
ciall yifthe vehicle is laden or towing atrailer,
yo um ust select shift range 1,2or 3in good
time. By doing so, you will make use of the
braking effec tofthe engine. This relieves the
load on the brake system and prevents the
brakes from overheating and wearing too
quickly.
If DI STRONIC PLUS detects aslower-moving
vehicle in front ,your vehicle is braked in order
to maintain the preset distance to the vehicle
in front.
If ther eisnov ehicle in front ,DISTRONIC
PLUS operate sinthe sam eway as cruise
control in the spee drange between
30 km/h and 200 km/h. If avehicle is driving
in fron tofyou, DI STRONIC operates in the
speed range betwee n0km/h and
200 km/h.
Do not us eDISTRONIC PLUS on roa dswith
steep gradients. Driving systems
199Drivinga nd parking Z
Page 262 of 441
reasons concerning th
eoperating permit.
This also applie sincountries in which the
permissible maximum speed for vehicle/
trailer combinations is above 100 km/h.
When towing atrailer, your vehicle's handling
characteristics wil lbedifferen tincomparison
to when drivin gwithout atrailer and it will
consume more fuel.
On long and stee pdownhil lgradients ,you
must select shift range 1,2or 3in good time.
i This also applies if you have activated
cruise con trol, SPEEDTRONIC or DI S-
TRONIC PLUS.
This will use the brakin geffect of th eengine,
so les sbraking wil lberequired to prevent the
vehicle from gainin gspeed. This relieves the
load on the brak esystem and prevent sthe
brakes from overheating and wearing too
quickly .Ifyou need additional braking,
depress the brake pedal repeatedly rather
than con tinuously.
Driving tips If the trailer swings from sid
etoside:
X Do not accelerate.
X Do not countersteer.
X Brake if necessary.
R Maintain agreater distance from th evehi-
cle in front than when driving without a
trailer.
R Avoid braking abruptly. If possible, brake
gently at first to allow the trailer to run on.
Then, increase the braking force rapidly.
R The values given for gradient-climbing
capabilities from astandstill refer to sea
level. Whe ndriving in mountainou sareas,
note that th epower outpu tofthe engine,
and consequen tlyt he vehicle' sgradient-
climbing capability ,decrease with increas-
ing altitude. Folding out the ball coupling
G
WARNING
If the ball coupling is not correctly engaged,
the trailer can detach. There is arisk of an
accident.
Always engage the ball coupling as described. G
WARNING
If you release the ball coupling or it does not
engage correctly when folding in, it will swing
out. Within pivoting range of the ball coupling,
there is an increased risk of an accident and
injury.
Only release the ball coupling if the pivoting
range is unobstruc ted. Alway smake sure that
the ball coupling engages when folding in.
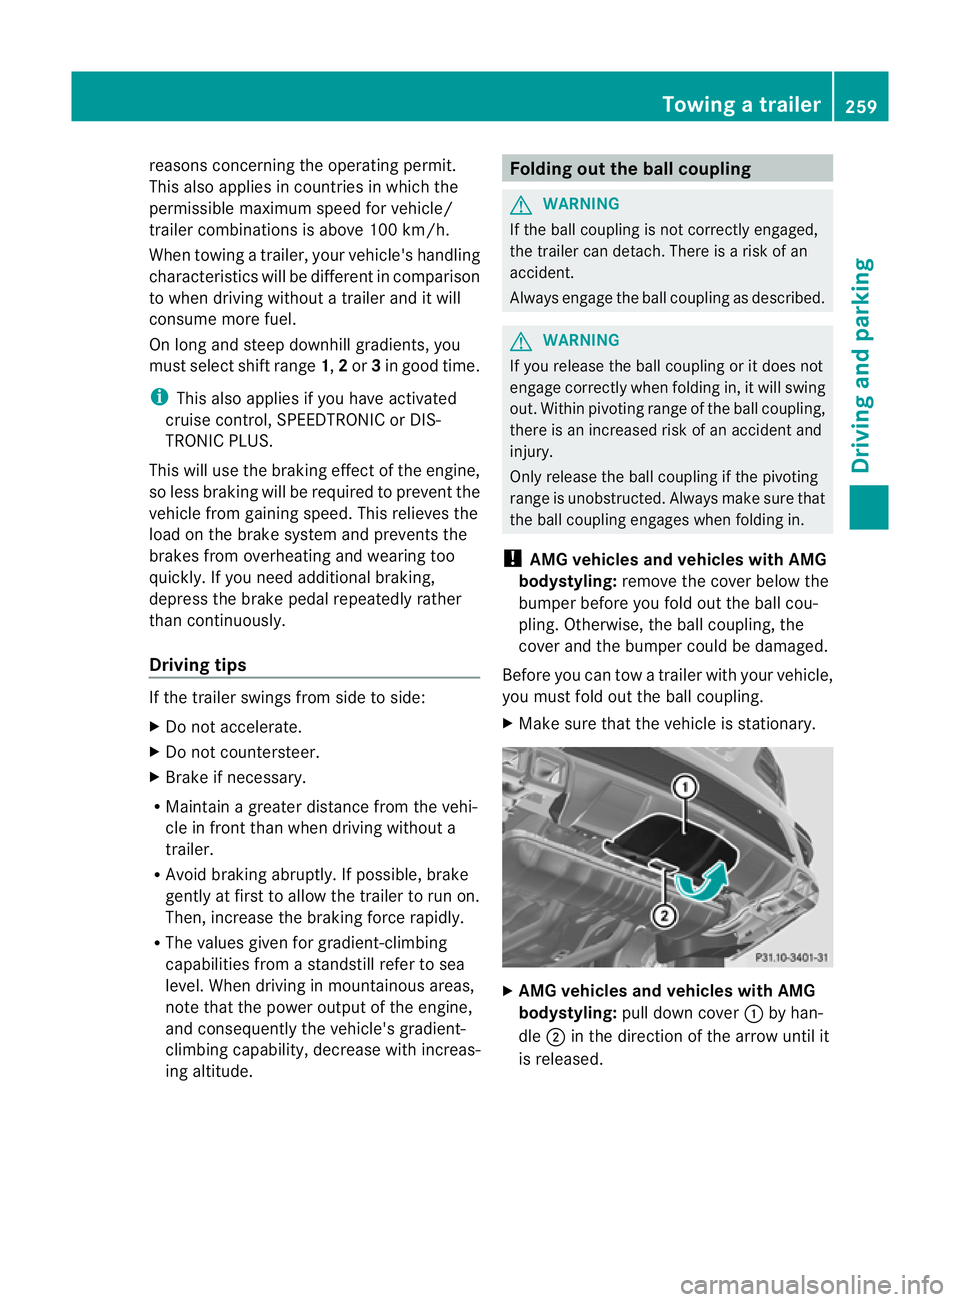
! AMG vehicles and vehicles with AMG
bodystyling: remove the cover below the
bumper before you fold out the ball cou-
pling. Otherwise, the ball coupling, the
cover and the bumper could be damaged.
Before you can tow atrailer with your vehicle,
yo um ust fold out the ball coupling.
X Make sure that the vehicle is stationary. X
AMG vehicles and vehicles with AMG
bodystyling: pull down cover :by han-
dle ;in the direction of the arrow until it
is released. Towin
gatrailer
259Driving an dparking Z
Page 287 of 441

When you are close to radi
otelescope facili-
ties, the rada rsensor system will be deacti-
vated automatically.
The following system sare switche doff when
th er adar senso rsystem is deactivated:
R DISTRONIC PLUS (Y page 198)
R BAS PLUS (Y page 62)
R PRE-SAFE ®
Brak e(Ypage 68)
R Blin dSpot Assist (Y page 238)
R Active Blin dSpot Assist (Y page 242)
Heating submenu Auxiliary heating dep
arture time G
WARNING
Exhaus tfumes are produced when the auxili-
ary heating is in operation. Inhaling the se
exhaus tfumes can be poisonous. You should
therefor eswitch off th eauxiliar yheating in
confine dspaces without an extraction sys-
tem, e.g .agarage. G
WARNING
When operating the auxiliary heating parts of
the vehicle can get very hot. Make sure that
the exhaust system does not under any cir-
cumstances come into contact with easily
ignitable material such as dry grass or fuels.
The material could otherwise ignite and set
the vehicle alight. Choos eyour parkin gspot
accordingly.
Operating the auxiliary heating is thus pro-
hibited at fillin gstations or when your vehicle
is being refuelled .You must therefor eswitch
off the auxiliary heating at filling stations.
! Operating the auxiliary heating/ventila-
tion draws on the vehicle battery. After you
have heated or ventilated the vehicle a
maximum of two times, drive for alonger
distance.
This func tion is only available on vehicles with
auxiliary heatin g(Ypage 148). In the
Heating submenu, you can select a
stored departure tim eorchange adeparture
time.
The auxiliary heatin gtimer func tion calcu-
lates the switch-on tim eaccording to the out-
sid etemperatur esothat the vehicle is pre-
heate dbyt he departur etime. When the
departur etime is reached, the auxiliary heat-
ing continues to heat for afurther five
minutes and then switches off. The auxiliary
heating adopts the THERMATI Cor
THERMOTRONI Ctemperature setting.
You can switc hoff th eauxiliary heating by
using the remot econtrol or the auxiliar yheat-
ing button on the centre console.
i Swit chthe auxiliary heating on regularly
once amonthfor about ten minutes.
Selecting th edepartur etime or deactivat-
ing aselected depa rtur et ime
X Press the =or; button on the steer-
ing wheel to select the Settings menu.
X Press the :or9 button to select the
Heating submenu.
X Press ato confirm.
You will see the selected setting.
X Press ato confirm.
X Press the :or9 button to select
one of the three departur etimes or Timer off (no timer active).
X Press ato confirm.
If ad eparture tim eisselected, the yellow
indicator lam plights up on the auxiliary
heating button.
Changing the depa rtur et ime
X Press the =or; button on the steer-
ing wheel to select the Settings menu.
X Press the :or9 button to select the
Heating submenu.
X Press ato confirm.
You will see the selected setting.
X Press ato confirm. 284
Menus and submenusOn-board computer and displays
Page 288 of 441

X
Press the :or9 button to select A ,
B or
Change C .
X Press ato confirm.
You can now change the departur etime.
X Press the =or; button to select the
display to be changed: hours, minutes.
X Press the :or9 button to set the
selected display.
X Press the abutton to store the entry.
The yellow indicator lamp on the auxiliary
heating button lights up.
Convenience submenu Activating/deactivating the EASY-
ENTRY/EXIT feature
G
WARNING
The steerin gwheel moves when the EASY-
ENTRY/ EXIT feature is active. There is arisk
of occupant sbecoming trapped. Before acti-
vating the EASY-ENTRY/EXI Tfeature, make
sure that nobody can becom etrapped.
Do not leave children unsupervised in the
vehicle, eve nifthey ar esecured in achild
rest raint system. The children could open the
driver's door and thereby unintentionally acti-
vate the EASY-ENTRY/EXIT featur eand
become trapped.
X Pres sthe = or; button on the steer-
ing wheel to selec tthe Settings menu.
X Press the :or9 button to selec tthe
Convenie nce submenu.
X Press ato con firm.
X Press :or9 to select the Easy Entry/Ex
it function.
If the Easy Entry/Exit function is activa-
ted ,the vehicle steerin gwheel is displayed
in red in the multifunction display.
X Press the abutton to sav ethe setting.
Further information on the EASY- ENTRY/EXIT
feature (Y page 111). Switching the belt adjustment on/off
X
Press the =or; button on the steer-
ing whee ltoselect the Settings menu.
X Press the :or9 button to select the
Convenie nce submenu.
X Press ato con firm.
X Press the :or9 buttontos elect the
Belt adjustme nt function.
When the Belt adjustment function is
activated, th evehicle seat belt is displayed
in red in the multifunction display.
X Press the abutton to save the setting.
For further information on belt adjustment,
see (Y page 48).
Switching th eFold in mirrors when lock-
ing function on/off
This func tion is only available on vehicles with
Memor yFunction (Y page 115).
When you activat ethe Auto. fold-in mir‐
rors func
tion, the exterior mirror sare folded
in when th evehicle is locked. When you
unloc kthe vehicle and then open adoor, the
exterior mirror sfold out again.
X Press the =or; button on the steer-
ing wheel to select the Settings menu.
X Press the :or9 button to select the
Convenie nce submenu.
X Press ato con firm.
X Press :or9 to select the Auto. fold-in mirrors function.
If the Auto. fold-in mirrors function is
activated, th evehicle' sexterior mirror is
displaye dinred in the multifunction dis-
play.
X Press the abutton to save the setting. Menus and submenus
285On-board computera nd displays Z
Page 308 of 441

Displa
ymessages Possible causes/consequences and
M Solutions
# The battery is no
tbeing charged.
Aw arning ton ealso sounds.
Possible causes:
R fault yalternator
R torn poly-V-belt
R am alfunction in the elect ronics
X Stop the vehicle immediately, paying attention to road and traf-
fic conditions, and switch off the engine.
X Open the bonnet.
X Check whether the poly-V-belt is torn.
If the poly-V-belt is torn:
! Do not continue driving. The engine could otherwise overheat.
X Consult aqualified specialist workshop.
If the poly-V-belt is OK:
X Visit aqualified specialist workshop. 4
Chec
keng. oil lev. when next
refuelling Th
ee ngine oil level has dropped to the minimum level.
Aw arning ton ealso sounds.
X Chec kthe oil level when nex trefuelling, at the latest
(Y page 362).
X If necessary, top up the engine oil (Y page 362).
X Hav ethe engin echecked at aqualified specialist worksho pif
the engine oil needs topping up more often than usual. 4
Top up wit
h1 litre of engine
oil when next refu‐
elling AM
Gvehicles: the engine oil level is too low.
X Check the oil level when next refuelling, at the latest
(Y page 362).
X If necessary, top up the engine oil (Y page 362).
X Hav ethe engin echecked at aqualified specialist worksho pif
the engine oil needs topping up more often than usual. 8
Reserv
efuel level Th
ef uel level has dropped into the reserve range.
Operation of the auxiliary heating is deactivated if the fuel level
drops into the reserve range.
X Refuel at the nearest filling station. C There is only
avery small amount of fuel in the fuel tank.
The auxiliary heatin gcannot be operated.
X Refuel at the nearest filling station without fail. Display messages
305On-board computer and displays Z
Page 324 of 441

Displa
ymessages Possible causes/consequences and
M Solutions
j
Ch
eckt railer hitch lock Th
et railer to whitch is no tcorrectly engaged.
Aw arning ton ealso sounds.
X Stop th evehicle immediately, payin gattentio ntoroad and traf-
fic conditions, and switc hoff th eengine.
X Secure the vehicl eagainst rolling away (Y page 181).
X Engage the trailer coupling' sball coupling in the end position
(Y page 259). Ð
Power
steering mal‐
function Se
eOwn‐ er's Manual Th
ep ower steerin gassistanc eisf aulty.
Aw arning ton ealso sounds.
G WARNING
You will need to use mor eforce to steer.
Ther eisar isk of an ac cident.
X Check wheth er youare able to appl ythe ext raforce required.
X If you are abl etosteer safely: carefully drive on to aqualified
specialist workshop.
X If you are unable to steer safely: do not drive on. Contact the
nearest qualified specialist workshop. &
inoperativ
eBat‐ tery low Yo
uh ave attempted to switch on the auxiliary heating or to acti-
vate adeparture tim eusing the on-boar dcomputer after operating
the auxiliary heatin gtwice.
X Let the engine run for 10 seconds.
The auxiliary heating is operational again. The on-board voltage is too low. The auxiliary heating has switched
itself off or cannot be switched on (Y
page 148).
X Driv efor alonger distance.
The battery is being charged. The auxiliary heatin gisoperational
again as soon as the on-boar delectrical system voltage is suf-
ficient. &
inoperative
Refuel
vehicle There is too little fuel in the fuel tank
.The auxiliary heating cannot
be switched on (Y page 148).
X Refuel at the nearest filling station. Displa
ymessages
321On-board compu tera nd displays Z
Page 325 of 441

Displa
ymessages Possible causes/consequences and
M Solutions
&
in
operative See Owner'
sMan. Th
ea uxiliar yheatin ghasatemporary ma lfunction or is faulty.
X When the vehicl eisonalevel surface and the engin ehas cooled
down, make up to four attempts to switch on the auxiliary heat-
ing, waiting several minutes between each attempt
(Y page 148).
X If the auxiliary heating does not switch on, consult aqualified
specialist workshop. Teleph
oneNo service Your vehicl
eisoutside the network provider's transmitter/
receiver range.
X Wait until the mobile phone operational readiness symbol
appears in the multifunction display. ¥
Top
up washer fluid The washe
rfluid level in the washer fluid reservoir has dropped
below the minimum.
X Top up the washer fluid (Y page 364).Wipe
rmalfunction‐ ing Th
ew indscreen wipers are malfunctioning.
X Visit aqualified specialist workshop. Hazard warning
lamp
smalfunction‐ ing Th
eh azard warning lamps are faulty.
X Visit aqualified specialist workshop. Key
Display messages Possible causes/consequences and
M Solutions
Â
Ke
yd oes not belong to vehicle Yo
uh ave put the wrong key in the ignition lock.
X Use the correct key. Â
Replac
ekey Th
ek ey needs to be replaced.
X Visit aqualified specialist workshop. Â
Change ke
ybatter‐ ies Th
eb atteries of the KEYLESS-GO key are discharged.
X Change the batteries (Y page 79).322
Display messagesOn-board computer and displ
ays
Page 350 of 441

You can remove the rubber mat of the cup
holder to clean it. Clean it with clean
,luke-
warm water only.
Temperature-controlled cup holder in
th ef ront-compartment centr econsole G
WARNING
When you use the warmin gfunction ,the metal
insert of thecup holder is heated. Therefore,
do not touch the cup holder inser t.Otherwise,
you migh tburny oursel f. :
Cuph olders
; Residual heat indicator lamp
= Button
Th et emperature-c ontrolle dcup holde rcan
be used to keep cold drinks cold and hot
drinks hot.
X Turn the key to position 2in the ignition
lock.
X To switch on th ecooling function: press
and hold button =until th eblue indicator
lamp on th ebutton lights up.
X To switch on th eheating function: press
and hold button =until the red indicator
lamp on the button lights up.
X To switch off th efunc tion: press and hold
button =until the indicator lamp on the
button goes out.
When the heatin gfunction is used, residual
heat indicator lamp ;lights up fro macer-
tain temperature. This mean sthat the metal
insert of the cup holder is hot. Cu
ph older in th erears eat armrest !
Do not sit on or support your body weight
on the rear seat arm rest when it is folded
down ,asy ou coul dotherwise damage it. X
Fold down the rear seat armrest.
Cup holder :is located in the rear seat
armrest.
Cup holder in th ethird row of seats :
Cup holders
The cup holders are located on the right-hand
and left-han dside panels. Sun visors
Overview G
WAR
NING
Keep the vanity mirrors in the sun visors cov-
ered whil edriving.Y ou coul dotherwise be
dazzled, which may impair your view of traffic
conditions and as aresult could cause an
accident. Features
347Stowing and features Z
Page 353 of 441

Make sur
ethat children travellin ginthe vehi-
cle ar enot able to injure themselves on the
hot cigarette lighter or cause afire with it.
! The cigarette lighter in the centre console
in the front compartmen tisn ot intended
for operatin gthe tyr einflation compressor. X
Turn the key to position 2in the ignition
lock.
X To open: slide cover :to its foremost
position.
X Pres sinc igarette lighter ;.
Cigarette lighter ;will pop out automati-
cally when the heating element is red-hot.
X To close: pull cover :back as far as it will
go. 12
Vsockets
General notes X
Turn th ekey to position 1in th eignition
lock.
Wit hthe exception of th esocket in th efront
centr econsole, all socket scan be used for
accessories with amaximum curren tdraw of
240 W(20 A) .The socket in the front centre
console can be used for accessories with a
maximum curren tdraw of 180 W(15 A).
Accessories includ esuch items as lamp sor
charg ersf or mobi lephones.
If you use the sockets for long periods when
the engine is switched off ,the battery may
discharge. i
An emergency cut-of fensure sthat the on-
board voltage does not drop too low. If the
on-boar dvoltage is too low, the power to
the socket sisautomatically cut. This
ensures that there is sufficient power to
start the engine.
Socket in the front centre console !
The socket is not intended for operating
the tyre inflation compressor. X
To open: slide cover :to its foremost
position.
X Lift up the cover of socket ;.
X To close: pull cover :back as far as it will
go.
Socket in the rear-compartment centre
console X
Lift up the cover of socket :.
On vehicles with the Rear Seat Entertainment
System, there are two sockets in the rear-
compartmen tcentre console. 350
FeaturesStowing and features
Page 370 of 441

G
WARNING
Th ev ehicle is braked when the HOL Dfunction
or DISTRONIC PLUS is activated. Therefore,
deactivate the HOLD function and DISTRONIC
PLUS before the vehicl eiswashed in an auto-
matic car wash.
! Make sure that:
R the side windows and sliding sunroof are
closed completely.
R the blower for the ventilation/heating is
switched off (OFF button is depressed).
R the windscreen wiper switch is at posi-
tion 0.
The vehicl ecould otherwise be dam aged.
! In car washes with atowing mechanism,
make sure that the automatic transmission
is in transmission position N,otherwise the
vehicl ecould be dam aged.
R Vehicles with akey:
do not remove the key from the igniti on
lock. Do not open the driver's door or
front-passenge rdoor when the engin eis
switched off .Otherwise, the automatic
transmission selects park position P
automatically and locks the wheels. You
can prevent this by shiftin gthe auto-
matic transmission to Nbeforehand.
R Vehicles with KEYL ESS-GO:
do not ope nthe driver's door or front-
passenger door when the engin eis
switched off .Otherwise, the automatic
transmission selects park position P
automatically and locks the wheels.
Observe the following to make sure that the
automatic transmission stays in position N:
X Make sure the vehicle is statio naryand the
ignition is switched off.
X Turn the key to position 2(Y page 159 )in
the ignitio nlock.
Use the key instead of the Start/S topb ut-
ton on vehicles with KEYLESS-GO.
X Depress and hold the brake pedal. X
Shift the automatic transmissio ntoposi-
tion N.
X Release the brake pedal.
X Release the electric parkin gbrake.
X Switch off th eignition and leav ethe key in
the ignition lock.
You can wash the vehicle in an automatic car
wash from the ver ystart.
Wash off excess dirt before cleaning the vehi-
cle in an automatic car wash.
After using an automatic car wash ,wipe off
wax from the windscreen and the wiper
blades. This will prevent smears and reduce
wiping noises caused by residue on the wind-
screen.
Washing by hand In some countries, washing by hand is only
allowe
datspecially equipped washing bays.
Observe the legal requirement sfor each indi-
vidual coun try.
X Do not use hot water and do not wash the
vehicle in direct sunlight.
X Use asoft sponge to clean.
X Use amild cleaning agent, such as acar
shampoo approved by Mercedes-Benz.
X Thoroughly hos edown the vehicle with a
gentl ejet of water.
X Do not point the water jet directly towards
the air inlets.
X Use plenty of water and rinse out the
sponge frequently.
X Rinse the vehicle with clean water and dry
thoroughly with achamois.
X Do not let the cleanin gagent dry on the
paintwork.
When using the vehicle in winter, remove all
traces of roa dsalt deposits carefully and as
soon as possible. Care
367Maintenance and care Z