display MERCEDES-BENZ GL SUV 2012 Manual PDF
[x] Cancel search | Manufacturer: MERCEDES-BENZ, Model Year: 2012, Model line: GL SUV, Model: MERCEDES-BENZ GL SUV 2012Pages: 441, PDF Size: 10.66 MB
Page 226 of 441
10 km/h wh
enexiting aparking space.
Otherwise ,Active Parking Assist will be
cancel led.
X Stop as soon as PARK TRONIC sounds the
continuous warning tone, if not before.
X Shif tthe transmission to position Dor Ras
req uired wh ilet he vehicle is stationary.
Activ eParking Assis timmediatel ysteers in
the othe rdirection.
i You will achieve the best results by wait-
ing for the steering procedure to complete
before pulling away.
If you rever seafter activation, the steering
wheel is moved to the straight-ahead posi-
tion.
X Drive forwards or reverse the vehicle, being
read ytob rake at al ltimes.
X Stop as soon as PARKTRONIC sounds the
continuou swarning tone, if not before.
X Drive forwards and revers easinstructed by
the PARKTRONI Cwarning displays.
Once you have exite dthe parkin gspace com-
pletely, the steering wheel is moved to the
straight-ahead position. You hea ratonea nd
the message Park Assist switched off appear
sinthe multifuncti on display. You will
then have to steer and merg eintot raffic on
you rown. PARKTRONI Cisstill available.
Cancelling Active Parking Assist X
Stop the movemen tofthe multifunction
steeri ngwheel or steer yourself.
Activ eParking Assist will be cancelled at
once. The Park Assist cancelled mes-
sage appears in the multifunction display.
or
X Press the PARKTRONI Cbutton on the
centr econsole (Y page 218).
PARKTRONI Cisswitched off and Active
Parking Assist is immediately cancelled.
The Park Assist cancelled message
appears in the multifunction display. Activ
eParking Assist is cancelled automati-
cally if:
R parking using Activ eParking Assist is no
longer possible.
R you are drivin gfaster than 10 km/h.
R aw heel spin sand ESP ®
intervenes or fails.
The ÷ warnin glamp lights up in the
instrumen tcluster.
Aw arning ton esounds. The par king symbol
disappears and the multifunction display
shows the ParkA ssist cancelled mes-
sage.
When Activ eParking Assist is cancelled, you
must steer again yourself.
Towing atrailer For vehicles with
atrailer to whitch, the min-
imum length for parking spaces is slightly
increased.
If yo uhavea ttache datrailer to your vehicle,
yo us houl dnot us eActiv eParking Assist.
Once the electrica lconnection is established
between your vehicl eand the trailer, Active
Parking Assist is no longer available .PARK-
TRONIC is deactivated for the rear area. Reversin
gcamera
Important safety notes G
WARNING
Mak esure that no persons or animals are in
the manoeuvring range. Otherwise, they
could be injured. G
WARNING
The reversing camera is only an aid and may
sho wad istorted view of obstacles, show
them incorrectly or not at all. The reversing
camer aisnotas ubstitute for paying atten-
tion. The camera cannot sho wobject sinthe
following areas: Driving systems
223Driving and parking
Z
Page 227 of 441
R
very close to th erear bumper
R under the rear bumper
R in close range above the handle on the boot
lid
You are alway sresponsible for safety, and
must alway spay attention to you rsurround-
ings when parking and manoeuvring. This
applies to the areas behind, in front of and
beside th evehicle. Yo ucould otherwise
endanger yoursel fand others. G
WARNING
Unde rthe followin gcircumstances, the
reversing camer awill not func tion, or will
function in alimited manner:
R if the boot lid is open
R in heavy rain, snow or fog
R at night or in very dark places
R if the camer aisexposed to very brigh tlight
R if the area is lit by fluorescen tlight or LED
lighting (the display may flicker)
R if there is asudden change in temperature,
e.g. when driving into aheated garage in
winter
R if the camera lens is dirt yorobstructed
R if the rear of your vehicl eisdamaged. In this
event, have the camera positio nand setting
checked at aqualified specialist workshop.
Do not use the reversing camera in these
types of situation. You could otherwis einjure
others or damage object sand your vehicle
whil eyou are parking.
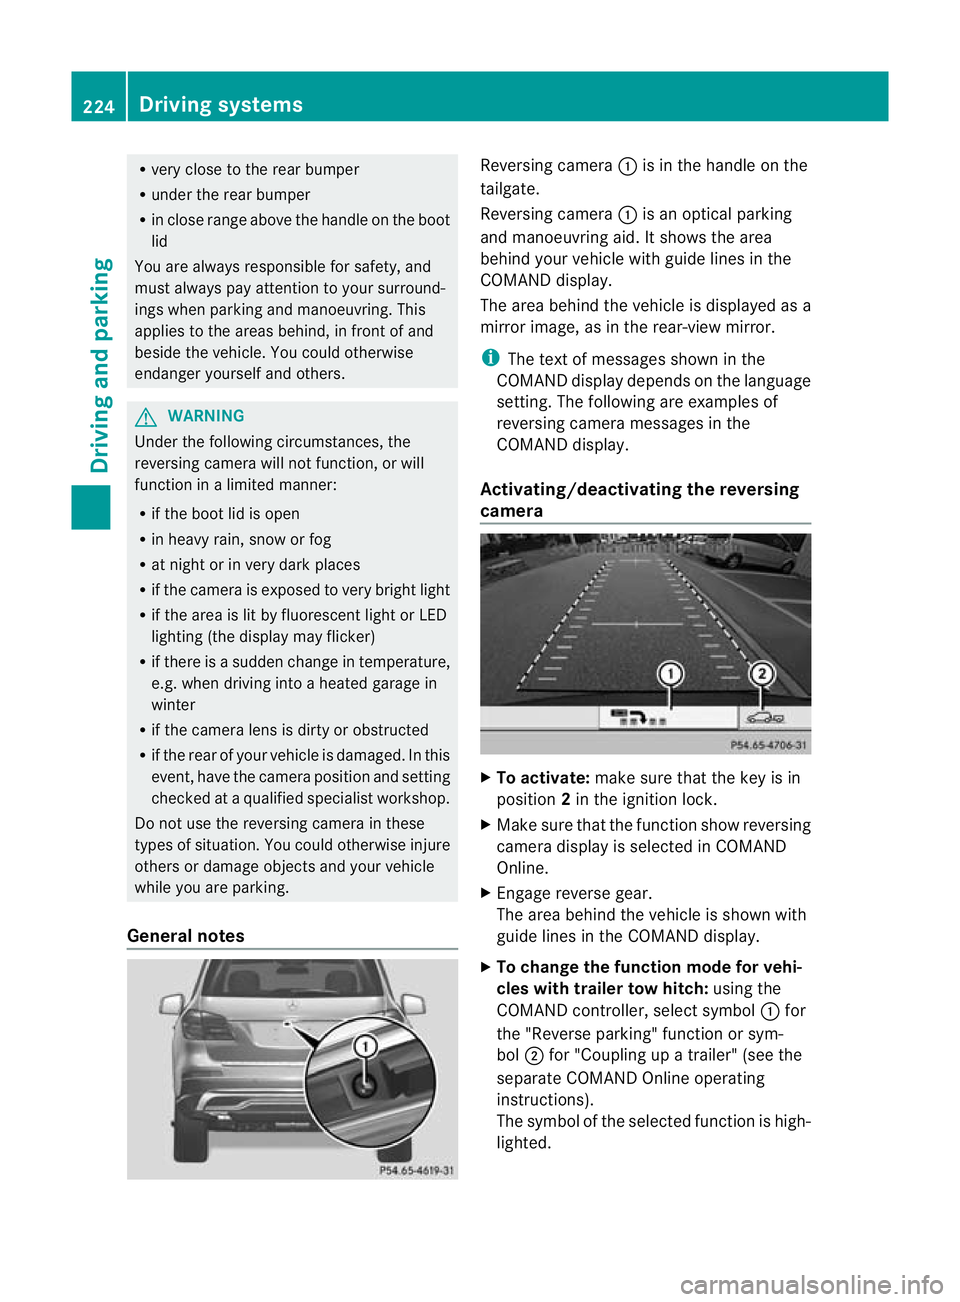
General notes Reversin
gcamera :is in the handle on the
tailgate.
Reversing camera :is an optical parking
and manoeuvring aid. It shows the area
behind your vehicle with guide lines in the
COMAND displ ay.
Th ea rea behind th evehicle is displayed as a
mirror image, as in the rear-view mirror.
i The text of messages shown in the
COMAN Ddispla ydepends on the language
setting. The following are examples of
reversin gcamera message sint he
COMAN Ddisplay.
Activating/deactivating the reversing
camera X
To activate: make sure that the key is in
position 2in the ignition lock.
X Make sure that the func tion show reversing
camera display is selected in COMAND
Online.
X Engage reverse gear.
The area behind the vehicle is shown with
guide lines in the COMAN Ddisplay.
X To change the function mode for vehi-
cles with trailer tow hitch: using the
COMAND controller, select symbol :for
the "Reverse parking" func tion or sym-
bol ;for "Coupling up atrailer" (see the
separate COMAND Online operating
instructions).
Th es ymbol of the selected function is high-
lighted. 224
Driving systemsDrivin
gand pa rking
Page 228 of 441
To deactivate:
the reversing camera is deac-
tivated if you:
R sh iftt he transmission to position P
R drive for wards 10 m
R shift th etransmission from Rto another
positio n(after 15 seconds)
R driv eforwards at aspee dofover
10 km/h
Display sintheCOMAN Ddisplay G
WARNING
Usin gthe reversing camera ca nbedangerous
if you are colour-blind or if your abilit ytodis-
tinguish colours is impaired.
Only use th ereversing camera if you can see
and distinguish between all th ecoloured
guide lines that are displayed by the reversing
camera in the COMAN Ddisplay. G
WARNING
Please note that object snot at groun dlevel
may appear to be further away than they
actually are. These include:
R the bumper of avehicle that is parked
behind your vehicle
R at railer drawbar
R theb all coupling of atrailer tow hitch
R thet ail-end of alorry
R slanted posts
The lines are only guides, not accurate meas-
urements of the distance to an obstacle.
Therefore, you should never pass the red line
when approachin ganobstacle. You could oth-
erwise cause an accident and injur eyourself
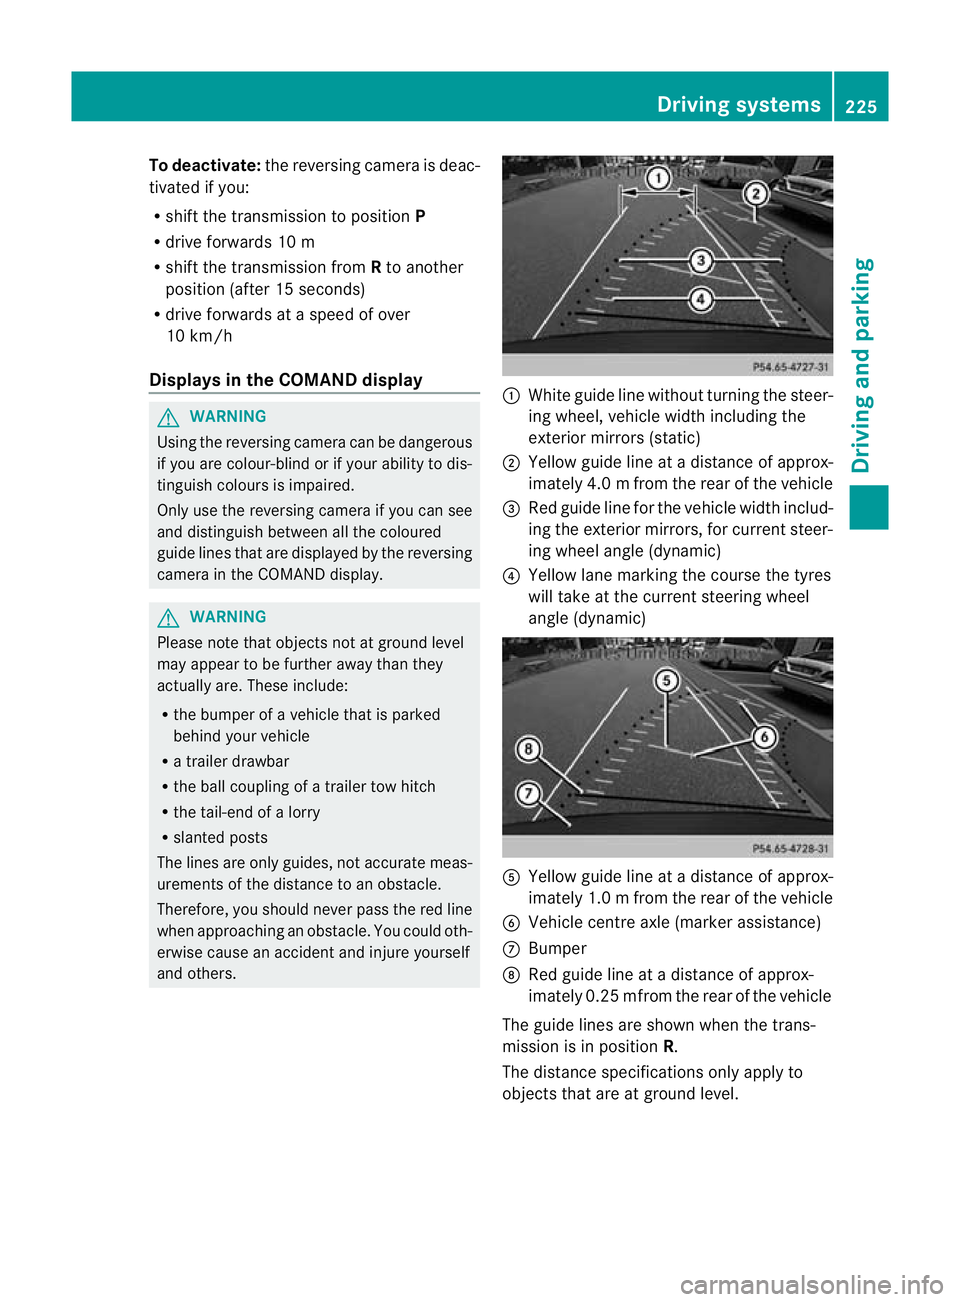
and others. :
White guide line without turnin gthe steer-
ing wheel, vehicle widt hincluding the
exterior mirrors (static)
; Yellow guid eline at adistance of approx-
imately 4.0 mfrom th erear of the vehic le
= Red guide line for the vehicl ewidth includ-
ing the exterior mirrors, for current steer-
ing whee langle (dynamic)
? Yellow lane marking the course the tyres
willtake at the current steering wheel
angle (dynamic) A
Yellow guide line at adistance of approx-
imately 1.0 mfrom th erear of the vehic le
B Veh icle centr eaxle (marker ass istance)
C Bumper
D Red guide line at adistance of approx-
imately 0.2 5mfrom th erear of the vehic le
Th eg uide lines are sho wn whenthe trans-
mission is in position R.
The distance specifications only apply to
object sthat ar eatground level. Dri
ving systems
225Driving and pa rking Z
Page 229 of 441
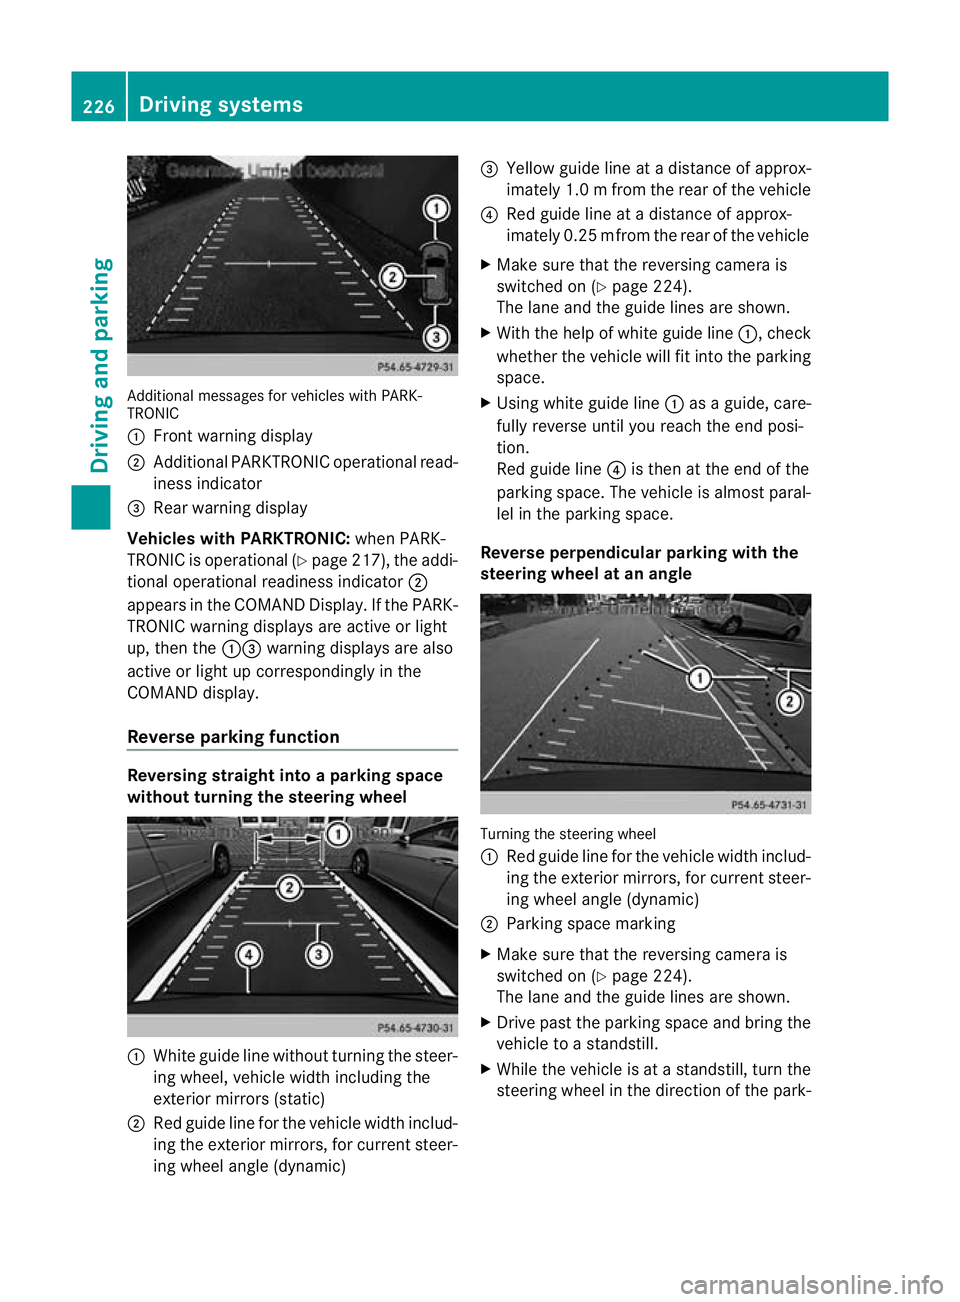
Additiona
lmessages for vehicles with PARK-
TRONIC
: Fron twarning display
; Additiona lPARKTRONIC operationa lread-
iness indicator
= Rear warning display
Veh icleswithP ARKTRONIC: when PARK-
TRONIC is operationa l(Y page 217), the addi-
tional operat iona lreadiness indicator ;
appears in the COMAN DDisplay. If the PARK-
TRONIC warnin gdisplays are active or light
up ,then the :=warnin gdisplays are also
active or light up correspondingl yinthe
COMAND display.
Reverse parkin gfunction Reversin
gstraight into aparkin gspace
withou tturning the ste eringwheel :
White gu idel ine without turning the steer-
ing wheel, vehicle width including the
exterior mirrors (static)
; Red guide line for the vehicle width includ-
ing the exterior mirrors, for current steer-
ing wheel angle (dynamic) =
Yellow guide line at adistance of approx-
imately 1.0 mfrom th erear of the vehic le
? Red guide line at adistance of approx-
imately 0.2 5mfrom th erear of the vehic le
X Ma ke sure that the reversing camera is
switched on (Y page224).
Th elane and the guide lines are sho wn.
X Wi th the hel pofwhite guide line :,check
whether the vehicle will fit into the parking
space.
X Using white guide line :asag uide, care-
fully reverse until you reach the end posi-
tion.
Red guide line ?is then at the end of the
parking space. The vehicle is almost paral-
lel in the parking space.
Reverse perpendicular parking with the
steering wheel at an angle Turning the steering wheel
:
Red guide line for the vehicle width includ-
ing the exterior mirrors, for current steer-
ing wheel angle (dynamic)
; Parking space marking
X Make sure that the reversing camera is
switched on (Y page 224).
The lane and the guide lines are shown.
X Drive past the parking space and bring the
vehicle to astandstill.
X While the vehicle is at astandstill, turn the
steering whee lint he direction of the park- 226
Driving systemsDriving and pa
rking
Page 231 of 441
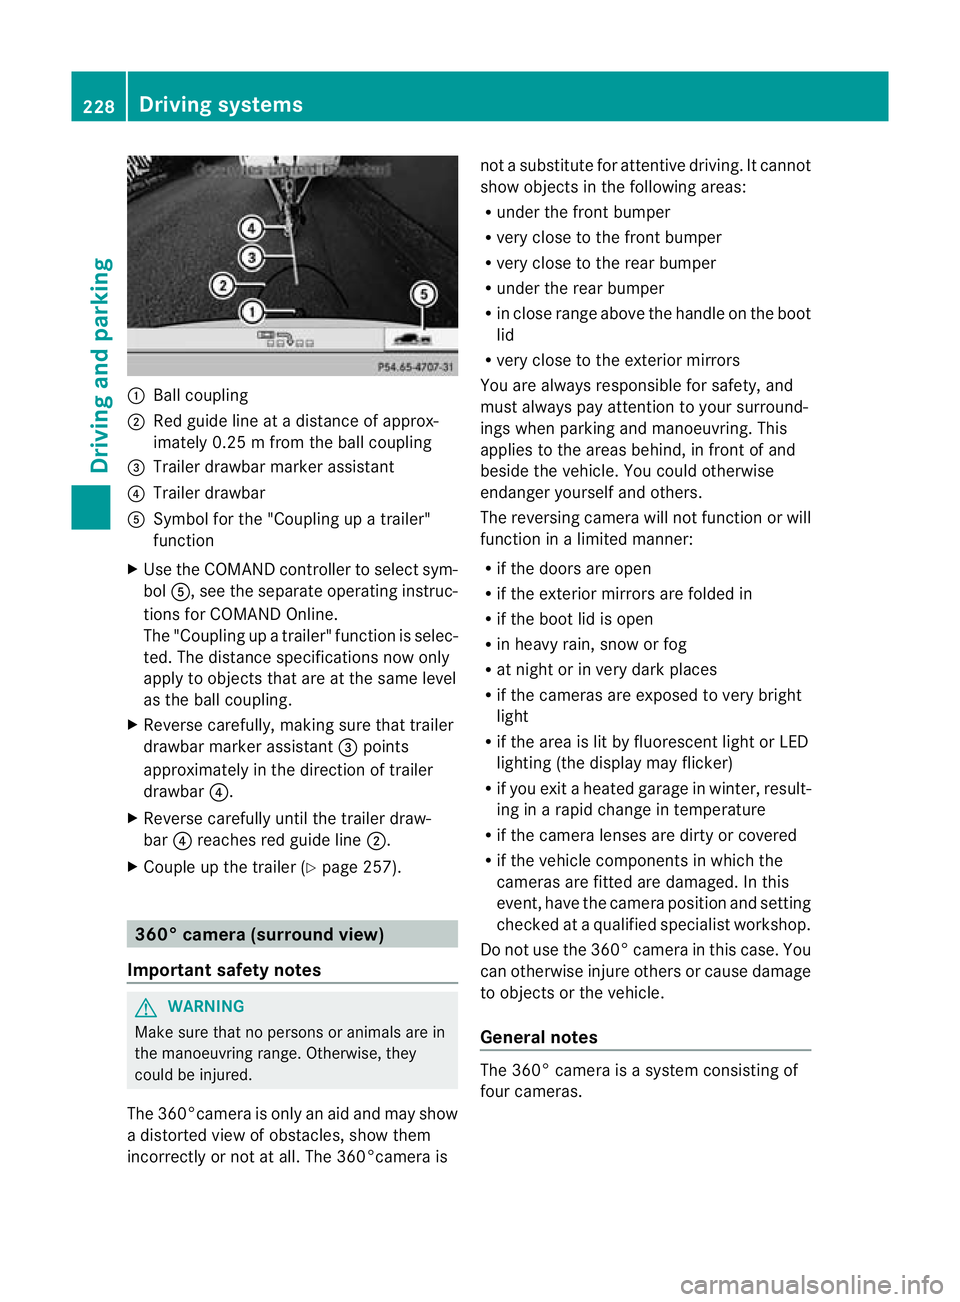
:
Ballcoupling
; Red guid elineatad istance of approx-
imately 0.25 mfromt he ball coupling
= Trailer drawbar marker assistant
? Trailer drawbar
A Symbol for the "Coupling up atrailer"
functi on
X Use th eCOM AND controlle rtoselect sym-
bol A,s ee the separate operating instruc-
tions for COMAN DOnline.
The "Coupling up atrailer" functio nisselec-
ted. The distance specification snow only
apply to objec tsthat are at the same level
as the ball coupling.
X Reverse carefully, making sure that trailer
drawbar marker assistant =points
approximately in the directio noftrailer
drawbar ?.
X Revers ecarefully until the trailer draw-
bar ?reaches red guide line ;.
X Couple up the trailer (Y page 257).360° camera (surround view)
Important safety notes G
WARNING
Make sure that no persons or animals are in
the manoeuvring range. Otherwise, they
could be injured.
The 360°camera is only an aid and may show
ad istorted view of obstacles, show them
incorrectly or not at all. The 360°camer aisnot
asubstitute for attentiv edriving. It cannot
sho wobjects in the following areas:
R under the fr ontb um per
R very clos etothe frontb um per
R very clos etothe rear bumper
R unde rthe rear bumper
R in close range abov ethe handle on th eboot
lid
R ver yclose to th eexter ior mirrors
You are always responsible for safety, and
must always pay attention to your surround-
ing sw hen par king and manoeuvring. This
applies to the areas behind ,inf ront of and
beside th evehicle. Yo ucould otherwise
endanger yoursel fand oth ers.
The rever sing camera will not functi on or will
function in alimited manner:
R if the doors are open
R if the exterior mir rors are folde din
R if the boot lid is open
R in heavy rain, snow or fog
R at night or in very dark places
R if the cameras are exposed to very bright
light
R if the area is lit by fluorescen tlight or LED
lightin g(the display may flicker)
R if you exit aheate dgarage in winter, result-
ing in arapid change in temperature
R if the camera lenses are dirt yorcovered
R if the vehicle component sinwhich the
cam erasare fitted are damaged .Inthis
event, hav ethe cam eraposition and setting
checked at aqualified specialist workshop.
Do not use the 360 °camer aint his case .You
can otherwise injur eothersorc ause damage
to object sorthe vehicle.
Ge neral notes The 360° camera is
asystem consisting of
four cameras. 228
Drivin
gsystemsDriving and parking
Page 232 of 441
The system evaluates images from the fol-
lowin gcameras:
R reversin gcamera
R fron tcamera
R two cameras in the exterior rear view mir-
rors
The cameras capture the immediate sur-
roundings of the vehicle. The system sup-
ports you, e.g. when parking or if vision is
restricted at an exit.
The 360 °camera images can be shown in full
screen mode or in seven different split-screen
views on the COMAND display. Asplit-screen
view also includes atop view of the vehicle.
This view is calculated from the data supplied
by the installed camera s(virtual camera).
Th e7s plit-screen views are:
R top view and picture from the reversing
camera (13 0°viewing angle)
R top view and picture from the fron tcamera
(without displaying the maximum steering
wheel angle)
R top view and enlarged rear view
R top view and enlarged front view
R top view and trailer view (vehicles with
trailer tow hitch)
R top view and pictures from the rearward
facin gmirror cameras (rear wheel view)
R top view and pictures from the forward
facin gmirror cameras (fron twheel view)
i The top vie wand trailer view are available
for vehicles equipped with atrailer tow
hitch.
When th efunction is active and you shift the
transmission from position Dor Rto N,y ou
see the previous view in the COMAN Ddis-
play. The dynamic guidelines are hidden.
When you change between transmission
positions Dand R,you see the previously
selected front or rea rview. Activation conditions The 360
°camera image can be displ ayed if:
R your vehicle is equip pedw ith the 360°
camera.
R COMAND Online is switched on, see the
separate COMAND Online operating
instruc tions.
R the 360° camera func
tion is activated
Activating th e360° camera using the
SYS but ton X
Press and hold the Wbutton for longer
than 2seconds, see the separate COMAND
Online operatin ginstructions.
Depe nding on whether position Dor Ris
engaged, the following is shown:
R full screen display with the image from
the fron tcamera
R full screen display with the image from
the rear camera.
Activating the 360° camer awith
COMAN DOnline X
Press the Wbutton, see the separate
COMAN DOnline operating instructi ons.
X Select System by turning
cVdthe
COMAND contr ollerand press Wto con-
firm.
X Select 360°camera and press
Wto con-
firm.
Depending on whethe rposition Dor Ris
engaged, the following is shown:
R as plit screen with top view and the
image from the front camera or
R as plit screen with top view and the
image from the reversing camera.
For further information about the COMAND
Controller, see the separat eCOMAN DOnline
operating instructions. Drivin
gsystems
229Drivingand pa rking Z
Page 233 of 441
Activating th
e360° camera using
revers egear You can show images from th
e360°c amera
automatically by engagin grevers egear.
X Mak esuret hat the key is in position 2in
th ei gnition lock.
X Mak esuret hat the Activation by R gear setting is ac
tive in COMAND Online,
se et he separa teCOMAND Onlin eoperat-
ing instructions.
X To sho wthe360° camera image: engage
revers egear.
The COMAND display show sthe ar ea
behind th evehicl einS plitS creen:
R vehicl ewithg uide lines
R top vie wofthe vehicle
Selec ting th esplit-screen and full
screen displays X
To switch between split-scree nviews:
switc htot he line with the vehi cles ymbols
by sliding ZVthe COMAND controller.
X Turn cVd the COMAND controlle rand
select one of the vehicle symbols.
X To switch to full scree nmode: select
Full scre en by tur
ning cVd the
COMAN Dcontroller and press Wto con-
firm.
Display sinthe COMAND display Important safety notes
!
Objec tsnot at ground level may appear to
be further away than they actually are, e.g.:
R the bumpe rofaparked vehicle
R the drawbar of atrailer
R theb all coupling of atrailer to whitch
R the rear section of an HGV
R as lanted post
Use the guidelines only for orientation.
Approach object snofurther than the bot-
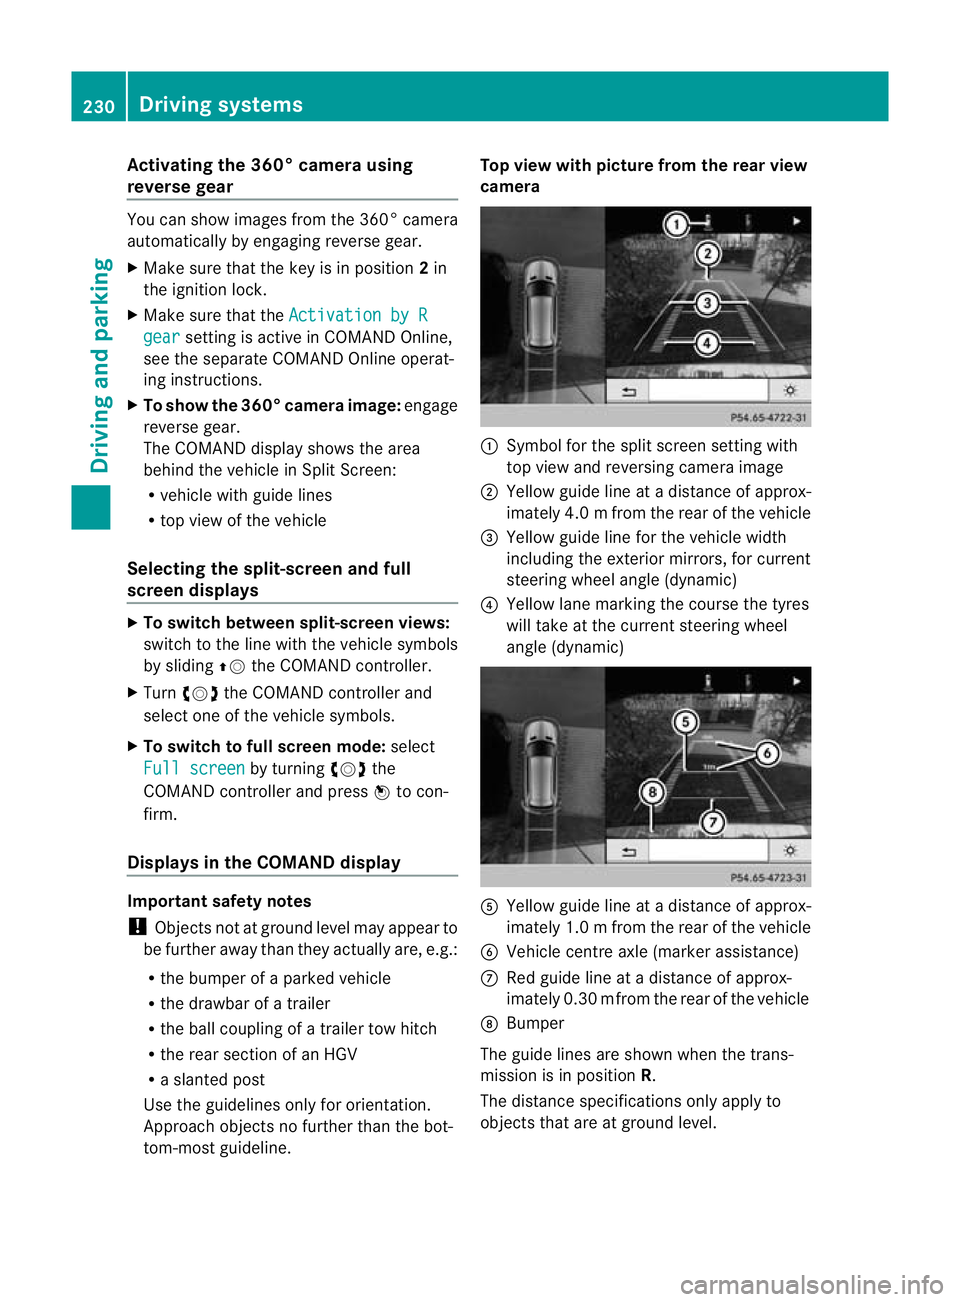
tom-most guidel ine. Top vie
wwith pictu re from the rear view
camera :
Symbol for the split screen settin gwith
top view and reversing camera image
; Yellow guide line at adistance of approx-
imately 4.0 mfrom th erear of the vehic le
= Yellow guide line for the vehicle width
including the exterior mirrors, for current
steering whee langle (dynamic)
? Yellow lane marking the course the tyres
wil ltake at the current steering wheel
angle (dynamic) A
Yellow guide line at adistance of approx-
imately 1.0 mfrom th erear of the vehic le
B Veh icle centr eaxle (marker ass istance)
C Red guide line at adistance of approx-
imately 0.3 0mfrom th erear of the vehic le
D Bumper
Th eg uide lines are sho wn whenthe trans-
mission is in position R.
The distance specifications only apply to
object sthat ar eatground level. 230
Dri
ving systemsDriving and pa rking
Page 235 of 441
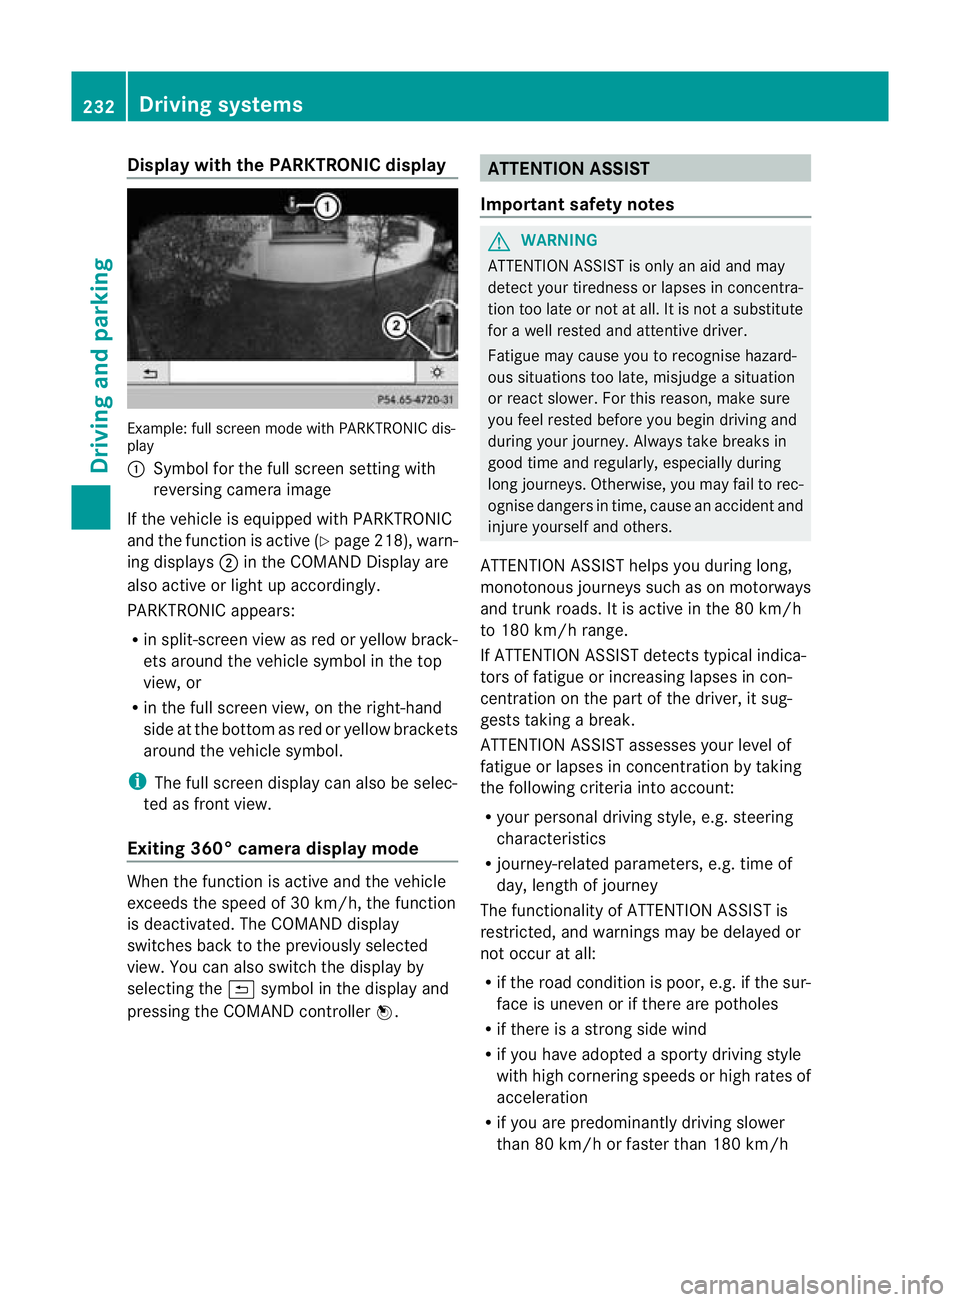
Display wit
hthe PARKTRONIC display Exam
ple:full scree nmode with PARKTRONI Cdis-
play
: Symbol for the full screen setting with
reversing camer aimage
If th evehicle is equipped with PARKTRONIC
and the function is active (Y page 218), warn-
ing displays ;in the COMAN DDisplay are
also activ eorlight up accordingly.
PARKTRONIC appears:
R in split-screen view as red or yellow brack-
ets around the vehicle symbol in the top
view, or
R in the full screen view, on the right-hand
side at the bottom as red or yellow brackets
around the vehicle symbol.
i The full screen display can also be selec-
ted as front view.
Exiting 360° camera display mode When the func
tion is active and the vehicle
exceeds the speed of 30 km /h,the func tion
is deactivated. The COMAN Ddisplay
switches back to the previously selected
view. You can also switch the display by
selecting the &symbol in the display and
pressing the COMAND controller W. ATTENTION ASSIST
Important safet ynotes G
WARNING
ATTENTION ASSIST is only an aid and may
detect your tiredness or lapses in concentra-
tion too late or not at all. It is not asubstitute
for aw ell reste dand attentiv edriver.
Fatigue may cause yo utorecognise hazard-
ous situations to olate ,misjudge asituation
or reac tslower .For this rea son, make sure
you fee lreste dbefore you begin driving and
duri ngyour jour ney. Always tak ebreaks in
good time and regularly ,especiall yduring
long jour neys. Otherwise ,you may fai ltorec-
ognise danger sint ime, caus eanaccidentand
injur eyours elfa nd others.
ATTENTIO NASSIST he lpsy ou durin glon g,
mon otonous journeys such as on motorways
and trunk roads. It is act iveint he 80 km/h
to 18 0km/h range.
If ATTENTIO NASSIST detects typica lindica-
tors of fatigu eorincreasing lapse sincon-
centr ation on the part of the driver, it sug-
gests taking abreak.
ATTENTIO NASSIST asse sses your level of
fat igue or lapse sinconcentr ation by taking
the following crit eria into account:
R your persona ldriving st yle, e.g. steering
characteristics
R journey-relate dparameters ,e.g. time of
day, length of journey
Th ef unctionality of ATTENTIO NASSIST is
restricted, and warning smay be delaye dor
not occu ratall:
R if the road condition is poor, e.g. if the sur-
face is uneven or if there are potholes
R if there is astrong sid ewind
R if you have adopted asport ydrivi ng style
wit hh igh cornering speeds or high rates of
acceleration
R if you are predominantly drivin gslower
than 80 km/h or faster than 180 km/h 232
Drivin
gsystemsDrivin gand parking
Page 236 of 441
R
if you are cur rently using COM ANDOnline
or ma kingatelephon ecall with it
R if the tim ehas been set incorrectly
R in active drivin gsituations, such as when
you change lanes or change your speed
Warning and display messages in the
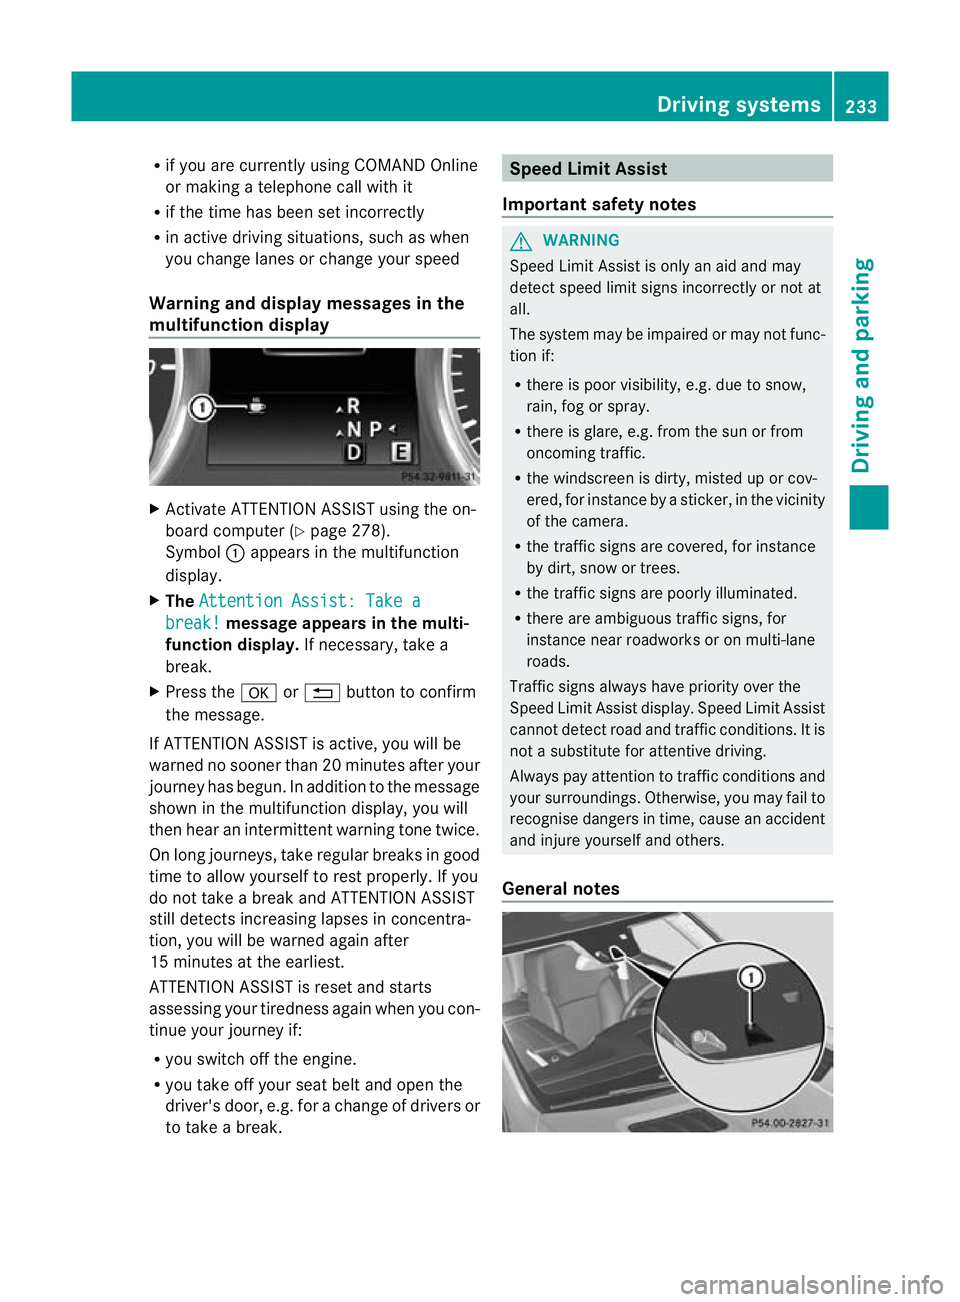
multifunction display X
Activate ATTE NTION ASSIS Tusing the on-
boar dcomputer (Y page 278).
Symbol :appears in the multifunction
display.
X The Attentio nA ssist: Take a break! mess
agea ppears in th emulti-
function display. If necessary, takea
break.
X Press the aor% button to confirm
the message.
If ATTENTION ASSI STis active, you will be
warne dnosooner than 20 minutes after your
journey has begun. In additio ntothe message
shown in the multifunc tion display, you will
then hear an intermit tent warning tone twice.
On long journeys ,take regular breaks in good
time to allow yourself to rest properly. If you
do not take abrea kand ATTENTION ASSIST
stil ldetect sincreasing lapses in concentra-
tion, you will be warned agai nafter
15 minutes at th eearliest.
ATTENTION ASSIST is reset and starts
assessing your tiredness again when you con-
tinue your journey if:
R you switch off the engine.
R you take off your seat belt and open the
driver' sdoor, e.g. for achange of driver sor
to take abreak. Speed Limit Assist
Important safety notes G
WARNING
Speed Limit Assis tiso nly an aid and may
detect speed limit signs incorrectly or not at
all.
The system may be impaired or may not func-
tion if:
R there is poo rvisibility, e.g. due to snow,
rain, fog or spray.
R there is glare, e.g. from the sun or from
oncoming traffic.
R the windscreen is dirty, misted up or cov-
ered, for instance by asticker, in the vicinity
of the camera.
R the traffic signs are covered, for instance
by dirt, snow or trees.
R the traffic signs are poorly illuminated.
R there are ambiguous traffic signs, for
instance near roadworks or on multi-lane
roads.
Traffic signs alway shave priority over the
Speed Limit Assis tdisplay .Speed Limit Assist
cannot detec troad and traffic conditions. It is
not asubstitute for atten tivedriving.
Alway spay atten tion to traffic condition sand
your surroundings. Otherwise ,you may fai lto
recognise dangers in time ,cause an accident
and injure yourself and others.
General notes Driving systems
233Drivingand parking Z
Page 237 of 441
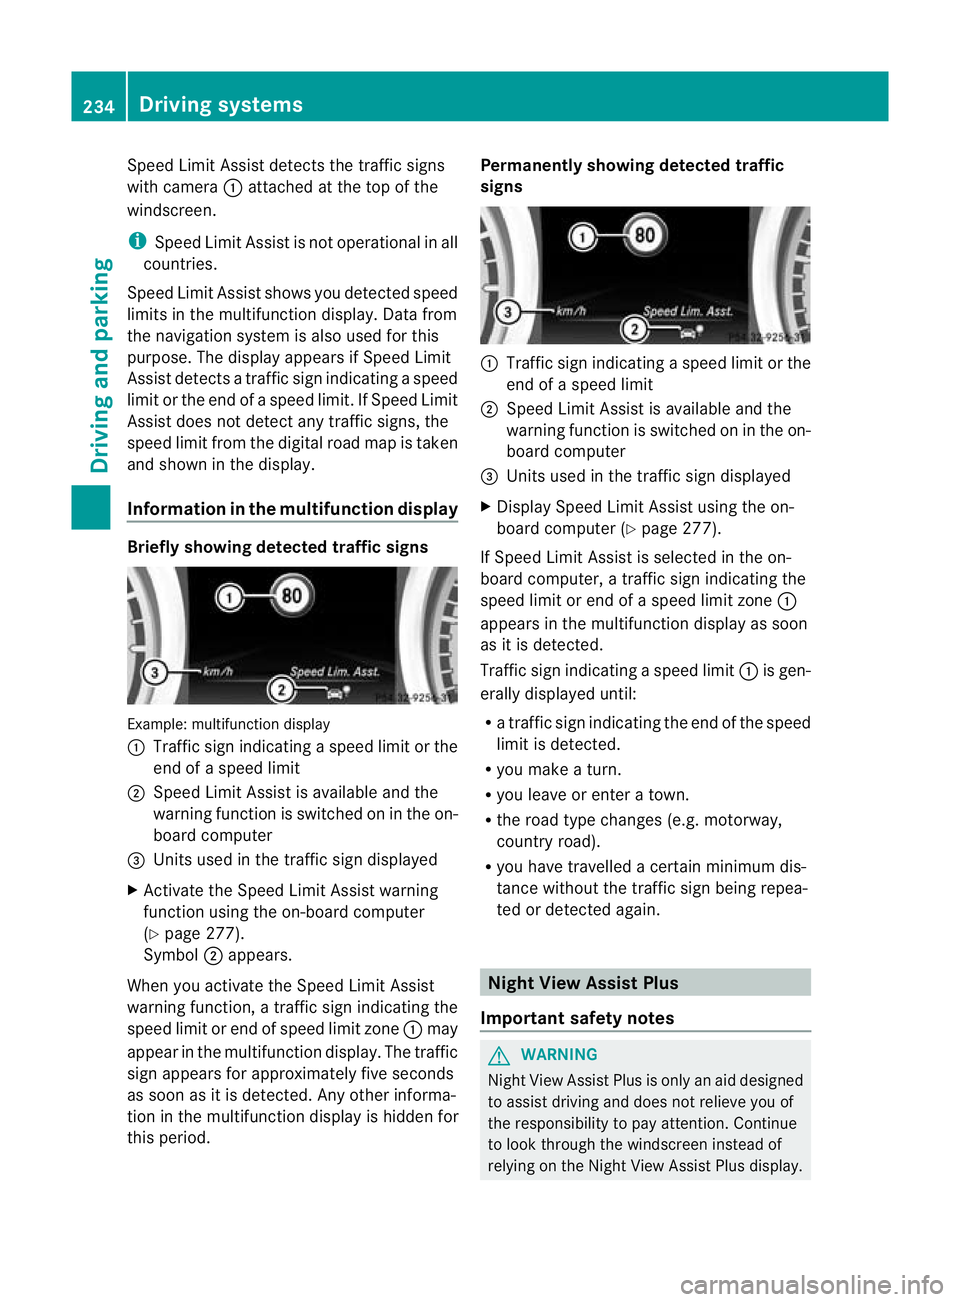
Speed Limi
tAssist detect sthe traffi csigns
with cam era:attached at the top of the
windscreen.
i Speed Limit Assist is not operationa linall
countries.
Speed Limit Ass ists hows you detected speed
limits in the mu ltifunction display .Data from
the navigation system is also used for this
purpose. The display appears if Speed Limit
Assist detect satraffic sign indica ting aspeed
limit or th eend ofas peed limit .IfSpeed Limit
Assist does not detec tany traffic signs ,the
speed limit from the digital road map is tak en
and shown in the display.
Informatio ninthe mult ifunction display Briefly showing detecte
dtraffic signs Examp
le:m ultifunctio ndisplay
: Traffic sign indicatin gaspeed limit or the
end of aspeed limit
; Speed Limit Assist is available and the
warning fun ction is switched on in the on-
board computer
= Unit sused in the traffi csign displayed
X Activat ethe Speed Limi tAssist warning
function usin gthe on-boar dcompu ter
( Y page 27 7).
Symbol ;appears.
When you activate the Spee dLimit Assist
warnin gfunction, atraffic sign indicating the
spee dlimit or end of speed limit zone :may
appear in the multifunction display. The traffic
sign appears for approximately fiv eseconds
as soon as it is detected. An yother informa-
tion in the multifunction display is hidden for
this period. Permanently showing detected traffic
signs
:
Traffic sig nindicating aspeed limit or the
end of aspeed limit
; Speed Limit Assist is available and the
warning fun ction is switched on in the on-
board computer
= Unit sused in the traffi csign displayed
X Display Speed Limit Assist using the on-
board computer (Y page 277).
If Speed Limit Assist is selected in the on-
board computer, atraffic sign indicating the
spee dlimit or end of aspeed limit zone :
appear sinthe multifunction displa yassoon
as it is detected.
Traffic sign indicating aspeed limit :is gen-
erall ydisplayed until:
R at raffic sign indicating th eend of the speed
limit is dete cted.
R you mak eaturn.
R you leave or enter atown.
R the roa dtype changes (e.g. motorway,
country road).
R you have travelle dacertain minimu mdis-
tanc ewithout the traffic sign being repea-
ted or detected again. Night View Assist Plus
Importan tsafety notes G
WARNING
Nigh tView Assist Plus is only an aid designed
to assist drivin gand doe snot relieve you of
the responsibilit ytopay attention. Continue
to look through the windscreen instead of
relying on the Night View Assis tPlus display. 234
Drivin
gsystemsDrivin gand parking