seat adjustment MERCEDES-BENZ GL SUV 2012 Owners Manual
[x] Cancel search | Manufacturer: MERCEDES-BENZ, Model Year: 2012, Model line: GL SUV, Model: MERCEDES-BENZ GL SUV 2012Pages: 441, PDF Size: 10.66 MB
Page 49 of 441
the seat back. There is
arisk thatthe seats
and/or the objec ts could be damaged.
PRE-SAFE ®
takes pre-emptive measures to
protect occupants in certain hazardous sit-
uations.
PRE-SAFE ®
intervenes:
R if BAS activates, e.g. in emergency braking
situations
R if BAS PLUS intervenes powerfull y—on
vehicles wit hDISTRONIC PLUS
R if, on vehicles with DISTRONIC PLUS, the
radar sensor system detects an imminent
dang er of collision in cer tain situations
R in critical drivin gsituations, e.g. when phys-
ical limits are exceeded and the vehicle
understeers or oversteers severely
PRE-SAFE ®
takes the following measures
depending on the hazardous situation detec-
ted:
R the front seat belts are pre-tensioned.
R vehicles with the memor yfunction: the
front-passenger seat is adjusted if it is in an
unfavourable position.
R vehicles with amulticontour seat: the air
pressure in the side bolsters of the back-
rest is increased.
R if the vehicle skids ,the slidin gsunroof/
panorama sliding sunroof and the side win-
dows are closed so that only asmall gap
remains.
If th ehazardous situation passe swithout
resulting in an accident ,PRE-SAFE ®
slackens
the belt pretensioning. On vehicles with mul-
ticontour seats ,the air pressur einthe side
bolster sisreduced again. All settings made
by PRE- SAFE®
can the nbereversed.
If the seat belts are not released:
X Move the backrest or seat back slightly, but
only when the vehicle is stationary.
The belt pretensioning is reduced and the
locki ng mech anism is released.
More information about seat belt adjustment,
ac onvenien ce function integ rated into PRE- SAFE
®
,c an be found in the "Seat belt adjust-
ment "section (Y page 48). Seat belts
Important safety notes G
WARNING
As eat belt which is not worn correctly, or
which has not been engaged in the seat belt
buckle correctly, can notp rovide th eintended
level of protection. Under certain circumstan-
ces, this could cause severe or even fatal inju-
ries in the event of an accident.
Therefore, make sure that all occupants —in
particular ,pregnant women —wear their seat
belts cor rectly at all times.
R Th es eat belt must fit snugly on your body
and must not be twisted.Therefore, avoid
wearing bulky clothing, e.g. awinter coat.
The shoulder section of the belt must be
routed across the centre of your shoulder
—onnoa ccount acros syour nec korunder
your arm —and pulled tight against your
uppe rbody. The lap belt must always pass
across your lap as low down as possible, i.e.
over your hip join ts—n ot across your abdo-
men .Ifn ecessary, push the seat belt
slightly downwards and adjust it by pulling
it in the direction the seat belt retracts.
R Do not rout ethe seat belt strap over sharp
or fragile objec ts.P lease make sure that
such object sare not on or in your clothing,
e.g .spectacles, pens or keys etc. The seat
belt strap could become damaged and tear
durin gana ccident and you or other vehicle
occupants coul dbeinjured.
R Only one person should use each sea tbelt
at any one time. Children must never travel
sittin gont he lap of another occupan t.The
child will not be secured in the even tofan
accident ,heavy braking or sudden change
of direction .This ma yresult in the child or
other occupants being seriously or fatally
injured. 46
Occupant safetySafety
Page 50 of 441
R
Persons under 1. 50mtall cannot wear the
seat belts correctly. For this reason secure
person sless than 1.50 mtall in specially
designed, suitable restraint systems.
R Children under 1. 50mt all and younger
than twelv eyears of age canno twear the
seat belts cor rectly. For thi sreason secure
them in special suitable child restraint sys-
tems installed on asuitable seat. Additional
information can be found in the Operating
Instructions in the chapter "Safety", "Chil-
dren in the Vehicle". Observe the installa-
tion instructions of the child restraint sys-
tem manufac turer.
R Do not secure an object wit haseat belt if
the seat belt is also being used by one of
the vehicle's occupants. G
WAR
NING
The seat belt doe snot offer the intended level
of protection unless the back rest is almost
ver tical. Under certain circumstances, this
coul dcause severe or even fatal injuries in the
event of an accident.
Befor estarting ajourney, mak esure that the
seat is properly adjusted and that the back-
rest is almost vertical. G
WARNING
Ad irtyo rdamaged seat belt or one that has
been modified or subjected to aload in an
accident no longer offers the intended level of
protection. Un dercertain cir cumstances, this
could caus esever eoreven fatal injurie sinthe
even tofana ccident.
For thi sreason ,chec kregularly that the seat
belts are not damaged or dirty.
Alway shave damaged seat belts or seat belts
that have been subjected to aload in an acci-
dent replaced at aqualified specialist work-
shop.
For safety reasons, Mercedes -Benz recom-
mends that you only use seat belts which have
been approved by Mercedes-Benz for your
vehicle. Seat belts are the most effectiv
emeans of
restraining the movemen tofvehicle occu-
pant sint he even tofanaccident. This
reduce sthe risk of vehicle occupan tscoming
into contact with parts of the vehicle interior.
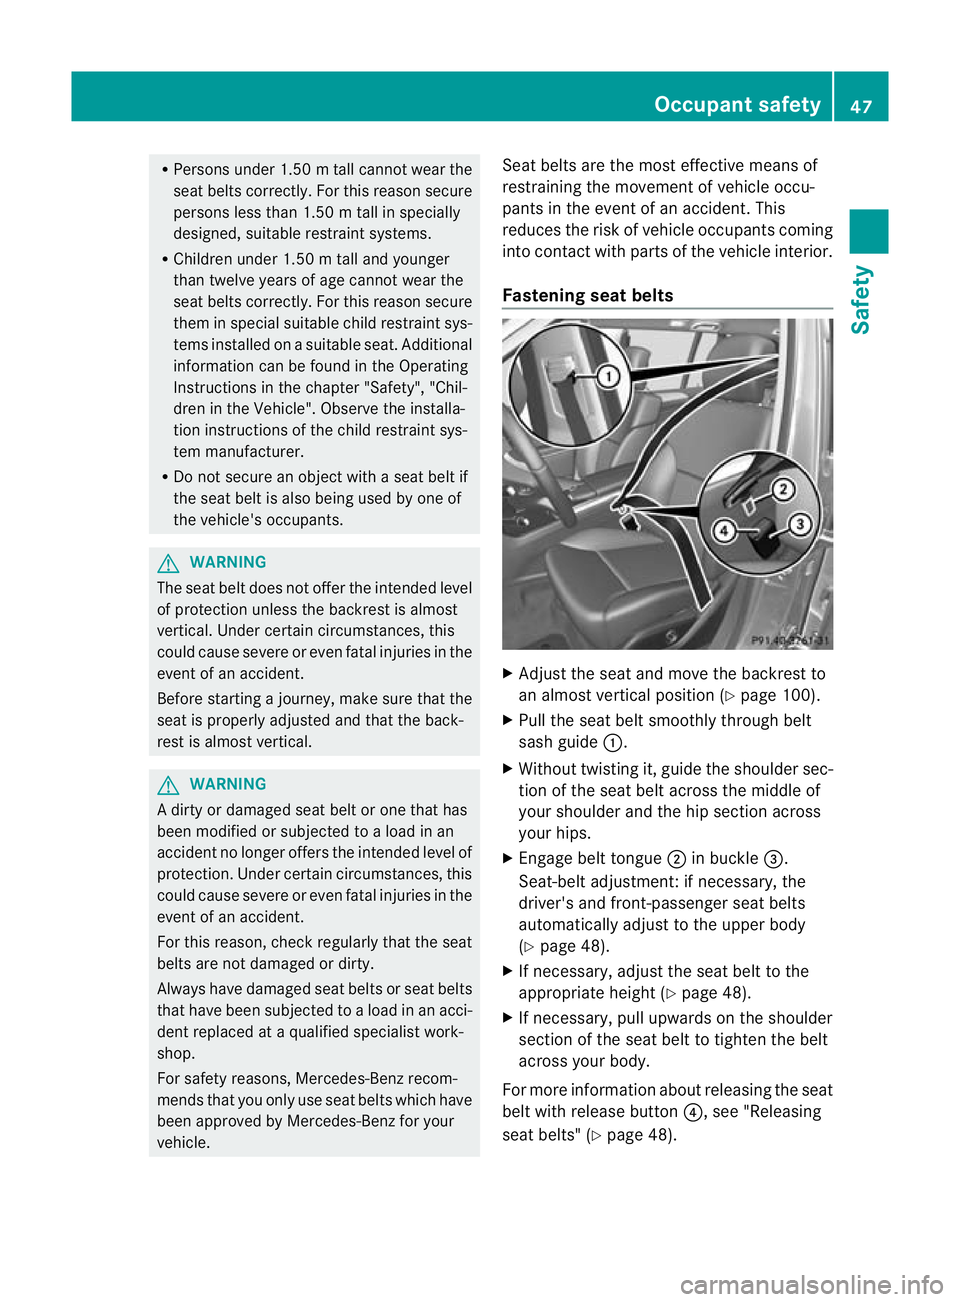
Fastenin gseat belts X
Adjust the seat and move the backrest to
an almost vertical position (Y page 100).
X Pull the seat belt smoothly through belt
sash guide :.
X Without twistin git, guid ethe shoulder sec-
tion of the seat belt across the middle of
your shoulder and the hip section across
your hips.
X Engage belt tongue ;in buckle =.
Seat-belt adjustment :ifnecessary, the
driver' sand front-passenger sea tbelts
automatically adjust to the upper body
(Y page 48).
X If necessary, adjust the seat belt to the
appropriate height (Y page 48).
X If necessary, pull upwards on the shoulder
section of the seat belt to tighten the belt
across your body.
For mor einformation about releasing the seat
bel tw ith release button ?,see "Releasing
seat belts" (Y page 48). Occupant safety
47Safety Z
Page 51 of 441
Sea
tbelt adjustment The seat-belt adjustment func
tion adjusts the
driver's and front-passenger seat belt to the
upper body of the occupants.
The belt strap is tighte neds lightly when:
R you engage the belt tongue in the belt
buckle and you then turn the key to position
2in the ignition lock.
R the key is in position 2in the ignition lock
and you then engage the belt tongue in the
buckle.
The seat-belt adjustment will apply acertain
tightening force if any slack is detected
between the occupant and the seat belt. Do
not hold on to the seat belt tightly while it is
adjusting. You can switch the seat-belt
adjustmen tonand off in the on-board com-
puter (Y page285).
Th es eat-belt adjustmen tisani ntegral part of
the PRE-SAFE ®
convenience function. More
information abou tPRE-SAFE ®
can be found
under "PRE-SAFE ®
(preventative occupant
protection)" (Y page 45).
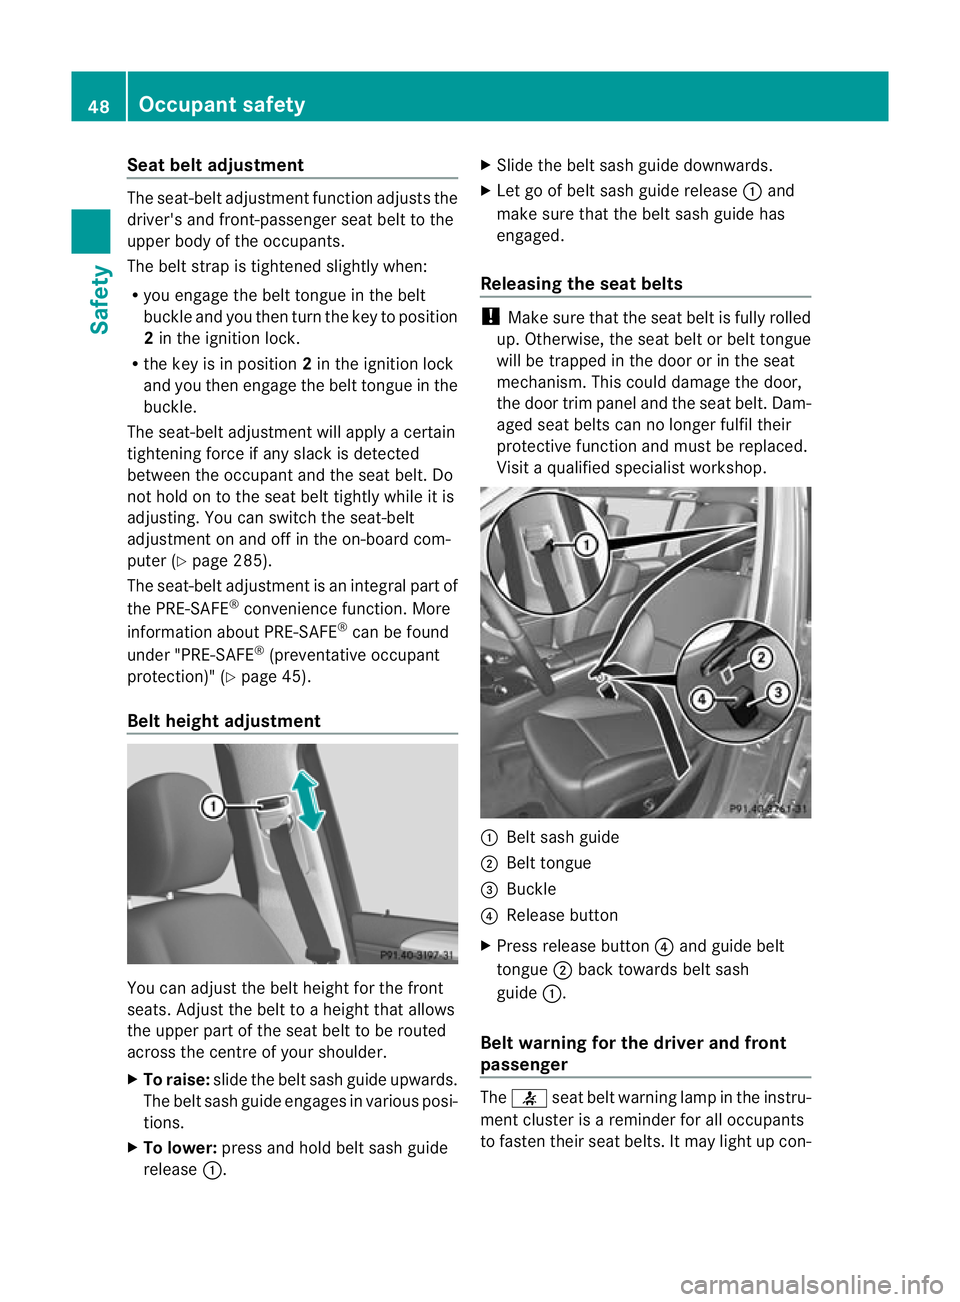
Belt height adjustment You can adjust the belt height for the front
seats
.Adjust the belt to aheight that allows
the upper part of the seat belt to be routed
across the centre of your shoulder.
X To raise: slide the belt sash guide upwards.
The belt sash guide engages in various posi-
tions.
X To lower: press and hold belt sash guide
release :. X
Slide the belt sash guide downwards.
X Let go of belt sash guide release :and
mak esure that the belt sash guide has
engaged.
Releasing the seat belts !
Make sure that the seat belt is fully rolled
up. Otherwise, the seat belt or belt tongue
will be trapped in the door or in the seat
mechanism. This could damage the door,
the door trim panel and the seat belt. Dam-
aged seat belts can no longer fulfil their
protective function and must be replaced.
Visit aqualified specialist workshop. :
Belt sash guide
; Belt tongue
= Buckle
? Release button
X Press release button ?and guide belt
tongue ;back towards belt sash
guide :.
Belt warning for the driver and front
passenger The
7 seat belt warning lamp in the instru-
ment cluster is areminder for all occupants
to fasten their seat belts. It may light up con- 48
Occupant safetySafety
Page 103 of 441
Usefu
linfor mati on
i This Owner's Manual describes all mod-
els, series and optional equipment for your
vehicle that were available at the time of
going to press. National variation sare pos-
sible. Note that your vehicl emay not be
equippe dwith all of the function sdescri-
bed. This is also the case for system sand
functions relevant to safety.
i Read the information on qualified special-
ist workshops: (Y page25). Correc
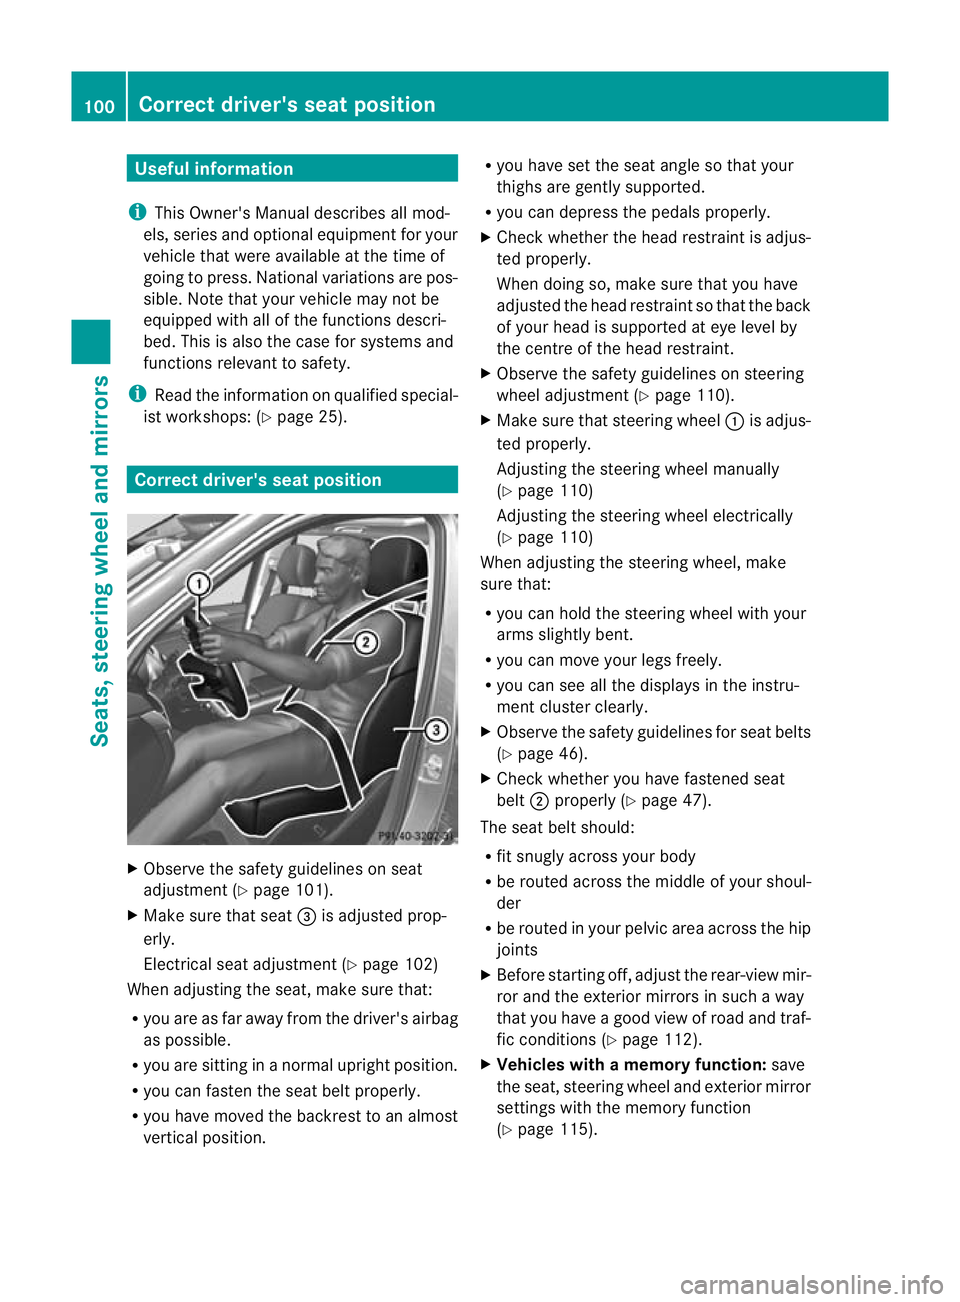
tdriver' sseat position X
Observ ethe safet yguideline sonseat
adjustmen t(Y page 10 1).
X Make sur ethat seat =is adjusted prop-
erly.
Electrical seat adjustmen t(Y page 10 2)
When adjusting the seat, mak esure that:
R you are as far away from the driver' sairbag
as possible.
R you are sitting in anorma lupright position.
R you can faste nthe seat belt properly.
R you hav emoved the backrest to an almost
vertical position. R
you have set the seat angle so that your
thighs ar egently supported.
R you can depress the pedals properly.
X Check whether the head restraint is adjus-
ted properly.
When doing so, mak esure that you have
adjusted the head restraint so that the back
of your head is supported at eye level by
the centre of the head restraint.
X Observe the safety guidelines on steering
wheel adjustment (Y page 110).
X Make sure that steering wheel :is adjus-
ted properly.
Adjusting the steering wheel manually
(Y page 110)
Adjusting the steering wheel electrically
(Y page 110)
When adjusting the steering wheel ,make
sure that:
R you can hold the steering wheel with your
arms slightly bent.
R you can move your legs freely.
R you can see all the displ aysint he instru-
men tcluster clearly.
X Observe the safety guidelines for seat belts
(Y page 46).
X Check whether you have fastened seat
belt ;properly (Y page 47).
The seat belt should:
R fit snugly across your body
R be routed across the middle of your shoul-
der
R be routed in your pelvic area across the hip
joints
X Befor estartin goff, adjus tthe rear-view mir-
ror and the exterior mirrors in such away
that you have agood view of roa dand traf-
fic conditions (Y page112).
X Vehicle switham emory function: save
the seat, steering wheel and exterior mirror
settings with the memor yfunction
(Y page 115). 100
Correct driver's seat positionSeats, steerin
gwhee land mirrors
Page 105 of 441
i
Further related subjects:
R Luggage compartment enlargement
(folding do wnthe rear bench seat)
(Y page 341) Adjustin
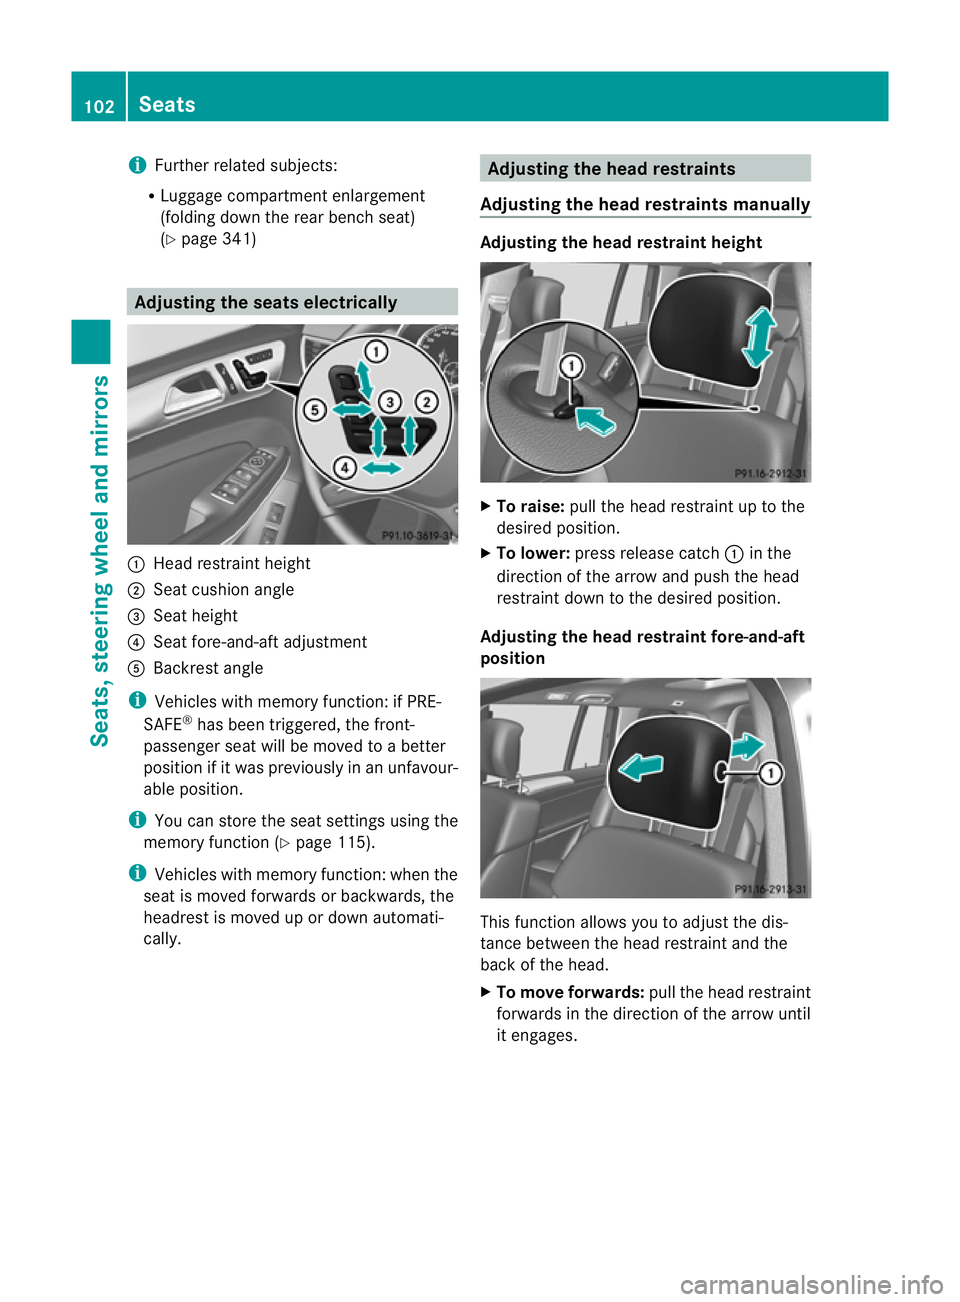
gthe seats electrically :
Hea drestraint height
; Seat cushion angle
= Seat height
? Seat fore-and-aft adjustment
A Backrest angle
i Vehicles with memory function: if PRE-
SAFE ®
has been triggered, the front-
passenger seat will be moved to abetter
position if it was previously in an unfavour-
able position.
i You can store the seat settings using the
memory function (Y page 115).
i Vehicles with memory function: when the
seat is moved forwards or backwards, the
headrest is moved up or down automati-
cally. Adjusting the hea
drestraints
Adjusting the head restraints manually Adjusting the head restraint height
X
To raise: pull the head restrain tuptot he
desired position.
X To lower: press release catch :in the
direction of the arrow and push the head
restraint down to the desired position.
Adjusting th ehead restraint fore-and-aft
position This func
tion allows you to adjust the dis-
tance between the head restraint and the
back of the head.
X To move forwards: pull the head restraint
forwards in the direction of the arrow until
it engages. 102
SeatsSeats, steering wheel and mirrors
Page 106 of 441

There are
anumber of detents.
X To move backwards: press and hold
release button :and push the head
restraint backwards.
X When the head restraint is in the desired
position, release the button and make sure
that the head restraint is engage dinposi-
tion.
Adjusting th ehead restraints electri-
cally X
To adjust the head restraint height: slide
the switch for head restraint adjustment
(Y page 102 )upordown in the direction of
the arrow.
Adjusting th eluxury head restraints Th
e1 st row of seat shas luxury head
restraints.
X To adjust the side bolsters of the head
restraint: push or pull right and/or left-
hand side bolster :into the desired posi-
tion.
X To adjust the fore-and-af tposition of
the head restraint: push or pull the head
restraint in the direction of arrow ;.Rear seat head restraints Adjusting the rear seat head restraint
height
X
Onc ethe head rest raint is fully lowered,
press release catch :.
X To raise: pull the head restraint up to the
desired position.
X To lower: press release catch :and push
the head restraint down until it is in the
desired position.
Adjusting the rear seat hea drestraint
angle Adjust the head restraints so that they are as
close as possible to your head.
You can only adjust the two outer head
restraints.
X
Using both hands, reach back and grasp
the sides of the head restraint.
X Pull the lower edge of the head restraint
forwards or back until it is in the desired
position. Seats
103Seats, steering wheel and mirrors Z
Page 113 of 441
Problems wit
hthe seat ventilation Th
es eat ven tilation has switched off prema-
turely or cannot be switched on. The vehicle's
electrical system voltage is too low because
too many electrical consumer sare switched
on.
X Switch off electrica lconsumers that you do
not need, such as the rea rwindow heating
or interior lighting. Steering wheel
Important safet
ynotes G
WARNING
Do not adjust the steering wheel while driving.
Adjusting the steering wheel while driving, or
drivin gwithout the steering wheel adjustment
featur elocked coul dcause the driver to lose
control of the vehicle.
The electrical steering wheel adjustment fea-
ture can be operated at any time. Therefore,
do not leave children unattended in the vehi-
cle, or with access to an unlocked vehicle. A
child's unsupervised access to avehicle could
result in an accident and/or serious personal
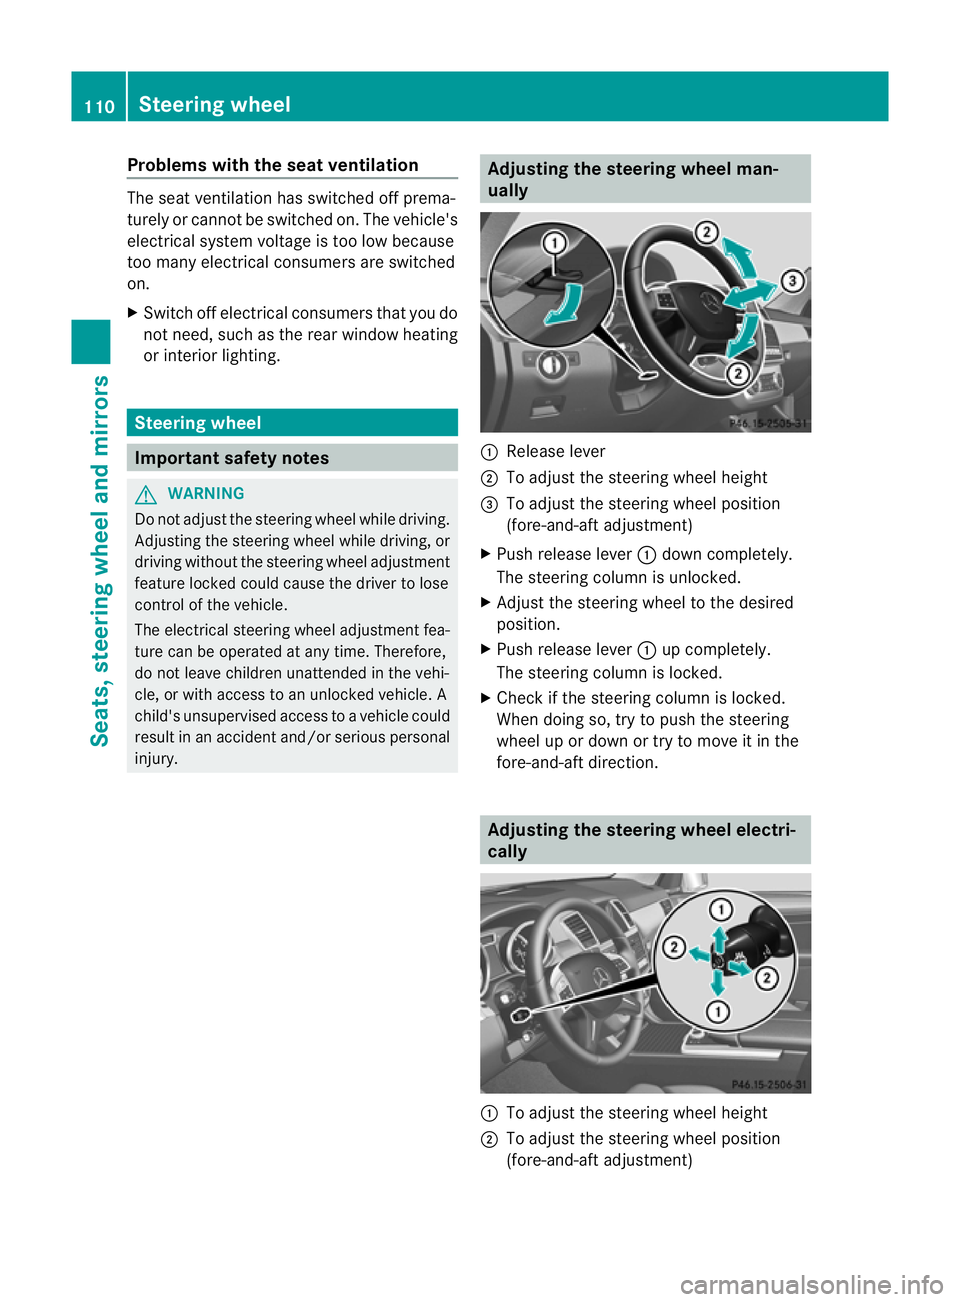
injury. Adjusting the steering whee
lman-
ually :
Release lever
; To adjus tthe steering wheel height
= To adjust the steering wheel position
(fore-and-af tadjustment)
X Push release lever :down completely.
The steerin gcolum nisu nlocked.
X Adjus tthe steering wheel to the desired
position.
X Push release lever :up completely.
The steering column is locked.
X Chec kifthe steering column is locked.
When doing so, tr ytopush the steering
wheel up or down or try to move it in the
fore-and-aft direction. Adjusting the steering wheel electri-
cally :
To adjust the steering wheel height
; To adjust the steering wheel position
(fore-and-aft adjustment) 110
Steering wheelSeats, steerin
gwhee land mirrors
Page 114 of 441
i
Further related subjects:
R EASY-ENT RY/EXIT feature
(Y page 111)
R storing setting s(Ypag e115) Ste
ering wheel heating
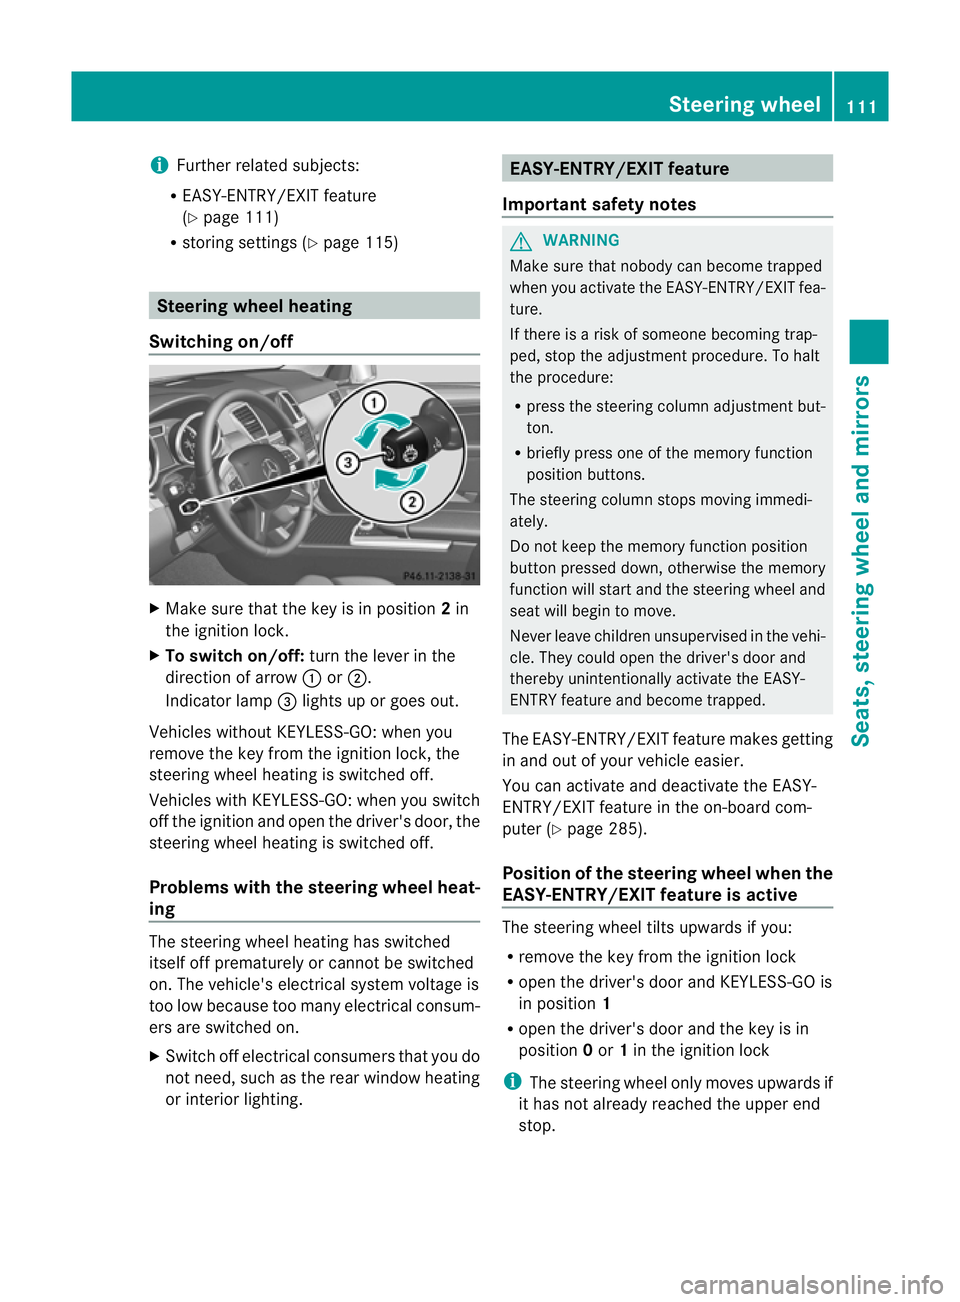
Switchin gon/off X
Make sure that the key is in position 2in
the ignition lock.
X To switch on/off: turn the lever in the
direction of arrow :or;.
Indicator lamp =lights up or goe sout.
Vehicles without KEYLESS-GO: when you
remove the key from the ignition lock, the
steering wheel heating is switched off.
Vehicles with KEYLESS-GO: when you switch
off the ignition and open the driver' sdoor, the
steerin gwheel heating is switched off.
Problems wit hthe steering whee lheat-
ing The steerin
gwheel heating has switched
itsel foff prematurely or cannot be switched
on. Th evehicle' selectrical system voltage is
too low because too many electrical consum-
ers are switched on.
X Switc hoff elect rical consumers that you do
not need, such as the rear window heating
or inte rior lighting. EASY-ENTRY/EXIT feature
Important safety notes G
WARNING
Make sur ethat nobody can becom etrapped
when you activate th eEASY-ENTRY/EXI Tfea-
ture.
If there is arisk of someon ebecomin gtrap-
ped, stop th eadjustment procedure. To halt
the procedure:
R press the steerin gcolum nadjustment but-
ton.
R briefly press one of the memory fun ction
position buttons.
The steerin gcolum nstops moving immedi-
ately.
Do not keep the memory function position
button pressed down, otherwise the memory
function will start and the steerin gwheel and
seat will begin to move.
Never leav echildren unsupervised in the vehi-
cle. They coul dopen the driver' sdoor and
thereby unin tentionally activate the EASY-
ENTRY feature and become trapped.
The EASY-ENTRY/EX ITfeature make sgetting
in and out of your vehicle easier.
You can activa teand deactivat ethe EASY-
ENTRY/ EXIT feature in th eon-board com-
puter (Y page285).
Positio nofthe steering whee lwhen the
EASY-ENTRY/EXIT feature is active Th
es teering whee ltilts upwards if you:
R remov ethe key from the ignition lock
R open the driver's door and KEYL ESS-GO is
in position 1
R ope nthe driver's door and the key is in
position 0or 1in the ignition lock
i The steerin gwheel only moves upwards if
it has not already reached the upper end
stop. Steering wheel
111Seats, steering whee land mirrors Z
Page 116 of 441
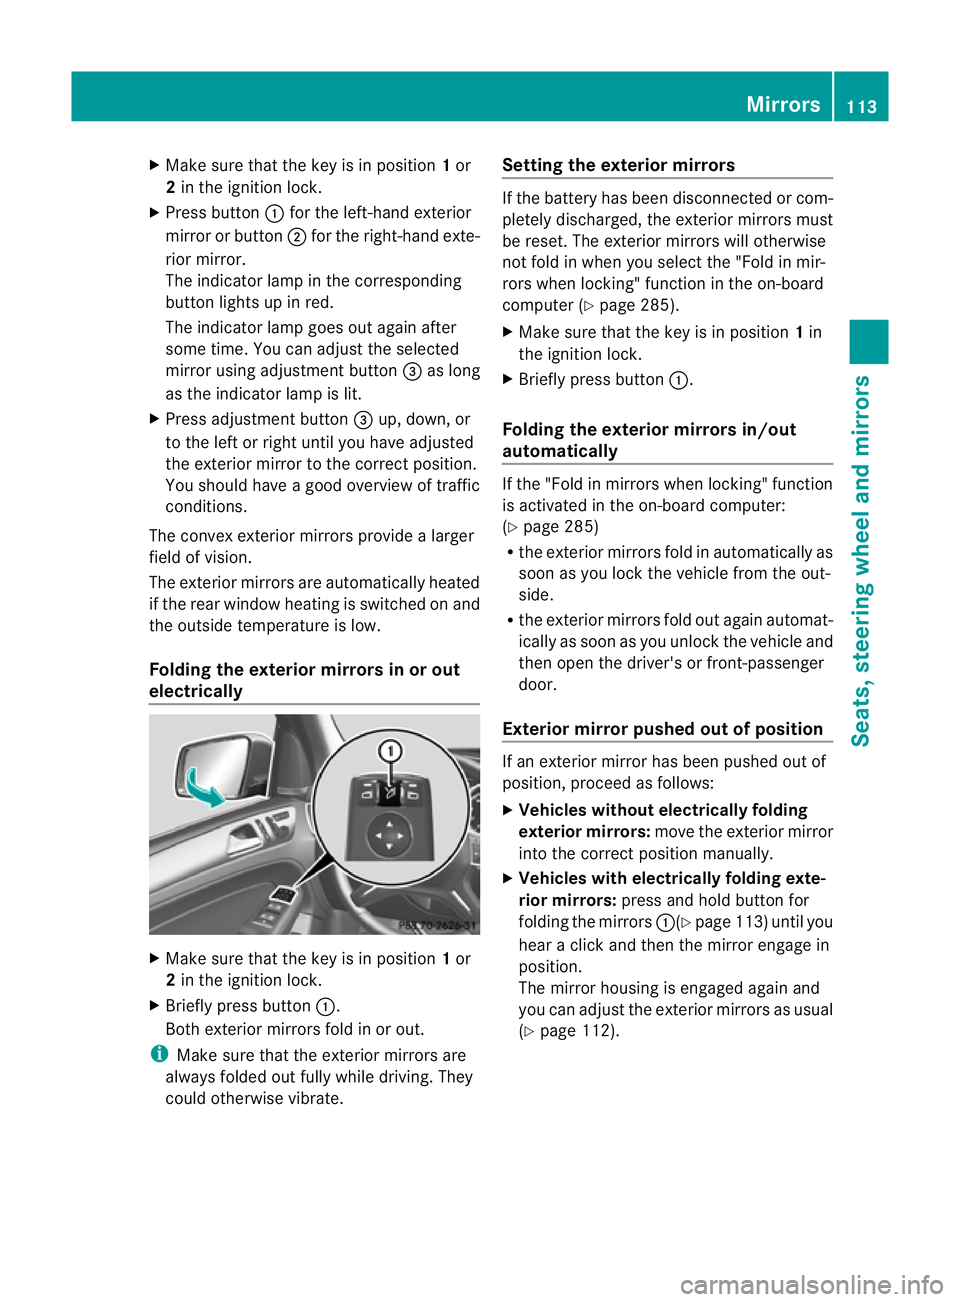
X
Make sur ethat the key is in position 1or
2 in the ignition lock.
X Press button :for the left-hand exterior
mirror or button ;for the right-hand exte-
rior mirror.
The indicator lam pint he corresponding
button lights up in red.
The indicator lam pgoes out again after
some time. You can adjust the selected
mirror using adjustment button =as long
as the indicator lam pislit.
X Press adjustment button =up, down, or
to the left or right until you have adjusted
the exterior mirror to the correct position.
You should have agood overview of traffic
conditions.
The convex exterior mirror sprovide alarger
field of vision.
The exterior mirrors are automatically heated
if the rear window heating is switched on and
the outside temperature is low.
Folding the exterior mirrors in or out
electrically X
Make sure that the key is in position 1or
2 in the ignition lock.
X Briefly press button :.
Both exterior mirrors fold in or out.
i Make sure that the exterior mirrors are
always folded out fully while driving. They
could otherwise vibrate. Setting the exterior mirrors If the battery has been disconnected or com-
pletely discharged
,the exterior mirrors must
be reset .The exterior mirrors will otherwise
not fol dinwhen you selec tthe "Fold in mir-
ror sw hen locking" func tion in the on-board
computer (Y page 285).
X Make sure that the key is in position 1in
the ignition lock.
X Briefl ypres sbutton :.
Folding the exterior mirrors in/out
automatically If the "Fold in mirrors when locking" function
is activated in the on-board computer:
(Y
page 285)
R the exterior mirrors fold in automatically as
soo nasyou lock the vehicle from the out-
side.
R the exterior mirror sfold out again automat-
ically as soon as you unloc kthe vehicle and
then open the driver's or front-passenger
door.
Exterior mir rorp ushe dout of position If an exterior mirro
rhas been pushe dout of
position, proceed as follows:
X Vehicles without electrically folding
exterior mirrors: move the exterior mirror
into the correct position manually.
X Vehicles with electrically folding exte-
rior mirrors: press and hold button for
folding the mirrors :(Ypage 113 )until you
hea rac lick and then the mirror engage in
position.
The mirror housing is engaged again and
you can adjust the exterior mirrors as usual
(Y page 112). Mirrors
113Seats, steerin gwhee land mirrors Z
Page 117 of 441
Automati
canti-dazzle mirrors G
WA
RNING
If inciden tlight fro mheadlamps is prevented
from striking the sensor in the rear-view mir-
ror ,for instance, by luggage piled too high in
the vehicle, the mirror's automatic anti-dazzle
fun ction will not operate.
Incident light could then blind you. This may
distrac tyou from the traffic condition sand,
as aresult, you may cause an accident.
The rear-view mirror and the exterior mirror
on the driver' sside automatically go int oanti-
dazzle mode if the following conditions are
met simultaneously:
R the ignition is switched on and
R incide ntlight from headlamps strikes the
sensor in the rear-view mirror.
The mirror sdonot go int oanti-dazzle mode if
reverse gea risengaged or if the interior light-
ing is switched on. Parking position for the exterior mir-
ror on the front-passenge
rside
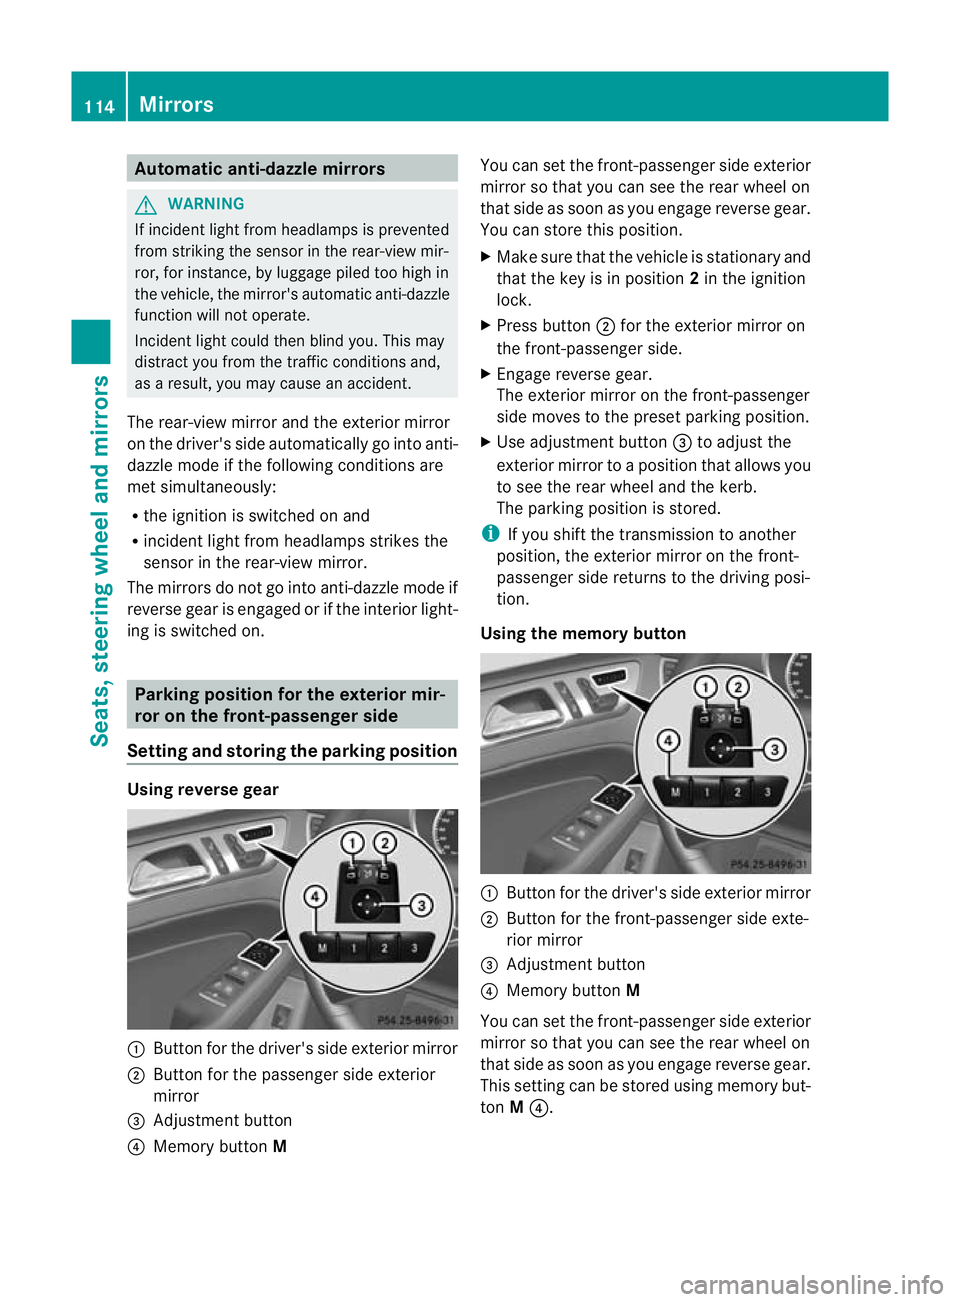
Setting and storing the parking position Using reverse gear
:
Button for the driver' sside exterior mirror
; Button for the passenger side exterior
mirror
= Adjustmen tbutton
? Memory button M You can set the front-passenger side exterior
mirror so that you can see the rear wheel on
that side as soo
nasyou engage revers egear.
You can stor ethis position.
X Make sur ethat the vehicle is stationary and
that the key is in position 2in the ignition
lock.
X Press button ;for the exterior mirror on
the front-passenger side.
X Engage revers egear.
The exterior mirror on the front-passenger
side moves to the preset parkin gposition.
X Use adjustment button =to adjust the
exterior mirror to aposition that allows you
to see the rea rwheel and the kerb.
The parkin gposition is stored.
i If you shift the transmission to anot her
po sition ,the exterior mirror on the front-
passenger side retur nsto the driving posi-
tion.
Usin gthe memory button :
Button for th edriver's side exterior mirror
; Button for th efront-passenge rside exte-
rior mirror
= Adjustmen tbutton
? Memory button M
You can set the front-passenger side exterior
mirror so that you can see the rear wheel on
that side as soo nasyou engage revers egear.
This setting can be stored using memory but-
ton M?. 114
MirrorsSeats, steering wheel and mirrors