steering wheel adjustment MERCEDES-BENZ GL SUV 2012 Owners Manual
[x] Cancel search | Manufacturer: MERCEDES-BENZ, Model Year: 2012, Model line: GL SUV, Model: MERCEDES-BENZ GL SUV 2012Pages: 441, PDF Size: 10.66 MB
Page 103 of 441
Usefu
linfor mati on
i This Owner's Manual describes all mod-
els, series and optional equipment for your
vehicle that were available at the time of
going to press. National variation sare pos-
sible. Note that your vehicl emay not be
equippe dwith all of the function sdescri-
bed. This is also the case for system sand
functions relevant to safety.
i Read the information on qualified special-
ist workshops: (Y page25). Correc
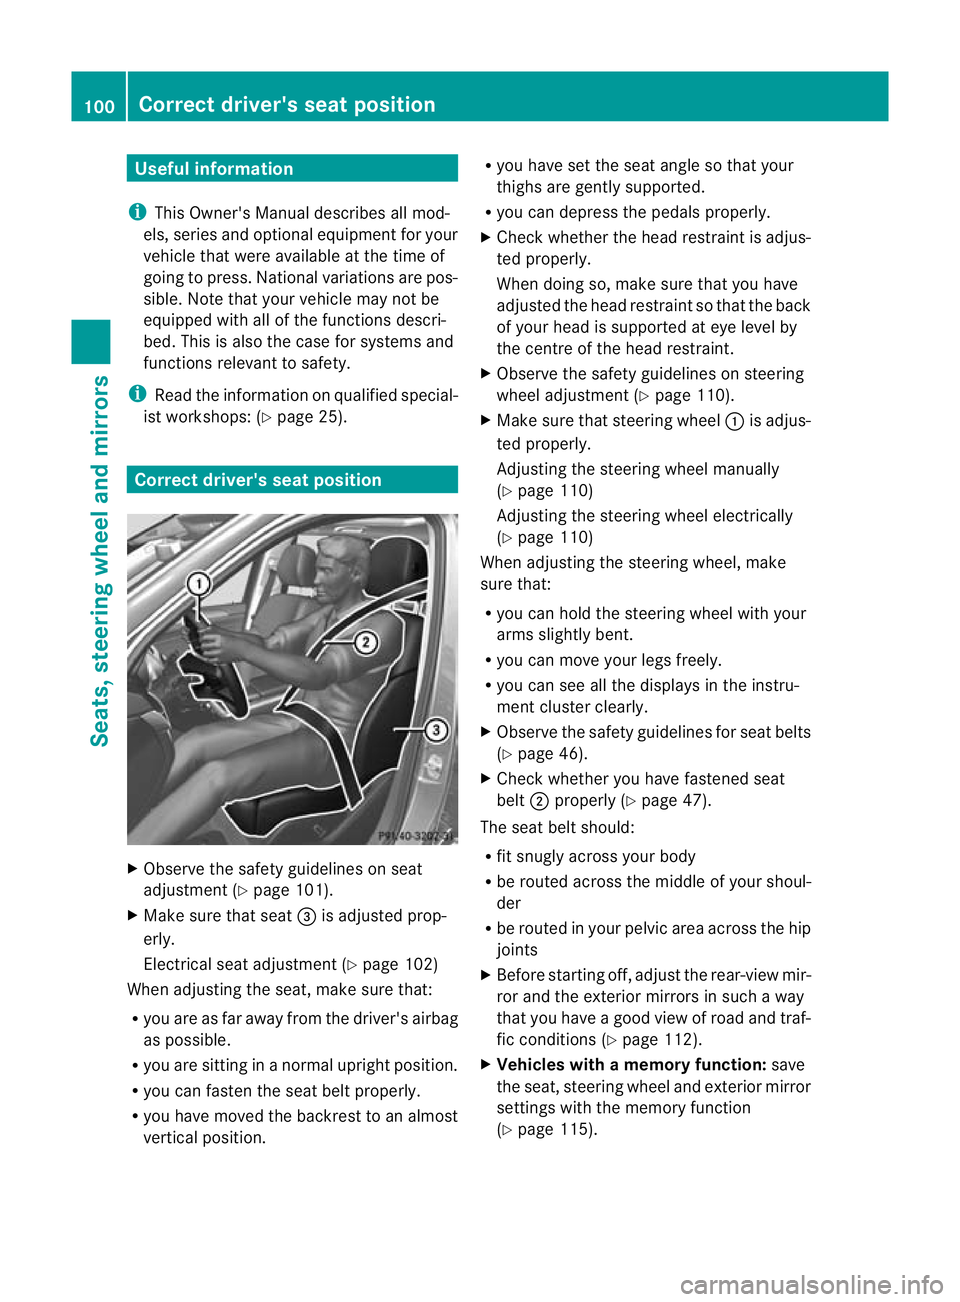
tdriver' sseat position X
Observ ethe safet yguideline sonseat
adjustmen t(Y page 10 1).
X Make sur ethat seat =is adjusted prop-
erly.
Electrical seat adjustmen t(Y page 10 2)
When adjusting the seat, mak esure that:
R you are as far away from the driver' sairbag
as possible.
R you are sitting in anorma lupright position.
R you can faste nthe seat belt properly.
R you hav emoved the backrest to an almost
vertical position. R
you have set the seat angle so that your
thighs ar egently supported.
R you can depress the pedals properly.
X Check whether the head restraint is adjus-
ted properly.
When doing so, mak esure that you have
adjusted the head restraint so that the back
of your head is supported at eye level by
the centre of the head restraint.
X Observe the safety guidelines on steering
wheel adjustment (Y page 110).
X Make sure that steering wheel :is adjus-
ted properly.
Adjusting the steering wheel manually
(Y page 110)
Adjusting the steering wheel electrically
(Y page 110)
When adjusting the steering wheel ,make
sure that:
R you can hold the steering wheel with your
arms slightly bent.
R you can move your legs freely.
R you can see all the displ aysint he instru-
men tcluster clearly.
X Observe the safety guidelines for seat belts
(Y page 46).
X Check whether you have fastened seat
belt ;properly (Y page 47).
The seat belt should:
R fit snugly across your body
R be routed across the middle of your shoul-
der
R be routed in your pelvic area across the hip
joints
X Befor estartin goff, adjus tthe rear-view mir-
ror and the exterior mirrors in such away
that you have agood view of roa dand traf-
fic conditions (Y page112).
X Vehicle switham emory function: save
the seat, steering wheel and exterior mirror
settings with the memor yfunction
(Y page 115). 100
Correct driver's seat positionSeats, steerin
gwhee land mirrors
Page 105 of 441
i
Further related subjects:
R Luggage compartment enlargement
(folding do wnthe rear bench seat)
(Y page 341) Adjustin
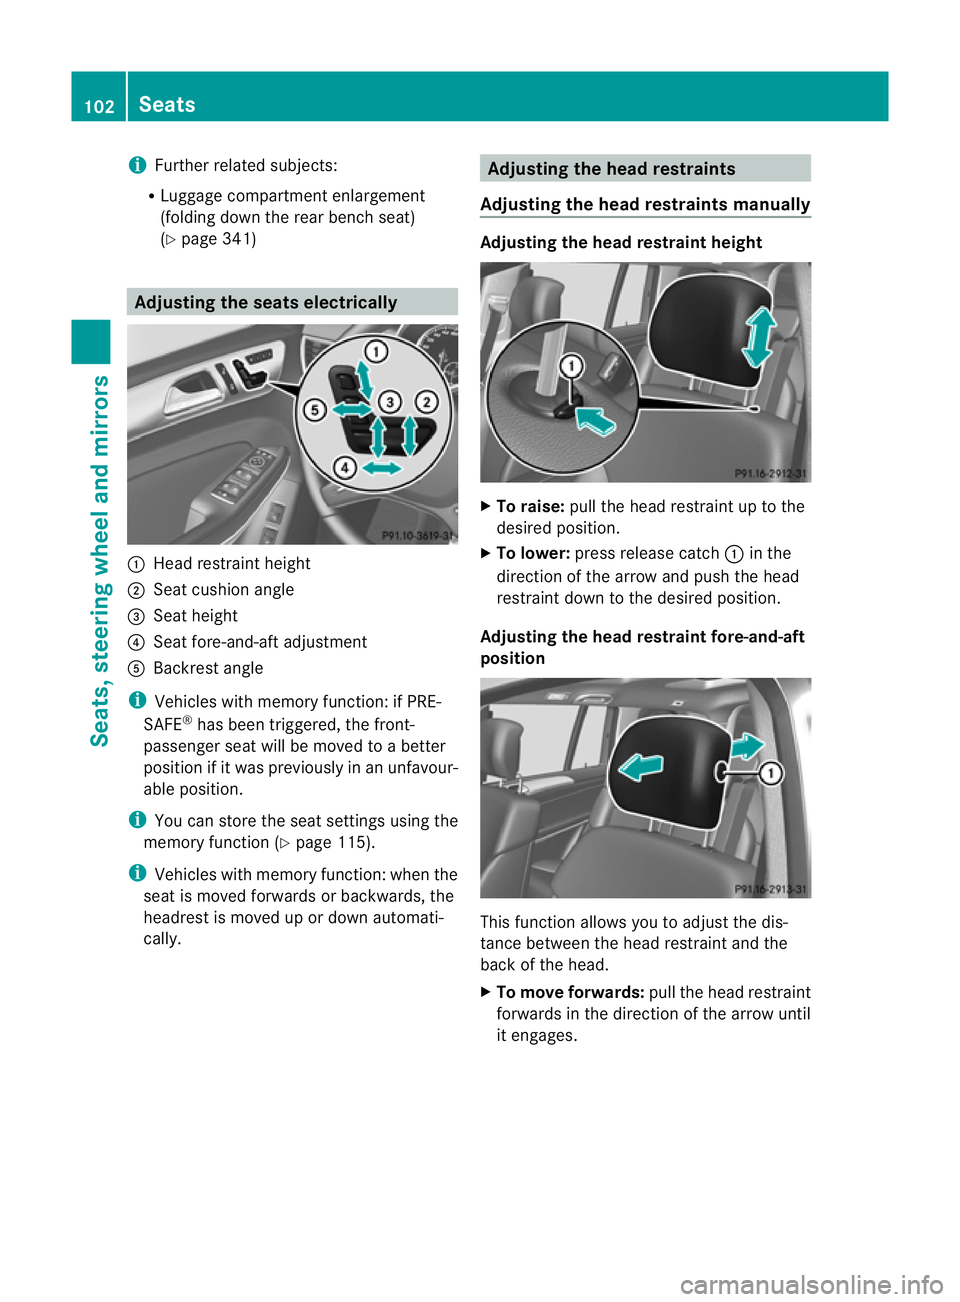
gthe seats electrically :
Hea drestraint height
; Seat cushion angle
= Seat height
? Seat fore-and-aft adjustment
A Backrest angle
i Vehicles with memory function: if PRE-
SAFE ®
has been triggered, the front-
passenger seat will be moved to abetter
position if it was previously in an unfavour-
able position.
i You can store the seat settings using the
memory function (Y page 115).
i Vehicles with memory function: when the
seat is moved forwards or backwards, the
headrest is moved up or down automati-
cally. Adjusting the hea
drestraints
Adjusting the head restraints manually Adjusting the head restraint height
X
To raise: pull the head restrain tuptot he
desired position.
X To lower: press release catch :in the
direction of the arrow and push the head
restraint down to the desired position.
Adjusting th ehead restraint fore-and-aft
position This func
tion allows you to adjust the dis-
tance between the head restraint and the
back of the head.
X To move forwards: pull the head restraint
forwards in the direction of the arrow until
it engages. 102
SeatsSeats, steering wheel and mirrors
Page 106 of 441

There are
anumber of detents.
X To move backwards: press and hold
release button :and push the head
restraint backwards.
X When the head restraint is in the desired
position, release the button and make sure
that the head restraint is engage dinposi-
tion.
Adjusting th ehead restraints electri-
cally X
To adjust the head restraint height: slide
the switch for head restraint adjustment
(Y page 102 )upordown in the direction of
the arrow.
Adjusting th eluxury head restraints Th
e1 st row of seat shas luxury head
restraints.
X To adjust the side bolsters of the head
restraint: push or pull right and/or left-
hand side bolster :into the desired posi-
tion.
X To adjust the fore-and-af tposition of
the head restraint: push or pull the head
restraint in the direction of arrow ;.Rear seat head restraints Adjusting the rear seat head restraint
height
X
Onc ethe head rest raint is fully lowered,
press release catch :.
X To raise: pull the head restraint up to the
desired position.
X To lower: press release catch :and push
the head restraint down until it is in the
desired position.
Adjusting the rear seat hea drestraint
angle Adjust the head restraints so that they are as
close as possible to your head.
You can only adjust the two outer head
restraints.
X
Using both hands, reach back and grasp
the sides of the head restraint.
X Pull the lower edge of the head restraint
forwards or back until it is in the desired
position. Seats
103Seats, steering wheel and mirrors Z
Page 113 of 441
Problems wit
hthe seat ventilation Th
es eat ven tilation has switched off prema-
turely or cannot be switched on. The vehicle's
electrical system voltage is too low because
too many electrical consumer sare switched
on.
X Switch off electrica lconsumers that you do
not need, such as the rea rwindow heating
or interior lighting. Steering wheel
Important safet
ynotes G
WARNING
Do not adjust the steering wheel while driving.
Adjusting the steering wheel while driving, or
drivin gwithout the steering wheel adjustment
featur elocked coul dcause the driver to lose
control of the vehicle.
The electrical steering wheel adjustment fea-
ture can be operated at any time. Therefore,
do not leave children unattended in the vehi-
cle, or with access to an unlocked vehicle. A
child's unsupervised access to avehicle could
result in an accident and/or serious personal
injury. Adjusting the steering whee
lman-
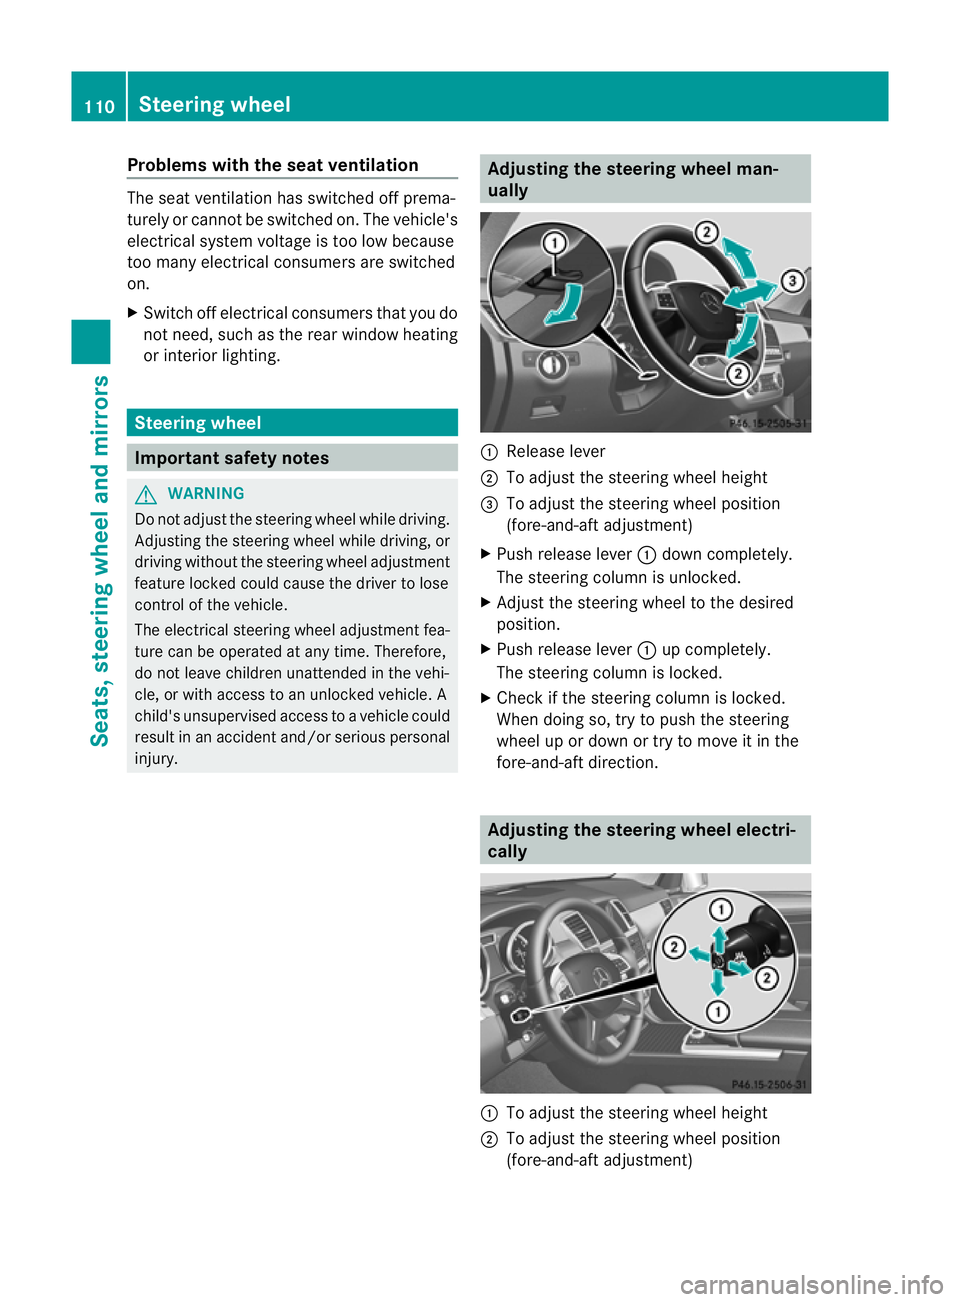
ually :
Release lever
; To adjus tthe steering wheel height
= To adjust the steering wheel position
(fore-and-af tadjustment)
X Push release lever :down completely.
The steerin gcolum nisu nlocked.
X Adjus tthe steering wheel to the desired
position.
X Push release lever :up completely.
The steering column is locked.
X Chec kifthe steering column is locked.
When doing so, tr ytopush the steering
wheel up or down or try to move it in the
fore-and-aft direction. Adjusting the steering wheel electri-
cally :
To adjust the steering wheel height
; To adjust the steering wheel position
(fore-and-aft adjustment) 110
Steering wheelSeats, steerin
gwhee land mirrors
Page 114 of 441
i
Further related subjects:
R EASY-ENT RY/EXIT feature
(Y page 111)
R storing setting s(Ypag e115) Ste
ering wheel heating
Switchin gon/off X
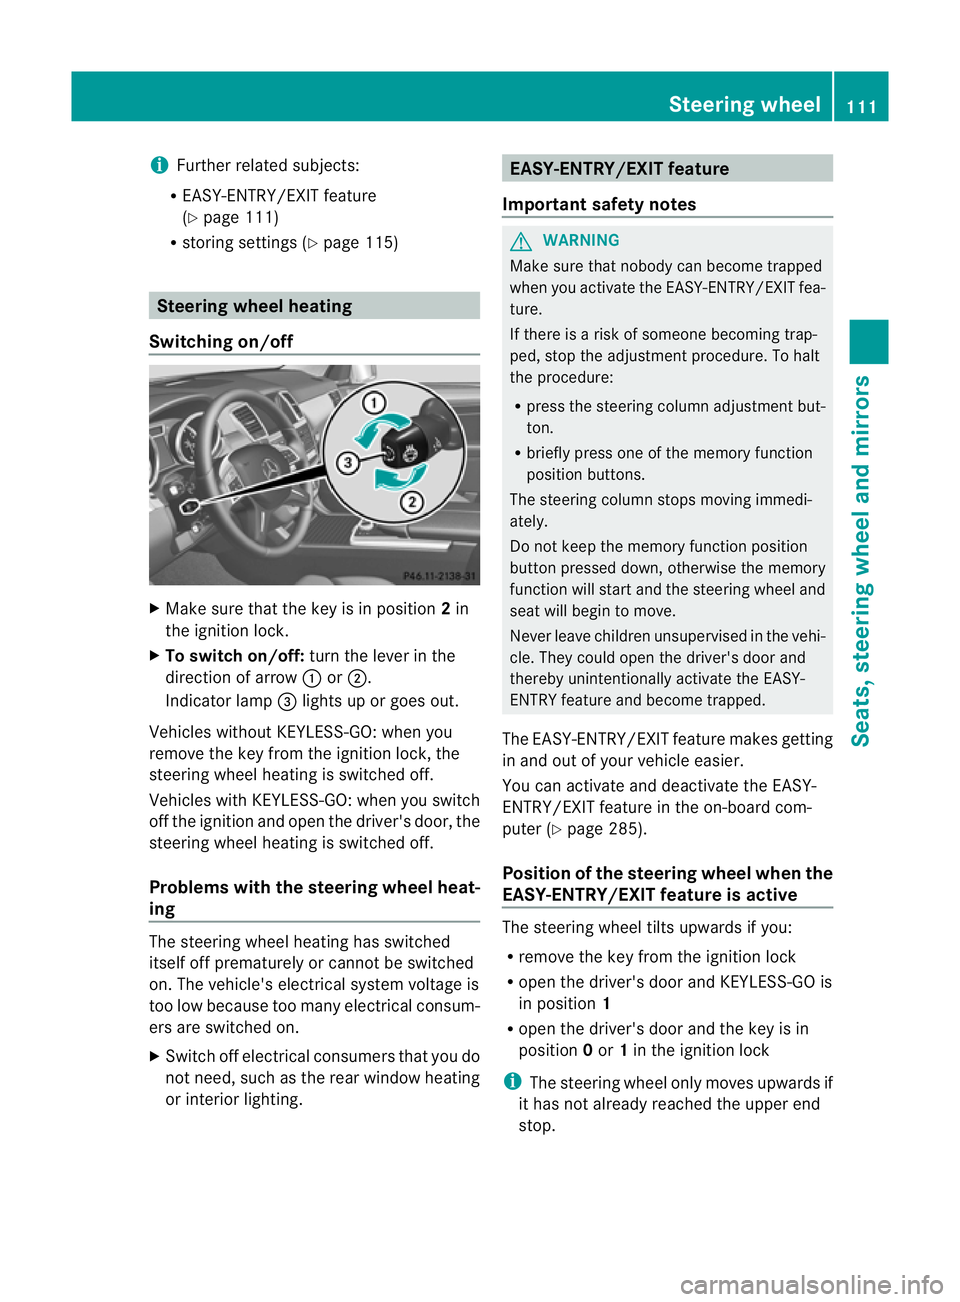
Make sure that the key is in position 2in
the ignition lock.
X To switch on/off: turn the lever in the
direction of arrow :or;.
Indicator lamp =lights up or goe sout.
Vehicles without KEYLESS-GO: when you
remove the key from the ignition lock, the
steering wheel heating is switched off.
Vehicles with KEYLESS-GO: when you switch
off the ignition and open the driver' sdoor, the
steerin gwheel heating is switched off.
Problems wit hthe steering whee lheat-
ing The steerin
gwheel heating has switched
itsel foff prematurely or cannot be switched
on. Th evehicle' selectrical system voltage is
too low because too many electrical consum-
ers are switched on.
X Switc hoff elect rical consumers that you do
not need, such as the rear window heating
or inte rior lighting. EASY-ENTRY/EXIT feature
Important safety notes G
WARNING
Make sur ethat nobody can becom etrapped
when you activate th eEASY-ENTRY/EXI Tfea-
ture.
If there is arisk of someon ebecomin gtrap-
ped, stop th eadjustment procedure. To halt
the procedure:
R press the steerin gcolum nadjustment but-
ton.
R briefly press one of the memory fun ction
position buttons.
The steerin gcolum nstops moving immedi-
ately.
Do not keep the memory function position
button pressed down, otherwise the memory
function will start and the steerin gwheel and
seat will begin to move.
Never leav echildren unsupervised in the vehi-
cle. They coul dopen the driver' sdoor and
thereby unin tentionally activate the EASY-
ENTRY feature and become trapped.
The EASY-ENTRY/EX ITfeature make sgetting
in and out of your vehicle easier.
You can activa teand deactivat ethe EASY-
ENTRY/ EXIT feature in th eon-board com-
puter (Y page285).
Positio nofthe steering whee lwhen the
EASY-ENTRY/EXIT feature is active Th
es teering whee ltilts upwards if you:
R remov ethe key from the ignition lock
R open the driver's door and KEYL ESS-GO is
in position 1
R ope nthe driver's door and the key is in
position 0or 1in the ignition lock
i The steerin gwheel only moves upwards if
it has not already reached the upper end
stop. Steering wheel
111Seats, steering whee land mirrors Z
Page 117 of 441
Automati
canti-dazzle mirrors G
WA
RNING
If inciden tlight fro mheadlamps is prevented
from striking the sensor in the rear-view mir-
ror ,for instance, by luggage piled too high in
the vehicle, the mirror's automatic anti-dazzle
fun ction will not operate.
Incident light could then blind you. This may
distrac tyou from the traffic condition sand,
as aresult, you may cause an accident.
The rear-view mirror and the exterior mirror
on the driver' sside automatically go int oanti-
dazzle mode if the following conditions are
met simultaneously:
R the ignition is switched on and
R incide ntlight from headlamps strikes the
sensor in the rear-view mirror.
The mirror sdonot go int oanti-dazzle mode if
reverse gea risengaged or if the interior light-
ing is switched on. Parking position for the exterior mir-
ror on the front-passenge
rside
Setting and storing the parking position Using reverse gear
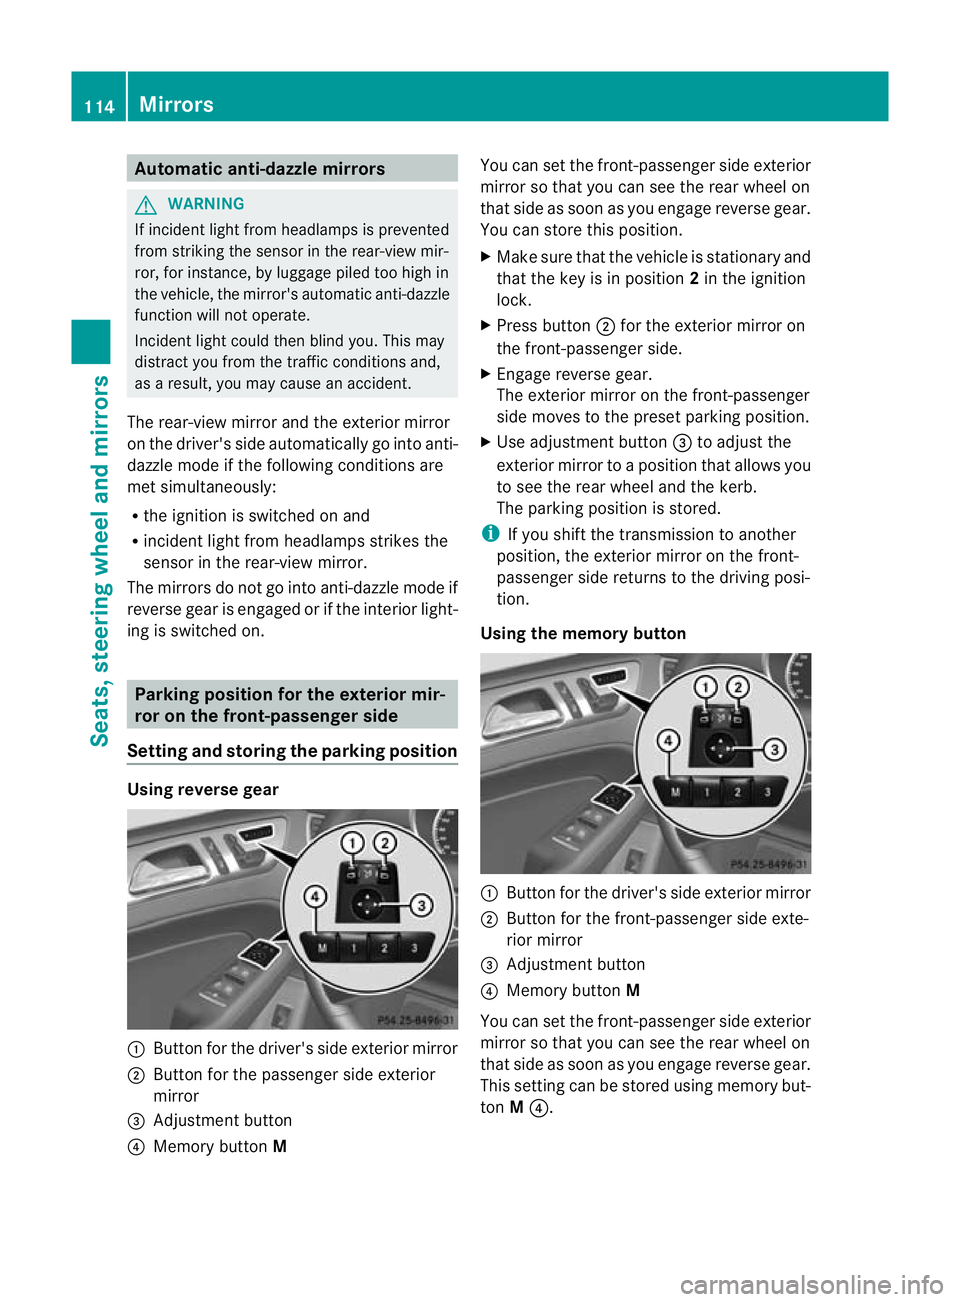
:
Button for the driver' sside exterior mirror
; Button for the passenger side exterior
mirror
= Adjustmen tbutton
? Memory button M You can set the front-passenger side exterior
mirror so that you can see the rear wheel on
that side as soo
nasyou engage revers egear.
You can stor ethis position.
X Make sur ethat the vehicle is stationary and
that the key is in position 2in the ignition
lock.
X Press button ;for the exterior mirror on
the front-passenger side.
X Engage revers egear.
The exterior mirror on the front-passenger
side moves to the preset parkin gposition.
X Use adjustment button =to adjust the
exterior mirror to aposition that allows you
to see the rea rwheel and the kerb.
The parkin gposition is stored.
i If you shift the transmission to anot her
po sition ,the exterior mirror on the front-
passenger side retur nsto the driving posi-
tion.
Usin gthe memory button :
Button for th edriver's side exterior mirror
; Button for th efront-passenge rside exte-
rior mirror
= Adjustmen tbutton
? Memory button M
You can set the front-passenger side exterior
mirror so that you can see the rear wheel on
that side as soo nasyou engage revers egear.
This setting can be stored using memory but-
ton M?. 114
MirrorsSeats, steering wheel and mirrors
Page 118 of 441
X
Make sur ethat the key is in position 2in
the ignition lock.
X With the exterior mirror on the front-
passenger side activated, use adjustment
button =to adjust the exterior mirror. In
the exterior mirror, the rea rwheel and the
ker bshould be visible.
X Press memory button M? and one of the
arrow sona djustment button =within
three seconds.
The parking position is stored if the exterior
mirror does not move.
X If the mirror moves out of position, repeat
the steps.
Calling up astore dparkin gposition set-
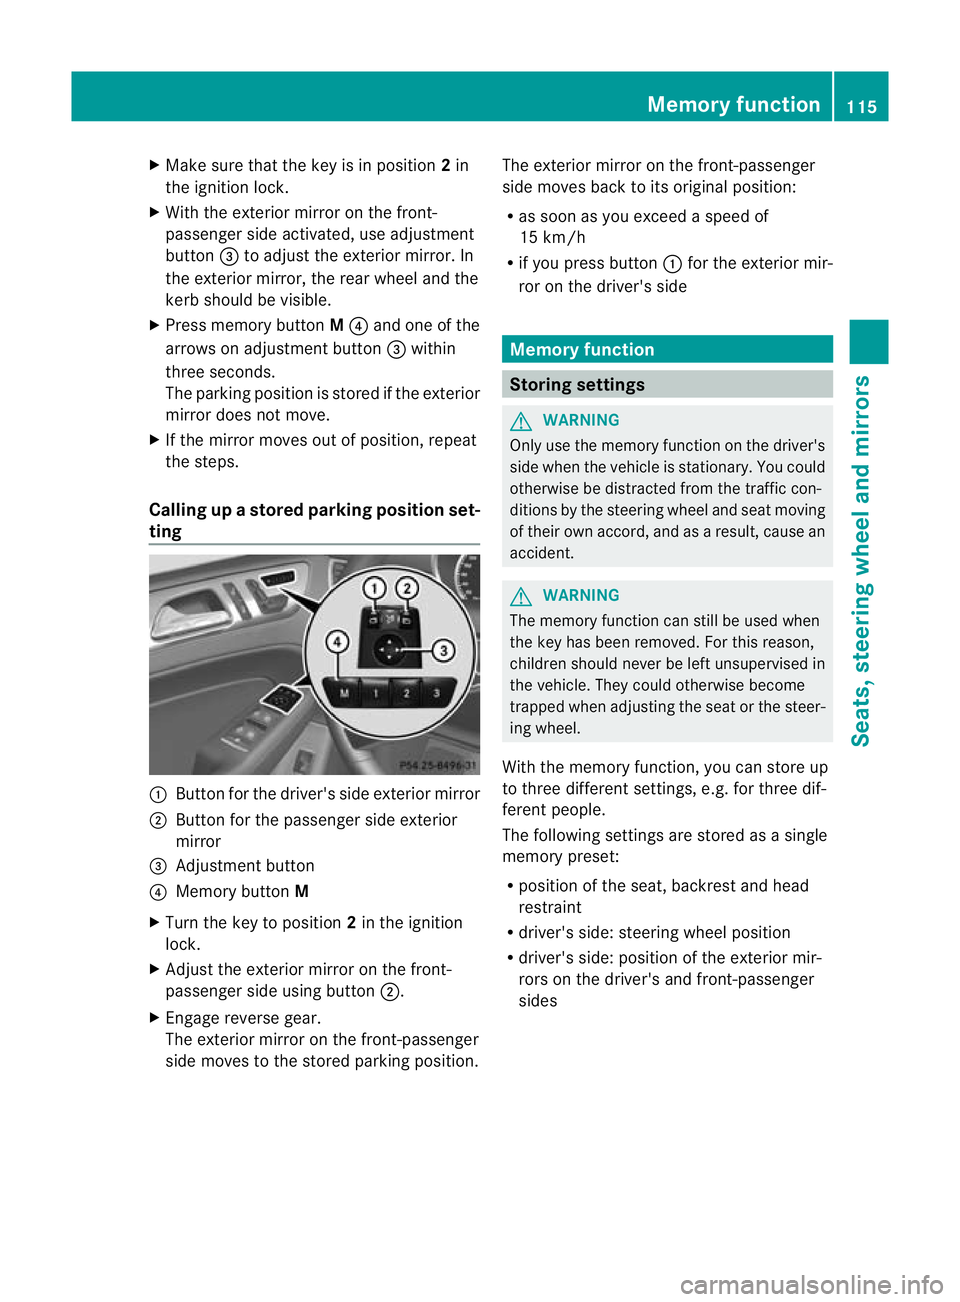
ting :
Button for the driver's sid eexterio rmirror
; Button for the passenger side exterior
mirror
= Adjustment button
? Memo rybutton M
X Turn the key to position 2in the ignition
lock.
X Adjust the exterior mir roront he front-
pa ssenger side usin gbutton ;.
X Engage reverse gear.
The exterior mirror on the front-passenger
side moves to the stored parking posi tion. The exterior mir
roront he front-passenger
side moves bac ktoits original position:
R as soo nasyou exceed aspeed of
15 km/h
R if you press button :for the exterior mir-
ror on the driv er'sside Me
mo ry function Storing settings
G
WARNING
Only use the memory function on the driver's
side when the vehicle is stationary. You could
otherwise be distracted fro mthe traffic con-
diti ons by th esteerin gwheel and seat moving
of their own accord, and as aresult ,cause an
accident. G
WARNING
The memory function can still be used when
the key has been removed. For this reason,
children shoul dnever be left unsupervised in
the vehicle. They could otherwise become
trapped when adjusting the seat or the steer-
ing wheel.
With the mem ory function,you can store up
to three differen tsettings, e.g. for three dif-
ferent people.
The followi ngsettings ar estore dasa single
mem orypreset:
R position of the seat ,backrest and head
restraint
R driver's side: steerin gwheel position
R driver' sside: position of the exterior mir-
ror so nthe driver' sand front-passenger
sides Memory function
115Seats, steering wheel and mirrors Z
Page 212 of 441
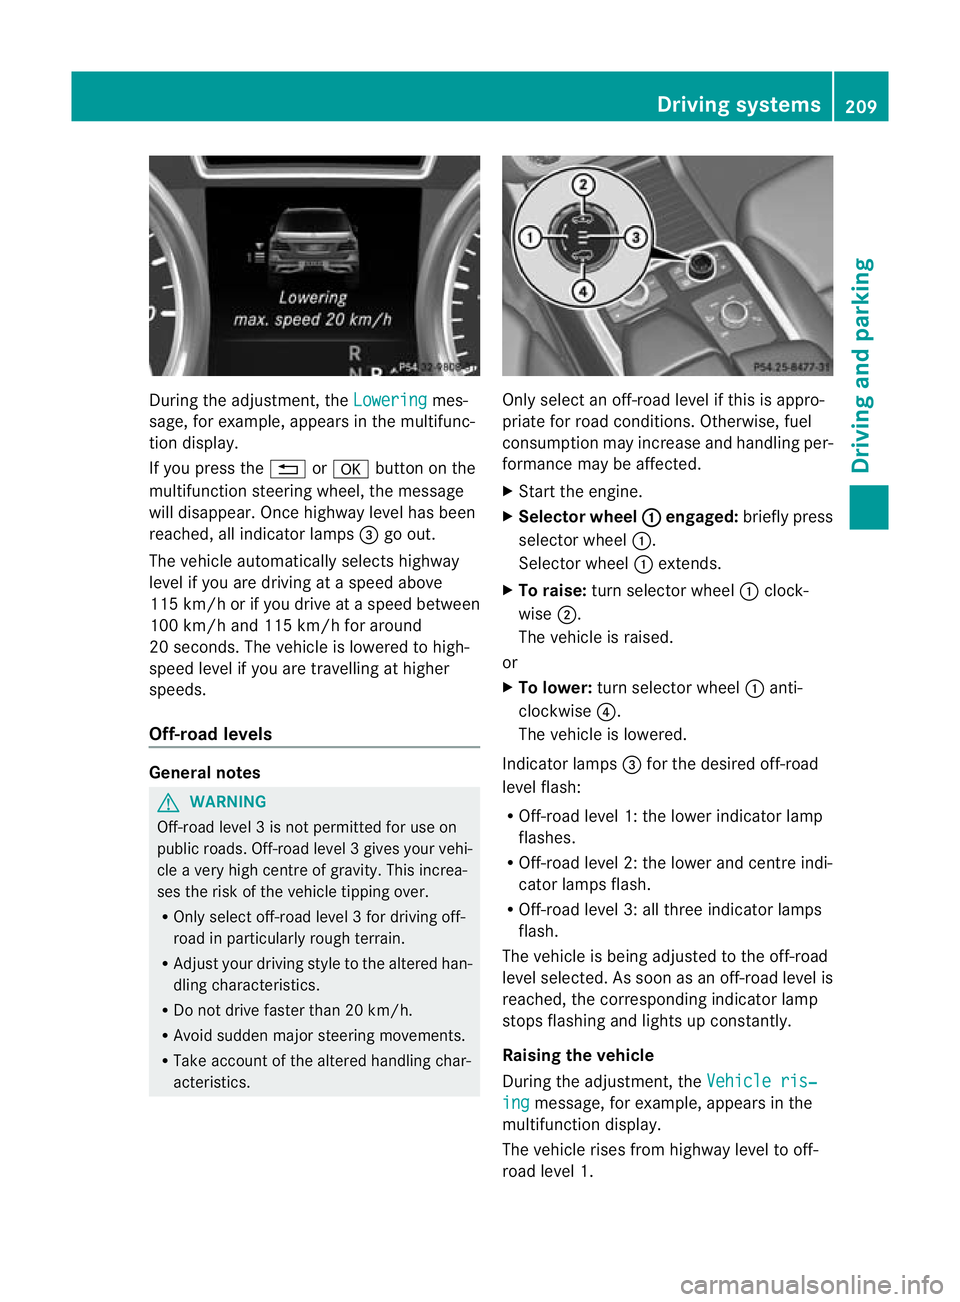
During the adjustment, the
Lowering mes-
sage ,for example, appears in the multifunc-
tion display.
If yo upressthe % ora button on the
multifunction steeri ngwheel, the message
will disappear. Onc ehighway level has been
reached, all indicator lamps =go out.
The vehicle automatically select shighway
level if you are drivin gataspeed above
11 5k m/ horify ou drive at aspeed between
10 0k m/ hand 115 km/h for around
20 seconds. The vehicle is lowered to high-
speed level if you are travelling at higher
speeds.
Off- road levels General notes
G
WARNING
Off-road level 3isn ot permitte dfor use on
public roads. Off -road level 3gives your vehi-
cle avery high centr eofgravity. This increa-
se st he risk of the vehi clet ippin gover.
R Onl yselec toff-road level 3for drivin goff-
road in particularl yrough terrain.
R Adjust your drivin gstyle to the altered han-
dling charac teristics.
R Do not drive faster than 20 km/h.
R Avoid sudden majo rsteering movements.
R Take account of th ealtered handling char-
acteristics. Only select an off-road level if this is appro-
priate for road conditions. Otherwise, fuel
consumption may increase and handling per-
formanc
emay be affected.
X Start the engine.
X Selector wheel : engaged:
briefly press
selector wheel :.
Selector wheel :extends.
X To raise: turn selector wheel :clock-
wise ;.
The vehicle is raised.
or
X To lower: turn selector wheel :anti-
clockwise ?.
The vehicle is lowered.
Indicator lamps =for the desired off-road
level flash:
R Off-road level 1: the lower indicator lamp
flashes.
R Off-road level 2: the lower and centre indi-
cator lamps flash.
R Off-road level 3: all three indicator lamps
flash.
The vehicle is being adjusted to the off-road
level selected .Assoon as an off-road leve lis
reached, th ecorresponding indicator lamp
stops flashing and lights up constantly.
Raising th evehicle
During the adjustment, the Vehicleris‐ ing message
,for example, appear sint he
multifunc tion display.
The vehicle rises from highway leve ltooff-
roa dlevel 1. Driving systems
209Driving and parking Z
Page 213 of 441
If yo
upressthe % ora button on the
multifunction steering wheel, the messa ge
wil ldisappear.
i Up to off-road level 2, you can hide the
messages using the %ora button
on the multif unctio nsteering wheel.
Once off-road level 2has been reached, the
lower and centr eindicator lamps of the selec-
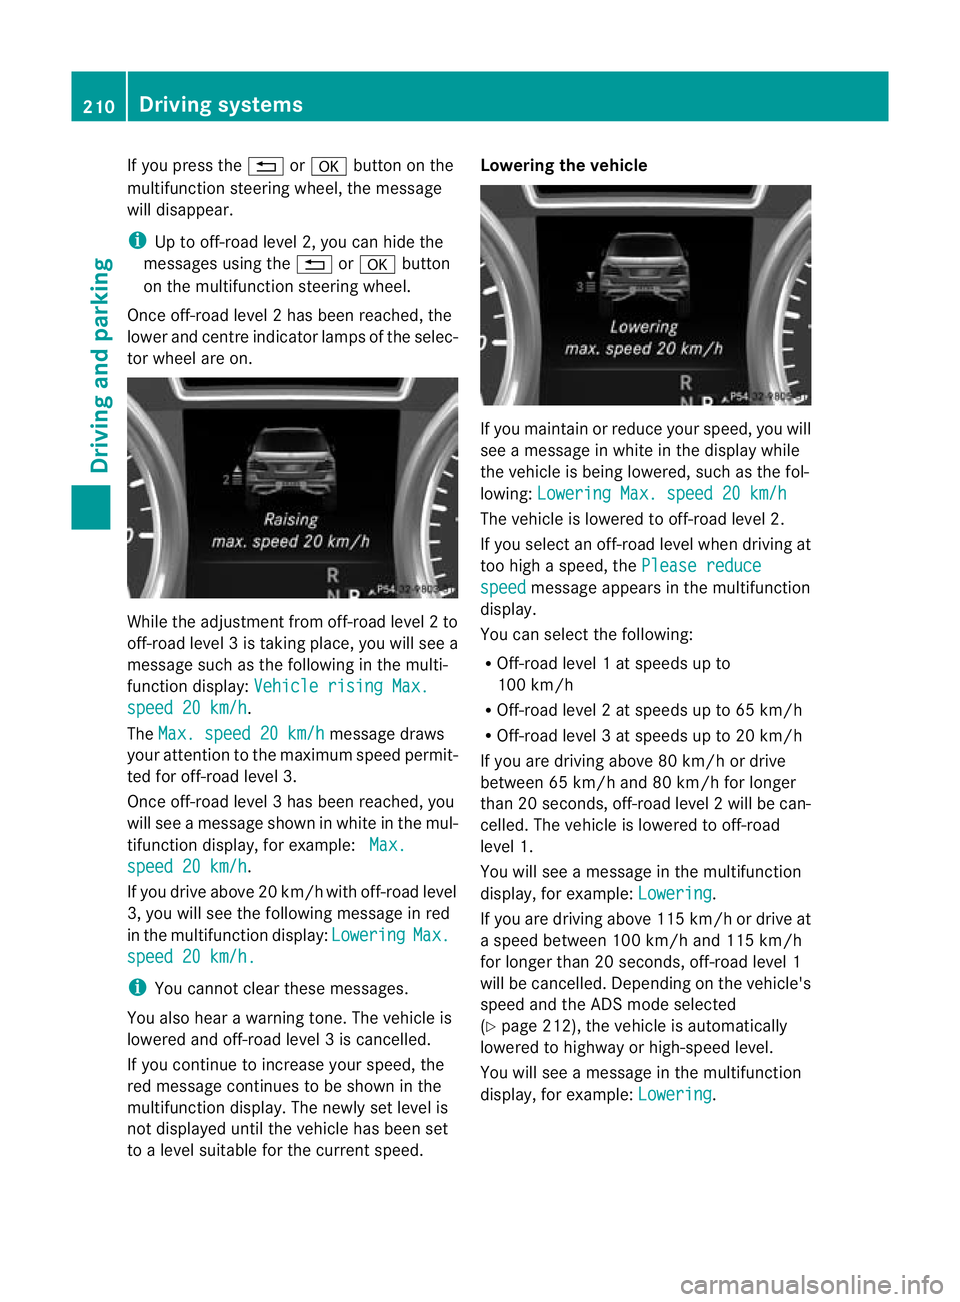
tor wheel are on. While the adjustment from off-road level
2to
off -ro ad level 3istaking place, you will see a
message such as the following in the multi-
function displ ay:Vehicle rising Max. speed 20 km/h .
The Max. speed 20 km/h message draws
your attentio ntothe maximum speed permit-
ted for off-road level 3.
Onc eoff-roa dlevel 3has been reached, you
will see amessage shown in whit eint he mul-
ti fu nction display, for example: Max.spee
d20k m/h .
If yo udrive above 20 km/h wit hoff-road level
3, you wil lsee the followi ngmessage in red
in th emultifunction display: Lowering Max.
spee
d20k m/h. i
Youc annot clear these messages.
You also hear awarnin gtone. The vehicle is
lowered and off-road leve l3iscancelled.
If you continue to increase your speed, the
red message continues to be shown in the
multifunction displ ay.T he newl yset level is
not displayed until the vehicle has been set
to alevel suitable for the curren tspeed. Lowering the vehicle
If you maintain or reduc
eyour speed, you will
see amessage in white in the display while
the vehicle is being lowered, such as the fol-
lowing: Lowering Max. spee d20km/h Th
ev ehicle is lowered to off-road level 2.
If you select an off-road level when driving at
too high aspeed, the Please reduce speed message appears in the multifunction
display.
You can select the following:
R Off-road level 1atspeeds up to
10 0k m/h
R Off-road level 2atspeeds up to 65 km/h
R Off -road leve l3atspeeds up to 20 km/h
If you are drivin gabove 80 km/ hordrive
between 65 km/h and 80 km/h for longer
than 20 seconds ,off-roa dlevel 2will be can-
celled. The vehicle is lowered to off-road
level 1.
You will see amessage in the mul tifunction
display, for example: Lowering .
If you are drivin gabove 11 5km/ hordrive at
as peed between 10 0km/ hand 115 km/h
for longer than 20 seconds ,off-road level 1
wil lbec ancelled. Dependin gonthe vehicle's
speed and the ADS mode selected
(Y page 212), the vehicle is automatically
lowered to highway or high-spee dlevel.
You will see amessage in the multifunction
display, for example: Lowering .210
Driving systemsDriving and parking