Lock MERCEDES-BENZ GL450 2010 X164 Service Manual
[x] Cancel search | Manufacturer: MERCEDES-BENZ, Model Year: 2010, Model line: GL450, Model: MERCEDES-BENZ GL450 2010 X164Pages: 380, PDF Size: 9.81 MB
Page 87 of 380
Easy-entry/exit feature for third-row
seats
This feature allows for easier access to and
exit from the vehicle’s third-row seats.
GWarning!
To help avoid personal injury, the second-row
seat backrests must be properly locked either
in the upright position or, when using the
expanded cargo volume, in the fully folded
position while the vehicle is in motion.
Easy-entry feature for third-row seats
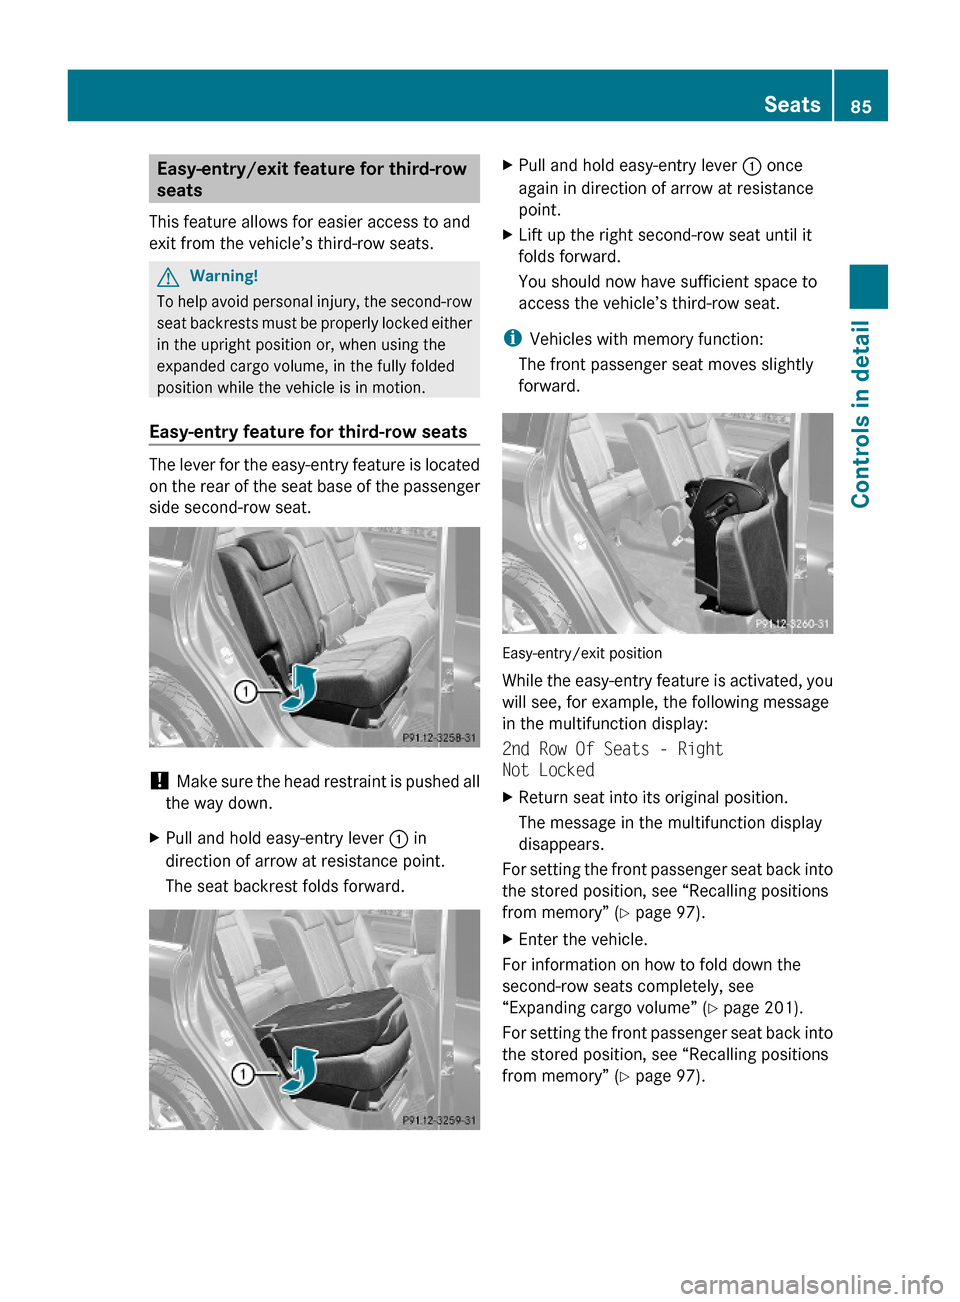
The lever for the easy-entry feature is located
on the rear of the seat base of the passenger
side second-row seat.
! Make sure the head restraint is pushed all
the way down.
XPull and hold easy-entry lever : in
direction of arrow at resistance point.
The seat backrest folds forward.
XPull and hold easy-entry lever : once
again in direction of arrow at resistance
point.
XLift up the right second-row seat until it
folds forward.
You should now have sufficient space to
access the vehicle’s third-row seat.
iVehicles with memory function:
The front passenger seat moves slightly
forward.
Easy-entry/exit position
While the easy-entry feature is activated, you
will see, for example, the following message
in the multifunction display:
2nd Row Of Seats - Right
Not Locked
XReturn seat into its original position.
The message in the multifunction display
disappears.
For setting the front passenger seat back into
the stored position, see “Recalling positions
from memory” (Y page 97).
XEnter the vehicle.
For information on how to fold down the
second-row seats completely, see
“Expanding cargo volume” (Y page 201).
For setting the front passenger seat back into
the stored position, see “Recalling positions
from memory” (Y page 97).
Seats85Controls in detailX164_AKB; 5; 31, en-USd2ureepe,Version: 2.11.8.12009-09-11T12:30:16+02:00 - Seite 85Z
Page 88 of 380
Easy-exit feature for third-row seats
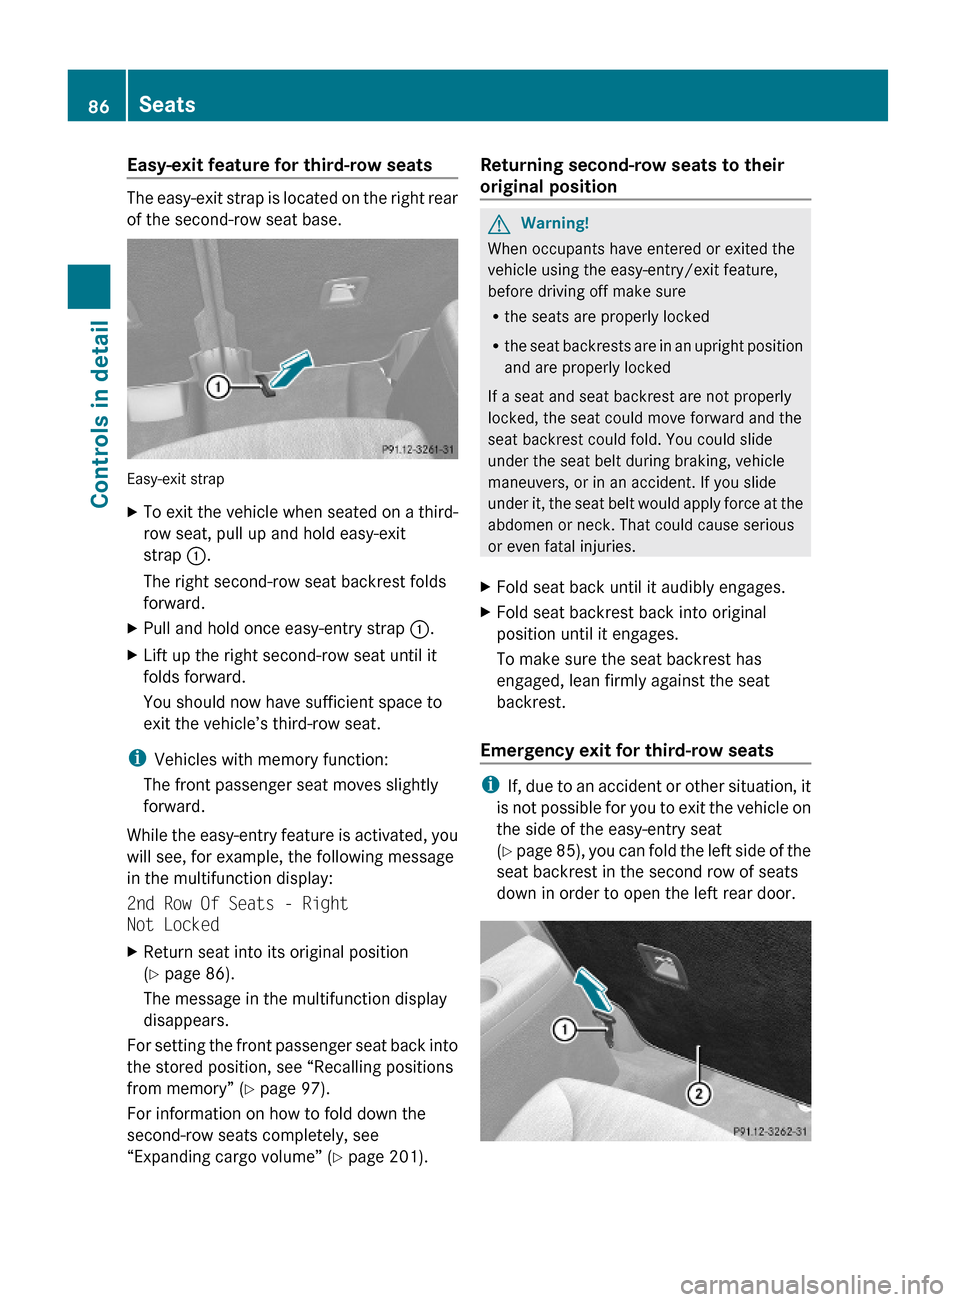
The easy-exit strap is located on the right rear
of the second-row seat base.
Easy-exit strap
XTo exit the vehicle when seated on a third-
row seat, pull up and hold easy-exit
strap :.
The right second-row seat backrest folds
forward.
XPull and hold once easy-entry strap :.XLift up the right second-row seat until it
folds forward.
You should now have sufficient space to
exit the vehicle’s third-row seat.
iVehicles with memory function:
The front passenger seat moves slightly
forward.
While the easy-entry feature is activated, you
will see, for example, the following message
in the multifunction display:
2nd Row Of Seats - Right
Not Locked
XReturn seat into its original position
(Y page 86).
The message in the multifunction display
disappears.
For setting the front passenger seat back into
the stored position, see “Recalling positions
from memory” (Y page 97).
For information on how to fold down the
second-row seats completely, see
“Expanding cargo volume” (Y page 201).
Returning second-row seats to their
original position
GWarning!
When occupants have entered or exited the
vehicle using the easy-entry/exit feature,
before driving off make sure
Rthe seats are properly locked
Rthe seat backrests are in an upright position
and are properly locked
If a seat and seat backrest are not properly
locked, the seat could move forward and the
seat backrest could fold. You could slide
under the seat belt during braking, vehicle
maneuvers, or in an accident. If you slide
under it, the seat belt would apply force at the
abdomen or neck. That could cause serious
or even fatal injuries.
XFold seat back until it audibly engages.XFold seat backrest back into original
position until it engages.
To make sure the seat backrest has
engaged, lean firmly against the seat
backrest.
Emergency exit for third-row seats
iIf, due to an accident or other situation, it
is not possible for you to exit the vehicle on
the side of the easy-entry seat
(Y page 85), you can fold the left side of the
seat backrest in the second row of seats
down in order to open the left rear door.
86SeatsControls in detail
X164_AKB; 5; 31, en-USd2ureepe,Version: 2.11.8.12009-09-11T12:30:16+02:00 - Seite 86
Page 89 of 380
! Make sure the head restraint is pushed all
the way down.
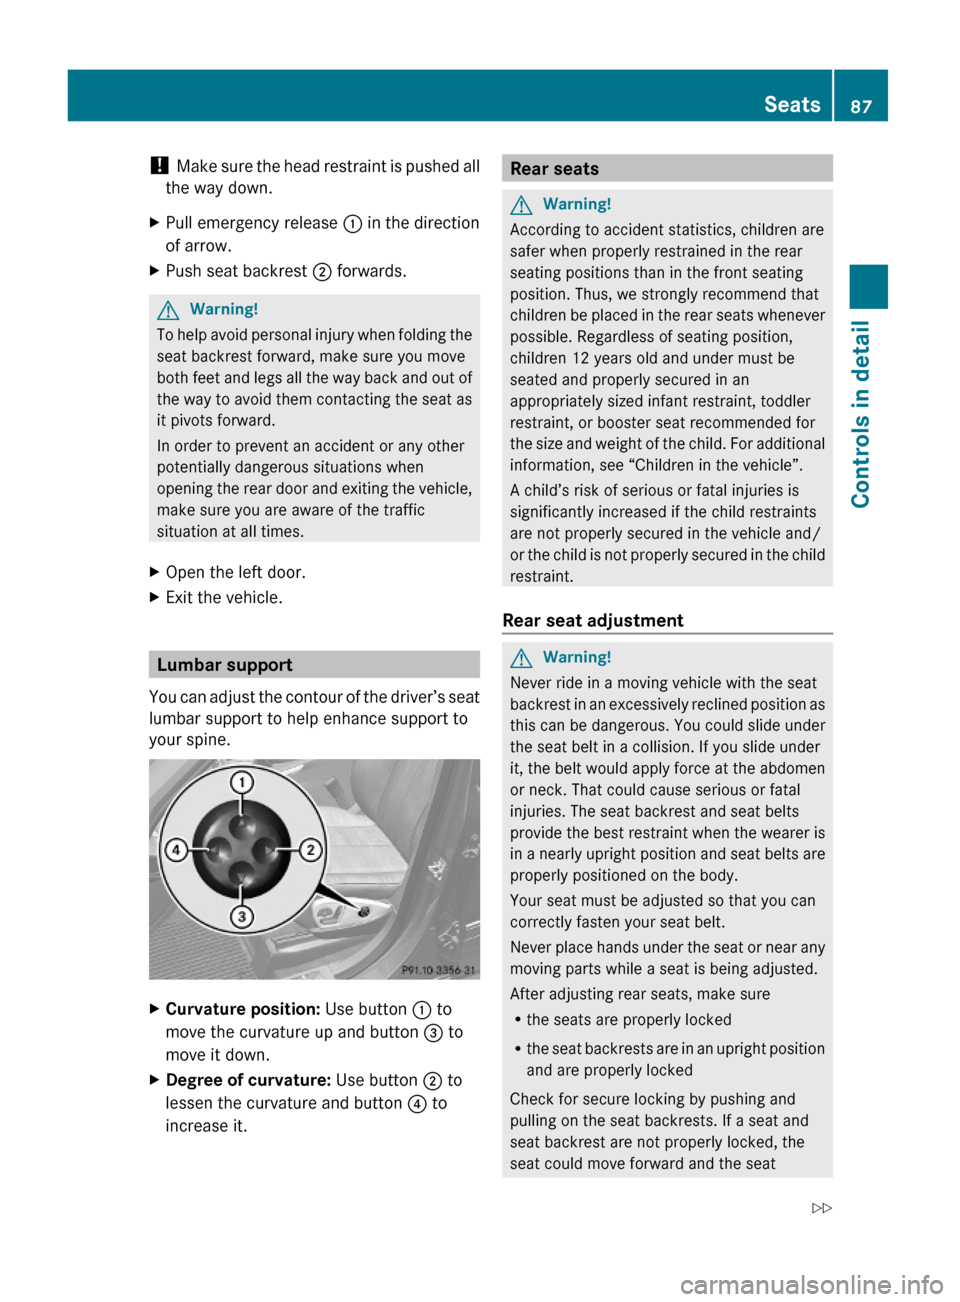
XPull emergency release : in the direction
of arrow.
XPush seat backrest ; forwards.GWarning!
To help avoid personal injury when folding the
seat backrest forward, make sure you move
both feet and legs all the way back and out of
the way to avoid them contacting the seat as
it pivots forward.
In order to prevent an accident or any other
potentially dangerous situations when
opening the rear door and exiting the vehicle,
make sure you are aware of the traffic
situation at all times.
XOpen the left door.XExit the vehicle.
Lumbar support
You can adjust the contour of the driver’s seat
lumbar support to help enhance support to
your spine.
XCurvature position: Use button : to
move the curvature up and button = to
move it down.
XDegree of curvature: Use button ; to
lessen the curvature and button ? to
increase it.
Rear seatsGWarning!
According to accident statistics, children are
safer when properly restrained in the rear
seating positions than in the front seating
position. Thus, we strongly recommend that
children be placed in the rear seats whenever
possible. Regardless of seating position,
children 12 years old and under must be
seated and properly secured in an
appropriately sized infant restraint, toddler
restraint, or booster seat recommended for
the size and weight of the child. For additional
information, see “Children in the vehicle”.
A child’s risk of serious or fatal injuries is
significantly increased if the child restraints
are not properly secured in the vehicle and/
or the child is not properly secured in the child
restraint.
Rear seat adjustment
GWarning!
Never ride in a moving vehicle with the seat
backrest in an excessively reclined position as
this can be dangerous. You could slide under
the seat belt in a collision. If you slide under
it, the belt would apply force at the abdomen
or neck. That could cause serious or fatal
injuries. The seat backrest and seat belts
provide the best restraint when the wearer is
in a nearly upright position and seat belts are
properly positioned on the body.
Your seat must be adjusted so that you can
correctly fasten your seat belt.
Never place hands under the seat or near any
moving parts while a seat is being adjusted.
After adjusting rear seats, make sure
Rthe seats are properly locked
Rthe seat backrests are in an upright position
and are properly locked
Check for secure locking by pushing and
pulling on the seat backrests. If a seat and
seat backrest are not properly locked, the
seat could move forward and the seat
Seats87Controls in detailX164_AKB; 5; 31, en-USd2ureepe,Version: 2.11.8.12009-09-11T12:30:16+02:00 - Seite 87Z
Page 93 of 380
Rear seat heating switches
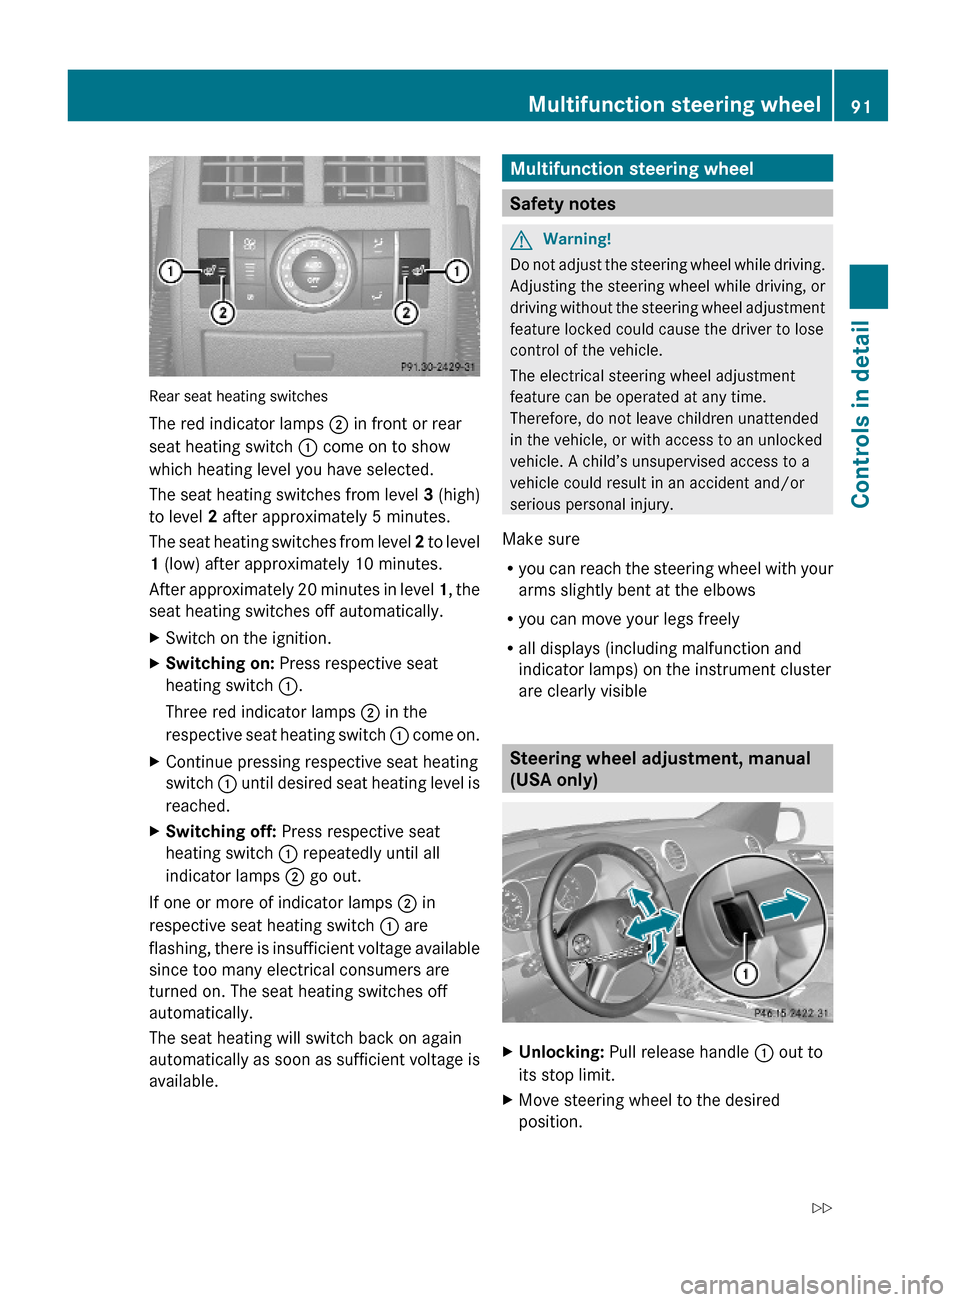
The red indicator lamps ; in front or rear
seat heating switch : come on to show
which heating level you have selected.
The seat heating switches from level 3 (high)
to level 2 after approximately 5 minutes.
The seat heating switches from level 2 to level
1 (low) after approximately 10 minutes.
After approximately 20 minutes in level 1, the
seat heating switches off automatically.
XSwitch on the ignition.XSwitching on: Press respective seat
heating switch :.
Three red indicator lamps ; in the
respective seat heating switch : come on.
XContinue pressing respective seat heating
switch : until desired seat heating level is
reached.
XSwitching off: Press respective seat
heating switch : repeatedly until all
indicator lamps ; go out.
If one or more of indicator lamps ; in
respective seat heating switch : are
flashing, there is insufficient voltage available
since too many electrical consumers are
turned on. The seat heating switches off
automatically.
The seat heating will switch back on again
automatically as soon as sufficient voltage is
available.
Multifunction steering wheel
Safety notes
GWarning!
Do not adjust the steering wheel while driving.
Adjusting the steering wheel while driving, or
driving without the steering wheel adjustment
feature locked could cause the driver to lose
control of the vehicle.
The electrical steering wheel adjustment
feature can be operated at any time.
Therefore, do not leave children unattended
in the vehicle, or with access to an unlocked
vehicle. A child’s unsupervised access to a
vehicle could result in an accident and/or
serious personal injury.
Make sure
Ryou can reach the steering wheel with your
arms slightly bent at the elbows
Ryou can move your legs freely
Rall displays (including malfunction and
indicator lamps) on the instrument cluster
are clearly visible
Steering wheel adjustment, manual
(USA only)
XUnlocking: Pull release handle : out to
its stop limit.
XMove steering wheel to the desired
position.
Multifunction steering wheel91Controls in detailX164_AKB; 5; 31, en-USd2ureepe,Version: 2.11.8.12009-09-11T12:30:16+02:00 - Seite 91Z
Page 94 of 380
XLocking: Push release handle : back to
its original position.
XMake sure the steering wheel is securely
locked by trying to move it up and down as
well as in and out before driving off.
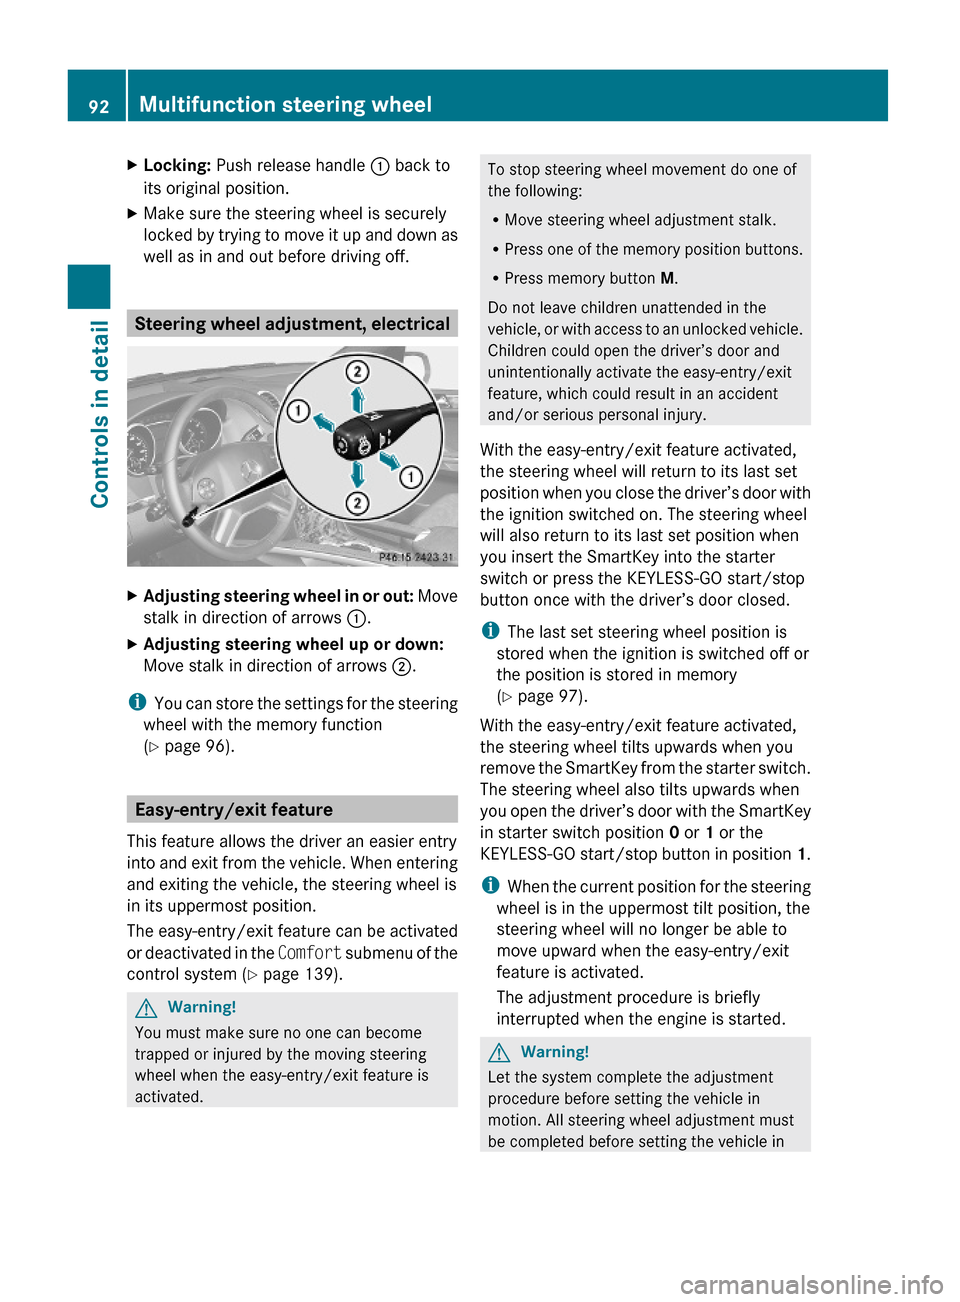
Steering wheel adjustment, electrical
XAdjusting steering wheel in or out: Move
stalk in direction of arrows :.
XAdjusting steering wheel up or down:
Move stalk in direction of arrows ;.
iYou can store the settings for the steering
wheel with the memory function
(Y page 96).
Easy-entry/exit feature
This feature allows the driver an easier entry
into and exit from the vehicle. When entering
and exiting the vehicle, the steering wheel is
in its uppermost position.
The easy-entry/exit feature can be activated
or deactivated in the Comfort submenu of the
control system (Y page 139).
GWarning!
You must make sure no one can become
trapped or injured by the moving steering
wheel when the easy-entry/exit feature is
activated.
To stop steering wheel movement do one of
the following:
RMove steering wheel adjustment stalk.
RPress one of the memory position buttons.
RPress memory button M.
Do not leave children unattended in the
vehicle, or with access to an unlocked vehicle.
Children could open the driver’s door and
unintentionally activate the easy-entry/exit
feature, which could result in an accident
and/or serious personal injury.
With the easy-entry/exit feature activated,
the steering wheel will return to its last set
position when you close the driver’s door with
the ignition switched on. The steering wheel
will also return to its last set position when
you insert the SmartKey into the starter
switch or press the KEYLESS-GO start/stop
button once with the driver’s door closed.
iThe last set steering wheel position is
stored when the ignition is switched off or
the position is stored in memory
(Y page 97).
With the easy-entry/exit feature activated,
the steering wheel tilts upwards when you
remove the SmartKey from the starter switch.
The steering wheel also tilts upwards when
you open the driver’s door with the SmartKey
in starter switch position 0 or 1 or the
KEYLESS-GO start/stop button in position 1.
iWhen the current position for the steering
wheel is in the uppermost tilt position, the
steering wheel will no longer be able to
move upward when the easy-entry/exit
feature is activated.
The adjustment procedure is briefly
interrupted when the engine is started.
GWarning!
Let the system complete the adjustment
procedure before setting the vehicle in
motion. All steering wheel adjustment must
be completed before setting the vehicle in
92Multifunction steering wheelControls in detail
X164_AKB; 5; 31, en-USd2ureepe,Version: 2.11.8.12009-09-11T12:30:16+02:00 - Seite 92
Page 98 of 380
The exterior rear view mirrors fold in
automatically as soon as the vehicle is locked
from the outside.
The exterior rear view mirrors fold out
automatically as soon as the vehicle is
unlocked and the driver’s or front passenger
door is subsequently opened.
Synchronizing
The power-folding rear view mirrors may have
to be synchronized after the vehicle battery
has been disconnected or discharged. If the
exterior rear view mirrors do not fold properly
upon locking or unlocking the vehicle, do the
following:
XMake sure the power-folding function in the
control system is activated (Y page 140).
XWhen the power-folding function is
activated and the exterior rear view
mirrors still do not fold properly: Fold
each exterior rear view mirror in completely
(Y page 96).
XFold each exterior rear view mirror out
completely (Y page 96).
When the exterior rear view mirrors fold
properly upon locking the vehicle, the exterior
mirrors are synchronized. Otherwise repeat
the above steps.
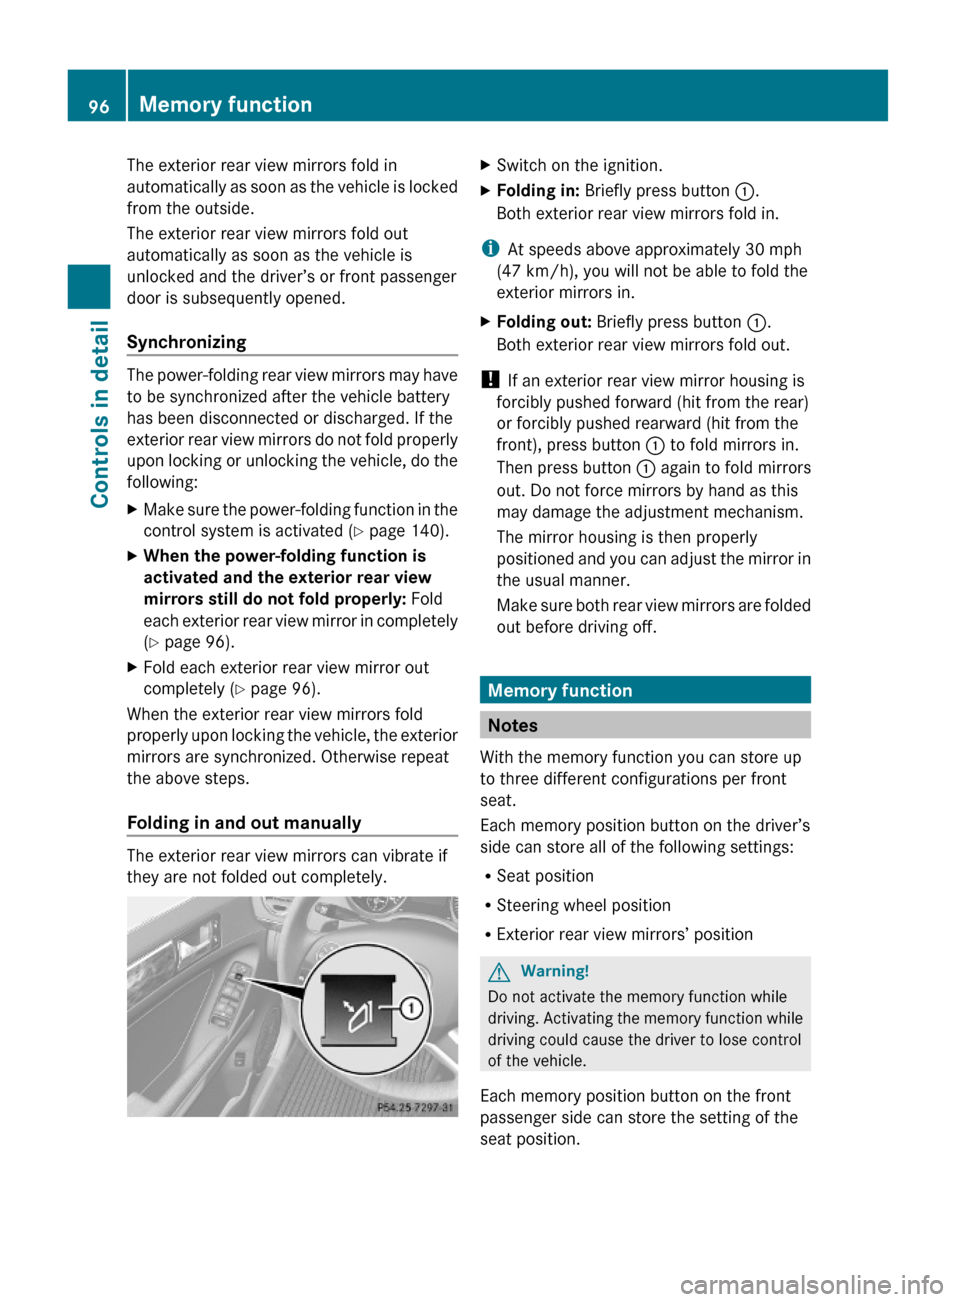
Folding in and out manually
The exterior rear view mirrors can vibrate if
they are not folded out completely.
XSwitch on the ignition.XFolding in: Briefly press button :.
Both exterior rear view mirrors fold in.
iAt speeds above approximately 30 mph
(47 km/h), you will not be able to fold the
exterior mirrors in.
XFolding out: Briefly press button :.
Both exterior rear view mirrors fold out.
! If an exterior rear view mirror housing is
forcibly pushed forward (hit from the rear)
or forcibly pushed rearward (hit from the
front), press button : to fold mirrors in.
Then press button : again to fold mirrors
out. Do not force mirrors by hand as this
may damage the adjustment mechanism.
The mirror housing is then properly
positioned and you can adjust the mirror in
the usual manner.
Make sure both rear view mirrors are folded
out before driving off.
Memory function
Notes
With the memory function you can store up
to three different configurations per front
seat.
Each memory position button on the driver’s
side can store all of the following settings:
RSeat position
RSteering wheel position
RExterior rear view mirrors’ position
GWarning!
Do not activate the memory function while
driving. Activating the memory function while
driving could cause the driver to lose control
of the vehicle.
Each memory position button on the front
passenger side can store the setting of the
seat position.
96Memory functionControls in detail
X164_AKB; 5; 31, en-USd2ureepe,Version: 2.11.8.12009-09-11T12:30:16+02:00 - Seite 96
Page 104 of 380
Runlock the vehicle
Rremove the SmartKey from the starter
switch (Interior Lighting Delayed
Shut-off must be switched on
(Y page 138))
Ropen a door
Ropen the tailgate
The interior lighting goes out after a short
time.
iIf a door remains open, the interior lamps
go out automatically after approximately
5 minutes when the SmartKey is removed
or in starter switch position 0.
XDeactivating: Press button ~.
Button ~ engages.
Manual control
! An interior lamp switched on manually
does not go out automatically.
Leaving an interior lamp switched on for an
extended period of time with the engine
turned off could result in a discharged
battery.
XSwitching front interior lighting on/
off: Press switch c.
XSwitching rear interior lighting on/off:
Press switch v.
XSwitching front reading lamps on/off:
Press respective switch p.
Ambient lighting
The brightness of the ambient lighting C is
adjusted via the “Control system”
(Y page 137).
Emergency lighting
The interior lighting comes on automatically
if the vehicle is involved in an accident.
Switching off: XPress button ~.
or
XPress hazard warning flasher switch
(Y page 101).
or
XUnlock the vehicle with the SmartKey.
Interior lighting in the rear
! An interior lamp switched on manually
does not go out automatically.
Leaving an interior lamp switched on for an
extended period of time with the engine
turned off could result in a discharged
battery.
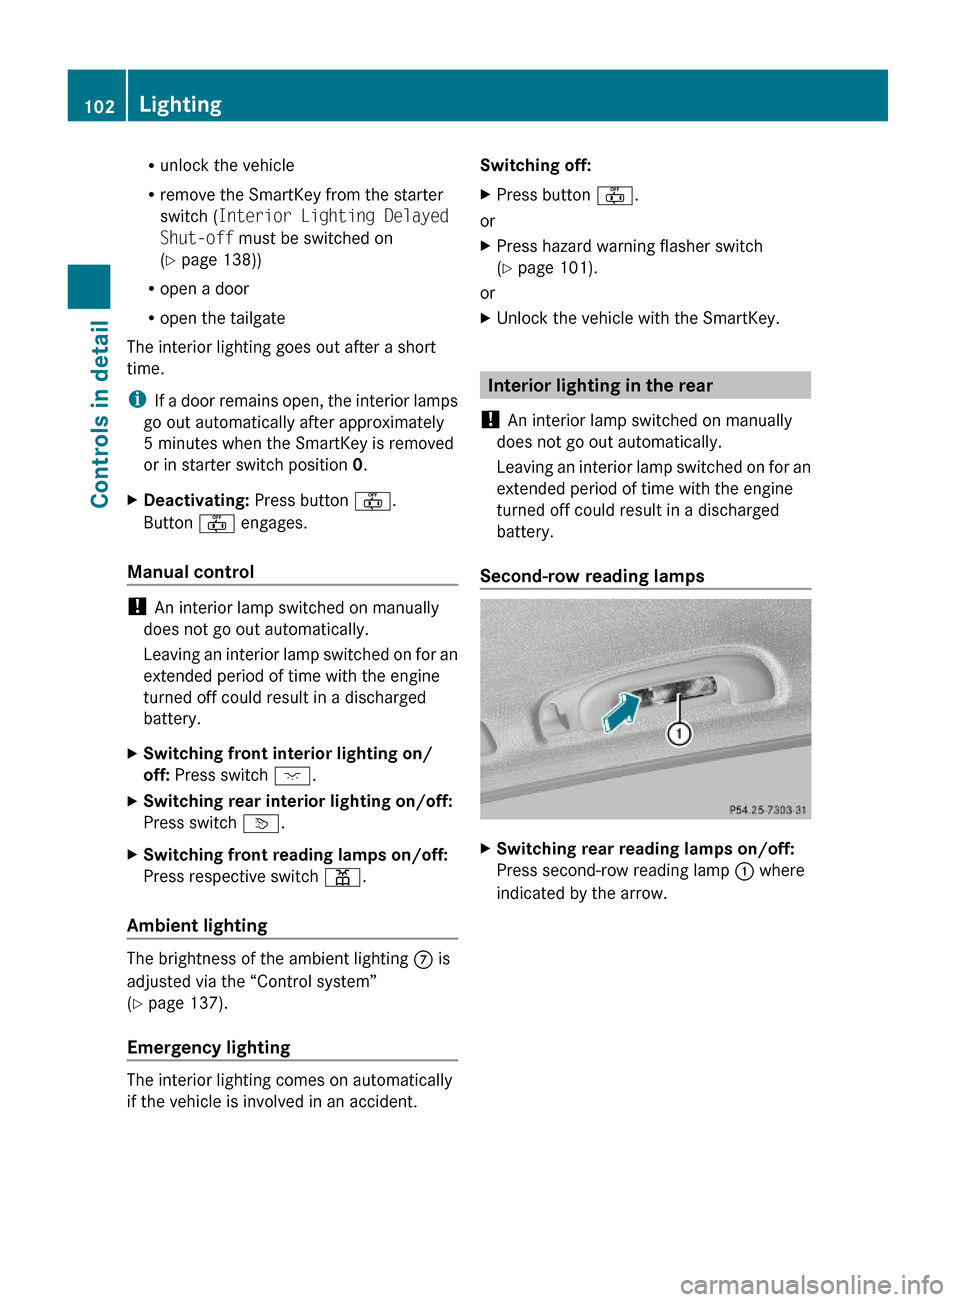
Second-row reading lamps
XSwitching rear reading lamps on/off:
Press second-row reading lamp : where
indicated by the arrow.
102LightingControls in detail
X164_AKB; 5; 31, en-USd2ureepe,Version: 2.11.8.12009-09-11T12:30:16+02:00 - Seite 102
Page 107 of 380
For information on filling up the washer
reservoir, see “Washer system and headlamp
cleaning system” ( Y page 232).
Problems with wipers
! If anything blocks the wipers (leaves,
snow, etc.), switch them off immediately.
For safety reasons, do the following before
attempting to remove any blockage:
R Stop the vehicle in a safe location.
R Remove the SmartKey from the starter
switch.
or
R Turn off the engine by pressing the
KEYLESS-GO start/stop button and
open the driver’s door (with the driver’s
door open, starter switch is in position
0 , same as with SmartKey removed from
starter switch).
R Engage the parking brake.
R Remove blockage.
R Turn the wipers on again.
If the windshield wipers fail to function at
all with the combination switch in position
Ä or Å ,
R set the combination switch to the next
higher wiper speed
R have the windshield wipers checked at
the nearest authorized Mercedes-Benz
Center
Power windows
Opening and closing
The door windows and the hinged quarter
windows are opened and closed electrically.
The switches for all door windows and the
hinged quarter windows are located on the
driver’s door control panel. The switches for
the respective door windows are located on
the front passenger door and the rear doors.
The hinged quarter windows can be operated
from the driver’s seat only.
i Operating the rear door windows from
the rear is not possible when you activate
the override switch ( Y page 60).GObserve Safety notes, see page 55.GWarning!
When opening or closing the windows, make
sure there is no danger of anyone being
harmed by the opening/closing procedure.
The door windows are equipped with the
express operation and automatic reversal
function. If in express operation mode a door
window encounters an obstruction that
blocks its path, the automatic reversal
function will stop the door window and open
it slightly.
The door windows operate differently when
the switch is pulled and held. See the “Closing
when a door window is blocked” section in
this chapter for details.
The closing of a door window can be
immediately halted by releasing the switch or,
if the switch was pulled past the resistance
point and released, by either pressing or
pulling the respective switch.
The closing of the hinged quarter windows can
be immediately halted by pressing or pulling
the switch.
If a window encounters an obstruction that
blocks its path in a circumstance where you
are closing the windows by pressing and
holding button & on the SmartKey or by
pressing and holding the lock button (vehicles
with KEYLESS-GO) on an outside door handle,
the automatic reversal function will not
operate.
Activate the override switch when children
are riding in the back seats of the vehicle. The
children may otherwise injure themselves,
e.g. by becoming trapped in the window
opening.
Power windows105Controls in detailX164_AKB; 5; 31, en-USd2ureepe,Version: 2.11.8.12009-09-11T12:30:16+02:00 - Seite 105Z
Page 108 of 380
GWarning!
Do not keep any part of your body up against
the window pane when opening a window. The
downward motion of the pane may pull that
part of your body down between the window
pane and the door frame and trap it there. If
there is a risk of entrapment, release the
switch and pull it to close the window.
iYou can also open or close the windows
using the SmartKey, see “Summer opening
feature” (Y page 107) and “Convenience
closing feature” (Y page 107).
iAfter switching off the ignition or
removing the SmartKey from the starter
switch, you can operate the windows until
you open the driver’s or front passenger
door. If no door was opened you can
operate the windows for up to 5 minutes.
Door windows
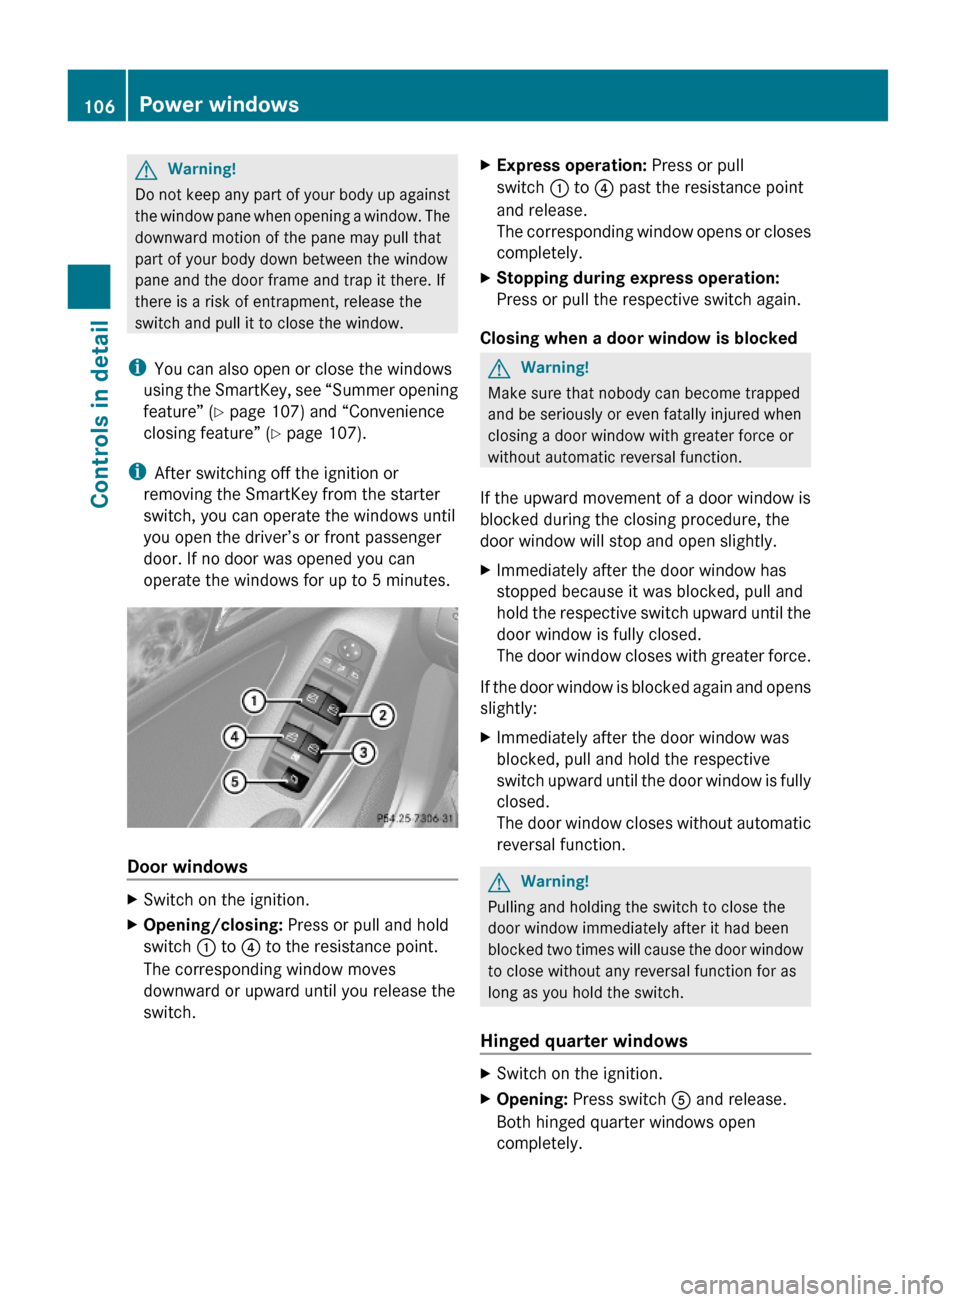
XSwitch on the ignition.XOpening/closing: Press or pull and hold
switch : to ? to the resistance point.
The corresponding window moves
downward or upward until you release the
switch.
XExpress operation: Press or pull
switch : to ? past the resistance point
and release.
The corresponding window opens or closes
completely.
XStopping during express operation:
Press or pull the respective switch again.
Closing when a door window is blocked
GWarning!
Make sure that nobody can become trapped
and be seriously or even fatally injured when
closing a door window with greater force or
without automatic reversal function.
If the upward movement of a door window is
blocked during the closing procedure, the
door window will stop and open slightly.
XImmediately after the door window has
stopped because it was blocked, pull and
hold the respective switch upward until the
door window is fully closed.
The door window closes with greater force.
If the door window is blocked again and opens
slightly:
XImmediately after the door window was
blocked, pull and hold the respective
switch upward until the door window is fully
closed.
The door window closes without automatic
reversal function.
GWarning!
Pulling and holding the switch to close the
door window immediately after it had been
blocked two times will cause the door window
to close without any reversal function for as
long as you hold the switch.
Hinged quarter windows
XSwitch on the ignition.XOpening: Press switch A and release.
Both hinged quarter windows open
completely.
106Power windowsControls in detail
X164_AKB; 5; 31, en-USd2ureepe,Version: 2.11.8.12009-09-11T12:30:16+02:00 - Seite 106
Page 109 of 380
XClosing: Pull switch A and release.
Both hinged quarter windows close
completely.
i When the obstruction sensor detects that
a hinged quarter windows is blocked during
the closing process, they will stop and open
slightly.
XHalting closing process: Press or pull
switch A once more during the closing
process.
The hinged quarter windows will stop and
open completely.
i For your safety, the hinged quarter
windows cannot be opened again until
4 seconds have passed.
Synchronizing door windows
The door windows must be synchronized after
the battery has been disconnected or if the
door windows cannot be fully closed (express
operation).
Each door window must be synchronized
separately.
XClose all doors.XSwitch on the ignition.XPull and hold switch :, ; , = or ?
( Y page 106) until the respective door
window is closed.
The door window opens again slightly.XPull and hold the respective switch once
more immediately until the door window is
closed completely.XHold the respective switch for
approximately 1 second.
The door window is synchronized.Summer opening feature
When the weather is warm, you can ventilate
the vehicle before driving off by
simultaneously
R opening the door windows
R opening the hinged quarter windows
R opening the tilt/sliding sunroof
R switching on the seat ventilation for the
driver’s seat
The summer opening feature can only be
activated via the remote control of the
SmartKey. The SmartKey must be in close
proximity to the driver’s outside door handle.XAim the transmitter eye of the SmartKey at
the driver’s outside door handle.XPress and hold button % on the
SmartKey until the windows and the tilt/
sliding sunroof have reached the desired
position.
The vehicle unlocks.XRelease button % on the SmartKey to
interrupt the opening procedure.
Convenience closing feature
When locking the vehicle, you can
simultaneously close
R the door windows
R the hinged quarter windows
R the tilt/sliding sunroof
GWarning!
When closing the windows and the tilt/sliding
sunroof, make sure there is no danger of
anyone being harmed by the closing
procedure.
If potential danger exists, proceed as follows:
R Release button & to stop the closing
procedure. To open, press and hold button
% . To continue the closing procedure
after making sure that there is no danger of
Power windows107Controls in detailX164_AKB; 5; 31, en-USd2ureepe,Version: 2.11.8.12009-09-11T12:30:16+02:00 - Seite 107Z