change wheel MERCEDES-BENZ GLA SUV 2013 Owner's Manual
[x] Cancel search | Manufacturer: MERCEDES-BENZ, Model Year: 2013, Model line: GLA SUV, Model: MERCEDES-BENZ GLA SUV 2013Pages: 401, PDF Size: 11.9 MB
Page 326 of 401
ple, changed more frequently. The tyres must
be checked more frequently if the vehicle is
operated under increased loads. Further
information can be obtained at a qualified
specialist workshop, e.g. a Mercedes-Benz
Service Centre.
Driving abroad
An extensive Mercedes-Benz Service network is also available in other countries. You can
obtain further information from any
Mercedes-Benz Service Centre. Care
General notes
H
Environmental note
Dispose of empty packaging and cleaning
cloths in an environmentally responsible man- ner.
! For cleaning your vehicle, do not use any
of the following:
R dry, rough or hard cloths
R abrasive cleaning agents
R solvents
R cleaning agents containing solvents
Do not scrub.
Do not touch the surfaces or protective
films with hard objects, e.g. a ring or ice
scraper. You could otherwise scratch or
damage the surfaces and protective film.
! Do not park up the vehicle for an extended
period straight after cleaning it, particularly after having cleaned the wheels with wheel
cleaner. Wheel cleaners could cause
increased corrosion of the brake discs and
brake pads/linings. For this reason, you
should drive for a few minutes after clean-
ing. Braking heats the brake discs and the
brake pads/linings, thus drying them. The
vehicle can then be parked up.
Regular care of your vehicle is a condition for
retaining the quality in the long term. Use care products and cleaning agents rec-
ommended and approved by Mercedes-Benz. Care of the exterior
Automatic car wash G
WARNING
Braking efficiency is reduced after the vehicle has been washed. There is a risk of an acci-
dent.
After washing the vehicle, brake carefully
while paying attention to the traffic conditions in order to restore full braking efficiency.
! If DISTRONIC PLUS or the HOLD function
is activated, the vehicle brakes automati-
cally in certain situations. To prevent dam-
age to the vehicle, deactivate DISTRONIC
PLUS and the HOLD function in the follow-
ing or other similar situations:
R when towing the vehicle
R in the car wash
! Make sure that the automatic transmis-
sion is in position Nwhen washing your
vehicle in a tow-through car wash. The vehi-
cle could be damaged if the transmission is
in another position.
! Make sure that:
R the side windows and sliding sunroof are
closed completely.
R the blower for the ventilation/heating is
switched off (OFF button is depressed/
airflow control is turned to position 0).
R the windscreen wiper switch is at posi-
tion 0.
The vehicle could otherwise be damaged.
You can wash the vehicle in an automatic car
wash from the very start.
Wash off excess dirt before cleaning the vehi-
cle in an automatic car wash.
After using an automatic car wash, wipe off
wax from the windscreen and the wiper
blades. This will prevent smears and reduce Care
323Maintenance and care Z
Page 331 of 401
qualified specialist workshop, e.g. a
Mercedes-Benz Service Centre. Interior care
Cleaning the display !
For cleaning, do not use any of the fol-
lowing:
R alcohol-based thinner or petrol
R abrasive cleaning agents
R commercially-available household clean-
ing agents
These may damage the display surface. Do not put pressure on the display surface
when cleaning. This could lead to irrepara-
ble damage to the display.
X Before cleaning the display, make sure that
it is switched off and has cooled down.
X Clean the display surface using a commer-
cially available microfibre cloth and
TFT/LCD display cleaner.
X Dry the display surface using a dry micro-
fibre cloth.
Cleaning the plastic trim G
WARNING
Care products and cleaning agents containing solvents can cause surfaces in the cockpit to
become porous. This could result in plastic
parts breaking away when the airbags are
deployed. There is a danger of injury.
Do not use care products and cleaning agents containing solvents to clean the cockpit.
! Do not affix the following to plastic surfa-
ces:
R stickers
R films
R scented oil bottles or similar items
You could otherwise damage the plastic.
! Do not allow cosmetics, insect repellent
or sunscreen to come in contact with the plastic trim. This maintains the high-quality
look of the surfaces.
X Wipe the plastic trim with a damp, lint-free
cloth, e.g. a microfibre cloth.
X Heavy soiling: use car care and cleaning
products recommended and approved by
Mercedes-Benz.
The surface may change colour tempora-
rily. Wait until the surface is dry again.
Cleaning the steering wheel and gear or selector lever X
Thoroughly wipe with a damp cloth or use
leather care agents that have been recom-
mended and approved by Mercedes-Benz.
Cleaning wooden trim and trim ele-
ments !
Do not use solvent-based cleaning agents
such as tar remover, wheel cleaners, pol-
ishes or waxes. There is otherwise a risk of damaging the surface.
X Wipe the wooden trim and trim elements
with a damp, lint-free cloth, e.g. a microfi-
bre cloth.
X Heavy soiling: use car care and cleaning
products recommended and approved by
Mercedes-Benz.
Cleaning the seat covers General notes
! Do not use microfibre cloths to clean gen-
uine leather, artificial leather or DINAMICA
covers. If used often, these can damage the cover.
i Note that regular care is essential to
make sure that the appearance and com-
fort of the covers are retained over time.
Genuine leather seat covers
Leather is a natural product.
It has natural surface properties, e.g.: 328
CareMaintenance and care
Page 336 of 401
X
Remove first-aid kit =.
i Check the expiry date on first-aid kit
=at
least once a year. Replace the contents if
necessary, and replace any missing items. Fire extinguisher
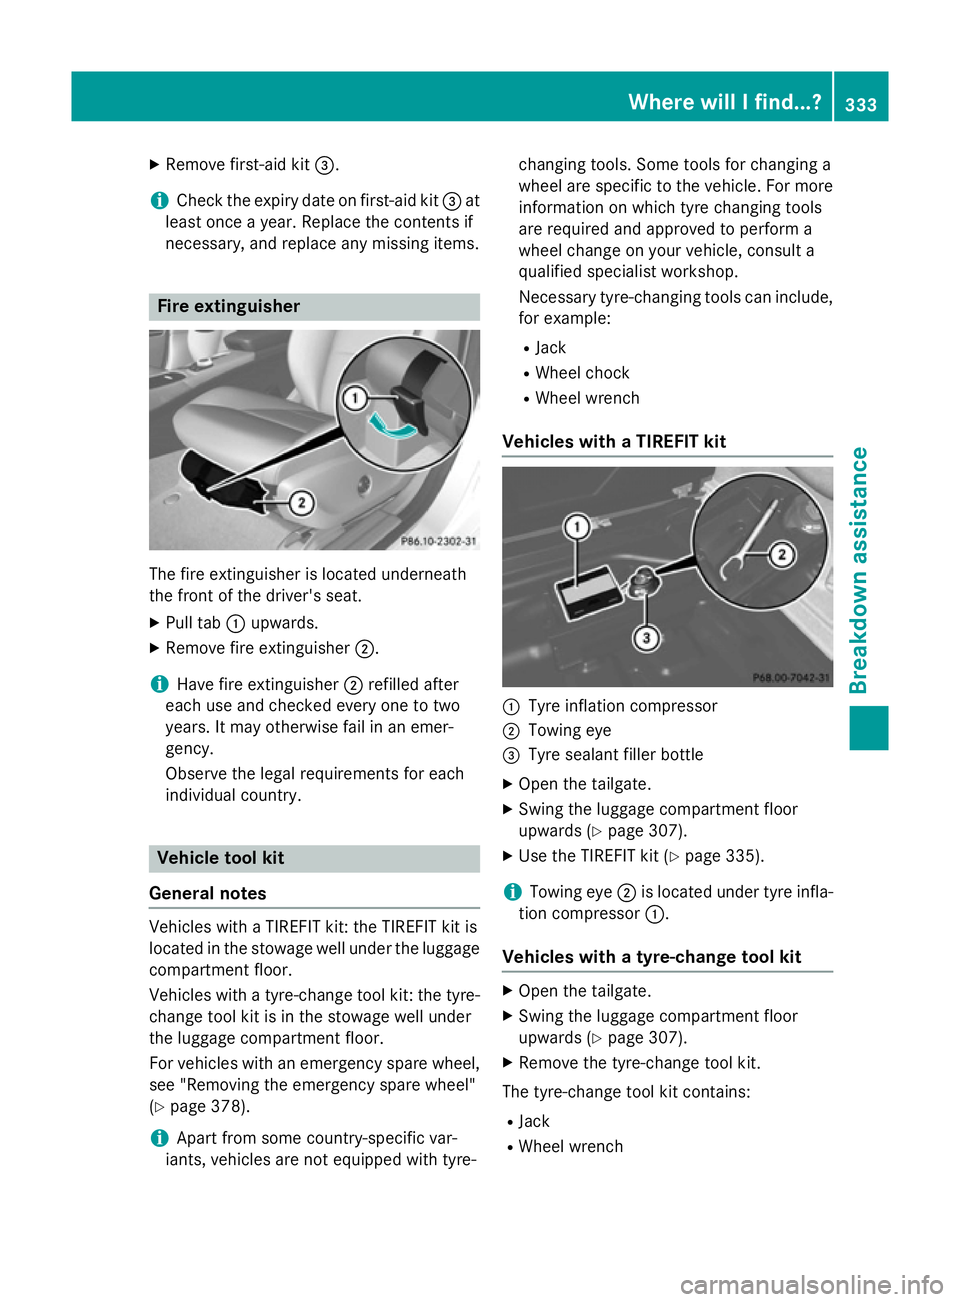
The fire extinguisher is located underneath
the front of the driver's seat.
X Pull tab :upwards.
X Remove fire extinguisher ;.
i Have fire extinguisher
;refilled after
each use and checked every one to two
years. It may otherwise fail in an emer-
gency.
Observe the legal requirements for each
individual country. Vehicle tool kit
General notes Vehicles with a TIREFIT kit: the TIREFIT kit is
located in the stowage well under the luggage
compartment floor.
Vehicles with a tyre-change tool kit: the tyre-change tool kit is in the stowage well under
the luggage compartment floor.
For vehicles with an emergency spare wheel,
see "Removing the emergency spare wheel"
(Y page 378).
i Apart from some country-specific var-
iants, vehicles are not equipped with tyre- changing tools. Some tools for changing a
wheel are specific to the vehicle. For more
information on which tyre changing tools
are required and approved to perform a
wheel change on your vehicle, consult a
qualified specialist workshop.
Necessary tyre-changing tools can include,
for example:
R Jack
R Wheel chock
R Wheel wrench
Vehicles with a TIREFIT kit :
Tyre inflation compressor
; Towing eye
= Tyre sealant filler bottle
X Open the tailgate.
X Swing the luggage compartment floor
upwards (Y page 307).
X Use the TIREFIT kit (Y page 335).
i Towing eye
;is located under tyre infla-
tion compressor :.
Vehicles with a tyre-change tool kit X
Open the tailgate.
X Swing the luggage compartment floor
upwards (Y page 307).
X Remove the tyre-change tool kit.
The tyre-change tool kit contains:
R Jack
R Wheel wrench Where will I find.
..?
333Breakdo wn assis tance
Page 337 of 401
R
One pair of gloves
R Folding wheel chock Flat tyre
Preparing the vehicle
Your vehicle may be equipped with: R MOExtended tyres (tyres with run-flat char-
acteristics) (Y page 334)
Vehicle preparation is not necessary on
vehicles with MOExtended tyres.
R a TIREFIT kit (Y page 333)
R an emergency spare wheel (only for certain
countries)
Information on changing/fitting a wheel
(Y page 362).
X Stop the vehicle as far away as possible
from traffic on solid, non-slippery and level
ground.
X Switch on the hazard warning lamps.
X Secure the vehicle against rolling away
(Y page 179).
X If possible, bring the front wheels into the
straight-ahead position.
X Switch off the engine.
X Remove the key from the ignition lock.
X All occupants must get out of the vehicle.
Make sure that they are not endangered as they do so.
X Make sure that no one is near the danger
area while a wheel is being changed. Any-
one who is not directly assisting in the
wheel change should, for example, stand
behind the barrier.
X Get out of the vehicle. Pay attention to traf-
fic conditions when doing so.
X Close the driver's door.
X Place the warning triangle a suitable dis-
tance away (Y page 332). Observe legal
requirements.
i Vehicles with MOExtended tyres are not
equipped with a TIREFIT kit at the factory. It
is therefore recommended that you addi- tionally equip your vehicle with a TIREFIT kit
if you fit tyres that do not feature run-flat
characteristics, e.g. winter tyres. A TIREFIT
kit can be obtained from a qualified spe-
cialist workshop. MOExtended tyres (tyres with run-flat
characteristics)
General notes With MOExtended tyres (tyres with run-flat
characteristics), you can continue to drive
your vehicle even if there is a total loss of
pressure in one or more tyres. The affected
tyre must not show any clearly visible dam-
age.
You can recognise MOExtended tyres by the
MOExtended marking which appears on the
tyre wall. You will find this marking next to the
tyre size designation, the load-bearing capa-
city and the speed index.
MOExtended tyres may only be used in con-
junction with an active tyre pressure loss
warning system or tyre pressure monitoring
system.
If the pressure loss warning message
appears in the multifunction display:
R observe the instructions in the display mes-
sages (Y page 280).
R check the tyre for damage
R if driving on, observe the following notes
The maximum driving distance is approx-
imately 80 km when the vehicle is partially
laden and approximately 30 km when the
vehicle is fully laden.
In addition to the vehicle load, the driving dis- tance possible depends upon:
R speed
R road condition
R outside temperature
The driving distance possible in run-flat mode may be reduced by extreme driving condi-
tions/manoeuvres, or it can be increased
through a moderate style of driving. 334
Flat tyreBreakdown assistance
Page 339 of 401
R
Immediately change out of clothing which
has come into contact with tyre sealant.
R If an allergic reaction occurs, seek medical
attention immediately.
Comply with the manufacturer’s safety
instructions on the sticker on the tyre infla-
tion compressor.
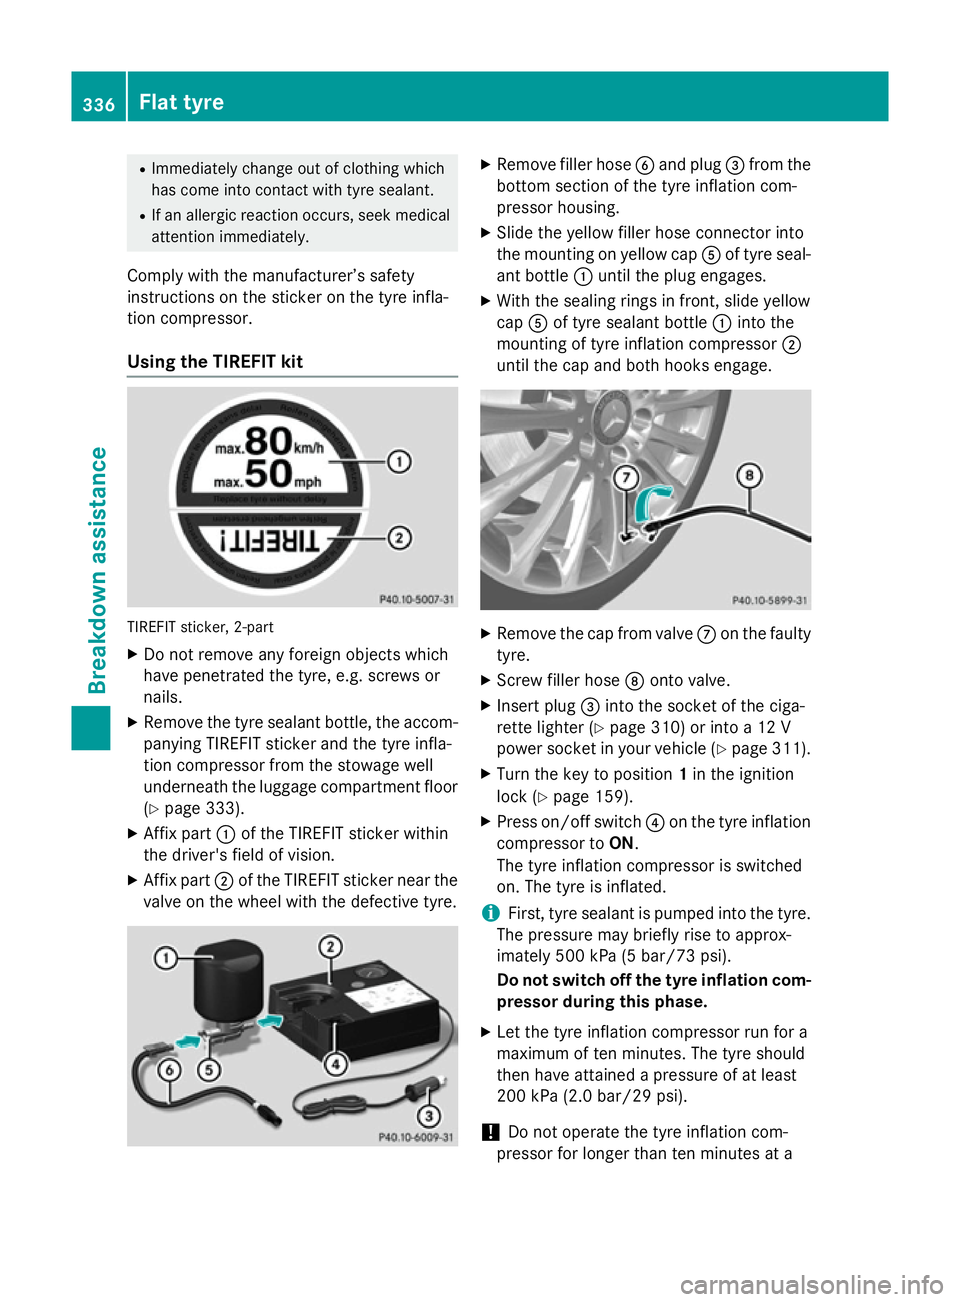
Using the TIREFIT kit TIREFIT sticker, 2-part
X Do not remove any foreign objects which
have penetrated the tyre, e.g. screws or
nails.
X Remove the tyre sealant bottle, the accom-
panying TIREFIT sticker and the tyre infla-
tion compressor from the stowage well
underneath the luggage compartment floor
(Y page 333).
X Affix part :of the TIREFIT sticker within
the driver's field of vision.
X Affix part ;of the TIREFIT sticker near the
valve on the wheel with the defective tyre. X
Remove filler hose Band plug =from the
bottom section of the tyre inflation com-
pressor housing.
X Slide the yellow filler hose connector into
the mounting on yellow cap Aof tyre seal-
ant bottle :until the plug engages.
X With the sealing rings in front, slide yellow
cap Aof tyre sealant bottle :into the
mounting of tyre inflation compressor ;
until the cap and both hooks engage. X
Remove the cap from valve Con the faulty
tyre.
X Screw filler hose Donto valve.
X Insert plug =into the socket of the ciga-
rette lighter (Y page 310) or into a 12 V
power socket in your vehicle (Y page 311).
X Turn the key to position 1in the ignition
lock (Y page 159).
X Press on/off switch ?on the tyre inflation
compressor to ON.
The tyre inflation compressor is switched
on. The tyre is inflated.
i First, tyre sealant is pumped into the tyre.
The pressure may briefly rise to approx-
imately 500 kPa (5 bar/73 psi).
Do not switch off the tyre inflation com-
pressor during this phase.
X Let the tyre inflation compressor run for a
maximum of ten minutes. The tyre should
then have attained a pressure of at least
200 kPa (2.0 bar/29 psi).
! Do not operate the tyre inflation com-
pressor for longer than ten minutes at a 336
Flat tyreBreakdown assistance
Page 350 of 401
Towing the vehicle with both axles on
the ground
i In order to signal a change of direction
when towing with the hazard warning lamps switched on, use the combination switch as
usual. In this case, only the turn signals for
the desired direction flash. When you reset
the combination switch, the hazard warn-
ing lamps start flashing again.
Vehicles with automatic transmission: the
automatic transmission automatically shifts
to position Pwhen you open the driver's or
front-passenger door or when you remove the
key from the ignition lock. In order to ensure that the automatic transmission stays in posi- tion Nwhen towing the vehicle, you must
observe the following points:
X Make sure that the vehicle is stationary.
X Turn the key to position 2in the ignition
lock.
X Depress and hold the brake pedal.
X Shift the automatic transmission to posi-
tion N.
Vehicles with manual transmission: X Turn the key to position 2in the ignition
lock.
X Depress and hold the brake pedal.
X Depress the clutch pedal fully and shift to
neutral.
Vehicles with manual or automatic trans- mission:
X Leave the key in position 2in the ignition
lock.
X Release the brake pedal.
X Release the electric parking brake.
X Switch on the hazard warning lamps
(Y page 123).
It is important that you observe the safety
instructions when towing away your vehicle
(Y page 344). Transporting the vehicle
! You may only secure the vehicle by the
wheels, not by parts of the vehicle such as
axle or steering components. Otherwise,
the vehicle could be damaged.
X Vehicles with manual transmission:
depress the clutch pedal fully and shift to
neutral.
X Vehicles with automatic transmission:
turn the key to position 2in the ignition
lock.
X Move the transmission to position N.
As soon as the vehicle is loaded: X Prevent the vehicle from rolling away by
applying the electric parking brake.
X Vehicles with manual transmission:
depress the clutch pedal fully and engage
first or reverse gear.
X Vehicles with automatic transmission:
shift the transmission to position P.
X Turn the key to position 0in the ignition
lock and remove it.
X Secure the vehicle.
The towing eyes or trailer tow hitch can be
used to pull the vehicle onto a trailer or trans-
porter if you wish to transport it. Notes for 4MATIC vehicles
! Vehicles with 4MATIC must not be towed
with the front or rear axle raised; otherwise, the transmission may be damaged.
Vehicles with 4MATIC may only be either
towed away with both axles on the ground or be loaded up and transported.
If the vehicle has transmission damage or
damage to the front or rear axle, have it trans-
ported on a transporter or trailer.
In the event of damage to the electrical
system
If the battery is defective, the automatic
transmission will be locked in position P. To
shift the automatic transmission to position Towing and tow-starting
347Breakdown assistance Z
Page 357 of 401
tyre load rating and speed rating required for
your vehicle.
Pay special attention to country-specific
requirements for tyre approval. These
requirements can stipulate a specific tyre
type for your vehicle. Furthermore, the use of certain tyre types in certain regions and areas
of operation can be highly beneficial. You can find further information regarding tyres at
specialist tyre retailers, at qualified specialist
workshops or at any Mercedes-Benz Service
Centre.
R Only fit tyres and wheels of the same type
and make.
Exception: it is permissible to fit a different
type or make in the event of a flat tyre.
Observe the "MOExtended tyres (tyres with
run-flat characteristics" section
(Y page 334).
R Only fit tyres of the correct size onto the
wheels.
R Run in new tyres at moderate speeds for
the first 100 km. They only reach their full
performance after this distance.
R Do not drive with tyres which have too little
tread depth. This otherwise significantly
reduces the traction on wet roads (aqua-
planing).
R Replace the tyres after six years at the lat-
est, regardless of wear.
Observe the notes on the emergency spare
wheel (Y page 377). MOExtended tyres (tyres with run-flat
characteristics)
With MOExtended tyres (tyres with run-flat
characteristics), you can continue to drive
your vehicle even if there is a total loss of
pressure in one or more tyres.
Only use MOExtended tyres in conjunction
with an activated tyre pressure loss warning
system or tyre pressure monitoring system
and only on tyres specifically inspected by
Mercedes ‑Benz. Notes on driving with MOExtended tyres with
a flat tyre (Y page 334).
i Vehicles with MOExtended tyres are not
equipped with a TIREFIT kit at the factory. It
is therefore recommended that you addi-
tionally equip your vehicle with a TIREFIT kit if you fit tyres that do not feature run-flat
characteristics, e.g. winter tyres. A TIREFIT
kit can be obtained from a qualified spe-
cialist workshop. Winter operation
General notes
Have your vehicle winterproofed at a qualified
specialist workshop at the onset of winter.
Observe the notes in the "Changing a wheel" section (Y page 361). Driving with summer tyres
At temperatures below +7 †, summer tyres
lose elasticity and therefore traction and
braking power. Change the tyres on your vehi- cle to M+S tyres. Using summer tyres at very
cold temperatures could cause tears to form, thereby damaging the tyres permanently.
Mercedes-Benz cannot accept responsibility
for this type of damage. G
WARNING
Damaged tyres can cause tyre inflation pres-
sure loss. As a result, you could lose control of your vehicle. There is a risk of accident.
Check the tyres regularly for signs of damageand replace any damaged tyres immediately. M+S tyres
G
WARNING
M+S tyres with a tyre tread depth of less than 4 mm are not suitable for use in winter as they
do not provide sufficient traction. There is a
risk of accident. 354
Winter operationWheels and tyres
Page 359 of 401
Tyre pressure
Tyre pressure specifications
G
WARNING
Underinflated or overinflated tyres pose the
following risks:
R the tyres may burst, especially as the load
and vehicle speed increase.
R the tyres may wear excessively and/or
unevenly, which may greatly impair tyre
traction.
R the driving characteristics, as well as steer-
ing and braking, may be greatly impaired.
There is a risk of an accident.
Observe the recommended tyre pressure and check the tyre pressure of all the tyres includ-
ing the spare wheel:
R at least every two weeks
R when the load changes
R before embarking on a longer journey
R for changed operating conditions, e.g. off-
road driving
If necessary, correct the tyre pressure. G
WARNING
If you fit unsuitable accessories onto tyre
valves, the tyre valves may be overloaded and malfunction, which can cause tyre pressure
loss. Due to their design, retrofitted tyre pres-
sure monitors keep the tyre valve open. This
can also result in tyre pressure loss. There is a risk of accident.
Only screw standard valve caps or valve caps
specifically provided by Mercedes-Benz for
your vehicle onto the tyre valve. G
WARNING
If the tyre pressure drops repeatedly, the
wheel, valve or tyre may be damaged. Tyre
pressure that is too low may result in a tyre
blow-out. There is a risk of accident.
R Check the tyre for foreign objects.
R Check whether the wheel is losing air or the
valve is leaking. If you are unable to rectify the damage, con-
tact a qualified specialist workshop.
H
Environmental note
Check the tyre pressure regularly, at least
every 14 days.
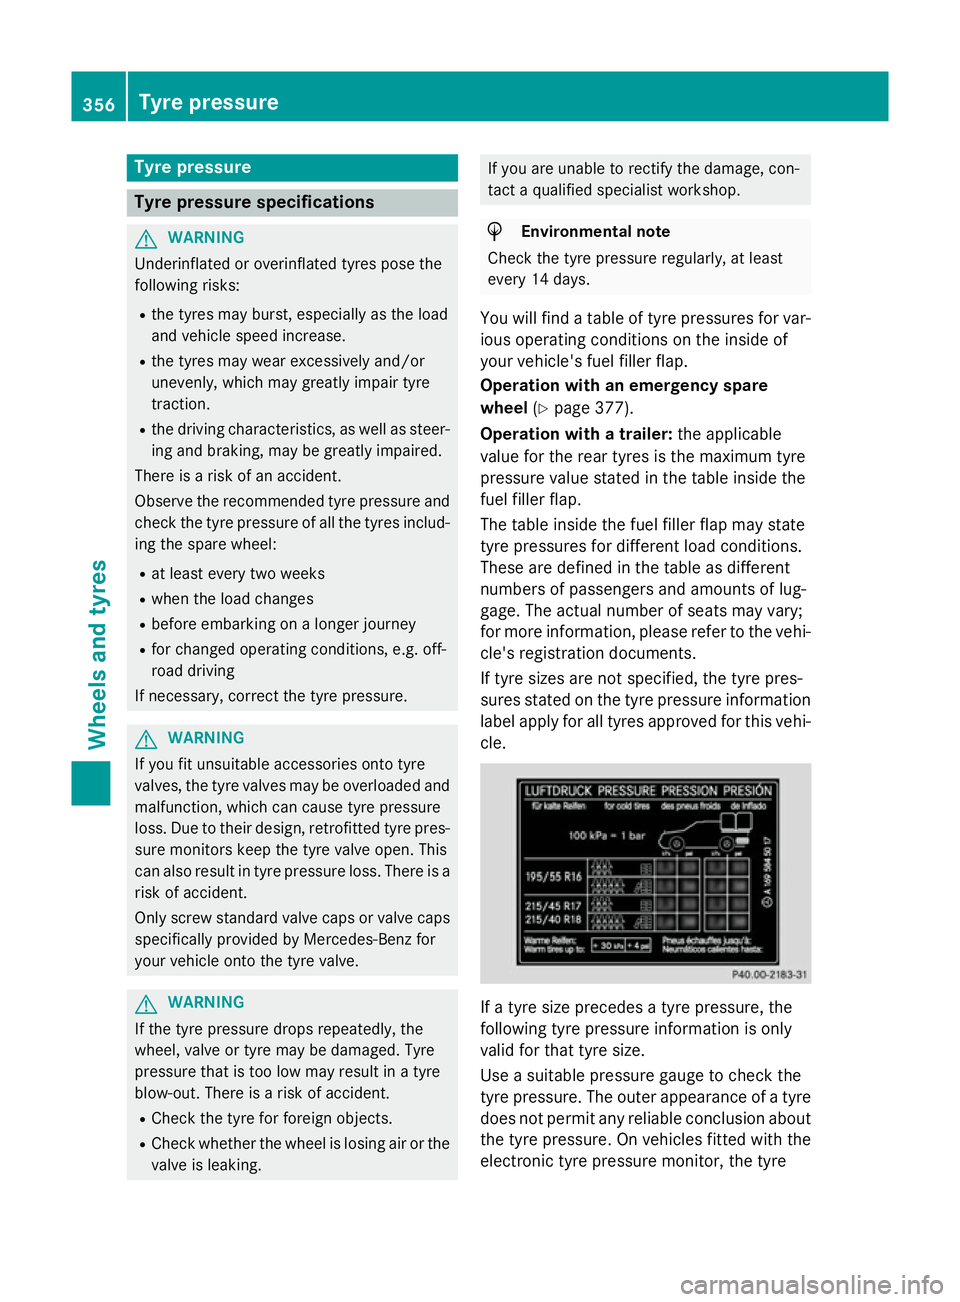
You will find a table of tyre pressures for var- ious operating conditions on the inside of
your vehicle's fuel filler flap.
Operation with an emergency spare
wheel (Ypage 377).
Operation with a trailer: the applicable
value for the rear tyres is the maximum tyre
pressure value stated in the table inside the
fuel filler flap.
The table inside the fuel filler flap may state
tyre pressures for different load conditions.
These are defined in the table as different
numbers of passengers and amounts of lug-
gage. The actual number of seats may vary;
for more information, please refer to the vehi-
cle's registration documents.
If tyre sizes are not specified, the tyre pres-
sures stated on the tyre pressure information
label apply for all tyres approved for this vehi- cle. If a tyre size precedes a tyre pressure, the
following tyre pressure information is only
valid for that tyre size.
Use a suitable pressure gauge to check the
tyre pressure. The outer appearance of a tyre
does not permit any reliable conclusion aboutthe tyre pressure. On vehicles fitted with the
electronic tyre pressure monitor, the tyre 356
Tyre pressureWheels and tyres
Page 360 of 401
pressure can be checked using the on-board
computer.
If possible, only correct tyre pressures when
the tyres are cold.
The tyres are cold:
R if the vehicle has been parked with the tyres
out of direct sunlight for at least three
hours and
R if the vehicle has not been driven further
than 1.6 km
Depending on the ambient temperature, the
speed at which you are driving and the load on the tyres, the tyre temperature and thus the
tyre pressure changes by approximately
10 kPa (0.1 bar/1.5 psi) per 10 †. Take this
into account when checking the pressure of
warm tyres. Only correct the tyre pressure if it
is too low for the current operating condi-
tions.
Driving with tyre pressure that is too high or
too low can:
R shorten the service life of the tyres
R cause increased tyre damage
R have a negative effect on handling charac-
teristics and thus driving safety (e.g. aqua-
planing)
i The tyre pressure values given for low
loads are minimum values which offer you
good ride comfort characteristics.
However, you can also use the values given for higher loads. These are permissible andwill not adversely affect the running of the
vehicle. Tyre pressure loss warning system
General notes While the vehicle is in motion, the tyre pres-
sure loss warning system monitors the set
tyre pressure using the rotational speed of
the wheels. This enables the system to detect
significant pressure loss in a tyre. If the speed of rotation of a wheel changes as a result of aloss of pressure, a corresponding warning message will appear in the multifunction dis-
play.
You can recognise the tyre pressure loss
warning in the multifunction display in the
Serv.
Serv. menu, by the Run Flat Indicator Run Flat Indicator
active
active Restart
Restart with
withOK
OKmessage. Further
information on the message display can be
found under "Restarting the tyre pressure
loss warning system" (Y page 358).
Important safety notes The tyre pressure warning system does not
warn you of an incorrectly set tyre pressure.
Observe the notes on the recommended tyre
pressure (Y page 356).
The tyre pressure loss warning does not
replace the need to regularly check the tyre
pressures. An even loss of pressure on sev-
eral tyres at the same time cannot be detec-
ted by the tyre pressure loss warning system. The tyre pressure monitor is not able to warn
you of a sudden loss of pressure, e.g. if the
tyre is penetrated by a foreign object. In the
event of a sudden loss of pressure, bring the
vehicle to a halt by braking carefully. Avoid
abrupt steering manoeuvres.
The function of the tyre pressure loss warning system is limited or delayed if:
R snow chains are fitted to your vehicle's
tyres.
R road conditions are wintry.
R you are driving on sand or gravel.
R you adopt a very sporty driving style (cor-
nering at high speeds or driving with high
rates of acceleration).
R you are towing a very heavy or large trailer.
R you are driving with a heavy load (in the
vehicle or on the roof). Tyre pressure
357Wheels and tyres Z
Page 361 of 401
Restarting the tyre pressure loss warn-
ing system Restart the tyre pressure loss warning system
if you have:
R changed the tyre pressure
R changed the wheels or tyres
R fitted new wheels or tyres
X Before restarting, make sure that the tyre
pressures are set properly on all four tyres
for the respective operating conditions.
The recommended tyre pressures can be
found in the tyre pressure table on the fuel
filler flap.
The tyre pressure loss warning system can only give reliable warnings if you have set
the correct tyre pressure. If an incorrect
tyre pressure is set, these incorrect values
will be monitored.
X Observe the notes in the section on tyre
pressures (Y page 356).
X Make sure that the key is in position 2in the
ignition lock (Y page 159).
X Press the =or; button on the steer-
ing wheel to select the Serv.
Serv. menu.
X Press the 9or: button to select
Tyre pressure
Tyre pressure .
X Press the abutton.
The Run Flat Indicator active Run Flat Indicator active
Restart
Restart with
withOK
OKmessage appears in the
multifunction display.
If you wish to confirm the restart: X Press the abutton.
The Tyre press. now OK?
Tyre press. now OK? message
appears in the multifunction display.
X Press the 9or: button to select
Yes
Yes.
X Press the abutton.
The Run Flat Indicator restarted
Run Flat Indicator restarted
message appears in the multifunction dis-
play.
After a teach-in period, the tyre pressure
loss warning system will monitor the set
tyre pressures of all four tyres. If you wish to cancel the restart:
X Press the %button.
or X When the Tyre Tyrepress. press. now
nowOK?
OK?message
appears, press the 9or: button to
select Cancel
Cancel.
X Press the abutton.
The tyre pressure values stored at the last
restart will continue to be monitored. Tyre pressure monitor
General notes If a tyre pressure monitor system is fitted, the
vehicle's wheels have sensors fitted that
monitor the tyre pressures in all four tyres.
The tyre pressure monitor warns you if the
pressure drops in one or more of the tyres.
The tyre pressure monitor only functions if
the corresponding sensors are fitted to all
wheels.
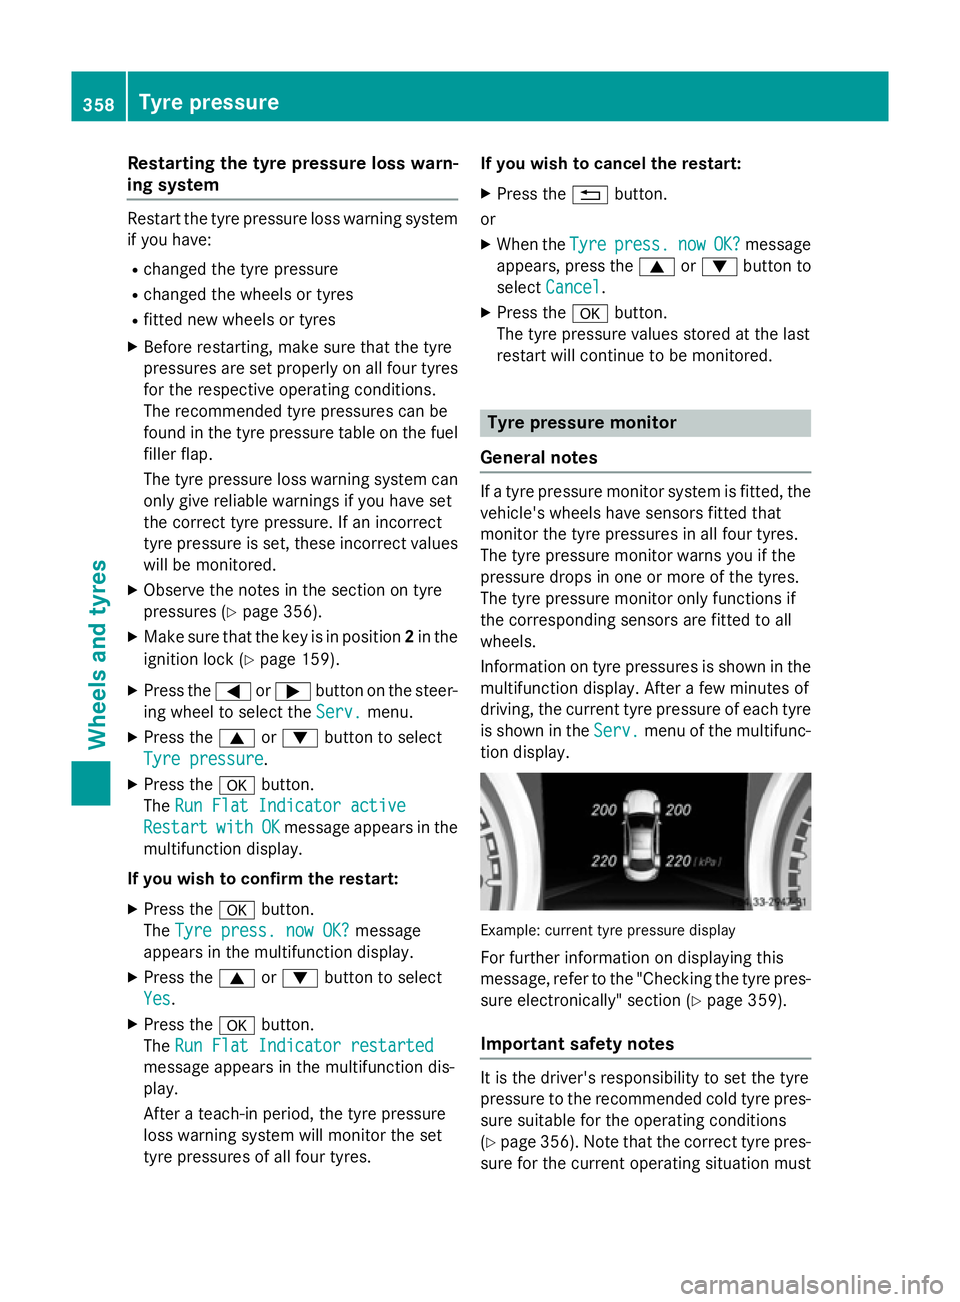
Information on tyre pressures is shown in the multifunction display. After a few minutes of
driving, the current tyre pressure of each tyre
is shown in the Serv. Serv.menu of the multifunc-
tion display. Example: current tyre pressure display
For further information on displaying this
message, refer to the "Checking the tyre pres-
sure electronically" section (Y page 359).
Important safety notes It is the driver's responsibility to set the tyre
pressure to the recommended cold tyre pres-
sure suitable for the operating conditions
(Y page 356). Note that the correct tyre pres-
sure for the current operating situation must 358
Tyre pressureWheels and tyres