fuel MERCEDES-BENZ GLA SUV 2013 Owner's Manual
[x] Cancel search | Manufacturer: MERCEDES-BENZ, Model Year: 2013, Model line: GLA SUV, Model: MERCEDES-BENZ GLA SUV 2013Pages: 401, PDF Size: 11.9 MB
Page 175 of 401
In drive program
M, you can change gear
yourself using the steering wheel gearshift
paddles.
If you pull the left or right steering wheel gear- shift paddle when in automatic drive programE (drive program Con AMG vehicles) or S, the
automatic transmission shifts into drive pro-
gram Mfor a limited time. Depending on
which gearshift paddle is pulled, the auto-
matic transmission immediately shifts into
the next gear down or up.
AMG vehicles: you can activate drive pro-
gram MRACE START (Y page 202) using the
steering wheel gearshift paddles.
i You can only change gear with the steer-
ing wheel gearshift paddles when the trans-
mission is in position D.
i For further information on the manual
drive program, see (Y page 172).Automatic drive program
Drive program E(drive program Con AMG
vehicles) is characterised by the following:
R comfort-oriented engine settings.
R optimal fuel consumption resulting from
the automatic transmission shifting up
sooner.
R the vehicle pulling away more gently in
forward and reverse gears unless the accel-
erator pedal is depressed fully.
R increased sensitivity. This improves driving
stability on slippery road surfaces, for
example.
R the automatic transmission shifting up
sooner. This results in the vehicle being
driven at lower engine speeds and the
wheels being less likely to spin. Drive program
Sis characterised by the fol-
lowing:
R sporty engine settings.
R the automatic transmission shifting up
later
R as a result of the later automatic transmis-
sion shift points, the fuel consumption pos- sibly being higher. Manual drive program
Introduction In manual drive program
M, you can change
gear yourself by using the steering wheel
gearshift paddles. For this, the transmission
must be in position D. The gear currently
selected and engaged is shown in the multi-
function display.
Manual drive program Mdiffers from drive
programs E(drive program Con AMG vehi-
cles) and Swith regard to spontaneity,
responsiveness and smoothness of gear
changes. Gear Driving situations
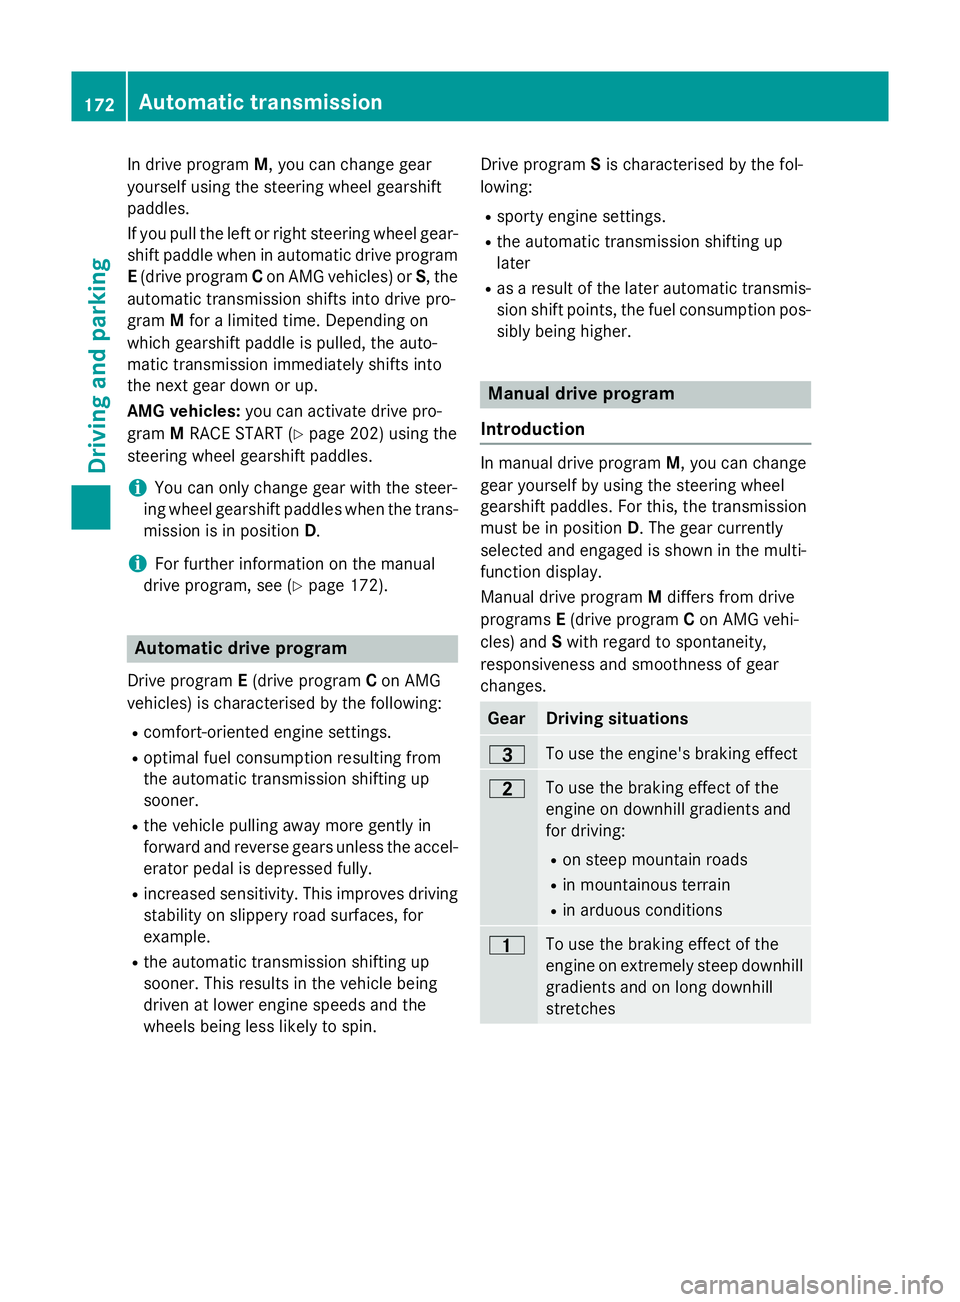
=
To use the engine's braking effect
5
To use the braking effect of the
engine on downhill gradients and
for driving:
R on steep mountain roads
R in mountainous terrain
R in arduous conditions 4
To use the braking effect of the
engine on extremely steep downhill
gradients and on long downhill
stretches 172
Automatic transmissionDriving and parking
Page 176 of 401
Activating the manual drive program
Activating permanently
X Press the program selector button
(Y page 171) repeatedly until Mappears in
the multifunction display.
Manual drive program Mremains active
until drive program E(drive program Con
AMG vehicles) or Sis engaged.
Activating temporarily
X Pull the right or left steering wheel gearshift
paddle (Y page 171).
M is shown in the multifunction display.
Manual drive program Mis temporarily
active. Depending on which gearshift pad-
dle is pulled, the automatic transmission
immediately shifts into the next gear down
or up.
i When manual drive program
Mis activa-
ted via the steering wheel gearshift pad-
dles, the temporarily active manual drive
program Mwill be deactivated automati-
cally after a limited time, if the driving sit-
uation permits. The automatic transmis-
sion switches to the previously activated
drive program E(drive program Con AMG
vehicles) or S. When driving on downhill
gradients, the temporarily active manual
drive program Mwill only be deactivated if
the accelerator pedal is depressed while
the vehicle is rolling downhill.
Shifting up X
Pull the right-hand steering wheel gearshift
paddle (Y page 171).
The automatic transmission shifts up to the next gear.
i All vehicles (except AMG vehicles): in
order to prevent engine damage the auto-
matic transmission automatically shifts up:
R if the maximum engine speed on the cur-
rently engaged gear is reached and
R you depress the accelerator pedal.
AMG vehicles: !
In manual gearshift program
M, the auto-
matic transmission does not shift up auto-
matically even when the engine limiting
speed for the current gear is reached.
When the engine limiting speed is reached, the fuel supply is cut to prevent the engine
from overrevving. You must make sure that the engine speed does not reach the red
area of the rev counter. Otherwise, there is
a risk of engine damage.
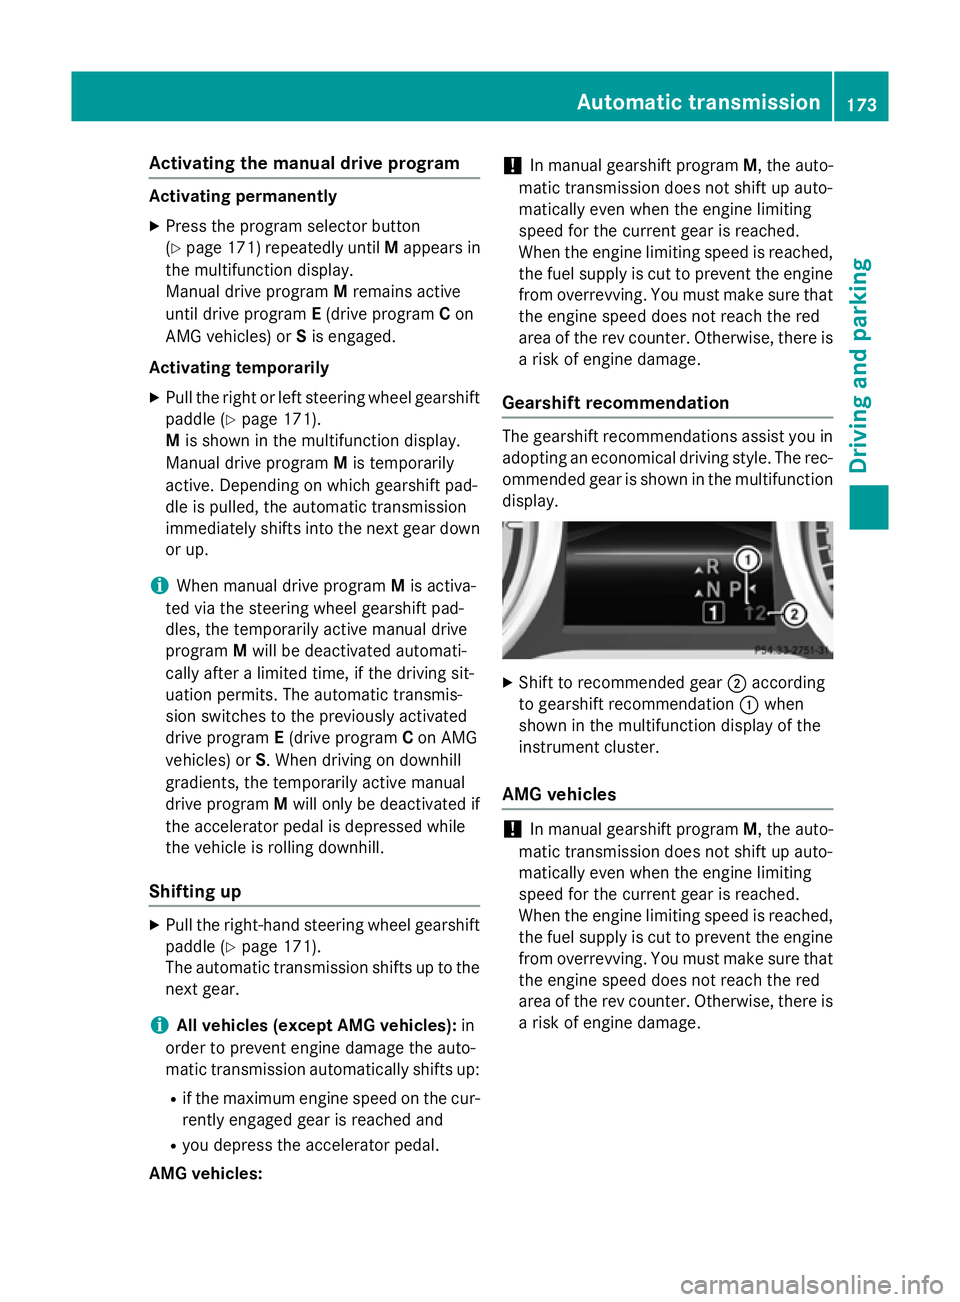
Gearshift recommendation The gearshift recommendations assist you in
adopting an economical driving style. The rec- ommended gear is shown in the multifunctiondisplay. X
Shift to recommended gear ;according
to gearshift recommendation :when
shown in the multifunction display of the
instrument cluster.
AMG vehicles !
In manual gearshift program
M, the auto-
matic transmission does not shift up auto-
matically even when the engine limiting
speed for the current gear is reached.
When the engine limiting speed is reached, the fuel supply is cut to prevent the engine
from overrevving. You must make sure that the engine speed does not reach the red
area of the rev counter. Otherwise, there is
a risk of engine damage. Automatic trans
mission
173Driving an d parking Z
Page 178 of 401
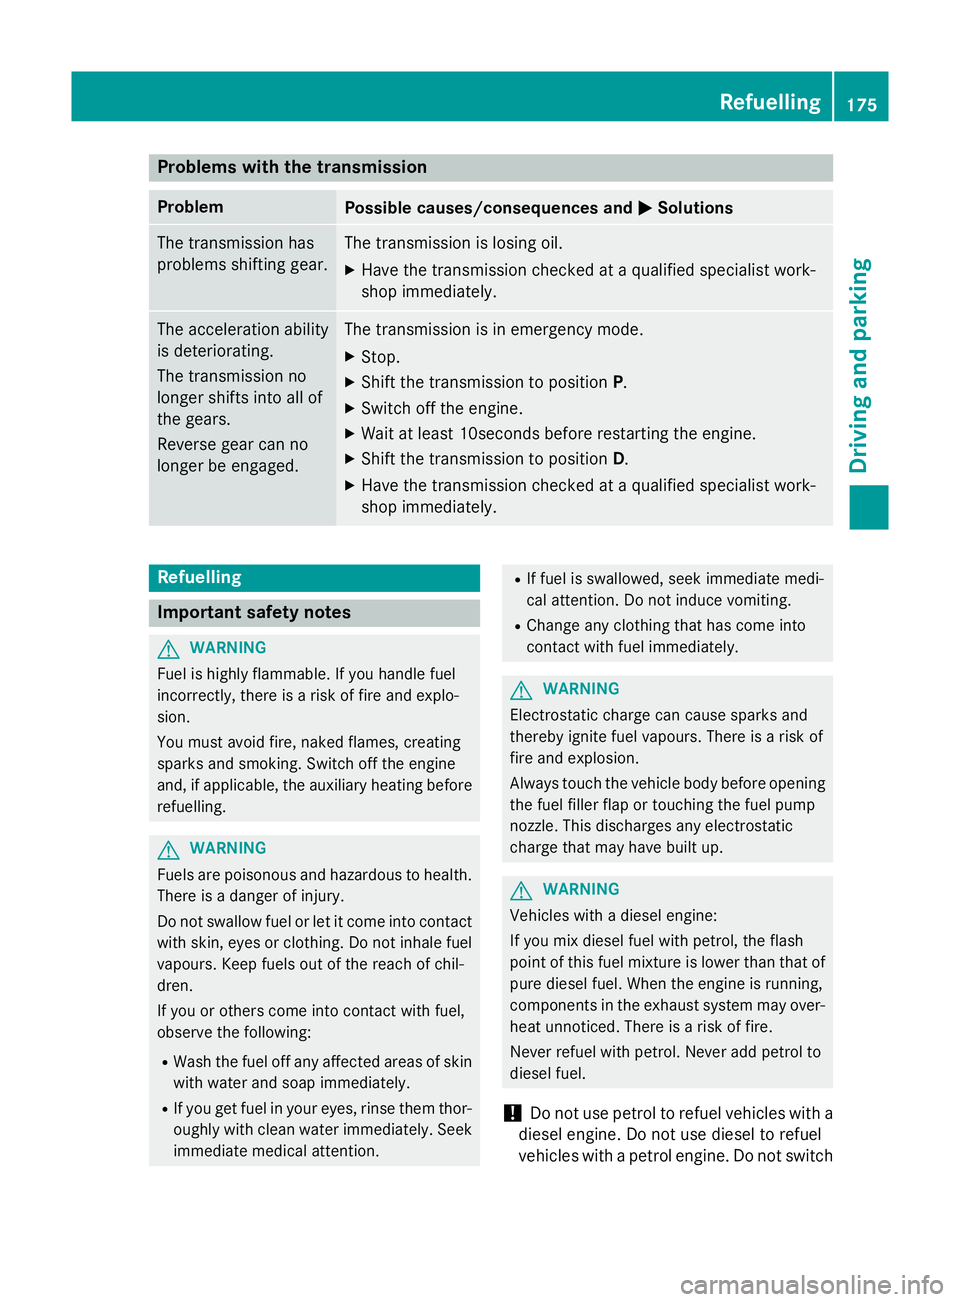
Problems with the transmission
Problem
Possible causes/consequences and
M
MSolutions The transmission has
problems shifting gear. The transmission is losing oil.
X Have the transmission checked at a qualified specialist work-
shop immediately. The acceleration ability
is deteriorating.
The transmission no
longer shifts into all of
the gears.
Reverse gear can no
longer be engaged. The transmission is in emergency mode.
X Stop.
X Shift the transmission to position P.
X Switch off the engine.
X Wait at least 10seconds before restarting the engine.
X Shift the transmission to position D.
X Have the transmission checked at a qualified specialist work-
shop immediately. Refuelling
Important safety notes
G
WARNING
Fuel is highly flammable. If you handle fuel
incorrectly, there is a risk of fire and explo-
sion.
You must avoid fire, naked flames, creating
sparks and smoking. Switch off the engine
and, if applicable, the auxiliary heating before refuelling. G
WARNING
Fuels are poisonous and hazardous to health. There is a danger of injury.
Do not swallow fuel or let it come into contact
with skin, eyes or clothing. Do not inhale fuel
vapours. Keep fuels out of the reach of chil-
dren.
If you or others come into contact with fuel,
observe the following:
R Wash the fuel off any affected areas of skin
with water and soap immediately.
R If you get fuel in your eyes, rinse them thor-
oughly with clean water immediately. Seek immediate medical attention. R
If fuel is swallowed, seek immediate medi-
cal attention. Do not induce vomiting.
R Change any clothing that has come into
contact with fuel immediately. G
WARNING
Electrostatic charge can cause sparks and
thereby ignite fuel vapours. There is a risk of
fire and explosion.
Always touch the vehicle body before opening the fuel filler flap or touching the fuel pump
nozzle. This discharges any electrostatic
charge that may have built up. G
WARNING
Vehicles with a diesel engine:
If you mix diesel fuel with petrol, the flash
point of this fuel mixture is lower than that of pure diesel fuel. When the engine is running,
components in the exhaust system may over-
heat unnoticed. There is a risk of fire.
Never refuel with petrol. Never add petrol to
diesel fuel.
! Do not use petrol to refuel vehicles with a
diesel engine. Do not use diesel to refuel
vehicles with a petrol engine. Do not switch Refuelling
175Driving and parking Z
Page 179 of 401
on the ignition if you accidentally refuel
with the wrong fuel. Otherwise, the fuel will enter the fuel system. Even small amounts
of the wrong fuel could result in damage to the fuel system and the engine. The repair
costs are high. Notify a qualified specialist
workshop and have the fuel tank and fuel
lines drained completely.
! Do not use diesel to refuel vehicles with a
petrol engine. Do not switch on the ignition if you accidentally refuel with the wrong
fuel. Otherwise, fuel can enter the fuel sys- tem. Even small amounts of the wrong fuel
could result in damage to the fuel system
and the engine. Notify a qualified specialist workshop and have the fuel tank and fuel
lines drained completely.
! Overfilling the fuel tank could damage the
fuel system.
! Take care not to spill any fuel on painted
surfaces. You could otherwise damage the
paintwork.
! Use a filter when adding fuel from a fuel
can. The fuel lines and/or the diesel injec-
tion system could otherwise be blocked by particles from the fuel can.
Do not get into the vehicle again during the
refuelling process. Otherwise, electrostatic
charge could build up again.
If you overfill the fuel tank, some fuel may
spray out when you remove the fuel pump
nozzle.
Further information on fuel and fuel quality
(Y page 385). Refuelling
General notes The fuel filler flap is unlocked or locked auto-
matically when you open or close the vehicle
with the key.
The position of the fuel filler cap is displayed
æ in the instrument cluster. The arrow next to the filling pump indicates the side of
the vehicle.
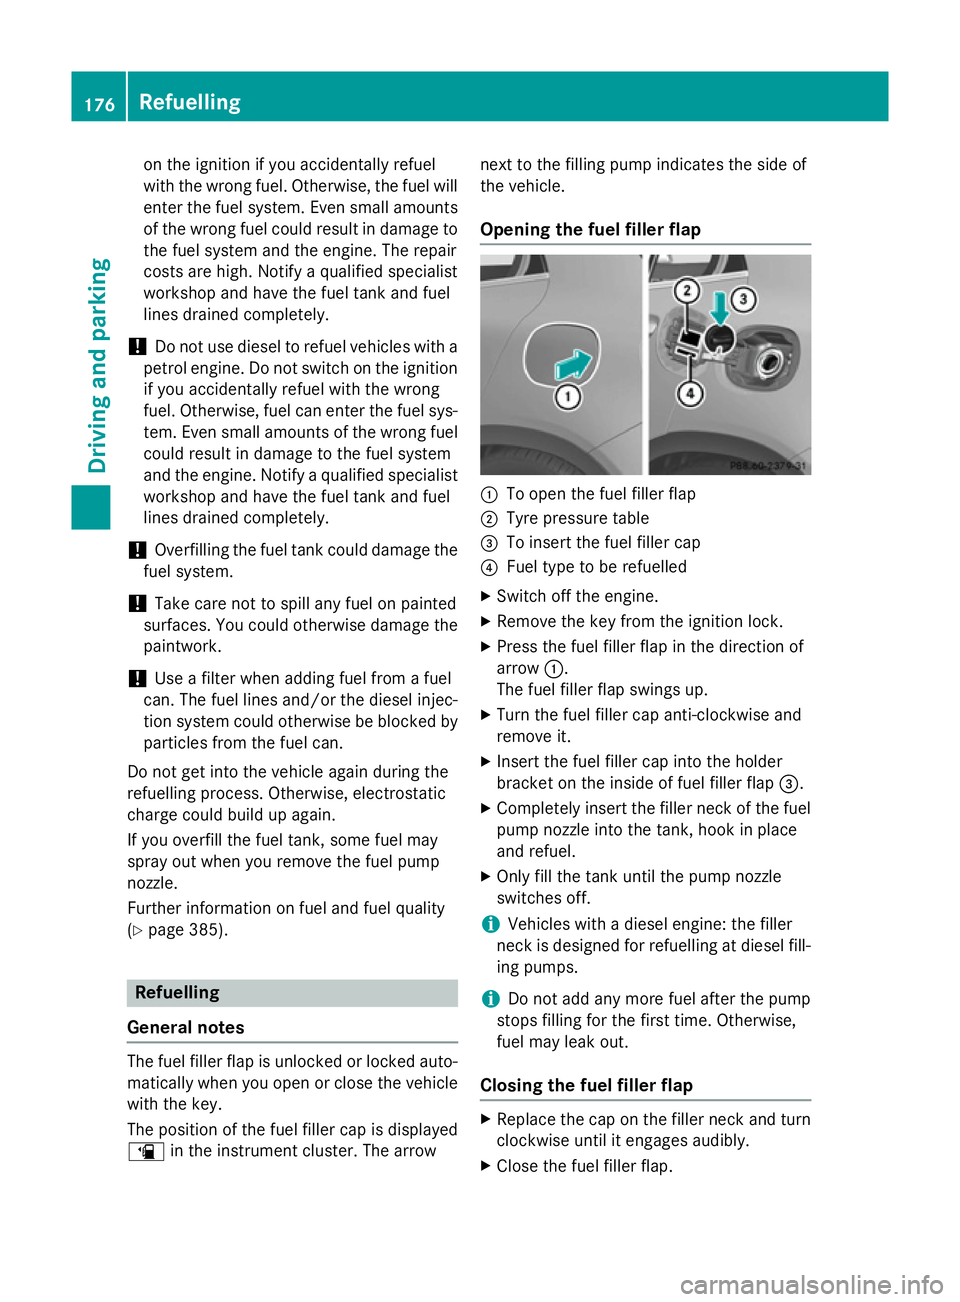
Opening the fuel filler flap :
To open the fuel filler flap
; Tyre pressure table
= To insert the fuel filler cap
? Fuel type to be refuelled
X Switch off the engine.
X Remove the key from the ignition lock.
X Press the fuel filler flap in the direction of
arrow :.
The fuel filler flap swings up.
X Turn the fuel filler cap anti-clockwise and
remove it.
X Insert the fuel filler cap into the holder
bracket on the inside of fuel filler flap =.
X Completely insert the filler neck of the fuel
pump nozzle into the tank, hook in place
and refuel.
X Only fill the tank until the pump nozzle
switches off.
i Vehicles with a diesel engine: the filler
neck is designed for refuelling at diesel fill-
ing pumps.
i Do not add any more fuel after the pump
stops filling for the first time. Otherwise,
fuel may leak out.
Closing the fuel filler flap X
Replace the cap on the filler neck and turn
clockwise until it engages audibly.
X Close the fuel filler flap. 176
RefuellingDriving and parking
Page 180 of 401
i
Close the fuel filler flap before locking the
vehicle. Refuelling
177Driving and pa rking Z
Page 181 of 401
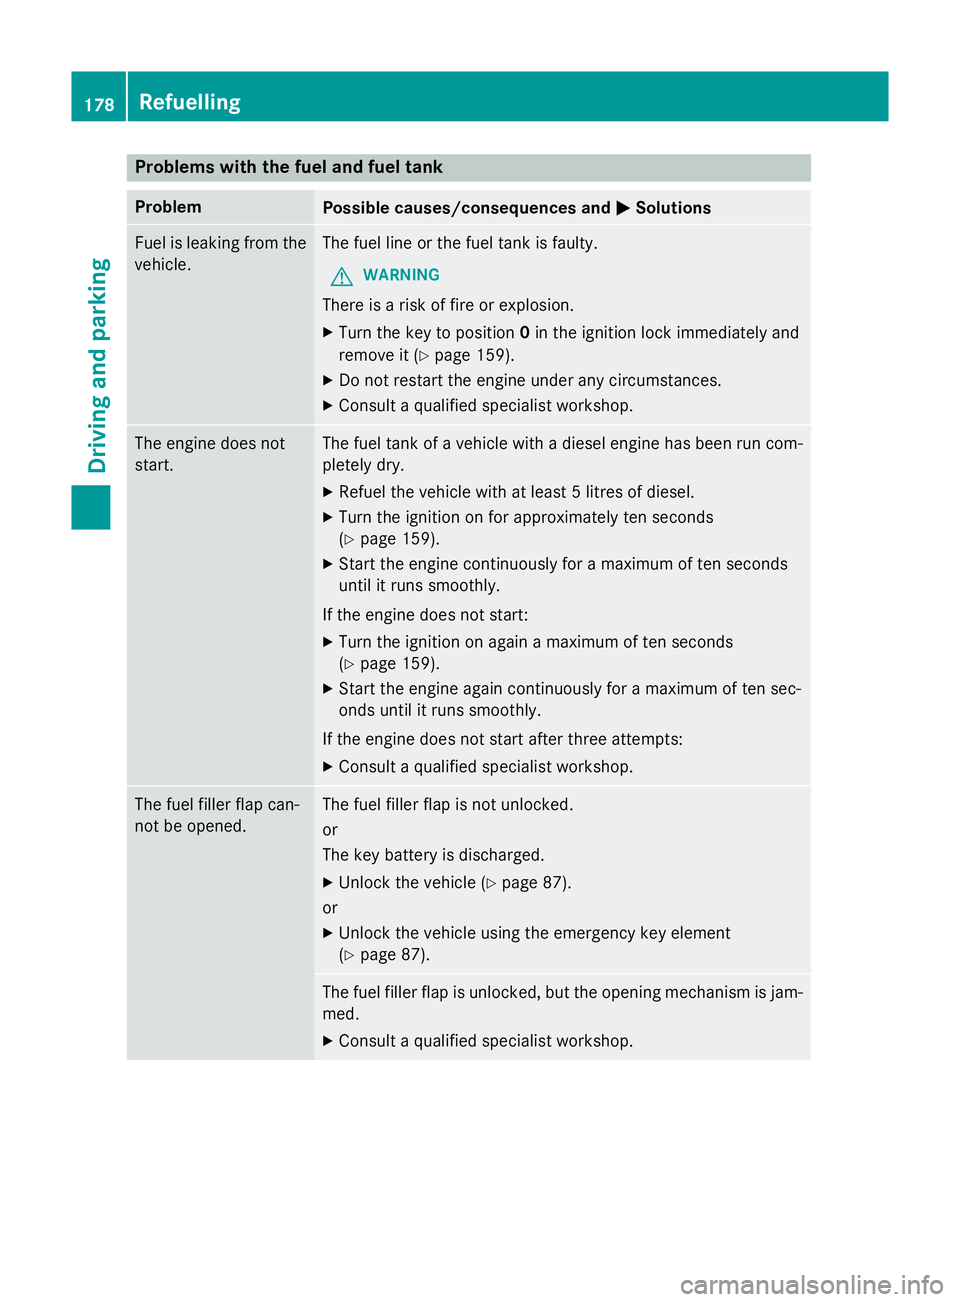
Problems with the fuel and fuel tank
Problem
Possible causes/consequences and
M
MSolutions Fuel is leaking from the
vehicle. The fuel line or the fuel tank is faulty.
G WARNING
There is a risk of fire or explosion. X Turn the key to position 0in the ignition lock immediately and
remove it (Y page 159).
X Do not restart the engine under any circumstances.
X Consult a qualified specialist workshop. The engine does not
start. The fuel tank of a vehicle with a diesel engine has been run com-
pletely dry.
X Refuel the vehicle with at least 5 litres of diesel.
X Turn the ignition on for approximately ten seconds
(Y page 159).
X Start the engine continuously for a maximum of ten seconds
until it runs smoothly.
If the engine does not start:
X Turn the ignition on again a maximum of ten seconds
(Y page 159).
X Start the engine again continuously for a maximum of ten sec-
onds until it runs smoothly.
If the engine does not start after three attempts:
X Consult a qualified specialist workshop. The fuel filler flap can-
not be opened. The fuel filler flap is not unlocked.
or
The key battery is discharged.
X Unlock the vehicle (Y page 87).
or
X Unlock the vehicle using the emergency key element
(Y page 87). The fuel filler flap is unlocked, but the opening mechanism is jam-
med.
X Consult a qualified specialist workshop. 178
RefuellingDriving and parking
Page 185 of 401
If you leave the vehicle parked up for longer
than six weeks, the vehicle may suffer dam-
age as a result of lack of use.
X Visit a qualified specialist workshop and
seek advice.
i You can obtain information about trickle
chargers from a qualified specialist work-
shop. Driving tips
General notes
G
WARNING
If you switch off the ignition while driving,
safety-relevant functions are only available
with limitations, or not at all. This could affect, for example, the power steering and the brake
boosting effect. You will require considerably
more effort to steer and brake. There is a risk of an accident.
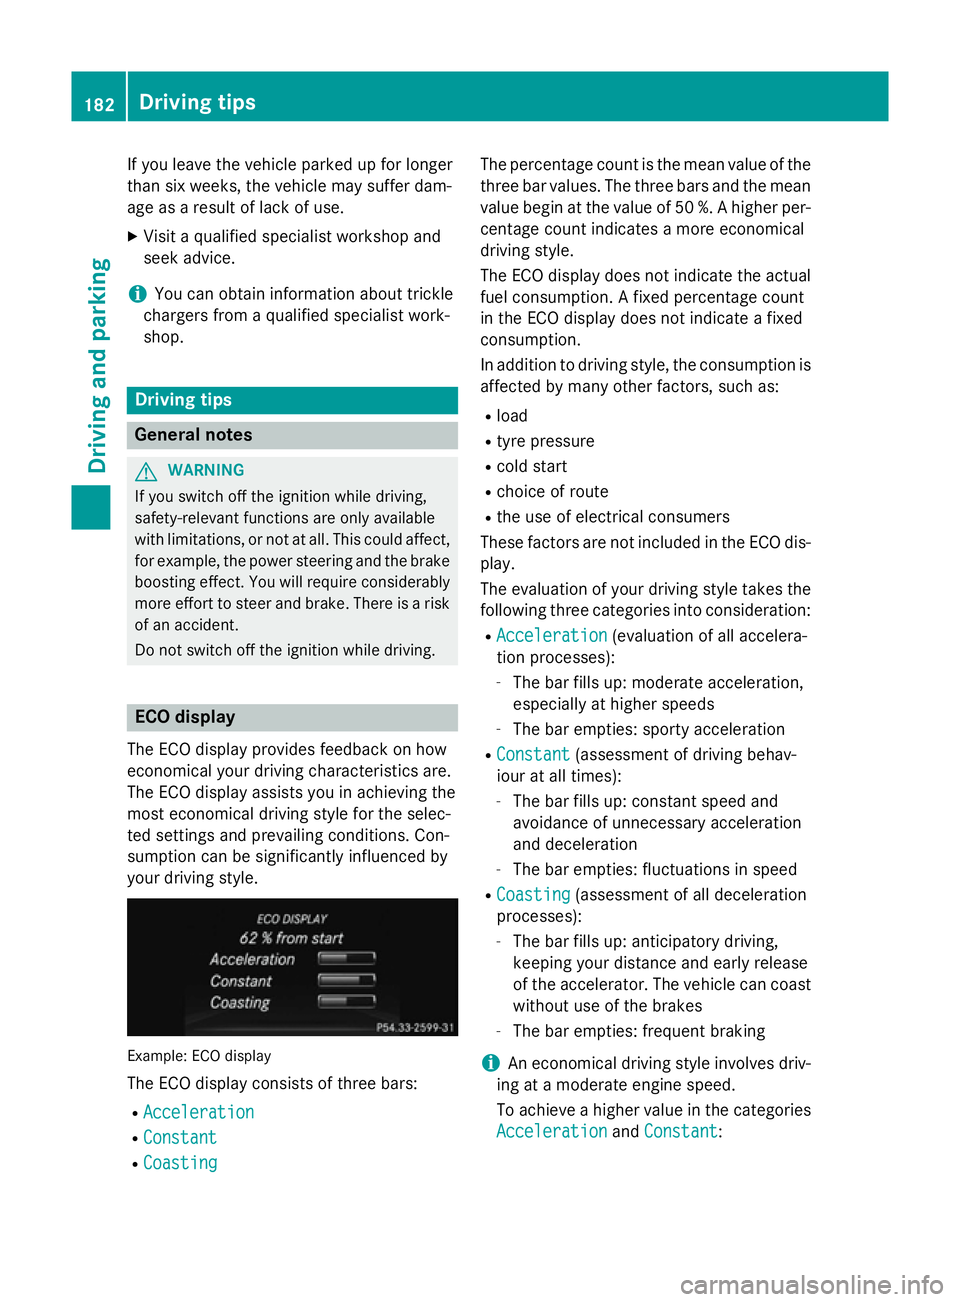
Do not switch off the ignition while driving. ECO display
The ECO display provides feedback on how
economical your driving characteristics are.
The ECO display assists you in achieving the
most economical driving style for the selec-
ted settings and prevailing conditions. Con-
sumption can be significantly influenced by
your driving style. Example: ECO display
The ECO display consists of three bars:
R Acceleration Acceleration
R Constant
Constant
R Coasting
Coasting The percentage count is the mean value of the
three bar values. The three bars and the mean
value begin at the value of 50 %. A higher per- centage count indicates a more economical
driving style.
The ECO display does not indicate the actual
fuel consumption. A fixed percentage count
in the ECO display does not indicate a fixed
consumption.
In addition to driving style, the consumption is
affected by many other factors, such as:
R load
R tyre pressure
R cold start
R choice of route
R the use of electrical consumers
These factors are not included in the ECO dis-
play.
The evaluation of your driving style takes the
following three categories into consideration:
R Acceleration Acceleration (evaluation of all accelera-
tion processes):
- The bar fills up: moderate acceleration,
especially at higher speeds
- The bar empties: sporty acceleration
R Constant Constant (assessment of driving behav-
iour at all times):
- The bar fills up: constant speed and
avoidance of unnecessary acceleration
and deceleration
- The bar empties: fluctuations in speed
R Coasting Coasting (assessment of all deceleration
processes):
- The bar fills up: anticipatory driving,
keeping your distance and early release
of the accelerator. The vehicle can coast
without use of the brakes
- The bar empties: frequent braking
i An economical driving style involves driv-
ing at a moderate engine speed.
To achieve a higher value in the categories
Acceleration
Acceleration andConstant Constant: 182
Driving tipsDriving and parking
Page 189 of 401
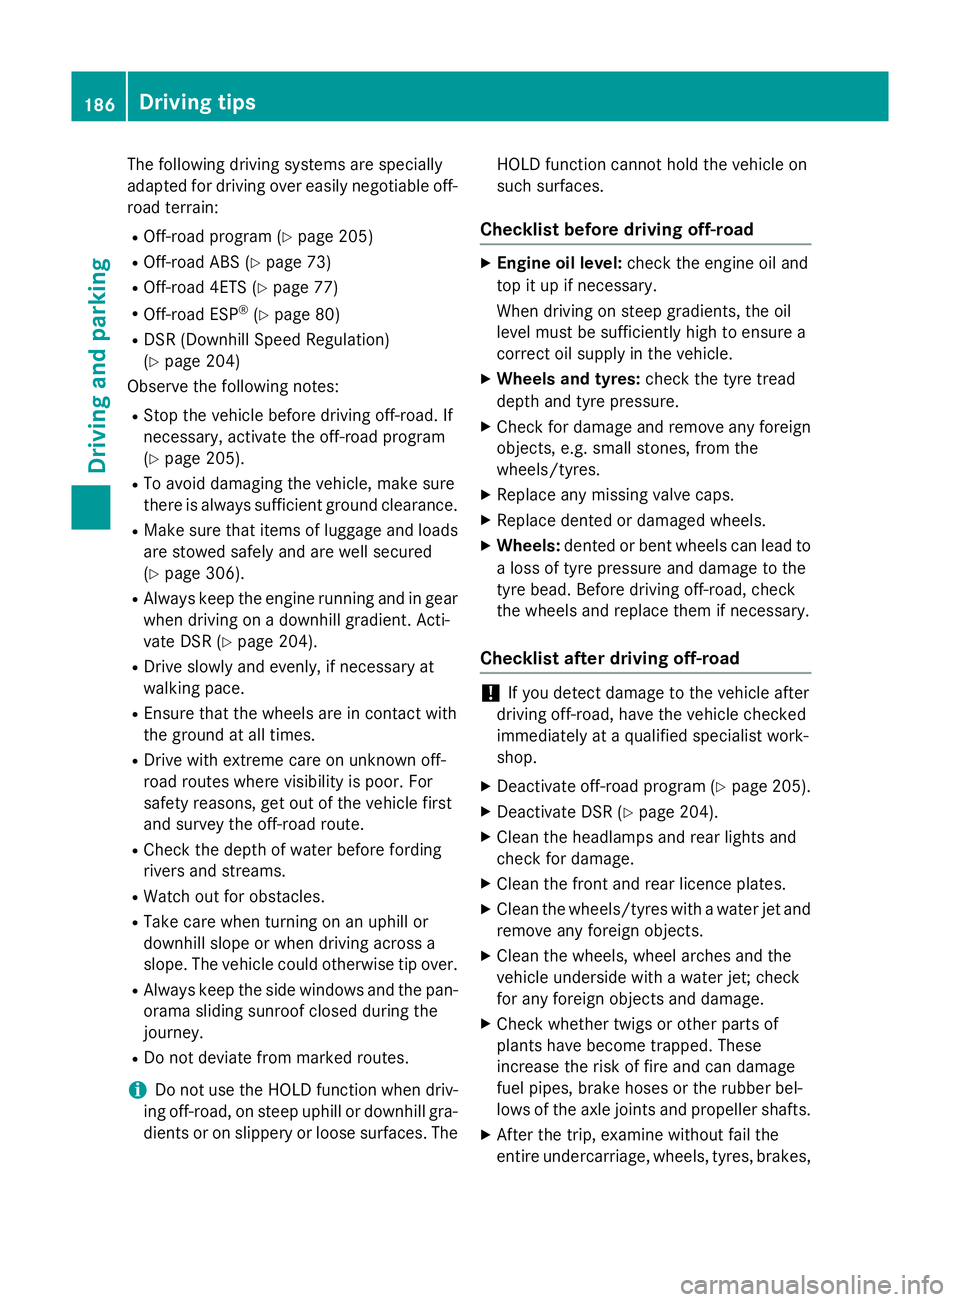
The following driving systems are specially
adapted for driving over easily negotiable off-
road terrain:
R Off-road program (Y page 205)
R Off-road ABS (Y page 73)
R Off-road 4ETS (Y page 77)
R Off-road ESP ®
(Y page 80)
R DSR (Downhill Speed Regulation)
(Y page 204)
Observe the following notes:
R Stop the vehicle before driving off-road. If
necessary, activate the off-road program
(Y page 205).
R To avoid damaging the vehicle, make sure
there is always sufficient ground clearance.
R Make sure that items of luggage and loads
are stowed safely and are well secured
(Y page 306).
R Always keep the engine running and in gear
when driving on a downhill gradient. Acti-
vate DSR (Y page 204).
R Drive slowly and evenly, if necessary at
walking pace.
R Ensure that the wheels are in contact with
the ground at all times.
R Drive with extreme care on unknown off-
road routes where visibility is poor. For
safety reasons, get out of the vehicle first
and survey the off-road route.
R Check the depth of water before fording
rivers and streams.
R Watch out for obstacles.
R Take care when turning on an uphill or
downhill slope or when driving across a
slope. The vehicle could otherwise tip over.
R Always keep the side windows and the pan-
orama sliding sunroof closed during the
journey.
R Do not deviate from marked routes.
i Do not use the HOLD function when driv-
ing off-road, on steep uphill or downhill gra- dients or on slippery or loose surfaces. The HOLD function cannot hold the vehicle on
such surfaces.
Checklist before driving off-road X
Engine oil level: check the engine oil and
top it up if necessary.
When driving on steep gradients, the oil
level must be sufficiently high to ensure a
correct oil supply in the vehicle.
X Wheels and tyres: check the tyre tread
depth and tyre pressure.
X Check for damage and remove any foreign
objects, e.g. small stones, from the
wheels/tyres.
X Replace any missing valve caps.
X Replace dented or damaged wheels.
X Wheels: dented or bent wheels can lead to
a loss of tyre pressure and damage to the
tyre bead. Before driving off-road, check
the wheels and replace them if necessary.
Checklist after driving off-road !
If you detect damage to the vehicle after
driving off-road, have the vehicle checked
immediately at a qualified specialist work-
shop.
X Deactivate off-road program (Y page 205).
X Deactivate DSR (Y page 204).
X Clean the headlamps and rear lights and
check for damage.
X Clean the front and rear licence plates.
X Clean the wheels/tyres with a water jet and
remove any foreign objects.
X Clean the wheels, wheel arches and the
vehicle underside with a water jet; check
for any foreign objects and damage.
X Check whether twigs or other parts of
plants have become trapped. These
increase the risk of fire and can damage
fuel pipes, brake hoses or the rubber bel-
lows of the axle joints and propeller shafts.
X After the trip, examine without fail the
entire undercarriage, wheels, tyres, brakes, 186
Driving tipsDriving and parking
Page 230 of 401
This can impair the vehicle's handling char-
acteristics. Adapt your driving style accord-
ingly. Maintain a safe distance. Drive care-
fully.
When towing a trailer, always adjust your
speed to the current road and weather con-
ditions. Do not exceed the maximum permis- sible speed for your vehicle/trailer combina-
tion.
General notes X
When towing a trailer, set the tyre pressure
on the rear axle of the towing vehicle for a
maximum load; see the tyre pressure table in the fuel filler flap (Y page 356).
Please note that when towing a trailer, PARK-
TRONIC (Y page 206) and Blind Spot Assist
(Y page 222) availability is limited or not avail-
able at all.
i The height of the ball coupling changes
with the load of the vehicle. If necessary,
use a trailer with a height-adjustable draw- bar.
You will find fitting dimensions and loads
under "Technical data" (Y page 393).
Driving tips i
Observe the notes on ESP ®
trailer stabi-
lisation (Y page 80).
The maximum permissible speed for vehicle/
trailer combinations depends on the type of
trailer. Before beginning the journey, check
the trailer's documents to see what the max- imum permitted speed is. Observe the legally
prescribed maximum speed in the relevant
country.
For certain Mercedes-Benz vehicles, the max-
imum permissible rear axle load is increased
when towing a trailer. Refer to the "Technical
data" section to find out whether this applies to your vehicle. If you utilise any of the added
maximum rear axle load when towing a trailer, the vehicle/trailer combination may not
exceed a maximum speed of 100 km/h for reasons concerning the operating permit.
This also applies in countries in which the
permissible maximum speed for vehicle/
trailer combinations is above 100 km/h.
When towing a trailer, your vehicle's handling
characteristics will be different in comparison to when driving without a trailer and it will
consume more fuel.
Change into a lower gear in good time on long
and steep downhill gradients. For vehicles
with automatic transmission, you need to
have selected manual drive program M
(Y page 172).
i This also applies if you have activated
cruise control, SPEEDTRONIC or DIS-
TRONIC PLUS.
This will use the braking effect of the engine,
so less braking will be required to maintain
vehicle speed. This relieves the load on the
brake system and prevents the brakes from
overheating and wearing too quickly. If you
need additional braking, depress the brake
pedal repeatedly rather than continuously.
i Briefly depressing the accelerator pedal
on downhill gradients while the manual
drive program Mis temporarily activated
(vehicles with automatic transmission): the automatic transmission may switch back to
the last active automatic drive program Eor
S. The automatic transmission may shift to
a higher gear. This can reduce the engine's braking effect.
Driving tips If the trailer swings from side to side:
X Do not accelerate.
X Do not countersteer.
X Brake if necessary. Towing a trailer
227Driving and parking Z
Page 238 of 401
At high outside temperatures and when driv-
ing uphill, the coolant temperature may rise
to the end of the scale. Rev counter
! Do not drive in the overrevving range.
Doing so will damage the engine.
The red band in the rev counter indicates the
engine's overrevving range.
The fuel supply is interrupted to protect the
engine when the red band is reached. Outside temperature display
You should pay special attention to road con-
ditions when temperatures are around the
freezing point.
The outside temperature display is in the mul- tifunction display.
Changes in the outside temperature are dis-
played after a short delay. Speedometer with segments
The speedometer is divided into segments on
vehicles with DISTRONIC PLUS.
The segments in the speedometer indicate
which speed range is available.
R Cruise control activated (Y page 188):
The segments light up from the stored
speed to the maximum speed.
R Variable SPEEDTRONIC activated
(Y page 192):
The segments light up from the start of the
scale to the selected limit speed.
R DISTRONIC PLUS activated (Y page 193):
One or two segments in the set speed
range light up.
R DISTRONIC PLUS detects a vehicle in front:
The segments between the speed of the
vehicle in front and the stored speed light
up. Operating the on-board computer
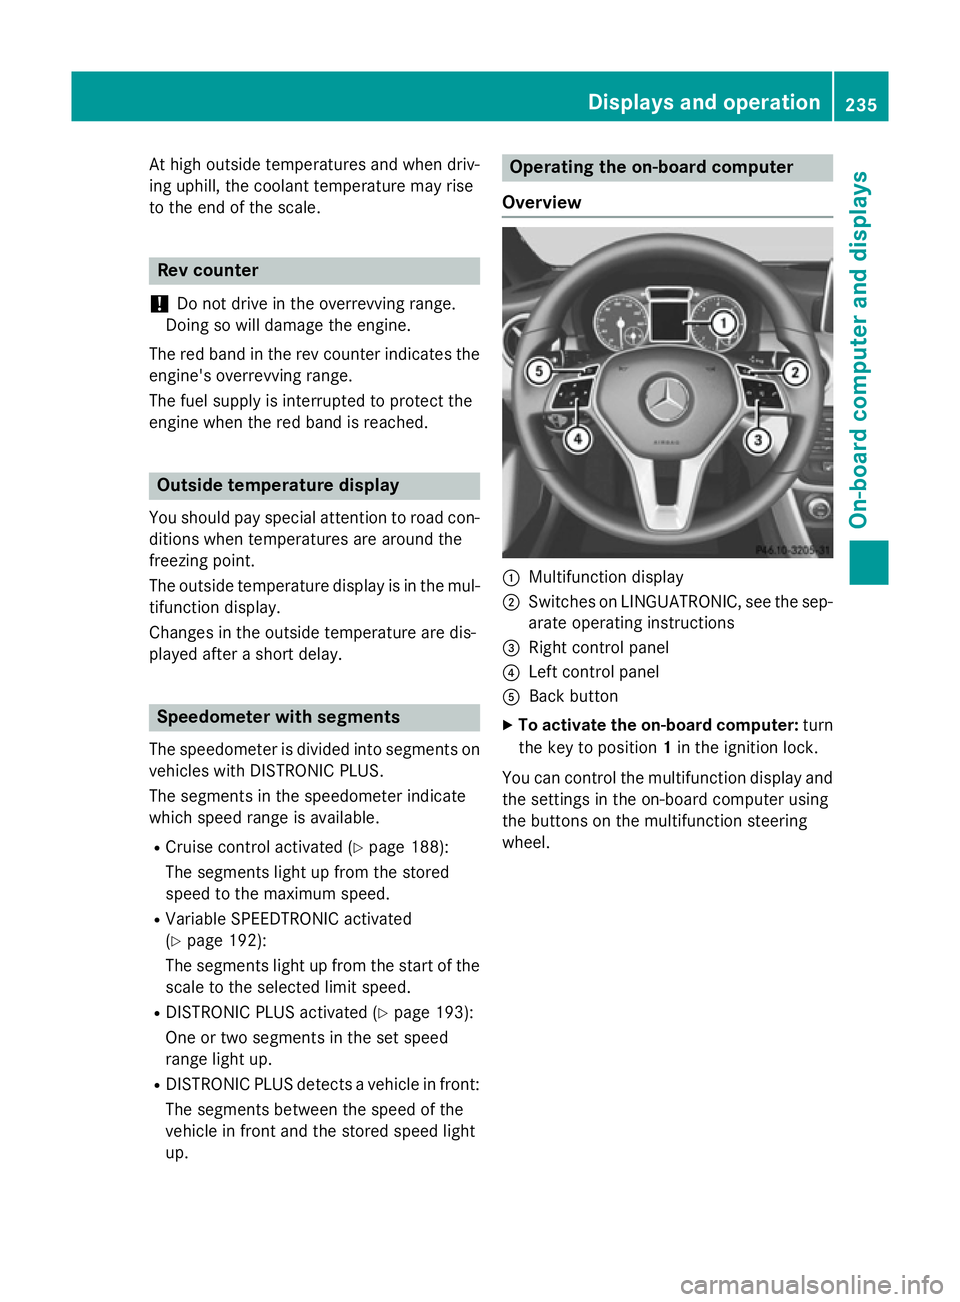
Overview :
Multifunction display
; Switches on LINGUATRONIC, see the sep-
arate operating instructions
= Right control panel
? Left control panel
A Back button
X To activate the on-board computer: turn
the key to position 1in the ignition lock.
You can control the multifunction display and
the settings in the on-board computer using
the buttons on the multifunction steering
wheel. Displays and operation
235On-board computer and displays Z