MERCEDES-BENZ GLA SUV 2018 Owner's Manual
Manufacturer: MERCEDES-BENZ, Model Year: 2018, Model line: GLA SUV, Model: MERCEDES-BENZ GLA SUV 2018Pages: 338, PDF Size: 5.59 MB
Page 251 of 338
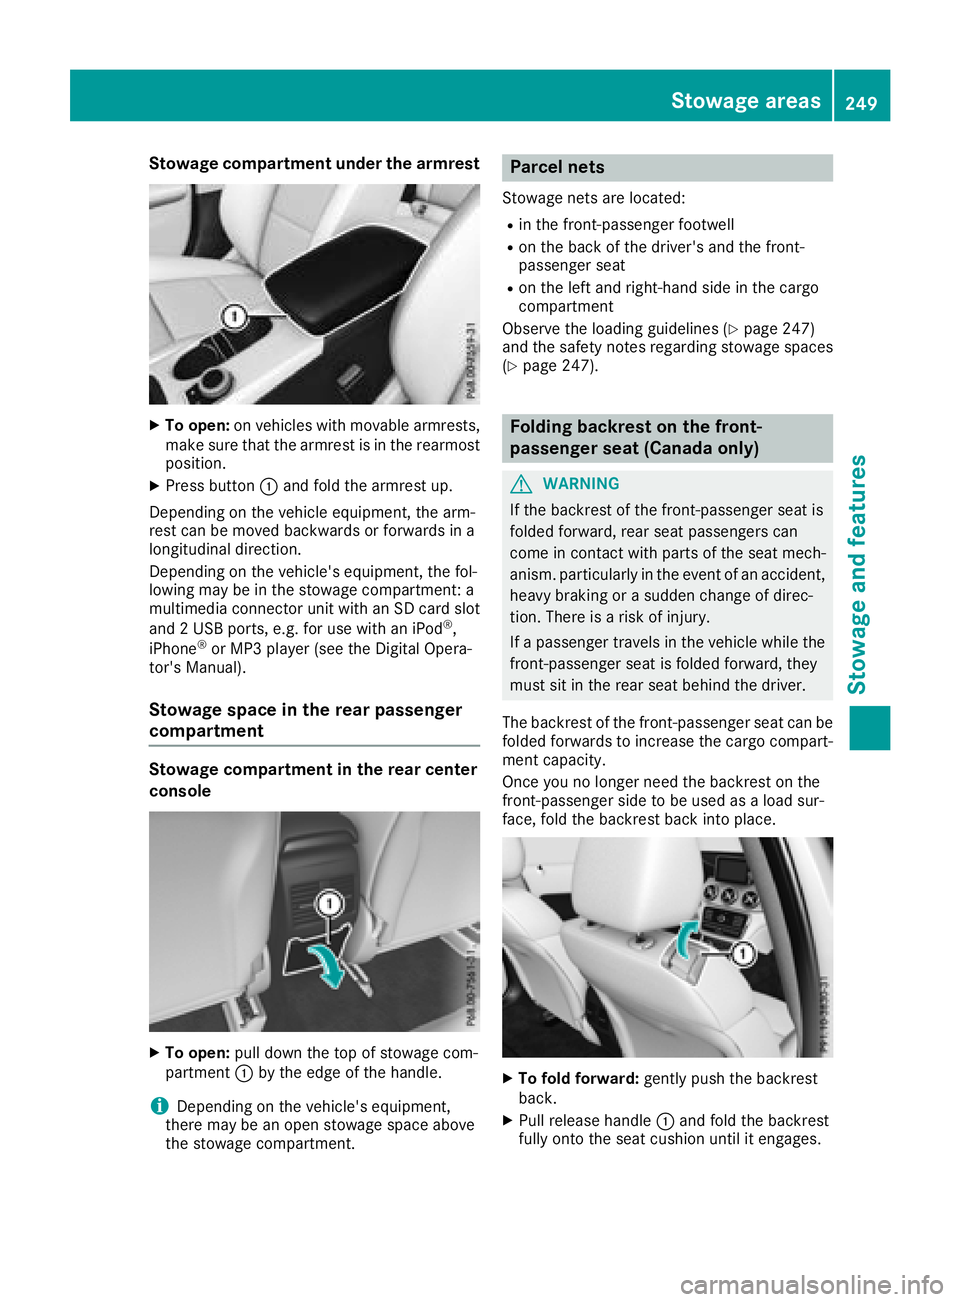
Stowage compartment under the armrest
XTo open:on vehicles with movable armrests,
make sure that the armrest is in the rearmost
position.
XPress button :and fold the armrest up.
Depending on the vehicle equipment, the arm-
rest can be moved backwards or forwards in a
longitudinal direction.
Depending on the vehicle's equipment, the fol-
lowing may be in the stowage compartment: a
multimedia connector unit with an SD card slot
and 2 USB ports, e.g. for use with an iPod
®,
iPhone®or MP3 player (see the Digital Opera-
tor's Manual).
Stowage space in the rear passenger
compartment
Stowage compartment in the rear center
console
XTo open: pull down the top of stowage com-
partment :by the edge of the handle.
iDepending on the vehicle's equipment,
there may be an open stowage space above
the stowage compartment.
Parcel nets
Stowage nets are located:
Rin the front-passenger footwell
Ron the back of the driver's and the front-
passenger seat
Ron the left and right-hand side in the cargo
compartment
Observe the loading guidelines (
Ypage 247)
and the safety notes regarding stowage spaces
(
Ypage 247).
Folding backrest on the front-
passenger seat (Canada only)
GWARNING
If the backrest of the front-passenger seat is
folded forward, rear seat passengers can
come in contact with parts of the seat mech-
anism. particularly in the event of an accident, heavy braking or a sudden change of direc-
tion. There is a risk of injury.
If a passenger travels in the vehicle while the
front-passenger seat is folded forward, they
must sit in the rear seat behind the driver.
The backrest of the front-passenger seat can be
folded forwards to increase the cargo compart-
ment capacity.
Once you no longer need the backrest on the
front-passenger side to be used as a load sur-
face, fold the backrest back into place.
XTo fold forward: gently push the backrest
back.
XPull release handle :and fold the backrest
fully onto the seat cushion until it engages.
Stowage areas249
Stowage and features
Z
Page 252 of 338
XTo fold back:gently push the backrest down
and pull release handle :.
XFold the seat backrest back until it engages.
Through-loading facility in the rear
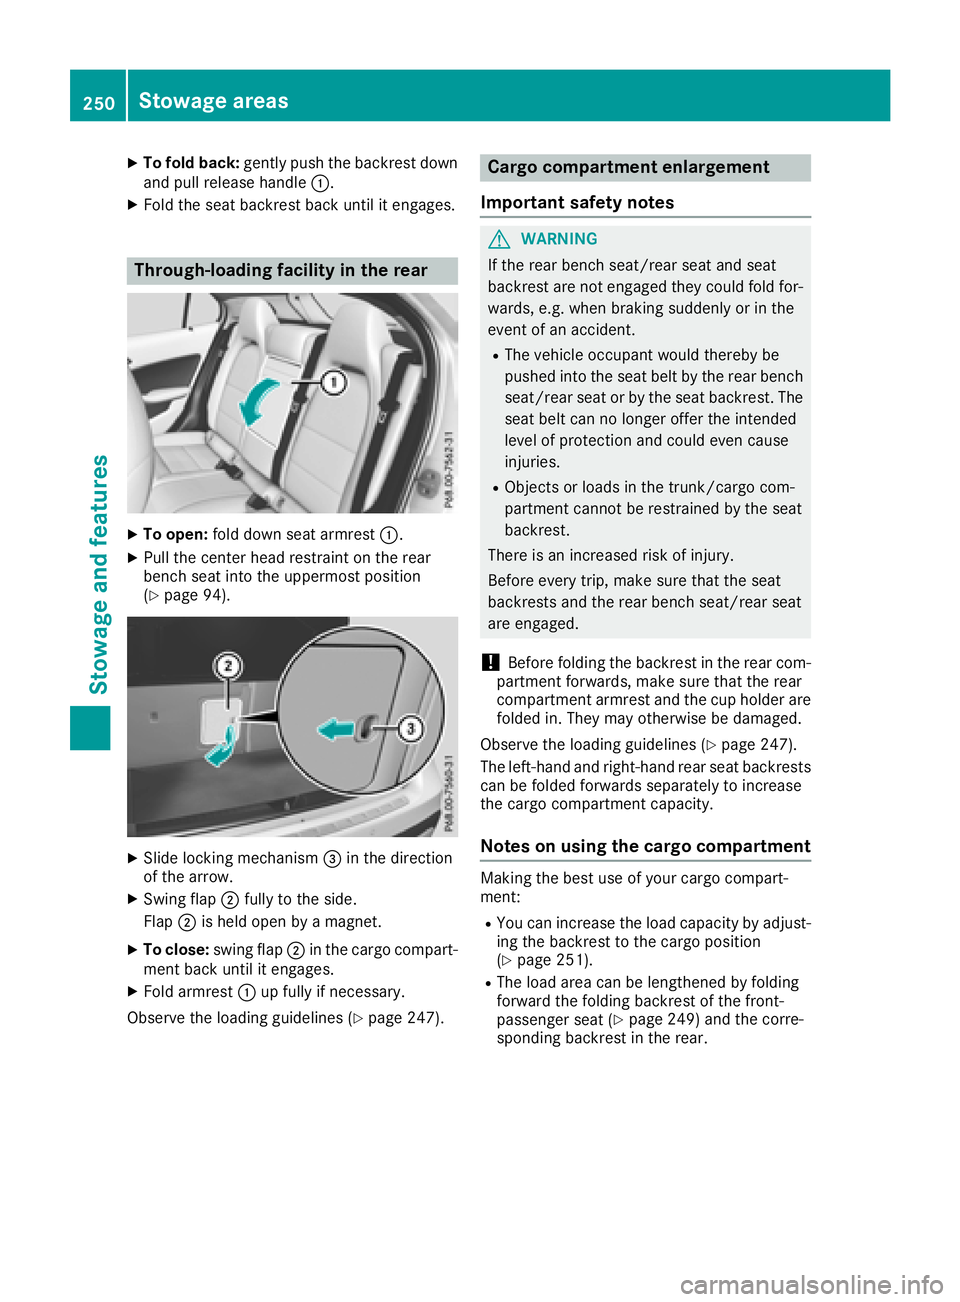
XTo open:fold down seat armrest :.
XPull the center head restraint on the rear
bench seat into the uppermost position
(
Ypage 94).
XSlide locking mechanism =in the direction
of the arrow.
XSwing flap ;fully to the side.
Flap ;is held open by a magnet.
XTo close: swing flap ;in the cargo compart-
ment back until it engages.
XFold armrest :up fully if necessary.
Observe the loading guidelines (
Ypage 247).
Cargo compartment enlargement
Important safety notes
GWARNING
If the rear bench seat/rear seat and seat
backrest are not engaged they could fold for-
wards, e.g. when braking suddenly or in the
event of an accident.
RThe vehicle occupant would thereby be
pushed into the seat belt by the rear bench
seat/rear seat or by the seat backrest. The
seat belt can no longer offer the intended
level of protection and could even cause
injuries.
RObjects or loads in the trunk/cargo com-
partment cannot be restrained by the seat
backrest.
There is an increased risk of injury.
Before every trip, make sure that the seat
backrests and the rear bench seat/rear seat
are engaged.
!Before folding the backrest in the rear com-
partment forwards, make sure that the rear
compartment armrest and the cup holder are
folded in. They may otherwise be damaged.
Observe the loading guidelines (
Ypage 247).
The left-hand and right-hand rear seat backrests
can be folded forwards separately to increase
the cargo compartment capacity.
Notes on using the cargo compartment
Making the best use of your cargo compart-
ment:
RYou can increase the load capacity by adjust-
ing the backrest to the cargo position
(
Ypage 251).
RThe load area can be lengthened by folding
forward the folding backrest of the front-
passenger seat (
Ypage 249) and the corre-
sponding backrest in the rear.
250Stowage areas
Stowag ean d features
Page 253 of 338
Folding the rear seat backrest forward
and back
Folding the rear seat backrestsforward
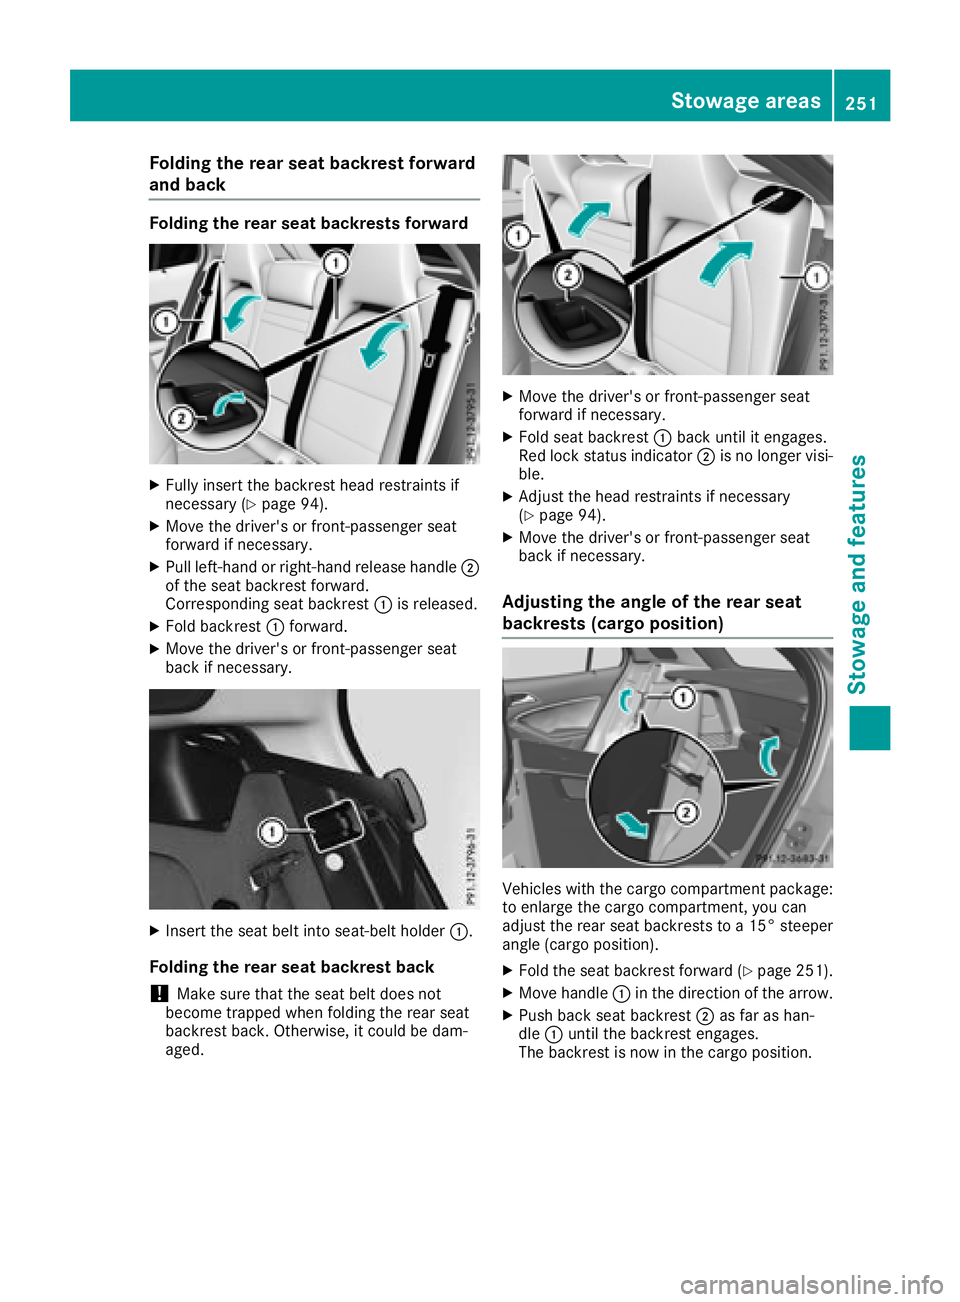
XFull yinsert th ebackrest head restraints if
necessar y (Ypage 94).
XMoveth edriver' sor front-passenger seat
forward if necessary.
XPull left-han dor right-hand release handle ;
of th eseat backrest forward.
Corresponding seat backrest :is released.
XFold backrest :forward.
XMov eth edriver' sor front-passenger seat
bac kif necessary.
XInser tth eseat belt int oseat-belt holder :.
Folding the rear seat backrest back
!Makesure that th eseat belt does no t
become trapped when foldin gth erear seat
backrest back. Otherwise, it could be dam-
aged.
XMov eth edriver' sor front-passenger seat
forward if necessary.
XFold seat backrest :bac kuntil it engages.
Red loc kstatus indicator ;is no longer visi-
ble.
XAdjus tth ehead restraint sif necessar y
(Ypage 94) .
XMoveth edriver' sor front-passenger seat
bac kif necessary.
Adjusting the angle of the rear seat
backrests (cargo position)
Vehicles wit hth ecargo compartmen tpackage:
to enlarg eth ecargo compartment, you can
adjust th erear seat backrest sto a15 °steepe r
angle (cargo position).
XFold th eseat backrest forward (Ypage 251).
XMovehandle :in th edirection of th earrow.
XPush bac kseat backrest ;as far as han -
dle :until th ebackrest engages.
The backrest is no win th ecargo position .
Stowage areas251
Stowage and features
Z
Page 254 of 338
Securing loads
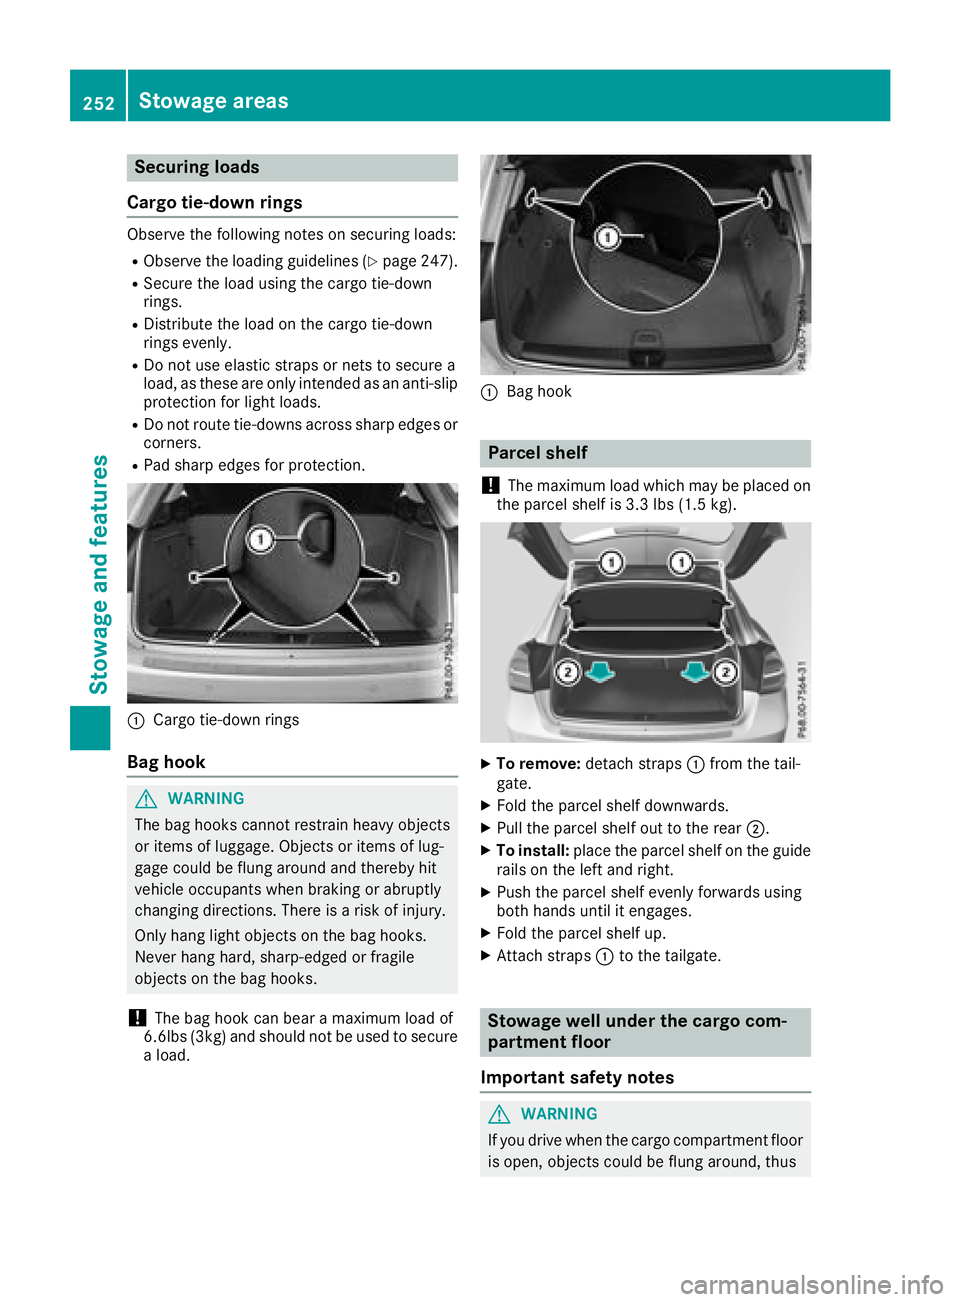
Cargo tie-down rings
Observe the following notes on securing loads:
RObserve the loading guidelines (Ypage 247).
RSecure the load using the cargo tie-down
rings.
RDistribute the load on the cargo tie-down
rings evenly.
RDo not use elastic straps or nets to secure a
load, as these are only intended as an anti-slip
protection for light loads.
RDo not route tie-downs across sharp edges or corners.
RPad sharp edges for protection.
:Cargo tie-down rings
Bag hook
GWARNING
The bag hooks cannot restrain heavy objects
or items of luggage. Objects or items of lug-
gage could be flung around and thereby hit
vehicle occupants when braking or abruptly
changing directions. There is a risk of injury.
Only hang light objects on the bag hooks.
Never hang hard, sharp-edged or fragile
objects on the bag hooks.
!The bag hook can bear a maximum load of
6.6lbs (3kg) and should not be used to secure
a load.
:Bag hook
Parcel shelf
!
The maximum load which may be placed on
the parcel shelf is 3.3 lbs (1.5 kg).
XTo remove: detach straps :from the tail-
gate.
XFold the parcel shelf downwards.
XPull the parcel shelf out to the rear ;.
XTo install:place the parcel shelf on the guide
rails on the left and right.
XPush the parcel shelf evenly forwards using
both hands until it engages.
XFold the parcel shelf up.
XAttach straps :to the tailgate.
Stowage well under the cargo com-
partment floor
Important safety notes
GWARNING
If you drive when the cargo compartment floor is open, objects could be flung around, thus
252Stowage areas
Stowage and features
Page 255 of 338
striking vehicle occupants. There is a risk of
injury, particularly in the event of sudden
braking or a sudden change in direction.
Always close the cargo compartment floor
before a journey.
!The maximum load capacity of the stowage
well under the cargo compartment floor is
55 lbs (25 kg).
There is a stowage area for TIREFIT, the vehicle
tool kit, a folding box, etc. underneath the cargo
compartment floor.
Opening/closing the cargo compart-
ment floor
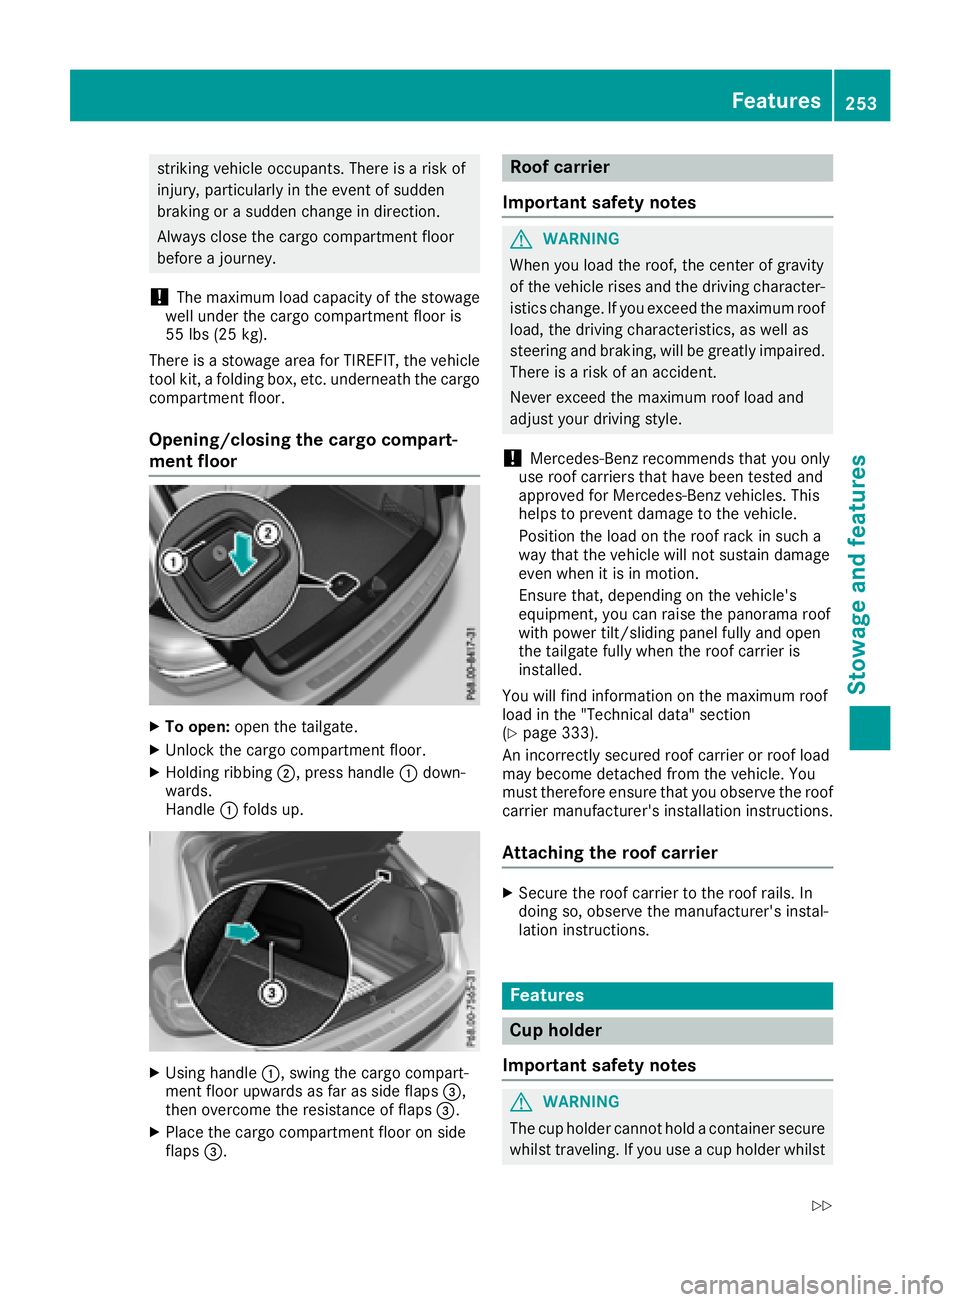
XTo open: open the tailgate.
XUnlock the cargo compartment floor.
XHolding ribbing ;, press handle :down-
wards.
Handle :folds up.
XUsing handle :, swing the cargo compart-
ment floor upwards as far as side flaps =,
then overcome the resistance of flaps =.
XPlace the cargo compartment floor on side
flaps=.
Roof carrier
Important safety notes
GWARNING
When you load the roof, the center of gravity
of the vehicle rises and the driving character-
istics change. If you exceed the maximum roof
load, the driving characteristics, as well as
steering and braking, will be greatly impaired.
There is a risk of an accident.
Never exceed the maximum roof load and
adjust your driving style.
!Mercedes-Benz recommends that you only
use roof carriers that have been tested and
approved for Mercedes-Benz vehicles. This
helps to prevent damage to the vehicle.
Position the load on the roof rack in such a
way that the vehicle will not sustain damage
even when it is in motion.
Ensure that, depending on the vehicle's
equipment, you can raise the panorama roof
with power tilt/sliding panel fully and open
the tailgate fully when the roof carrier is
installed.
You will find information on the maximum roof
load in the "Technical data" section
(
Ypage 333).
An incorrectly secured roof carrier or roof load
may become detached from the vehicle. You
must therefore ensure that you observe the roof
carrier manufacturer's installation instructions.
Attaching the roof carrier
XSecure the roof carrier to the roof rails. In
doing so, observe the manufacturer's instal-
lation instructions.
Features
Cup holder
Important safety notes
GWARNING
The cup holder cannot hold a container secure
whilst traveling. If you use a cup holder whilst
Features253
Stowage and features
Z
Page 256 of 338
traveling, the container may be flung around
and liquid may be spilled. The vehicle occu-
pants may come into contact with the liquid
and if it is hot, they may be scalded. You maybe distracted from the traffic conditions and
you could lose control of the vehicle. There is
a risk of an accident and injury.
Only use the cup holder when the vehicle is
stationary. Only use the cup holder for con-
tainers of the right size. Always close the con-tainer, particularly if the liquid is hot.
GWARNING
The heating elements of the cup holder can
become very hot. You could burn yourself on
them.
There is a risk of injury.
Do not touch the hot heating elements of the
cup holder. Always make sure that children
cannot access the hot heating elements of the
cup holder. Never leave children unsuper-
vised in the vehicle.
GWARNING
If you transport objects in the vehicle interior
and these are not adequately secured, they
could slip or be flung around and thereby
strike vehicle occupants. In addition, cup
holders, open stowage spaces and mobile
phone brackets may not always be able to
hold the objects placed in them in the event of
an accident. There is a risk of injury, particu-
larly in the event of sharp braking or sudden
changes of direction.
RAlways stow objects in such a way that they cannot be tossed about in these or similar
situations.
RAlways make sure that objects do not pro-
trude out of the stowage spaces, luggage
nets or stowage nets.
REnsure that closable stowage spaces are
shut before beginning your journey.
RAlways stow and secure heavy, hard, poin-
ted, sharp-edged, fragile or large objects in
the cargo compartment.
!Only use the cup holders for containers of
the right size and which have lids. The drinks could otherwise spill.
Observe the loading guidelines (
Ypage 247).
The stowage compartments in the doors provide
space for bottles:
Rfront: capacity up to 34 fl. oz. (1.0 l)
Rrear: capacity up to 17 fl. oz. (0.5 l)
Cup holder in the front center console
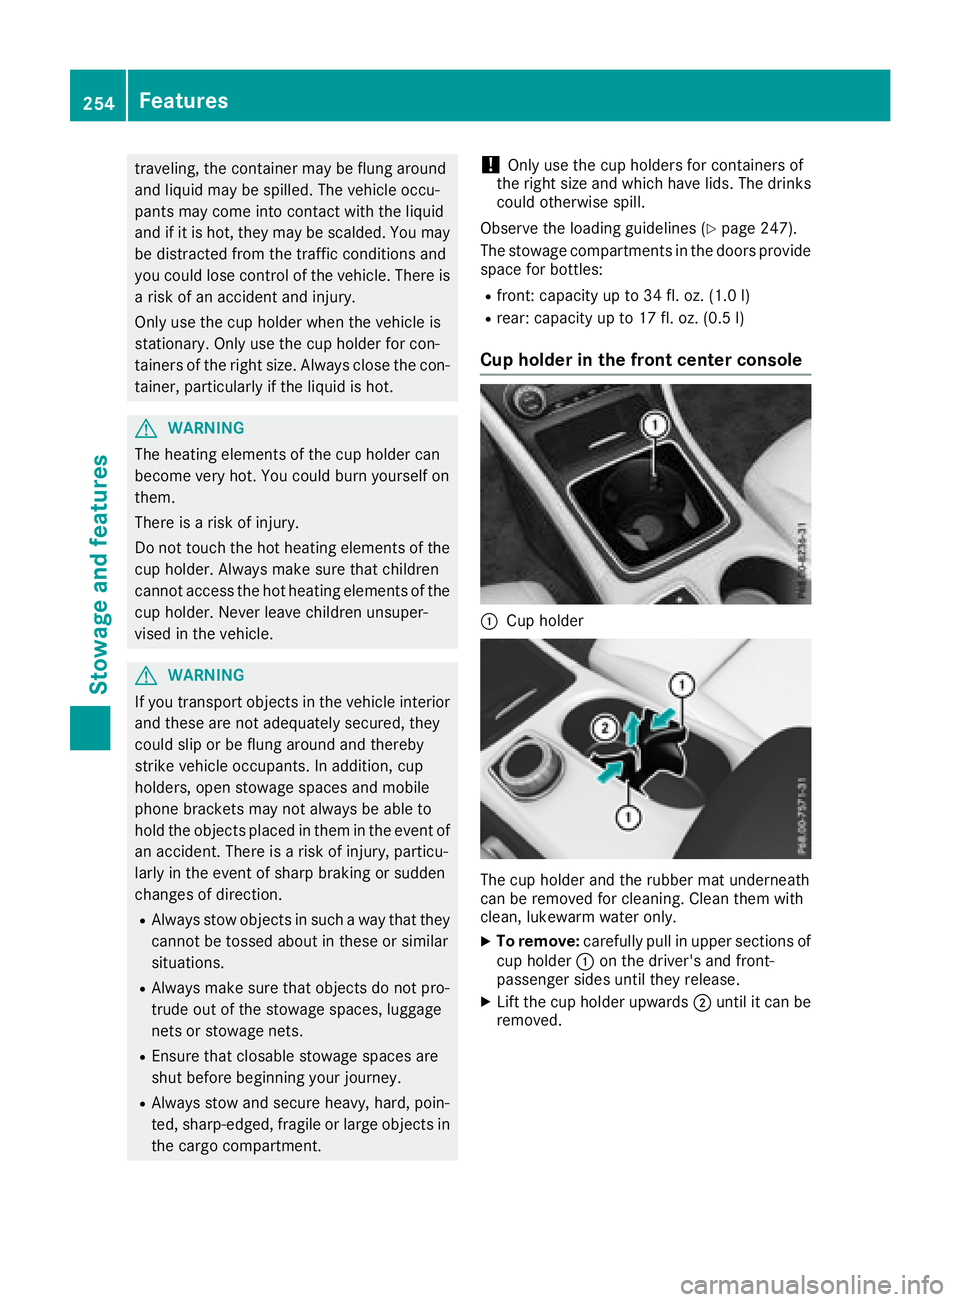
:Cup holder
The cup holder and the rubber mat underneath
can be removed for cleaning. Clean them with
clean, lukewarm water only.
XTo remove: carefully pull in upper sections of
cup holder :on the driver's and front-
passenger sides until they release.
XLift the cup holder upwards ;until it can be
removed.
254Features
Stowag ean d features
Page 257 of 338
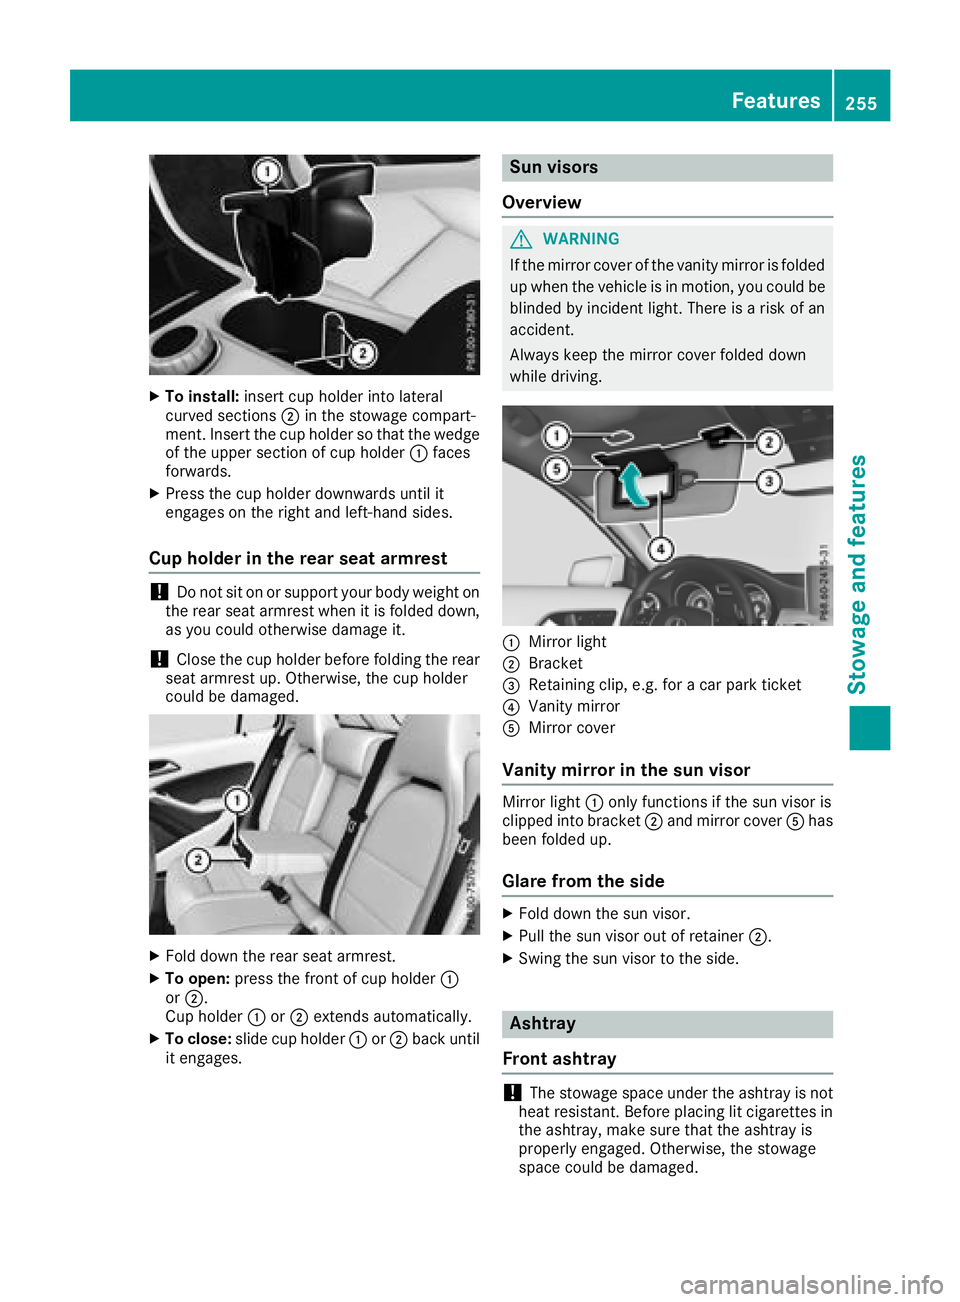
XTo install:insert cup holder into lateral
curved sections ;in the stowage compart-
ment. Insert the cup holder so that the wedge of the upper section of cup holder :faces
forwards.
XPress the cup holder downwards until it
engages on the right and left-hand sides.
Cup holder in the rear seat armrest
!Do not sit on or support your body weight on
the rear seat armrest when it is folded down,
as you could otherwise damage it.
!Close the cup holder before folding the rear
seat armrest up. Otherwise, the cup holder
could be damaged.
XFold down the rear seat armrest.
XTo open: press the front of cup holder :
or ;.
Cup holder :or; extends automatically.
XTo close: slide cup holder :or; back until
it engages.
Sun visors
Overview
GWARNING
If the mirror cover of the vanity mirror is folded
up when the vehicle is in motion, you could be
blinded by incident light. There is a risk of an
accident.
Always keep the mirror cover folded down
while driving.
:Mirror light
;Bracket
=Retaining clip, e.g. for a car park ticket
?Vanity mirror
AMirror cover
Vanity mirror in the sun visor
Mirror light :only functions if the sun visor is
clipped into bracket ;and mirror cover Ahas
been folded up.
Glare from the side
XFold down the sun visor.
XPull the sun visor out of retainer ;.
XSwing the sun visor to the side.
Ashtray
Front ashtray
!The stowage space under the ashtray is not
heat resistant. Before placing lit cigarettes in the ashtray, make sure that the ashtray is
properly engaged. Otherwise, the stowage
space could be damaged.
Features255
Stowag ean d features
Z
Page 258 of 338
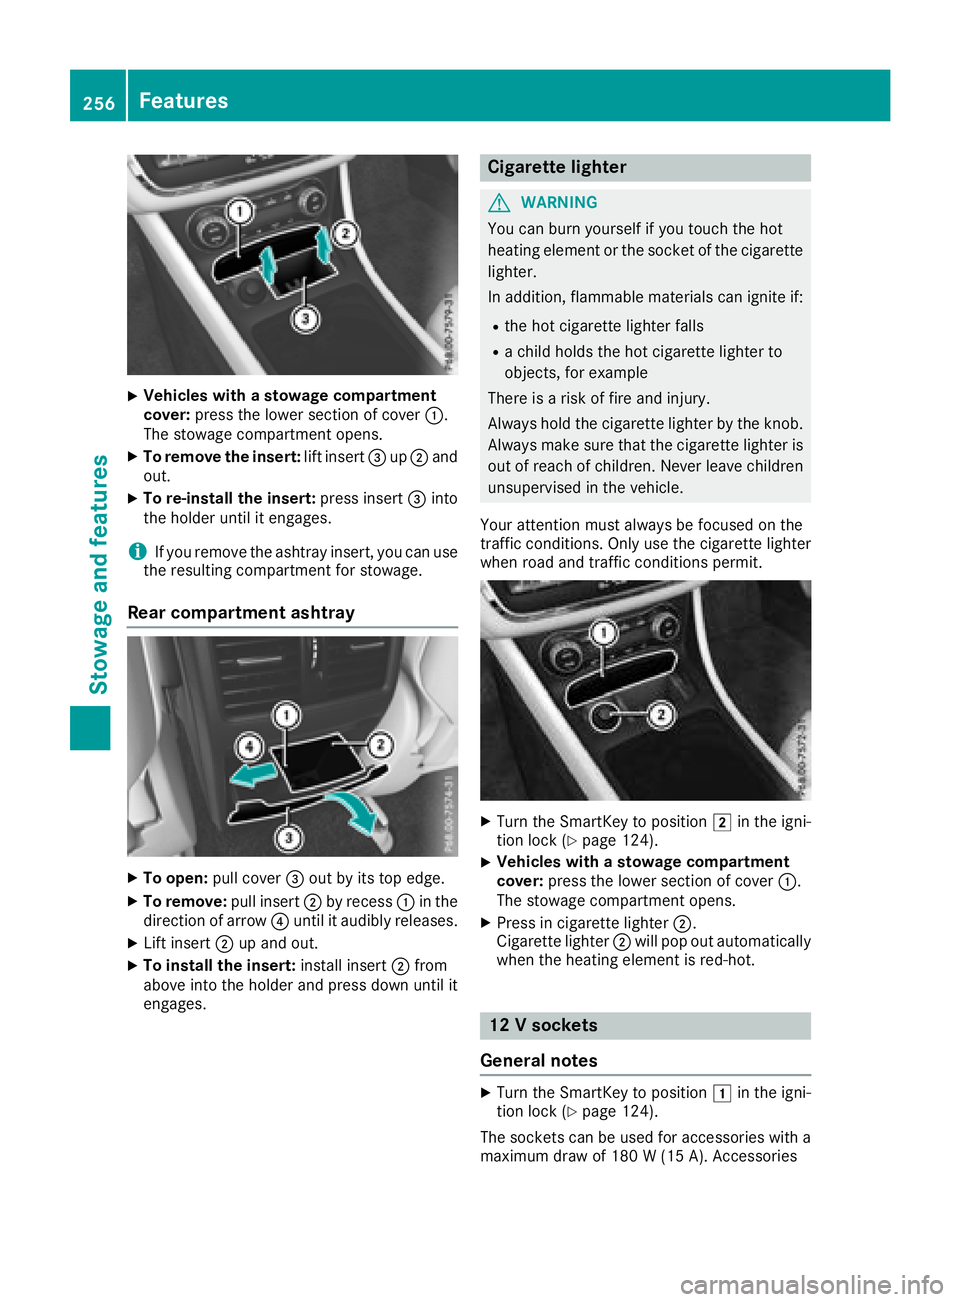
XVehicles with a stowage compartment
cover:press the lower section of cover :.
The stowage compartment opens.
XTo remove the insert: lift insert=up; and
out.
XTo re-install the insert: press insert=into
the holder until it engages.
iIf you remove the ashtray insert, you can use
the resulting compartment for stowage.
Rear compartment ashtray
XTo open: pull cover =out by its top edge.
XTo remove: pull insert;by recess :in the
direction of arrow ?until it audibly releases.
XLift insert ;up and out.
XTo install the insert: install insert;from
above into the holder and press down until it
engages.
Cigarette lighter
GWARNING
You can burn yourself if you touch the hot
heating element or the socket of the cigarette lighter.
In addition, flammable materials can ignite if:
Rthe hot cigarette lighter falls
Ra child holds the hot cigarette lighter to
objects, for example
There is a risk of fire and injury.
Always hold the cigarette lighter by the knob.
Always make sure that the cigarette lighter is
out of reach of children. Never leave children
unsupervised in the vehicle.
Your attention must always be focused on the
traffic conditions. Only use the cigarette lighter when road and traffic conditions permit.
XTurn the SmartKey to position 2in the igni-
tion lock (Ypage 124).
XVehicles with a stowage compartment
cover: press the lower section of cover :.
The stowage compartment opens.
XPress in cigarette lighter ;.
Cigarette lighter ;will pop out automatically
when the heating element is red-hot.
12 V sockets
General notes
XTurn the SmartKey to position 1in the igni-
tion lock (Ypage 124).
The sockets can be used for accessories with a
maximum draw of 180 W (15 A). Accessories
256Features
Stowage and features
Page 259 of 338
include such items as chargers for mobile
phones.
If you use the sockets for long periods when the
engine is switched off, the battery may dis-
charge.
An emergency cut-out ensures that the on-
board voltage does not drop too low. If the on-
board voltage is too low, the power to the sock-
ets is automatically cut. This ensures that there is sufficient power to start the engine.
Socket in the front center console
XVehicles with a stowage compartment
cover: press the lower section of the cover.
The stowage compartment opens.
XLift up the cover of the socket.
Socket in the rear compartment center
console
XPull the cover out by the top of the handle
edge.
XLift up the cover of the socket.
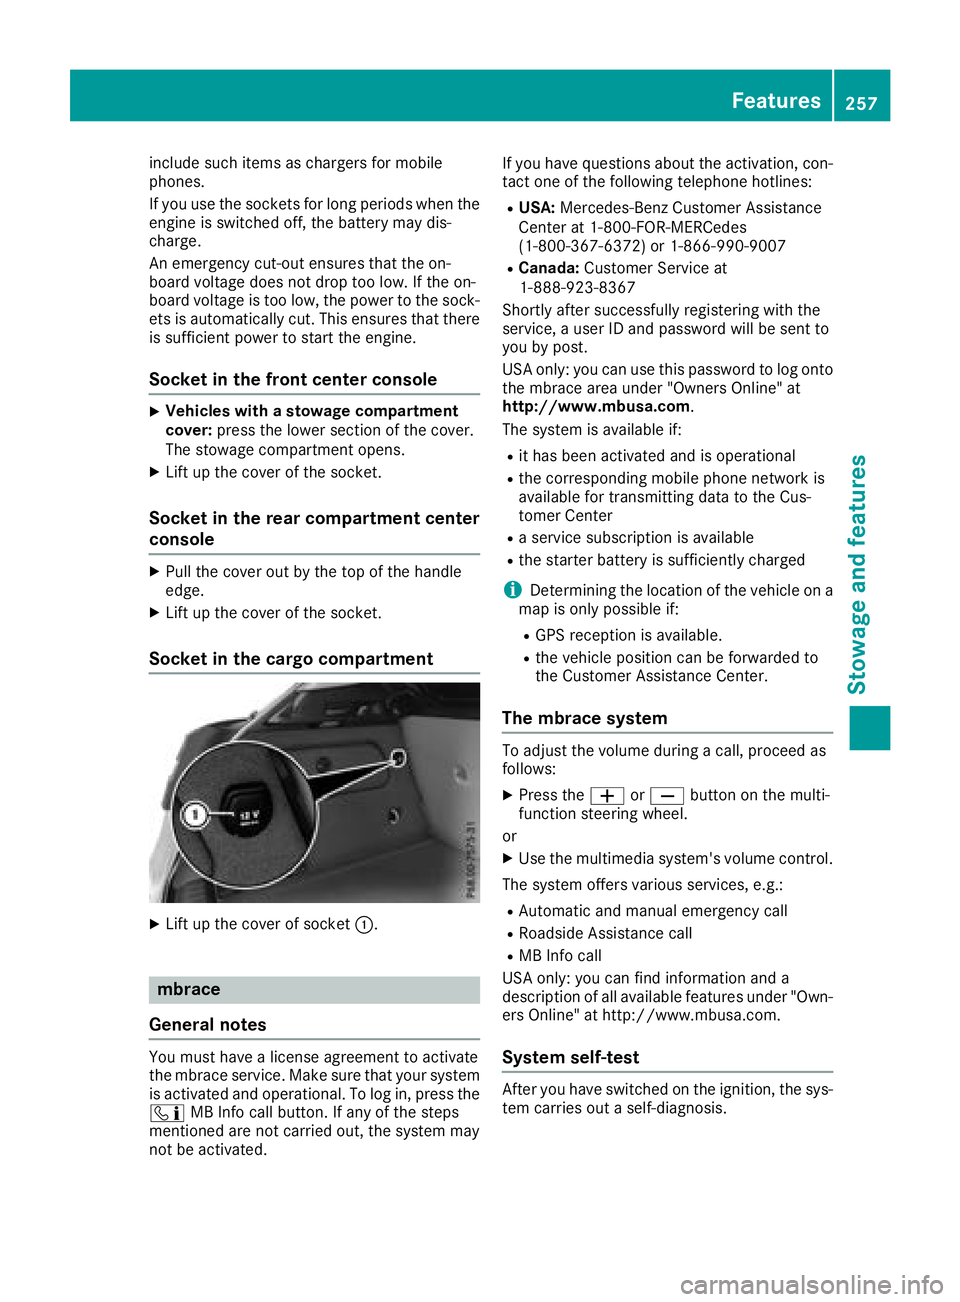
Socket in the cargo compartment
XLift up the cover of socket :.
mbrace
General notes
You must have a license agreement to activate
the mbrace service. Make sure that your system
is activated and operational. To log in, press the
ï MB Info call button. If any of the steps
mentioned are not carried out, the system may
not be activated. If you have questions about the activation, con-
tact one of the following telephone hotlines:
RUSA:
Mercedes-Benz Customer Assistance
Center at 1-800-FOR-MERCedes
(1-800-367-6372) or 1-866-990-9007
RCanada: Customer Service at
1-888-923-8367
Shortly after successfully registering with the
service, a user ID and password will be sent to
you by post.
USA only: you can use this password to log onto
the mbrace area under "Owners Online" at
http://www.mbusa.com.
The system is available if:
Rit has been activated and is operational
Rthe corresponding mobile phone network is
available for transmitting data to the Cus-
tomer Center
Ra service subscription is available
Rthe starter battery is sufficiently charged
iDetermining the location of the vehicle on a
map is only possible if:
RGPS reception is available.
Rthe vehicle position can be forwarded to
the Customer Assistance Center.
The mbrace system
To adjust the volume during a call, proceed as
follows:
XPress the WorX button on the multi-
function steering wheel.
or
XUse the multimedia system's volume control.
The system offers various services, e.g.:
RAutomatic and manual emergency call
RRoadside Assistance call
RMB Info call
USA only: you can find information and a
description of all available features under "Own-
ers Online" at http://www.mbusa.com.
System self-test
After you have switched on the ignition, the sys-
tem carries out a self-diagnosis.
Features257
Stowage and features
Z
Page 260 of 338
A malfunction in the system has been detected
if one of the following occurs:
RThe indicator lamp in the SOS button does notcome on during the system self-test.
RThe indicator lamp in the FRoadside
Assistance button does not light up during
self-diagnosis of the system.
RThe indicator lamp in the ïMB Info call
button does not light up during self-diagnosis
of the system.
RThe indicator lamp in one or more of the fol-
lowing buttons continues to light up red after
the system self-diagnosis:
-SOS button
-F Roadside Assistance call button
-ïMB Info call button
RAfter the system self-diagnosis, the Inoper‐ativeorServiceNotActivatedmessage
appears in the multifunction display.
If a malfunction is indicated as outlined above,
the system may not operate as expected. In the event of an emergency, help will have to be
summoned by other means.
Have the system checked at the nearest
Mercedes-Benz Service Center or contact the
following service hotlines:
RUSA: Mercedes-Benz Customer Assistance
Center at 1-800-FOR-MERCedes
(1-800-367-6372) or 1-866-990-9007
RCanada: Customer Service at
1-888-923-8367
Emergency call
Important safety notes
GWARNING
It can be dangerous to remain in the vehicle,
even if you have pressed the SOS button in an emergency if:
Ryou see smoke inside or outside of the vehi-
cle, e.g. if there is a fire after an accident
Rthe vehicle is on a dangerous section of
road
Rthe vehicle is not visible or cannot easily beseen by other road users, particularly when
dark or in poor visibility conditions
There is a risk of an accident and injury.
Leave the vehicle immediately in this or simi- lar situations as soon as it is safe to do so.
Move to a safe location along with other vehi-
cle occupants. In such situations, secure the
vehicle in accordance with national regula-
tions, e. g. with a warning triangle.
You must have a license agreement to activate
the mbrace service. Make sure that your system
is activated and operational. To register, press
the ï MB Info call button. If any of the steps
mentioned are not carried out, the system may
not be activated.
If you have questions about the activation, con-
tact one of the following telephone hotlines:
RUSA: Mercedes-Benz Customer Assistance
Center at 1-800-FOR-MERCedes
(1-800-367-6372) or 1-866-990-9007
RCanada: Customer Service at
1-888-923-8367
General notes
An emergency call is dialed automatically if an
air bag or Emergency Tensioning Device is trig-
gered.
iYou cannot end an automatically triggered
emergency call yourself.
An emergency call can also be initiated man-
ually.
As soon as the emergency call has been initi-
ated, the indicator lamp in the SOS button
flashes. The Connecting Call
message
appears in the multifunction display.
The audio output is muted.
Once the connection has been made, the Call
Connectedmessage appears in the multifunc-
tion display.
All important information on the emergency is
transmitted, for example:
Rcurrent location of the vehicle (as determined by the GPS system)
Rvehicle identification number
Rinformation on the severity of the accident
Shortly after the emergency call has been initi-
ated, a voice connection is automatically estab-
lished between the Customer Assistance Center
and the vehicle occupants.
RIf the vehicle occupants respond, the
Mercedes-Benz Customer Assistance Center
258Features
Stowag ean d features