tow bar MERCEDES-BENZ GLB SUV 2019 Owners Manual
[x] Cancel search | Manufacturer: MERCEDES-BENZ, Model Year: 2019, Model line: GLB SUV, Model: MERCEDES-BENZ GLB SUV 2019Pages: 689, PDF Size: 11.39 MB
Page 23 of 689

Calling up
the Digital Owner's Manual
Multimedia sy stem:
4 © 5
Info 5
Owner's Manual 5
Õ The Digital Owner's Manual describes
the func‐
tion and operation of:
R theve hicle
R the multimedia sy stem #
Select one of thefo llowing menu items in the
Digital Owner's Manual:
R Search: sea rchfo rke ywords in order tofind
qu ick answers toquestions about the opera‐
tion of theve hicle. R
Quick start: find thefirs tst eps towa rds set‐
ting up your vehicle.
R Tips: find information that prepares youfor
cer tain eve ryday situations with your vehicle.
R Messages: recei veadditional information
about the messages in the instrument dis‐
pla y.
R Bookmarks :ga in access to your personally
sa ve d bookmar ks.
R Language: select the language forth e Digital
Owner's Manual.
Some sections in the Digital Owner's Manual,
e.g. warning no tes, can be opened and closed.
Ad ditional methods of calling up the Digital
Owner's Manual:
Di rect access: openthere qu ired con tent in the
Digital Owner's Manual bypressing and holding
an ent ryon theta b bar in the multimedia sys‐
te m: Instrument displa
y:call up brief information as
displ aymessa ges in the instrument clus ter.
LINGU ATRO NIC: call up via thevo ice control
sy stem
Global sear ch:call up sear chresults for con‐
te nts of the Digital Owner's Manual in the home
screen
Fo r saf etyre asons, the Digital Owner's Manual is
deactivated while driving.
% The Owner's Manual can also be found in the
Mercedes-Benz Guides App in all common
app stores. 20
Digital Owner's Manual
Page 117 of 689
Ad
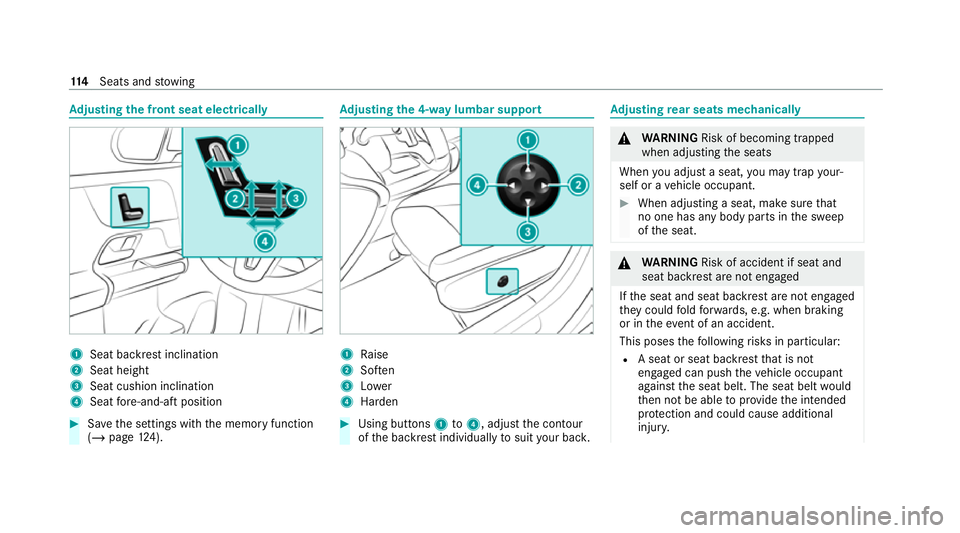
justing the front seat electrically 1
Seat ba ckrest inclination
2 Seat height
3 Seat cushion inclination
4 Seat fore -and-aft position #
Save the settings with the memory function
(/ page 124). Ad
justing the 4-w aylumbar support 1
Raise
2 Soften
3 Lower
4 Harden #
Using buttons 1to4 , adjust the conto ur
of the backrest individually tosuit your bac k. Ad
justing rear seats mechanically &
WARNING Risk of becoming trapped
when adjusting the seats
When you adjust a seat, you may trap your‐
self or a vehicle occupant. #
When adjusting a seat, make sure that
no one has any body parts in the sweep
of the seat. &
WARNING Risk of accident if seat and
seat ba ckrest are not engaged
If th e seat and seat backrest are not engaged
th ey could fold forw ards, e.g. when braking
or in theev ent of an accident.
This poses thefo llowing risks in particular:
R A seat or seat backrest that is not
engaged can push theve hicle occupant
against the seat belt. The seat belt would
th en not be able toprov ide the intended
pr otection and could cause additional
injur y. 11 4
Seats and stowing
Page 123 of 689
#
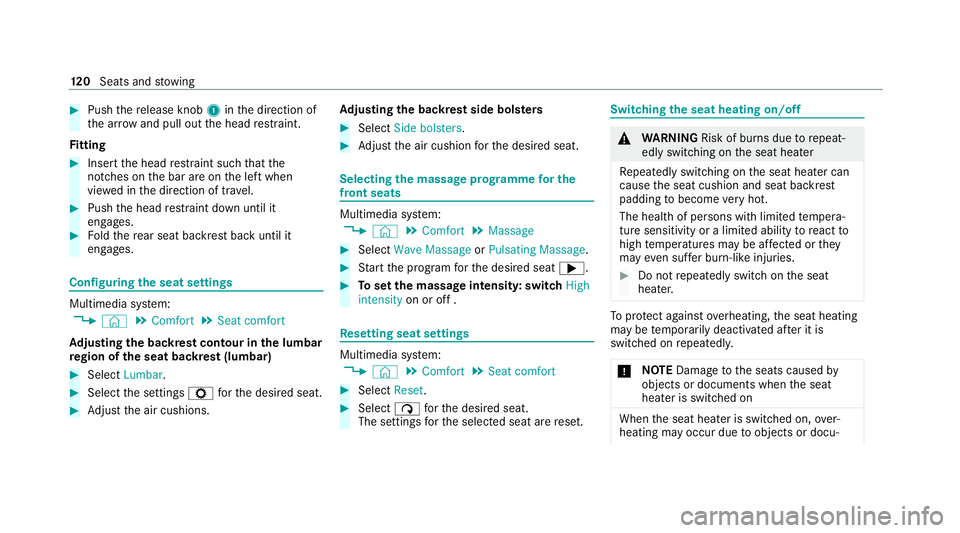
Push there lease knob 1inthe direction of
th e ar row and pull out the head restra int.
Fi tting #
Inse rtthe head restra int such that the
notches on the bar are on the left when
vie we d in the direction of tra vel. #
Push the head restra int down until it
engages. #
Foldthere ar seat backrest back until it
engages. Configuring
the seat settings Multimedia sy
stem:
4 © 5
Comfort 5
Seat comfort
Ad justing the backrest contour in the lumbar
re gion of the seat backrest (lumbar) #
Select Lumbar . #
Select the settings Zforth e desired seat. #
Adjust the air cushions. Ad
justing the backrest side bols ters #
Select Side bolsters . #
Adjust the air cushion forth e desired seat. Selecting
the massage prog ramme for the
front seats Multimedia sy
stem:
4 © 5
Comfort 5
Massage #
Select Wave Massage orPulsating Massage . #
Start the program forth e desired seat ;. #
Toset the massage intensit y:switch High
intensity on or off . Re
setting seat settings Multimedia sy
stem:
4 © 5
Comfort 5
Seat comfort #
Select Reset. #
Select ßforth e desired seat.
The settings forth e selected seat are reset. Switching
the seat heating on/off &
WARNING Risk of bu rns due torepeat‐
edly switching on the seat heater
Re peatedly switching on the seat heater can
cause the seat cushion and seat backrest
padding tobecome very hot.
The health of persons with limited temp era‐
ture sensitivity or a limited ability toreact to
high temp eratures may be af fected or they
may even su ffer burn-like injuries. #
Do not repeatedly switch on the seat
heater. To
protect against overheating, the seat heating
may be temp orarily deactivated af ter it is
switched on repeatedly.
* NO
TEDama getothe seats caused by
objects or documents when the seat
heater is switched on When
the seat heater is switched on, over‐
heating may occur due toobjects or docu‐ 12 0
Seats and stowing
Page 147 of 689
%
The cup holder and theru bber mat beneath
it can be remo vedfo r cleaning, e.g. with
clean, luk ewarmwate r. Cup holder in
thestow age compartment with co ver Cup holder in
thestow age compartment without
co ver #
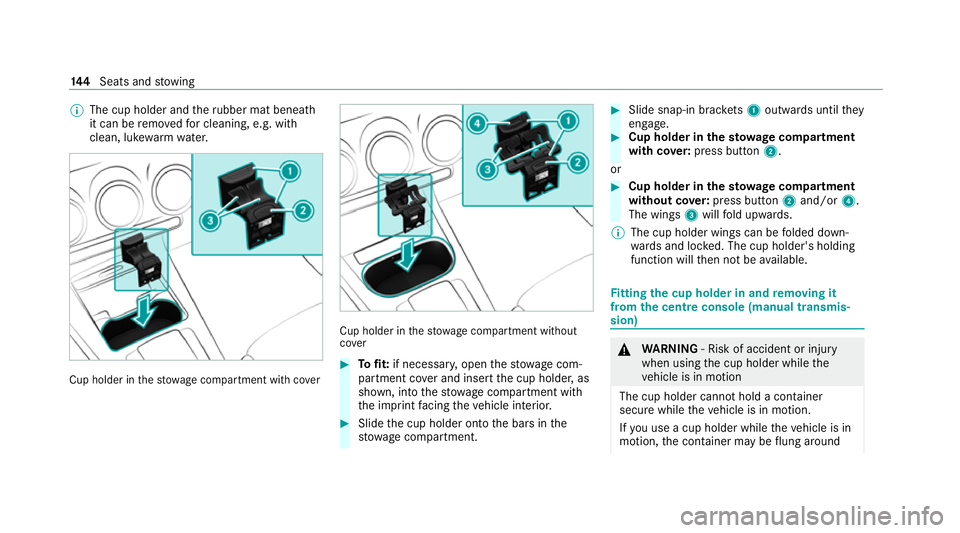
Tofit: if necessar y,open thestow age com‐
partment co ver and insert the cup holder, as
shown, into thestow age compartment with
th e imprint facing theve hicle interior. #
Slide the cup holder onto the bars in the
stow age compartment. #
Slide snap-in brac kets 1 outwards until they
engage. #
Cup holder in thesto wage compa rtment
with co ver:press but ton2.
or #
Cup holder in the stowage compa rtment
without co ver:press but ton2 and/or 4.
The wings 3will fold upwards.
% The cup holder wings can be folded down‐
wa rds and loc ked. The cup holder's holding
function will then not be available. Fi
tting the cup holder in and removing it
from the centre console (manual transmis‐
sion) &
WARNING ‑ Risk of accident or inju ry
when using the cup holder while the
ve hicle is in motion
The cup holder cannot hold a container
secure while theve hicle is in motion.
If yo u use a cup holder while theve hicle is in
motion, the conta iner may be flung around 14 4
Seats and stowing
Page 148 of 689
and liquids could be spilled. The
vehicle
occupants may come into contact with the
liquid and if it is hot, they could be scalded.
Yo u could be distracted from traf fic condi‐
tions and you may lose cont rol of theve hicle. #
Only use the cup holder when theve hi‐
cle is stationar y. #
Only use the cup holder for containers
of theright size. #
Alw ays close the conta iner, particularly
if th e liquid is hot. #
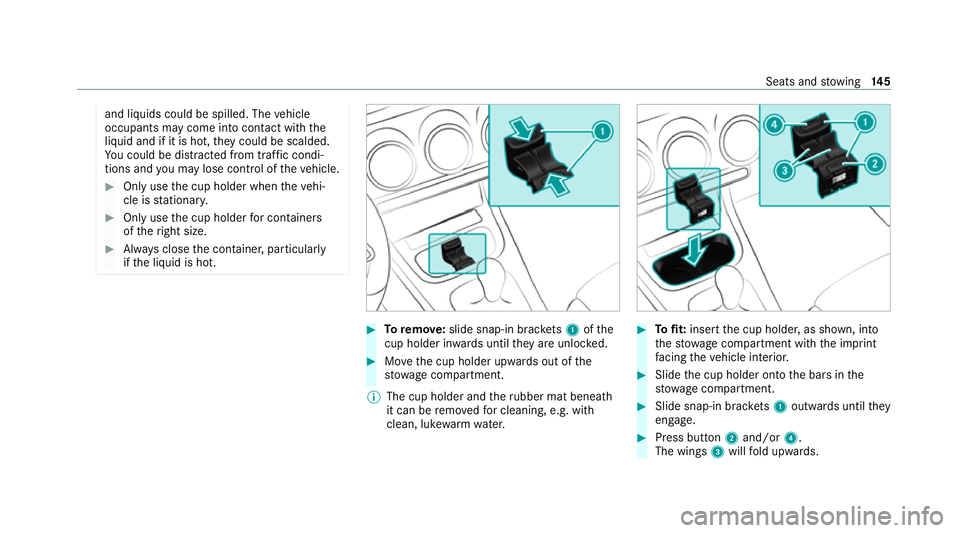
Toremo ve:slide snap-in brac kets 1 ofthe
cup holder in wards until they are unlo cked. #
Movethe cup holder upwards out of the
stow age compartment.
% The cup holder and theru bber mat beneath
it can be remo vedfo r cleaning, e.g. with
clean, luk ewarmwate r. #
Tofit: inse rtthe cup holder, as shown, into
th estow age compartment with the imprint
fa cing theve hicle interior. #
Slide the cup holder onto the bars in the
stow age compartment. #
Slide snap-in brac kets 1 outwards until they
engage. #
Press button 2and/or 4.
The wings 3will fold upwards. Seats and
stowing 14 5
Page 296 of 689
Alw
ays secure the bicycles topreve ntthem from
moving around and check them at regular inter‐
va ls to ensure that they are secure.
Do not use tarp aulins or other co vers. The driv‐
ing characteristics and rear view may be
impaired. In addition, aerodynamic resis tance
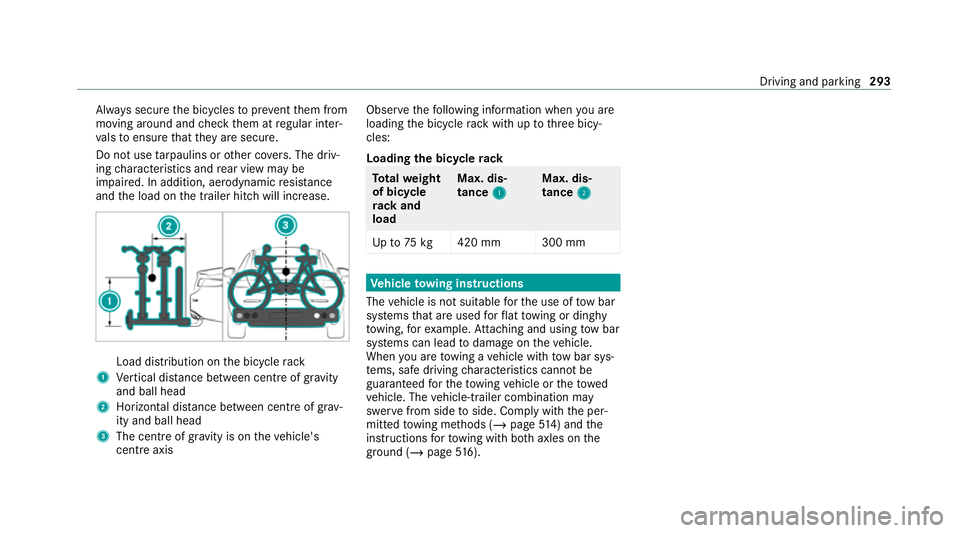
and the load on the trailer hitch will increase. Load distribution on
the bicycle rack
1 Vertical dis tance between centre of gr avity
and ball head
2 Horizon tal dis tance between centre of gr av‐
ity and ball head
3 The centre of gr avity is on theve hicle's
centre axis Obse
rveth efo llowing information when you are
loading the bicycle rack with up tothre e bicy‐
cles:
Loading the bicycle rack To
tal weight
of bicycle
rack and
load Max. dis‐
tance
1 1 Max. dis‐
tance
2 2
Up to75 kg 420 mm 300 mm Ve
hicle towing instructions
The vehicle is not suitable forth e use of tow bar
sy stems that are used forflat towing or ding hy
to wing, forex ample. Attach ing and using tow bar
sy stems can lead todamage on theve hicle.
When you are towing a vehicle with tow bar sys‐
te ms, safe driving characteristics cannot be
guaranteed forth eto wing vehicle or theto wed
ve hicle. The vehicle-trailer combination may
swer vefrom side toside. Comply with the per‐
mitted towing me thods (/ page514) and the
instructions forto wing with bo thaxles on the
ground ( /page 516). Driving and pa
rking 293
Page 461 of 689
Processing of personal data via
the11 2
emer gency call sy stem (EU eCall)
All processing of personal data via the11 2 emer‐
ge ncy call sy stem (EU eCall) cor responds with
th e specifications in the EU Regulation
20 16 /679 "on the pr otection of individuals with
re ga rd tothe processing of personal data
(GDPR)" and is based particular lyon the neces‐
sity of upholding the vital interests of the af fec‐
te d person in accordance with Article 6, Clause
1, Letter d of the GDPR.
The processing of this type of data is strictly
limited tothe purpose of operating the emer‐
ge ncy calls tothest andard European emer gency
call number 112.
Data recipient
The recipients of da tathat is processed using
th e11 2 emergency call sy stem (EU eCall) are the
re leva nt eme rgency call inquiry term inals that
are specified tofirs tre cei veand handle emer‐
ge ncy calls tothest andard European emer gency
call number 112by there spective country
authorities in whose territory you are located. Ar
rangements for data processing
Bo th emer gency call sy stems are designed so
th at thefo llowing requ irements are fulfilled:
R The data con tained in the sy stem memory is
not accessible outside the sy stem prior to
th e initiation of an emer gency call.
R Both emer gency call sy stems cann otbe
traced and there is no continuous tracking in
normal operation.
R The data in the sy stem's internal memory is
automatically and continuously dele ted.
R The location data of theve hicle is continu‐
ously overwritten in the sy stem's internal
memor y,so that no more than the last three
cur rent locations requ ired forth e normal
function of the sy stem are available.
R The record of the activity data of bo themer‐
ge ncy call sy stems is only kept for as long as
is requ ired tofulfil the purpose of handling
th e emer gency call, and under no circum‐
st ances for more than 13 hours af terthe
time that an emer gency call is initia ted. Rights of persons af
fected bythe data pro‐
cessing
The person af fected bythe data processing (the
ve hicle owner) has theright toaccess the data
and if applicable can demand the cor rection,
del etion or bar ring of da tathat af fects him or
her and that the processing of which does not
cor respond with the GDPR regulations. Each cor‐
re ction, del etion or bar ring car ried out according
to this regulation must be shared with theth ird
party towhich the data has been transmit ted,
pr ov ided this does not pr oveto be infeasible and
does not incur disproportionate expenditure.
The person af fected bythe data processing has
th eright tocomplain tothe appropriate data
pr otection authority should they be of the opin‐
ion that their rights ha vebeen infringed bythe
processing of their personal data.
Re sponsible contact point forth e processing of
access rights: Authorised company representa‐
tive for data pr otection, Daimler AG, HPC G353,
D-70546 Stutt gart, Germany 458
MBUX multimedia sy stem
Page 511 of 689
Damaged tyres and a tyre pressure
that is
to o low can significantly impair braking and
handling characteristics. #
Do not drive on. #
Consult a qualified specialist workshop. *
NO
TEStaining from leaking tyre sealant Af
ter use, excess tyre sealant may leak out
from thefilling hose. #
Therefore, place thefilling hose in the
plastic bag that con tained the TIREFIT
kit. If, af
terte n minutes, a tyre pressure of
200 kPa (2.0 bar/29 psi) has been achie ved: #
Switch off the tyre inflation compressor. #
Unscr ew thefilling hose from theva lve of the
defective tyre.
Please no tethat tyre sealant may leak out when
unscr ewing thefilling hose. &
WARNING Risk of accident from driving
wi th sealed tyres
A tyre temp orarily sealed with tyre sealant
impairs driving characteristics and is not
suitable for higher speeds. #
Adapt your driving style according lyand
drive carefull y. #
Do not exceed the maximum speed
limit with a tyre that has been repaired
using tyre sealant. #
Obser vethe maximum permissible speed for
a tyre sealed with tyre sealant 80 km/h. #
The sticke r with de tails of the maximum per‐
missible speed must be af fixe dto the instru‐
ment clus ter where it can be easi lyseen by
th e driver.
* NO
TEStaining from leaking tyre sealant Af
ter use, excess tyre sealant may leak out
from thefilling hose. #
Therefore, place thefilling hose in the
plastic bag that con tained the TIREFIT
kit. +
ENVIRONMEN
TALNO TEEnvironmental
pollution caused byenvironmen tally ir re‐
sponsible disposal Ty
re sealant contains polluta nts. #
Have the tyre sealant bottle disposed of
professionall y,e.g. at a Mercedes-Benz
Service Centre. #
Stow th e tyre sealant bottle, the tyre inflation
compressor and thewa rning triangle. #
Pull away immediatel y. #
Stop driving af ter appro ximately ten minu tes
and check the tyre pressure using the tyre
inflation compressor.
The tyre pressure must now be at least
13 0 kPa (1.3 bar/19 psi). 508
Breakd own assi stance
Page 512 of 689
&
WARNING Risk of accident due tothe
specified tyre pressure not being ach‐
ie ved
If th e specified tyre pressure is not achie ved
af te r a brief drive, the tyre is too badly dam‐
aged. The tyre sealant cannot repair the tyre
in this ins tance.
Dama ged tyres and a tyre pressure that is
to o low can significantly impair braking and
handling characteristics. #
Do not drive on. #
Consult a qualified specialist workshop. Countries
that ha veMercedes-Benz
Service24h: you will find a sticke r with thete le‐
phone number, e.g. on the B‑pillar on the driver's
side. #
Cor rect the tyre pressure if it is still at least
13 0 kPa (1.3 bar/19 psi). See the tyre pres‐
sure table on the fuel filler flap forva lues. #
Toincrease the ty repressure: switch on
th e tyre inflation compressor. #
Toreduce the tyre pressure: remo vethe
tyre sealant bottle from the tyre inflation
compressor. #
Insert thefiller hose in the soc ket of the tyre
inflation compressor and turn it a quarter
turn clo ckwise. #
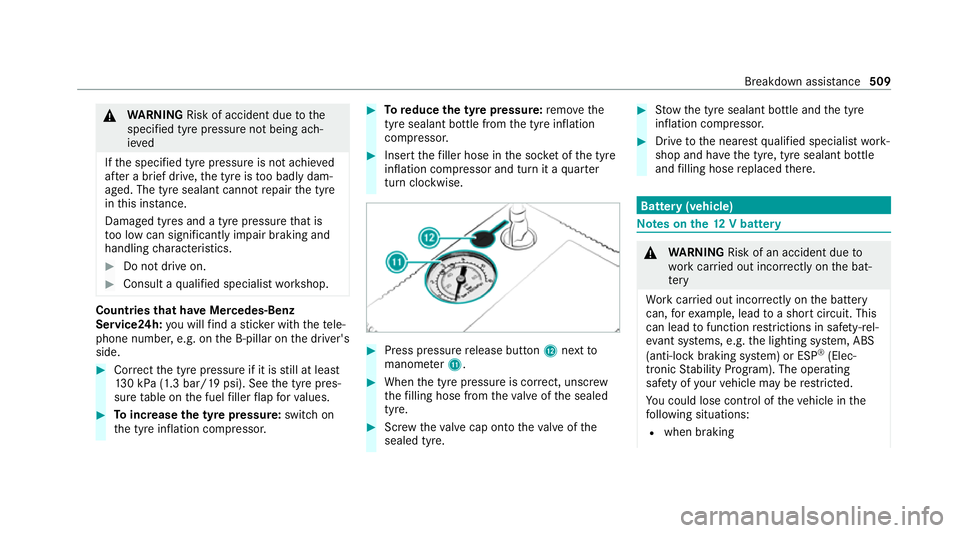
Press pressure release button Cnext to
manome terB. #
When the tyre pressure is cor rect, unscr ew
th efilling hose from theva lve of the sealed
tyre. #
Screw theva lve cap onto theva lve of the
sealed tyre. #
Stow th e tyre sealant bottle and the tyre
inflation compressor. #
Drive tothe nearest qualified specialist work‐
shop and ha vethe tyre, tyre sealant bottle
and filling hose replaced there. Batte
ry(vehicle) Note
s onthe12 V battery &
WARNING Risk of an accident due to
wo rkcar ried out incor rectly on the bat‐
te ry
Wo rkcar ried out incor rectly on the battery
can, forex ample, lead toa short circuit. This
can lead tofunction restrictions in saf ety-re l‐
eva nt sy stems, e.g. the lighting sy stem, ABS
(anti-lock braking sy stem) or ESP ®
(Elec‐
tronic Stability Prog ram). The operating
saf ety of your vehicle may be restricted.
Yo u could lose cont rol of theve hicle in the
fo llowing situations:
R when braking Breakdown assis
tance 509
Page 518 of 689
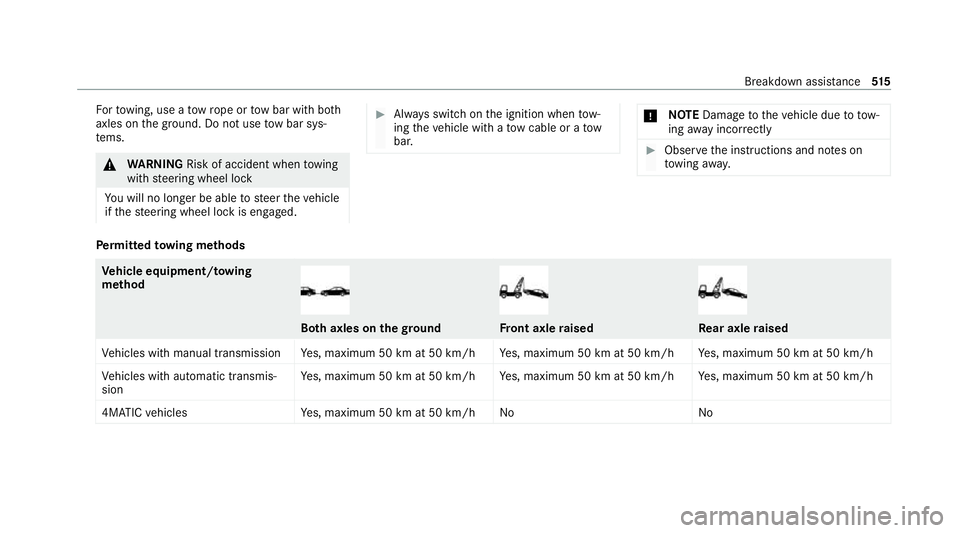
Fo
rto wing, use a tow rope or tow bar with bo th
axles on the ground. Do not use tow bar sys‐
te ms. &
WARNING Risk of accident when towing
with steering wheel lock
Yo u will no lon ger be able tosteer theve hicle
if th esteering wheel lock is engaged. #
Alw ays switch on the ignition when tow‐
ing theve hicle with a tow cable or a tow
bar. *
NO
TEDama getotheve hicle due to tow‐
ing away incor rectly #
Obser vethe instructions and no tes on
to wing away. Pe
rm itted towing me thods Ve
hicle equipment/ towing
me thod Bo
th axles on thegr ound Fr
ont axle raised Re
ar axle raised
Ve hicles with manual transmission Yes, maximum 50 km at 50 km/h Yes, maximum 50 km at 50 km/h Yes, maximum 50 km at 50 km/h
Ve hicles with automatic transmis‐
sion Ye
s, maximum 50 km at 50 km/h Yes, maximum 50 km at 50 km/h Yes, maximum 50 km at 50 km/h
4MATIC vehicles Yes, maximum 50 km at 50 km/h No No Breakdown assis
tance 515