fuel MERCEDES-BENZ GLC 2019 Owner's Guide
[x] Cancel search | Manufacturer: MERCEDES-BENZ, Model Year: 2019, Model line: GLC, Model: MERCEDES-BENZ GLC 2019Pages: 370, PDF Size: 19.55 MB
Page 275 of 370
Calling up the climate control bar
Multimedia system:
XSelectVehicleVehicle.The vehicle menu is displayed.
XSlide6the controller repeatedly until theclimate control bar is activated.
Calling up the climate control menu
Multimedia system:
XSelectVehicleVehicle.The vehicle menu is displayed.
XSlide6the controller repeatedly until theclimate control bar is activated.
XTo select from climate control barD: turnand press the controller.The menu for selecting the climate controlfunction is activated.
XTo select the climate control function: turnand press the controller.The selected climate control functionappears.
Settings in the climate menu
Adjusting the climate mode settings
The climate mode determines the type of air-flow. The setting is active when the air-condi-tioning system is set toX(Ypage 123).
XCall up the climate control menu(Ypage 273).
XTo selectClimate ModeClimate Mode: turn and press thecontroller.
XTo change the setting: turn the controller.
XTo exit the menu:press the8button.
The climate mode bar displays the current air-flow setting:DIFFUSEDIFFUSE,MEDIUMMEDIUMorFOCUSFOCUS.
Starting/stopping the perfume atomizer
The perfume atomizer makes it possible to scentthe air in individual compartments in the vehicleinterior. Further information (Ypage 127).
XCall up the climate control menu(Ypage 273).
XTo selectAirAirFreshenerFreshener: turn and press thecontroller.The setting element is active.
XTo start/stop the perfume atomizer: pressthe controller.
XTo set the intensity: turn the controller whenthe atomizer is switched on.
XTo exit the menu:press the8button.
Switching the ionization on/off
The ionization has a cleansing effect on the air inthe vehicle interior. Further information(Ypage 128).
XCall up the climate control menu(Ypage 273).
XTo selectIonizationIonization: turn and press thecontroller.The setting element is active.
XTo switch the ionization on or off: turn thecontroller.
XTo exit the menu:press the8button.
Settings in the bottom bar of the cli-
mate control menu
Switching cooling with air dehumidifica-
tion on/off
XCall up the climate control menu(Ypage 273).
XSlide6the controller repeatedly until thebottom bar is activated.
XTo selectssA/CA/C: turn and press the control-ler.
XSwitch cooling with air dehumidification onsor offS.
iThe current status of the cooling function isdisplayed in the climate control bar: A/C ON– activated, A/C OFF – deactivated.
iDeactivating the cooling with air dehumidi-fication function reduces fuel consumption.
Synchronizing the climate control set-
tings
UsessSyncSync(synchronization) to select the cli-mate control setting for all zones togethersorseparatelyS.
XCall up the climate control menu(Ypage 273).
XSlide6the controller repeatedly until thebottom bar is activated.
XTo selectssSyncSync: turn and press the con-troller.
XSwitch the synchronization function onsoroffS.
Operating system273
Multi media system
Z
Page 309 of 370
RLight bulbs
RSeals
RTrim elements
RVentilation slots
Damaged seals or electrical components canlead to leaks or failures.
!Vehicles with decorative film: parts of yourvehicle are covered with decorative film.Maintain a distance of at least 27.5 in (70 cm)between the film-covered parts of the vehicleand the nozzle of the power washer.
Information about the correct distance isavailable from the equipment manufacturer.
Move the power washer nozzle around whencleaning your vehicle.
The water temperature of the power washermust not exceed 140 ‡ (60 †).
!If the SmartKey is within the rear detectionrange of KEYLESS-GO, the following situa-tions, for example, could lead to the uninten-tional opening of the tailgate:
Rwhen using an automatic car wash
Rwhen using a power washer
Make sure that the SmartKey is at least 10 ft(3 m) away from the vehicle.
Cleaning the paintwork
!Do not affix:
Rstickers
Rfilms
Rmagnetic plates or similar items
to painted surfaces. You could otherwisedamage the paintwork.
Scratches, corrosive deposits, areas affected bycorrosion and damage caused by inadequatecare cannot always be completely repaired. Insuch cases, visit a qualified specialist workshop.
XRemove dirt immediately, where possible,while avoiding rubbing too hard.
XSoak insect remains with insect remover andrinse off the treated areas afterwards.
XSoak bird droppings with water and rinse offthe treated areas afterwards.
XRemove tree resin, oils, fuels and greases byrubbing gently with a cloth soaked in petro-leum ether or lighter fluid
XRemove coolant and brake fluid with a moistcloth and clear water.
XUse tar remover to remove tar stains.
XUse silicone remover to remove wax.
When water no longer forms beads on the paintsurface, use the care product Paint Care, whichhas been approved for Mercedes-Benz. This isthe case approximately every three to fivemonths, depending on the climate conditionsand the care product used.
The cleaning product Paint Cleaner, which hasbeen recommended and approved forMercedes-Benz, should be used when dirt haspenetrated the paint surface.
Also use Paint Cleaner on paint that has becomedull.
Do not use these care products in the sun or onthe hood while the hood is hot.
XUse a suitable touch-up stick, e.g. MB Touch-Up Stick, to repair slight damage to the paint-work quickly and provisionally.
Matte finish care
!Never polish the vehicle or the light alloywheels. Polishing causes the finish to shine.
!The following can give the paint a glossyappearance and thus reduce the matt effect:
RRubbing hard with unsuitable agents
RWashing the vehicle in direct sunlight
!Never use paint cleaner, buffing or polishingproducts, or gloss preserver, e.g. wax, for thepurpose of paintwork care. These productsare only suitable for high-gloss surfaces. Theiruse on vehicles with matte paintwork leads toconsiderable surface damage or, more spe-cifically, to shiny, spotted areas.
Always have paintwork repairs carried out at aqualified specialist workshop.
!Only use automatic car washes which cor-respond to the latest technological stand-ards. Never use wash programs which finishby treating the vehicle with hot wax.
Observe these notes if your vehicle has a clearmatte finish. This will help you to avoid damageto the paintwork due to incorrect treatment.
These notes also apply to light alloy wheels witha clear matte finish.
Use only insect remover and car shampoo fromthe range of approved Mercedes-Benz careproducts.
Care307
Maintenance and care
Z
Page 320 of 370
have attained a pressure of at least 200 kPa(2.0 bar/29 psi).
If a pressure of 200 kPa (2.0 bar/29 psi) hasbeen attained after five minutes, see "Tire pres-sure reached" (Ypage 318).
If a tire pressure of 200 kPa (2.0 bar/29 psi) hasnot been attained after five minutes, see "Tirepressure not reached" (Ypage 318).
If tire sealant has escaped, clean it off affectedareas as quickly as possible. It is preferable touse clean water.
If your clothes are soiled with tire sealant, havethem cleaned with perchloroethylene at a drycleaner as soon as possible.
Tire pressure not reached
If a tire pressure of 200 kPa (2.0 bar/29 psi) hasnot been attained after ten minutes:
XSwitch off the tire inflation compressor.
XUnscrew the filler hose from the valve of thefaulty tire.Tire sealant may escape when the filler hose isunscrewed.
XVery slowly drive forwards or reverse approx-imately 30 ft (10 m).
XPump up the tire again.
After a maximum of ten minutes, the tire pres-sure must be at least 200 kPa (2.0 bar/29 psi).
GWARNING
If the required tire pressure is not reached
after the specified time, the tire is too badly
damaged. The tire sealant cannot repair the
tire in this instance. Damaged tires and a tire
pressure that is too low can significantly
impair the vehicle's braking and driving char-
acteristics. There is a risk of accident.
Do not continue driving. Contact a qualified
specialist workshop.
Tire pressure reached
GWARNING
A tire temporarily sealed with tire sealant
impairs the driving characteristics and is not
suitable for higher speeds. There is a risk of
accident.
You should therefore adapt your driving style
accordingly and drive carefully. Do not exceed
the specified maximum speed with a tire that
has been repaired using tire sealant.
The maximum permissible speed for a tiresealed with tire sealant is 50 mph (80 km/h).The upper part of the TIREFIT sticker must beaffixed to the instrument cluster in the driver'sfield of vision.
If a tire pressure of 200 kPa (2.0 bar/29 psi) hasbeen attained after ten minutes:
XSwitch off the tire inflation compressor.
XUnscrew the filler hose from the valve of thefaulty tire.Tire sealant may escape when the filler hose isunscrewed.
XStow the tire sealant bottle and the tire infla-tion compressor.
XPull away immediately.
XStop after driving for approximately tenminutes and check the tire pressure with thetire inflation compressor.The tire pressure must now be at least130 kPa (1.3 bar/19 psi).
GWARNING
If the required tire pressure is not reached
after driving for a short period, the tire is too
badly damaged. The tire sealant cannot repair
the tire in this instance. Damaged tires and a
tire pressure that is too low can significantly
impair the vehicle's braking and driving char-
acteristics. There is a risk of accident.
Do not continue driving. Contact a qualified
specialist workshop.
In cases such as the one mentioned above, con-tact an authorized Mercedes-Benz Center. Orcall 1-800-FOR-MERCedes (in the USA) or1-800-387-0100 (in Canada).
XCorrect the tire pressure if it is still at least130 kPa (1.3 bar/19 psi). See the Tire andLoading Information placard on the B-pillar onthe driver's side or the tire pressure table inthe fuel filler flap for values.
XTo increase the tire pressure:switch on thetire inflation compressor.
318Flat tire
Breakdown assistance
Page 325 of 370
!Avoid repeated and lengthy starting attempts. Otherwise, the catalytic converter could bedamaged by the non-combusted fuel.
Do not start the vehicle using a rapid charging device. If your vehicle's battery is discharged, theengine can be jump-started from another vehicle or from a donor battery using jumper cables.Observe the following points:
RThe battery is not accessible in all vehicles. If the other vehicle's battery is not accessible, jump-start the vehicle using a donor battery or a jump-starting device.
Ryou may only jump-start the vehicle when the engine and exhaust system are cold.
RAll vehicles except vehicles with a lithium-ion battery:do not start the engine if the batteryis frozen. Let the battery thaw first.
RJump-starting may be performed only using batteries with a nominal voltage of 12 V.
ROnly use jumper cables which have a sufficient cross-section and insulated terminal clamps.
RIf the battery is fully discharged, leave the battery that is being used to jump-start connected fora few minutes before attempting to start. This charges the battery slightly.
RMake sure that the two vehicles do not touch.
Make sure that:
RThe jumper cables are not damaged.
RBare parts of the terminal clamp do not come into contact with other metal parts while the jumpercables are connected to the battery.
RThe jumper cables cannot come into contact with parts that can move when the engine is running,such as the V-belt pulley or the fan.
XSecure the vehicle by applying the electric parking brake.
XShift the transmission to position].
XMake sure that the ignition is switched off. All indicator lamps in the instrument cluster must beoff. When using the SmartKey, turn the SmartKey to positionZin the ignition lock and remove it(Ypage 131).
XSwitch off all electrical consumers, e.g. rear window defroster, lighting, etc.
XOpen the hood.
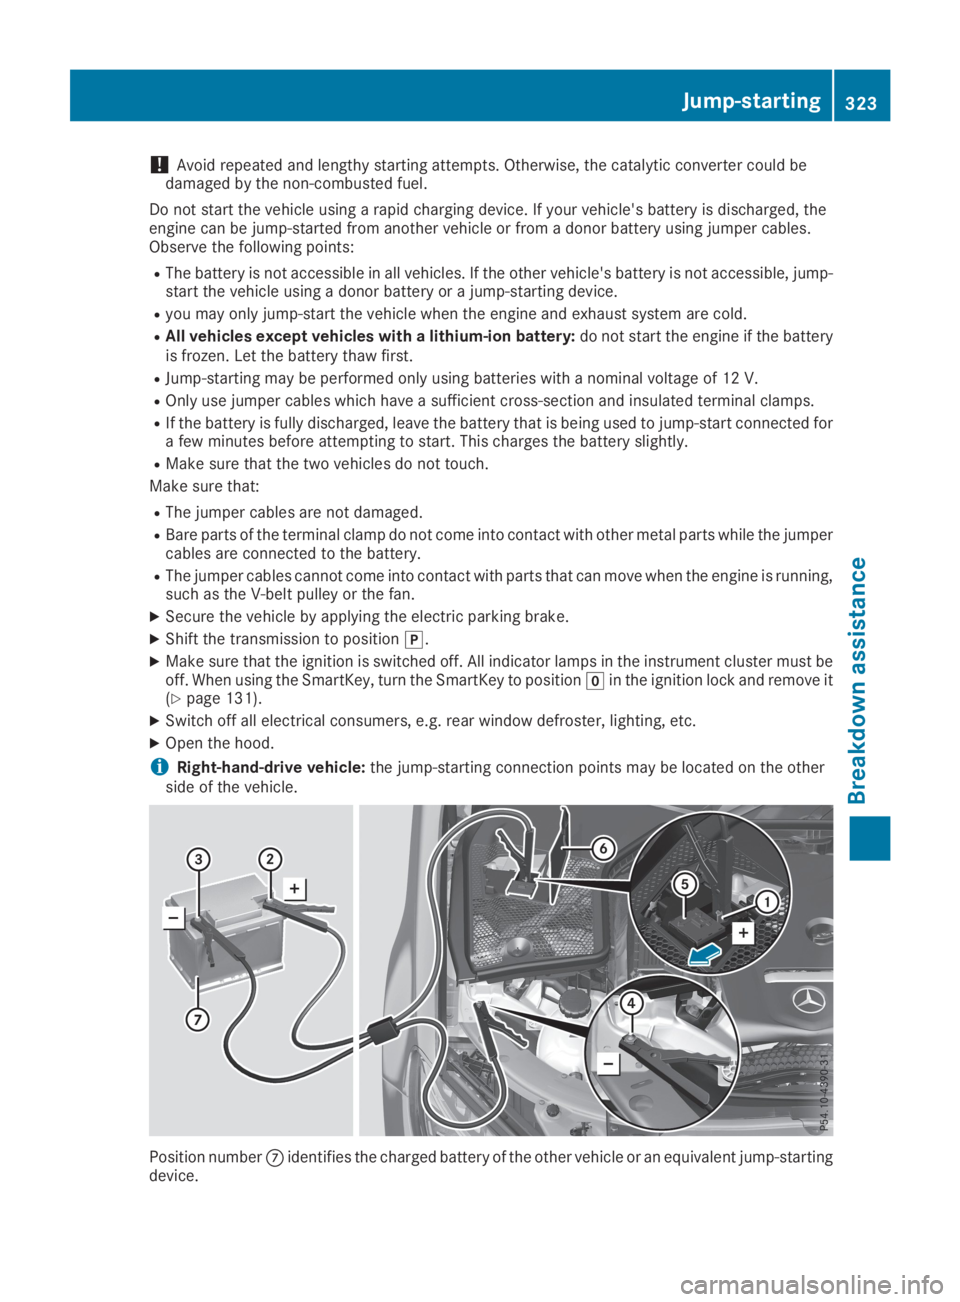
iRight-hand-drive vehicle:the jump-starting connection points may be located on the otherside of the vehicle.
Position numberkidentifies the charged battery of the other vehicle or an equivalent jump-startingdevice.
Jump-starting323
Breakdown assistance
Z
Page 332 of 370
Important safety notes
GWARNING
If wheels and tires of the wrong size are used,
the wheel brakes or suspension components
may be damaged. There is a risk of an acci-
dent.
Always replace wheels and tires with those
that fulfill the specifications of the original
part.
When replacing wheels, make sure to use the
correct:
Rdesignation
Rmodel
When replacing tires, make sure to use the
correct:
Rdesignation
Rmanufacturer
Rmodel
GWARNING
A flat tire severely impairs the driving, steer-
ing and braking characteristics of the vehicle.
There is a risk of accident.
Tires without run-flat characteristics:
Rdo not drive with a flat tire.
Rimmediately replace the flat tire with your
emergency spare wheel or spare wheel, or
consult a qualified specialist workshop.
Tires with run-flat characteristics:
Rpay attention to the information and warn-
ing notices on MOExtended tires (tires with
run-flat characteristics).
Accessories that are not approved for your vehi-cle by Mercedes-Benz or are not being used cor-rectly can impair the operating safety.
Before purchasing and using non-approvedaccessories, visit a qualified specialist work-shop and inquire about:
Rsuitability
Rlegal stipulations
Rfactory recommendations
Further information regarding wheels and tirescan be found under "Wheel/tire combinations"(Ypage 354).
You can ask for information regarding permittedwheel-tire combinations at an authorizedMercedes-Benz Center.
Information on tire pressure can be found:
Ron the Tire and Loading Information placardon the B-pillar on the driver's side(Ypage 340)
Rin the tire pressure table in the fuel filler flap(Ypage 333)
Runder "Tire pressure" (Ypage 333)
Operation
Information on driving
Check the tire pressure when the vehicle isheavily laden and adjust prior to a trip.
While driving, pay attention to vibrations, noisesand unusual handling characteristics, e.g. pull-ing to one side. This may indicate that thewheels or tires are damaged. If you suspect thata tire is defective, reduce your speed immedi-ately. Stop the vehicle as soon as possible tocheck the wheels and tires for damage. Hiddentire damage could also be causing the unusualhandling characteristics. If you find no signs ofdamage, have the tires and wheels checked at aqualified specialist workshop.
When parking your vehicle, make sure that thetires do not get deformed by the curb or otherobstacles. If they cannot be avoided, drive overobstacles such as curbs slowly and at an obtuseangle. Otherwise, you may damage the wheelsor tires.
Regular checking of wheels and tires
GWARNING
Damaged tires can cause tire inflation pres-
sure loss. As a result, you could lose control of
your vehicle. There is a risk of accident.
Check the tires regularly for signs of damage
and replace any damaged tires immediately.
Check wheels and tires for damage at least oncea month. Check wheels and tires after driving
330Operation
Wheels and ti res
Page 335 of 370
For safety reasons, Mercedes-Benz recom-mends that you only use snow chains that havebeen specially approved for your vehicle byMercedes-Benz, or are of a correspondingstandard of quality. For more information,please contact a qualified specialist workshop.
If you intend to mount snow chains, please bearthe following points in mind:
RSnow chains may not be mounted on allwheel/tire combinations. Observe the infor-mation regarding permitted wheel/tire com-binations (Ypage 354).
ROnly use snow chains when driving on roadscompletely covered by snow. Remove thesnow chains as soon as possible when youcome to a road that is not snow-covered.
RLocal regulations may restrict the use of snowchains. Observe the appropriate regulations ifyou wish to mount snow chains.
RDo not exceed the maximum permissiblespeed of 31 mph (50 km/h).
ROn vehicles with AIR BODY CONTROL, youmust only drive at raised vehicle level if snowchains have been installed (Ypage 172).
RWhen snow chains are installed, never useActive Parking Assist (Ypage 175).
You may wish to deactivate ESP®when pullingaway with snow chains installed:
RAll vehicles (except Mercedes‑AMG vehicles)(Ypage 69)
RMercedes‑AMG vehicles (Ypage 70)
You can thereby allow the wheels to spin in acontrolled manner, achieving an increased driv-ing force (cutting action).
Tire pressure
Tire pressure specifications
Important safety notes
GWARNING
Underinflated or overinflated tires pose the
following risks:
Rthe tires may burst, especially as the load
and vehicle speed increase.
Rthe tires may wear excessively and/or
unevenly, which may greatly impair tire
traction.
Rthe driving characteristics, as well as steer-
ing and braking, may be greatly impaired.
There is a risk of an accident.
Follow recommended tire inflation pressures
and check the pressure of all the tires includ-
ing the spare wheel:
Rmonthly, at least
Rif the load changes
Rbefore beginning a long journey
Runder different operating conditions, e.g.
off-road driving
If necessary, correct the tire pressure.
The data on the Tire and Loading Informationplacard and tire pressure table shown here areexamples. Tire pressure specifications are vehi-cle-specific and may deviate from the datashown here. The tire pressure specificationsthat are valid for your vehicle can be found onthe Tire and Loading Information placard andtire pressure table on the vehicle.
General notes
The recommended tire pressures for the tiresmounted at the factory can be found on thelabels described here.
Operation with a trailer:the applicable valuefor the rear axle is the maximum tire pressurevalue stated in the table inside the fuel filler flap.
Further information on tire pressures can beobtained at a qualified specialist workshop.
Tire pressure333
Wheels and tires
Z
Page 336 of 370
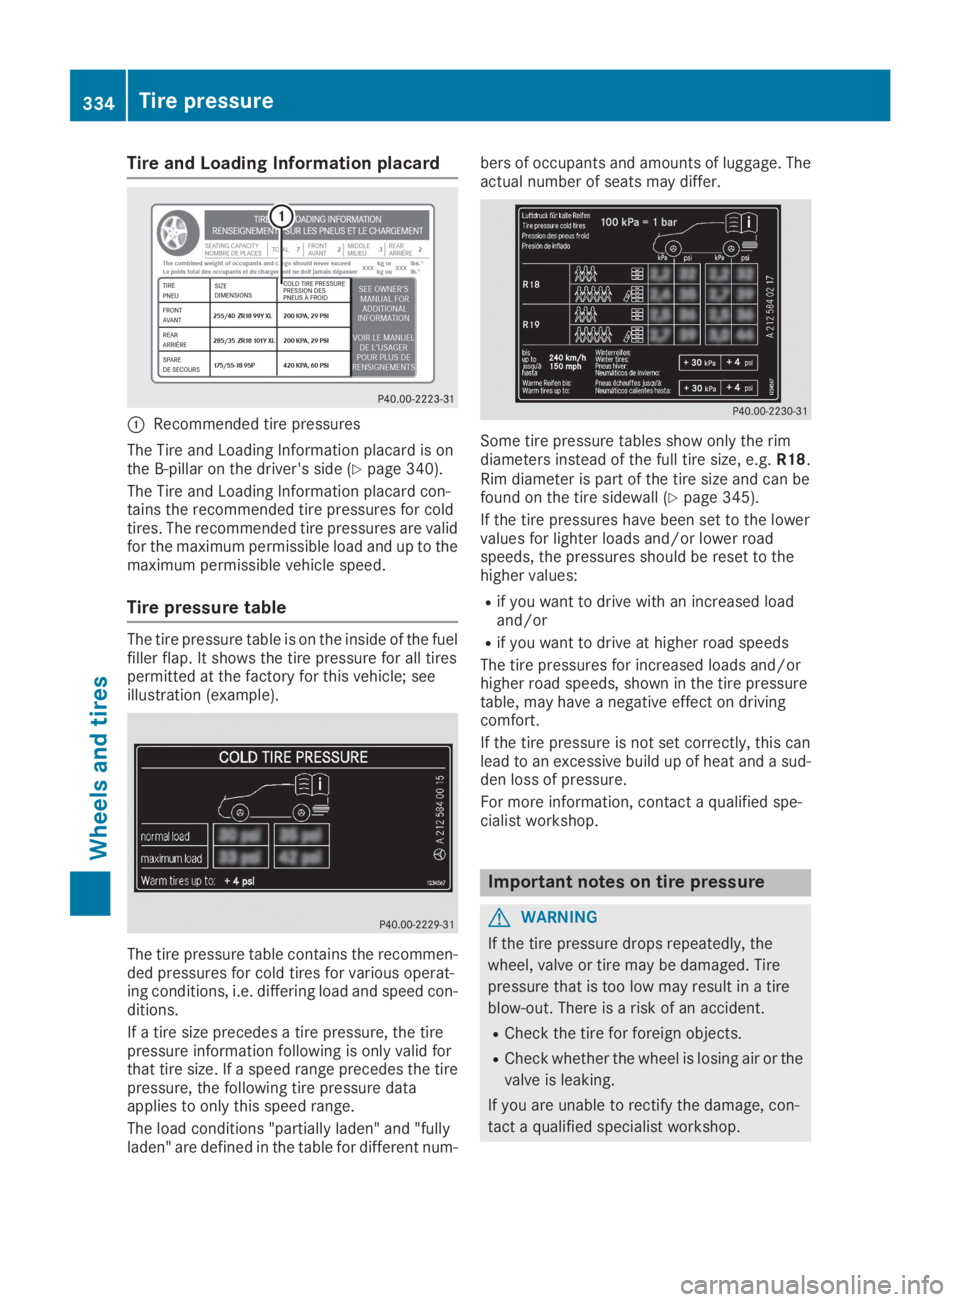
Tire and Loading Information placard
CRecommended tire pressures
The Tire and Loading Information placard is onthe B-pillar on the driver's side (Ypage 340).
The Tire and Loading Information placard con-tains the recommended tire pressures for coldtires. The recommended tire pressures are validfor the maximum permissible load and up to themaximum permissible vehicle speed.
Tire pressure table
The tire pressure table is on the inside of the fuelfiller flap. It shows the tire pressure for all tirespermitted at the factory for this vehicle; seeillustration (example).
The tire pressure table contains the recommen-ded pressures for cold tires for various operat-ing conditions, i.e. differing load and speed con-ditions.
If a tire size precedes a tire pressure, the tirepressure information following is only valid forthat tire size. If a speed range precedes the tirepressure, the following tire pressure dataapplies to only this speed range.
The load conditions "partially laden" and "fullyladen" are defined in the table for different num-
bers of occupants and amounts of luggage. Theactual number of seats may differ.
Some tire pressure tables show only the rimdiameters instead of the full tire size, e.g.R18.Rim diameter is part of the tire size and can befound on the tire sidewall (Ypage 345).
If the tire pressures have been set to the lowervalues for lighter loads and/or lower roadspeeds, the pressures should be reset to thehigher values:
Rif you want to drive with an increased loadand/or
Rif you want to drive at higher road speeds
The tire pressures for increased loads and/orhigher road speeds, shown in the tire pressuretable, may have a negative effect on drivingcomfort.
If the tire pressure is not set correctly, this canlead to an excessive build up of heat and a sud-den loss of pressure.
For more information, contact a qualified spe-cialist workshop.
Important notes on tire pressure
GWARNING
If the tire pressure drops repeatedly, the
wheel, valve or tire may be damaged. Tire
pressure that is too low may result in a tire
blow-out. There is a risk of an accident.
RCheck the tire for foreign objects.
RCheck whether the wheel is losing air or the
valve is leaking.
If you are unable to rectify the damage, con-
tact a qualified specialist workshop.
334Tire pressure
Wheels and tires
Page 337 of 370
GWARNING
If you fit unsuitable accessories onto tire
valves, the tire valves may be overloaded and
malfunction, which can cause tire pressure
loss. Due to their design, retrofitted tire pres-
sure monitors keep the tire valve open. This
can also result in tire pressure loss. There is a
risk of an accident.
Only screw the standard valve cap or other
valve caps approved by Mercedes-Benz for
your vehicle onto the tire valve.
Use a suitable pressure gauge to check the tirepressure. The outer appearance of a tire doesnot permit any reliable conclusion about the tirepressure. On vehicles equipped with the elec-tronic tire pressure monitor, the tire pressurecan be checked in the on-board computer.
The tire temperature and pressure increasewhen the vehicle is in motion. This is dependenton the driving speed and the load.
Therefore, you should only correct tire pres-sures when the tires are cold.
The tires are cold:
Rif the vehicle has been parked with the tiresout of direct sunlight for at least three hoursand
Rif the vehicle has not been driven further than1 mile (1.6 km)
The tire temperature changes depending on theoutside temperature, the vehicle speed and thetire load. If the tire temperature changes by18 ‡ (10 †), the tire pressure changes byapproximately 10 kPa (0.1 bar/1.5 psi). Takethis into account when checking the pressure ofwarm tires. Only correct the tire pressure if it istoo low for the current operating conditions. Ifyou check the tire pressure when the tires arewarm, the resulting value will be higher than ifthe tires were cold. This is normal. Do notreduce the tire pressure to the value specifiedfor cold tires. The tire pressure would otherwisebe too low.
Observe the recommended tire pressures forcold tires:
Ron the Tire and Loading Information placardon the B-pillar on the driver's side
Rin the tire pressure table on the fuel filler flap(Ypage 333)
Underinflated or overinflated tires
Underinflated tires
GWARNING
Tires with pressure that is too low can over-
heat and burst as a consequence. In addition,
they also suffer from excessive and/or irreg-
ular wear, which can severely impair the brak-
ing properties and the driving characteristics.
There is a risk of an accident.
Avoid tire pressures that are too low in all the
tires, including the spare wheel.
Underinflated tires may:
Roverheat, leading to tire defects
Radversely affect handling
Rwear excessively and/or unevenly
Rhave an adverse effect on fuel consumption
Overinflated tires
GWARNING
Tires with excessively high pressure can burst
because they are damaged more easily by
road debris, potholes etc. In addition, they
also suffer from irregular wear, which can
severely impair the braking properties and the
driving characteristics. There is a risk of an
accident.
Avoid tire pressures that are too high in all the
tires, including the spare wheel.
Overinflated tires may:
Rincrease the braking distance
Radversely affect handling
Rwear excessively and/or unevenly
Rhave an adverse effect on ride comfort
Rbe more susceptible to damage
Tire pressure335
Wheels and tires
Z
Page 338 of 370
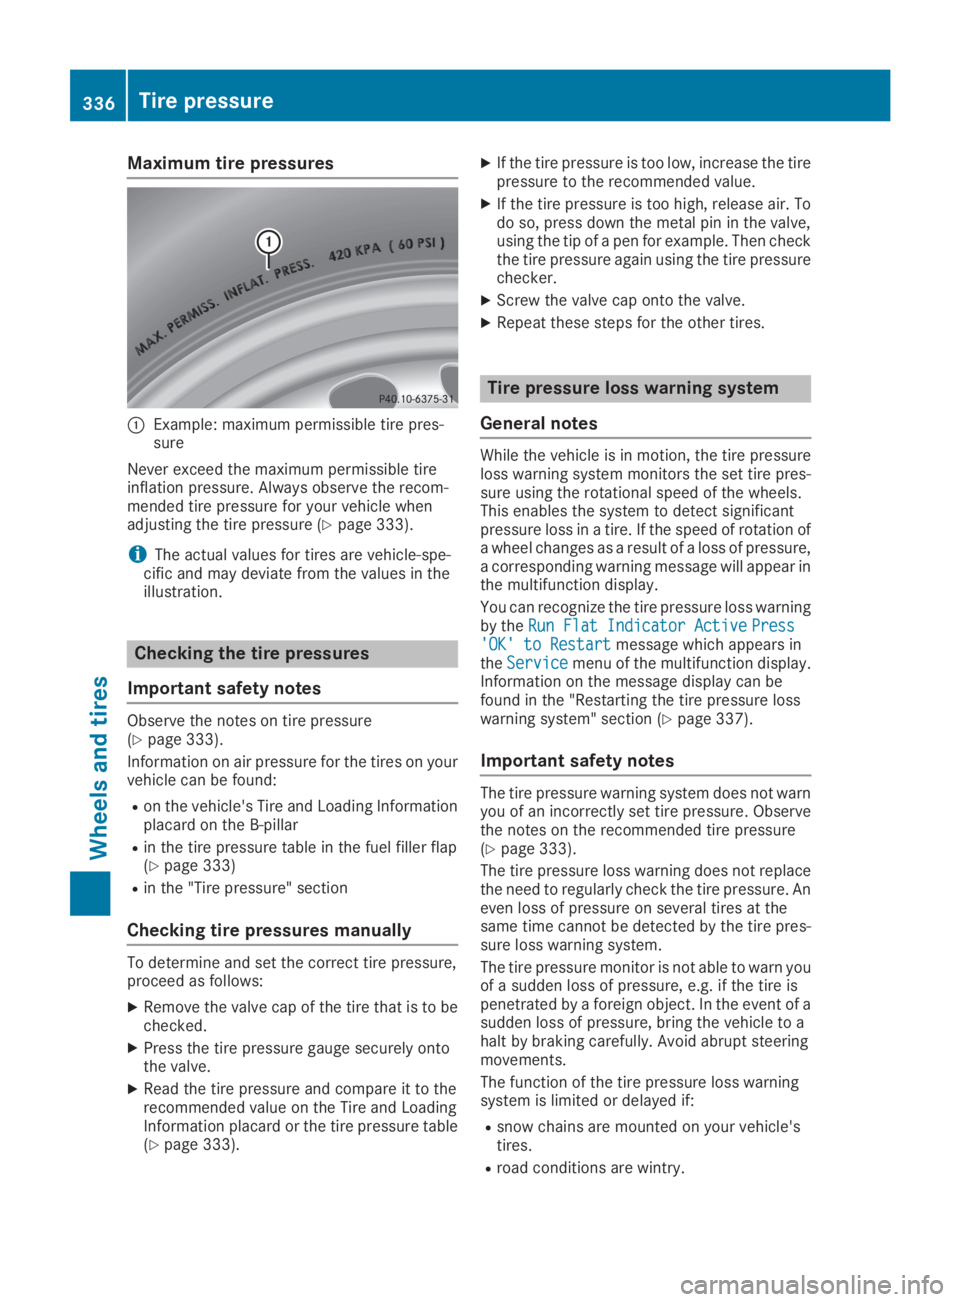
Maximum tire pressures
CExample: maximum permissible tire pres-sure
Never exceed the maximum permissible tireinflation pressure. Always observe the recom-mended tire pressure for your vehicle whenadjusting the tire pressure (Ypage 333).
iThe actual values for tires are vehicle-spe-cific and may deviate from the values in theillustration.
Checking the tire pressures
Important safety notes
Observe the notes on tire pressure(Ypage 333).
Information on air pressure for the tires on yourvehicle can be found:
Ron the vehicle's Tire and Loading Informationplacard on the B-pillar
Rin the tire pressure table in the fuel filler flap(Ypage 333)
Rin the "Tire pressure" section
Checking tire pressures manually
To determine and set the correct tire pressure,proceed as follows:
XRemove the valve cap of the tire that is to bechecked.
XPress the tire pressure gauge securely ontothe valve.
XRead the tire pressure and compare it to therecommended value on the Tire and LoadingInformation placard or the tire pressure table(Ypage 333).
XIf the tire pressure is too low, increase the tirepressure to the recommended value.
XIf the tire pressure is too high, release air. Todo so, press down the metal pin in the valve,using the tip of a pen for example. Then checkthe tire pressure again using the tire pressurechecker.
XScrew the valve cap onto the valve.
XRepeat these steps for the other tires.
Tire pressure loss warning system
General notes
While the vehicle is in motion, the tire pressureloss warning system monitors the set tire pres-sure using the rotational speed of the wheels.This enables the system to detect significantpressure loss in a tire. If the speed of rotation ofa wheel changes as a result of a loss of pressure,a corresponding warning message will appear inthe multifunction display.
You can recognize the tire pressure loss warningby theRun Flat Indicator ActiveRun Flat Indicator ActivePressPress'OK' to Restart'OK' to Restartmessage which appears intheServiceServicemenu of the multifunction display.Information on the message display can befound in the "Restarting the tire pressure losswarning system" section (Ypage 337).
Important safety notes
The tire pressure warning system does not warnyou of an incorrectly set tire pressure. Observethe notes on the recommended tire pressure(Ypage 333).
The tire pressure loss warning does not replacethe need to regularly check the tire pressure. Aneven loss of pressure on several tires at thesame time cannot be detected by the tire pres-sure loss warning system.
The tire pressure monitor is not able to warn youof a sudden loss of pressure, e.g. if the tire ispenetrated by a foreign object. In the event of asudden loss of pressure, bring the vehicle to ahalt by braking carefully. Avoid abrupt steeringmovements.
The function of the tire pressure loss warningsystem is limited or delayed if:
Rsnow chains are mounted on your vehicle'stires.
Rroad conditions are wintry.
336Tire pressure
Wheels and tires
Page 339 of 370
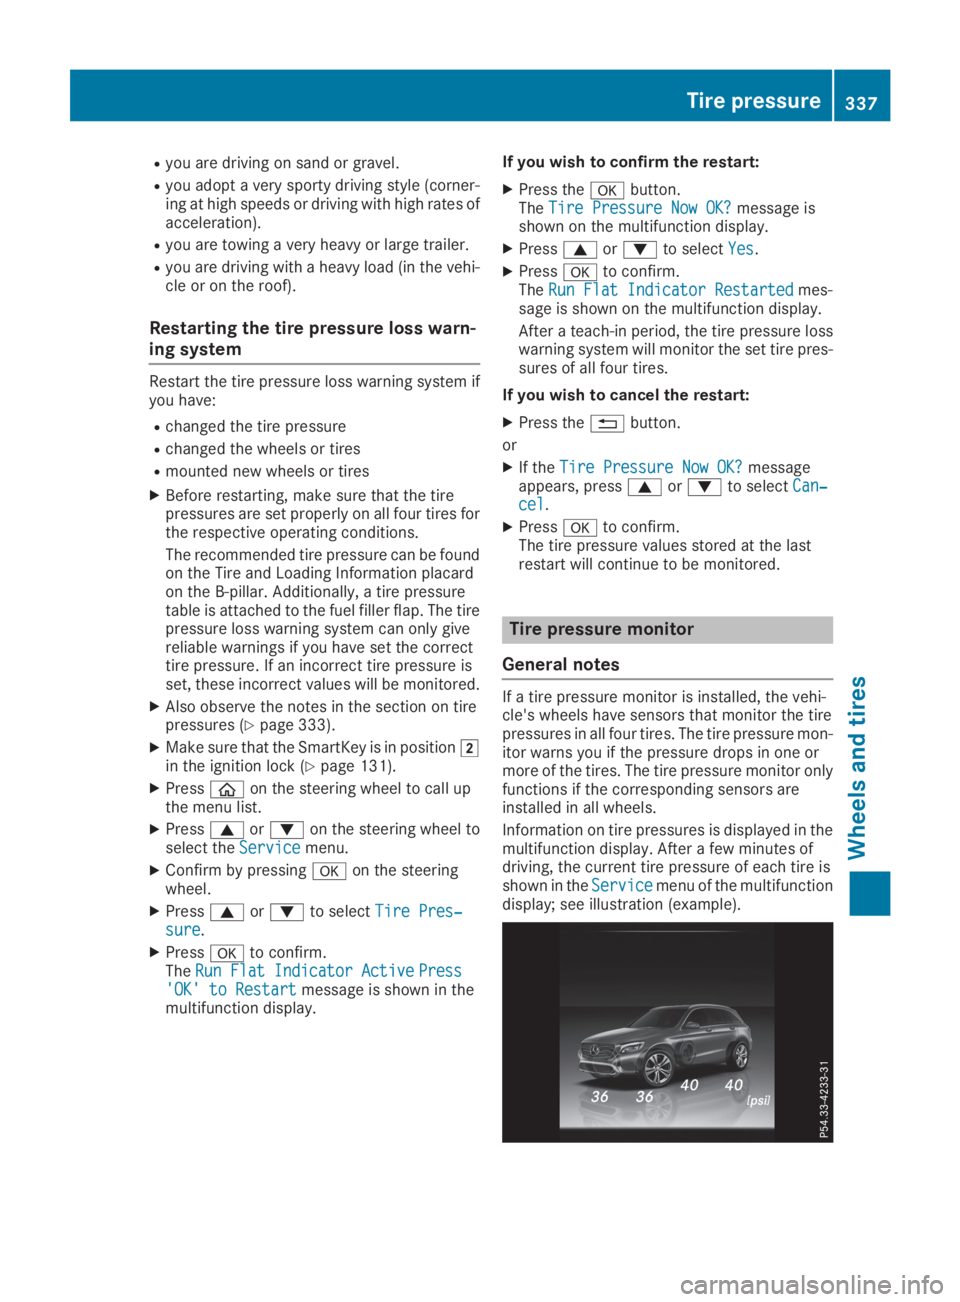
Ryou are driving on sand or gravel.
Ryou adopt a very sporty driving style (corner-ing at high speeds or driving with high rates ofacceleration).
Ryou are towing a very heavy or large trailer.
Ryou are driving with a heavy load (in the vehi-cle or on the roof).
Restarting the tire pressure loss warn-
ing system
Restart the tire pressure loss warning system ifyou have:
Rchanged the tire pressure
Rchanged the wheels or tires
Rmounted new wheels or tires
XBefore restarting, make sure that the tirepressures are set properly on all four tires forthe respective operating conditions.
The recommended tire pressure can be foundon the Tire and Loading Information placardon the B-pillar. Additionally, a tire pressuretable is attached to the fuel filler flap. The tirepressure loss warning system can only givereliable warnings if you have set the correcttire pressure. If an incorrect tire pressure isset, these incorrect values will be monitored.
XAlso observe the notes in the section on tirepressures (Ypage 333).
XMake sure that the SmartKey is in positionHin the ignition lock (Ypage 131).
XPress