change time MERCEDES-BENZ GLC 2019 Owners Manual
[x] Cancel search | Manufacturer: MERCEDES-BENZ, Model Year: 2019, Model line: GLC, Model: MERCEDES-BENZ GLC 2019Pages: 370, PDF Size: 19.55 MB
Page 3 of 370
Welcome to the world of Mercedes-Benz
We urge you to read this Operator's Manualcarefully and familiarize yourself with the vehi-cle before driving. For your own safety and alonger vehicle life, follow the instructions andwarning notices in this Operator's Manual.Ignoring them could result in damage to thevehicle or personal injury to you or others.
Vehicle damage caused by failure to followinstructions is not covered by the Mercedes-Benz Limited Warranty.
The equipment or product designation of yourvehicle may vary depending on:
RModel
ROrder
RCountry specification
RAvailability
Mercedes-Benz therefore reserves the right tointroduce changes in the following areas:
RDesign
REquipment
RTechnical features
The equipment in your vehicle may thereforediffer from that shown in the descriptions andillustrations.
The following are integral components of thevehicle:
RDigital Operator's Manual
RPrinted Operator's Manual
RMaintenance Booklet
REquipment-dependent supplements
Keep these documents in the vehicle at alltimes. If you sell the vehicle, always pass alldocuments on to the new owner.
Please note that the Mercedes-Benz Guides appmay not yet be available in your country.
Mercedes-Benz USA, LLC
Mercedes-Benz Canada, Inc.
A Daimler Company
2535847205É2535847205gËÍ
Page 9 of 370
BAS .................................................. 66
Brake fluid (notes) ......................... 361
Display message............................ 228
EBD .................................................. 72
Hill start assist ............................... 135
HOLD function ............................... 170
Important safety notes .................. 157
Maintenance .................................. 158
Parking brake ................................ 154
Riding tips ...................................... 157
Warning lamp ................................. 258
Breakdown assistance
Where will I find...? ........................ 313
see Flat tire
see Towing away
Brightness control (instrument
cluster lighting)................................... 35
Buttons on the steering wheel......... 209
C
California
Important notice for retail cus-
tomers and lessees .......................... 28
Calling up a malfunction
see Display messages
Calling up the climate control bar
Multimedia system ........................ 273
Calling up the climate control
menu
Multimedia system ........................ 273
Camera
see 360° camera
see Rear view camera
Car
see Vehicle
Car wash
see Care
Care
360° camera ................................. 309
Car wash ........................................ 305
Carpets .......................................... 312
Display ........................................... 310
Exhaust pipe .................................. 309
Exterior lights ................................ 308
General notes ................................ 305
Interior ........................................... 310
Matte finish ................................... 307
Paint .............................................. 307
Plastic trim .................................... 310
Power washer ................................ 306
Rear view camera .......................... 309
Roof lining ...................................... 312
Seat belt ........................................ 311
Seat cover..................................... 311
Selector lever ................................ 311
Sensors ......................................... 309
Side running board ........................ 309
Steering wheel ............................... 311
Trim pieces .................................... 311
Washing by hand ........................... 306
Wheels ........................................... 308
Windows ........................................ 308
Wiper blades .................................. 308
Wooden trim .................................. 311
Cargo compartment
Opening/closing (from outside,
HANDS-FREE ACCESS) .................... 87
Plug-in module (telescopic rods) .... 286
Cargo compartment cover
Important safety notes .................. 284
Notes/how to use ......................... 284
Cargo compartment enlargement... 281
Cargo compartment floor
Important safety notes .................. 287
Locking and unlocking ................... 288
Opening/closing ............................ 287
Stowage well (under)..................... 287
Cargo compartment plug-in mod-
ule (telescope bars).......................... 286
Cargo tie down rings......................... 283
CD
see also Digital Operator's Man-
ual .................................................. 268
CD player (on-board computer)........ 217
Center console
Lower section (Mercedes-AMG
vehicles) .......................................... 40
Upper section .................................. 38
Central locking
Locking/unlocking (SmartKey)........ 77
Change of address.............................. 29
Change of ownership.......................... 29
Changing the media source............. 216
Index7
Page 16 of 370
Start function ................................... 79
Unlocking ......................................... 78
Kickdown
Driving tips .................................... 144
Manual gearshifting ....................... 149
Knee bag.............................................. 50
L
Lamps
see Warning and indicator lamps
Lane Change Assist
see Active Blind Spot Assist
Lane detection (automatic)
see Lane Keeping Assist
Lane Keeping Assist
Activating/deactivating ................. 196
Activating/deactivating (on-
board computer) ............................ 221
Display message ............................ 245
Function/information .................... 195
see Active Lane Keeping Assist
Lane Tracking package..................... 193
Lap time (RACETIMER)...................... 225
LATCH-type (ISOFIX) child seat
anchors................................................ 61
Level control
Display message ............................ 245
see AIR BODY CONTROL
License plate lamp (display mes-
sage)................................................... 239
Light function, active
Display message ............................ 239
Light switch
Operation ....................................... 109
Lights
Adaptive Highbeam Assist ............. 111
Automatic headlamp mode ............ 109
Cornering light function ................. 111
Fogged up headlamps.................... 112
General notes ................................ 109
Hazard warning lamps ................... 111
High beam flasher .......................... 110
High-beam headlamps................... 110
Light switch ................................... 109
Low-beam headlamps.................... 110
Parking lamps ................................ 110
Rear fog lamp ................................ 110
Setting exterior lighting ................. 109
Standing lamps .............................. 110
Switching the daytime running
lamps on/off (on-board com-
puter) ............................................. 222
Turn signals ................................... 110
see Interior lighting
Loading guidelines............................ 278
Locking
see Central locking
Locking (doors)
Automatic ........................................ 84
Emergency locking ........................... 84
From inside (central locking but-
ton) .................................................. 83
Locking centrally
see Central locking
Low-beam headlamps
Display message ............................ 239
Replacing bulbs............................. 114
Switching on/off........................... 110
Lubricant additives
see Additives (engine oil)
Lumbar support
Adjusting the 4-way lumbar sup-
port ................................................ 100
M
M+S tires............................................ 332
Malfunction message
see Display messages
Matte finish (cleaning instruc-
tions).................................................. 307
mbrace
Display message ............................ 233
Mechanical key
Function/notes................................ 79
General notes .................................. 79
Inserting .......................................... 79
Locking vehicle ................................ 84
Removing ......................................... 79
Unlocking the driver's door .............. 84
Media Interface
see Digital Operator's Manual
Memory card (audio)......................... 217
14Index
Page 23 of 370
Summer tires
In winter ........................................332
Sun visor............................................ 290
Suspension settings
AIR BODY CONTROL ......................172
Suspension tuning
AMG sports suspension based on
AIR BODY CONTROL ......................174
SETUP (on-board computer,
Mercedes-AMG vehicles) ...............224
Switching air-recirculation mode
on/off................................................. 126
Switching on media mode
Via the device list.......................... 276
T
Tachometer........................................ 209
Tail lamps
Display message ............................ 239
Tailgate
Display message ............................ 254
Emergency unlocking ....................... 89
HANDS-FREE ACCESS ..................... 87
Important safety notes .................... 84
Limiting the opening angle ............... 89
object detection............................... 85
Opening dimensions ...................... 363
Opening/closing (automatically
from inside) ...................................... 88
Opening/closing (automatically
from outside) ................................... 85
Reversing feature ............................. 85
Tank content
Fuel gauge ....................................... 36
Technical data
Capacities ...................................... 358
Drawbar load (maximum) ............... 364
Information .................................... 356
Trailer loads................................... 364
Vehicle data ................................... 363
Telephone
Accepting a call (multifunction
steering wheel) .............................. 218
Authorizing a mobile phone (con-
necting) ......................................... 275
Connecting a mobile phone
(device manager) ........................... 275
Display message ............................ 255
Introduction ................................... 218
Menu (on-board computer) ............ 218
Number from the phone book ........ 218
Redialing ........................................ 219
Rejecting/ending a call ................. 218
see also Digital Operator's Man-
ual .................................................. 268
see Mobile phone
Temperature
Coolant (display in the instrument
cluster) .......................................... 209
Engine oil (on-board computer,
Mercedes-AMG vehicles) ............... 223
Outside temperature ...................... 209
Setting (climate control)................ 123
Transmission oil (on-board com-
puter, Mercedes-AMG vehicles) ..... 223
Timing (RACETIMER)......................... 225
Tire pressure
Calling up (on-board computer) ..... 337
Checking manually ........................ 336
Display message ............................ 250
Maximum ....................................... 336
Not reached (TIREFIT) .................... 318
Notes ............................................. 334
Reached (TIREFIT) .......................... 318
Recommended ............................... 333
Using the TIREFIT kit ...................... 317
Tire pressure loss warning system
General notes ................................ 336
Important safety notes .................. 336
Restarting ...................................... 337
Tire pressure monitor
Checking the tire pressure elec-
tronically ........................................ 339
Function/notes............................. 337
General notes ................................ 337
Important safety notes .................. 338
Radio type approval for the tire
pressure monitor ........................... 340
Restarting ...................................... 339
Warning lamp ................................. 266
Warning message .......................... 339
Tire pressure sensors
Display message ............................ 251
Tire-change tool kit........................... 314
Index21
Page 29 of 370
Protecting the environment
General notes
HEnvironmental note
Daimler's declared policy is one of compre-
hensive environmental protection.
The objectives are for the natural resources
that form the basis of our existence on this
planet to be used sparingly and in a manner
that takes the requirements of both nature
and humanity into account.
You too can help to protect the environment
by operating your vehicle in an environmen-
tally responsible manner.
Fuel consumption and the rate of engine,
transmission, brake and tire wear are affected
by these factors:
Roperating conditions of your vehicle
Ryour personal driving style
You can influence both factors. You should
bear the following in mind:
Operating conditions:
Ravoid short trips as these increase fuel con-
sumption.
Ralways make sure that the tire pressures
are correct.
Rdo not carry any unnecessary weight.
Rremove roof racks once you no longer need
them.
Ra regularly serviced vehicle will contribute
to environmental protection. You should
therefore adhere to the service intervals.
Ralways have service work carried out at a
qualified specialist workshop.
Personal driving style:
Rdo not depress the accelerator pedal when
starting the engine.
Rdo not warm up the engine when the vehicle
is stationary.
Rdrive carefully and maintain a safe distance
from the vehicle in front.
Ravoid frequent, sudden acceleration and
braking.
Rchange gear in good time and use each gear
only up to�
Page 31 of 370
vehicle occupants while driving and thisdefect has already been repaired at leasttwice and Mercedes-Benz, LLC has beeninformed in writing of the necessity of arepair.
(2) the defect or malfunction, though less seri-ous than (1) above, has already beenrepaired at least four times and Mercedes-Benz has been informed in writing of thenecessity of a repair.
(3) the vehicle cannot be used for longer than30 calendar days because of repair workresulting from this or other substantialdefects or malfunctions.
Please send your written notice to:
Mercedes-Benz USA, LLC
Customer Assistance Center
3 Mercedes Drive
Montvale, NJ 07645-0350
Maintenance
Always bring the Maintenance Booklet with youwhen taking the vehicle to an authorizedMercedes-Benz Center. Your customer serviceadvisor will enter every service into your Main-tenance Booklet on your behalf.
Roadside Assistance
The Mercedes-Benz Roadside Assistance Pro-gram offers technical help in the event of abreakdown. Calls to the toll-free Roadside Assis-tance Hotline are answered by our agents 24hours a day, 365 days a year.
1-800-FOR-MERCedes (1-800-367-6372)(USA)
1-800-387-0100 (Canada)
For additional information, refer to theMercedes-Benz Roadside Assistance Programbrochure (USA) or the "Roadside Assistance"section in the Service and Warranty Booklet(Canada). You will find both in the vehicle docu-ment wallet.
Change of address or change of own-
ership
In the event of a change of address, please sendus the "Notification of Address Change" in the
Service and Warranty Booklet or simply call theMercedes-Benz Customer Assistance Center(USA) at the hotline number1-800-FOR-MERCedes (1-800-367-6372) orCustomer Service Center (Canada) at1-800-387-0100. This will assist us in contact-ing you in a timely manner should the need arise.
If you sell your Mercedes, please leave all liter-ature in the vehicle so that it is available to thenext owner.
If you have purchased a used car, please send usthe "Notification of Used Car Purchase" in theService and Warranty Booklet or simply call theMercedes-Benz Customer Assistance Center(USA) at the hotline number1-800-FOR-MERCedes (1-800-367-6372) orCustomer Service (Canada) at 1-800-387-0100.
Vehicle operation outside the USA
and Canada
When you are abroad with your vehicle, observethe following points:
RService facilities or replacement parts maynot be readily available.
RLead-free fuel for vehicles with a catalyticconverter may not be available. Leaded fuelcan cause damage to the catalytic converter.
RThe fuel may have a considerably loweroctane number. Unsuitable fuel can causeengine damage.
Some Mercedes-Benz models are available fordelivery in Europe through our European Deliv-ery Program. For details, consult an authorizedMercedes-Benz Center or write to one of thefollowing addresses.
In the USA
Mercedes-Benz USA, LLC
European Delivery Department
One Mercedes Drive
Montvale, NJ 07645-0350
In Canada
Mercedes-Benz Canada, Inc.
European Delivery Department
98 Vanderhoof Avenue
Toronto, Ontario M4G 4C9
Service and vehicle operation29
Introduction
Z
Page 81 of 370
KEYLESS-GO start function
General notes
Bear in mind that the engine can be started byany of the vehicle occupants if there is a Smart-Key in the vehicle (Ypage 133).
Changing the settings of the locking
system
You can change the settings of the locking sys-tem. This means that only the driver's door andthe fuel filler flap are unlocked when the vehicleis unlocked. This is useful if you frequently travelalone.
XTo change the setting:press and hold downthe�6and�7buttons simultaneouslyfor approximately six seconds until the bat-tery check lamp (Ypage 80) flashes twice.
If the setting of the locking system is changedwithin the signal range of the vehicle, pressingthe�7or�6button:
Rlocks or
Runlocks the vehicle
The SmartKey now functions as follows:
XTo unlock:press the�6button once.
XTo unlock centrally:press the�6buttontwice.
XTo lock:press the�7button.
XTo restore the factory settings:press andhold the�6and�7buttons simultane-ously for approximately six seconds until thebattery check lamp (Ypage 80) flashestwice.
The KEYLESS-GO functions can be changed asfollows:
XTo unlock the driver's door:touch the innersurface of the door handle on the driver'sdoor.
XTo unlock centrally:touch the inner surfaceof the door handle on the front-passengerdoor or the rear door.
XTo lock centrally:touch the outer sensorsurface on one of the door handles.
Mechanical key
General notes
If the vehicle can no longer be locked orunlocked with the SmartKey or KEYLESS-GO,use the mechanical key.
If you use the mechanical key to unlock andopen the driver's door, the anti-theft alarm sys-tem will be triggered. Switch off the alarm(Ypage 75).
If you unlock the vehicle using the mechanicalkey, the fuel filler flap will not be unlocked auto-matically.
XTo unlock the fuel filler flap:insert theSmartKey into the ignition lock.
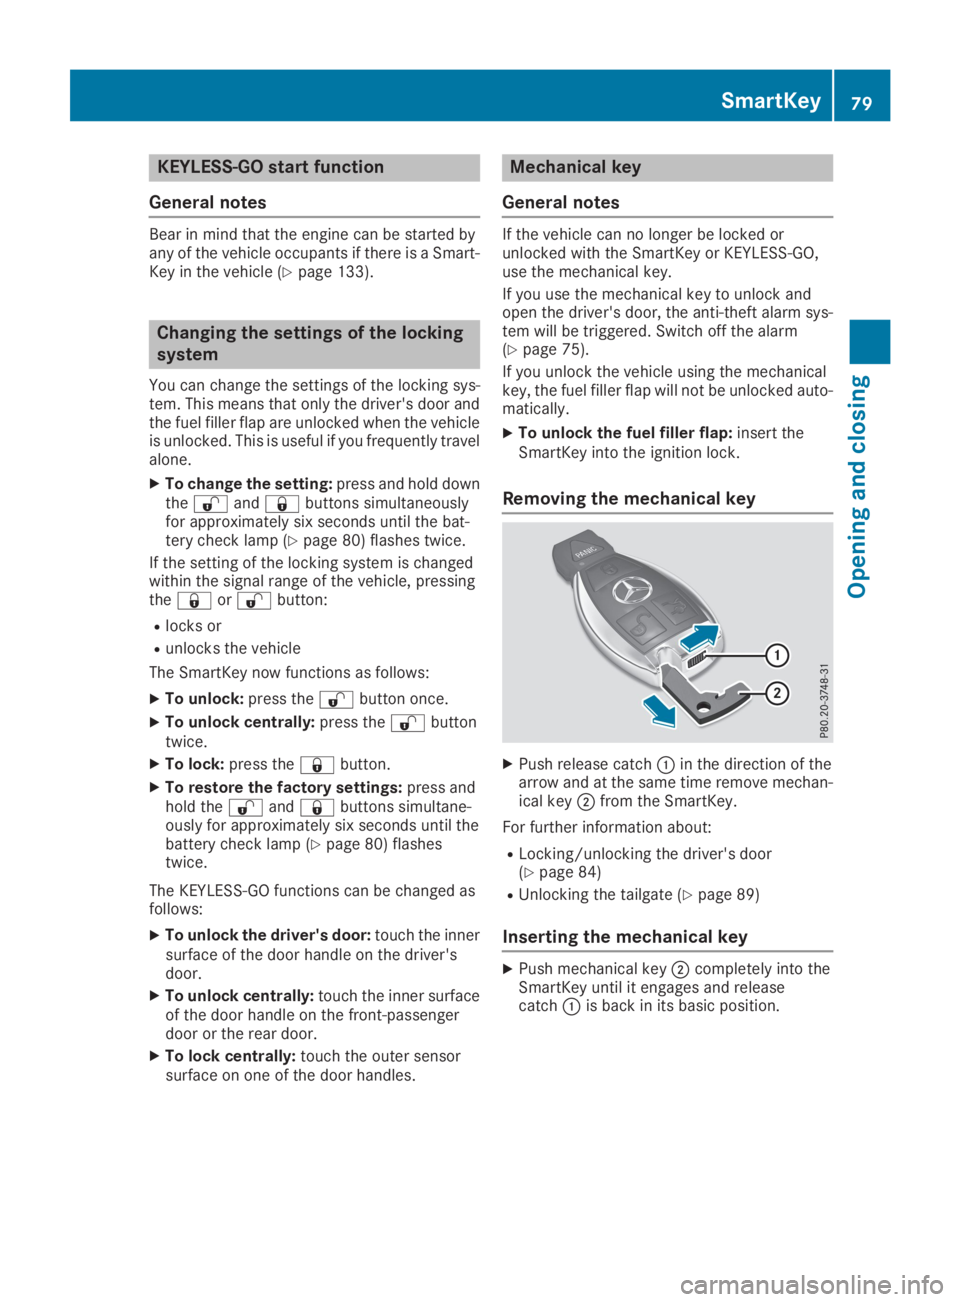
Removing the mechanical key
XPush release catch�Cin the direction of thearrow and at the same time remove mechan-ical key�Dfrom the SmartKey.
For further information about:
RLocking/unlocking the driver's door(Ypage 84)
RUnlocking the tailgate (Ypage 89)
Inserting the mechanical key
XPush mechanical key�Dcompletely into theSmartKey until it engages and releasecatch�Cis back in its basic position.
SmartKey79
Opening and closing
Z
Page 116 of 370
Protect bulbs from moisture during operation.Do not allow bulbs to come into contact withliquids.
Replace only the bulbs listed (Ypage 114).Have the bulbs that you cannot change yourselfreplaced at a qualified specialist workshop.
If you require assistance replacing bulbs, con-sult a qualified specialist workshop.
If the new bulb still does not light up, consult aqualified specialist workshop.
Headlamps and lights are an important aspect ofvehicle safety. You must therefore make surethat these function correctly at all times. Havethe headlamp setting checked regularly.
Vehicles with LED headlamps:the front andrear light clusters of your vehicle are equippedwith LED bulbs. Do not replace the bulbs your-self. Contact a qualified specialist workshopwhich has the necessary specialist knowledgeand tools to carry out the work required.
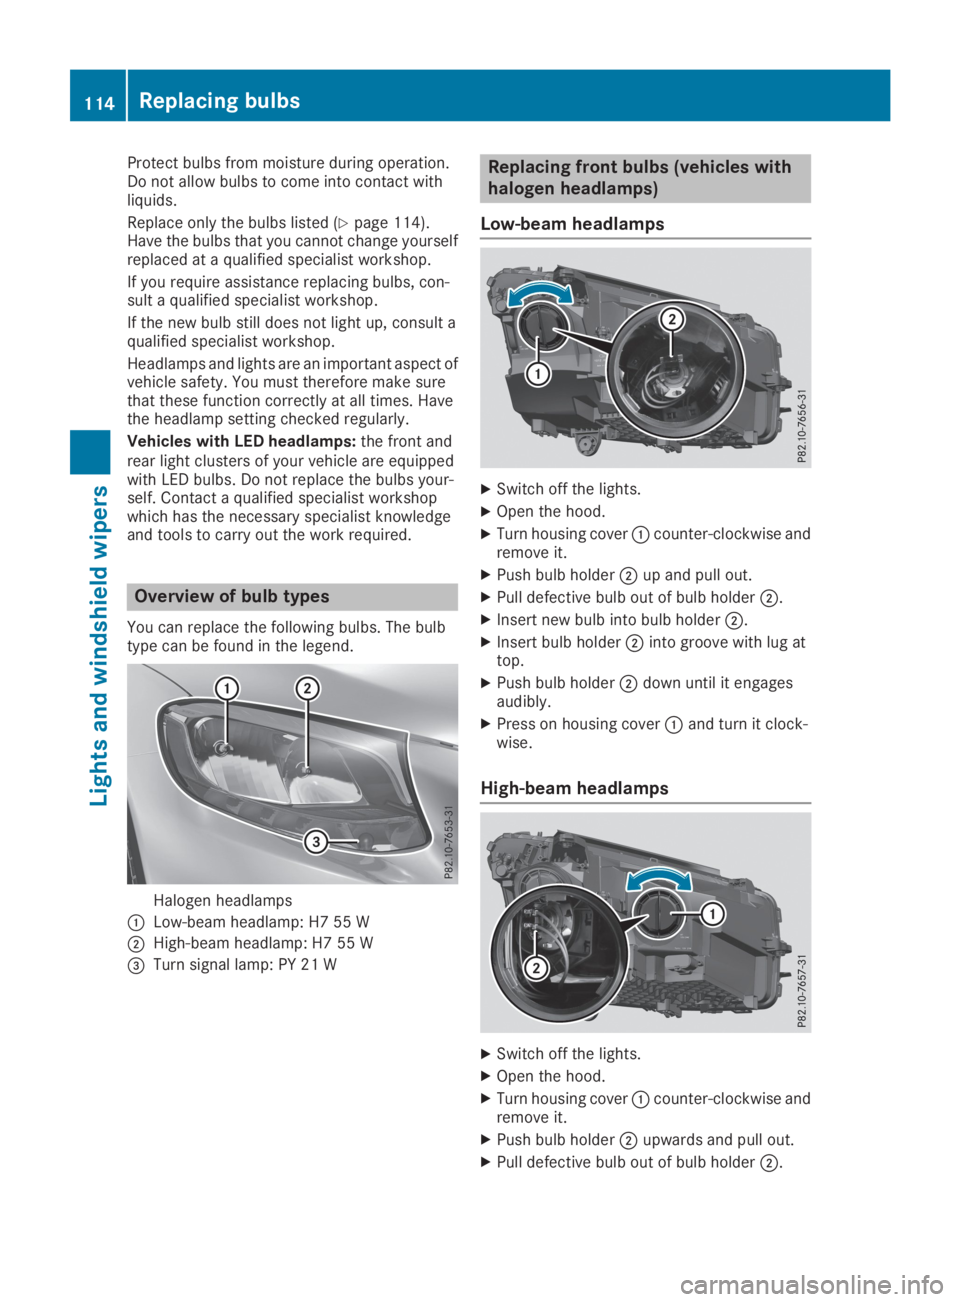
Overview of bulb types
You can replace the following bulbs. The bulbtype can be found in the legend.
Halogen headlamps
�CLow-beam headlamp: H7 55 W
�DHigh-beam headlamp: H7 55 W
�
Page 127 of 370

3-zone automatic climate control
XActivate or deactivate the "Synchronization"function using the multimedia system(Ypage 273).
The synchronization function is deactivated:
Rif the settings for the front-passenger side arechanged
Rthe settings for the rear compartment arechanged
Defrosting the windshield
General notes
You can use this function to defrost the wind-shield or to clear a fogged up windshield or frontside windows on the inside.
Switch off the "Windshield defrosting" functionas soon as the windshield is clear again.
Switching the "Windshield defrosting"
function on or off
XTurn the SmartKey to position�Hin the igni-tion lock (Ypage 131).
XTo switch on:press rocker switch�donthe front control unit up or down.The indicator lamp above the�drockerswitch lights up. The current climate controlsettings are deactivated.
The climate control system switches to thefollowing functions:
Rhigh airflow
Rhigh temperature
Rair distribution to the windshield and frontside windows
Rair-recirculation mode off
iIf necessary, the "Cooling with air dehumid-ification" function is activated. In this case,the indicator lamp above the�Zrockerswitch remains switched off.
XTo switch off:press rocker switch�dup ordown.The indicator lamp above the�drockerswitch goes out. The previously selected set-
tings are restored. Air-recirculation moderemains deactivated.
Removing condensation from the win-
dows
Windows fogged up on the inside
XActivate the "Cooling with air dehumidifica-tion" function with the�Zrocker switch.
XSwitch on automatic mode using the�Xrocker switch.
XIf the windows continue to fog up, activate the"Windshield defrosting" function using the�drocker switch.
iYou should only select this setting until thewindshield is clear again.
Windows fogged up on the outside
XActivate the windshield wipers.
XSwitch on automatic mode using the�Xrocker switch.
iIf you clean the windows regularly, they donot fog up so quickly.
Rear window defroster
General notes
The rear window defroster has a high currentdraw. You should therefore switch it off as soonas the rear window is clear. Otherwise, the rearwindow defroster switches off automaticallyafter several minutes.
If the battery voltage is too low, the rear windowdefroster may switch off.
Activating/deactivating
XTurn the SmartKey to position�Hin the igni-tion lock (Ypage 131).
XPress rocker switch�lup or down.The indicator lamp above rocker switch�llights up or goes out.
Operating the climate control systems125
Climate control
Page 132 of 370
Notes on breaking-in a new vehicle
Important safety notes
The sensor system of some driving and drivingsafety systems adjusts automatically while acertain distance is being driven after the vehiclehas been delivered or after repairs. Full systemeffectiveness is not reached until the end of thisteach-in procedure.
New and replaced brake pads and discs onlyreach their optimum braking effect after severalhundred kilometers of driving. Compensate forthis by applying greater force to the brake pedal.
The first 1,000 miles (1,500 km)
The more you look after the engine when it isnew, the more satisfied you will be with its per-formance in the future.
RYou should therefore drive at varying vehicleand engine speeds for the first 1,000 miles(1,500 km).
RAvoid heavy loads, e.g. driving at full throttle,during this period.
RWhen changing gears manually, change up ingood time. Change gear before the tachome-ter needle is�