change wheel MERCEDES-BENZ GLC-Class 2016 X253 Owner's Manual
[x] Cancel search | Manufacturer: MERCEDES-BENZ, Model Year: 2016, Model line: GLC-Class, Model: MERCEDES-BENZ GLC-Class 2016 X253Pages: 418, PDF Size: 9.23 MB
Page 20 of 418
Stowage compartmentsArmrest (under) ............................. 308
Center console .............................. 307
Cup holders ................................... 318
Door ............................................... 308
Eyeglasses compartment ............... 307
Glove box ....................................... 307
Important safety information ......... 306
Map pockets ..................................3 08
Rear ............................................... 308
Stowage net ................................... 308
see Stowage areas
Stowage net ....................................... 308
Summer tires
In winter ........................................ 376
Sun visor ............................................ 319
Suspension settings
AIR BODY CONTROL ......................1 96
SUV
(Sport Utility Vehicle) ....................... 25
Switching air-recirculation mode
on/off ................................................. 147
T
Tachometer ........................................ 239
Tail lamps
see Lights
Tailgate
Display message ............................ 288
Emergency unlocking ....................... 97
Limiting the opening angle ...............9 7
Obstruction detection ......................9 2
Opening dimensions ......................4 15
Opening/closing .............................. 92
Opening/closing (automatically
from inside) ...................................... 96
Opening/closing (automatically
from outside) ................................... 93
Opening/closing (manually from
outside) ............................................ 93
Tank content
Fuel gauge ....................................... 33
Technical data
Capacities ...................................... 409
Information ....................................4 06
Tires/wheels ................................. 399
Trailer loads ................................... 416 Vehicle data ................................... 415
Telephone
Accepting a call (multifunction
steering wheel) .............................. 250
Display message ............................ 289
Introduction ................................... 250
Menu (on-board computer) ............ 250
Number from the phone book ........2 51
Redialing ........................................ 251
Rejecting/ending a call ................. 250
Temperature
Coolant (display in the instrument
cluster) .......................................... 239
Outside temperature ......................2 39
Setting (climate control) ................ 145
Tire pressure
Calling up (on-board computer) ..... 381
Checking manually ........................ 381
Display message ............................ 285
Maximum ....................................... 380
Not reached (TIREFIT) .................... 359
Notes ............................................. 379
Reached (TIREFIT) .......................... 359
Recommended ............................... 377
Tire pressure monitor
Checking the tire pressure elec-
tronically ........................................ 383
Function/notes .............................3 81
G
eneral notes ................................ 381
Important safety notes .................. 381
Radio type approval for the tire
pressure monitor ........................... 384
Restarting ...................................... 383
Warning lamp ................................. 302
Warning message .......................... 383
Tire-change tool kit ........................... 356
TIREFIT kit .......................................... 358
Tire pressure not reached .............. 359
Tire pressure reached .................... 359
Tires
Aspect ratio (definition) ................. 394
Average weight of the vehicle
occupants (definition) .................... 393
Bar (definition) ............................... 392
Changing a wheel .......................... 395
Characteristics .............................. 392
Checking ........................................ 375
Curb weight (definition) ................. 394
18Index
Page 28 of 418
worked components. In particular, systems
relevant to safety could also be affected. As aresult, these may no longer function as inten-
ded and/or jeopardize the operating safety of
the vehicle. There is an increased risk of an
accident and injury.
Never tamper with the wiring as well as elec-
tronic components or their software. You
should have all work to electrical and elec-
tronic equipment carried out at a qualified
specialist workshop.
!There is a risk of damage to the vehicle if:
Rthe vehicle becomes stuck, e.g. on a high
curb or an unpaved road
Ryou drive too fast over an obstacle, e.g. a
curb or a hole in the road
Ra heavy object strikes the undercarriage
or parts of the chassis
In situations like this, the body, the under-
carriage, chassis parts, wheels or tires
could be damaged without the damage
being visible. Components damaged in this
way can unexpectedly fail or, in the case of
an accident, no longer withstand the strain
they are designed to.
If the underbody paneling is damaged,
combustible materials such as leaves,
grass or twigs can gather between the
underbody and the underbody paneling. If
these materials come in contact with hot
parts of the exhaust system, they can catch
fire.
In such situations, have the vehicle
checked and repaired immediately at a
qualified specialist workshop. If on con-
tinuing your journey you notice that driving
safety is impaired, pull over and stop the
vehicle immediat
ely, paying attention to
road and traffic conditions. In such cases,
consult a qualified specialist workshop.
Declarations of conformity
Vehicle components which receive
and/or transmit radio waves
USA: "The wireless devices of this vehicle
comply with Part 15 of the FCC Rules. Oper-
ation is subject to the following two condi-
tions: 1) These devices may not cause harm-
ful interference, and 2) These devices must
accept any interference received, including
interference that may cause undesired oper-
ation. Changes or modifications not expressly
approved by the party responsible for com-
pliance could void the user’s authority to
operate the equipment."
Canada: "The wireless devices of this vehicle
comply with Industry Canada license-exempt RSS standard(s). Operation is subject to the
following two conditions: (1) These devices
may not cause interference, and (2) These
devices must accept any interference, includ-
ing interference that may cause undesired
operation of the device."
Diagnostics connection
The diagnostics connection is only intended
for the connection of diagnostic equipment at
a qualified specialist workshop.
GWARNING
If you connect equipment to the diagnostics
connection in the vehicle, it may affect the
operation of the vehicle systems. As a result,
the operating safety of the vehicle could be
affected. There is a risk of an accident.
Do not connect any equipment to a diagnos-
tics connection in the vehicle.
GWARNING
Objects in the driver's footwell can restrict the pedal travel or obstruct a depressed pedal.
The operating and road safety of the vehicle is
jeopardized. There is a risk of an accident.
Make sure that all objects in the vehicle are
stowed correctly, and that they cannot enter
26Introduction
Page 122 of 418
Rthe exterior mirrors fold in automatically as
soon as you lock the vehicle from the out-
side.
Rthe exterior mirrors fold out automatically
again as soon as you unlock the vehicle.
iIf the exterior mirrors have been folded in
manually, they do not fold out.
Exterior mirror pushed out of position
If an exterior mirror has been pushed out of
position, proceed as follows:
XVehicles without electrically folding
exterior mirrors: move the exterior mirror
into the correct position manually.
XVehicles with electrically folding exte-
rior mirrors: press and hold button :
until you hear a click and then the mirror
engaging in position (
Ypage 119).
The mirror housing is engaged again and
you can adjust the exterior mirrors as usual
(
Ypage 119).
Automatic anti-glare mirrors
GWARNING
Electrolyte may escape if the glass in an auto-
matic anti-glare mirror breaks. The electrolyte
is harmful and causes irritation. It must not
come into contact with your skin, eyes, res-
piratory organs or clothing or be swallowed.
There is a risk of injury.
If you come into contact with the electrolyte,
observe the following:
RRinse off the electrolyte from your skin
immediately with water.
RImmediately rinse the electrolyte out of
your eyes thoroughly with clean water.
RIf the electrolyte is swallowed, immediately
rinse your mouth out thoroughly. Do not
induce vomiting.
RIf electrolyte comes into contact with your
skin or hair or is swallowed, seek medical
attention immediately.
RImmediately change out of clothing which
has come into contact with electrolyte.
RIf an allergic reaction occurs, seek medical
attention immediately.
The rear-view mirror and the exterior mirror
on the driver's side automatically go into anti-
glare mode if the following conditions are met
simultaneously:
Rthe ignition is switched on
Rincident light from headlamps strikes the
sensor in the rear-view mirror
The mirrors do not go into anti-glare mode if
reverse gear is engaged or if the interior light-
ing is switched on.
Parking position for the exterior mir-
ror on the front-passenger side
Storing the parking position
You can position the front-passenger side
exterior mirror in such a way that you can see
the rear wheel on that side as soon as you
engage reverse gear. You can store this posi- tion.
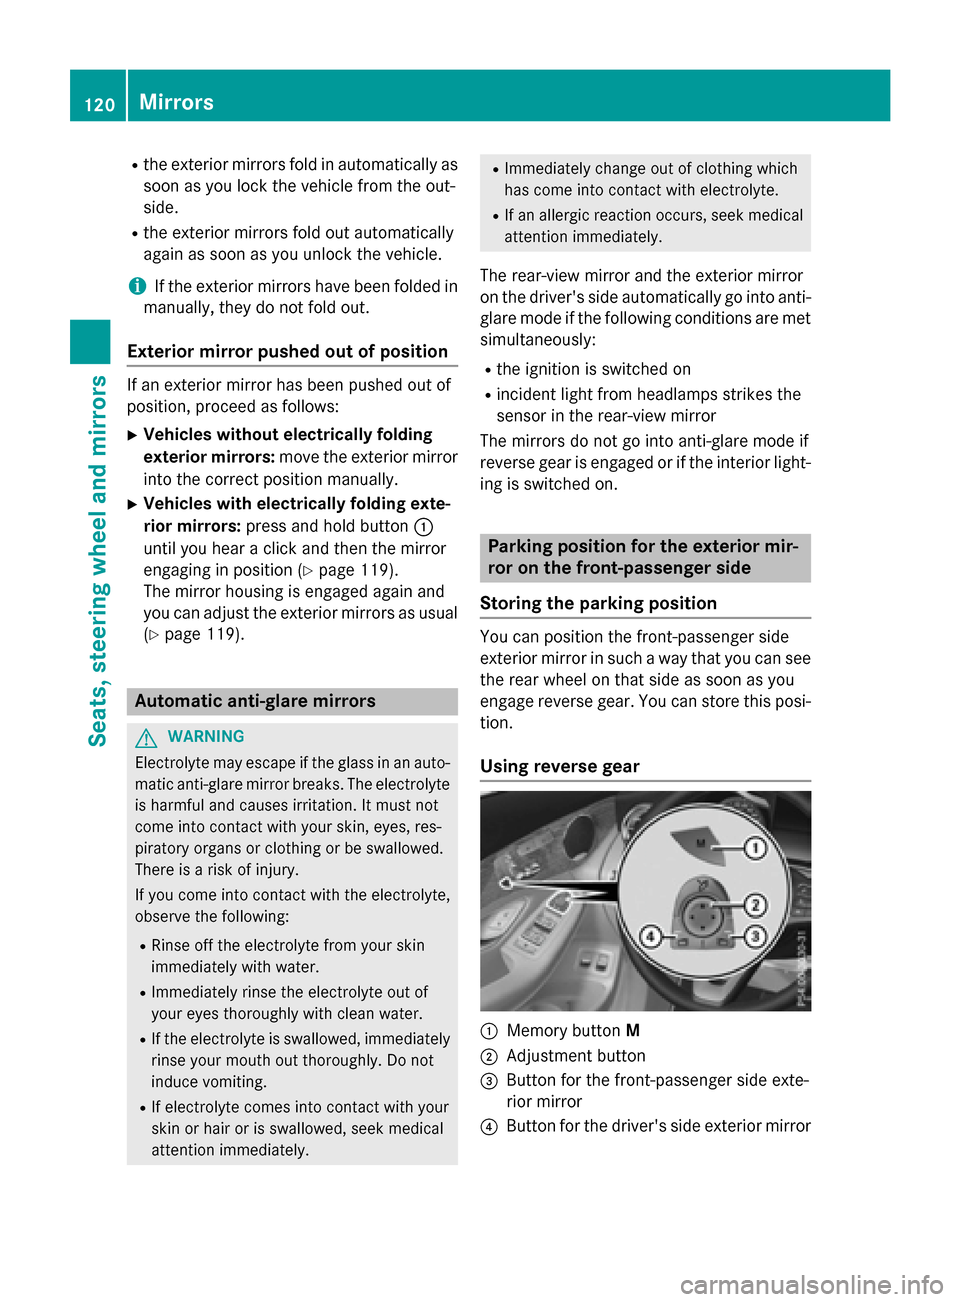
Using reverse gear
:Memory button M
;Adjustment button
=Button for the front-passenger side exte-
rior mirror
?Button for the driver's side exterior mirror
120Mirrors
Seats, steering wheel and mirrors
Page 129 of 418
Hazard warning lamps
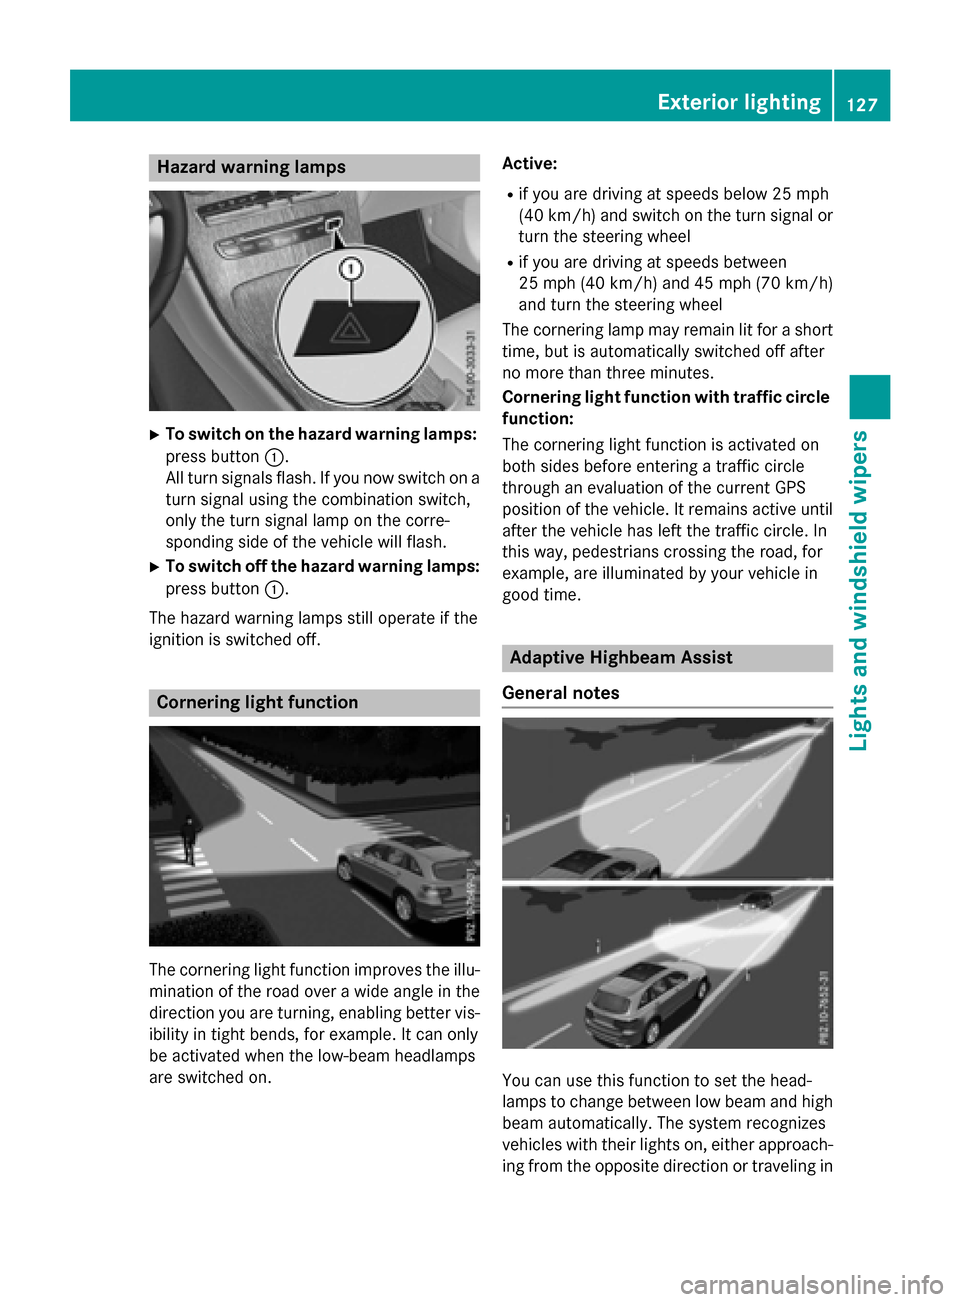
XTo switch on the hazard warning lamps:press button :.
All turn signals flash. If you now switch on a
turn signal using the combination switch,
only the turn signal lamp on the corre-
sponding side of the vehicle will flash.
XTo switch off the hazard warning lamps:
press button :.
The hazard warning lamps still operate if the
ignition is switched off.
Cornering light function
The cornering light function improves the illu-
mination of the road over a wide angle in the
direction you are turning, enabling better vis-
ibility in tight bends, for example. It can only
be activated when the low-beam headlamps
are switched on. Active:
Rif you are driving at speeds below 25 mph
(40 km/h) and switch on the turn signal or
turn the steering wheel
Rif you are driving at speeds between
25 mph (40 km/h) and 45 mph (70 km/h)
and turn the steering wheel
The cornering lamp may remain lit for a short
time, but is automatically switched off after
no more than three minutes.
Cornering light function with traffic circle
function:
The cornering light function is activated on
both sides before entering a traffic circle
through an evaluation of the current GPS
position of the vehicle. It remains active until after the vehicle has left the traffic circle. In
this way, pedestrians crossing the road, for
example, are illuminated by your vehicle in
good time.
Adaptive Highbeam Assist
General notes
You can use this function to set the head-
lamps to change between low beam and high beam automatically. The system recognizes
vehicles with their lights on, either approach-
ing from the opposite direction or traveling in
Exterior lighting127
Lights and windshield wipers
Z
Page 133 of 418
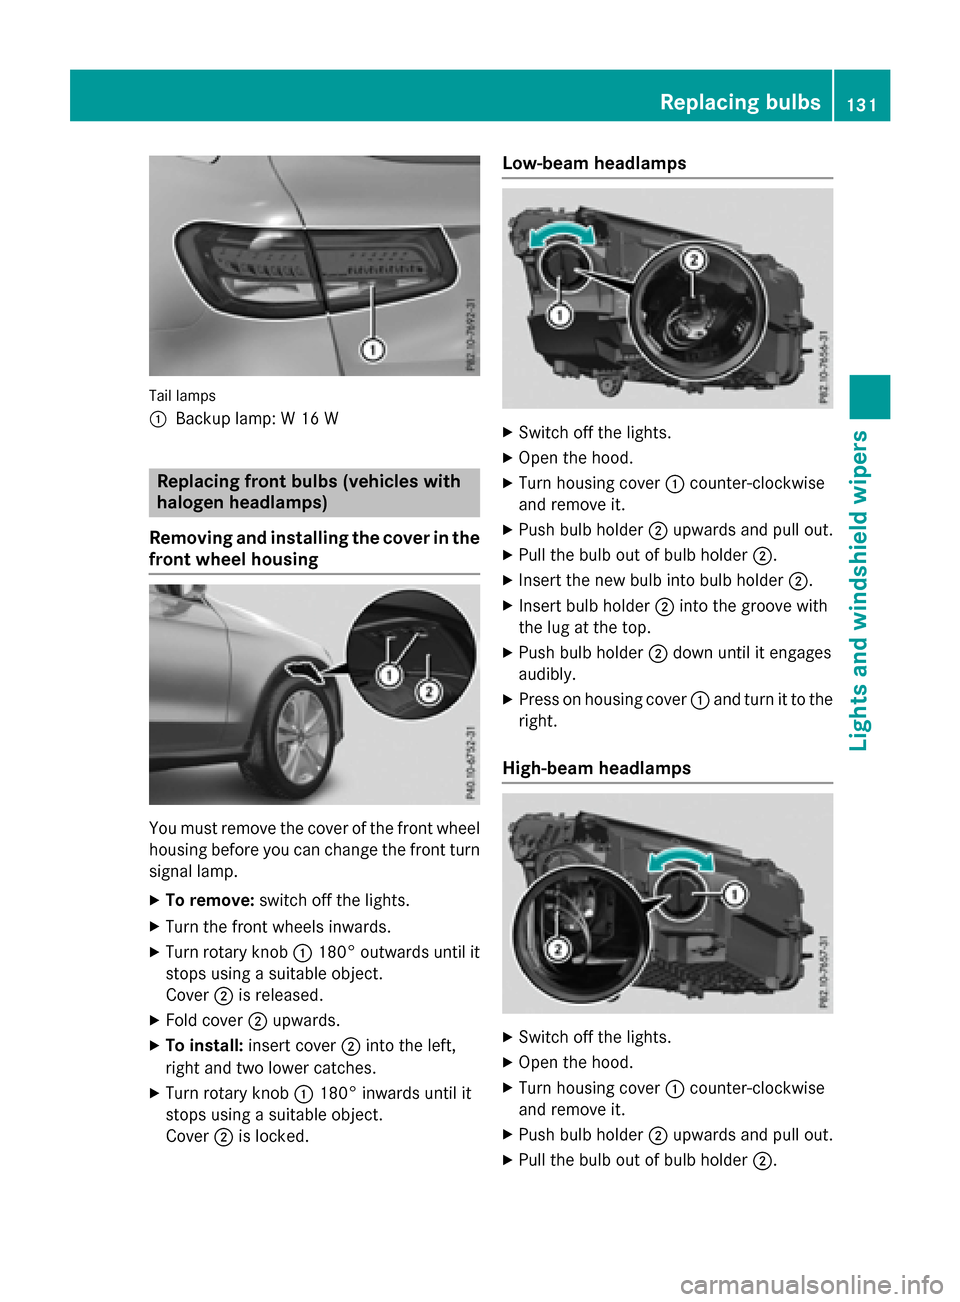
Tail lamps
:
Backup lamp: W 16 W
Replacing front bulbs (vehicles with
halogen headlamps)
Removing and installing the cover in the
front wheel housing
You must remove the cover of the front wheel
housing before you can change the front turn signal lamp.
XTo remove: switch off the lights.
XTurn the front wheels inwards.
XTurn rotary knob :180° outwards until it
stops using a suitable object.
Cover ;is released.
XFold cover ;upwards.
XTo install: insert cover ;into the left,
right and two lower catches.
XTurn rotary knob :180° inwards until it
stops using a suitable object.
Cover ;is locked.
Low-beam headlamps
XSwitch off the lights.
XOpen the hood.
XTurn housing cover :counter-clockwise
and remove it.
XPush bulb holder ;upwards and pull out.
XPull the bulb out of bulb holder ;.
XInsert the new bulb into bulb holder ;.
XInsert bulb holder;into the groove with
the lug at the top.
XPush bulb holder ;down until it engages
audibly.
XPress on housing cover :and turn it to the
right.
High-beam headlamps
XSwitch off the lights.
XOpen the hood.
XTurn housing cover :counter-clockwise
and remove it.
XPush bulb holder ;upwards and pull out.
XPull the bulb out of bulb holder ;.
Replacing bulbs131
Lights and windshield wipers
Z
Page 167 of 418
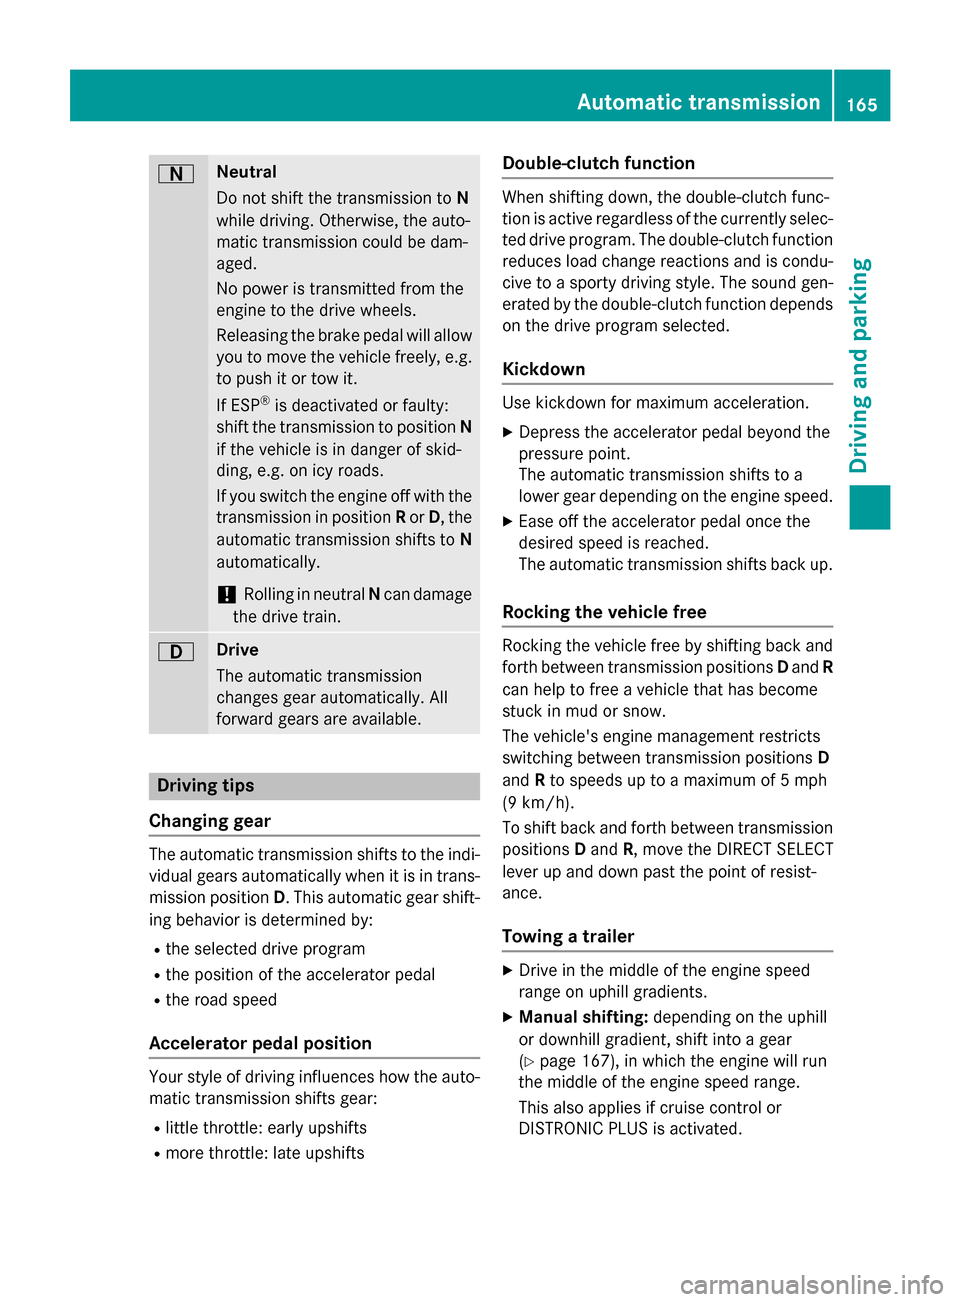
ANeutral
Do not shift the transmission toN
while driving. Otherwise, the auto-
matic transmission could be dam-
aged.
No power is transmitted from the
engine to the drive wheels.
Releasing the brake pedal will allow
you to move the vehicle freely, e.g. to push it or tow it.
If ESP
®is deactivated or faulty:
shift the transmission to position N
if the vehicle is in danger of skid-
ding, e.g. on icy roads.
If you switch the engine off with the
transmission in position Ror D, the
automatic transmission shifts to N
automatically.
!Rolling in neutral Ncan damage
the drive train.
7Drive
The automatic transmission
changes gear automatically. All
forward gears are available.
Driving tips
Changing gear
The automatic transmission shifts to the indi-
vidual gears automatically when it is in trans-
mission position D. This automatic gear shift-
ing behavior is determined by:
Rthe selected drive program
Rthe position of the accelerator pedal
Rthe road speed
Accelerator pedal position
Your style of driving influences how the auto- matic transmission shifts gear:
Rlittle throttle: early upshifts
Rmore throttle: late upshifts
Double-clutch function
When shifting down, the double-clutch func-
tion is active regardless of the currently selec-
ted drive program. The double-clutch function
reduces load change reactions and is condu-
cive to a sporty driving style. The sound gen-
erated by the double-clutch function depends
on the drive program selected.
Kickdown
Use kickdown for maximum acceleration.
XDepress the accelerator pedal beyond the
pressure point.
The automatic transmission shifts to a
lower gear depending on the engine speed.
XEase off the accelerator pedal once the
desired speed is reached.
The automatic transmission shifts back up.
Rocking the vehicle free
Rocking the vehicle free by shifting back and
forth between transmission positions Dand R
can help to free a vehicle that has become
stuck in mud or snow.
The vehicle's engine management restricts
switching between transmission positions D
and Rto speeds up to a maximum of 5 mph
(9 km/h).
To shift back and forth between transmission
positions Dand R, move the DIRECT SELECT
lever up and down past the point of resist-
ance.
Towing a trailer
XDrive in the middle of the engine speed
range on uphill gradients.
XManual shifting: depending on the uphill
or downhill gradient, shift into a gear
(
Ypage 167), in which the engine will run
the middle of the engine speed range.
This also applies if cruise control or
DISTRONIC PLUS is activated.
Automatic transmission165
Driving an d parking
Z
Page 169 of 418
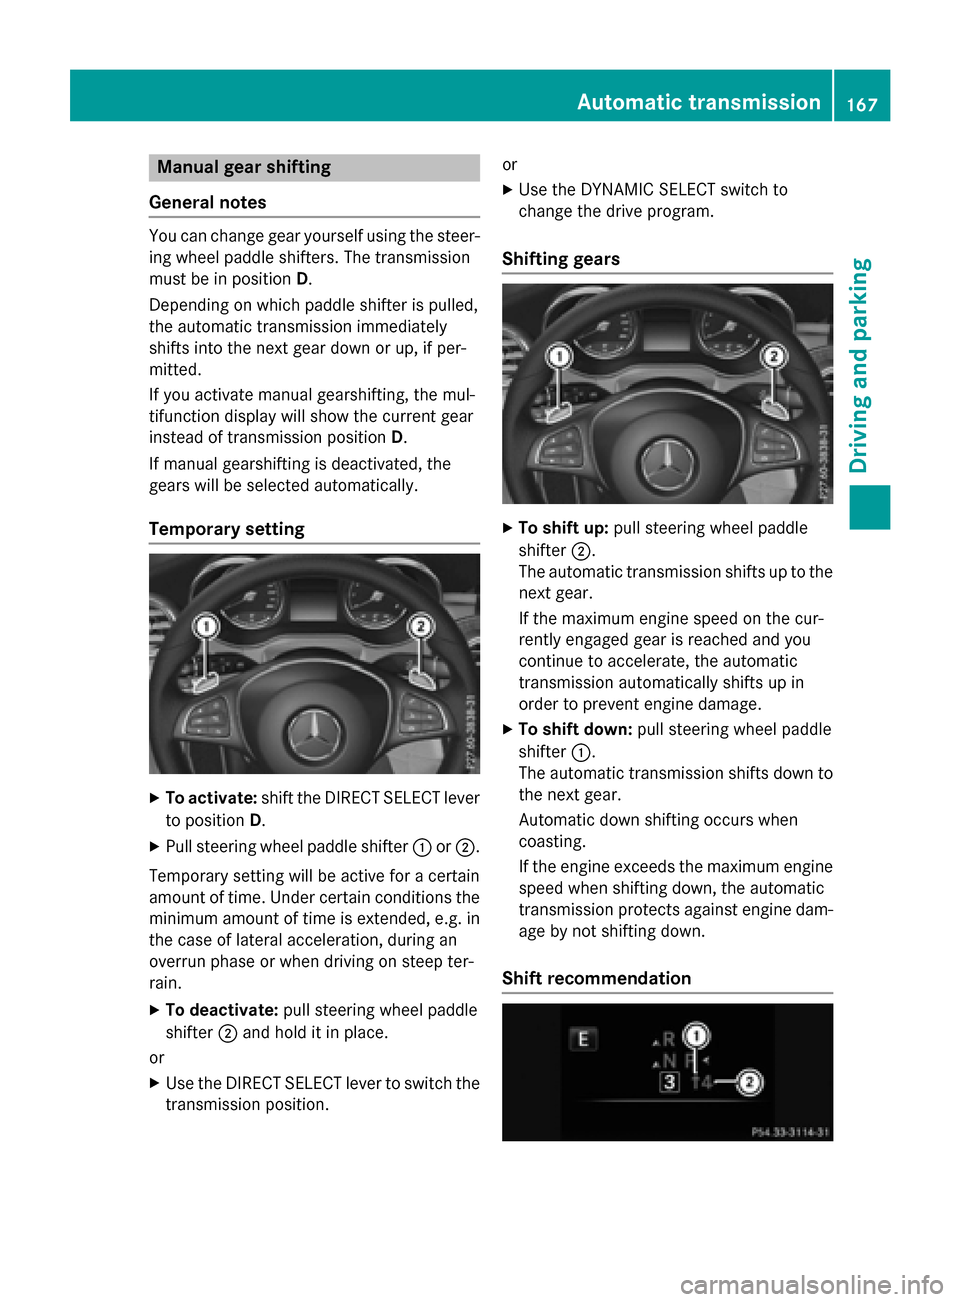
Manual gear shifting
General notes
You can change gear yourself using the steer-
ing wheel paddle shifters. The transmission
must be in position D.
Depending on which paddle shifter is pulled,
the automatic transmission immediately
shifts into the next gear down or up, if per-
mitted.
If you activate manual gearshifting, the mul-
tifunction display will show the current gear
instead of transmission position D.
If manual gearshifting is deactivated, the
gears will be selected automatically.
Temporary setting
XTo activate: shift the DIRECT SELECT lever
to position D.
XPull steering wheel paddle shifter :or;.
Temporary setting will be active for a certain
amount of time. Under certain conditions the
minimum amount of time is extended, e.g. in
the case of lateral acceleration, during an
overrun phase or when driving on steep ter-
rain.
XTo deactivate: pull steering wheel paddle
shifter ;and hold it in place.
or
XUse the DIRECT SELECT lever to switch the
transmission position. or
XUse the DYNAMIC SELECT switch to
change the drive program.
Shifting gears
XTo shift up:
pull steering wheel paddle
shifter ;.
The automatic transmission shifts up to the next gear.
If the maximum engine speed on the cur-
rently engaged gear is reached and you
continue to accelerate, the automatic
transmission automatically shifts up in
order to prevent engine damage.
XTo shift down: pull steering wheel paddle
shifter :.
The automatic transmission shifts down to the next gear.
Automatic down shifting occurs when
coasting.
If the engine exceeds the maximum engine
speed when shifting down, the automatic
transmission protects against engine dam-
age by not shifting down.
Shift recommendation
Automatic transmission167
Driving and parking
Z
Page 171 of 418
Problems with the transmission
ProblemPossible causes/consequences andMSolutions
The transmission has
problems shifting gear.The transmission is losing oil.
XHave the transmission checked at a qualified specialist work-
shop immediately.
The acceleration ability
is deteriorating.
The transmission no
longer changes gear.The transmission is in emergency mode.
It is only possible to shift intosecondgear and reverse gear.
XStop the vehicle.
XShift the transmission to position P.
XSwitch off the engine.
XWait at least ten seconds before restarting the engine.
XShift the transmission to positionDor R.
If D is selected, the transmission shifts into secondgear; ifRis
selected, the transmission shifts into reverse gear.
XHave the transmission checked at a qualified specialist work-
shop immediately.
Transfer case
This section is only valid for vehicles with 4-
wheel drive (4MATIC). Power is always trans-
mitted to both axles.
!Performance tests may only be carried
out on a 2-axle dynamometer. The brake
system or transfer case could otherwise be
damaged. Contact a qualified specialist
workshop for a performance test.
!Since ESP®engages automatically, the
ignition must be switched off (the Smart-
Key or Start/Stop button must be in posi-
tion 0or 1) if:
Rthe electric parking brake is being tested
on a brake dynamometer
Rthe vehicle is being towed with only one
axle raised (not permitted for vehicles
with 4MATIC).
The brake system could otherwise be dam-
aged.
!Vehicles with 4MATIC must not be towed
with either the front or the rear axle raised,
as doing so will damage the transmission.
Refueling
Important safety notes
GWARNING
Fuel is highly flammable. If you handle fuel
incorrectly, there is a risk of fire and explo-
sion.
You must avoid fire, open flames, creating
sparks and smoking. Switch off the engine
and, if applicable, the auxiliary heating before refueling.
GWARNING
Fuel is poisonous and hazardous to health.
There is a risk of injury.
You must make sure that fuel does not come into contact with your skin, eyes or clothing
and that it is not swallowed. Do not inhale fuel
vapors. Keep fuel away from children.
Refueling169
Driving and parking
Z
Page 180 of 418
The three inner areas display the current driv-
ing style and light up green as a result of a
particularly economical driving style.
Depending on the driving situation, up to two
areas may light up simultaneously.
At the beginning of the journey, the three
outer areas are empty and fill up as a result of
economical driving. A higher level indicates a
more economical driving style. If the three
outer areas are completely filled at the same
time, the driver has adopted the most eco-
nomical driving style for the selected settings and prevailing conditions. The ECO display
border lights up.
The ECO display does not indicate the actual
fuel consumption. The additionally achieved
range displayed under Bonus fr. Start
does not indicate a fixed consumption reduc-
tion.
In addition to driving style, the actual con-
sumption is affected by other factors, such
as:
Rload
Rtire pressure
Rcold start
Rchoice of route
Relectrical consumers switched on
These factors are not included in the ECO dis-
play.
An economical driving style specially requires
driving at moderate engine speeds.
Achieving a higher value in the categories
"Acceleration" and "Constant":
Robserve the gearshift recommendations.
Rdrive in drive program E.
On long journeys at a constant speed, e.g. on the highway, only the outer area for "con-
stant" will change.
The ECO display summarizes the driving style
from the start of the journey to its completion.
Therefore, there are more marked changes in the outer areas at the start of a journey. On
longer journeys, there are fewer changes. For
more marked changes, perform a manual rest
(
Ypage 245). For further information on the ECO display,
see (
Ypage 244).
Braking
Important safety notes
GWARNING
If you shift down on a slippery road surface in an attempt to increase the engine's braking
effect, the drive wheels could lose their grip.
There is an increased danger of skidding and
accidents.
Do not shift down for additional engine brak-
ing on a slippery road surface.
Downhill gradients
!On long and steep gradients, you must
reduce the load on the brakes by shifting
early to a lower gear. This allows you to take
advantage of the engine braking effect and
helps avoid overheating and excessive
wear of the brakes.
When you take advantage of the engine
braking effect, a drive wheel may not turn
for some time, e.g. on a slippery road sur-
face. This could cause damage to the drive
train. This type of damage is not covered by
the Mercedes-Benz warranty.
Heavy and light loads
GWARNING
If you rest your foot on the brake pedal while
driving, the braking system can overheat. This increases the stopping distance and can even
cause the braking system to fail. There is a
risk of an accident.
Never use the brake pedal as a footrest. Never
depress the brake pedal and the accelerator
pedal at the same time.
!Depressing the brake pedal constantly
results in excessive and premature wear to
the brake pads.
178Driving tips
Driving and parking
Page 182 of 418
Always replace all brake disks and brake
pads/linings on an axle at the same time.
Always install new brake pads/linings when
replacing brake disks.
The vehicle is equipped with lightweight
brake disks to which the wheel assembly with
rim and threaded connection is matched.
The use of brake disks other than those
approved by Mercedes-Benz can change the
track width and is subject to approval, if appli-cable.
Shock-type loads when handling the brake
disks, such as when changing wheels, can
lead to a reduction in comfort when driving
with lightweight brake disks. Avoid shock-
type loads on the lightweight brake disks,
particularly on the brake plate.
Mercedes-Benz recommends that you only
use brake fluid that has been specially
approved for your vehicle by Mercedes-Benz,
or which corresponds to an equivalent quality
standard. Brake fluid which has not been
approved for Mercedes-Benz vehicles or
which is not of an equivalent quality could
affect your vehicle's operating safety.
Driving on wet roads
Hydroplaning
If water has accumulated to a certain depth
on the road surface, there is a danger of
hydroplaning occurring, even if:
Ryou drive at low speeds.
Rthe tires have adequate tread depth.
For this reason, in the event of heavy rain or in
conditions in which hydroplaning may occur,
you must drive in the following manner:
Rlower your speed.
Ravoid ruts.
Ravoid sudden steering movements.
Rbrake carefully.
Driving on flooded roads
!Bear in mind that vehicles traveling in
front or in the opposite direction create
waves. This may cause the maximum per-
missible water depth to be exceeded.
Failure to observe these notes may result in
damage to the engine, electrical systems
and transmission.
If you have to drive on stretches of road on
which water has collected, please bear in
mind that:
Rin the case of standing water, the water
level may be no higher than the lower edge of the vehicle body
Ryou should drive no faster than at a walking
pace
Winter driving
GWARNING
If you shift down on a slippery road surface in an attempt to increase the engine's braking
effect, the drive wheels could lose their grip.
There is an increased danger of skidding and
accidents.
Do not shift down for additional engine brak-
ing on a slippery road surface.
GDANGER
If the exhaust pipe is blocked or adequate
ventilation is not possible, poisonous gases
such as carbon monoxide (CO) may enter the vehicle. This is the case, e.g. if the vehicle
becomes trapped in snow. There is a risk of
fatal injury.
If you leave the engine or the auxiliary heating
running, make sure the exhaust pipe and area
around the vehicle are clear of snow. To
ensure an adequate supply of fresh air, open a
window on the side of the vehicle that is not
facing into the wind.
Have your vehicle winter-proofed at a quali-
fied specialist workshop at the onset of win-
ter.
180Driving tips
Driving an d parking