trailer MERCEDES-BENZ GLC COUPE 2016 User Guide
[x] Cancel search | Manufacturer: MERCEDES-BENZ, Model Year: 2016, Model line: GLC COUPE, Model: MERCEDES-BENZ GLC COUPE 2016Pages: 389, PDF Size: 7.34 MB
Page 25 of 389
Transmission oil (on-board com-
puter, Mercedes-AMG vehicles) ..... 245
TEMPOMAT
Function/notes ............................. 174
Text messages
Telephone module with Blue-
tooth ®
(SAP profile) ....................... 302
Timing (RACETIMER) .........................247
TIREFIT Kit
Declaration of conformity ................ 29
Important safety notes .................. 342
Storage location ............................ 340
Tyre pressure not reached ............. 344
Tyre pressure reached ................... 344
Using ............................................. 343
Top Tether ............................................ 59
Total distance recorder .................... 232
Touchpad
Changing the station/music
track .............................................. 295
Character suggestions ................... 294
Deleting characters ....................... 294
Entering a space ............................ 294
Entering characters ....................... 294
Gesture control .............................. 294
Handwriting recognition ................ 294
Operating the touchpad ................. 294
Overview ........................................ 293
Quick access for audio .................. 295
Switching ....................................... 293
Switching input line ....................... 294
Tow-away protection
Deactivating ..................................... 80
Function .......................................... .80
Priming/deactivating ....................... 80
Tow-starting
Emergency engine starting ............ 353
Important safety notes .................. 350
Towing
Important safety notes .................. 350
Notes for 4MATIC vehicles ............ 353
Transporting the vehicle ................3 53
Towing a trailer
Active Blind Spot Assist ................. 215
Active Lane Keeping Assist ............ 218
Active Parking Assist ..................... 194
Axle load, permissible .................... 381 ESP
®
(Electronic Stability Pro-
gram) ............................................... 76
Failure check for LEDs ................... 223
Pulling away with a trailer .............. 147
Swinging out the ball coupling ....... 220
Trailer tow hitch display message .. 277
Towing away
Fitting the towing eye .................... 352
Removing the towing eye ............... 352
With both axles on the ground ....... 353
Towing eye ......................................... 340
Traffic Sign Assist
Activating/deactivating the warn-ing function .................................... 241
Display message ............................ 269
Function/note s............................. 208
Important safety notes .................. 209
Instrument cluster display ............. 209
Trailer coupling
see Towing a trailer
Trailer towing
7-pin connecto r............................. 223
Blind Spot Assist ............................ 211
Cleaning the trailer tow hitch ......... 336
Coupling up a traile r...................... 222
Decoupling a trailer ....................... 222
Driving tip s.................................... 219
Important safety notes .................. 218
Lights display message .................. 261
Parktronic ...................................... 191
Power supply ................................. 222
Problem (fault) ............................... 224
Trailer load s................................... 380
Transfer case ..................................... 161
Transmission
see Automatic transmission
Transmission position display ......... 155
Transporting the vehicle .................. 353
Trim pieces (cleaning instruc-
tions) .................................................. 336
Trip computer (on-board com-
puter) .................................................. 233
Trip meter
Calling up ....................................... 232
Resetting (on-board computer) ...... 234
Turn signals
Replacing bulbs (front) ................... 123 22
Index
Page 59 of 389
Using the radar sensor system, PRE-SAFE
®
PLUS is able to detect that a head-on or rear-end
collision is imminent. In certain hazardous sit-
uations, PRE-SAFE ®
PLUS takes pre-emptive
measures to protect the vehicle occupants.
Important safety notes The intervention of PRE-SAFE
®
PLUS cannot
prevent an imminent collision.
The driver is not warned before the intervention
of PRE-SAFE ®
PLUS.
PRE-SAFE ®
PLUS does not intervene:
R if the vehicle is reversing
R when the vehicle is towing a trailer and there
is a risk of a rear-end collision
When driving, or when parking or exiting a park- ing space with assistance from Active Parking
Assist, PRE-SAFE ®
PLUS will not apply the
brakes.
Function PRE-SAFE
®
PLUS intervenes in certain situa-
tions if the radar sensor system detects an
imminent head-on or rear-end collision.
PRE-SAFE ®
PLUS takes the following measures
depending on the hazardous situation detected:
R if the radar sensor system detects that a
head-on collision is imminent, the seat belts
are pre-tensioned
R if the radar sensor system detects that a rear-
end collision is imminent:
- the rear hazard warning lamps are activa-
ted and flash at a higher frequency
- the brake pressure is increased if the driver
applies the brakes when the vehicle is sta-
tionary
- the seat belts are pre-tensioned
The PRE-SAFE ®
PLUS braking application is can-
celled:
R if the accelerator pedal is depressed when a
gear is engaged
R if the risk of a collision passes or is no longer
detected
R if DISTRONIC PLUS indicates an intention to
pull away
If the hazardous situation passes without result- ing in an accident, the original settings are
restored. Automatic measures after an acci-
dent
Immediately after an accident, the following
measures are implemented, depending on the
type and severity of the impact:
R the hazard lamps are switched on
R the emergency lighting is switched on
R the vehicle doors are unlocked
R the front side windows are lowered
R vehicles with the memory function: the elec-
trically adjustable steering wheel is raised
R the engine is switched off and the fuel supply
is cut off
R vehicles with the Mercedes-Benz emergency
call system: automatic emergency call Children in the vehicle
Important safety notes
Accident statistics show that children secured
in the rear seats are safer than children secured in the front-passenger seat. For this reason,
Mercedes-Benz strongly advises that you install
a child restraint system on a rear seat. Children are generally better protected there.
If a child younger than twelve years old and
under 1.50 min height is travelling in the vehi-
cle:
R always secure the child in a child restraint
system suitable for Mercedes-Benz vehicles.
The child restraint system must be appropri-
ate to the age, weight and size of the child.
R be sure to observe the instructions and safety
notes in this section in addition to the child
restraint system manufacturer's installation
instructions.
R be sure to observe the instructions and safety
notes on the automatic front-passenger front airbag deactivation system (Y page 49).56
Children in the vehicleSafety
Page 79 of 389
X
To activate ESP ®
:briefly press button :.
The å ESP®
OFF warning lamp on the
instrument cluster goes out. The ÷ON
ON
message appears on the multifunction dis-
play.
Characteristics when SPORT handling
mode is activated
If SPORT handling mode is activated and one or
more wheels start to spin, the ÷ESP®
warn-
ing lamp on the instrument cluster flashes. In
such situations, ESP ®
will stabilise the vehicle
only to a limited degree.
When SPORT handling mode is activated:
R ESP ®
improves driving stability only to a limi-
ted degree
R traction control is still activated
R engine torque is no longer limited and the
drive wheels may start to spin
R ESP ®
still provides support when you brake
firmly.
Characteristics when ESP ®
is deactivated
If ESP ®
is deactivated and one or more wheels
start to spin, the ÷ESP®
warning lamp on
the instrument cluster does not flash. In such
situations, ESP ®
will not stabilise the vehicle.
If you deactivate ESP ®
:
R ESP ®
no longer improves driving stability
R engine torque is no longer limited and the
drive wheels may start to spin
R traction control is still activated
R COLLISION PREVENTION ASSIST is no longer
available; it is not activated even if you brake
firmly with assistance from ESP ®
R PRE-SAFE ®
is no longer available; it is not
activated even if you brake firmly with assis-
tance from ESP ®
R PRE-SAFE ®
Brake is no longer available; it is
not activated even if the brakes are firmly
applied with assistance from ESP ®
R ESP ®
still provides support when you brake
firmly. ESP
®
trailer stabilisation General information
If your vehicle/trailer combination begins to
lurch, ESP ®
assists you in this situation. ESP ®
slows the vehicle down by braking and limiting
the engine output until the vehicle/trailer com- bination has stabilised.
Important safety notes G
WARNING
If road and weather conditions are poor,
trailer stabilisation will not be able to prevent the vehicle/trailer combination from swerv-
ing. Trailers with a high centre of gravity can
tip over before ESP ®
can detect this. There is
a risk of an accident.
Always adapt your driving style to the prevail-
ing road and weather conditions.
If your vehicle/trailer combination begins to
lurch, you can stabilise the vehicle/trailer com-
bination only by depressing the brake firmly.
ESP ®
trailer stabilisation is active above speeds
of approximately 65 km/h.
ESP ®
trailer stabilisation does not work if ESP ®
is deactivated or disabled because of a malfunc- tion.
Crosswind Assist General notes
Strong crosswind gusts can impair the ability of your vehicle to drive straight ahead. The cross-
wind driving assistance function integrated in
ESP ®
noticeably reduces these impairments.
Depending on the direction and intensity of the
side wind, ESP ®
is activated automatically.
ESP ®
engages with a stabilising application of
the brakes to assist you in keeping the vehicle in the lane.
Crosswind Assist is active at vehicle speeds
above 80 km/h when the vehicle is driving
straight ahead or cornering gently.
Important safety notes
Crosswind Assist does not work if ESP ®
is deac-
tivated or disabled because of a malfunction. 76
Driving safety systemsSafety
Page 96 of 389
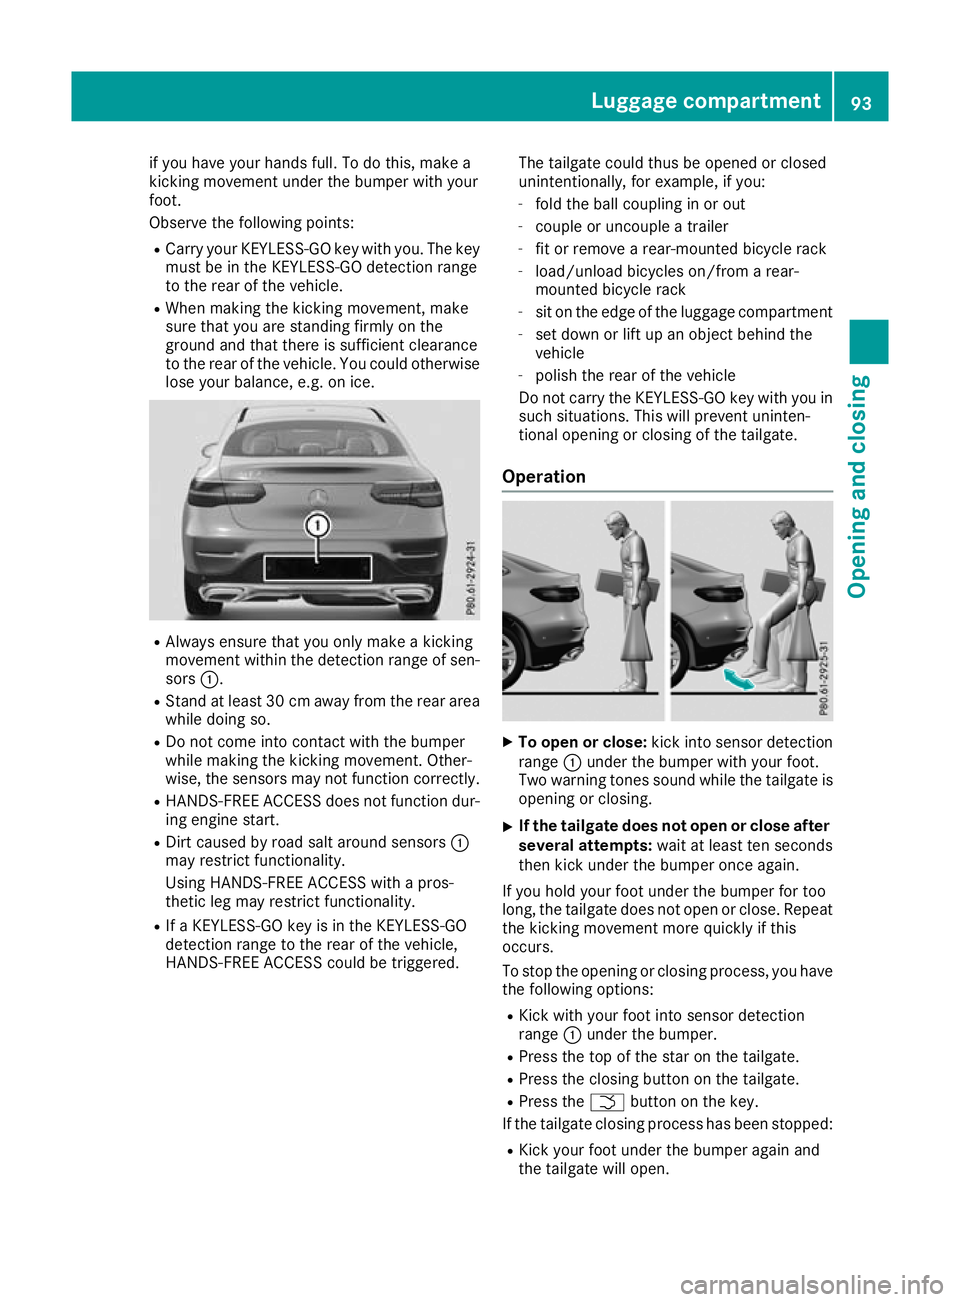
if you have your hands full. To do this, make a
kicking movement under the bumper with your
foot.
Observe the following points:
R Carry your KEYLESS-GO key with you. The key
must be in the KEYLESS-GO detection range
to the rear of the vehicle.
R When making the kicking movement, make
sure that you are standing firmly on the
ground and that there is sufficient clearance
to the rear of the vehicle. You could otherwise lose your balance, e.g. on ice. R
Always ensure that you only make a kicking
movement within the detection range of sen- sors :.
R Stand at least 30 cm away from the rear area
while doing so.
R Do not come into contact with the bumper
while making the kicking movement. Other-
wise, the sensors may not function correctly.
R HANDS-FREE ACCESS does not function dur-
ing engine start.
R Dirt caused by road salt around sensors :
may restrict functionality.
Using HANDS-FREE ACCESS with a pros-
thetic leg may restrict functionality.
R If a KEYLESS-GO key is in the KEYLESS-GO
detection range to the rear of the vehicle,
HANDS-FREE ACCESS could be triggered. The tailgate could thus be opened or closed
unintentionally, for example, if you:
- fold the ball coupling in or out
- couple or uncouple a trailer
- fit or remove a rear-mounted bicycle rack
- load/unload bicycles on/from a rear-
mounted bicycle rack
- sit on the edge of the luggage compartment
- set down or lift up an object behind the
vehicle
- polish the rear of the vehicle
Do not carry the KEYLESS-GO key with you in such situations. This will prevent uninten-
tional opening or closing of the tailgate.
Operation X
To open or close: kick into sensor detection
range :under the bumper with your foot.
Two warning tones sound while the tailgate is opening or closing.
X If the tailgate does not open or close after
several attempts: wait at least ten seconds
then kick under the bumper once again.
If you hold your foot under the bumper for too
long, the tailgate does not open or close. Repeat
the kicking movement more quickly if this
occurs.
To stop the opening or closing process, you have the following options:
R Kick with your foot into sensor detection
range :under the bumper.
R Press the top of the star on the tailgate.
R Press the closing button on the tailgate.
R Press the Fbutton on the key.
If the tailgate closing process has been stopped:
R Kick your foot under the bumper again and
the tailgate will open. Luggage compartment
93Opening and closing Z
Page 120 of 389
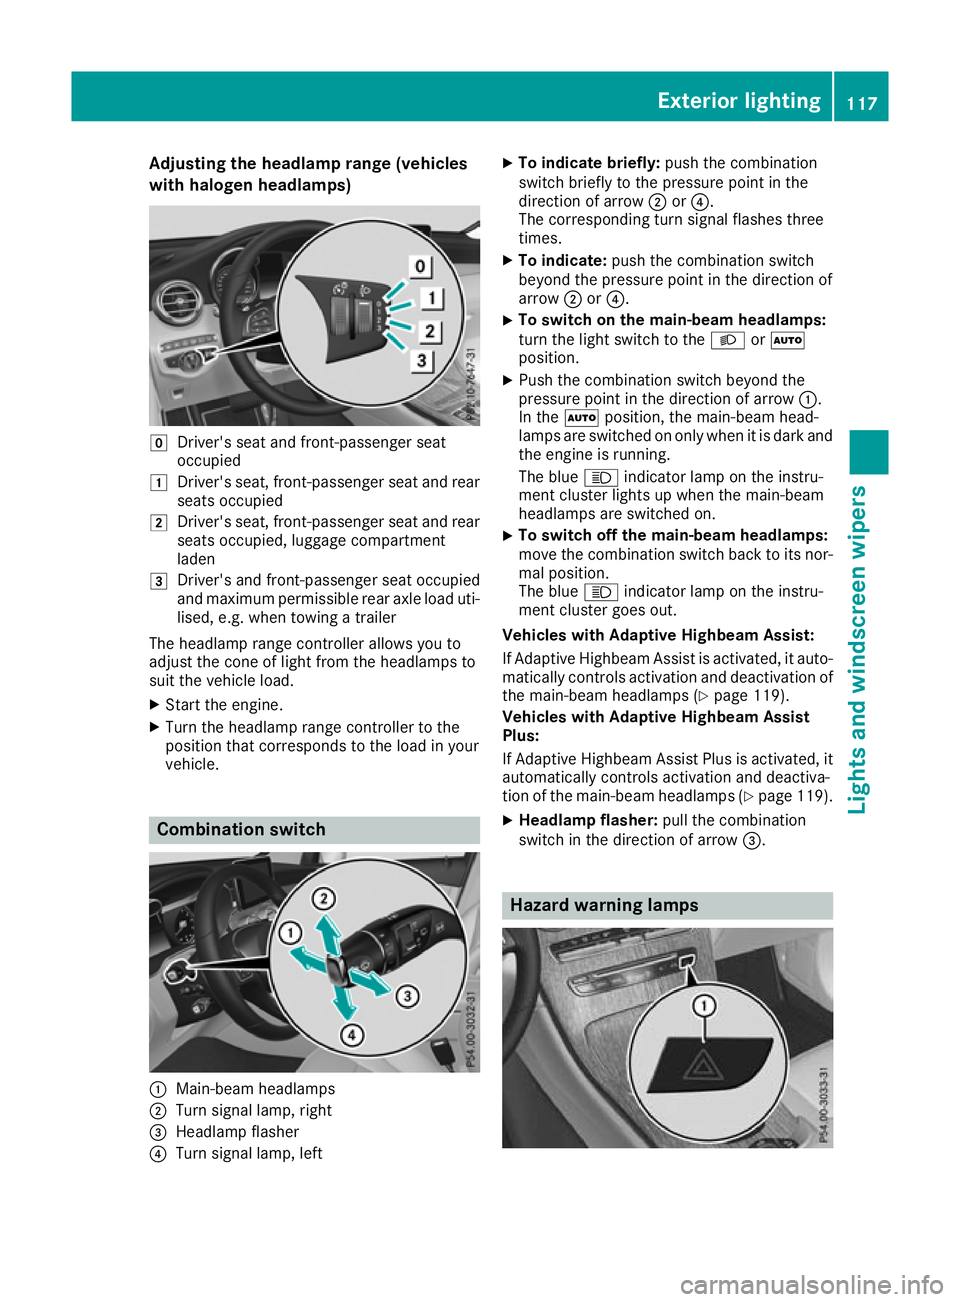
Adjusting the headlamp range (vehicles
with halogen headlamps) g
Driver's seat and front-passenger seat
occupied
1 Driver's seat, front-passenger seat and rear
seats occupied
2 Driver's seat, front-passenger seat and rear
seats occupied, luggage compartment
laden
3 Driver's and front-passenger seat occupied
and maximum permissible rear axle load uti-
lised, e.g. when towing a trailer
The headlamp range controller allows you to
adjust the cone of light from the headlamps to
suit the vehicle load.
X Start the engine.
X Turn the headlamp range controller to the
position that corresponds to the load in your
vehicle. Combination switch
:
Main-beam headlamps
; Turn signal lamp, right
= Headlamp flasher
? Turn signal lamp, left X
To indicate briefly: push the combination
switch briefly to the pressure point in the
direction of arrow ;or?.
The corresponding turn signal flashes three
times.
X To indicate: push the combination switch
beyond the pressure point in the direction of
arrow ;or?.
X To switch on the main-beam headlamps:
turn the light switch to the LorÃ
position.
X Push the combination switch beyond the
pressure point in the direction of arrow :.
In the Ãposition, the main-beam head-
lamps are switched on only when it is dark and
the engine is running.
The blue Kindicator lamp on the instru-
ment cluster lights up when the main-beam
headlamps are switched on.
X To switch off the main-beam headlamps:
move the combination switch back to its nor- mal position.
The blue Kindicator lamp on the instru-
ment cluster goes out.
Vehicles with Adaptive Highbeam Assist:
If Adaptive Highbeam Assist is activated, it auto- matically controls activation and deactivation of
the main-beam headlamps (Y page 119).
Vehicles with Adaptive Highbeam Assist
Plus:
If Adaptive Highbeam Assist Plus is activated, it
automatically controls activation and deactiva-
tion of the main-beam headlamps (Y page 119).
X Headlamp flasher: pull the combination
switch in the direction of arrow =. Hazard warning lamps Exterior lighting
117Lights and windscreen wipers Z
Page 150 of 389
The vehicle automatically locks centrally once
you have pulled away. The locking knobs in the
doors drop down.
You can open the doors from the inside at any
time.
You can also deactivate the automatic door
locking system; see the Digital Owner's Manual.
It is possible to shift the transmission from posi-
tion jto the desired position only if you
depress the brake pedal. Only then is the park-
ing lock released. If you do not depress the
brake pedal, the DIRECT SELECT lever can still
be moved but the parking lock remains
engaged.
i Upshifts take place at higher engine speeds
after a cold start. This helps the catalytic con-
verter to reach its operating temperature
more quickly.
Information on automatically releasing the elec-
trical parking brake (Y page 169).
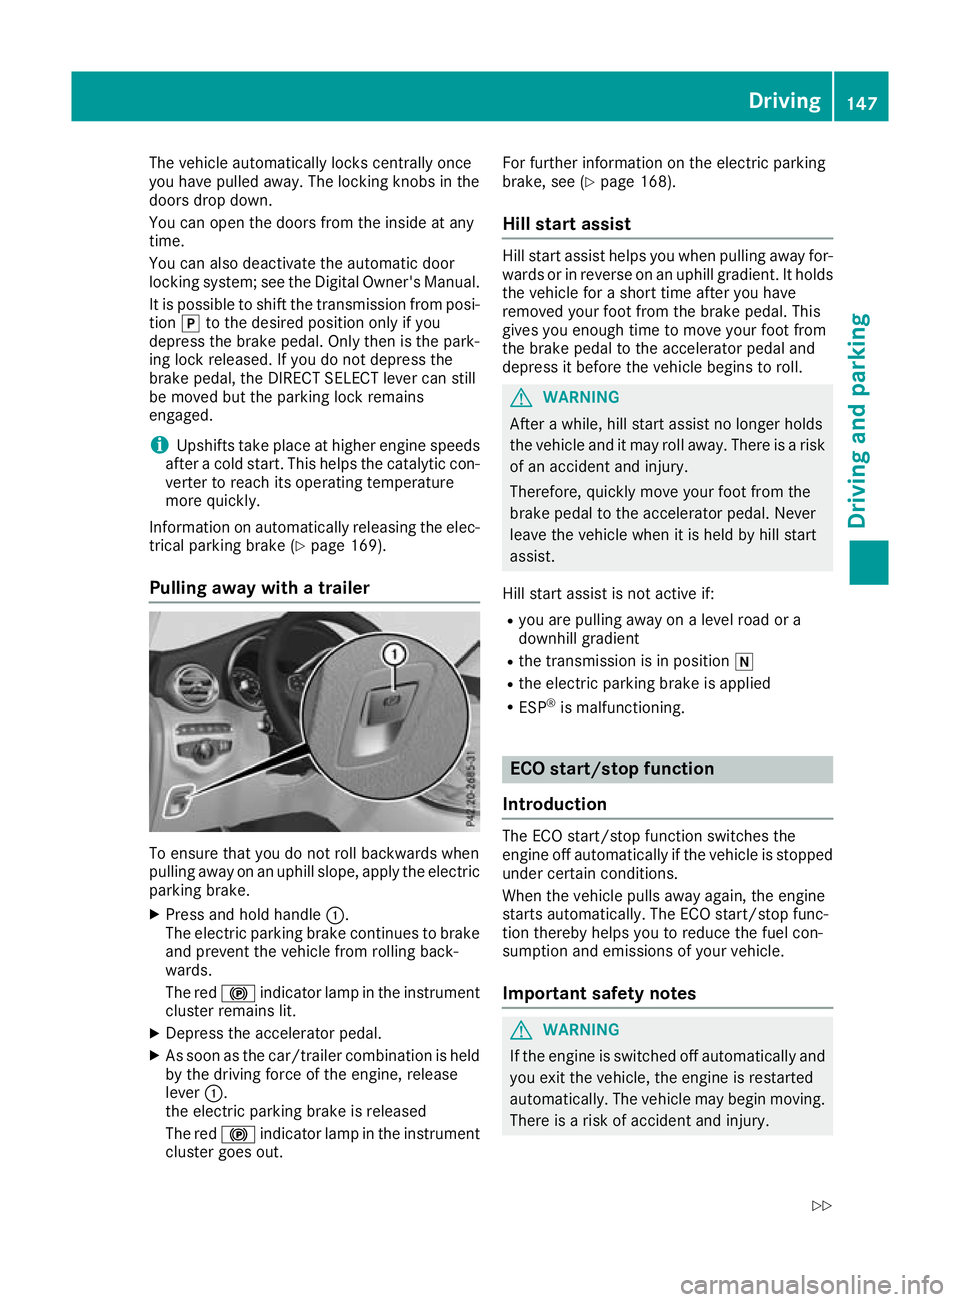
Pulling away with a trailer To ensure that you do not roll backwards when
pulling away on an uphill slope, apply the electric
parking brake.
X Press and hold handle :.
The electric parking brake continues to brake
and prevent the vehicle from rolling back-
wards.
The red !indicator lamp in the instrument
cluster remains lit.
X Depress the accelerator pedal.
X As soon as the car/trailer combination is held
by the driving force of the engine, release
lever :.
the electric parking brake is released
The red !indicator lamp in the instrument
cluster goes out. For further information on the electric parking
brake, see (Y
page 168).
Hill start assist Hill start assist helps you when pulling away for-
wards or in reverse on an uphill gradient. It holds the vehicle for a short time after you have
removed your foot from the brake pedal. This
gives you enough time to move your foot from
the brake pedal to the accelerator pedal and
depress it before the vehicle begins to roll. G
WARNING
After a while, hill start assist no longer holds
the vehicle and it may roll away. There is a risk of an accident and injury.
Therefore, quickly move your foot from the
brake pedal to the accelerator pedal. Never
leave the vehicle when it is held by hill start
assist.
Hill start assist is not active if:
R you are pulling away on a level road or a
downhill gradient
R the transmission is in position i
R the electric parking brake is applied
R ESP ®
is malfunctioning. ECO start/stop function
Introduction The ECO start/stop function switches the
engine off automatically if the vehicle is stopped
under certain conditions.
When the vehicle pulls away again, the engine
starts automatically. The ECO start/stop func-
tion thereby helps you to reduce the fuel con-
sumption and emissions of your vehicle.
Important safety notes G
WARNING
If the engine is switched off automatically and you exit the vehicle, the engine is restarted
automatically. The vehicle may begin moving. There is a risk of accident and injury. Driving
147Driving and parking
Z
Page 160 of 389
reactions and is conducive to a sporty driving
style. The sound generated by the double-clutch
function depends on the drive program.
Kickdown Use kickdown for maximum acceleration:
X Depress the accelerator pedal beyond the
pressure point.
The automatic transmission shifts to a lower
gear depending on the engine speed.
X Ease off the accelerator pedal once the
desired speed is reached.
The automatic transmission shifts back up.
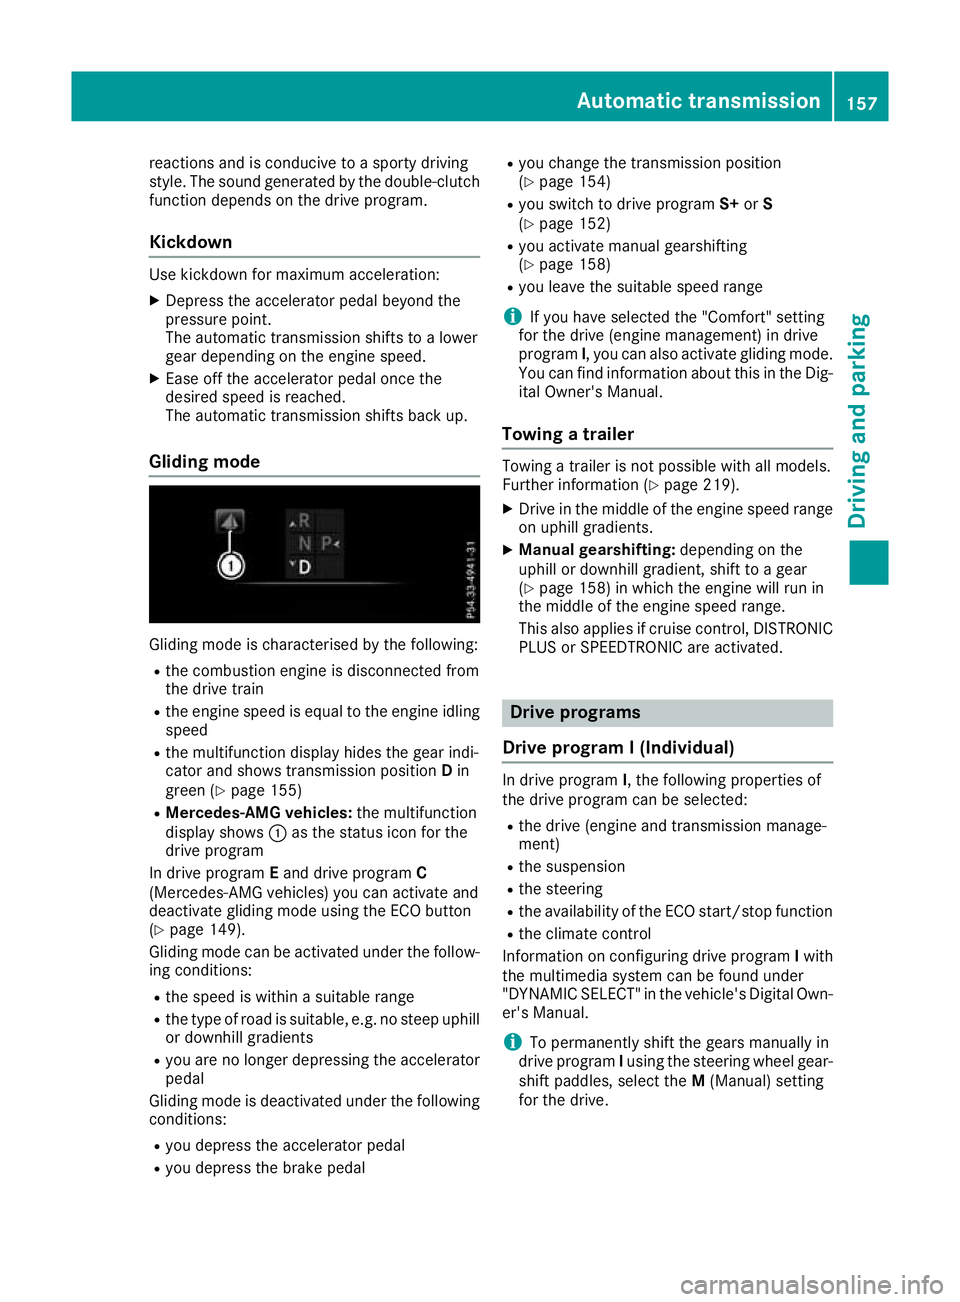
Gliding mode Gliding mode is characterised by the following:
R the combustion engine is disconnected from
the drive train
R the engine speed is equal to the engine idling
speed
R the multifunction display hides the gear indi-
cator and shows transmission position Din
green (Y page 155)
R Mercedes-AMG vehicles: the multifunction
display shows :as the status icon for the
drive program
In drive program Eand drive program C
(Mercedes-AMG vehicles) you can activate and
deactivate gliding mode using the ECO button
(Y page 149).
Gliding mode can be activated under the follow-
ing conditions:
R the speed is within a suitable range
R the type of road is suitable, e.g. no steep uphill
or downhill gradients
R you are no longer depressing the accelerator
pedal
Gliding mode is deactivated under the following
conditions:
R you depress the accelerator pedal
R you depress the brake pedal R
you change the transmission position
(Y page 154)
R you switch to drive program S+orS
(Y page 152)
R you activate manual gearshifting
(Y page 158)
R you leave the suitable speed range
i If you have selected the "Comfort" setting
for the drive (engine management) in drive
program I, you can also activate gliding mode.
You can find information about this in the Dig- ital Owner's Manual.
Towing a trailer Towing a trailer is not possible with all models.
Further information (Y
page 219).
X Drive in the middle of the engine speed range
on uphill gradients.
X Manual gearshifting: depending on the
uphill or downhill gradient, shift to a gear
(Y page 158) in which the engine will run in
the middle of the engine speed range.
This also applies if cruise control, DISTRONIC PLUS or SPEEDTRONIC are activated. Drive programs
Drive program I (Individual) In drive program
I, the following properties of
the drive program can be selected:
R the drive (engine and transmission manage-
ment)
R the suspension
R the steering
R the availability of the ECO start/stop function
R the climate control
Information on configuring drive program Iwith
the multimedia system can be found under
"DYNAMIC SELECT" in the vehicle's Digital Own- er's Manual.
i To permanently shift the gears manually in
drive program Iusing the steering wheel gear-
shift paddles, select the M(Manual) setting
for the drive. Automatic transmission
157Driving and parking Z
Page 175 of 389
Downhill gradients
Change into a lower gear in good time on long
and steep downhill gradients. Take particular
note of this when driving a laden vehicle and
when towing a trailer.
This also applies if cruise control, DISTRONIC
PLUS or SPEEDTRONIC is activated.
This will use the braking effect of the engine, so
less braking will be required to maintain vehicle
speed. This relieves the load on the brake sys-
tem and prevents the brakes from overheating
and wearing too quickly.
Heavy and light loads G
WARNING
The braking system can overheat if you leave your foot on the brake pedal while driving.
This increases the braking distance and could
even cause the braking system to fail. There is
a risk of an accident.
Never use the brake pedal as a footrest. Do
not simultaneously depress both the brake
pedal and the accelerator pedal while driving.
! Depressing the brake pedal constantly
results in excessive and premature wear to
the brake pads.
If heavy demands are made on the brakes, do
not park the vehicle immediately. Drive on for a
short while. This allows the airflow to cool the
brakes more quickly.
If the brakes have been used only moderately,
you should occasionally test their effectiveness.
To do this, brake more firmly from a higher
speed while paying attention to the traffic con-
ditions. This improves the grip of the brakes.
Wet road surfaces If you have driven for a long time in heavy rain
without braking, there may be a delayed reac-
tion from the brakes when braking for the first
time. This may also occur after a car wash or
after driving through deep water.
You will have to depress the brake pedal more
firmly. Maintain a greater distance to the vehicle in front.
After driving on a wet road or having the vehicle
washed, brake firmly while paying attention to
the traffic conditions. This will warm up the brake discs, thereby drying them more quickly
and protecting them against corrosion.
Limited braking performance on salt-
treated roads If you drive on salt-treated roads, a layer of salt
may form on the brake discs and pads. This can
increase the braking distance considerably.
R In order to prevent any salt build-up, apply the
brakes occasionally while paying attention to
the traffic conditions.
R Carefully depress the brake pedal at the end
of the journey and when starting the next
journey.
R Maintain a much greater distance to the vehi-
cle in front.
New brake discs and brake pads/
linings Brake pads/linings and discs that are either new
or have been replaced achieve optimum braking
effect only after several hundred kilometres of
driving. Compensate for the reduced braking
effect by applying greater force to the brake
pedal.
For safety reasons, Mercedes-Benz recom-
mends only fitting the following brake discs and brake pads/linings:
R brake discs that have been approved by
Mercedes-Benz
R brake pads/linings that have been approved
by Mercedes-Benz or that are of an equivalent
standard of quality
Other brake discs or brake pads/linings can
compromise the safety of your vehicle.
Always replace all brake discs and brake pads/
linings on an axle at the same time. Always fit
new brake pads/linings when replacing brake
discs.
The vehicle is equipped with lightweight brake
discs to which the wheel assembly with rim and threaded connection is matched.
The use of brake discs other than those
approved by Mercedes-Benz may alter track
width and is subject to approval, if applicable.
Shock-type loads when handling the brake
discs, such as when changing wheels, can lead
to a reduction in comfort when driving with light-
weight brake discs. Avoid shock-type loads on 172
Driving tipsDriving and pa
rking
Page 177 of 389
Driving systems
Mercedes-Benz Intelligent Drive
Mercedes-Benz Intelligent Drive stands for inno- vative driver assistance and safety systems
which enhance comfort and support the driver in
critical situations. With these intelligent co-ordi- nated systems Mercedes-Benz has set a mile-
stone on the path towards autonomous driving.
Mercedes-Benz Intelligent Drive embraces all
elements of active and passive safety in one well thought-out system – for the safety of the vehi-
cle occupants and that of other road users.
Further information on driving safety systems
(Y page 68). Cruise control
General notes Cruise control maintains a constant road speed
for you. It brakes automatically in order to avoid
exceeding the set speed. Shift to a lower gear in
good time on long and steep downhill gradients.
Take particular note of this when driving a laden vehicle and when towing a trailer. By doing so,
you will make use of the braking effect of the
engine. This relieves the load on the brake sys-
tem and prevents the brakes from overheating
and wearing too quickly.
Use cruise control only if road and traffic con-
ditions are appropriate for maintaining a steady speed for a prolonged period. You can store anyroad speed above 30 km/h. If you have set a
permanent limit speed, you cannot set the
speed any higher than the fixed limit speed
(Y page 177).
Important safety notes Cruise control can neither reduce the risk of an
accident if you fail to adapt your driving style nor
override the laws of physics. Cruise control can- not take into account road, weather or traffic
conditions. Cruise control is only an aid. You are
responsible for maintaining a safe distance from the vehicle in front, for vehicle speed, for brak-
ing in good time and for staying in lane. Do not use cruise control:
R in road and traffic conditions that do not allow
you to maintain a constant speed, e.g. in
heavy traffic or on winding roads.
R on smooth or slippery roads. Braking or accel-
erating can cause the drive wheels to lose
traction and the vehicle could then skid.
R when there is poor visibility, e.g. due to fog,
heavy rain or snow.
If there is a change of drivers, advise the new
driver of the speed stored.
i The speed indicated in the speedometer
may differ slightly from the speed stored.
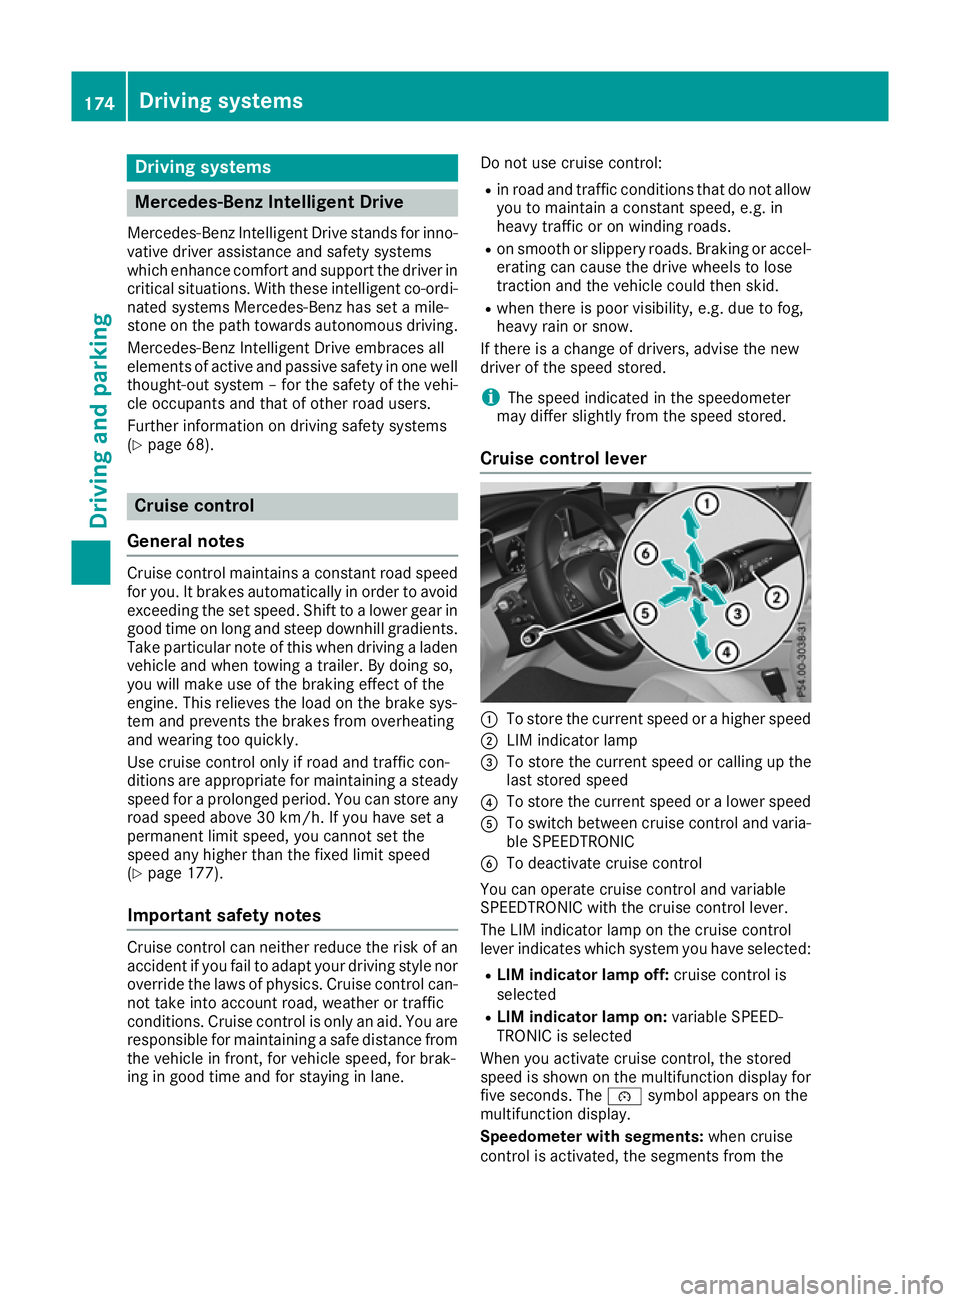
Cruise control lever :
To store the current speed or a higher speed
; LIM indicator lamp
= To store the current speed or calling up the
last stored speed
? To store the current speed or a lower speed
A To switch between cruise control and varia-
ble SPEEDTRONIC
B To deactivate cruise control
You can operate cruise control and variable
SPEEDTRONIC with the cruise control lever.
The LIM indicator lamp on the cruise control
lever indicates which system you have selected:
R LIM indicator lamp off: cruise control is
selected
R LIM indicator lamp on: variable SPEED-
TRONIC is selected
When you activate cruise control, the stored
speed is shown on the multifunction display for five seconds. The ésymbol appears on the
multifunction display.
Speedometer with segments: when cruise
control is activated, the segments from the 174
Driving syste
msDriving and parking
Page 179 of 389
If cruise control is deactivated, a warning tone
sounds. You will see the Cruise control off
Cruise control off
message on the multifunction display for
approximately five seconds. The message on
the multifunction display disappears and the
segments on the speedometer go out.
i The last speed stored is cleared when you
switch off the engine. SPEEDTRONIC
General notes SPEEDTRONIC is used to set a speed limit for
your vehicle. If the vehicle speed exceeds the
set speed limit, SPEEDTRONIC brakes automat- ically. Shift to a lower gear in good time on long
and steep downhill gradients. Take particular
note of this when driving a laden vehicle and
when towing a trailer. By doing so, you will make use of the braking effect of the engine. This
relieves the load on the brake system and pre-
vents the brakes from overheating and wearing too quickly.
Important safety notes SPEEDTRONIC can neither reduce the risk of an
accident if you fail to adapt your driving style nor override the laws of physics. SPEEDTRONIC
cannot take into account road, weather or traffic
conditions. SPEEDTRONIC is only an aid. You
are responsible for maintaining a safe distance
from the vehicle in front, for vehicle speed, for
braking in good time and for staying in lane.
If there is a change of drivers, advise the new
driver of the speed stored.
You can set a variable or permanent limit speed:
R variable for speed limits, e.g. in built-up areas
R permanent for long-term speed restrictions,
e.g. when driving with winter tyres fitted
(Y page 177)
i The speed indicated in the speedometer
may differ slightly from the limit speed stored. Variable SPEEDTRONIC General notes
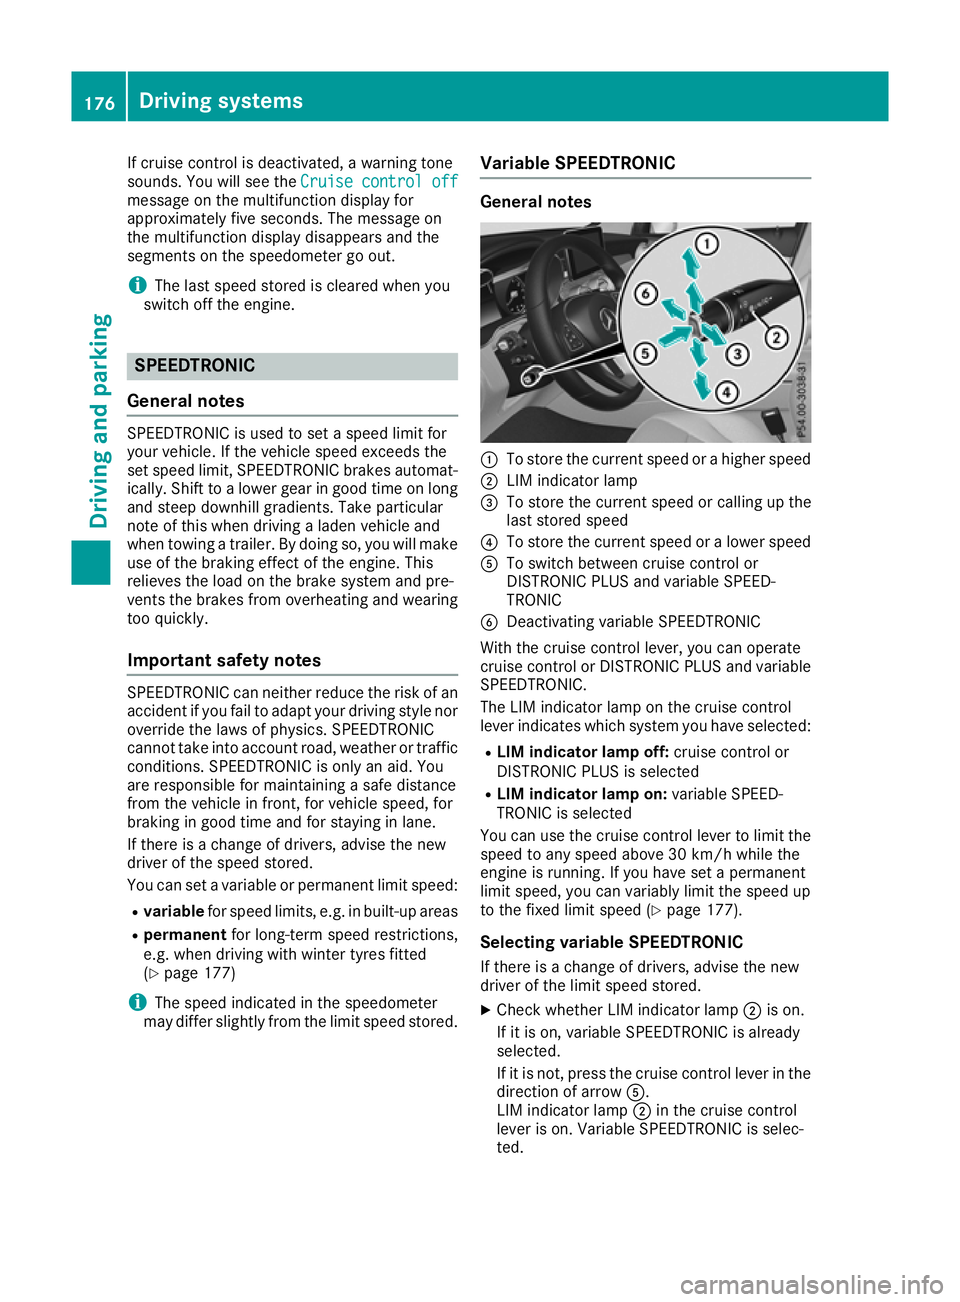
:
To store the current speed or a higher speed
; LIM indicator lamp
= To store the current speed or calling up the
last stored speed
? To store the current speed or a lower speed
A To switch between cruise control or
DISTRONIC PLUS and variable SPEED-
TRONIC
B Deactivating variable SPEEDTRONIC
With the cruise control lever, you can operate
cruise control or DISTRONIC PLUS and variable SPEEDTRONIC.
The LIM indicator lamp on the cruise control
lever indicates which system you have selected:
R LIM indicator lamp off: cruise control or
DISTRONIC PLUS is selected
R LIM indicator lamp on: variable SPEED-
TRONIC is selected
You can use the cruise control lever to limit the speed to any speed above 30 km/h while the
engine is running. If you have set a permanent
limit speed, you can variably limit the speed up
to the fixed limit speed (Y page 177).
Selecting variable SPEEDTRONIC
If there is a change of drivers, advise the new
driver of the limit speed stored. X Check whether LIM indicator lamp ;is on.
If it is on, variable SPEEDTRONIC is already
selected.
If it is not, press the cruise control lever in the direction of arrow A.
LIM indicator lamp ;in the cruise control
lever is on. Variable SPEEDTRONIC is selec-
ted. 176
Driving systemsDriving and parking